
Other Actions in Quotes
Edit a Quote
To edit a quote:
- Log in to your Zoho Books organisation.
- Go to Sales on the left sidebar, and select Quotes.
- Select the quote you want to edit.
- In the Details page, click Edit at the top.
- In the Edit Quote page, make the necessary changes.
- Click Save to save the quote, or Save and Send to send it to the customer.
Insert Headers as Line Items
You can insert headers to group related line items in your quote. When you have many line items, headers break the list into clear sections so your customers can scan the quote more easily. For example, you can add a header such as Maintenance Services, Hardware Items, or a project name and group the related line items under it. You can also insert multiple headers to your quote.
To insert a header row in your quote:
- Go to Sales in the left sidebar and select Quotes.
- Click + New in the top right corner to create a quote, or select an existing quote and click Edit to modify an existing one.
- In the Item Table, click the More icon next to the required line item, and select Insert New Header. Alternatively, you can click the dropdown next to + New Row below the Item Table and select New Header.
- Type the title for the header.
- Fill in the required fields and click Save.
The header will be added as a row and the line items below it will remain unchanged. To remove a header, click the Remove icon to the right of it.
Insight: Removing a header does not remove the line items below it.
Insert Subtotals as Line Items
A subtotal row displays the total of the line items above it in your quote. It includes all line items between the previous subtotal and the current subtotal, or all line items from the beginning of the quote if no previous subtotal exists. It is calculated automatically and updates whenever line items are added, edited, or removed. For example, you can add a subtotal for a group of hardware items or a project. You can add multiple subtotals to a quote.
To insert a subtotal row in your quote:
- Go to Sales in the left sidebar and select Quotes.
- Click + New in the top right corner to create a quote, or select an existing quote and click Edit to modify an existing one.
- In the Item Table, click the More icon next to the required line item, and select Insert New Subtotal. Alternatively, you can click the dropdown next to + New Row below the Item Table and select New Subtotal.
- The subtotal row will be inserted.
- Fill in the required fields and click Save.
The subtotal will be added as a row and the line items below it will remain unchanged. To remove a subtotal, click the Remove icon to the right of it.
Insight: Removing a subtotal does not remove the line items below it. The line items remain in the quote and are included in the final total.
Clone a Quote
If you need a new quote with the same details, you can clone the existing one. Here’s how:
- Log in to your Zoho Books organisation.
- Go to Sales on the left sidebar, and select Quotes.
- Select the quote you want to clone.
- In the Details page, click the More icon and select Clone from the dropdown.
- You’ll be redirected to the New Quote page with all the cloned details of the selected quote. Review and customise the details as needed.
- Click Save to save the quote, or Save and Send to save and send the cloned quote to the customer.
The existing quote will be cloned into a new one with the same details.
Export Quotes
If you need to back up your data or migrate to another accounting system, you can export the quotes from Zoho Books. Here’s how:
- Log in to your Zoho Books organisation.
- Go to Sales on the left sidebar, and select Quotes.
- Click the More icon in the top right corner and select Export Quotes from the dropdown.
- In the Export popup, fill in the following fields:
- Select Module: By default, the module will be Quotes.
- Select Status: Select the status of the quote you want to export. By default, All will be preselected.
- Export Template: Select a template from the dropdown to export the file with your chosen fields. To create a new template, click + New Template from the dropdown.
- Decimal Format: Select how the currency should be displayed.
- Export File Format: Choose the export format (CSV, XLS, or XLSX).
- Include Sensitive Personally Identifiable Information (PII) while exporting: Check this option if you want to include sensitive quote details, such as any custom fields, in the export.
- File Protection Password: Enter a password if you want to lock the file.
- Click Export.
Now, the file will be downloaded onto your device, containing the quotes with your selected preferences.
Export Current View of Quotes
note: You can export a maximum of 10,000 rows. If you have more rows, initiate a backup for your Zoho Books data and download it. Learn more about how to back up your data.
You can export the quotes in the same order as they appear on the Quotes List View page by exporting the current view of quotes. Here’s how:
- Log in to your Zoho Books organisation.
- Go to Sales on the left sidebar, and select Quotes.
- In the List View page, click the More icon in the top right corner, and select Export Current View from the dropdown.
- In the Export Current View popup, fill in the following fields:
- Decimal Format: Select how the currency in the bills should be displayed.
- Export File Format: Choose the export format (CSV, XLS, or XLSX).
- File Protection Password: Enter a password if you want to lock the file.
- Click Export.
Now, the file will be downloaded onto your device, containing the quotes in the same order as they appear on the List View page in Zoho Books.
Resize Columns in the Quotes List View Page
To resize columns in the Quotes List View page:
- Log in to your Zoho Books organisation.
- Go to Sales on the left sidebar, and select Quotes.
- In the List View page, hover over a column border, then drag it to make the column wider or narrower.
- Click Save in the top left corner to apply the changes.
Your customised column width will now be saved.
Insight: To reset the column width, go to Sales > Quotes > click the More icon in the top right corner, and select Reset Column Width from the dropdown.
Customize List View Page Columns
To customise the columns in the Quotes List View page:
- Log in to your Zoho Books organisation.
- Go to Sales on the left sidebar, and select Quotes.
- In the List View page, click the Customise dropdown in the top left corner, and select Customise Columns.
- In the Customise Columns popup, select the columns you want to display.
- Click Save.
Now, the selected columns will be shown in the List View page.
Insight:Columns with the Permanent Lock icon are mandatory columns and cannot be unchecked.
Refresh Quotes List
If you experience issues like an unrecorded transaction status or customised columns not appearing, refresh the quote list. To refresh the list:
- Log in to your Zoho Books organisation.
- Go to Sales on the left sidebar, and select Quotes.
- In the List View page, click the More icon in the top right corner, and select Refresh List from the dropdown.
Now, the page will be refreshed.
Create a Project From the Quote for the Customer
To create a project for the customer based on the quote you created for them:
- Log in to your Zoho Books organisation.
- Go to Sales on the left sidebar, and select Quotes.
- Select the quote which you want to use to create a project for a customer.
- In the Details page, click the More icon at the top, and select Create Project from the dropdown.
- You will be redirected to the New Project page, where the Customer Name and Project Tasks will auto populate based on the Customer’s Details and Services included in the quote.
- After filling in the other necessary details, click Save.
Now, a project will be created from the quote for the selected customer, adding the services listed in the quote as tasks in the project. Once you mark these tasks as Billable, you can invoice the customer for each task.
Create a Retainer Invoice From a Quote
If your customer makes a retainer payment, you can record this payment by creating a retainer invoice. To create a retainer invoice:
- Log in to your Zoho Books organisation.
- Go to Sales on the left sidebar, and select Quotes.
- Select an accepted quote for which you want to create a retainer invoice.
- In the Details page, click the More icon and select Create Retainer Invoice from the dropdown.
- In the following page, fill in the following fields:
- Billing Address: This field will auto-populate based on the billing address of the customer; click the Edit icon if you want to modify it.
- Description and Amount: In the table, enter a description of the services for which this invoice is created and the corresponding amount for those services in the retainer invoice.
- Retainer Invoice Number: This will auto-populate, but you click the Settings icon in the field and choose to enter the number manually if you prefer.
- Retainer Invoice Date: Select the creation date for the invoice.
- Customer Notes: Add any notes you want to display in the customer’s transaction.
- Terms and Conditions: Enter the terms and conditions of your business to be displayed in your transaction.
- Fill in the other necessary details and click Save as Draft to save the invoice without sending it, or click Save and Send to save and send it to the customer.
Now, a retainer invoice will be created from the quote.
Email the Quote to the Customer
If you want to email a copy of the quote at a later point in time, you can send it to your customer. Here’s how:
- Log in to your Zoho Books organisation.
- Go to Sales on the left sidebar, and select Quotes.
- Select the quote you want to email.
- In the Details page, click Send Quote to send the quote to the customer.
- In the page that follows, verify the details in the email and make any changes if needed.
- Scroll down, and click Send.
Now, the quote will be sent to the customer, and the status of the quote will be updated to Sent.
Share Quote Link With Customers
Secure Link Sharing: Since the quote link can be accessed by anyone, Secure Link Sharing adds a layer of security to ensure only the intended recipients view the full quote. To facilitate this, add your customer’s Email Address or Phone Number to their details in the Customers module. Next, when you generate and share the link, your customer can verify their identity by entering the same email address or phone number to view the full quote. If they cannot provide these details, they can only Accept or Reject the quote.
You can generate a link for the quote and share it with your customers. Using this link, the customer can view the quote. To generate and share the quote link:
- Log in to your Zoho Books organisation.
- Go to Sales on the left sidebar, and select Quotes.
- Select the quote you want to generate a link for.
- In the Details page, click Share at the top.
- In the Share Quote Link popup, fill in the following fields:
- Visibility: Choose the visibility as Public if you want anyone with the link to access the complete quote before its expiration date, or Private and Secure if you want your customer to access the quote only from the customer portal.
- Link Expiration Date: Choose the expiration date for the link you’re sharing with the customer.
Note: By default, the link expires 90 days from the date it’s generated.
- Click Generate Link.
Now, once you generate the link, click Copy Link to copy the link and share it with your customers.
Accept or Decline a Quote as a Customer via Public Link
When you send a quote link via Email, SMS/Text Message, WhatsApp, or messaging apps, customers can follow the steps below to review and respond to it:
- Click the quote link.
- Choose to Accept or Decline the quote.
- To view the full quote, click View Quote next to the Quote Number.
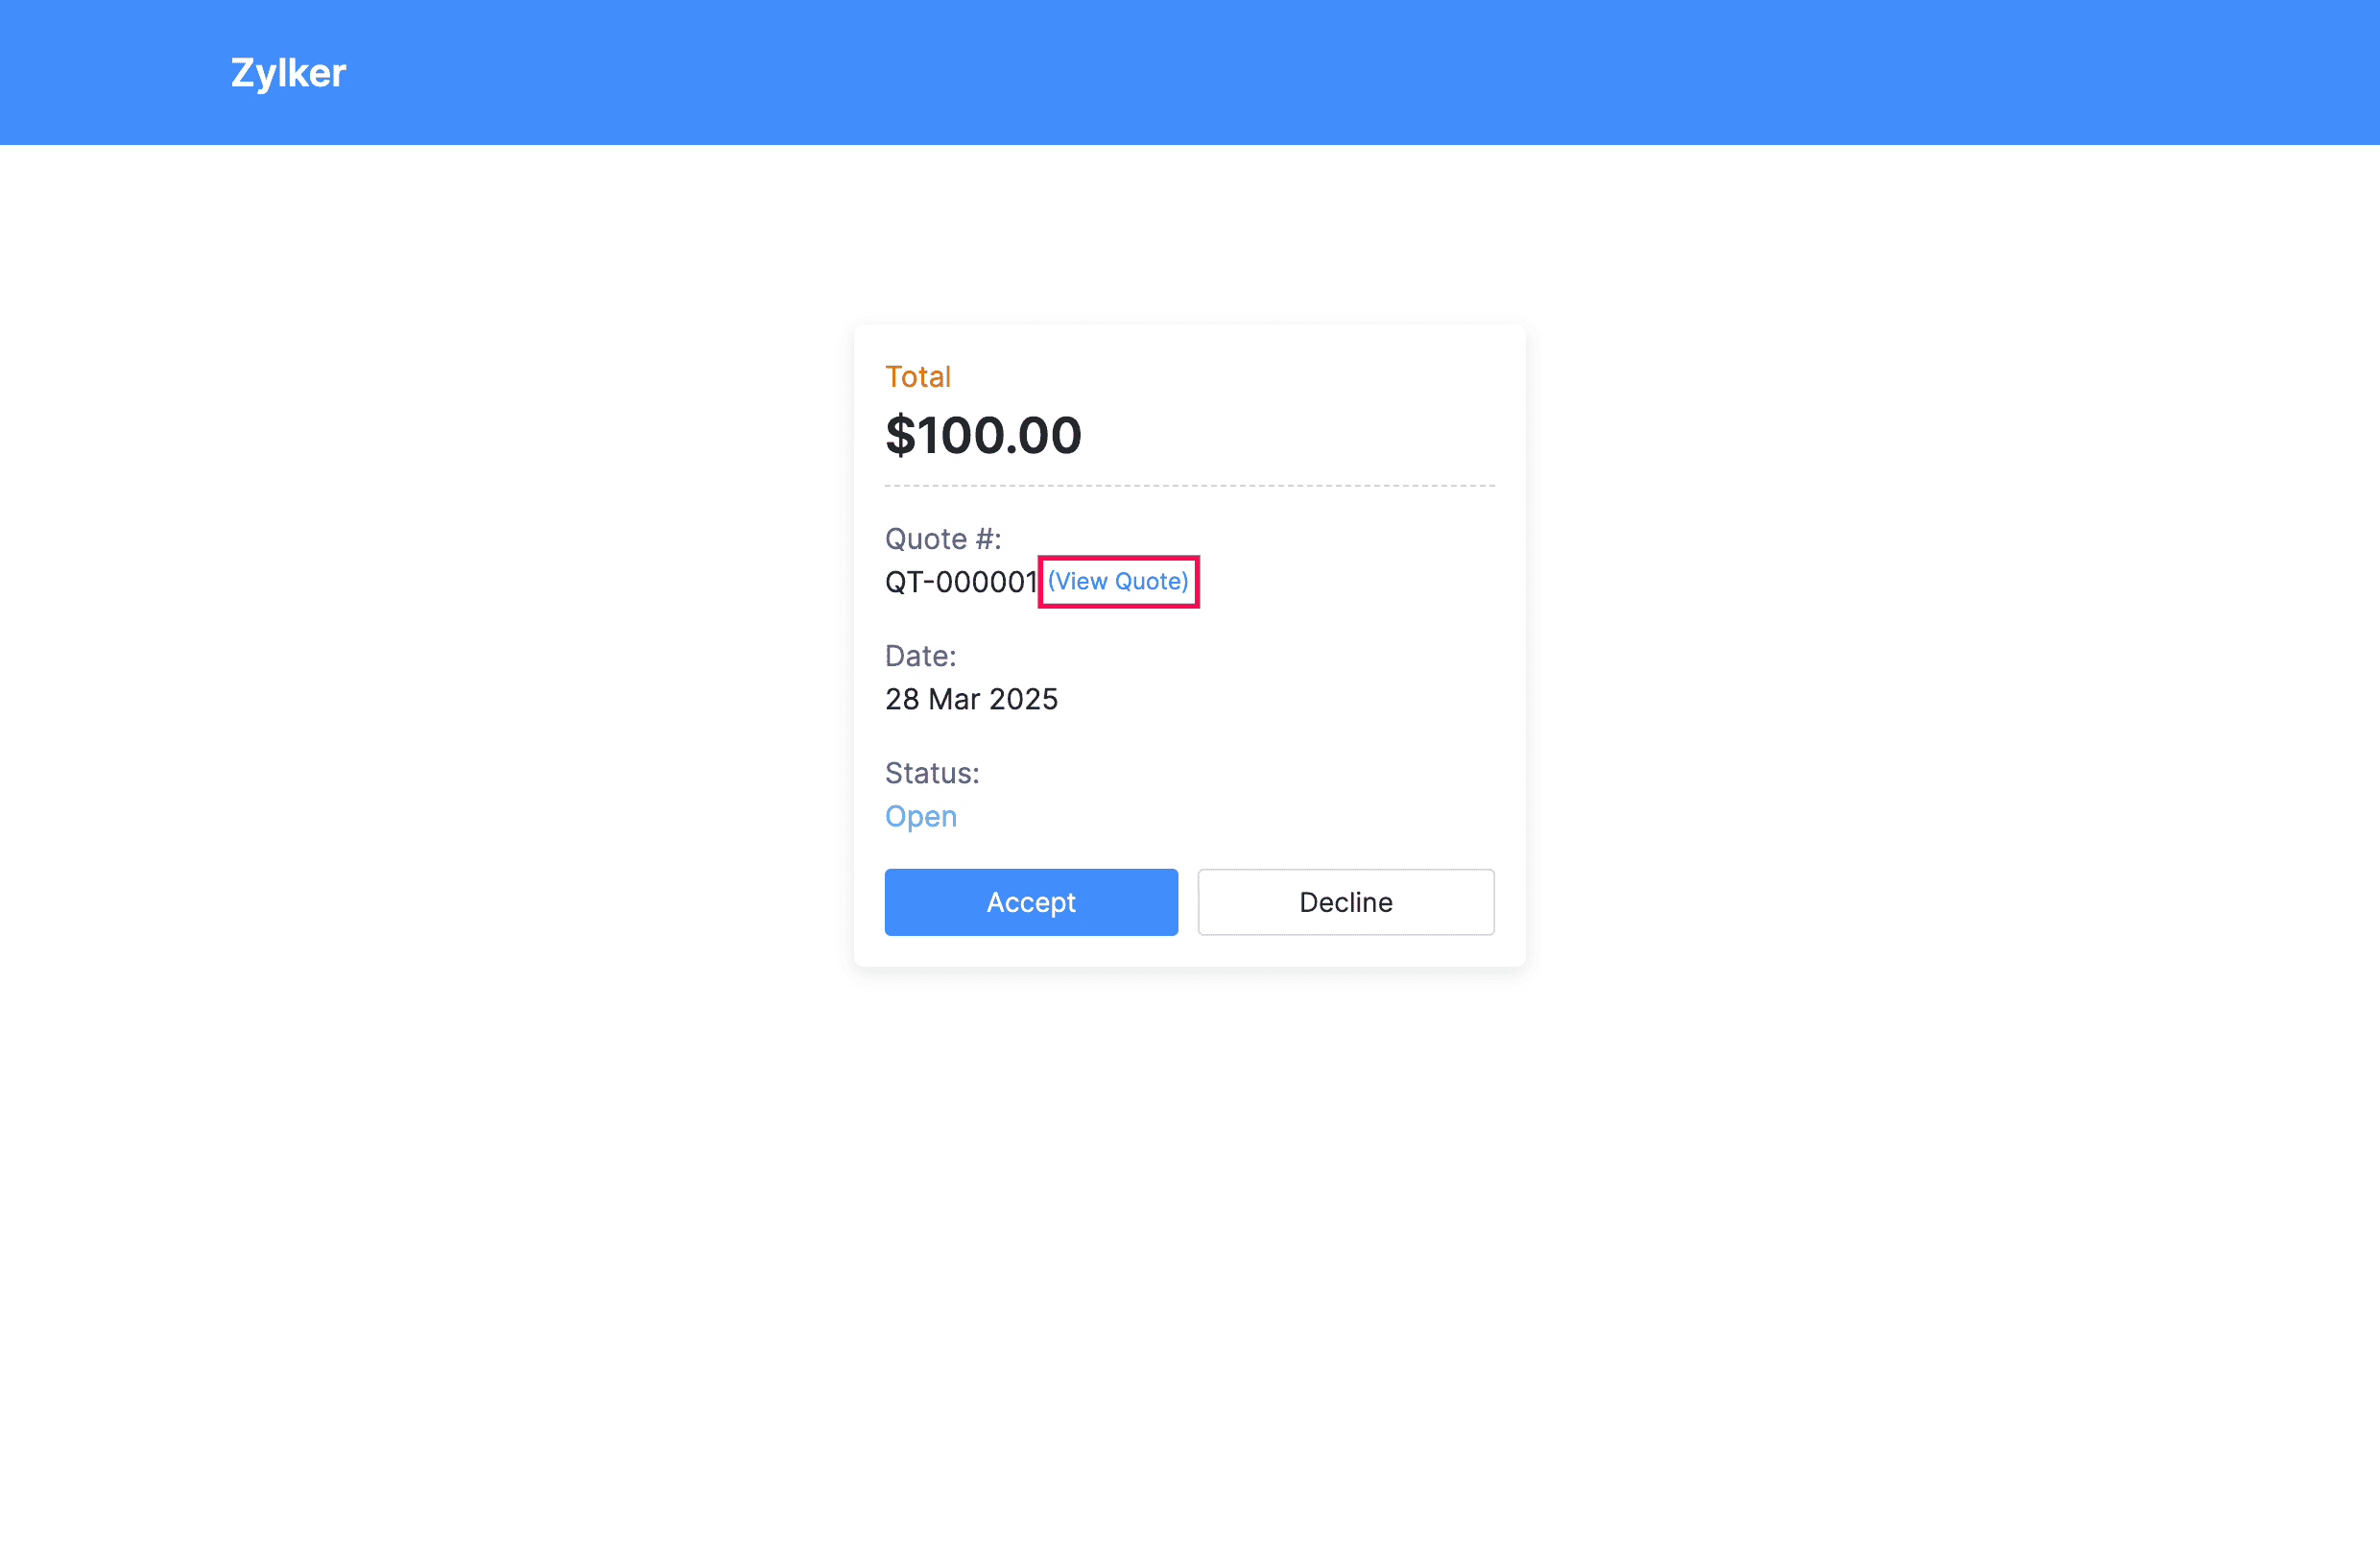
- In the Verify your identity popup, the customer must enter the email address associated with the business or their contact person’s email, and click Verify.

- Once verified, they can securely view the full quote, review the details, and choose to Accept, Decline, or Print the quote.
Now, the customers can securely respond to the quotes based on your preferences.
Add or View Comments and Quote History
To add or view the comments and track changes of the quote:
- Log in to your Zoho Books organisation.
- Go to Sales on the left sidebar, and select Quotes.
- Select the quote you want to view.
- In the Details page, click Comments & History in the top right corner.
- In the Comments & History pane on the right, add comments if needed, and click Add Comment.
Your comment will now be added. You can also track changes and view past comments from other users under the All Comments section.
Attach Files to a Quote
To attach files to a quote:
- Log in to your Zoho Books organisation.
- Go to Sales on the left sidebar, and select Quotes.
- Select the quote you want to attach files to.
- In the Details page, click Attach Files at the top right corner of the page.
- In the Attach files dropdown, select how you want to upload the file from the following options:
- Drag and Drop: Upload files directly from your computer.
- Cloud: Upload the files from cloud resources like Zoho Workdrive, Google Drive, Dropbox, OneDrive, etc.
- Documents: Upload files from the Documents module in Zoho Books.
Now, once you attach any files to the quote, you can use them internally. To display the attachments in the customer portal and emails, enable Display Attachments in Customer Portal and Emails under the attachment on the Quote Details page.
Note: You can upload a maximum of 10 files, each up to 10 MB.
Print a Quote
- Log in to your Zoho Books organisation.
- Go to Sales on the left sidebar, and select Quotes.
- Select the quote you want to print.
- In the Details page, click the PDF/Print at the top, and in the dropdown, select PDF to download the quote as a PDF to your computer or select Print to print the document.
Delete a Quote
Prerequisite: You cannot delete a quote if you’ve created an invoice or retainer invoice for it. Delete the associated invoice or retainer invoice first before deleting the quote.
- Log in to your Zoho Books organisation.
- Go to Sales on the left sidebar, and select Quotes.
- Select the quote you want to delete.
- In the Details page, click the More icon at the top, and select Delete from the dropdown.
- In the following popup, click OK to confirm.
Bulk Actions in Quotes
Bulk Update Quotes
If you need to update a specific field in multiple quotes at once, you can use the bulk update option. To update in bulk:
- Log in to your Zoho Books organisation.
- Go to Sales on the left sidebar, and select Quotes.
- Select the quotes you want to update.
- Click Bulk Update in the top left corner of the page.
- In the Bulk Update Quotes popup, choose the field you want to update from the dropdown and enter the new information.
- Click Update.
Now, the selected quotes will be updated with the new information.
Download Multiple Quote PDFs
You can select and download a PDF containing multiple quotes, with each quote on a separate page. To download:
- Log in to your Zoho Books organisation.
- Go to Sales on the left sidebar, and select Quotes.
- Select the quotes you want to download.
- Click the PDF icon in the top left corner.
Now, the selected quotes will download as a single PDF, with each quote on its individual page.
Print Quotes in Bulk
- Log in to your Zoho Books organisation.
- Go to Sales on the left sidebar, and select Quotes.
- Select the quotes you want to print.
- Click the Print icon in the top left corner.
- In the Preview popup, review the quotes you selected, and click Print.
Now, the selected quotes will be printed.
Delete Quotes in Bulk
Prerequisite: You cannot delete a quote once an invoice or retainer invoice has been created for it. First, delete the associated invoice or retainer invoice before attempting to delete the quote.
- Log in to your Zoho Books organisation.
- Go to Sales on the left sidebar, and select Quotes.
- Select the quotes you want to delete.
- Click the More icon at the top, and select Delete from the dropdown.
- In the pop-up, click OK to confirm.
Now, the selected quotes will be deleted at once.
Rename Estimates to Quotes
Note: This applies to organisations created before March 31, 2023.
In Zoho Books, organisations created before March 31, 2023, have Estimates as the module name, while organisations created after this date have Quotes as the module name. If the module name was Estimates in your organisation and you’ve renamed it to Quotes through the displayed pop-ups, you will need to do the following steps to apply the change fully:
- Update the Document’s Title in Templates
- Update the Transaction Prefix
Update the Document’s Title in Templates
The document title of the transaction in PDF templates will still be Estimate. You have to update the name manually in each PDF template. Here’s how:
- Log in to your Zoho Books organisation.
- Go to Settings.
- Select PDF Templates under Customisation.
- In the Templates pane on the right, select Quotes.
- Hover over a template and click Edit.
- Click Transaction Details on the left sidebar and expand the Document Details section at the bottom.
- Edit the text box below Show Document Title to change the document title from Estimate to Quote.
- Preview your change and click Save.
Update the Transaction Prefix
If you’ve enabled Transaction Number Series, here’s how you can update the prefix:
- Log in to your Zoho Books organisation.
- Go to Settings.
- Select Transaction Number Series under Customisation.
- Choose the required series.
- Scroll down to Quotes and enter the preferred prefix against the Prefix column, adhering to the renaming of the module.
- Click Save.
(or)
If you’ve not enabled Transaction Number Series, here’s how you can update the prefix:
- Log in to your Zoho Books organisation.
- Go to Sales on the left sidebar and select Quotes.
- Click + New in the top right corner.
- In the New Quote page, click the Settings icon in the text box next to Quote#.
- In the pop-up that appears, enter the preferred prefix in the text box below Prefix.
With this, the new quotes you create will have the prefix that you’ve entered.
 Yes
No
Yes
No
Thank you for your feedback!