
Preferences and Customization
In Zoho Books, you can customise how you manage bill payments to suit your business needs. Set up approval workflows for payments, add fields, and create buttons to simplify your tasks.
To configure preferences for the Payments Made module:
- Go to Settings on the top right corner of the page.
- Select Payments Made under Purchases.
Configure Approvals for Payments Made
You can configure approvals for payments made. You can choose from No Approval, Simple, and Multi-Level approval types based on your business requirements. Learn more about Approvals.
Fields in Payments Made
You can create new fields for payments and assign different data types to each field. Learn more about Fields.
Buttons in Payments Made
You can create new buttons in the Payments Made module that either execute actions using deluge scripts or open external URLs when clicked. Learn more about Buttons.
List View Customization
Filter Payments Made
To filter payments made:
- Go to Purchases on the left sidebar, and select Payments Made.
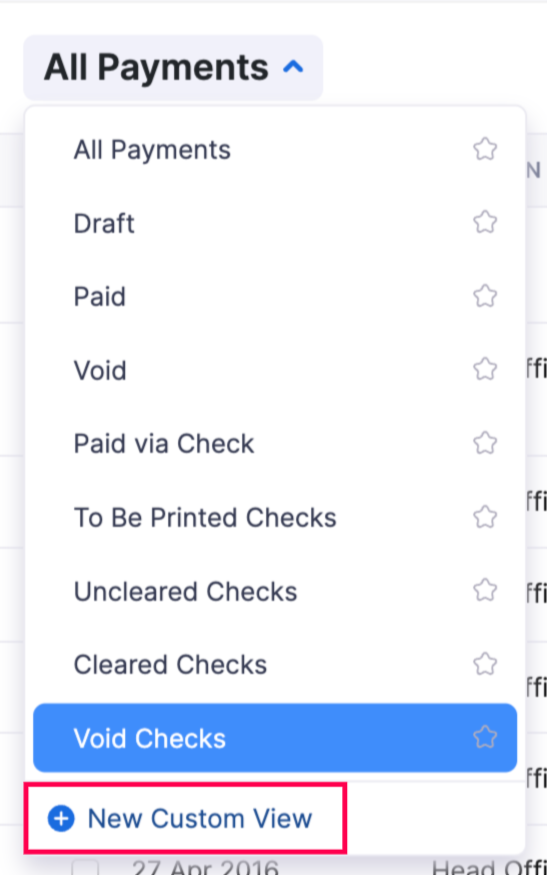
- Click the All Payments dropdown at the top to access the following filters:
- Draft: Lists payments that are in draft status.
- Paid: Lists payments made that were applied to bills.
- Void: Lists payments made were marked as void.
- Paid via Check: Lists payments made via check.
- To Be Printed Checks: Lists payments with checks that are yet to be printed.
- Uncleared Checks: Lists payments that are yet to be cleared.
- Cleared Checks: Lists payments with checks that have been cleared.
- Void Checks: Lists payments that have been voided.
- Advance Payments: Lists the vendor’s advance payments only.
- Bill Payments: Lists bill payments only.
- Advance Payments: Lists the vendor’s advance payments only.
The payments made will now be displayed based on the selected filters.
Create a Custom View
When you create a custom view, you can use it to filter payments based on specific criteria. To create a custom view:
- Go to Purchases on the left sidebar, and select Payments Made.
- In the List View page, click the All Payments dropdown, and select + New Custom View.
- In the New Custom View page, complete the following fields:
- Name: Enter a name for your custom view.
- Mark as Favorite: Select this if you want the custom view to appear under Favorites in the All Payments dropdown.
- Define the Criteria: Add fields, set comparators, and enter conditions to filter payments. Click + Add Criterion to add more conditions.
- CRITERIA PATTERN: Modify the pattern if required, then click Save.
- Columns Preference: Drag and drop columns from AVAILABLE COLUMNS to SELECTED COLUMNS to customise the List View display.
- Visibility Preference: Choose who can access this custom view:
- Only Me: Only you can access it.
- Only Selected Users & Roles: Grant access to specific users and roles.
- Everyone: Allow all users in your organisation to access it.
- Click Save.
Once you select the custom view you created from the All Payments dropdown, it will show the payments based on the criteria you’ve configured for the custom view on the List View page.
Customize List View Page Columns
To customise columns in the List View page:
- Go to Purchases on the left sidebar, and select Payments Made.
- In the List View page, click the Customise dropdown in the top left corner, and select Customise Columns.
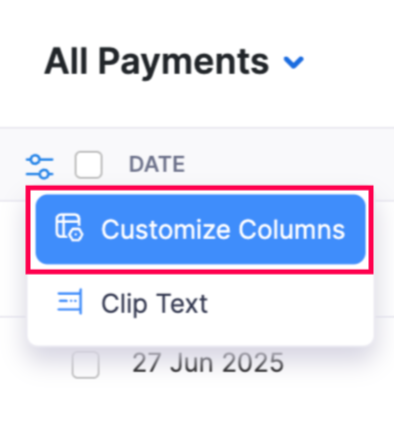
- In the Customise Columns popup, choose the columns you want to display.
- Click Save.
The selected columns will now be displayed in the List View page.
Note: Columns with the Permanent Lock icon are mandatory and cannot be unchecked.
Refresh Payments List
If you experience issues like an unrecorded transaction status or customised columns not appearing, you can simply refresh the payments list. To refresh the list:
- Go to Purchases on the left sidebar, and select Payments Made.
- In the List View page, click the Refresh List icon in the top right corner.
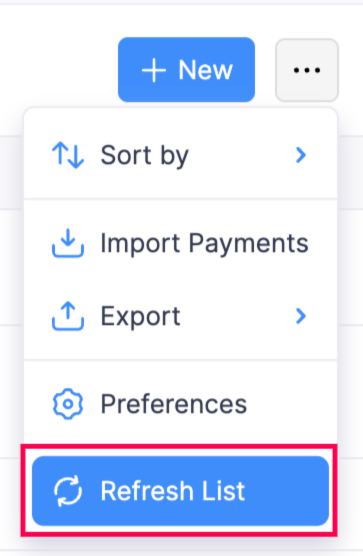
The payments list will now be refreshed.
 Yes
No
Yes
No
Thank you for your feedback!