


Integrate Zoho Inventory with Xero

Integrating Zoho Inventory with Xero helps you manage your inventory and accounting together. It syncs your sales, purchases, contacts, items, and tax information between both applications, reducing manual work and keeping your records up to date.
By integrating Zoho Inventory with Xero, you can:
- Sync invoices, credit notes, bills, and vendor credits from Zoho Inventory to Xero.
- Keep contacts, items, and tax information updated across both applications.
- Reduce manual work and maintain accurate financial records.
Prerequisite:
- You must have an active account with Xero.
- You cannot connect multiple Xero organizations to your Zoho Inventory organization and vice versa.
- Your Xero organization with which you wish to integrate must have the country as the same country as your Zoho Inventory organization.
- Ensure that the base currency of both these organizations is the same.
Set Up the Integration
Here’s how to set up the integration:
- Log in to your Zoho Inventory organization.
- Go to Settings in the top right corner.
- Select Accounting under Integrations & Marketplace.
- Click Connect to Xero next to Xero.
- You will be redirected to the Xero sign-in page. Enter your credentials to proceed.
- Once you sign in to Xero, select the organization which you want to integrate from the dropdown and click Next.
- In the next page, click Connect to complete the integration. You will then be redirected back to your Zoho Inventory account, where you can configure the integration.
Configure the Integration
Now that you’ve connected Zoho Inventory with Xero, you can choose what data should be imported from and exported to Xero.
Import from Xero
Since you need to account for your transactions in Zoho Inventory, you need to import the accounts and customers (if any) you have in Xero.
To import the data,
- Log in to your Zoho Inventory organization.
- Go to Settings in the top right corner.
- Select Accounting under Integrations & Marketplace.
- Click Show Details in the Xero section.
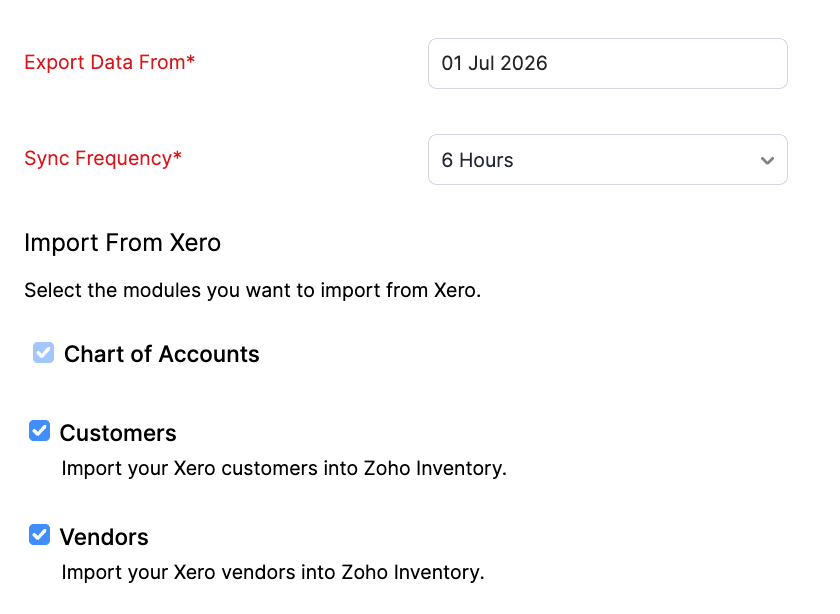
- Configure the following details:
- Chart of Accounts: By default, all your accounts in Xero will be imported into Zoho Inventory. These accounts will be available when you create an item in Zoho Inventory, so that you’ll be able to choose the account under which all sales transactions for that item should be tracked in Xero.
- Customers: Enable this option to import all your customer details from Xero. It will be created as new customers in Zoho Inventory automatically.
- Vendors: By enabling this, you can import all your vendor details from Xero. They will be automatically created as new vendors in Zoho Inventory.
Export to Xero
Export your Zoho Inventory transactions to Xero to ensure they are properly recorded and reflected in your financial accounts.
To export the data,
- Log in to your Zoho Inventory organization.
- Go to Settings in the top right corner.
- Select Accounting under Integrations & Marketplace.
- Click Show Details in the Xero section.
- Configure the following details:
- Choose the date from which you want your data from Zoho Inventory to Xero in the Export Data From field.
- Select the Sync Frequency from the dropdown.
- Choose the modules you want to export from Zoho Inventory to Xero:
- Invoices and Payments Received - Both paid and unpaid invoices will be exported to Xero. Invoices in the Draft status will also be exported.
- Credit Notes - Credit Notes in Zoho Inventory can be exported. When an invoice is written off in Zoho Inventory, a credit note is automatically created and associated with the corresponding invoice in Xero.
- Select the Bank Charge Account, Write-off Account, Discount Account, Shipping Charge Account, Adjustment Account, Retention Account and TDS Account under which you want to record bank charges, write-offs, and adjustments for your invoices. If a payment is recorded with bank charges, the amount paid is initially accounted as Undeposited Funds, and a deposit will be made to the appropriate bank account along with bank charges.
- Bill with Payments Made - The paid and unpaid bills from Zoho Inventory will be exported to Xero under Expenses.
- Vendor Credits - By enabling this, you can export the vendor credits from Zoho Inventory as Supplier Credits to Xero. Select the Adjustment Account, Discount Account, Retention Account and TDS Account to ensure the credits are recorded accurately in Xero.
- Journal - Once Invoices with Payments Received and Bills with Payments Made sync is enabled, you can enable Journal sync. The corresponding journal entries are exported along with invoices, bills, and other supported transactions to Xero. These journal entries update the Inventory Asset and Cost of Goods Sold (COGS) accounts in Xero. You can view the exported journal entries in the Journal Report in Xero.
Asset Account
Select the Asset Account to record the value of your inventory items and maintain accurate inventory asset balances in Xero.

Tax Mapping
Map the taxes in Zoho Inventory with the corresponding taxes in Xero to ensure that taxes in exported transactions are recorded accurately in Xero.
- To map the taxes, make sure that you have enabled Taxes in both Zoho Inventory and Xero accounts.
- Select an existing tax in Zoho Inventory (or create a new one) and map it to the corresponding tax in Xero to ensure accurate tax synchronization between the two applications.
Note: Ensure that the taxes being mapped have matching tax rates.
Edit Configuration
After configuring the integration, you can edit its details on the integration details page.
To edit the details,
- Go to Settings in the top right corner
- Select Accounting under Integrations & Marketplace.
- Click Show Details in the Xero section.
- Click Configure in the top right corner.
- Edit the required details.
- Click Save.
Add Items from Xero
When you export a transaction from Zoho Inventory to Xero, the items included in that transaction will also be synced to Xero. However, other items in your Zoho Inventory account will not be automatically available in Xero.
Similarly, existing items in Xero are not automatically imported into Zoho Inventory. If you want to manage those items in Zoho Inventory, you must import them manually.
To import your existing Xero items into Zoho Inventory:
- Export all your items in Xero.
- Import the same into Zoho Inventory.
- Mark your existing items in Xero as inactive to avoid errors while syncing items from transactions.
Note: The items in each invoice, exported from Zoho Inventory, will be created as Items and Services in Xero.
Sync Data
You can sync data either manually or automatically based on the configuration you have set up.
- Any new addition to the list of customers or accounts in Xero will be automatically reflected in your Zoho Inventory organization through Auto-Sync that occurs once a day.
- If you want the change to be reflected in Zoho Inventory immediately, you can click Sync Manually under From Xero to Zoho Inventory.
- Likewise, if you want the changes in Zoho Inventory to be reflected in Xero immediately, you can click Sync Manually under Export to Xero.
- You can change the sync frequency configurations at any time by clicking Configure at the top.
Sync between Zoho Inventory and Xero
The following table lists how the transactions are synced between Zoho Inventory and Xero.
| Zoho Inventory | Xero | Sync Type |
|---|---|---|
| Chart of Accounts | Chart of Accounts | Two-way sync |
| Create a Customer | Creates a new contact. | Two-way sync |
| Create an invoice | Creates a new invoice. | One-way sync |
| Update an invoice | Updates the corresponding invoice. | One-way sync |
| Delete or void an invoice | The invoice will be voided. | One-way sync |
| Write off an invoice | A credit note will be created, and the credits will be associated with the invoice. | One-way sync |
| Record a payment for an invoice | Creates a payment and associates it with the invoice. | One-way sync |
| Update the payment for an invoice | Updates the payment recorded for the corresponding invoice. | One-way sync |
| Delete the payment associated with an invoice | Deletes payment for the corresponding invoice. | One-way sync |
| Create a credit note | Creates a new credit note. | One-way sync |
| Update a credit note | Updates the corresponding credit note. | One-way sync |
| Allocate credits from a credit note to an invoice | Allocates the credits from the corresponding credit note to the specified invoice. | One-way sync |
| Delete a credit note | Deletes the corresponding credit note. | One-way sync |
| Create a refund for a credit note | Creates a refund for that corresponding credit note. | One-way sync |
| Update a credit note refund | Updates the corresponding credit note refund. | One-way sync |
| Delete a credit note refund | Deletes the corresponding credit note refund. | One-way sync |
| New bill | Creates a new bill | One-way sync |
| Updating bill | Updates the corresponding bill | One-way sync |
| Deleting bill | Deletes the corresponding bill | One-way sync |
| Adding payment for the bill | Creates payment for the corresponding bill | One-way sync |
| Deleting payment for the bill | Deletes payment for the corresponding bill | One-way sync |
Sync Details of Customers
Your customer details will be synced from Xero to Zoho Inventory. A contact created in Xero as a Customer will be imported into Zoho Inventory as a new Customer. Whenever a customer is added, edited, or deleted in Xero, it will be reflected in Zoho Inventory through automatic sync that occurs once a day or the manual sync option.
The following table lists how each customer’s details are reflected from Xero to Zoho Inventory.
| Xero | Zoho Inventory |
|---|---|
| Display name | Display Name |
| Email Address | |
| Phone | Phone |
| Mobile | Mobile |
| Website | Website URL |
| Billing address | Billing Address |
| Shipping Address | Shipping Address |
| Currency Code | Currency |
Sync Details of Invoice
The following table lists the fields in an invoice that are mapped to the one created in Xero.
| Zoho Inventory | Xero |
|---|---|
| Invoice# | Invoice no. |
| Invoice Date | Invoice date |
| Currency Code | Currency code |
| Exchange Rate | Currency exchange |
| Item Name | Product/Service |
| Item Description | Description |
| Item Rate | Rate |
| Item Quantity | Qty |
| Discount | Discount (Xero doesn’t support line item level discounts. All the item level discounts will be added and displayed as a total discount for the invoice.) |
| Tax | Tax |
| Shipping Charges | Shipping |
| Adjustment | Adjustment (Will be added as a separate line item) |
Sync Details of Bills
The following table lists the fields in Zoho Inventory bills that are mapped to the ones created in Xero.
| Zoho Inventory | Xero |
|---|---|
| Bill# | Bill No. |
| Bill Date | Bill date |
| Currency Code | Currency code |
| Exchange Rate | Exchange rate |
| Item Name | Product/Service |
| Item Description | Description |
| Item Rate | Rate |
| Item Quantity | Qty |
| Discount | Discount (Will be added as a separate accounting line item) |
| Adjustment | Adjustment (Will be added as a separate accounting line item) |
Disable Integration
If you want to pause the data sync for some time instead of deleting the integration completely, you can disable the integration. Your integration details will not be deleted, and you can activate the integration at any time.
To disable the integration:
- Log in to your Zoho Inventory organization.
- Go to Settings in the top right corner.
- Select Accounting under Integrations & Marketplace.
- Click Show Details in the Xero section.
- Click the dropdown next to Configure at the top and select Disable Integration.
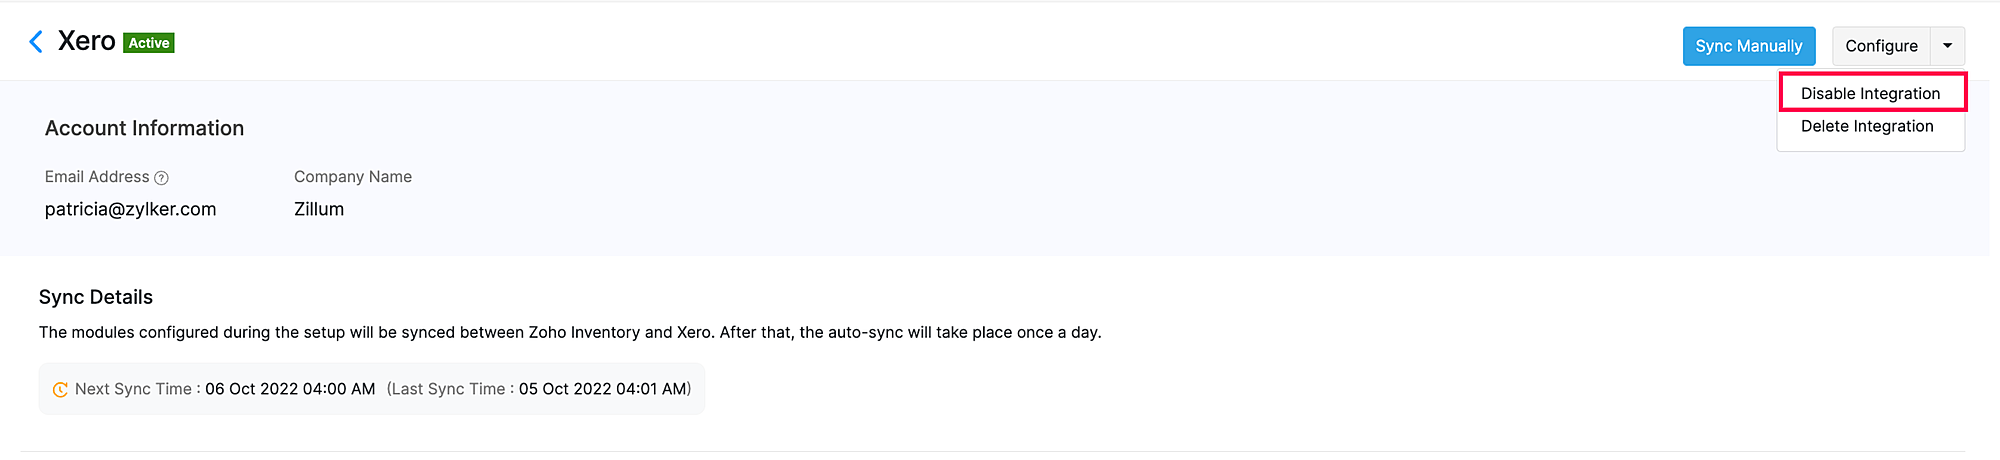
- In the following pop-up, click Disable Integration again to confirm the action. Your integration will now be disabled, and you will not be able to account for your transactions. You can always click Enable Integration to re-activate the integration.
Delete Integration
If you want to stop using Xero for accounting and would like to disconnect it from your Zoho Inventory Organization, you can delete the integration. Once you delete it, customers and transactions will no longer be synced between the apps, and the integration details will also be deleted.
To delete the integration with Xero:
- Log in to your Zoho Inventory organization.
- Go to Settings from the left sidebar.
- Select Accounting under Integrations & Marketplace.
- Click Show Details next to Xero.
- Click the dropdown next to Configure at the top and select Delete Integration.
- In the following pop-up, click Delete Integration again to confirm the action.
The integration will now be deleted, but all your accounts and customers that are already synced from Xero will continue to remain active in Zoho Inventory.
Note: If you want to integrate another Zoho Inventory organization with Xero, you can delete the current integration and set it up again with the new organization.