
Connect Zoho Billing to AI Models Using Zoho MCP
Model Context Protocol (MCP) is an open protocol that standardizes how applications communicate with Large Language Models (LLMs). The Zoho MCP server uses this protocol to connect your Zoho Billing data and workflows directly to AI models such as Claude and ChatGPT.
Once connected, you can create invoices, track payments, manage customers, and pull reports; all through plain-language prompts in your AI model’s interface, without having to navigate to Zoho Billing manually.
How Zoho MCP Works
The Zoho MCPserver acts as a secure bridge between your AI model and your Zoho Billing organization. When you prompt your AI model (the MCP client), it processes the request through the MCP server, which then calls the Zoho Billing API to carry out the action.
Before you get started, here are the key components you’ll encounter:
| Component | Role |
|---|---|
| MCP Server | The configured server that exposes a set of tools AI model such as Create Invoice, Get Contact Person, or Update Subscription to your AI model. |
| MCP Client | The AI model (Claude, Cursor, Windsurf, etc.) that receives and processes your prompts. |
| Tools | The specific actions your AI model is permitted to perform in Zoho Billing. You select tools from the available list in Zoho MCP. |
| You | Provide natural-language instructions; the AI model calls the right tool on your behalf. |
Here is the lifecycle of an action:
You type a prompt in your AI model’s interface for example, “In [Org ID], create an invoice for Zylker Corp for $500.”
The AI model identifies the right tool from the enabled tools on your MCP server.
The AI model sends the request to the Zoho MCP server.
The MCP server calls the Zoho Billing API to carry out the action.
The action is executed in your Zoho Billing account in this case, an invoice is created for Zylker Corp.
Supported MCP Clients
Zoho MCP works with any MCP-compatible client. The following clients have dedicated setup guides:
In addition to Claude and ChatGPT, Zoho MCP is compatible with Cursor, Windsurf, VS Code (with GitHub Copilot in Agent mode), Zed, Continue, Cline, and n8n. Learn More
Prerequisites
Before setting up an MCP server, ensure the following are in place:
To connect your Zoho MCP server with Claude, you must be a Claude Organization Admin. Once connected, the integration is automatically accessible to all members of your Claude organization. This applies only if you are on the Claude Team plan or higher.
For all MCP clients, account-level access to your Zoho Billing organization is required.
MCP client installed: Make sure your preferred AI model such as Claude or ChatGPT is set up and ready to use.
Set Up Your MCP Server
Setting up your MCP server is the foundation of your Zoho MCP configuration. Only after your server is configured can your AI model connect to it and begin executing actions in Zoho Billing through the tools you have enabled.
Generate Your Server URL
- Log in to Zoho MCP using your Zoho Billing account credentials.
- Create or select an MCP server.
- Go to Connect in the left sidebar.
- Copy the Server URL shown on the page.

Your Server URL follows this format:
https://[mcp-server-name]-[org-id].zohomcp.com/mcp/[api-key]/message
Treat your Server URL like a password. It grants access to your Zoho Billing tools and data, anyone with this URL can use it to interact with your MCP server. Do not share it in public repositories, shared documents, or anywhere others can view it. If you suspect your Server URL has been compromised, regenerate it immediately.
Regenerate Your API Key
If your Server URL is ever exposed or compromised, you can regenerate a new API key. This invalidates the old URL immediately, and any MCP clients using the old URL will lose access.
- Go to Connect in the left sidebar.
- Click Regenerate API Key at the top right of the Server URL section.
- Copy the new Server URL and update it in all connected MCP clients.
Configure Tools in Zoho MCP
Tools are the building blocks of everything your AI model can do in Zoho Billing. When you connect an AI model to Zoho Billing through the MCP server, the AI model doesn’t automatically get access to every action in Zoho Billing. Instead, you choose exactly which actions the AI model is permitted to perform. These permitted actions are called tools. Each tool maps to a specific Zoho Billing API call when an AI model executes a tool, it triggers the corresponding API in the background to carry out the action on your Zoho Billing data.
Learn how you can configure tools in Zoho MCP.
Connect with an MCP Client
With your MCP server set up, the next step is connecting it to your AI model. This allows your AI model to receive prompts and execute actions in Zoho Billing through the tools you have enabled.
Connect with Claude
- Go to claude.ai/settings/connectors, or open the Claude desktop application.
- Go Customize in the left side bar.
- Switch to Connectors tab.
- Click the + icon at the top and select Add customer connector.
- Enter a name for your connector for example, Zoho Billing.
- Paste the Server URL from Zoho MCP in the URL field and click Save.
- Scroll down to the connector you created and click Connect.
Once authorized, the connector will be active and Claude can begin executing actions in Zoho Billing on your behalf.
Access Zoho MCP Tools in Claude
- Open a new chat in Claude.
- Click the + icon in the chat toolbar and click Connectors.
- Select the custom connector you created.
- Start prompting Claude to manage your Zoho Billing data.
Connect with ChatGPT
ChatGPT supports MCP-based integrations through custom apps, allowing you to connect it to your Zoho MCP server and perform actions in Zoho Billing directly from your ChatGPT conversations.
First, copy your MCP URL from Zoho MCP:
- Log in to Zoho MCP account.
- Create or select your MCP server.
- Configure the tools as required.
- Go to Connect in the left sidebar.
- Copy the MCP URL.
Next, create a custom app in ChatGPT:
- Log in to your ChatGPT account.
- Click your profile icon and click Settings.
- Go to the Apps tab and scroll down to Advanced Settings.
- Toggle Developer Mode and click Create App.
- In the New App page, enter a name for your connector in the Name field.
- Paste the MCP URL copied from Zoho MCP in the MCP Server URL field.
- Set Authentication to OAuth.
- Read the terms, check I trust this application, and click Create.
During the connection setup, you will encounter two authorization screens. The first requests access to your Zoho MCP account and the tools you have enabled. The second is a Zoho OAuth screen that lists the specific Zoho Billing permissions being requested. Review the permissions on both screens and click Allow, then Accept, to complete the authorization.
Your connection will be created and you can then use ChatGPT to perform actions in your Zoho Billing account.
Access Zoho MCP Tools in ChatGPT
Here’s how you can start using the tools to perform actions from ChatGPT:
- Open a new chat in ChatGPT.
- Click the + icon in the chat toolbar.
- Click More and select the app you created.
- Start prompting ChatGPT to manage your Zoho Billing data.
Best Practices to Write Effective Prompts
Your prompt is the instruction your AI model works from the clearer it is, the less back-and-forth you’ll need. A well-structured prompt gets the right action done on the right record the first time.
Keep these tips in mind:
Name things specifically. Use the exact field names, IDs, and module names as they appear in Zoho Billing.
Reference records by their unique IDs so there’s no ambiguity about which customer, invoice, or plan you mean.
State your intent clearly what you want done, to what, and under what conditions.
Include edge cases upfront. If something should only happen when a condition is met, say so.
Johan, a Sales Operations Manager at Zylker Technologies, used to manually cross-check closed deals in Zoho CRM against subscription records in Zoho Billing at the end of every month a process that took hours and left room for mismatches. Now, using Zoho MCP, he simply prompts his AI model: “In [Org Name] (Org ID), fetch the list of deals closed in Zoho CRM this month and show me their corresponding subscription status in Zoho Billing.” In seconds, he has a complete view, spots a converted lead without an active subscription, and creates one on the spot.
Here are some example prompts to help you get started with common billing workflows. Adapt them with your actual customer names, amounts, and plan details.
Handle Invoices
In [Org Name] (Org ID), create an invoice for Zylker Corp with three items Professional Services at $500, Support at $200, and Setup at $100.
In [Org Name] (Org ID), collect payment for John’s invoice using his saved bank account.
Manage Subscriptions
In [Org Name] (Org ID), set up a new subscription for Zylker Corp on the Growth plan.
In [Org Name] (Org ID), update the offer amount of the coupon SUMMER20 to $25.
Pull Reports
In [Org Name] (Org ID), get the ARR report for Q1 2025 and summarize the month-on-month trend.
In [Org Name] (Org ID), get the AR aging summary report for January and list all customers with outstanding invoices, bucketed by how overdue they are.
Create Quotes and Plans
In [Org Name] (Org ID), create a quote for Acme Corp for Professional Services, Support, and Onboarding.
In [Org Name] (Org ID), create a new plan called Business Pro, billed monthly at $99.
Record Payments
In [Org Name] (Org ID), record a payment of $500 from Zylker Corp against their latest invoice.
In [Org Name] (Org ID), create a payment link for Sarah for her outstanding invoice.
The prompts above cover only a handful of the available tools. To see the full list, log in to Zoho MCP and go to Tools.
Track Your Activity Using Logs
Every time your AI model performs an action in Zoho Billing through the MCP server whether it creates an invoice, retrieves a customer record, or applies a coupon that action is logged. The Logs page gives you a complete, searchable record of all tool calls made through your MCP server, along with their outcomes.
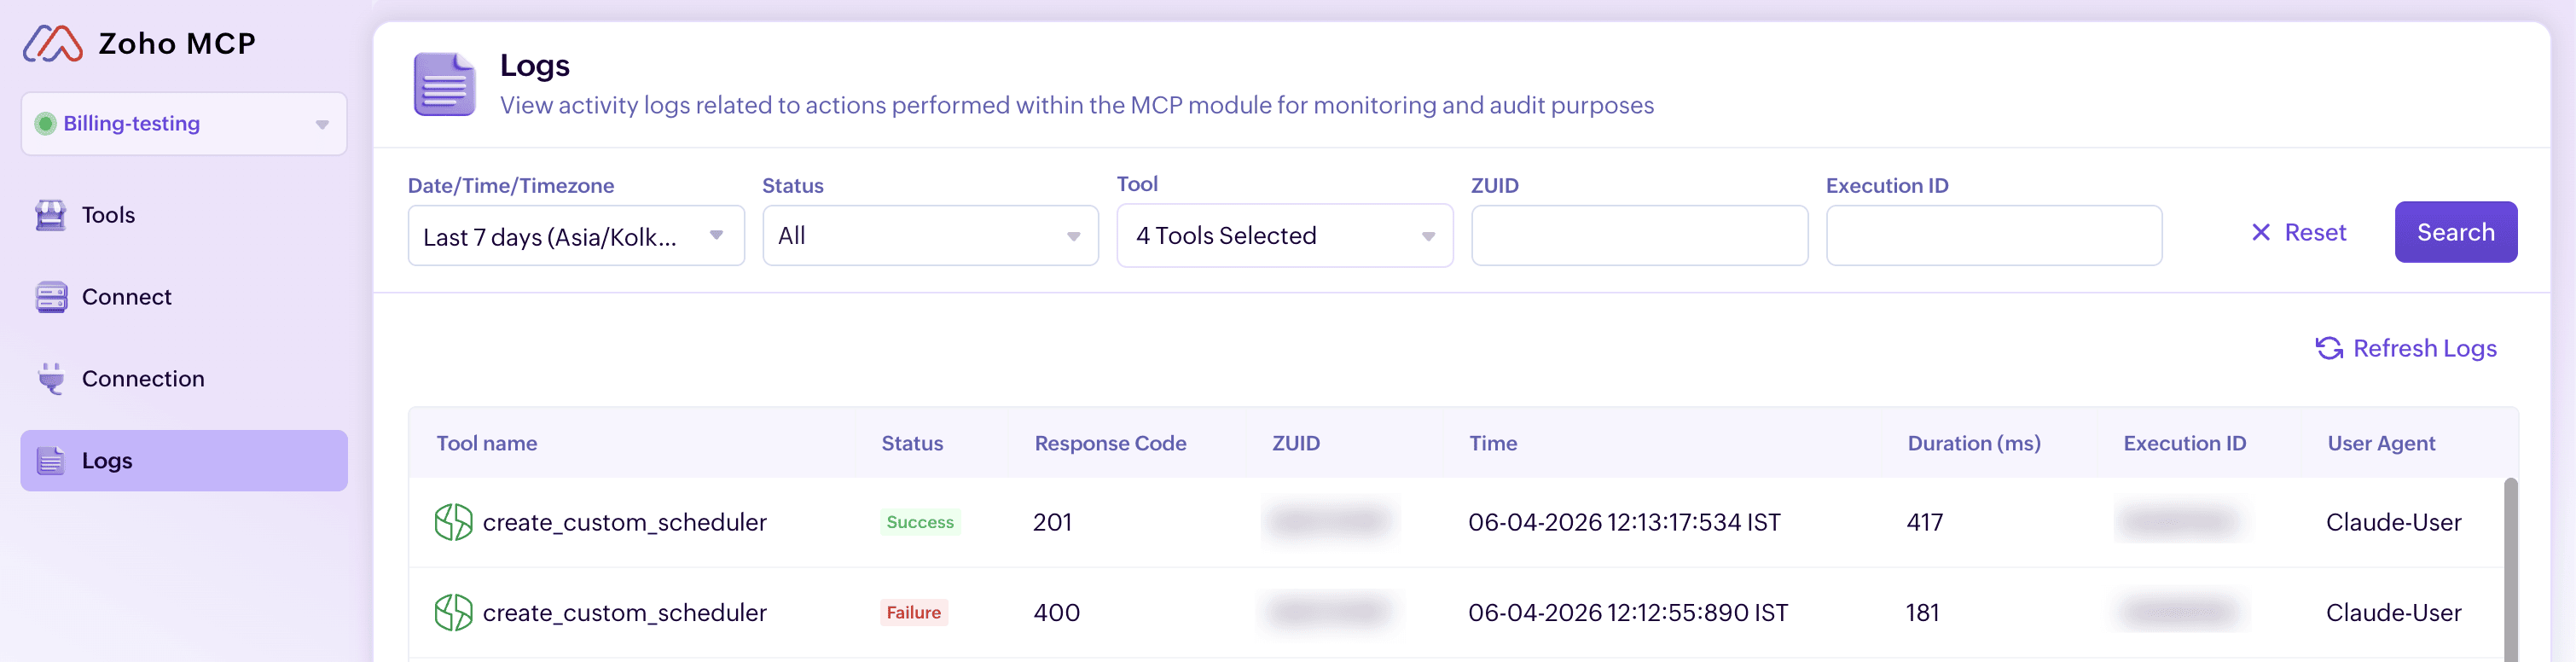
Each log entry captures the following:
| Field | What It Tells You |
|---|---|
| Tool | The specific Zoho Billing action that was called, such as Create Invoice or Get Records. |
| Status | Whether the tool call succeeded or failed. |
| ZUID | The Zoho User ID of the person whose AI model triggered the action. |
| Execution ID | A unique identifier for that specific tool call, useful when escalating an issue or cross-referencing with API logs. |
View Logs
The Logs page records every action performed through your Zoho MCP server. Each log entry captures what tool was used, who triggered it, whether it succeeded, and a unique identifier you can use to trace that specific execution.
- Log in to Zoho MCP account.
- Select the MCP server for which you’d like to view activity logs.
- Go to Logs in the left sidebar.
- Set filters Date, Time, Timezone, Status, Tool, ZUID, or Execution ID to narrow down the results.
- Click Search to view matching log entries.
Manage Your Connections
A connection provides your AI model with the access credentials such as OAuth access tokens and refresh tokens needed to interact with external services. Without one, the AI model can receive a prompt and identify the right tool, but cannot execute any actions.
Depending on how your organization works, you can choose to let each user authorize access themselves when they first use a tool, or you can set up a single admin-managed connection that powers all tool calls across the organization. Both approaches are supported, and you can switch between them at any time. Learn More
 Yes
No
Yes
No
Thank you for your feedback!