Emails
Add a personal touch to your invoices, order notifications and thank you mails. Make sure your clients and vendors perceive your care and commitment better, customize your emails to suit your business needs and the tone of your communication.
Sender Email Preferences
You can configure the email addresses that are used in the From field of emails sent from Zoho Inventory. However, these emails can sometimes land in your recipient’s spam folder, causing them to go unnoticed. This happens when the email address in the From field of an email belongs to a domain that does not have SPF and DKIM records.
By adding an SPF (Sender Policy Framework) record to your domain, your recipient’s mail server will be able to verify that Zoho Inventory is sending emails using your email address with your domain’s permission. Without the SPF record, the emails that Zoho Inventory sends on behalf of your domain will mostly end up in your recipient’s spam folder.
DKIM (Domain Keys Identified Mail) is also used for preventing spam and allows the recipient email server to verify whether an email was sent and authorized by the owner of that domain.
DKIM and SPF records are effective in preventing spam when used together. For this reason, Zoho Inventory will consider a domain as authenticated only if it has both SPF and DKIM records.
Domain Classification
Zoho Inventory has classified domains into 3 categories to help you identify the email addresses, which if used in the From field of emails, could cause them to go to the spam folder.
To find out which category your email addresses belong to:
- Go to Settings in the top right corner.
- Navigate to the Organization Settings.
- Click Email Notifications under Customization.
- Click Sender Email Preferences under Preferences in the left side bar.
The 3 categories that you will find in this page are:
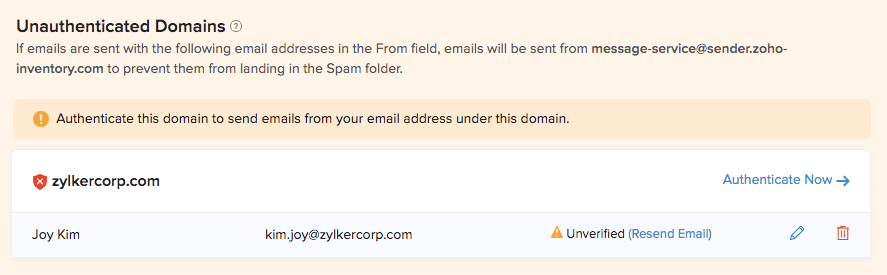
1. Unauthenticated Domains
Email addresses that belong to a domain without SPF and DKIM records will be listed here. If any of these email addresses are selected in the From field of an email sent from Zoho Inventory, the email address in the From field will be replaced automatically with message-service@sender.zoho-inventory.com, which is Zoho Inventory’ own email address. This is done to prevent the email you send from landing in the Spam folder.
It’s important to note that the message-service@sender.zoho-inventory.com address will only be used in the From address for emails and not the Reply-To address. i.e, your customers will still be able to see your name in their inbox and when they reply, their email will be delivered to your own email inbox.
To use the email addresses under this category in the From field, you must authenticate their domains.
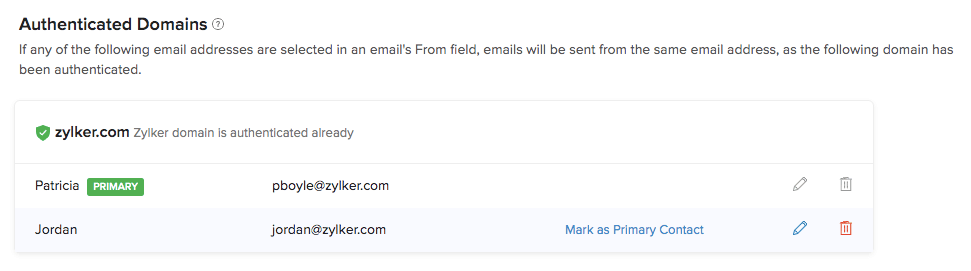
2. Authenticated Domains
Email addresses that belong to a domain with both SPF and DKIM records will be listed here. These email addresses can be used in the From field of emails sent from Zoho Inventory without worrying about them ending up as spam.
3. Public Domains
If you use an email address that belongs to a public domain, such as Gmail or Yahoo Mail in the From address of emails sent from Zoho Inventory, it will be replaced with message-service@sender.zoho-inventory.com. This is because SPF and DKIM records cannot be added for public domains and can only be added for domains that you own.
If you still wish to use emails listed in this category in the From address, you can do so by clicking Change Setting. Next, select Sender’s Email Address in the pop-up that follows.
Now, email addresses from public domains will not be replaced with message-service@sender.zoho-inventory.com.
Warning: We strongly recommend that you use message-service@sender.zoho-inventory.com instead of email addresses from a public domain to prevent your emails from ending up as spam.
Authenticate Domains
Emails listed under the Unauthenitcated Domains section can be authenticated by adding SPF and DKIM records for their domains.
To do this:
- Go to Settings in the top right corner.
- Navigate to the Organization Settings.
- Click Email Notifications under Customization.
- Click Sender Email Preferences under Preferences in the left sidebar.
- Click Authenticate Now next to the domain that you want to authenticate.
- Now, copy the SPF record from the pop-up that follows, and add it to your domain name provider’s (e.g. Daddy) DNS settings.
- Next, copy the Host Name and Value for the DKIM record and add it to the DNS settings of your domain name provider.
- Once you’ve added both the SPF and DKIM records, click Validate.
Insight: It will take a while for your newly added records to reflect on the DNS server. If your validation fails, wait for a while and try again. Also, you can continue to use Zoho Inventory while the records are being validated.
A few points to note about adding SPF and DKIM records:
- If an SPF record already exists for your domain, i.e, you’ve added an SPF record for a different service in the past, you must remove v=spf1 from the SPF record before adding it to your domain.
- If you use GoDaddy as your domain name provider, the Host Name for the DKIM record will have to be slightly modified. You will have to remove your domain name alone from the record, before adding it. For example, if the Host Name is 1522406527365._domainkey.patricia.com, you will have to remove your domain name and add 1522406527365._domainkey alone.
Now, your domain has been authenticated and it will be listed under the Authenticated Domains category. The emails from this domain can be used in the From address, without having it replaced or worrying about it landing in spam.
Other Actions
You can perform a few other actions from the Sender Email Preferences page.
- Mark Primary Contacts
- Add New Sender Email Address
- Resend Verification Email
- Edit/Delete Email Addresses
Mark Primary Contacts
A primary contact is an email address that will be used as the point of contact between your Zoho Inventory’ organization and Zoho. Updates regarding your Zoho Inventory’ organization, such as subscription renewals and usage related emails will be sent to this email address.
Also, this email address will be used as default in the From address of emails sent from Zoho Inventory, unless you change it manually while sending an email.
To mark a contact as primary, hover over an email address and click Mark as Primary Contact.
Add New Sender Email Address
You will be able to add new sender email addresses and select them when you send emails from Zoho Inventory. To do this:
- Go to Settings in the top right corner.
- Navigate to the Organization Settings.
- Click Email Notifications under Customization.
- Click Sender Email Preferences under Preferences in the left sidebar.
- Click the + New Sender button on the top right.
- Add a name and email address.
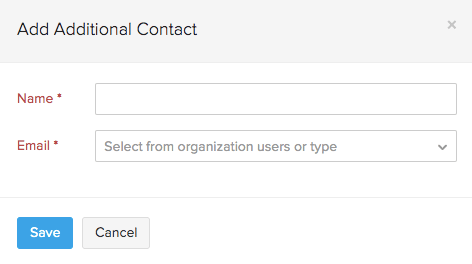
- Click Save.
Now, a verification email will be sent to the email address that you added. Once the email address has been verified, you will be able to use it in the From field of emails sent from Zoho Inventory.
Insight: Adding an email address this way will only enable the email address to be used for sending emails from Zoho Inventory and is not to be confused with adding users to your organization.
Resend Verification Emails
As mentioned in the previous section, when you add a new sender email address, a verification email will be sent to that email address. However, if the email was not received, you can resend the verification email. Here’s how:
- Go to Settings in the top right corner.
- Navigate to the Organization Settings.
- Click Email Notifications under Customization.
- Click Sender Email Preferences under Preferences in the left sidebar.
- Click Resend Email next to an email address that has not been verified yet.
The verification email will be sent again.
Edit/Delete Email Addresses
You can choose to edit or delete your users’ email addresses from Zoho Inventory by clicking the Pencil or Trash Can icons, respectively, which can be found on the right side of an email address.
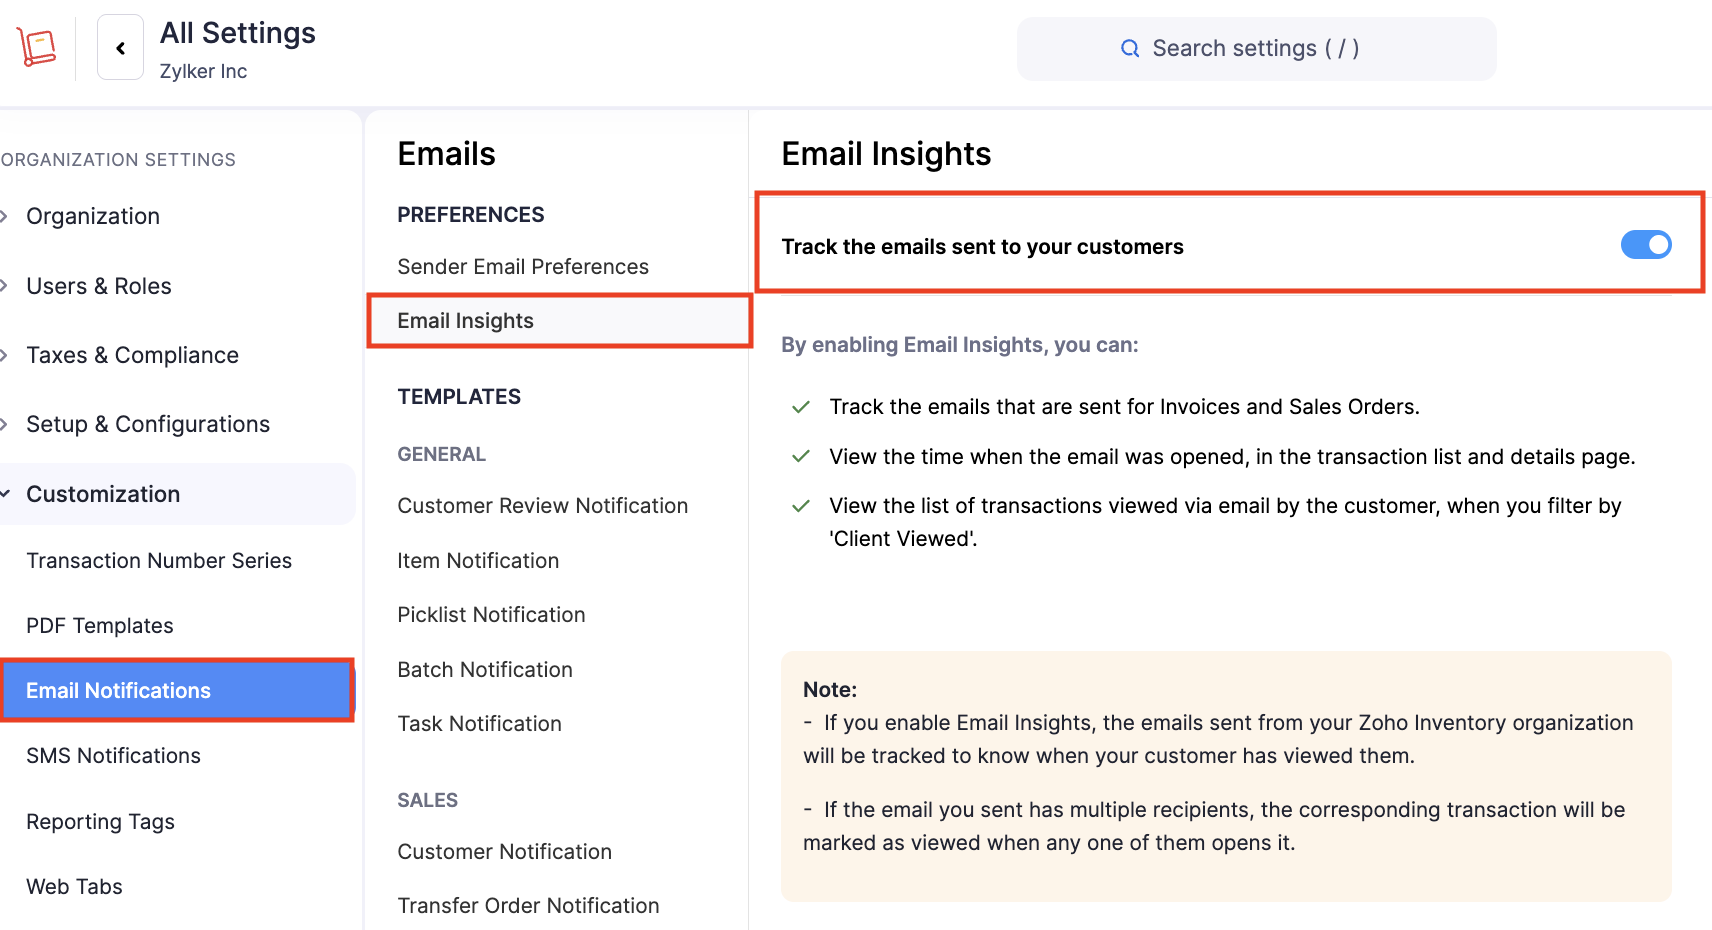
Email Insights
Email Insights allow you to view the date and time on which the transactions you’ve emailed your customers have been opened.
To enable email insights:
- Go to Settings in the top right corner.
- Navigate to the Organization Settings.
- Click Email Notifications under Customization.
- Click Email Insights under Preferences.
Enable the Track the emails sent to your customers option.
In the transactions list page, you can track the status of each email sent with the help of the following icons:
Closed Mail: The transaction has been sent via email.
Open Mail: The email has been opened by the recipient(s).
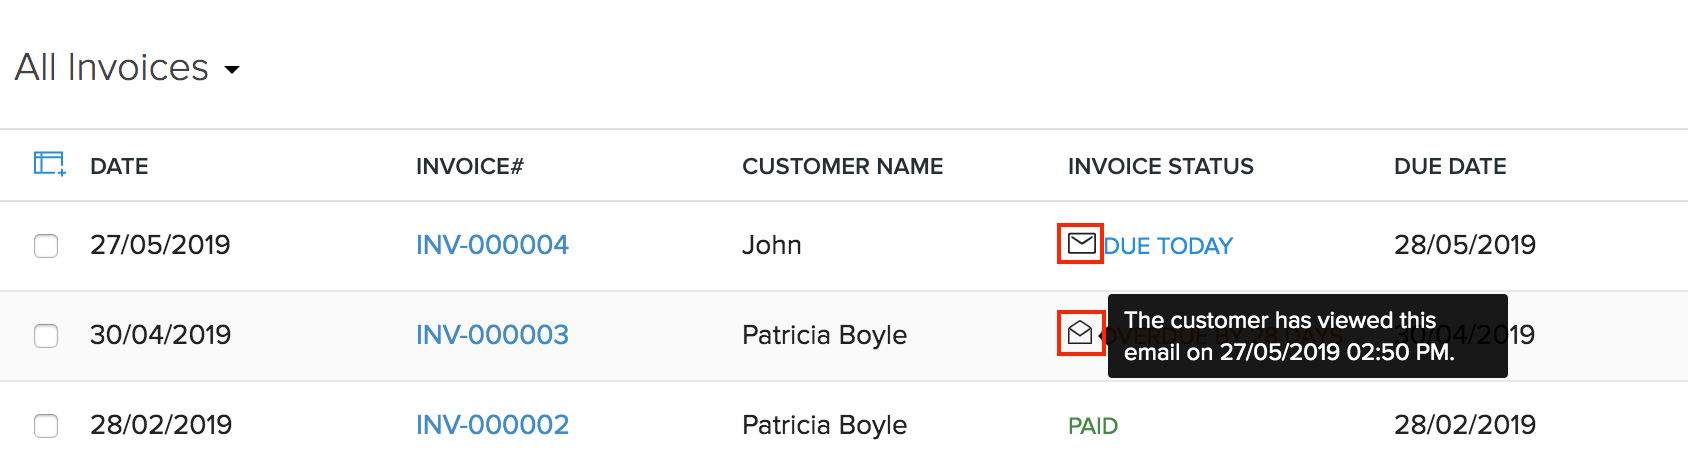
Insight: The transaction for which the email was sent is marked as viewed when any one recipient opens it.
Configuring Email Templates
To configure email templates,
- Go to Gear icon in the top right corner.
- Navigate to the Organization Settings.
- Click Email Notifications under Customization.
- Here you can choose the module for which you wish to customize the template.
- You can customize the pre-loaded templates or create new templates for invoices, sales orders and purchase orders and save them by clicking on the Save as New option near the bottom of the template.
- To edit a template, hover over the template you wish to edit and select the Edit button.
- After editing, press the Save button to save the changes.
- You can also edit your signature by clicking on the Edit Signature button at the bottom of the page.
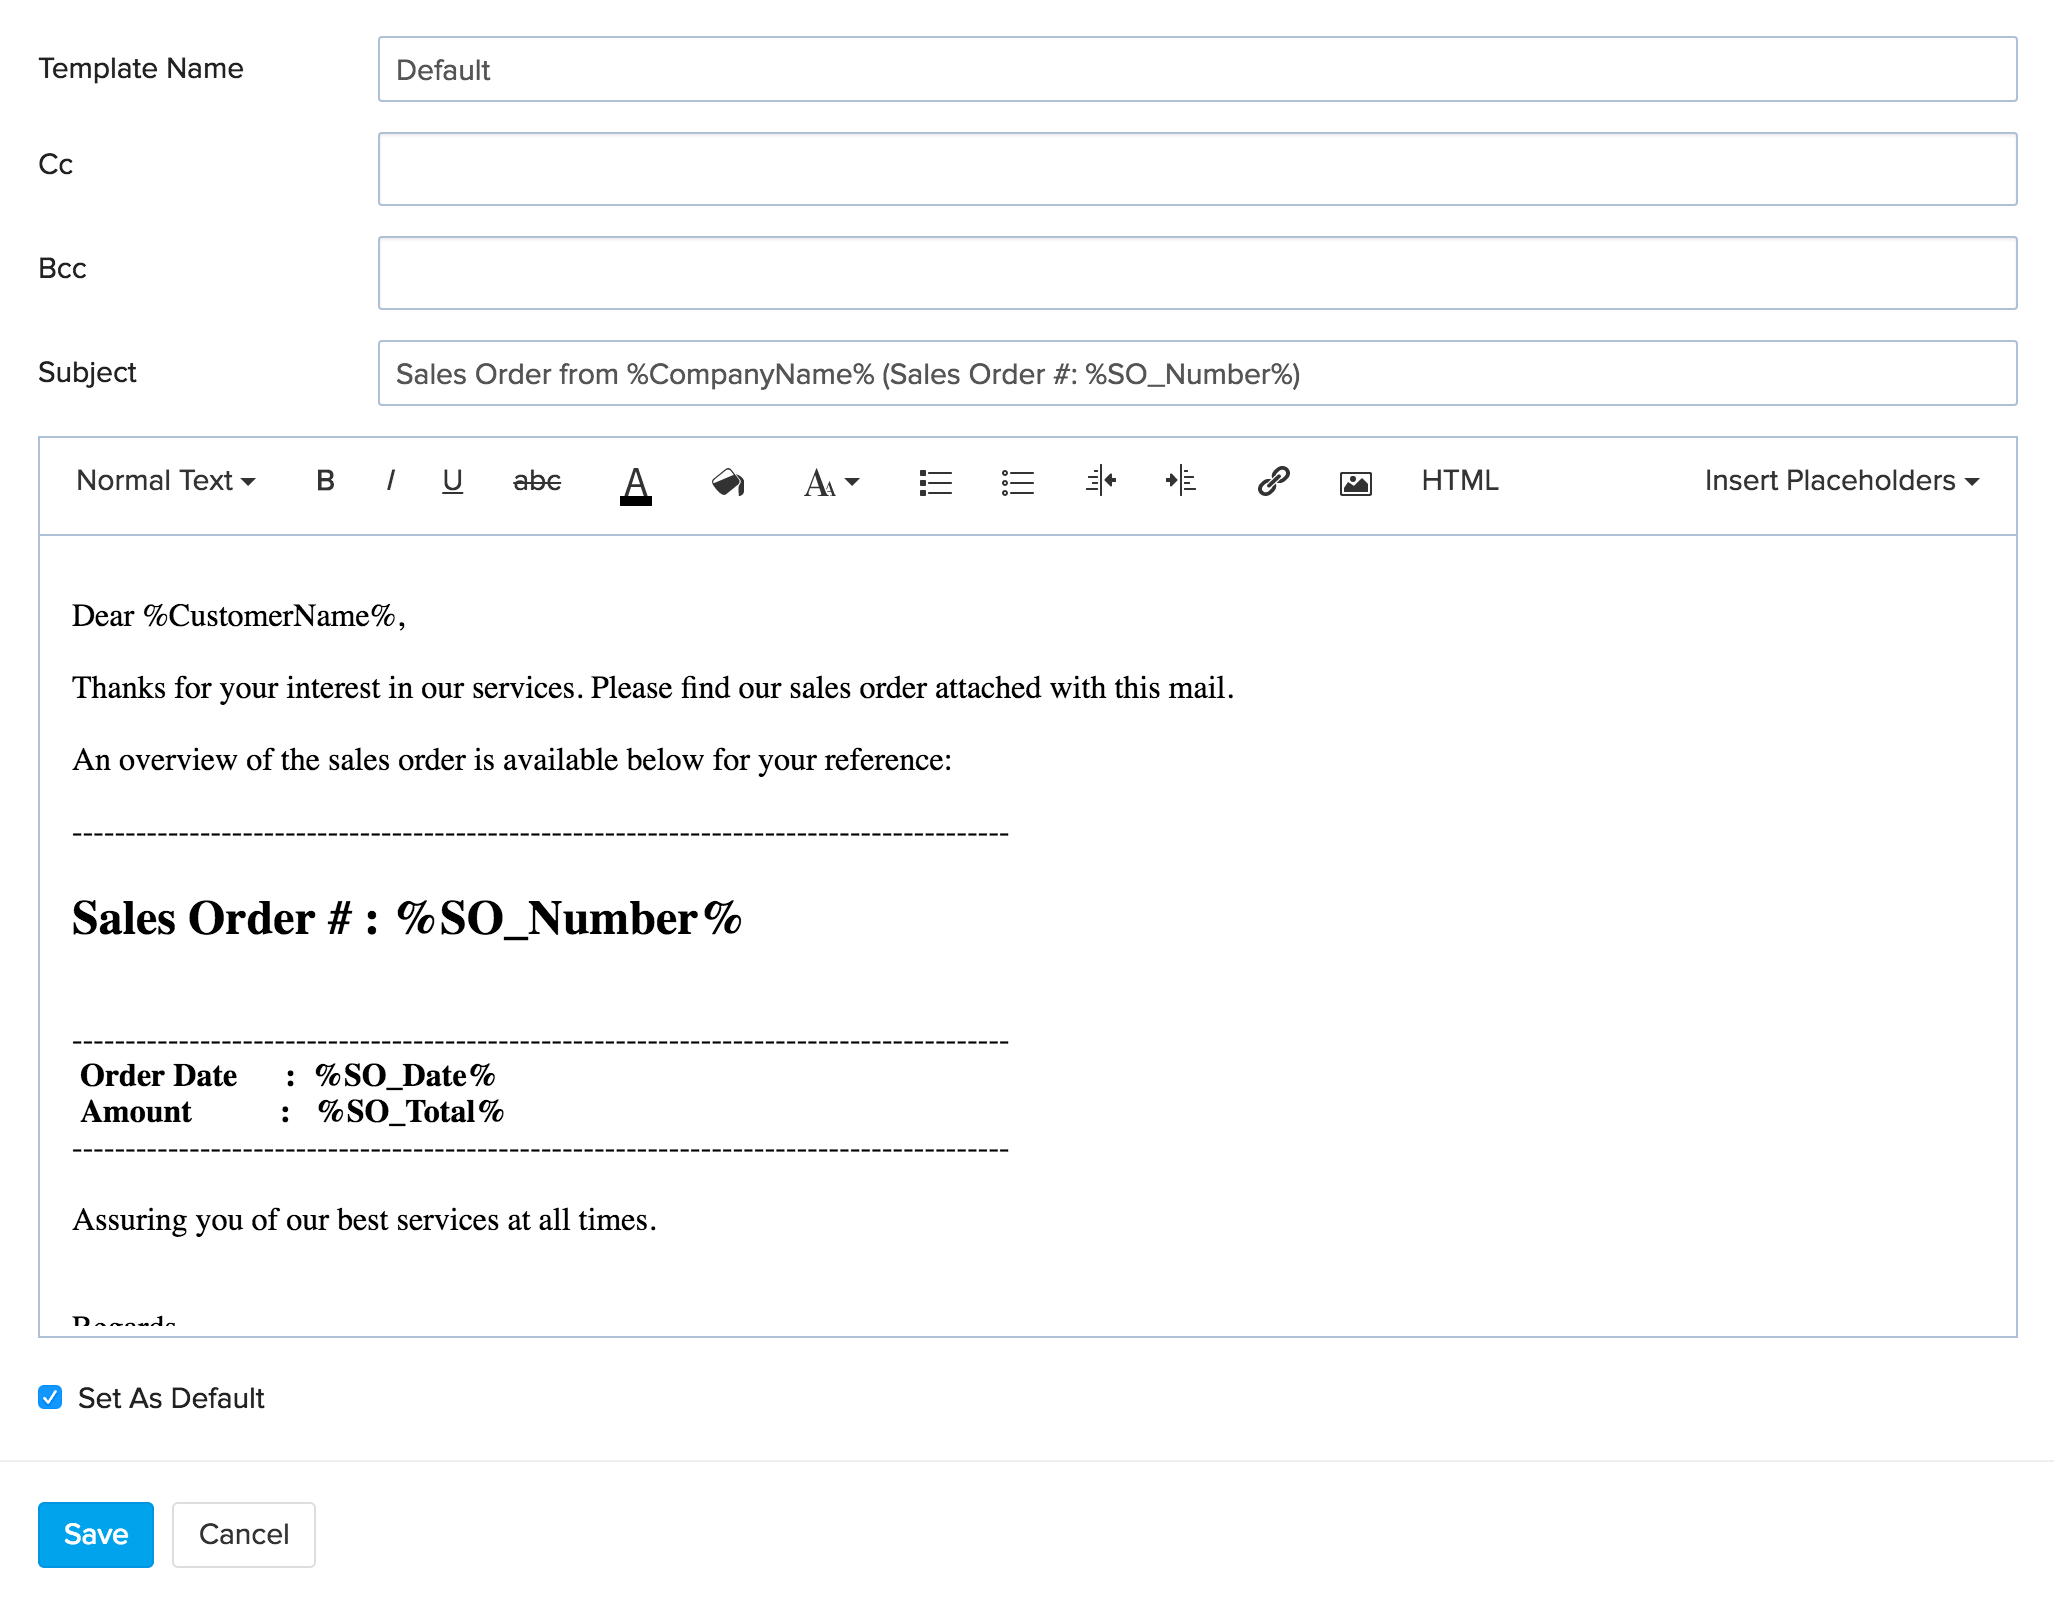
Customizing Email Templates
Under the ‘Email Templates’ section, you can select and assign the template from the drop down options of predefined default and custom templates for each of the following items:Invoice Notification, Purchase Order notification, Sales order notification.
To add a new Email Template:
- Hover over the template you wish to edit
- Click Edit from the dropdown.
- A new page from the Template section opens up.
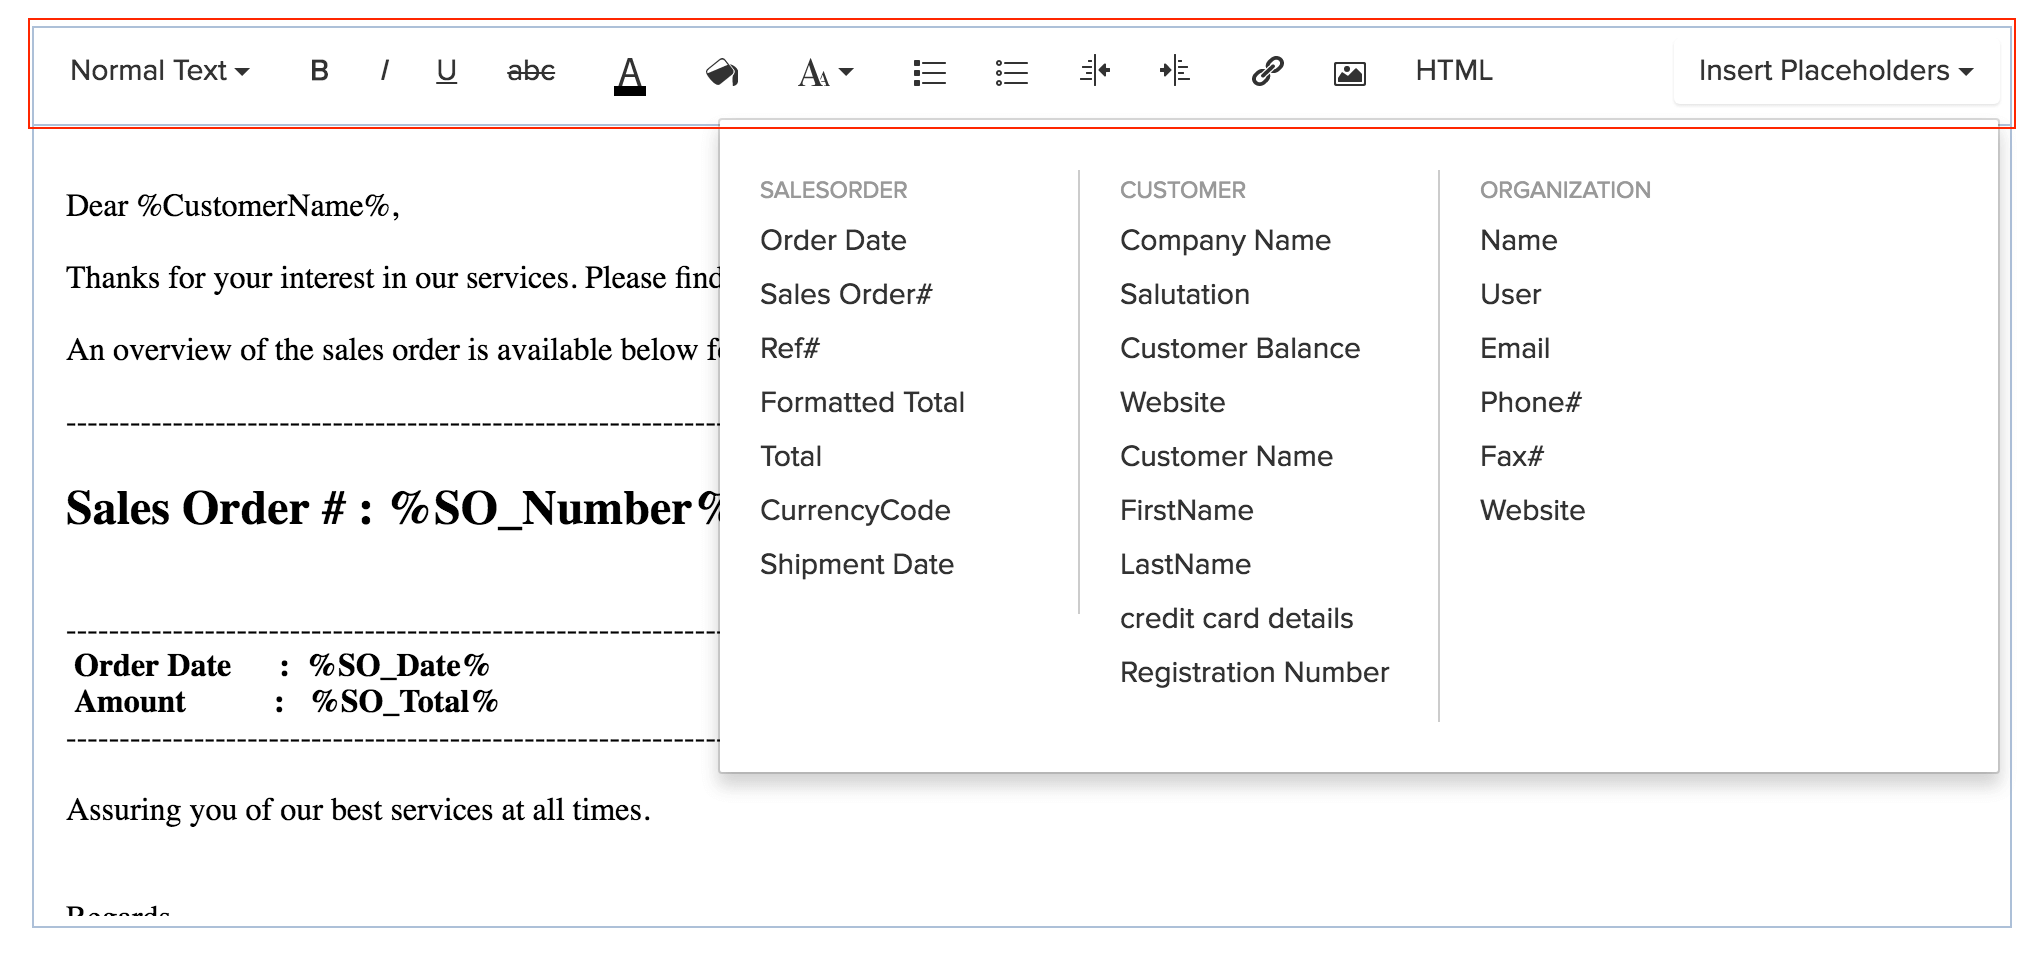
- Use the Rich Text editor to change the title, body message, text formatting, font size etc as desired.
- You can insert an image in the notification by placing your cursor where you would like the image to be placed and by clicking on the image icon. Provide a hyper link of the image in the field that appears.
- You can also provide a hyper link to specific part of the content. Just select the word or sentence that you wish to hyperlink, click on the hyper link icon and provide the relevant hyper link.
- In case you wish to add more dynamic content to your template, click on ‘Insert Placeholders’ button and select from the desired content title.
- If you wish to get a copy of the notifications you send to your customers, just check the box next to the field ‘Send a copy to me’, which is right toward the end of the page.
- Click Save to apply these changes and exit.
- To save these changes as a new template, click ‘Save as new’ instead.
- This template is now saved to the gallery as a new one and can be used for a specific customer.
- Click Save to confirm associating templates and proceed.