Help

Employees

The Employees module in Zoho Payroll allows you to add and manage employees’ personal and salary details, assign deductions to them, upload their IT Declaration and so much more.

Let’s see how you can:


Add Employees

To add an employee in Zoho Payroll,

  • Navigate to the Employees module on the left sidebar.
  • Click + Add New Employee.

Adding a new employee consists of 4 steps:
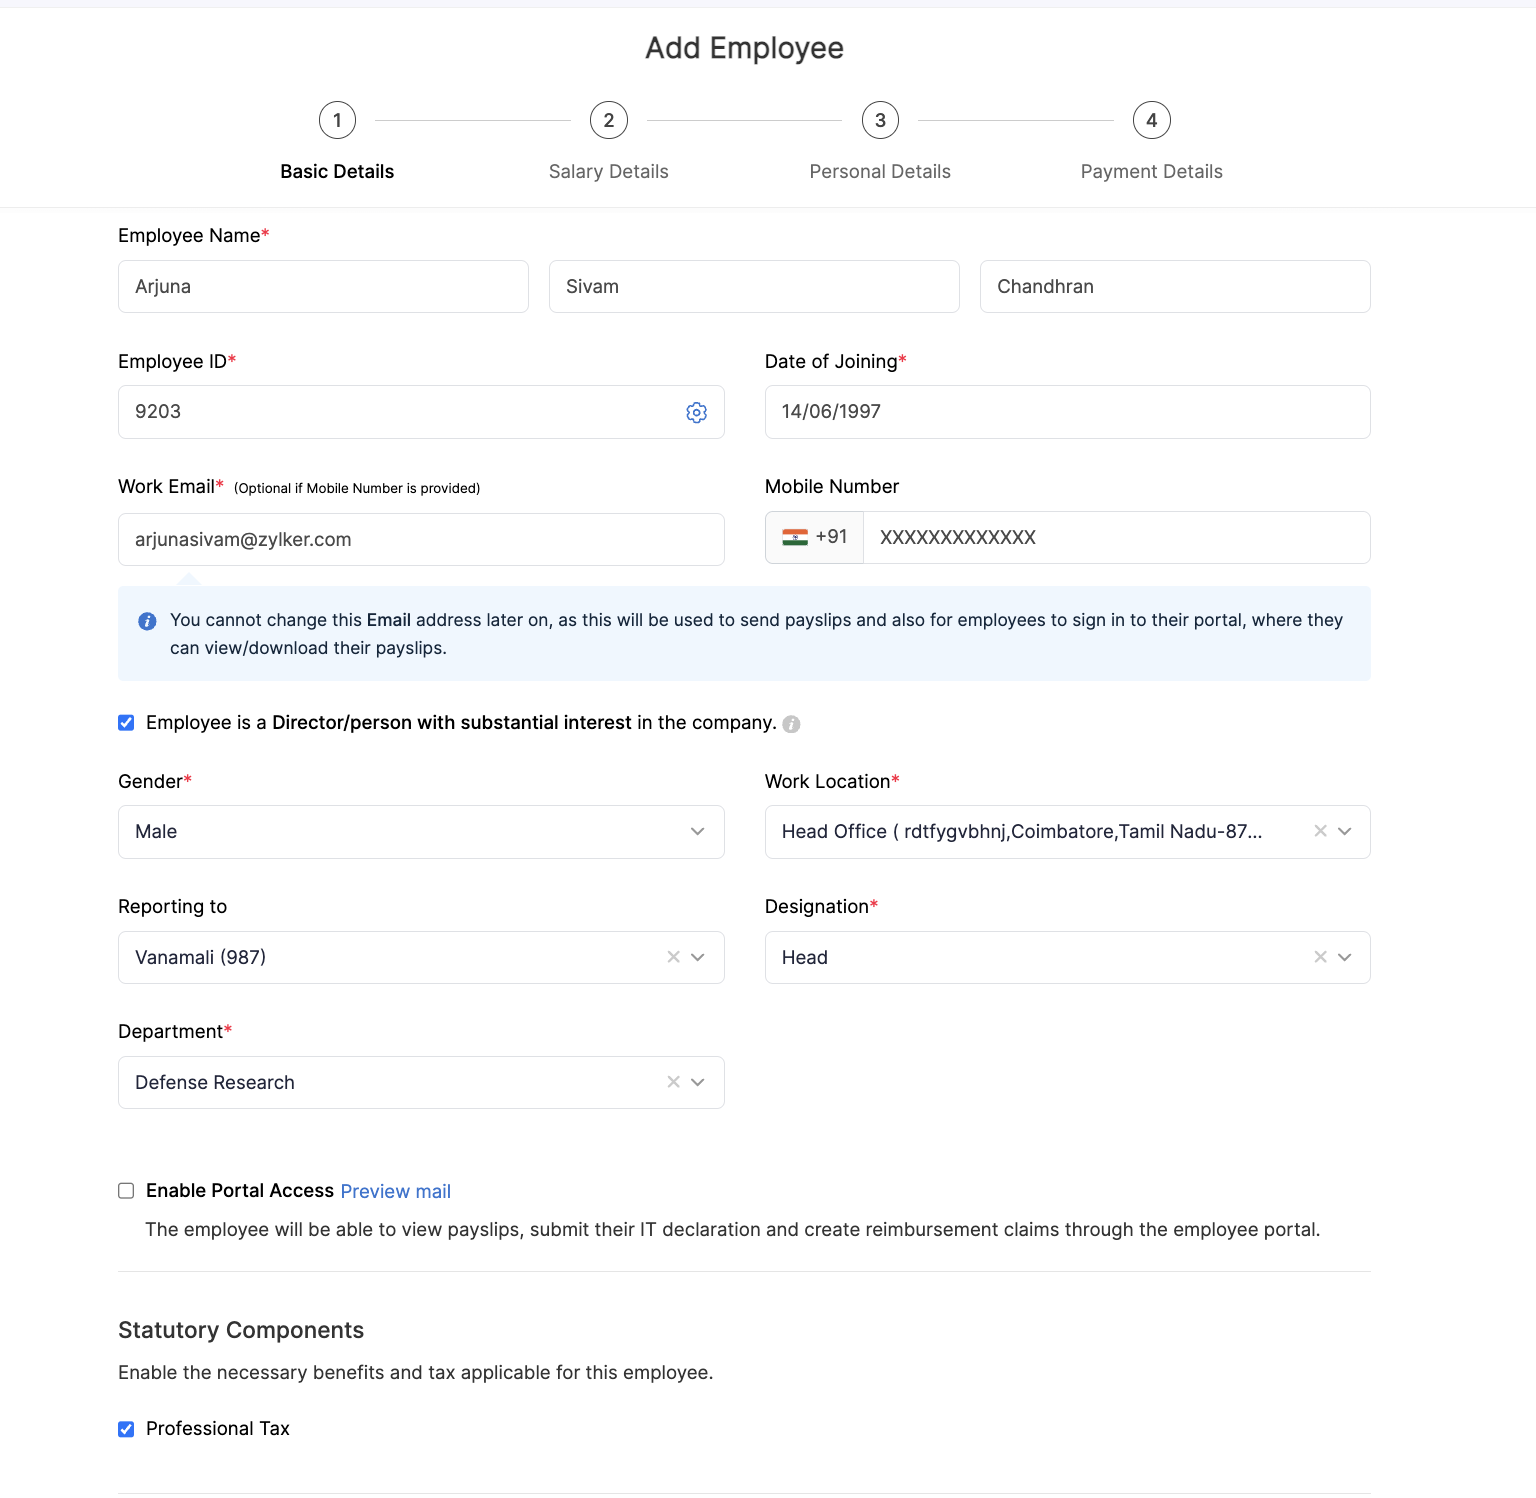

STEP 1: The Basics

Enter the employee’s basic details like Name, Employee ID, Date of Joining, Work Email Address and so on.

The Basics
Field Description
Employee Name Enter your employee’s first and last names. Middle name is optional.
Employee ID Enter the employee’s unique employee ID.
Gender Enter your employee’s gender.
Date of Joining This is the day on which the employee started working for your organisation. For an existing employee, choose their original date of joining. If it is a new hire, you can choose a date in the future.
Designation Enter the employee’s designation in your organisation.
Director/Employee with substantial interest Enable this checkbox if the employee is a Director or is a beneficial owner of shares and owns at least 20% of the voting power. This helps us fill out Form 12BA for your employees.
Work Email Address The employee’s payslips are sent to this address. Also, employees will be able to log into their employee portal using this email address, if you enable it for them.
Department Enter or select the department under which the employee would be working.
Work Location Select which branch your employee works from, if your organisation has multiple work locations.
Enable Portal Access Choose whether you want to enable Employee Portal for this employee. The employee can access their details, payslips and investments from the portal.
Statutory Components Enable the statutory components that the employee is eligible for.

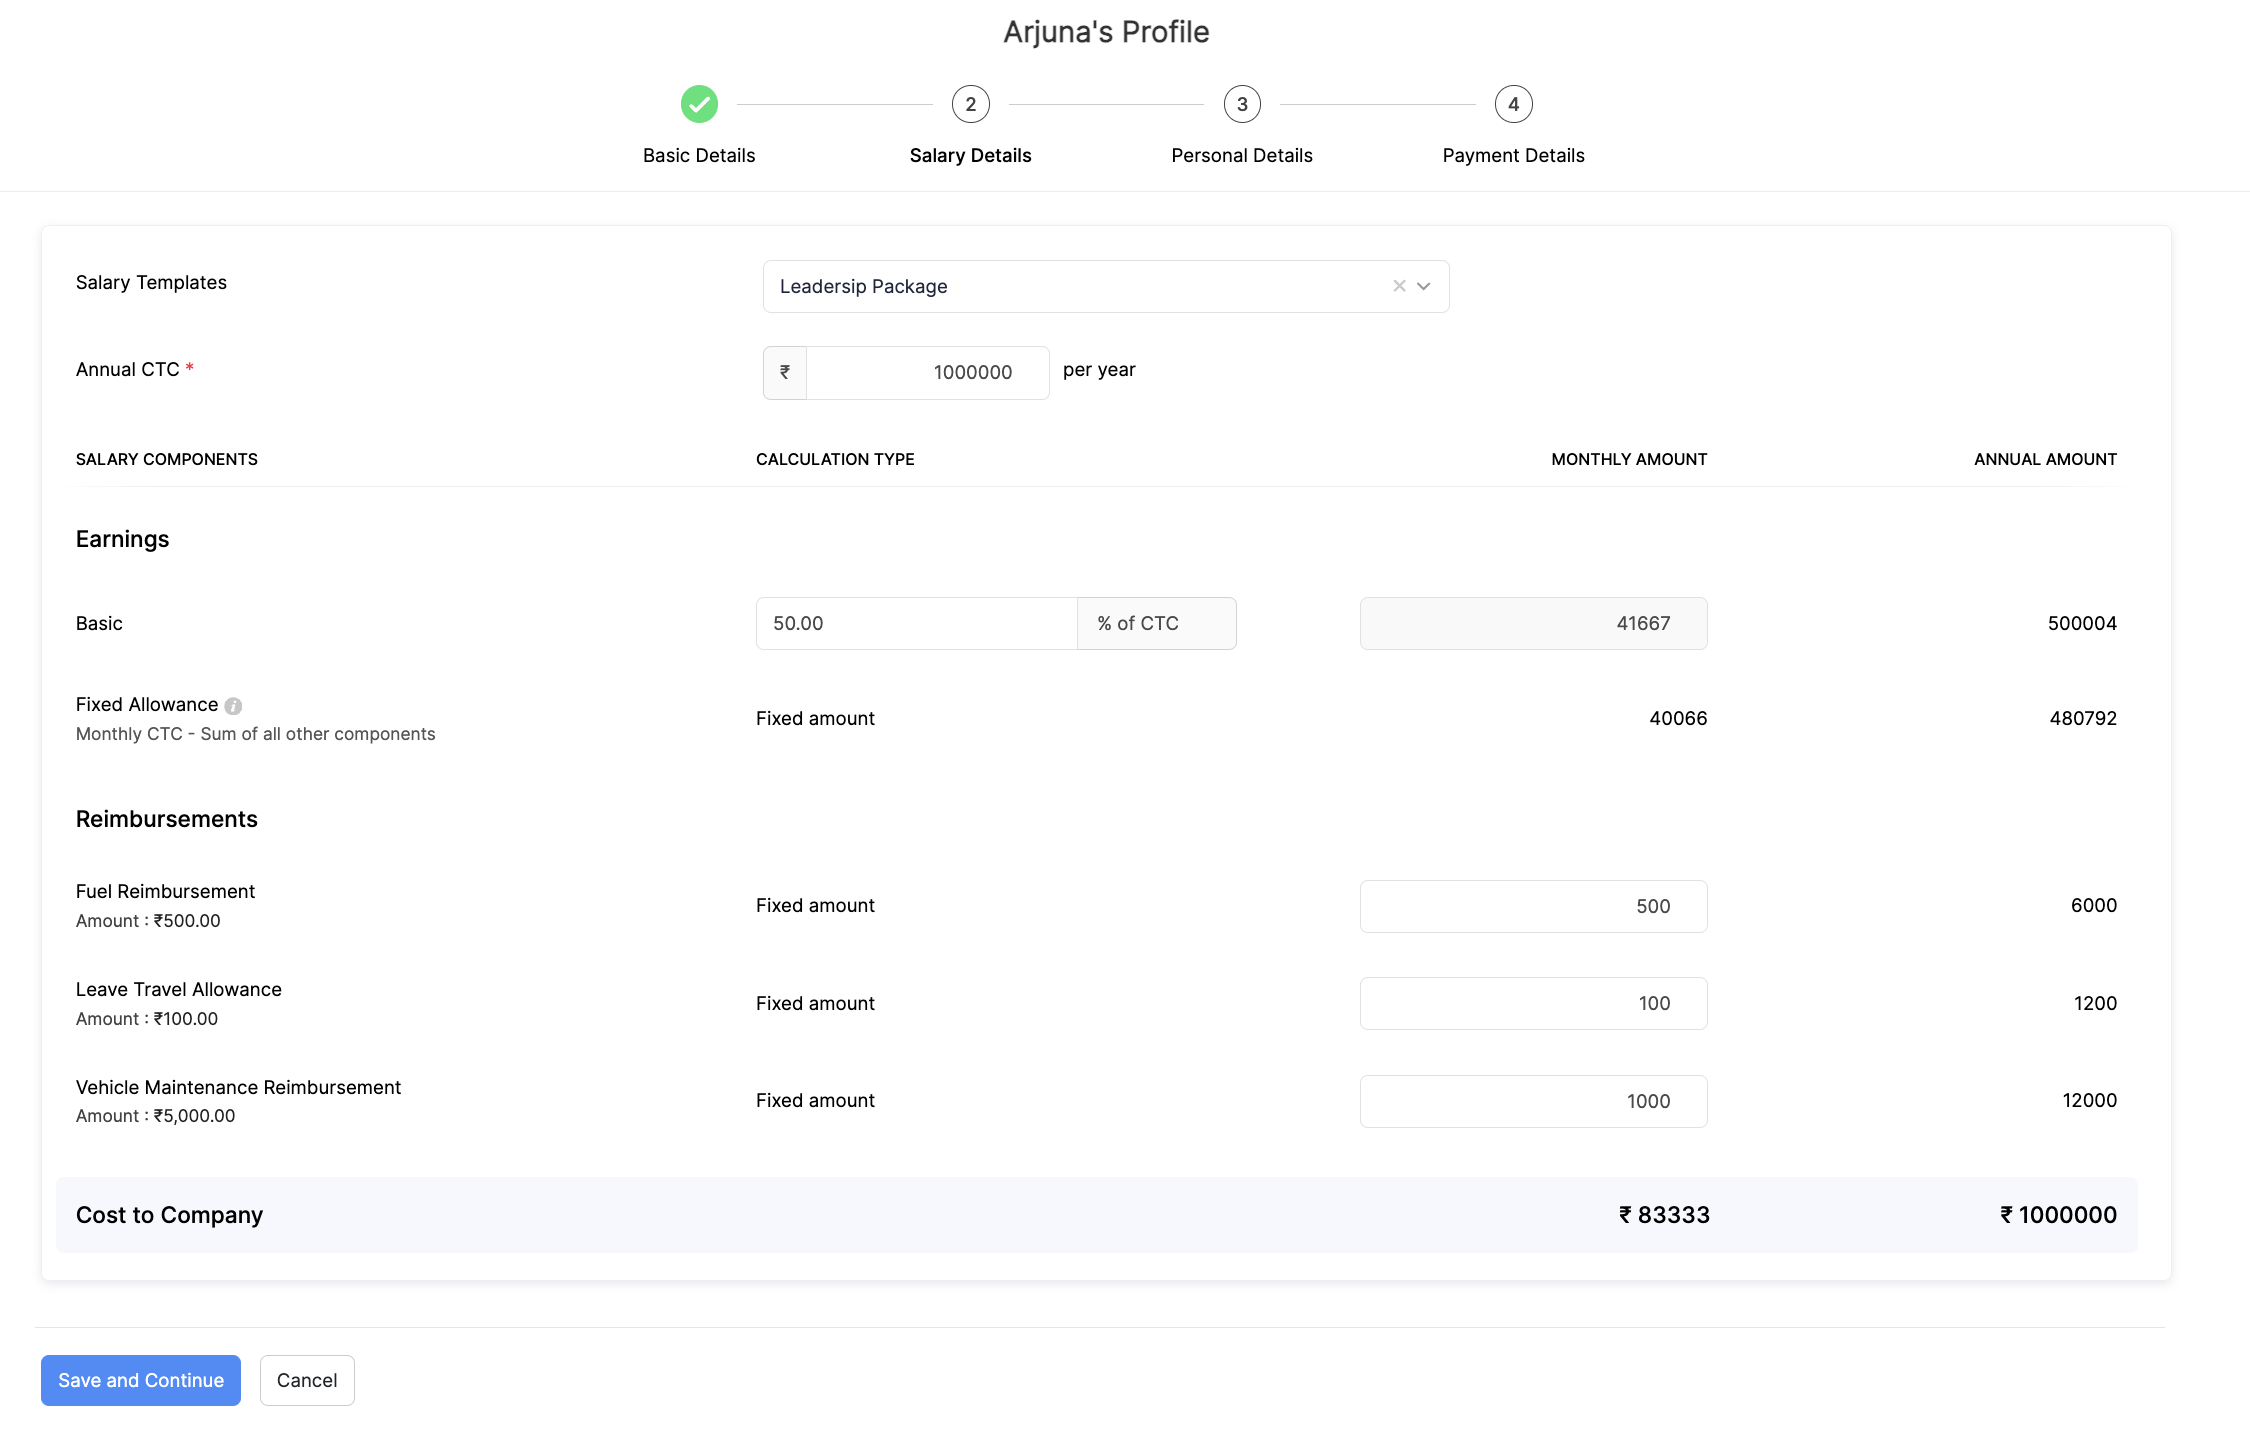
STEP 2: Salary Details

Enter the complete salary structure of your employee here.

  • Select a salary template if you have created one. If not, you can set salary templates for employees with similar CTC or pay structure.
  • Enter the employee’s Cost to Company (CTC). CTC refers to the gross salary before income tax and other deductions in a financial year.
  • Enter the amount/percentage of each earning, reimbursement and Flexible Benefit Plan (FBP) component. The amount remaining from the CTC after allocations are made for all other components, will be categorised under Other Allowances. The allocation for FBP components takes place through this component.
  • You can add deductions such as VPF or NPS later in the employee details page.
  • Click Save and Continue.
Salary Details

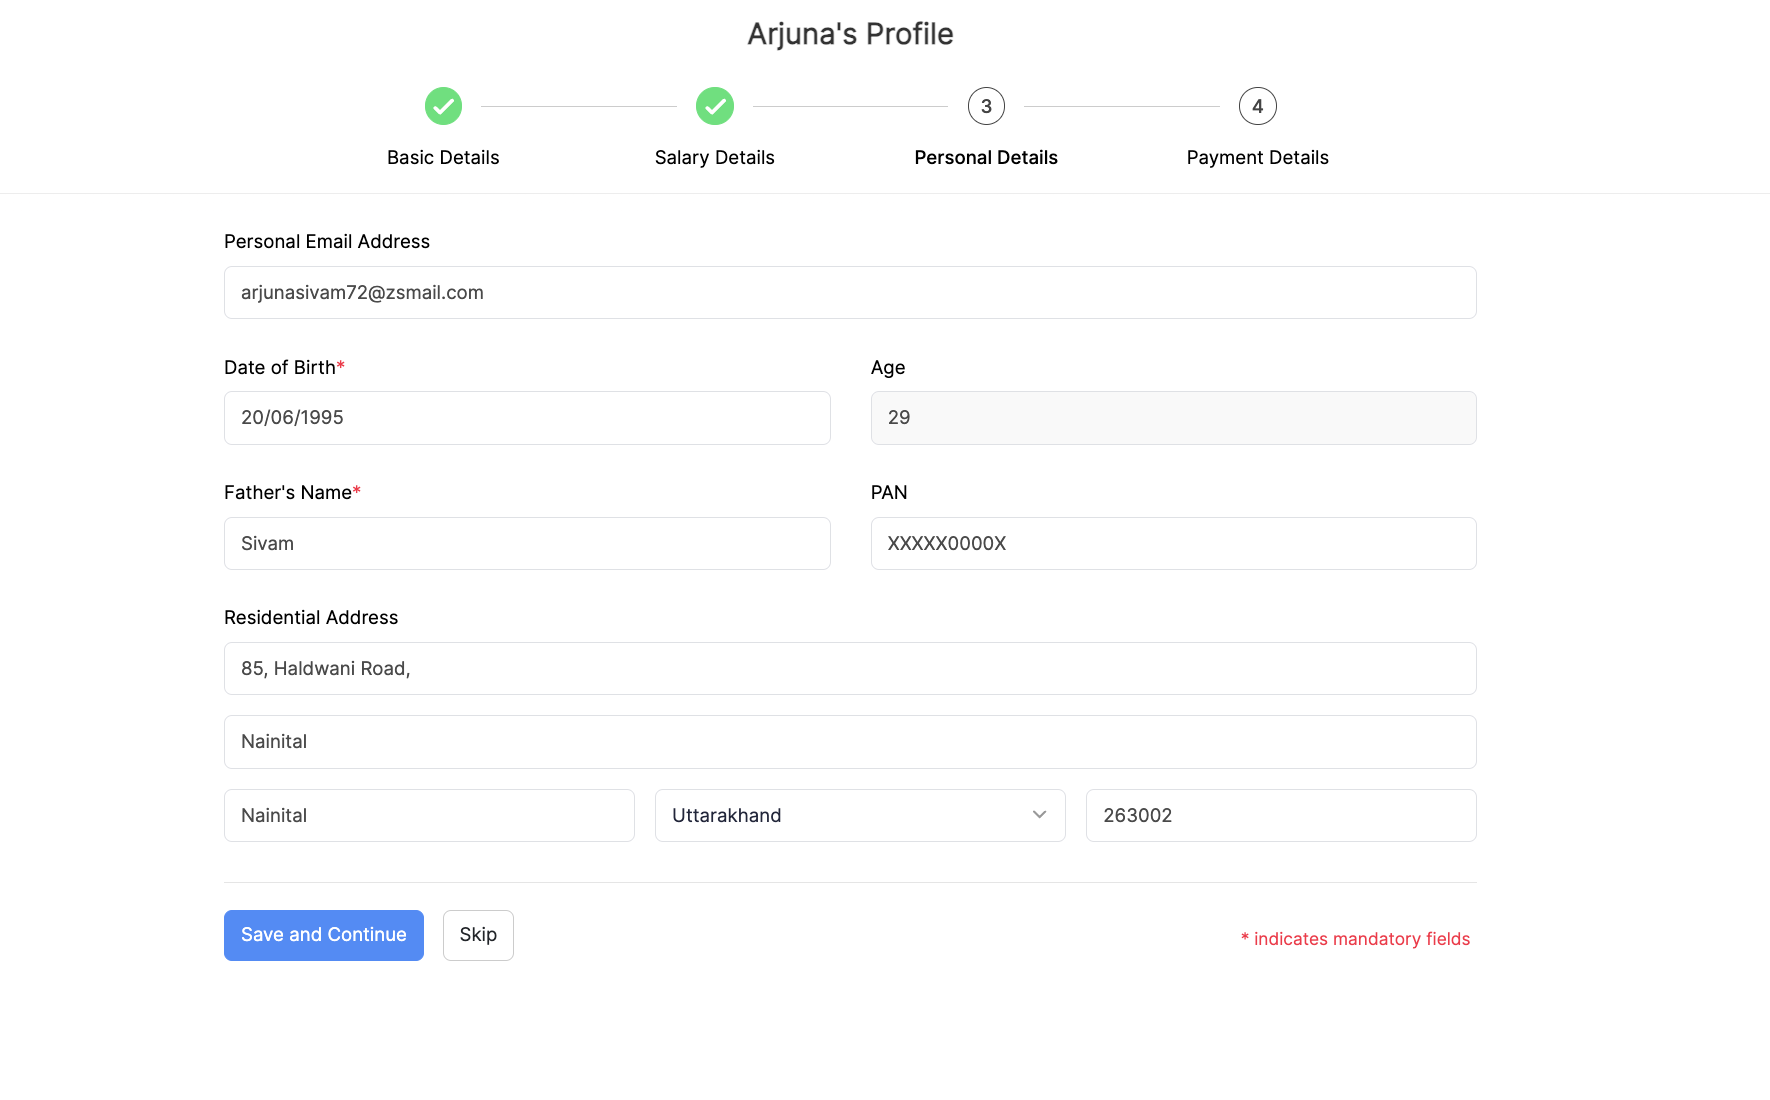
STEP 3: Personal Info

In this step, you must enter the following personal details of the employee:

  • Personal Email Address
  • Mobile Number
  • Date of Birth
  • Father’s Name
  • PAN
  • Residential Address

If you’ve enabled any custom fields, you can fill out that information in the Other Details section.

Click Save and Continue to move to the next step.

Note: All personal information about your employees will be encrypted and stored in our secure servers. Read our Security Policy.

Personal Info

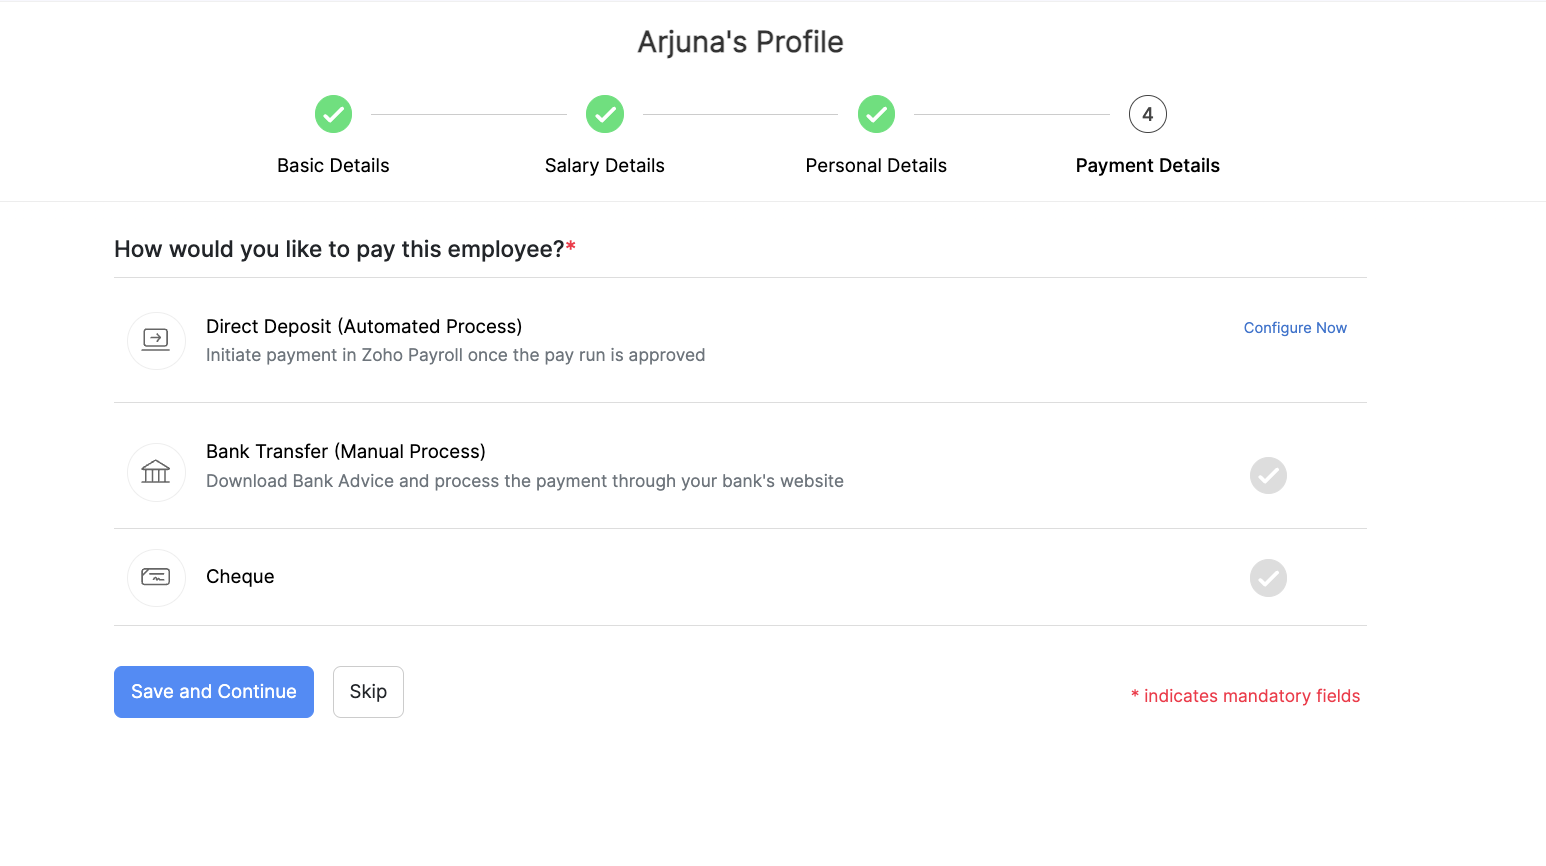
STEP 4: Payment Info

Choose the payment method you would like to use to pay this employee.

  • Direct Deposit: Transfer the money directly to your employee’s bank account. You would have to configure Yes Bank or HSBC Bank for your Zoho Payroll organisation to choose this payment method.

Note: Direct Deposit will not be enabled by default. Please contact support@zohopayroll.com and we’ll enable it for you.

  • Bank Transfer: Manually transfer the money to your employee’s bank account.
  • Cheque: Manually send cheques to your employees and record it in Zoho Payroll.
Payment Mode

Edit Employee

To update employee details such as mobile number, address or payment mode, you would have to edit the employee details.

To edit an employee:

  • Navigate to the Employees module on the left sidebar.
  • Select the employee whose details you want to edit.
  • Click the edit icon next to the section that you want to edit.
Edit Employee
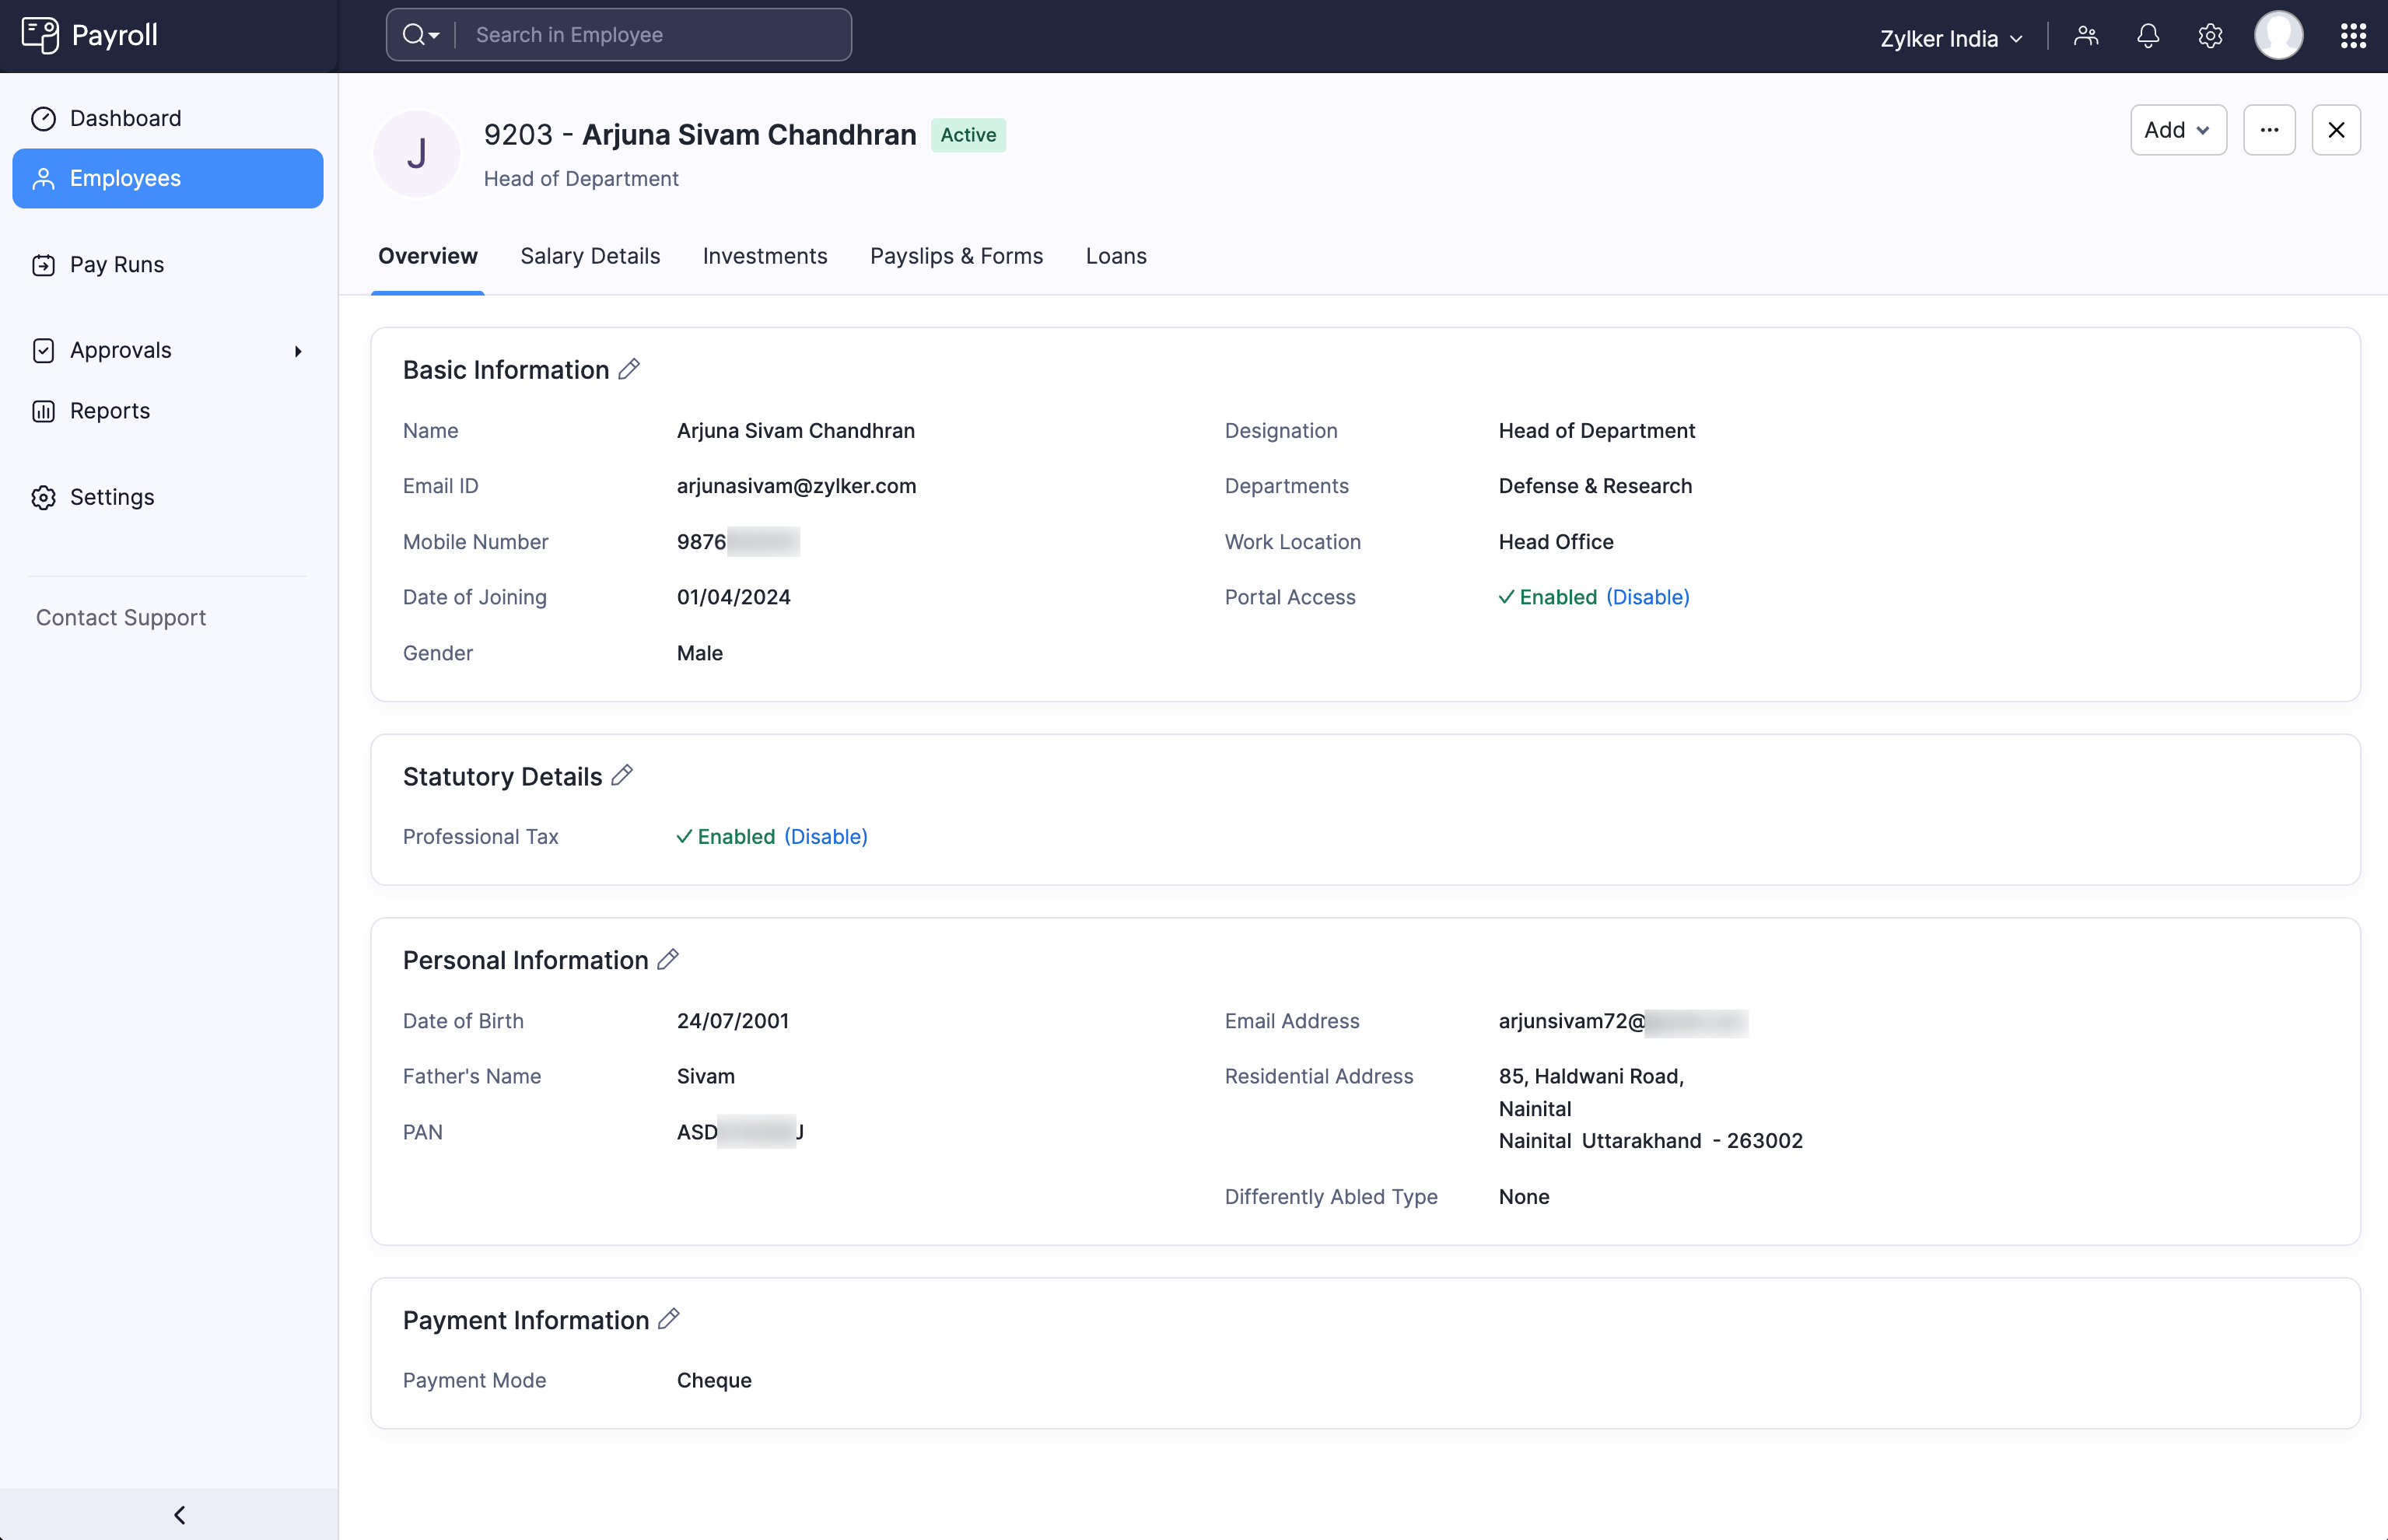
  • Click Save once you finish editing the details.

Delete Employee

If an employee is not a part of any current or completed pay runs, you can delete them from Zoho Payroll.

  • Navigate to the Employees module on the left sidebar.
  • Click the name of the employee whose details you want to delete.
  • Click More (three-doted icon) and select Delete Employee.

Note: The employee you want delete must not have any IT, POI, Perquisite, Claims details in Zoho Payroll or expenses in Zoho Expense associated with him/her.


Employee Exit

If an employee exits from your organisation, whether it is due to termination by the employer, resignation, death, or due to some disabilities, you’ll have to Initiate Exit Process for that employee in Zoho Payroll.

Note: It is recommended that you collect the POI (Proof Of investments) before you initiate the exit process.

To initiate exit process:

  • Go to Employees from the left sidebar and select the employee for whom you want to initiate the exit process.
  • Click More icon and select Initiate Exit Process.
Initiate Exit Process
  • In the Employee Exit Details page, you’ll have to enter details regarding the exit.
Exit Details
Field Description
Last Working Day Enter the last working day of the employee.
Reason for Exit Reason the employee is leaving the organisation.
Personal Email Address The employee’s personal email address in which you’ll be sending the full and final settlement payslip, TDS sheet and Form 16.
Notes Internal comment for initiating the exit process.
  • Click Proceed after entering all the details in the respective fields.

Process Final Settlement Payroll

Once you’ve entered the Exit details of the employee, you’ll be redirected to the Final Settlement Payroll page, where you can:

  • Enter the Organisation’s Payable Days and Employee’s Payable Days for that particular month.
  • Enter the LOP (Loss Of Pay) days, if any.
  • Enter Additional Earnings for the employee if any. Additional earning is an earning other than the employee’s regular salary.
Final Settlement Payroll
  • If any amount has to be deducted from the employee’s salary, you can enter it under Deductions by clicking Add Deduction.
Add Deduction
  • You can enable notice pay by checking the option under Notice Pay for the employees who are in their notice period.
  • If the organisation owes the employee, select Payable and if the employee owes the organisation, you can select Receivable.
  • Enter the amount in the Payable Amount or Receivable Amount field.
Notice Pay
  • If you want to enter any note in the final settlement slip, you can add them under Notes.
  • Click Save and Continue to proceed.
  • In the following page, click Submit to proceed with the exit. If you’re a user who has approve access then click the Submit and Approve button.

After getting the pay run approved, you’ll have to record payment in the Pay Runs page. Here’s how:

  • Go to Pay Runs and click View Details & Pay.
  • Click Record Payment on the top right corner of the page.
  • Select the payment date and check the Send payslip notification to exited employee option, if you want to send payslip notification to the employee.
  • Click Confirm to record the payment.
Record Payment

Filter Exited Employees

You can filter exited employees using the Exited Employees filter in the Employees page. To do that:

  • Go to Employees and click the filter dropdown on the top-left corner.
Filter Exited Employees
  • Select Exited Employees from the dropdown and you’ll be able to view all the employees who exited from your organisation

You can also filter employees based on their reason for exit. Here’s how:

  • Click the Reason for Exit dropdown on the top left corner.
  • Select the exit type.
Filter by Reason

Employee Exit for Organisations Integrated With Zoho People

  • Log in to your Zoho People account.
  • Go to Settings and then navigate to Employee Profiles.
  • Select the employee’s profile for whom you want to initiate the exit process.
People Integration
  • Scroll down to Employee Status and select the status as either Terminated or Resigned from the dropdown.
  • Enter the Exit Date.
  • Click Submit.
  • Now, go to your Zoho Payroll organisation and navigate to Zoho Apps from Settings.
  • Click View Details next to Zoho People.
  • Click Instant Sync to sync the data of your Zoho People organisation with Zoho Payroll.

Note: By default, the data gets synced every 24 hours.

Click Instant Sync

On the right side of your Home page, a notification will be shown regarding the exit of the employee along with the Exit Process button under To Do Tasks.

  • Click the Exit Process button in the To Do Tasks section and you will be redirected to the Final Settlement Payroll page where you’ll have to process the final settlement payroll.
To Do Tasks

Revert Exit Process

There might be cases where you might rehire an employee. In such cases, you can revert the exit process. Here’s how:

  • Go to Employees and select the Exited Employees filter.
Filter Exited Employees
  • Select the employee for whom you want to revert the exit process.
  • In the Overview page, click the More icon and select Revert Exit Process.
Select Revert Exit Process
  • In the following popup, enter the reason for reverting the exit process and click Proceed.
Revert Exit Process
  • After clicking Proceed, you’ll be redirected to the Employee’s Profile. You’ll have to enter the salary details of the employee again in the Salary Details page.

Other information of the employee will be populated automatically as per the information entered earlier. You can edit those details if needed.

Rehire Employees

The Rehire Employee feature in Zoho Payroll allows you to rehire a previously terminated employee easily. If the employee had worked at your organisation in the previous financial year, Zoho Payroll will automatically fetch their details for this financial year when they are rehired.

Note: This feature is only available in early access. Reach out to support@zohopayroll.com and we’ll enable it for you.

Scenario: The Mechanical Troupe company has recently received new funding, and they now have the resources to rehire several employees who were let go during the recession. One of these employees is Shakir, who worked at the company for 6 months before being terminated. The HR department decides to use the Rehire Employee feature in Zoho Payroll to bring Shakir back.

Once the HR department rehires Shakir, all his employee details from the last financial year will be available in Zoho Payroll. They need not enter the employee details manually.

Points to note before you rehire an employee:

  • The employee’s full and final settlement pay run should be completed and paid to rehire the employee.
  • There should be no pending loans associated with the employee you’re trying to rehire.
  • You’ll only be able to rehire an employee once.

How Previous Employment Details Will Be Handled in Zoho Payroll

Here’s some details you would want to know about when you rehire an employee:

Data Handling
Tax If the employee is terminated and rehired in the same fiscal year, their previous income details will be included in the current payslip and TDS. The previous salary will be added to the Gross Earnings section in TDS.
Investment Declaration If the employee submitted their proof of investment during their final settlement, their investment declaration will be retained when they are rehired. Otherwise, their investment declaration will be cleared for the fiscal year.
Proof of Investments (POI) Proof of investments will be retained for rehired employees.
Form 16 Form 16 will be issued for rehired employees in the fiscal year. Previous salary details will be included in gross salary.
Form 24Q For rehired employees, a single line item will be added in Form 24 Q to declare salary, exemptions, taxes, etc., for the fiscal year.

Zoho Payroll has specific procedures for handling employee rehires, depending on the employee’s job history.

Case 1 - Managing Payroll for Rehired Employees with No Interim Employment: Let’s assume, your employee worked in your company for two years before resigning from his position. After six months of being unemployed, he was rehired by your company. Zoho Payroll needs to accurately calculate the employee’s income details for the current financial year, taking into account their previous employment in your company.

Since the employee did not have any interim employment between leaving and returning to your company, Zoho Payroll will only consider their previous income details from your company.

Case 2 - Managing Payroll for Rehired Employees with Previous Employment: If an employee leaves your company to join Company B and later returns to your company within the same financial year, Zoho Payroll will include their previous income details from both your company and Company B in the current payslip and TDS. To ensure accuracy, you must enter the income details from Company B when rehiring the employee.

Case 3 - Navigating Multiple Employment History: If an employee leaves Company A to join your company, then later leaves your company to join Company C, and finally returns to your company within the same financial year, Zoho Payroll will include their previous income details from all three companies in the current payslip and TDS. To ensure accuracy, you must add the income details from both Company A and Company C and enter them as income details in Zoho Payroll when rehiring the employee.

Rehire Employees

You can rehire an employee or rehire multiple employees by importing them. Here’s how you can rehire an employee:

  • Go to Employees on the left sidebar and select the exited employee you want to rehire.
  • Click the More icon in the top right corner and click Rehire Employee.
Rehire Employees
  • Enter the Rehire Date.

Note: The employee’s new Date of Joining (DOJ) should be after the employee termination month. For example, if the employee exited on June 21st, 2022, the new DOJ can be provided after July 1st, 2022.

  • Click Proceed.
Rehire Employees

After rehiring an employee, the employee’s basic, personal, and payment information will be retained. However, you need to provide the new salary and statutory information accordingly.

Pro-Tip: If the rehired employee worked at a different organisation this financial year, you can import their previous employment details. The employment details during their time in your organisation are already available in Zoho Payroll.

Import Rehired Employees

Here’s how you can import employees to Zoho Payroll:

  • Go to Employees on the left sidebar.
  • Click the More icon in the top right corner and click Import.
Rehire Employees
  • Select Employee Rehire Import as the import type.
Rehire Employees
  • Upload the data in a CSV (Comma Separated Values), TSV (Tab Separated Values), or XLS (ExceL Spreadsheet) file. Also, select the character encoding based on your import file and click Next.
  • Map the relevant fields and click Next again.
  • Preview the import data and click Import.

In conclusion, to rehire an employee in Zoho Payroll, you need to update the rehired employee’s previous employment information and add them back to the payroll. Make sure to communicate any changes or updates to the employee and ensure that all necessary paperwork is completed.

Rehire Employees with Zoho People Integration

If you have integrated Zoho Payroll with Zoho People, rehiring employees becomes even more streamlined. Once employees and their details have been fetched from Zoho People, you can easily rehire them.

This is particularly helpful when an employee has been terminated in Zoho People, their full and final settlement payroll has been processed in Zoho Payroll, and then they are rehired on a future date, marked as active again in Zoho People.

Zoho People uses the previous employment details already available in Zoho Payroll, making it efficient and accurate.

Here’s how the rehiring process works with Zoho People integration:

  • Open Zoho People.
  • Click Settings on the left sidebar and select Employee Profiles or Users.
Rehire Employees
  • Select the exited employee you wish to rehire.
  • Select their employment status as Active and enter their new date of joining.
Rehire Employees
  • Next, remove their Date of Exit.
  • Click Save.
Rehire Employees

The latest details of the synced employees will be available in Zoho Payroll when you perform click Instant Sync. However, the profile of the employee will be incomplete. Complete all the details of the employee to rehire the employee successfully.


Adding Deductions:

Pre-tax

A pre-tax deduction is money taken out of the employee’s pay before income tax is calculated. As a result, they reduce the employee’s net taxable income and thereby reduce income tax. An example is deductions made towards schemes like National Pension Scheme (NPS) or Voluntary Provident Fund (VPF).

Disclaimer: Zoho Payroll does not deposit the deductions to the vendors on your behalf. You would have to deposit the deductions by yourself.

To associate a pre-tax deduction with an employee,

  • Go to the employee details page.
  • Click Add > Pre-Tax Deduction.
  • Select a previously created deduction or add a new deduction.
  • To add a new pre-tax deduction, click + New Deduction.
  • Enter the Deduction Name.
  • Select the Deduction Type and the investment which you want to associate with this deduction.
  • Enter the Employees’ Contribution per pay period, in flat amount or a percentage of (Basic Pay + DA).
  • Select when you want the deduction to expire.
  • Click Save.
Pre-tax Deductions

Post-tax

A post-tax deduction is money taken out of your employees’ pay after income tax has been calculated. This does not affect the net taxable income of the employee. Purchases made in the company grocery store or food court are examples of post-tax deductions.

To associate a post-tax deduction with an employee,

  • Go to the employee details page.
  • Click Add > Post-Tax Deduction.
  • Select a previously created deduction, or add a new deduction.
  • To add a new deduction, click + New Deduction.
  • Enter a Deduction Name.
  • Enter the Amount. It could either be a flat amount or a percentage of (Basic Pay + DA).
  • Select whether it is a one-time or a recurring deduction.
  • Click Save.
Post-tax Deductions

Salary Revision

If your employee reaches a predefined goal or has shown continued excellent performance, you can reward them by giving them a pay hike. You can do this by revising their salary from the Employees module.

  • Go to the employee details page.
  • Click the Salary Details tab.
  • Click Revise Salary. You can only revise your employee’s salary if they are involved in at least one completed pay run.
Revise Salary
  • Increase the employee’s CTC by a percentage, or enter a new CTC.
  • You can also change the amount allocated for each earning and reimbursement component.
Salary Revision
  • Enter the Effective From month and Payout Month.
  • Effective From - The revised salary will be applied to the employee from this month.
  • Payout Month - The revised salary will be paid to the employee on this month.
Payout Preferences
  • For example, if the Effective From month is May 2019 and the Payout Month is July 2019, the existing salary will be paid on May and June. However, the excess amount for those months will be kept aside and paid on July as arrears, along with the revised salary.
  • Click Save.

The salary revision will be applied in pay runs once it is approved from the Approvals module.


More Actions

You can submit IT Declaration and POI on your employees’ behalf.

Request a demo

*
*
*
*
*
*
*
*

By clicking the "Submit" button, you agree to our Privacy Policy.