

Functions in e-Invoicing
This guide will help you learn about the various actions you’ll be able to perform in Zoho Invoice as part of e-Invoicing.
Statuses of e-Invoicing in Zoho Invoice
Here are the various statuses related to e-Invoicing in Zoho Invoice.
| Status | Description |
|---|---|
| Yet-to-be Pushed | The transaction is yet to be pushed to the IRP for e-Invoicing. |
| Pushed | The transaction was pushed to the IRP successfully, and a QR code and IRN has been generated for it. |
| Push Initiated | The transaction is being pushed to the IRP as part of a bulk push action. |
| Cancelled | The e-Invoiced transaction has been cancelled in both Zoho Invoice and the IRP. The IRN associated with it is no longer valid. |
| Marked as Cancelled | The e-Invoiced transaction has been marked as cancelled in Zoho Invoice alone. You’ll have to cancel it in the GST portal to make the IRN invalid. |
| Failed | The transaction could not be pushed to the IRP. |
The e-Invoicing system requires the following transactions to be pushed to the IRP. An IRN will have to be generated for each of these transactions:
- Invoices
- Credit Notes
- Debit Notes
Insight: This guide explains how to push invoices to the e-Invoicing portal from Zoho Invoice. However, Credit Notes and Debit Notes can also be pushed in a similar manner.
Create Invoices
The Government has mandated a set of fields that are required for an e-Invoice. Some of these are available when creating new invoices. The other mandatory fields will be available for that invoice if you’ve already entered them in Zoho Invoice (e.g. in the Customers or Items modules)
Here’s a list of some of the mandatory fields:
| Module | Mandatory Fields |
|---|---|
| Organisation (Seller) Details |
|
| Customer (Buyer) Details |
|
| Transaction Details (Invoice, Credit Note, Debit Note) |
|
| Item Details |
|
*Addresses must include: Street1, City, Zip/Postal Code, and State
The other mandatory fields depend upon the business needs of the supplier. For example, the Dispatch From address is mandatory if it’s different from the seller address. The Shipping address is mandatory if it’s different from the buyer address.
Push Invoices to the IRP
Invoices in Zoho Invoice can be sent to the e-Invoicing portal with the click of a button. If you have enabled transaction approval, then the invoices must be approved before you can push them to the IRP. If you’ve set up multi-level approval, then you can push invoices only after they’ve been approved by the final approver.
Note: You have to push an invoice to the IRP successfully before sending it to the customer.
Here’s how you can push invoices to the IRP:
- Go to Invoices.
- Select the invoice that you want to push to the portal.
- Click the Push to IRP button.
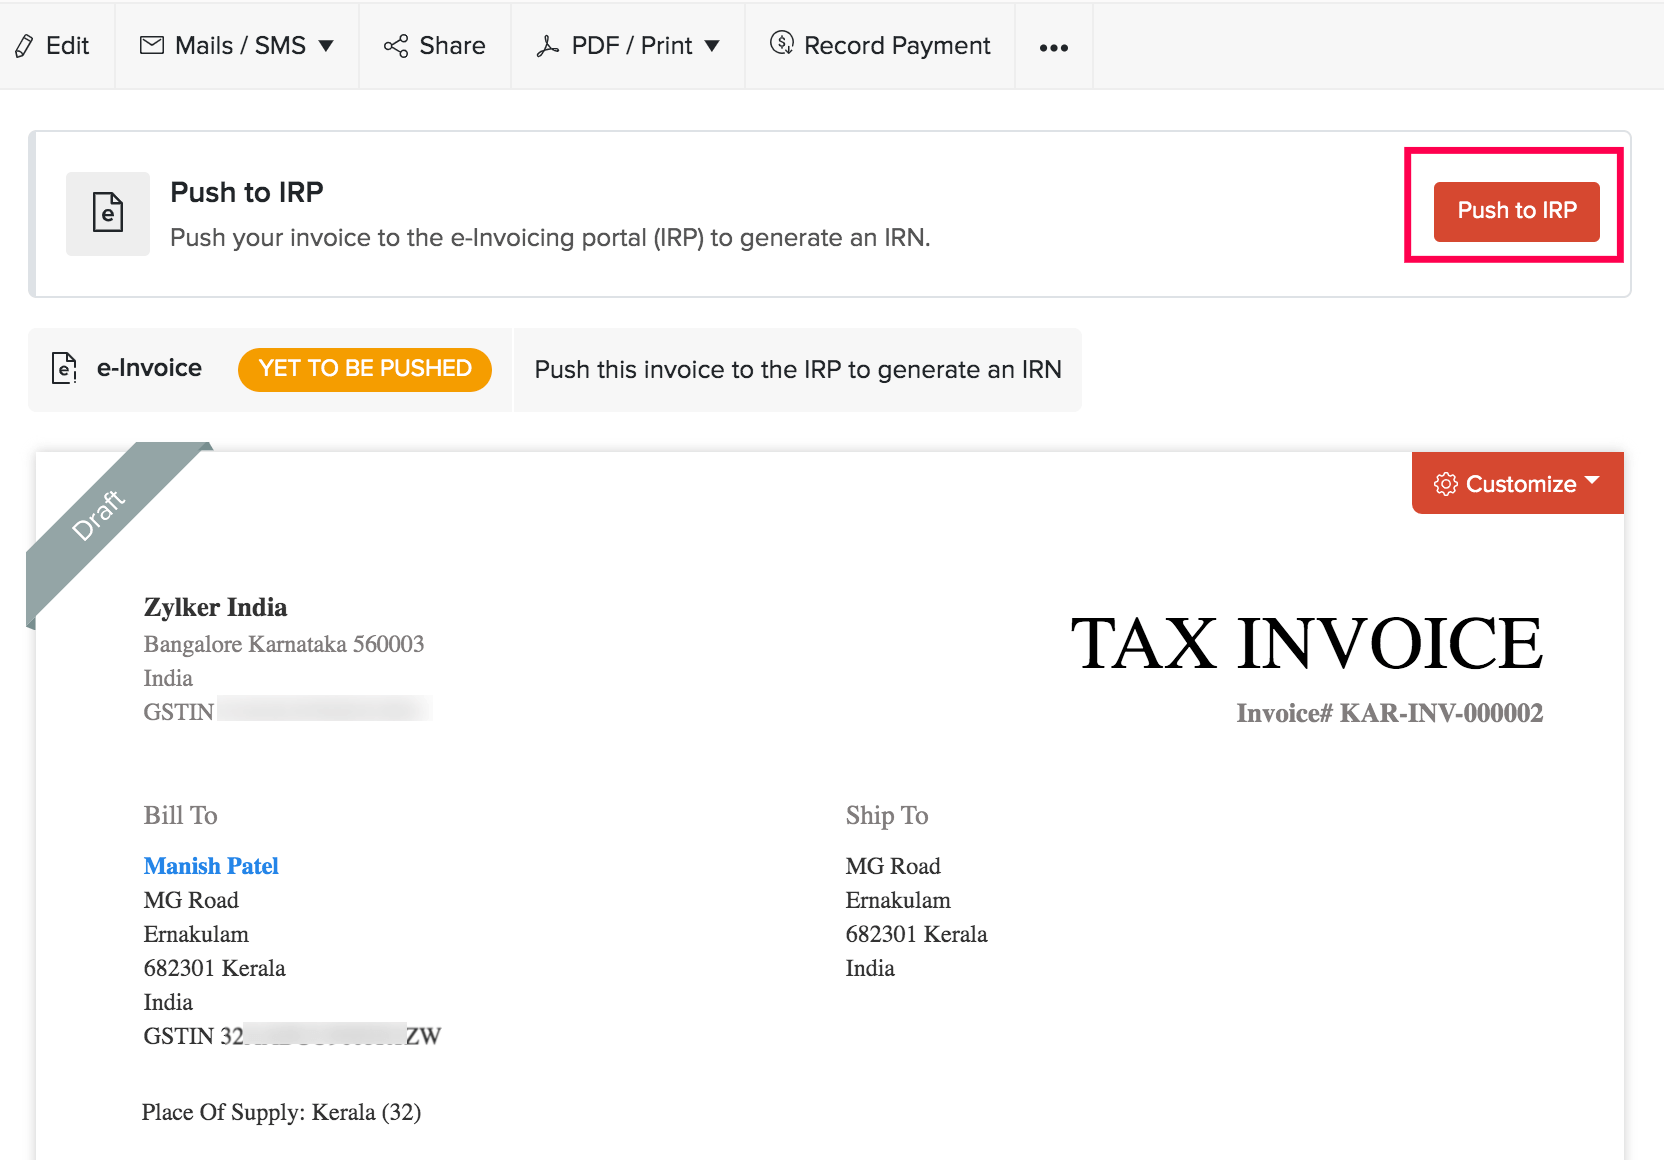
If the invoice is pushed to the IRP successfully, then an IRN (Invoice Reference Number) and QR Code will be generated by the IRP. This IRN is unique to each invoice and will be used to identify it for the entire financial year in the GST system. You can click Copy IRN above the invoice preview to copy this IRN if needed.
If you want to include this QR code and IRN in your invoice, you can do so by editing the invoice template. Here’s how:
- Hover over the invoice template.
- Click Customize.
- Select Edit Template from the list of options.
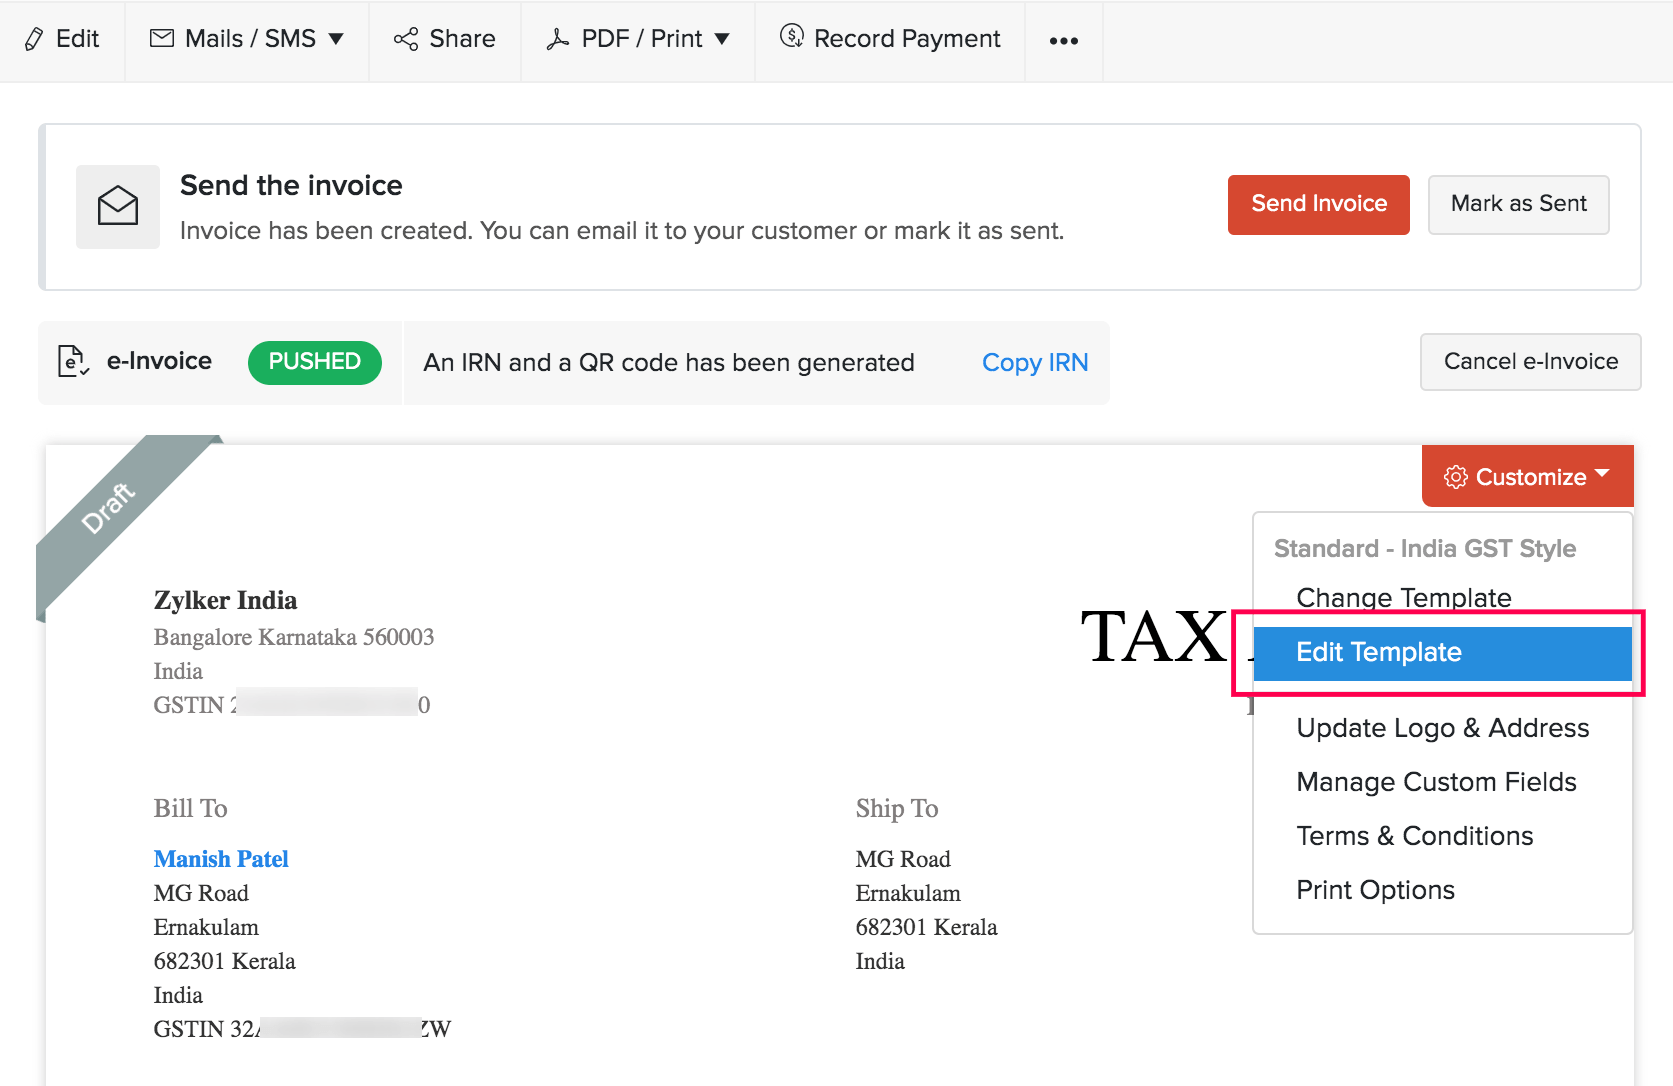
- Click Continue in the pop up.
- Click Footer in the left sidebar.
- Scroll down to the e-Invoicing Details section.
- Mark the QR Code and IRN options. You can also include Ack No. and Ack Date.
- Click Save.
These details will now be added to the footer of your invoice. Alternatively, you can also configure this option from the Templates section in Settings.
Pro Tip: To help with bulk actions, you can filter the invoices based on their e-Invoicing status in Zoho Invoice. To do this, go to the Invoices module and click All Invoices. From the list, you can either select Pushed for e-Invoicing or Yet-to-be pushed for e-Invoicing to view the corresponding list.
Bulk Push Invoices
You can save time and push multiple invoices to the IRP at once, using bulk actions in Zoho Invoice. Here’s how:
- Go to Invoices.
- Click All Invoices above the list of invoices.
- Select Yet-to-be pushed for e-Invoicing from the list of filters.
- Select the invoices that you want to push to the portal.
- Click the More button on the top.
- Select Push to IRP.
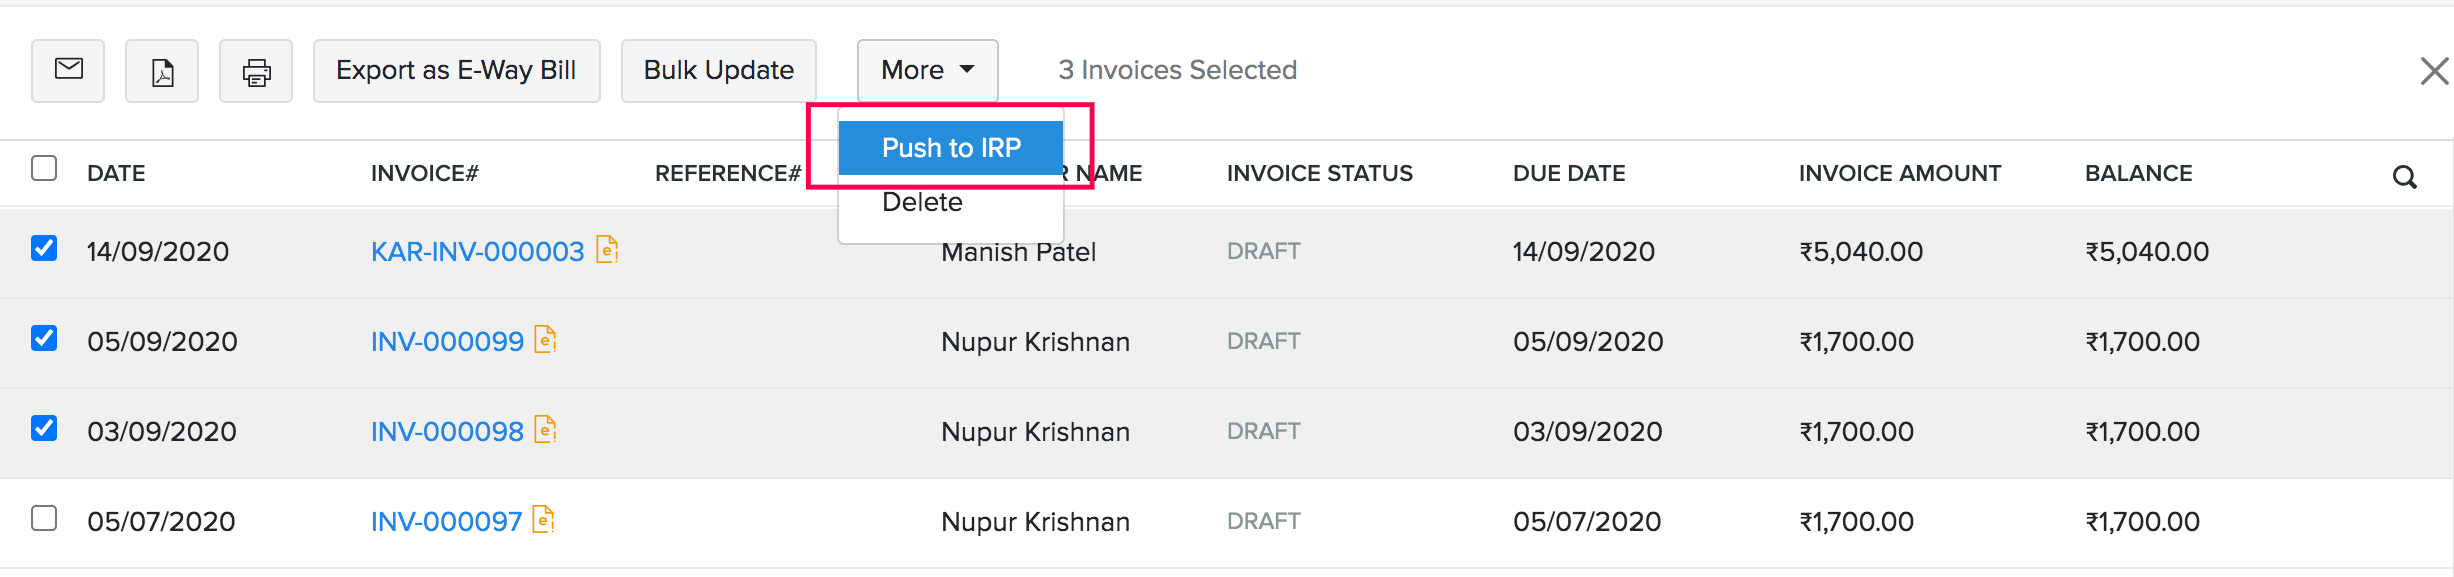
Now, pushing the selected invoices to the IRP will be initiated. When successful, a QR code and IRN will be generated for all of them.
If any of these invoices failed to be pushed to the IRP, you will be notified of it and an error summary will be sent to your (the user who initiates the push) email address that’s registered in Zoho Invoice.
Insight: Once an invoice has been pushed to the IRP and an IRN has been generated for it, you will not be able to edit any of its mandatory fields.
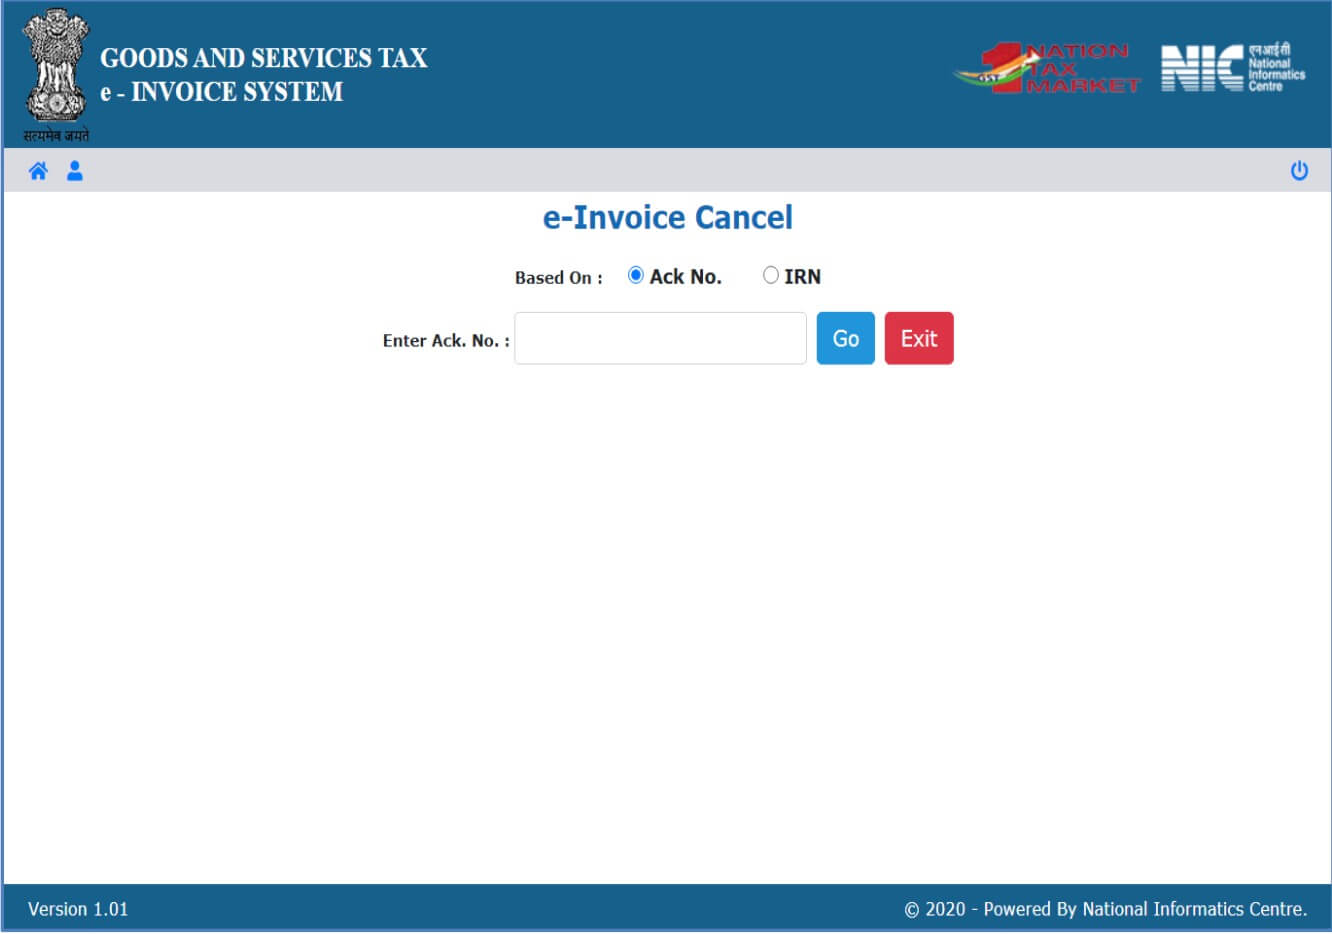
Cancel e-Invoices
You might want to cancel an e-Invoice if you’ve entered any incorrect values or for any other reason. This can be done in Zoho Invoice easily.
Warning: If you cancel an e-Invoice, the IRN associated with it will no longer be valid, and you’ll have to create a new IRN for the invoice.
Cancelling an e-Invoice depends upon the time lapsed since the IRN was generated:
- Cancelling within 24 hours
- Cancelling after 24 hours
Cancelling an e-Invoice within 24 hours
If you cancel an e-Invoice in Zoho Invoice within the first 24 hours of generating an IRN for it, then it will be cancelled in the IRP also automatically.
To cancel an e-Invoice:
- Go to Invoices.
- Select the e-Invoice that you want to cancel.
- Click the Cancel e-Invoice button.
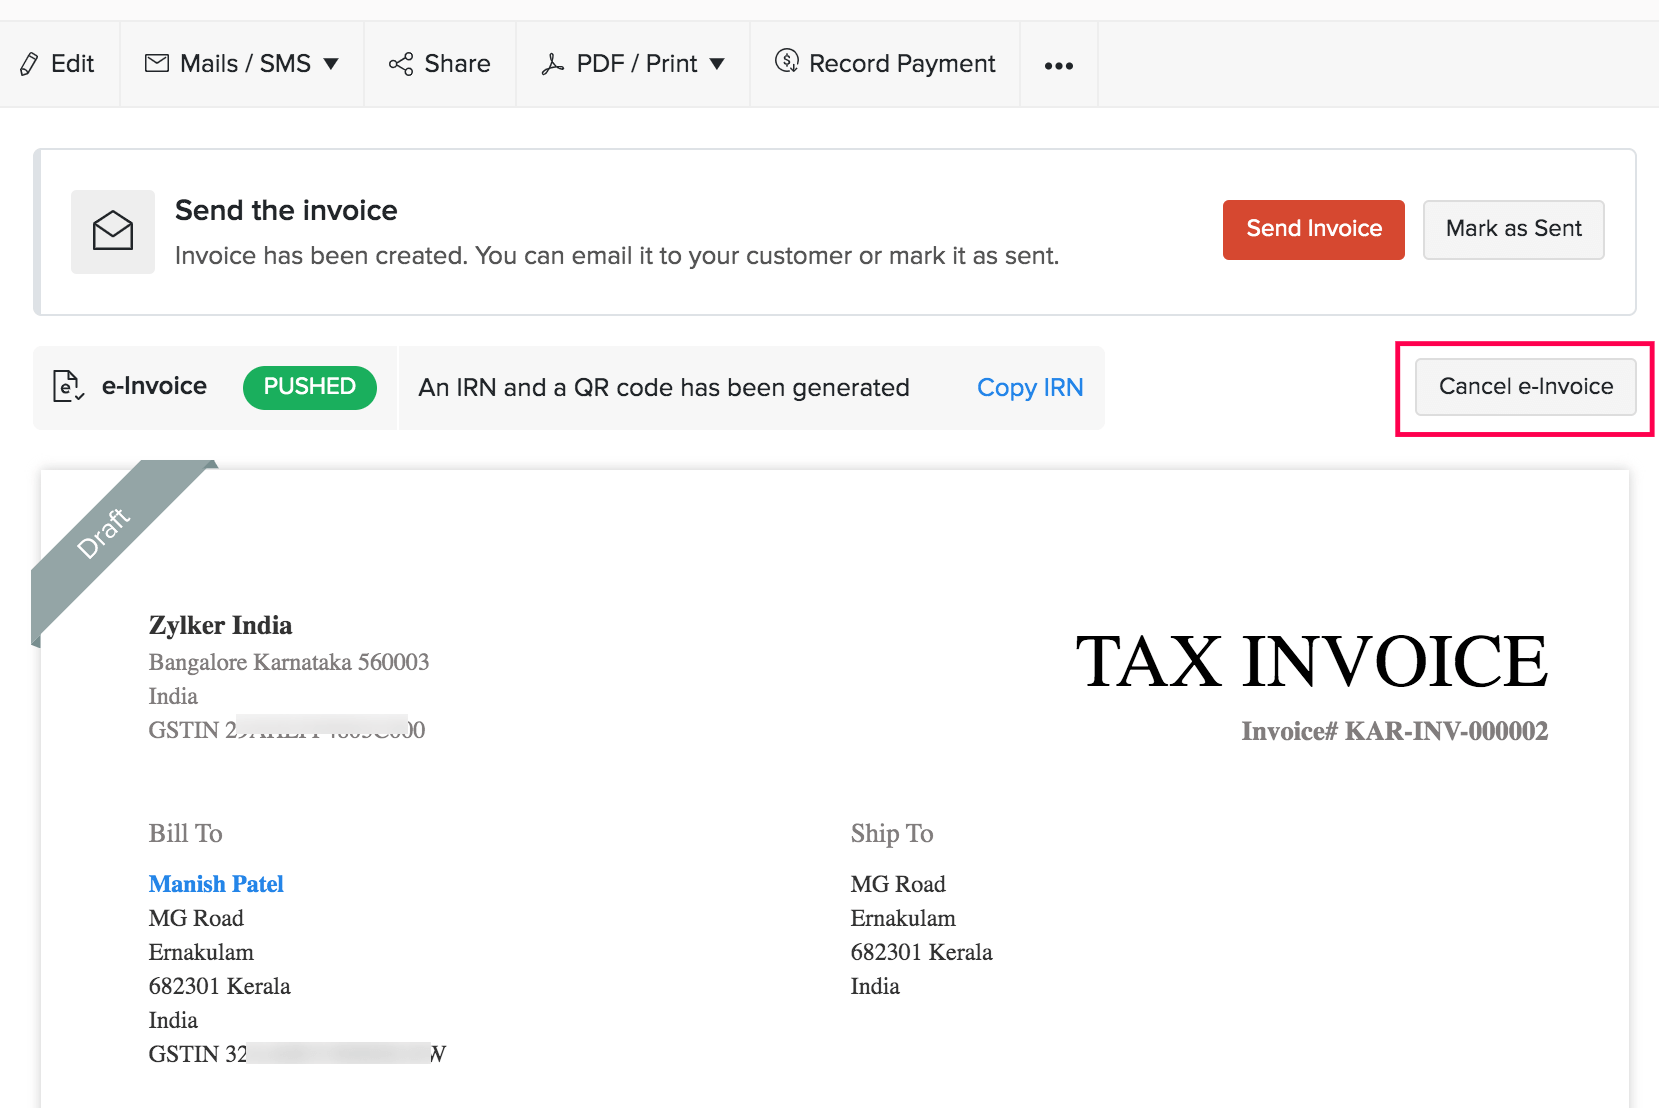
- Select the Reason for cancellation.
- Enter the Remarks.
- Click Cancel e-Invoice.
Cancelling an e-Invoice after 24 hours
After 24 hours of pushing an invoice to the IRP successfully, the IRN generated will no longer be available in the IRP. So cancelling in Zoho Invoice will not cancel it in the IRP automatically.
Instead, you can mark the e-Invoice in Zoho Invoice as cancelled, and then go to the GST portal to cancel the IRN manually.
Here’s how you can do this:
- Go to Invoices.
- Select the e-Invoice that you want to mark as cancelled.
- Click the Mark as Cancelled button.
- Enter the Reason for cancelling this e-Invoice.
- Click Mark as Cancelled.
Next,
- Log in to the GST System.
- Navigate to E-invoices and then select Cancel.
- Enter the IRN of the e-Invoice you want to cancel.
- Enter the Reason for Cancellation and Remarks.
- Click Submit.
Once an e-Invoice has been cancelled/marked as cancelled in Zoho Invoice, its status will change to Void. If needed, you can clone this invoice, make the necessary changes, and then push this new invoice to the IRP.
Note: When an e-Invoice has been cancelled, you cannot generate a new invoice using the same invoice number.
Configure Preferences for Other Modules
Now let’s take a look at how you can set up other preferences for other modules.
Recurring Invoice Preferences
If you have set up recurring invoices, the invoices generated from the profile will be pushed to the IRP automatically, depending on the Recurring Invoice Preferences which you’ve configured. If your preference is:
Create Invoices as Drafts: The invoices will be created in the Draft status and you’ll have to push them to the IRP manually by clicking the Push to IRP button.
Create, Push and Send Invoices: The invoices will be pushed to the IRP automatically. If it’s pushed successfully, the invoices will be sent to your customer. If the push fails, the invoices will not be sent. An email will be sent to your organisation’s email address, stating the reason for failure.
Create, Charge, Push and Send Invoices: The invoices will be charged and then pushed to the IRP automatically. If it’s pushed successfully, the invoices will be sent to your customer. If the push fails, the invoices will not be sent, but a payment thank-you email will be sent to them. An email will be sent to your organisation’s email address, stating the reason for failure.
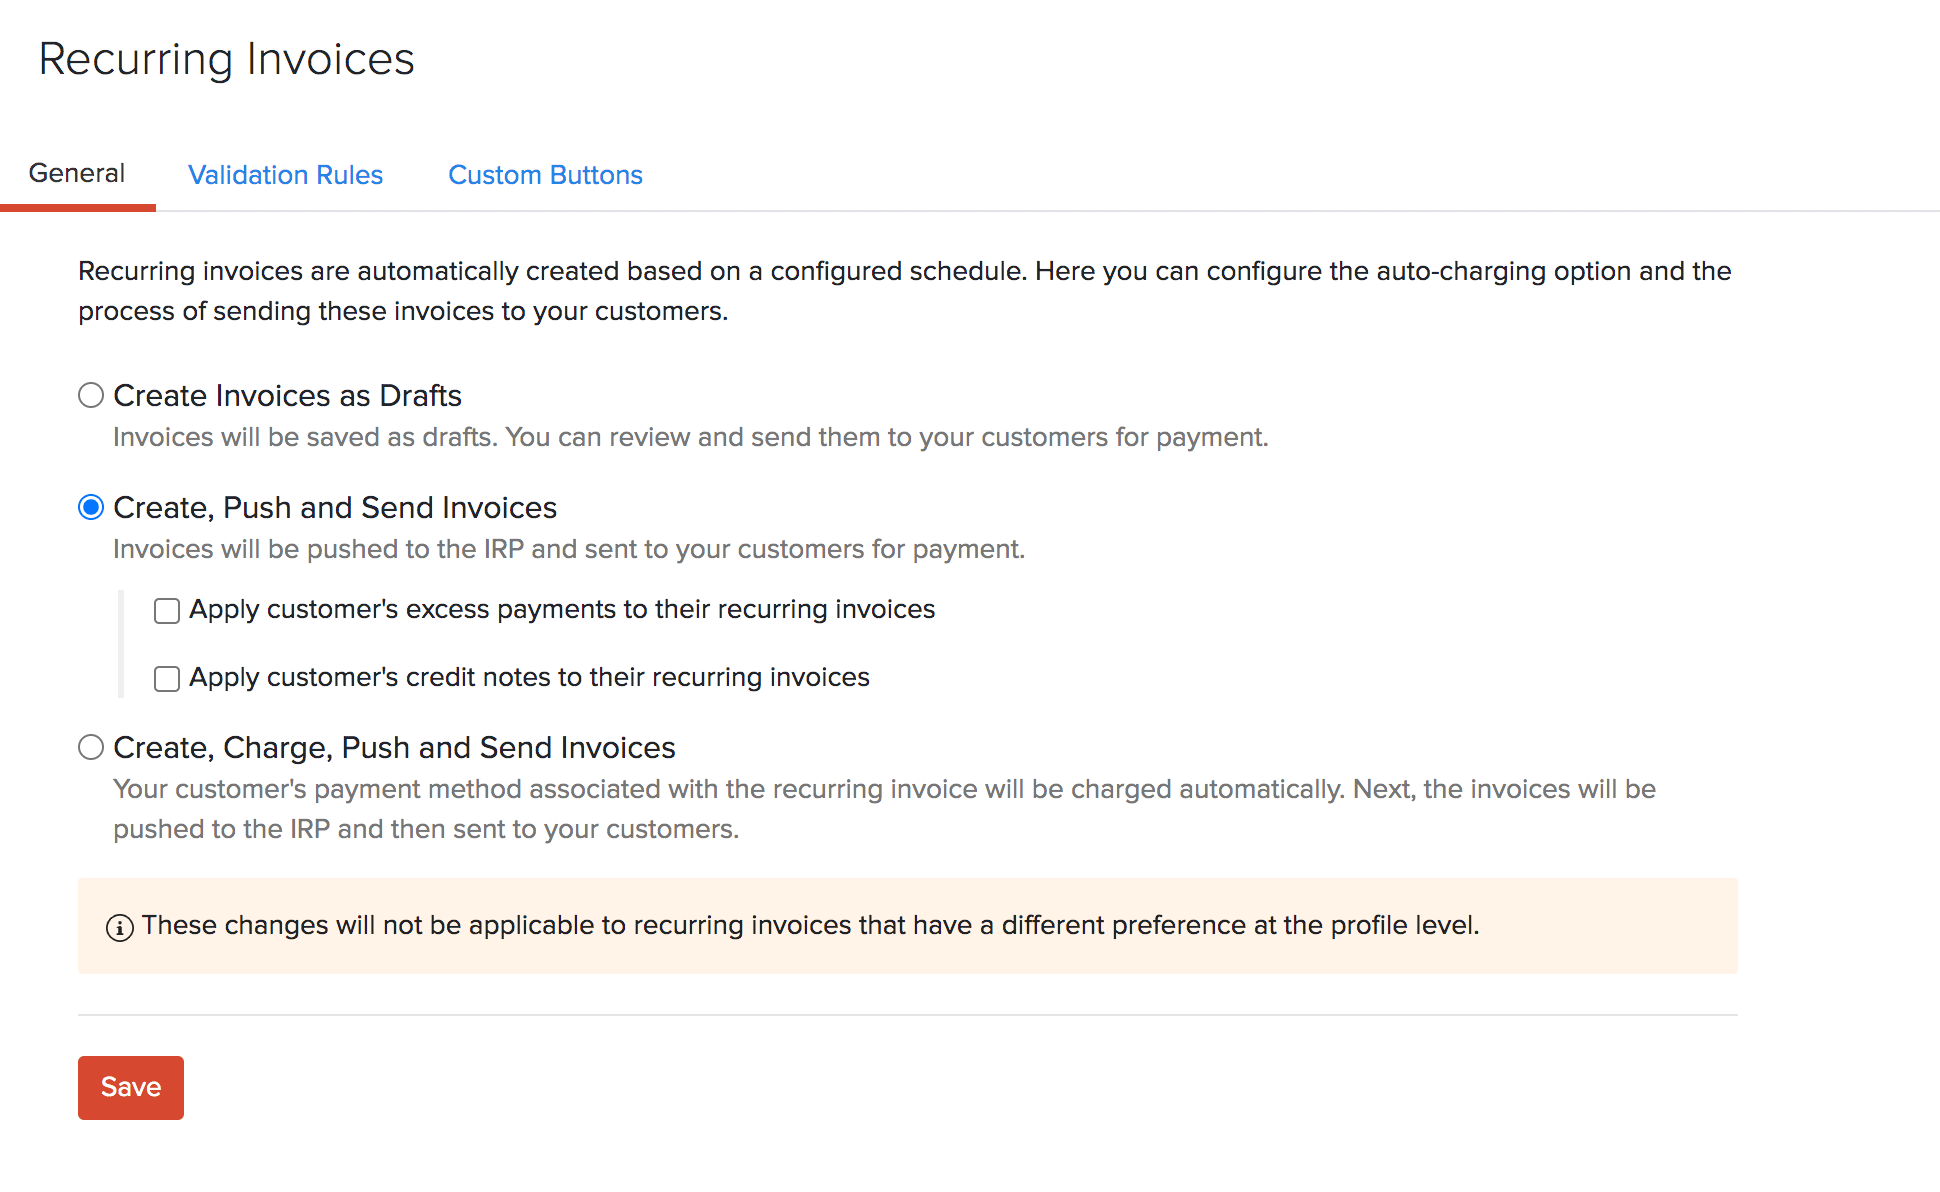
Insight: These options will differ accordingly if you have enabled transaction approval or digital signature.
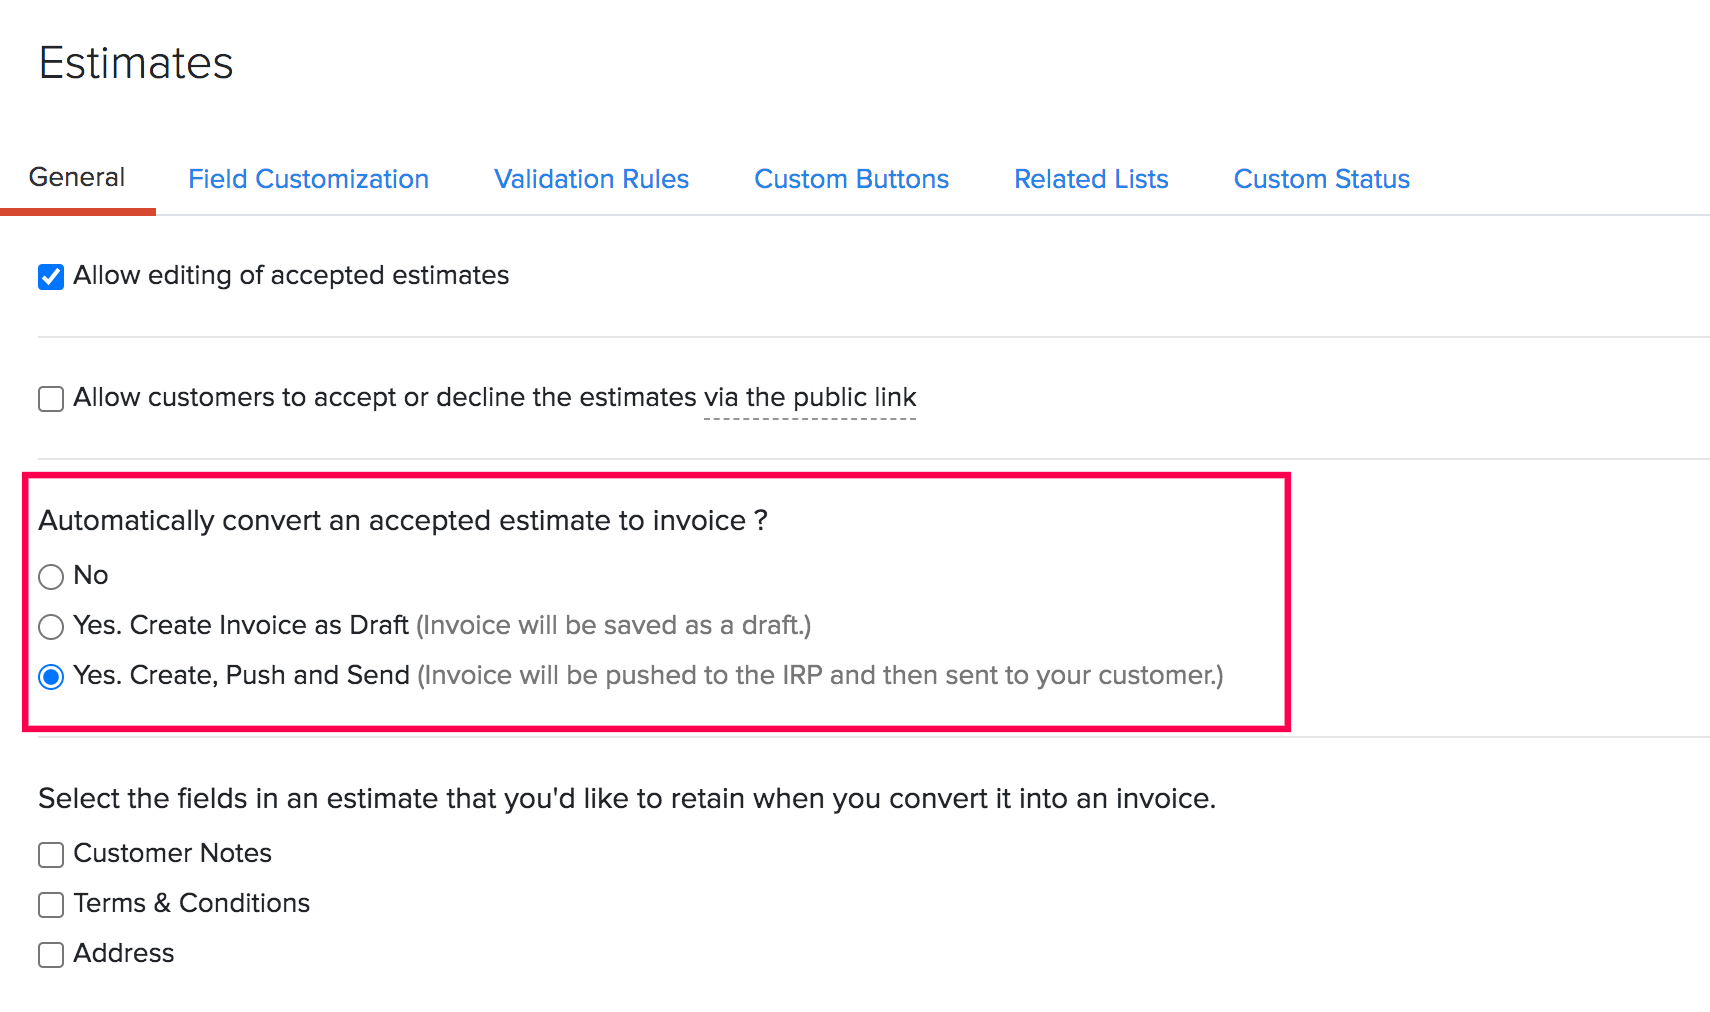
Estimate Preferences
If you’ve configured the estimate preferences to convert accepted estimates to invoices automatically, then these invoices will be pushed to the IRP depending on your set preference. If your preference is:
Create Invoice as Draft: The invoice will be created in the Draft status and you’ll have to push them to the IRP manually by clicking the Push to IRP button.
Create, Push and Send: The invoice will be created and pushed to the IRP automatically. If it’s pushed successfully, the invoice will be sent to your customer. If the push fails, the invoice will not be sent. An email will be sent to your organisation’s email address, stating the reason for failure.
Note: If you have any doubts or need any help with e-Invoicing in Zoho Invoice, you can reach out to us at einvoicing-support@zohofinance.com. We’ll be there to assist you.
 Yes
No
Yes
No
Thank you for your feedback!