
Pine Labs
Pine Labs is a prominent multinational fintech company that provides cloud-based payment gateways, prepaid issuing solutions, and advanced Point of Sale (POS) machines. You can collect customer payments through a Pine Labs terminal and record them in Zoho Inventory.
Obtain Pine Labs Credentials
Before you set up Pine Labs in Zoho Inventory, collect the required credentials from Pine Labs. Use the Pine Labs Merchant Portal for live accounts, or the Pine Labs Developer Portal for UAT or Sandbox testing.
To collect the credentials:
- Log in to the Pine Labs Merchant Dashboard.
- Go to Settings and then select Credentials.
- Copy the Client ID, and Client Secret.
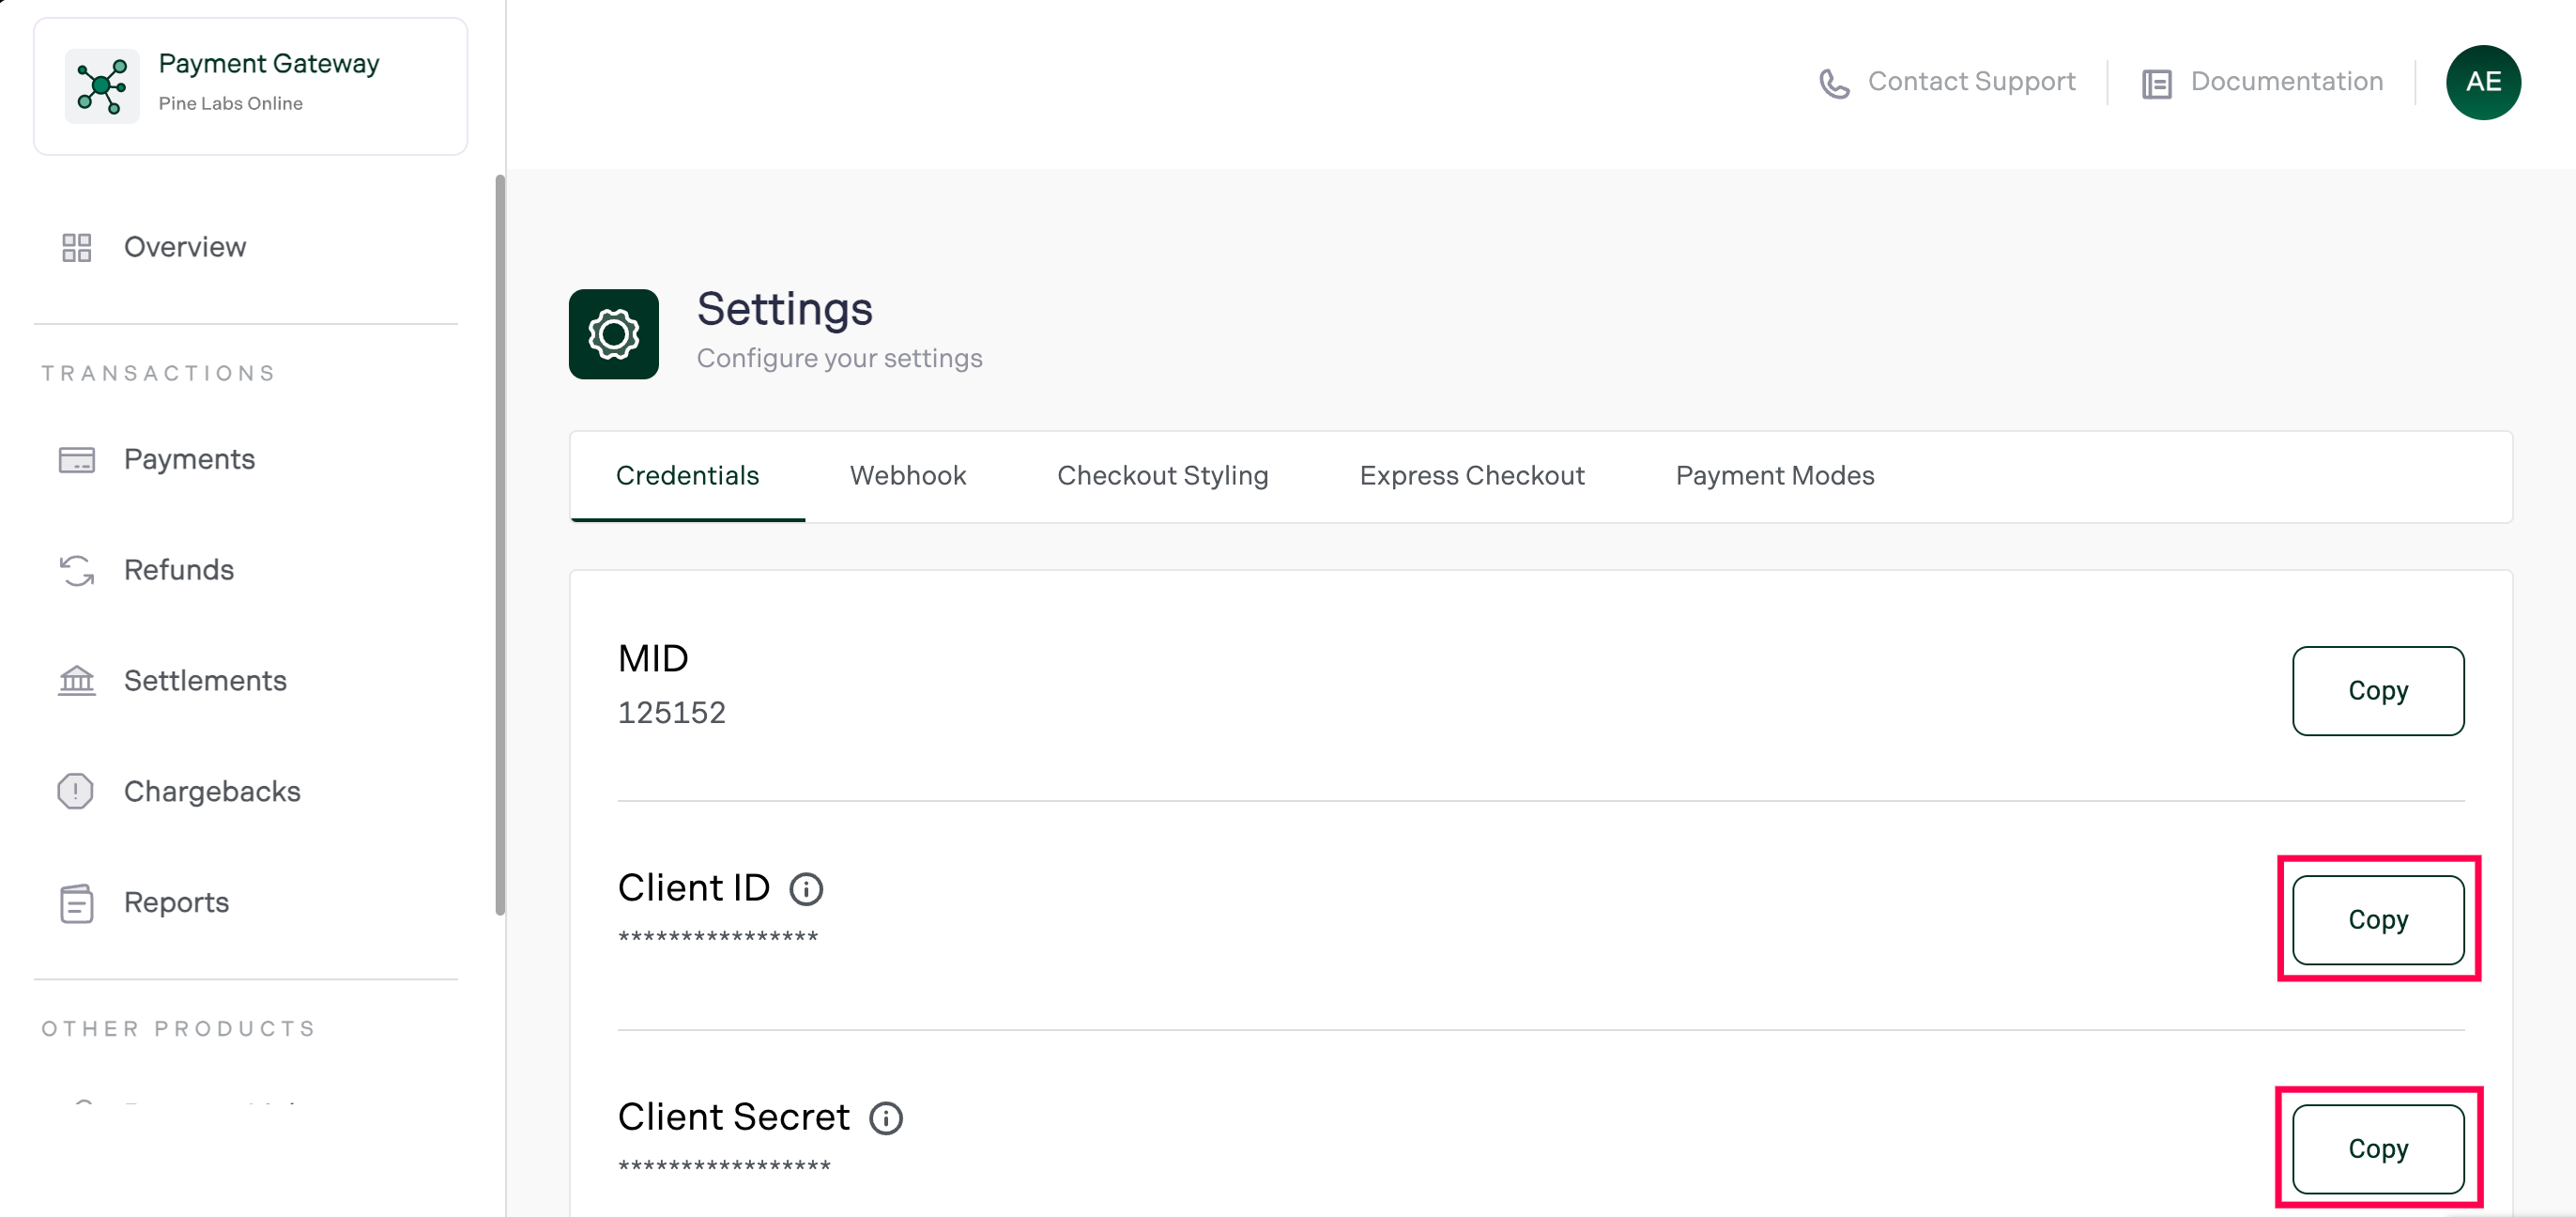
- Keep the copied credentials ready before you open Zoho Inventory.
Set Up Pine Labs Terminal
After you copy the required Pine Labs credentials, you need to enter them in Zoho Inventory.
To set up Pine Labs Terminal:
- Log in to your Zoho Inventory organisation.
- Click the Gear icon in the top right corner.
- Select Customer Payments under Online Payments.
- Click Set Up Now next to Pine Labs.
- Enter the Client ID, and Client Secret copied from Pine Labs.
- Click Save.
Pine Labs Terminal will be configured in Zoho Inventory.
Configure Payment Terminal
You can add and manage client details for terminal transactions, link them to your payment terminals, and start collecting payments easily.
Add Merchant ID
You can add multiple client IDs to manage payments across different Pine Labs merchant accounts.
To add or manage additional client IDs:
- Log in to your Zoho Inventory organisation.
- Click the Gear icon in the top right corner.
- Select Customer Payments under Online Payments.
- Click Manage next to Pine Labs.
- Click Add Client ID.
- Enter the Client ID, and Client Secret copied from Pine Labs.
- Click Save.
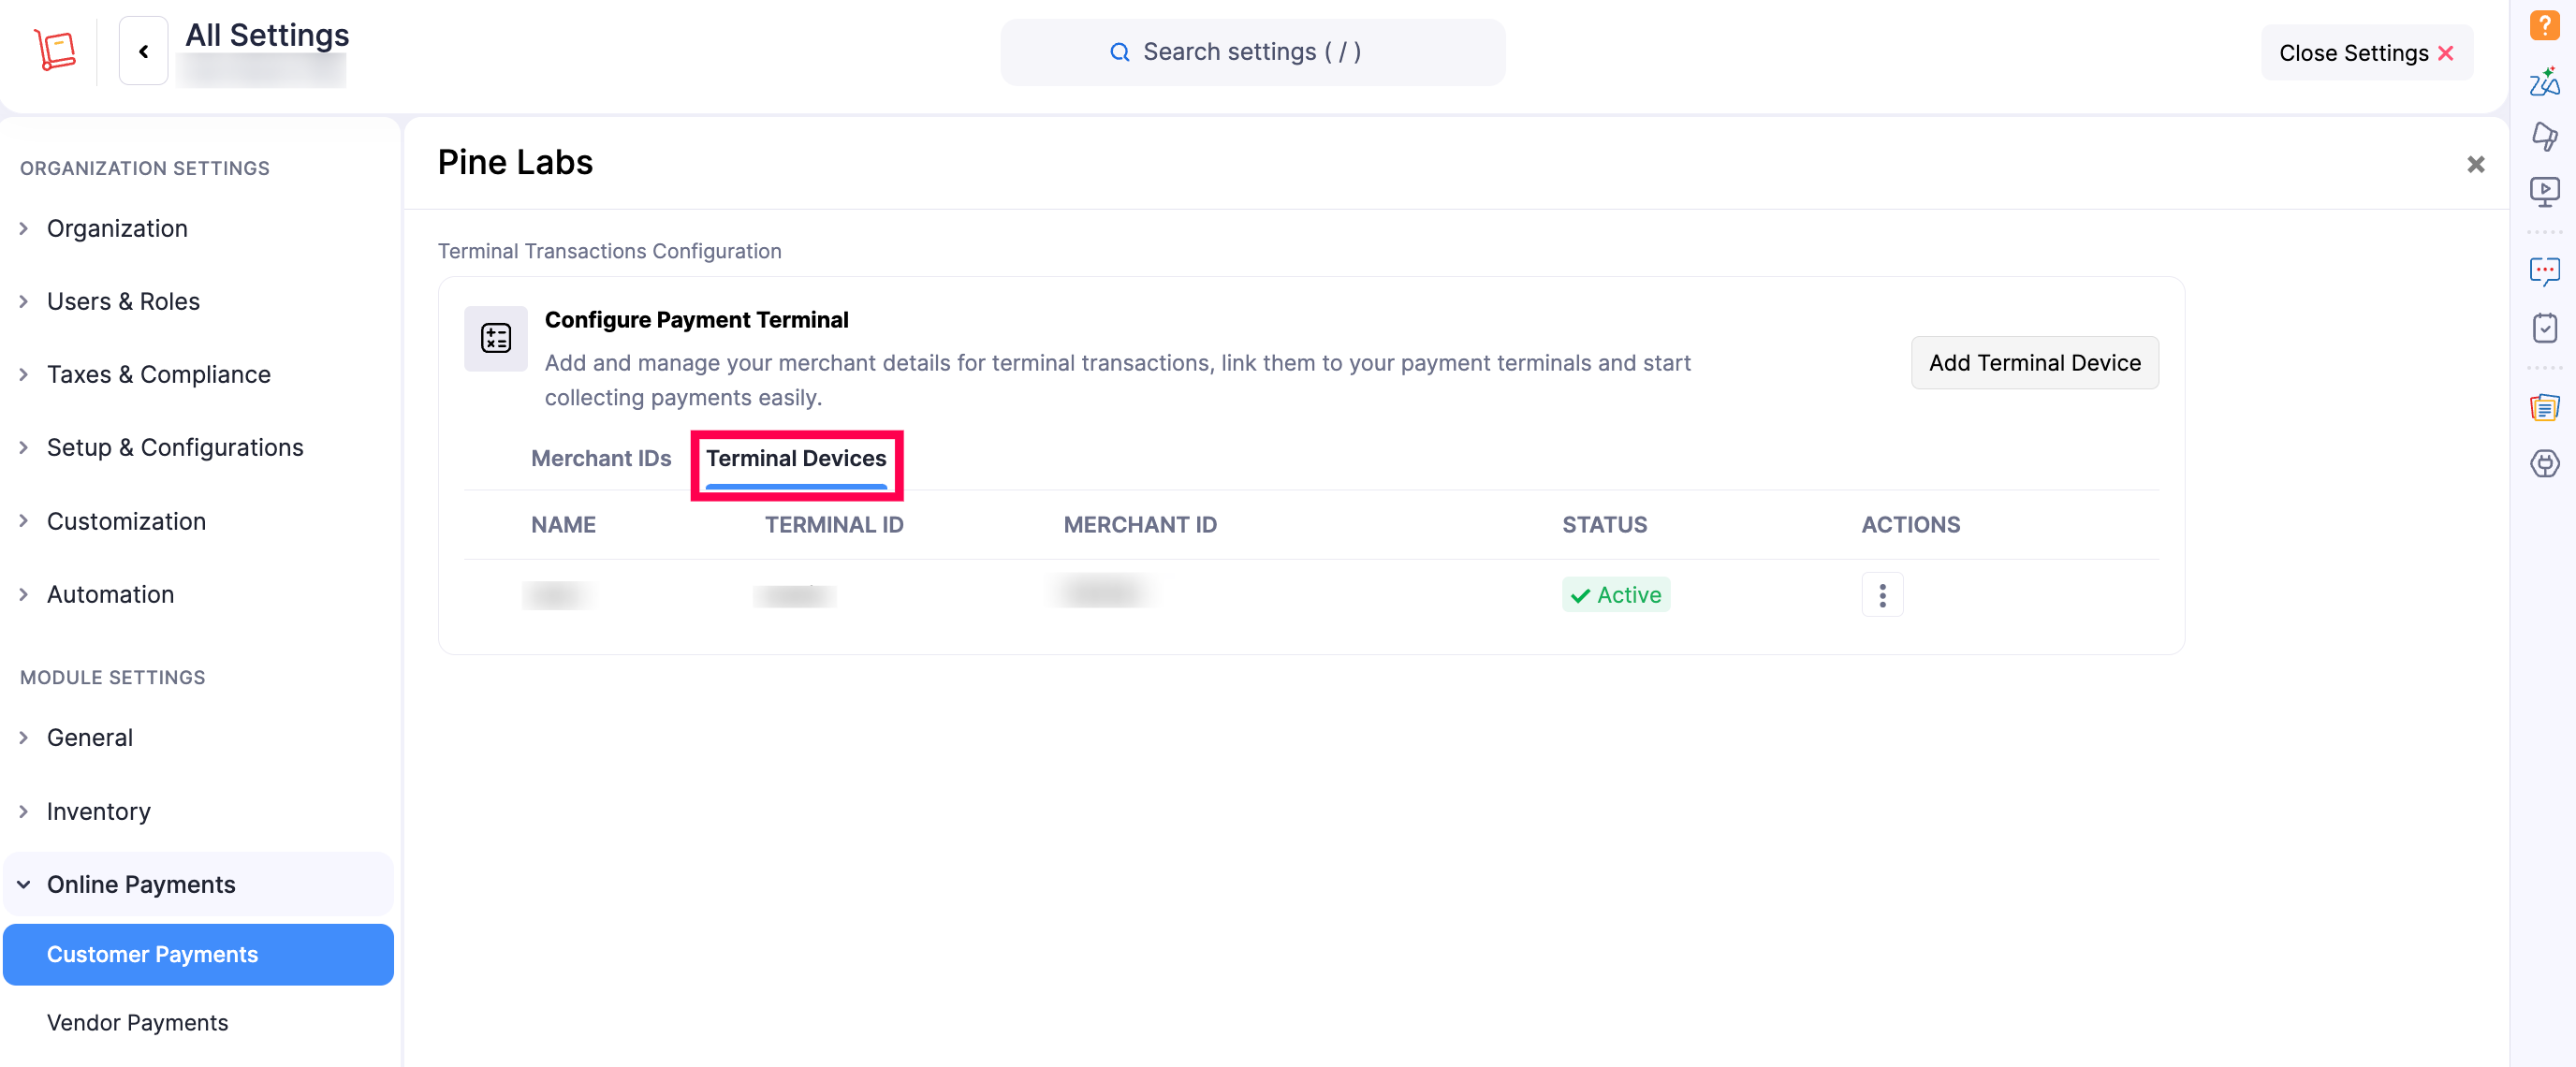
Add Terminal Devices
You can add and link terminal devices to a client ID to process in-person payments through specific Pine Labs hardware.
To add a terminal device:
- Log in to your Zoho Inventory organisation.
- Click the Gear icon in the top right corner.
- Select Customer Payments under Online Payments.
- Click Manage next to Pine Labs.
- Under the Terminal Devices tab, click Add Terminal Devices.
| Field | Description |
|---|---|
| IMEI | The International Mobile Equipment Identity (IMEI) number that uniquely identifies the Pine Labs terminal device. |
| Client POS Code | The POS code assigned by Pine Labs to identify the point-of-sale device at the merchant’s location. |
| Terminal Name | A name to identify and distinguish the terminal device within your organisation. |
| Payment Gateway | The payment gateway assigned to process transactions through this terminal. |
| Associated Client ID | The Client ID linked to this terminal device to authorise transactions. |
- Click Save.
Record a Terminal Payment From an Invoice
Use the invoice’s Details page when you want to record payment for a specific invoice.To record a terminal payment from an invoice:
- Go to the Invoices module under Sales from the left sidebar.
- Select the invoice for which you want to record payment.
- Click the Record Payment dropdown.
- Select Pay with Terminal.
- Enter the amount.
- Select the terminal payment provider in the Payment Gateway field.
- Select the Terminal Device.
- Choose whether it is a Card or UPI payment from Payment Type.
- Click Proceed.
If the full invoice amount is recorded, the invoice status changes to Paid. If only part of the invoice amount is recorded, the invoice status changes to Partially Paid.
Record Pine Labs Terminal Payments
After setting up Pine Labs, you can record payments received through the Pine Labs terminal from the Payments Received module.
To record the payment:
- Go to the Payments Received module under Sales from the left sidebar.
- Click + New in the top right corner.
- Select the customer from whom you received the payment.
- Enter the amount received.
- Select Pine Labs as the Payment Mode.
- Enter the Pine Labs terminal transaction details.
- Apply the payment to the customer’s invoice.
- Click Save.
The payment will be recorded against the selected customer and invoice.
More Actions
You can manage your existing Pine Labs client IDs and terminal devices using the following actions.
Delete Client ID/Terminal Device
You can delete a client ID or terminal device that is no longer needed.
- Log in to your Zoho Inventory organisation.
- Click the Gear icon in the top right corner.
- Select Customer Payments under Online Payments.
- Click Manage next to Pine Labs.
- Hover over the client ID or terminal device you want to delete and click the More icon.
- Click Delete and OK to confirm the action.
Edit Client ID/Terminal Device
You can update the details of an existing client ID or terminal device at any time.
- Log in to your Zoho Inventory organisation.
- Click the Gear icon in the top right corner.
- Select Customer Payments under Online Payments.
- Click Manage next to Pine Labs.
- Hover over the client ID or terminal device you want to edit and click the More icon.
- Make the necessary changes and click Save.
Mark a Terminal Device as Inactive
You can mark a terminal device as inactive to temporarily disable it without removing it from your configuration.
- Log in to your Zoho Inventory organisation.
- Click the Gear icon in the top right corner.
- Select Customer Payments under Online Payments.
- Click the gear icon next to Connected Payment Terminals or Manage next to Pine Labs.
- Hover over the terminal device you want to mark as inactive and click the More icon.
- Click Mark as Inactive.
Troubleshoot Terminal Payment Setup
If Zoho Inventory does not accept the terminal value, check the details in your provider dashboard and try again.
Use this checklist:
- Confirm that you copied the value from the correct terminal setup.
- Check whether the provider generated a new authorization code after the previous one expired.
- Confirm that the terminal is active in the provider dashboard.
- Verify that you selected the matching provider in Zoho Inventory.
- Contact your payment provider if the terminal value is not visible in the provider dashboard.
After correcting the details, update the provider settings in Zoho Inventory and save the changes.