
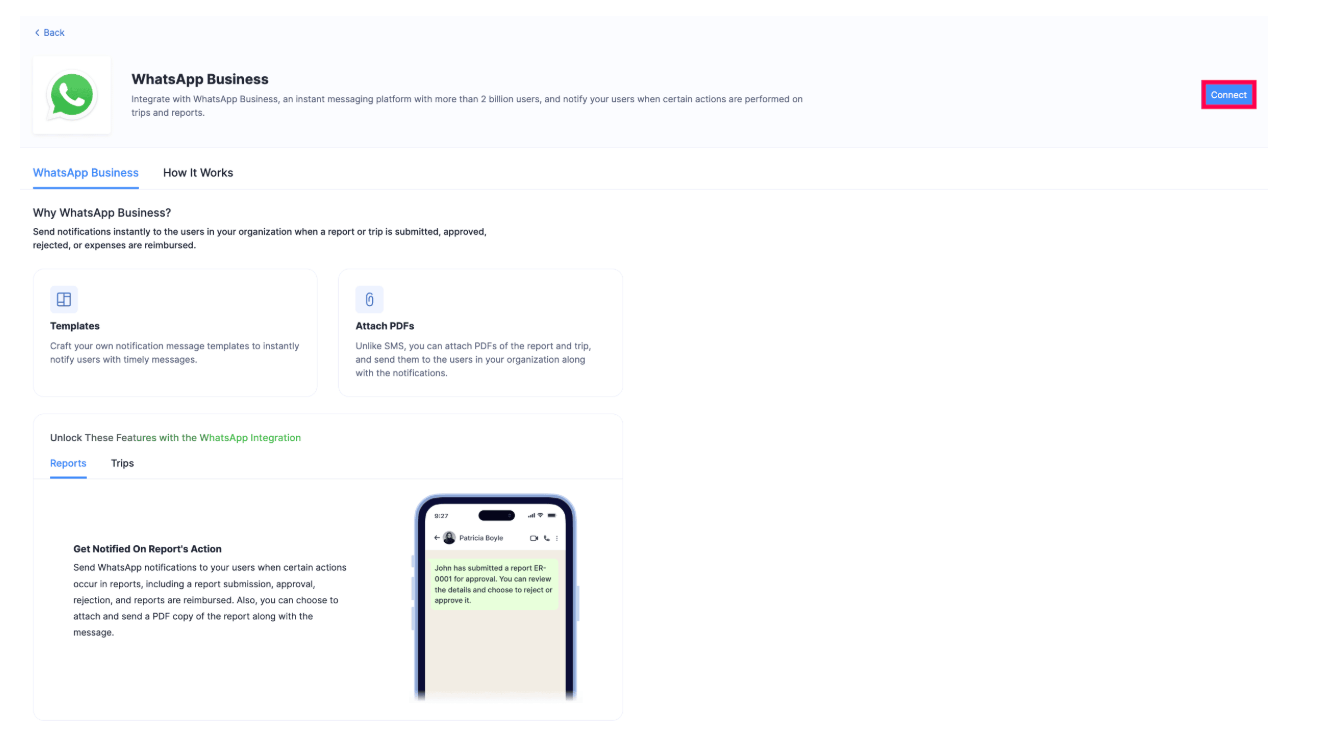
Integrate Zoho Expense With WhatsApp Business
Integrate WhatsApp Business with Zoho Expense to send notifications instantly to the users in your organization when a report or trip is submitted, approved, rejected, or when expenses are reimbursed. Craft your own notification message templates to notify users with timely messages. Also, you can choose to attach and send a PDF copy of the report along with the message.
After enabling WhatsApp, you will have to buy credits to send notifications to your users. Learn more about WhatsApp Credits.
Prerequisites
- By setting up this integration, Zoho will become your Business Service Provider(BSP). Ensure that the WhatsApp Business account that you are using to integrate with Zoho has not been used with any other BSPs.
- Ensure that the phone number you are going to use to set up this integration is a valid number and is owned by you. Also, it must not be in use with any other BSP, WhatsApp Personal, or WhatsApp Business. If it’s in use, you may lose your existing chats.
- Ensure you have access to your Facebook Business Manager.
Connect to WhatsApp Business
To send WhatsApp notifications to your users, you must connect Zoho Expense to WhatsApp. Here’s how:
- Click Admin View on the left sidebar.
- Go to Settings on the left sidebar.
(OR)
Click Settings in the top right corner of the page. - Select Collaboration under Integrations.
- Click WhatsApp.
- Click Connect to initiate the setup.
- In case you have an existing WhatsApp Business account, the Set up WhatsApp Business pop-up will appear.
- Click Use the existing WhatsApp Business account registered with Zoho if you have an existing account and select the account from the dropdown to continue using the existing WhatsApp account that is integrated with other Zoho apps.
- Click Connect a new WhatsApp Business account with Zoho to connect a new WhatsApp Business account.
- Click Continue.
- Read and agree to the terms in the Connect WhatsApp with Zoho Expense pop-up.
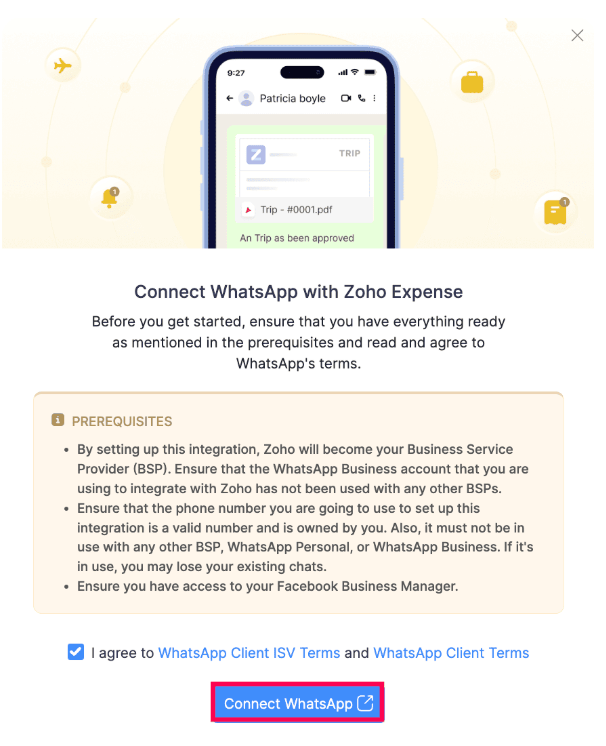
- Click Connect WhatsApp. You will be redirected to the Facebook Login page.
- Enter the registered Email Address or Phone Number and Password.
- Click Log in.
Insight: If you do not have a Facebook account, create one by clicking Create New Account.
- Verify your account and click Continue as [Your Account Name] on the next page.
- If you want to log in with another account, click Log in to another account.
- Read through the WhatsApp Business Terms of Service and the Meta Terms of Service and click Get Started.
- Fill in your Business Details and click Next.
- Select a WhatsApp Business account and WhatsApp Business Profile on the following page.
- Click Next.
Insight: If you do not have a WhatsApp business account or profile, select Create a WhatsApp Business account and Create a new WhatsApp Business Profile from the dropdown.
- Click Finish on the page that follows.
Your Zoho Expense organization will be connected with WhatsApp.
- Click Continue in the Connected to WhatsApp pop-up.
- Select the WhatsApp Number for the user notification channel from which the WhatsApp messages will be sent to your users and click Continue.
You can either buy credits in the next step or also do it once you have created templates for WhatsApp notifications.
Configure Notifications
To send notifications through WhatsApp, create a template in Zoho Expense and get it approved by the WhatsApp Business team.
Create Templates
To notify your users through WhatsApp, you’ll have to create a notification template for it. Here’s how:
- Click Admin View on the left sidebar.
- Go to Settings on the left sidebar.
(OR)
Click Settings in the top right corner of the page. - Select WhatsApp Notifications under Customization.
- Click Create Template Now to enable the notification.
- Enter the Template Name.
- Click the Language dropdown to choose the preferred language in which you want to send the notification to your users.
- Check the Attach PDF of Expense Report or Trip along with the message checkbox if you want to include PDFs of the trips and reports in the WhatsApp message.
- You can add Header Content if you do not want to attach PDFs by unchecking the Attach PDF of Expense Report or Trip along with the message checkbox.
- Enter the Message Content. You can insert placeholders by clicking the dropdown next to Insert Placeholders.
- Enter the Footer Content, if required.
- You can edit the Button Text, if required.
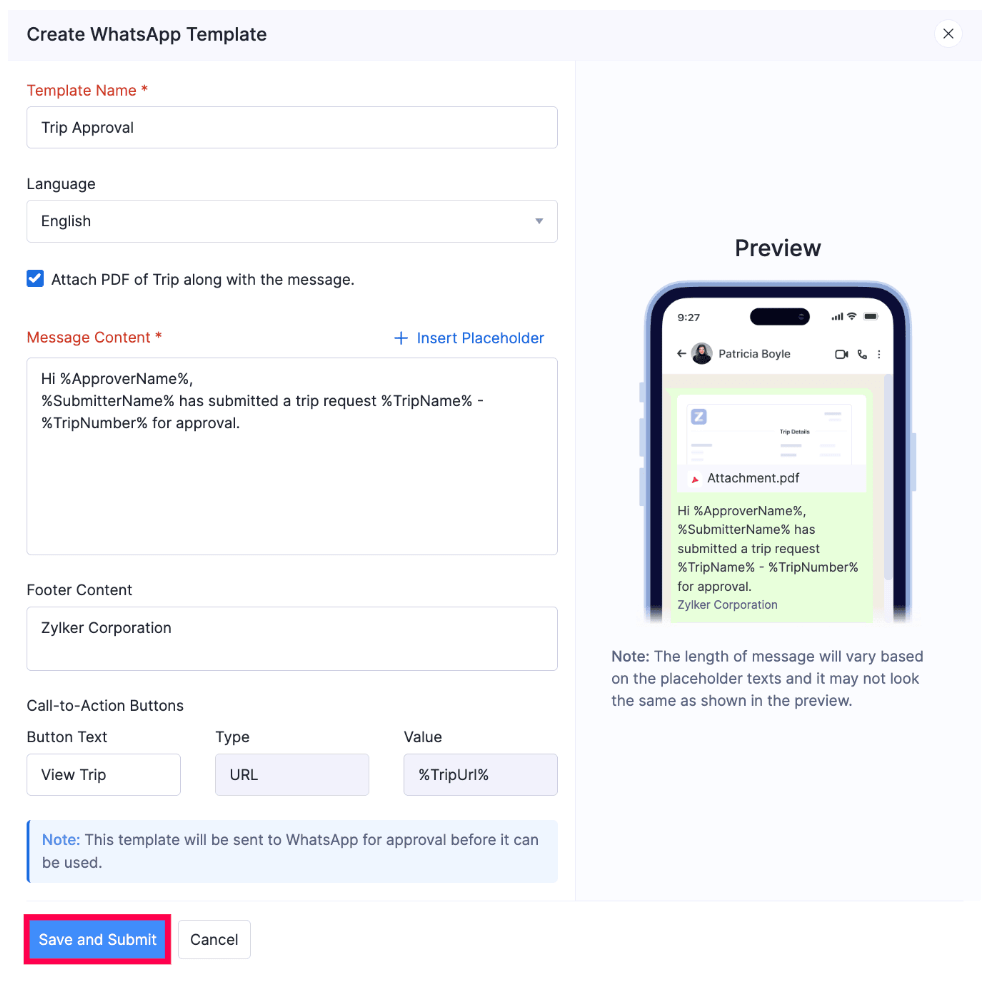
- Click Save and Submit.
Note: Here are some points to keep in mind while you create a WhatsApp message template:
- You can only use one placeholder in the Header field.
- You cannot use any placeholders in the Footer field.
- The footer should have only one line of text and should not contain any emojis.
Template Approval
Once you create a template, it will be sent for approval. It can take up to 24 hours for the WhatsApp team to approve it. The status of the approval will be displayed on the WhatsApp Notifications list page.
A template can have the following statuses:
| STATUS | DESCRIPTION |
|---|---|
| Approved | The WhatsApp Business team has approved the template. |
| Rejected | The WhatsApp Business team rejected the template. Edit and resubmit the template for approval. Learn why templates get rejected. |
| Pending Approval | The template has been sent to the WhatsApp Business team and is awaiting approval. It could take upto 24 hours for the status to be updated. |
| Deletion in Progress | The WhatsApp Business team is evaluating your request to delete a template. |
| Deletion Failed | The template was not deleted due to network issues. Initiate the deletion process once again. |
Edit Template
Here’s how you can edit your approved and rejected template:
- Click Admin View on the left sidebar.
- Go to Settings on the left sidebar.
(OR)
Click Settings in the top right corner of the page. - Select WhatsApp Notifications under Customization.
- Click the More icon next to the template you want to edit.
- Select Edit Template.
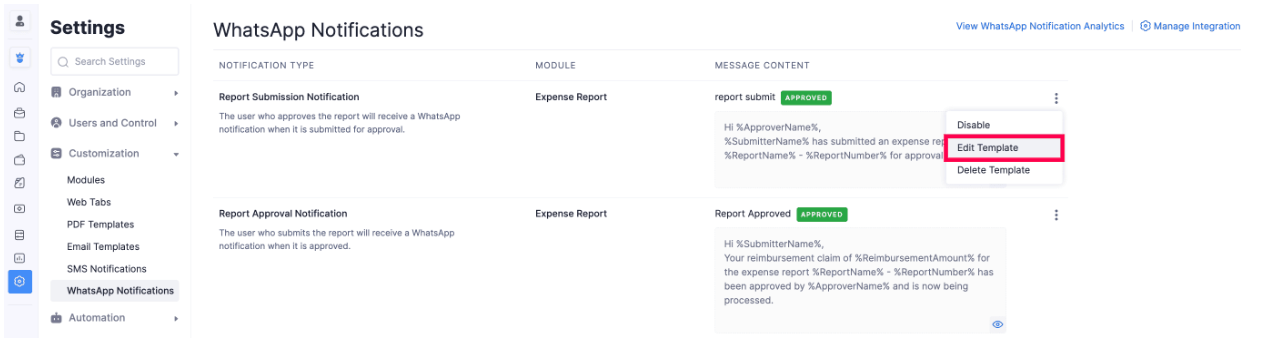
- Make the necessary changes and click Save.
Delete Template
You can delete a WhatsApp template if you do not require it. Once you delete a template, the notification associated with the template will be disabled.
Warning: Deleting a template is permanent and cannot be undone.
To delete a template:
- Click Admin View on the left sidebar.
- Go to Settings on the left sidebar.
(OR)
Click Settings in the top right corner of the page. - Select WhatsApp Notifications under Customization.
- Click the More icon next to the template you want to delete.
- Select Delete Template.
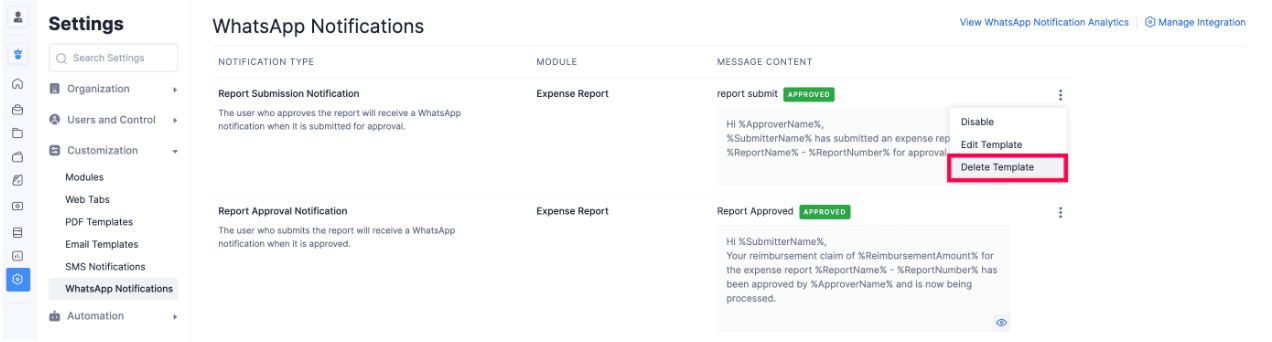
A request will be sent to the WhatsApp Business team to delete the template, which will subsequently be deleted.
WhatsApp Instant Messaging (IM) Credits
Once you enable WhatsApp in your Zoho Expense organization and create templates, you’ll have to purchase IM (Instant Messaging) credits to send notifications through your WhatsApp Business account. Learn more about how credits work.
To buy WhatsApp IM credits in Zoho Expense:
- Click Admin View on the left sidebar.
- Go to Settings on the left sidebar.
(OR)
Click Settings in the top right corner of the page. - Select Collaboration under Integrations.
- Click WhatsApp.
- Click Buy IM Credits on the WhatsApp configuration page.
- In the Buy IM (Instant Messaging) Credits pop-up, enter the number of IM credits you want to purchase. The price for one IM credit will be displayed next to the IM Credits field.
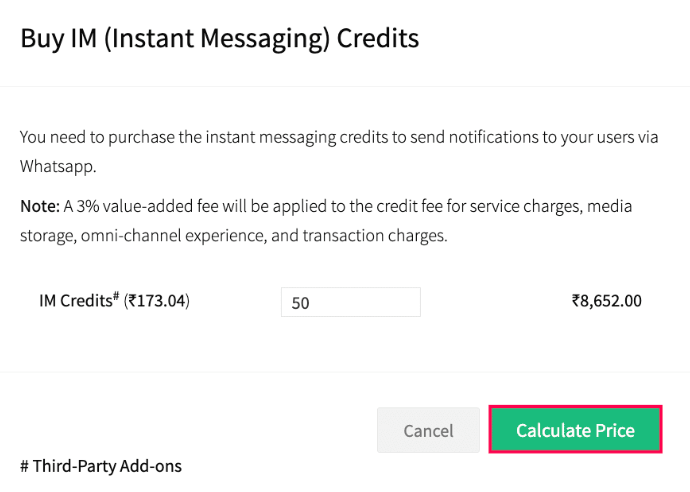
- Click Calculate Price. The total amount (including tax) will be displayed.
- Click Make Payment.
You’ll be redirected to the payment gateway, where you can make payment for the IM credits you want to purchase. Once done, the credits will be added to your organization. You can also buy credits from the Zoho Store.
Note: The amount used to purchase IM credits for WhatsApp may vary, depending on the currency you use for the purchase.
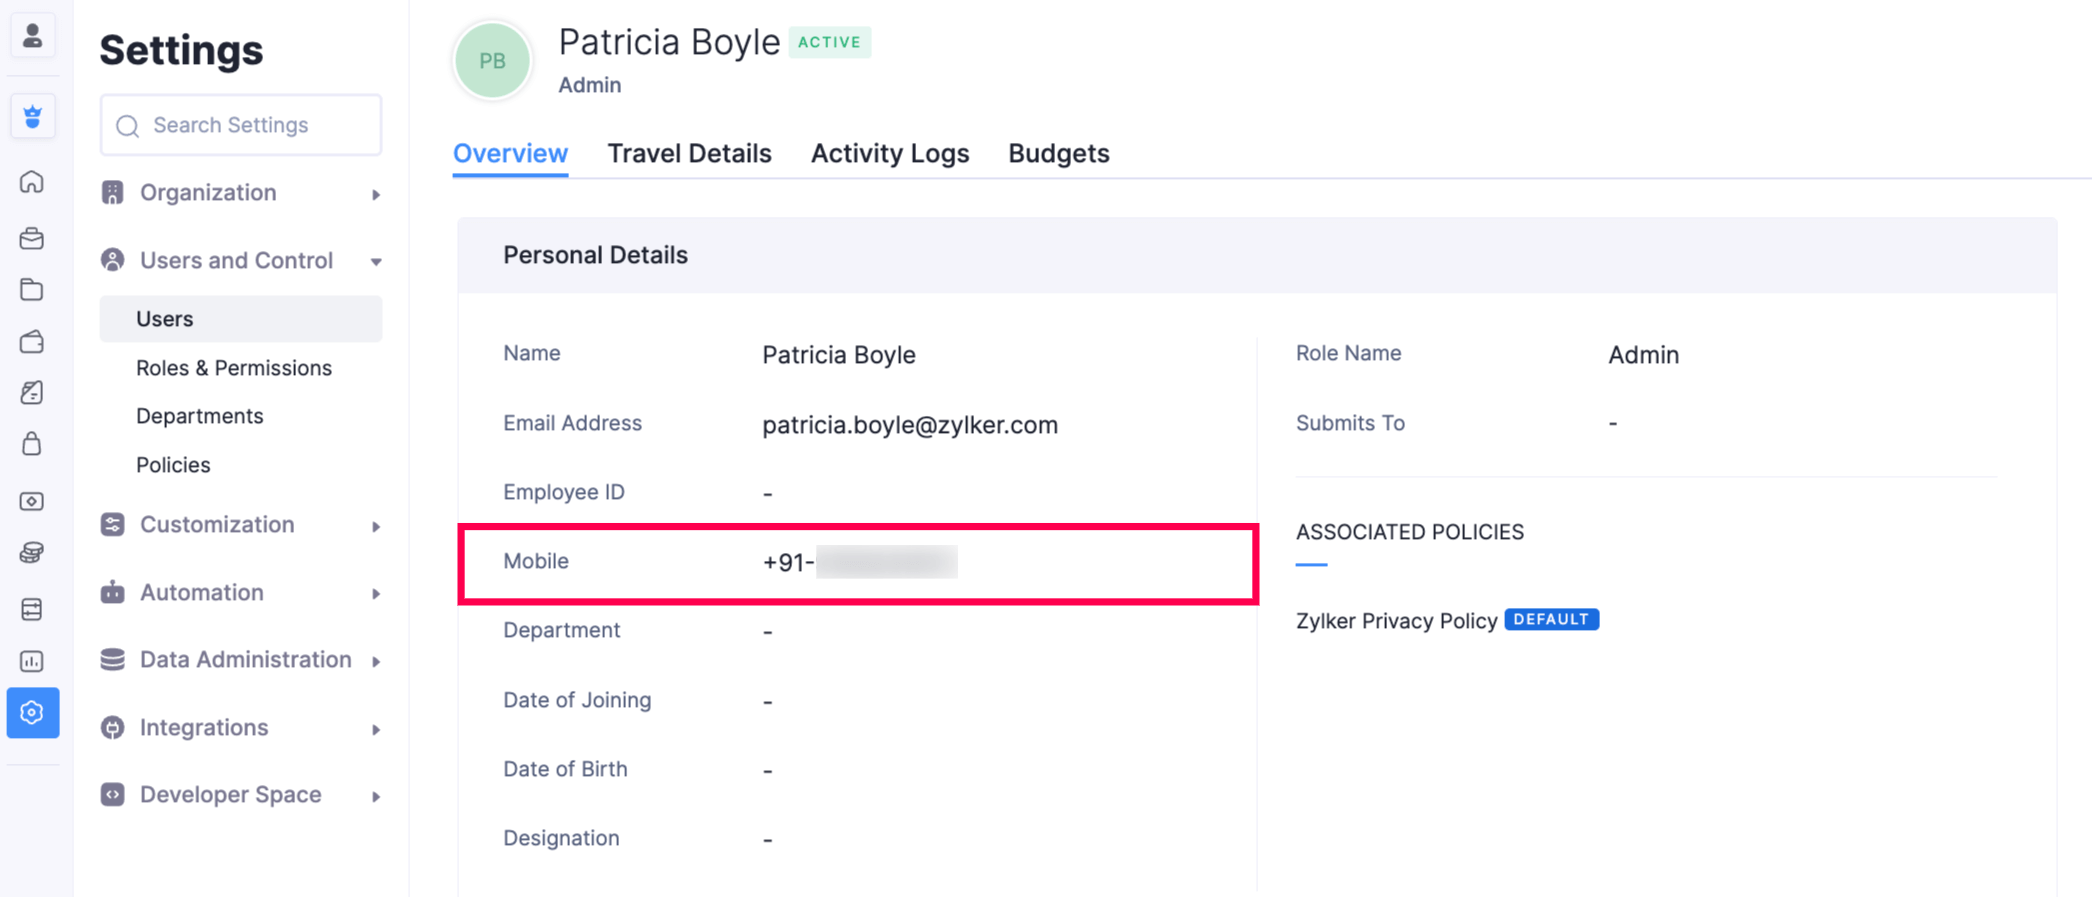
Send Notifications to Users
Once you’ve configured your notification templates and purchased IM Credits, WhatsApp notifications will be sent to users automatically whenever a report or trip is submitted, approved, rejected, or when an expense is reimbursed. You can also view and monitor all the messages sent to the users from your WhatsApp Business account in the WhatsApp Notifications Report.
Note: Ensure that you’ve provided your users’ phone number with the appropriate country code (for example, +91-).
Generate WhatsApp Analytics Reports
IM Credits Usage Report
In Zoho Expense, you can view and keep track of your IM (Instant Messaging) credits usage directly from the Analytics module. This helps you monitor and manage your IM credits efficiently.
To view the IM Credits Usage report:
- Click Admin View on the left sidebar.
- Go to Analytics on the left sidebar.
- Select IM Credits Usage under Activity.
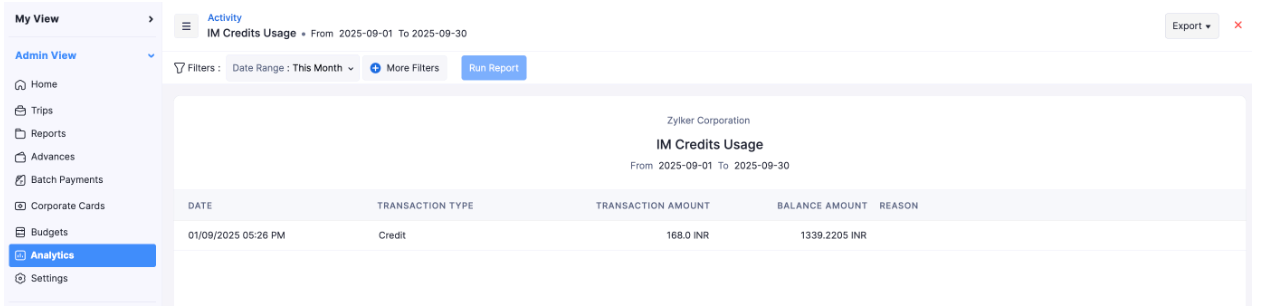
You can view the details of the IM credits you had used for your WhatsApp Business account.
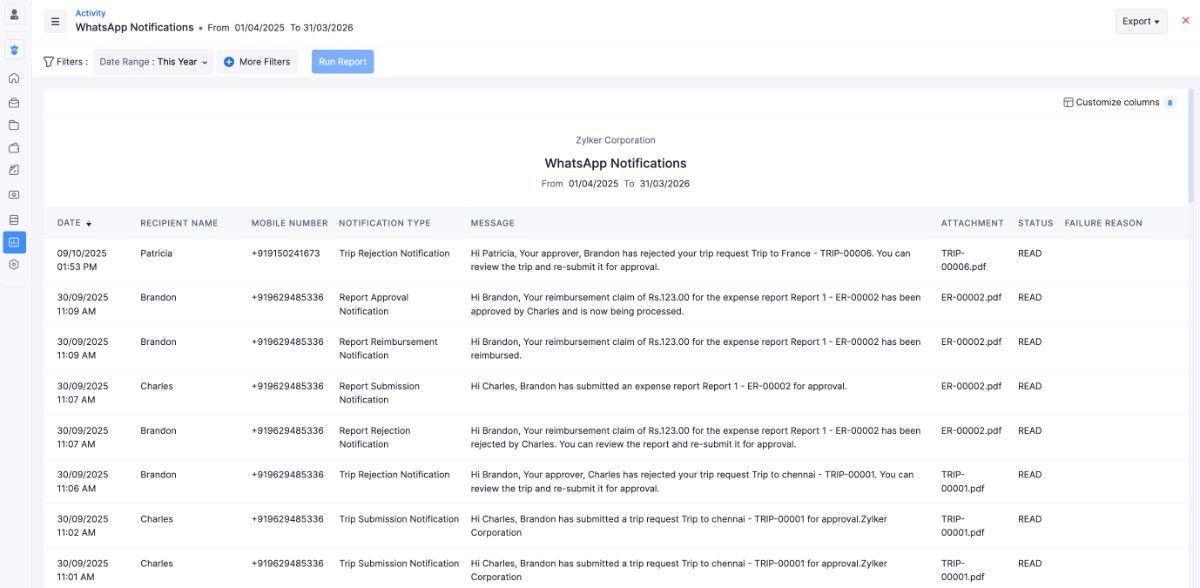
WhatsApp Notifications Report
In Zoho Expense, you can view and monitor the messages you send to the users from your WhatsApp Business account. This allows you to keep track of the type of notifications sent to your users and its status.
To view the WhatsApp Notifications report:
- Click Admin View on the left sidebar.
- Go to Analytics on the left sidebar.
- Select WhatsApp Notifications under Activity.
Other Actions
Disable WhatsApp Business
If you want to disable the WhatsApp integration temporarily, you can mark it as inactive. Here’s how:
- Click Admin View on the left sidebar.
- Go to Settings on the left sidebar.
(OR)
Click Settings in the top right corner of the page. - Select Collaboration under Integrations.
- Click WhatsApp.
- Click Mark as Inactive.
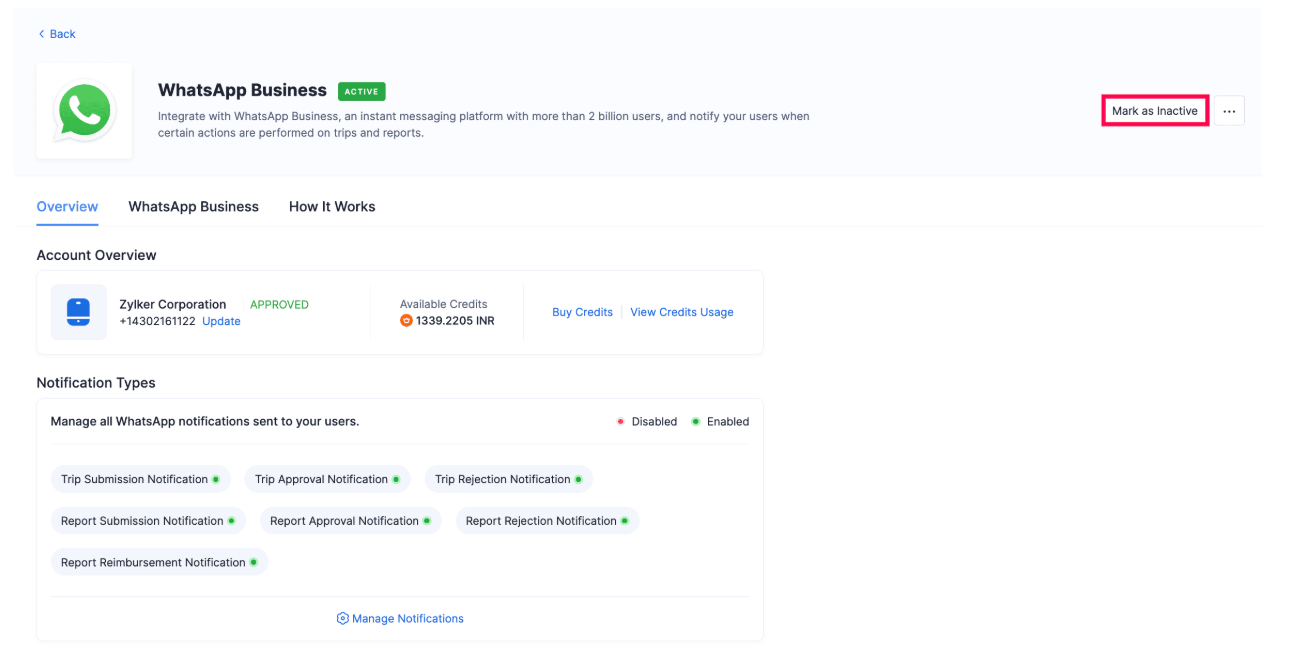
WhatsApp integration will be disabled for your organization.
Enable WhatsApp Business
If you want to re-enable WhatsApp Integration for your organization, you can mark WhatsApp integration as active. Here’s how:
- Click Admin View on the left sidebar.
- Go to Settings on the left sidebar.
(OR)
Click Settings in the top right corner of the page. - Select Collaboration under Integrations.
- Click WhatsApp.
- Click Mark as Active.
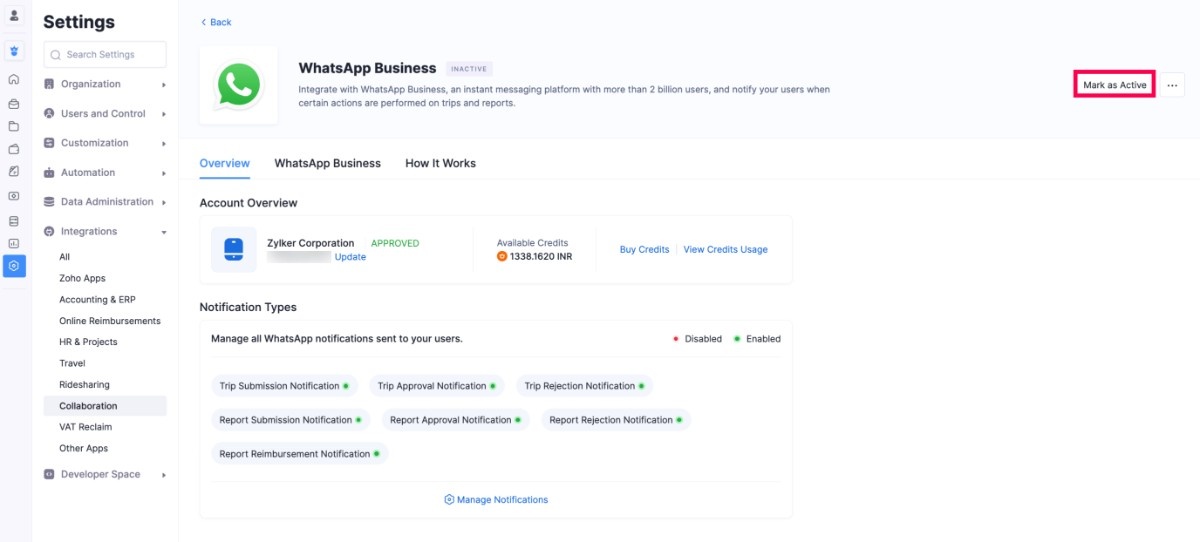
WhatsApp integration is now active for your organization.
Change User Communication Channel Number
The official WhatsApp Business number used by your organization to send and receive messages through WhatsApp is known as the User Communication Channel number. It’s the registered phone number connected to your WhatsApp Business Account (WABA).
To change the default WhatsApp user communication channel number, you must first delete the existing WhatsApp channel. Here’s how:
- Click Admin View on the left sidebar.
- Go to Settings on the left sidebar.
(OR)
Click Settings in the top right corner of the page. - Select Collaboration under Integrations.
- Click WhatsApp.
- Click the Update button next to the number.
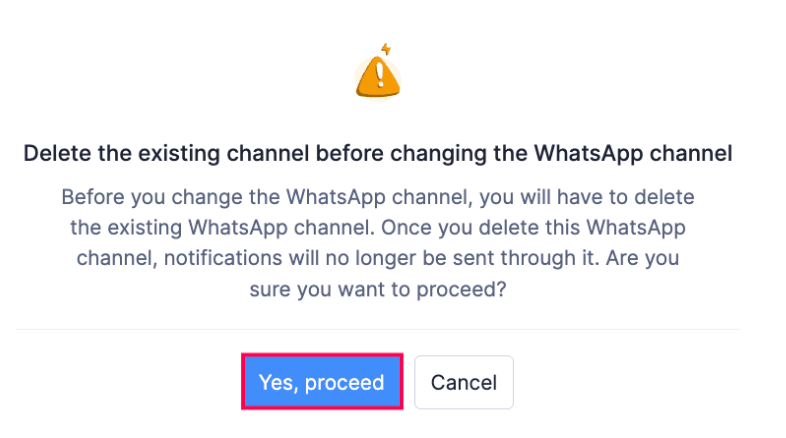
- Click Yes, proceed in the confirmation pop-up. The WhatsApp number associated with Zoho Expense will be deleted.
Once the existing channel is deleted, you can set up a WhatsApp user communication channel with the new phone number. Here’s how:
- Click Set up a Phone Number.
- Select the number you want to set as the default WhatsApp number from the pop-up that follows and click Continue.
- If you haven’t verified the WhatsApp Business number, it will not be listed in the pop-up. In that case, click Verify Numbers.
- Select the desired number and click Send OTP to verify the number. You can also choose to get the OTP via call.
- Enter the OTP and click Verify.
- Once verified, click Back and select the number from the Default WhatsApp User Communication Channel Number dropdown.
Your default WhatsApp User Communication Channel number will be updated.
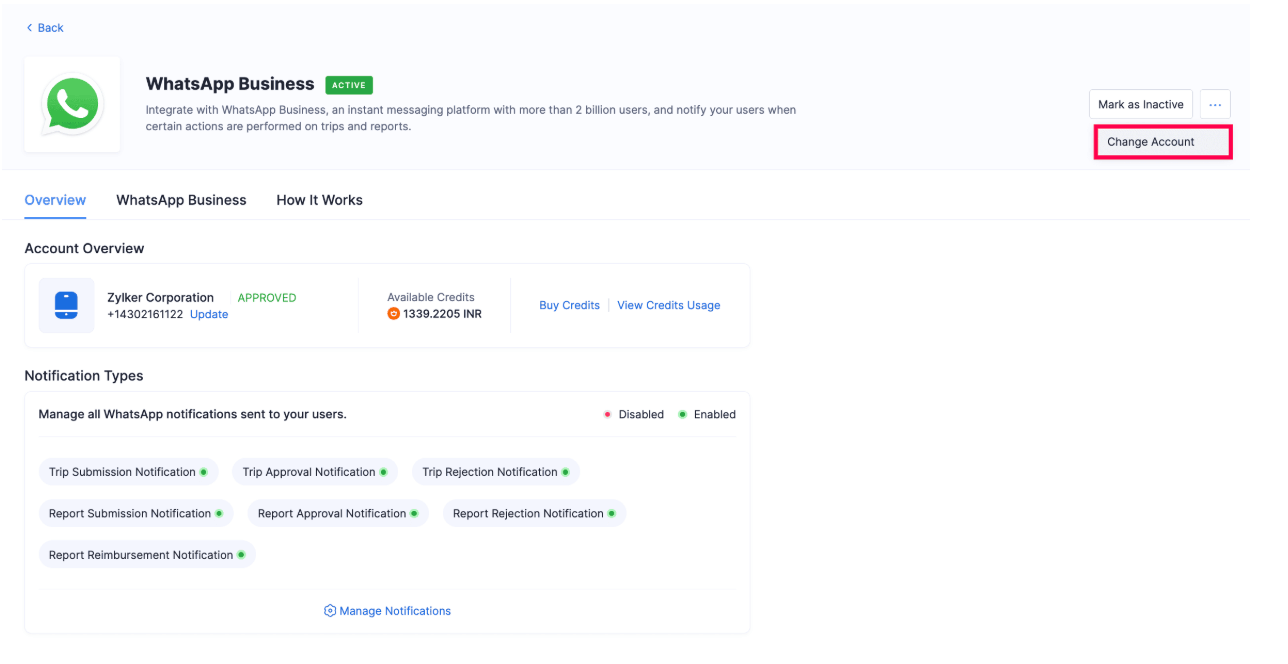
Change WhatsApp Business Account
You can also change the WhatsApp Business account if you have an existing account. Here’s how:
- Click Admin View on the left sidebar.
- Go to Settings on the left sidebar.
(OR)
Click Settings in the top right corner of the page. - Select Collaboration under Integrations.
- Click WhatsApp.
- Click the More icon. Select Change Account from the More dropdown.
Note: Once you change your WhatsApp Business account, you will not be able to use your existing WhatsApp channel and templates. Therefore, you will be required to delete the templates before proceeding.
- In the following pop-up, you should delete the existing templates before changing the default account. You can click:
- Schedule Automatic Deletion to initiate the automatic deletion process. The time duration for deletion depends on the process at Meta’s end.
- I’ll Delete Manually to delete templates and channels manually. Go to each template, click the More icon next to it, and select Delete.
Warning: Ensure that you delete the templates from Zoho Expense and not from Meta to avoid syncing issues.
Once the deletion process is completed, the status of your WhatsApp Business account will be changed to SETUP PENDING. You can also confirm if the deletion process has been completed by clicking Manage Notifications.
- Click the More icon, and select Change Account from the dropdown. The Change WhatsApp Business Account pop-up will appear.
- Click Use the existing WhatsApp Business account registered with Zoho and select the account from the dropdown to continue using the existing account. (or)
- Click Connect a new WhatsApp Business account with Zoho to connect a new WhatsApp Business account.
- Click Continue.
The WhatsApp Business Account will be changed.
 Yes
No
Yes
No
Thank you for your feedback!