Integrate Zoho Expense With Zoho Payroll
Paying your employee reimbursements is now easier with the Zoho Expense - Zoho Payroll integration. Process reimbursements and refunds along with employee salaries directly within Zoho Payroll.
Insight: Zoho Payroll is an efficient payroll processing application that helps you streamline your payroll management and rollout employee salaries effortlessly. Additionally, they provide all around employee management and secure employee portals.
Note: The Zoho Payroll - Zoho Expense integration is only available in early access. Contact support@zohoexpense.com to get access for your organisation.
How the Integration Works
After the integration is enabled, a new status, “Awaiting Reimbursement via Payroll” will be automatically available for all the approved reports in Zoho Expense. Once a report’s status is changed to Awaiting Reimbursement via Payroll, the report’s amount details will be directly sent to the employee’s recent pay run in Zoho Payroll and the admin can decide if they want to pay the employee’s reimbursements or refunds along with their pay run.
Only the aggregate of all the reimbursable reports that were submitted by an employee will be sent to Zoho Payroll. Once the reimbursements are processed along with their salaries in Zoho Payroll, the status of the reports will be automatically changed to Reimbursed in Zoho Expense.
Prerequisites
- The email address used in Zoho Payroll should be the same as the one used to log into Zoho Expense.
- The users should belong to the same organization in both Zoho Expense and Zoho Payroll.
- The Zoho Payroll integration is only available in the India edition of Zoho Expense.
Benefits
Automated processing of reimbursements and refunds
No more processing employee salaries and reimbursements separately. Once you select reimburse via Zoho Payroll, the total amount that is yet to be reimbursed for an employee will be automatically added to their upcoming pay run in Zoho Payroll. If there are refunds that have to be paid by an employee, they will be deducted from the reimbursement total. Finally, the admin who’s executing the pay run in Zoho Payroll will decide if the reimbursements and refunds could be processed with the pay run.
An organized view of the reimbursements that are pending to be processed with salaries
Once an employee’s report is marked as Awaiting Reimbursement via Payroll, a custom view is automatically created in Zoho Expense. This view easily filters out and displays the reports and users for whom the reimbursements are waiting to be paid along with their salaries in Zoho Payroll.
Set up the Integration
Prerequisite: The user who is setting up the integration should be a Super Admin in Zoho Payroll and an Admin in Zoho Expense.
You can be a user who falls under any of the following categories. Set up your account based on the category you best fit.
- I have an account in Zoho Expense but do not have an account in Zoho Payroll
- I already have an account in both Zoho Expense and Zoho Payroll
I have an account in Zoho Expense but do not have an account in Zoho Payroll
In this case, you can sign in to Zoho Payroll with the email address used in your Zoho Expense account and integrate your Zoho Payroll account with Zoho Expense. To do this:
- Sign in to Zoho Payroll with the same email address and password that you use to log in to your Zoho Expense account.
- In the page that opens, click Join Organization next to the organization that you belong to in Zoho Expense.
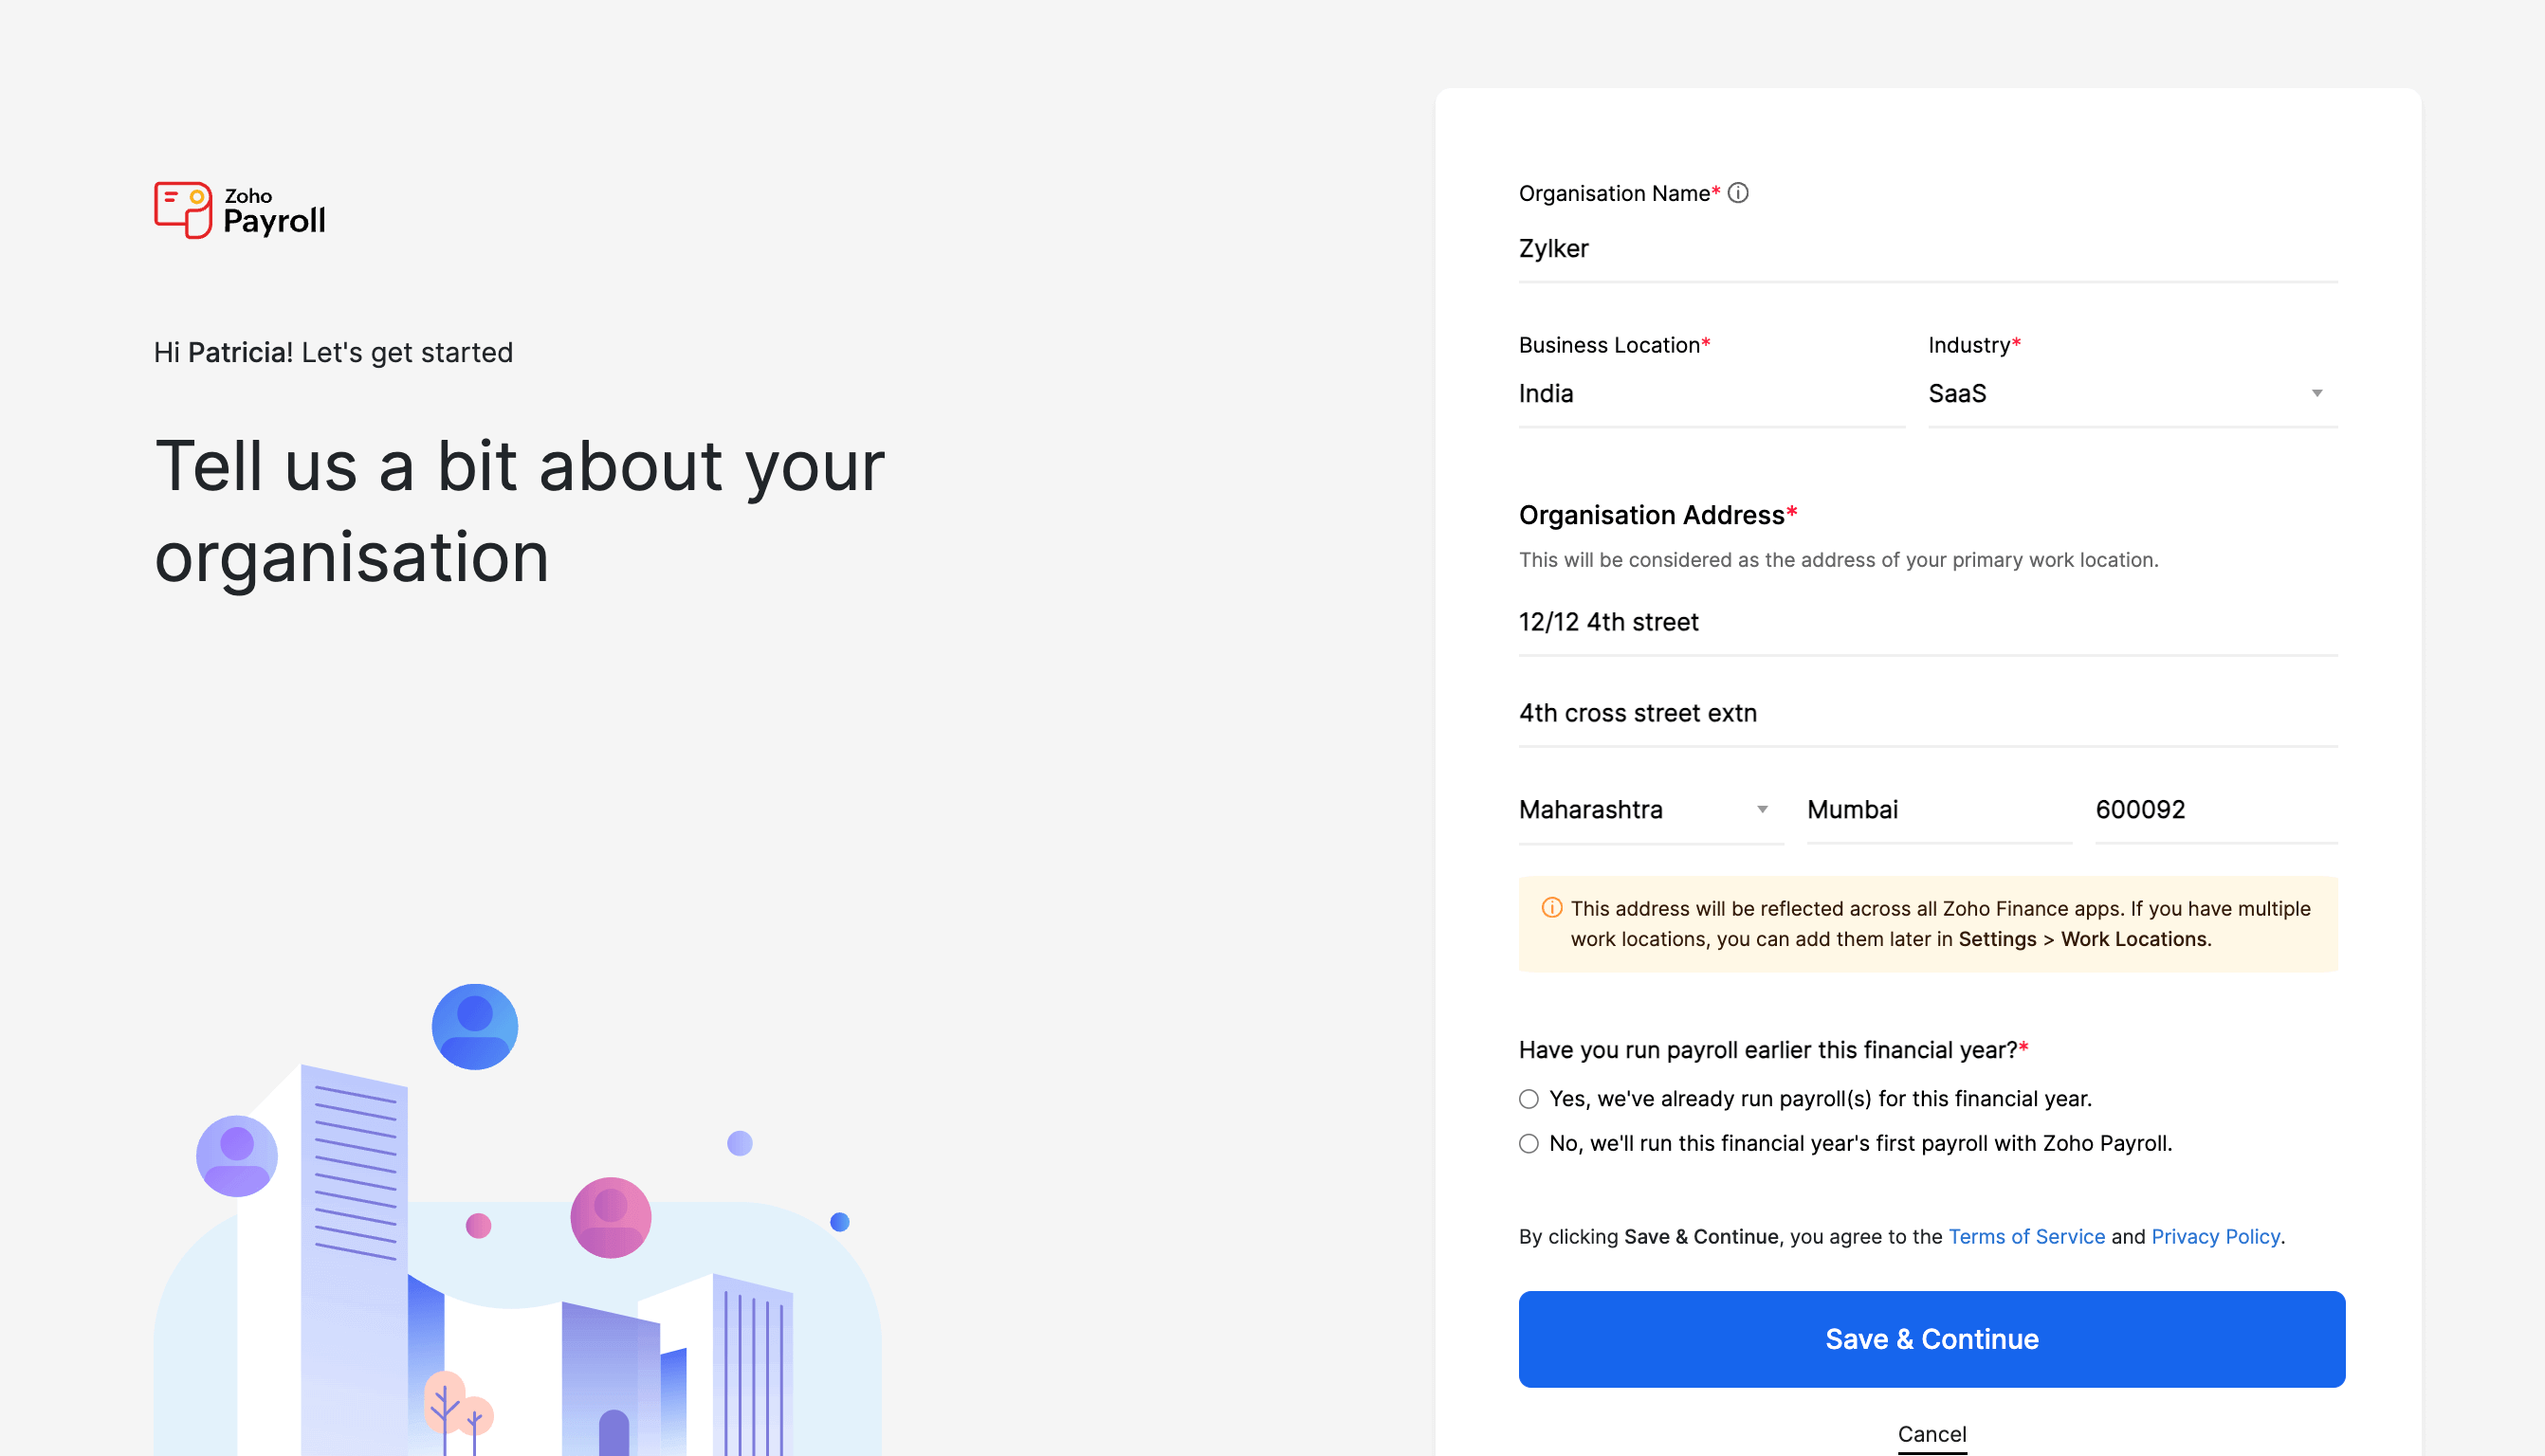
- Now, a new organization will be created in Zoho Payroll. Complete the organization setup, provide your tax information, configure your pay schedule, statutory components, and salary components.
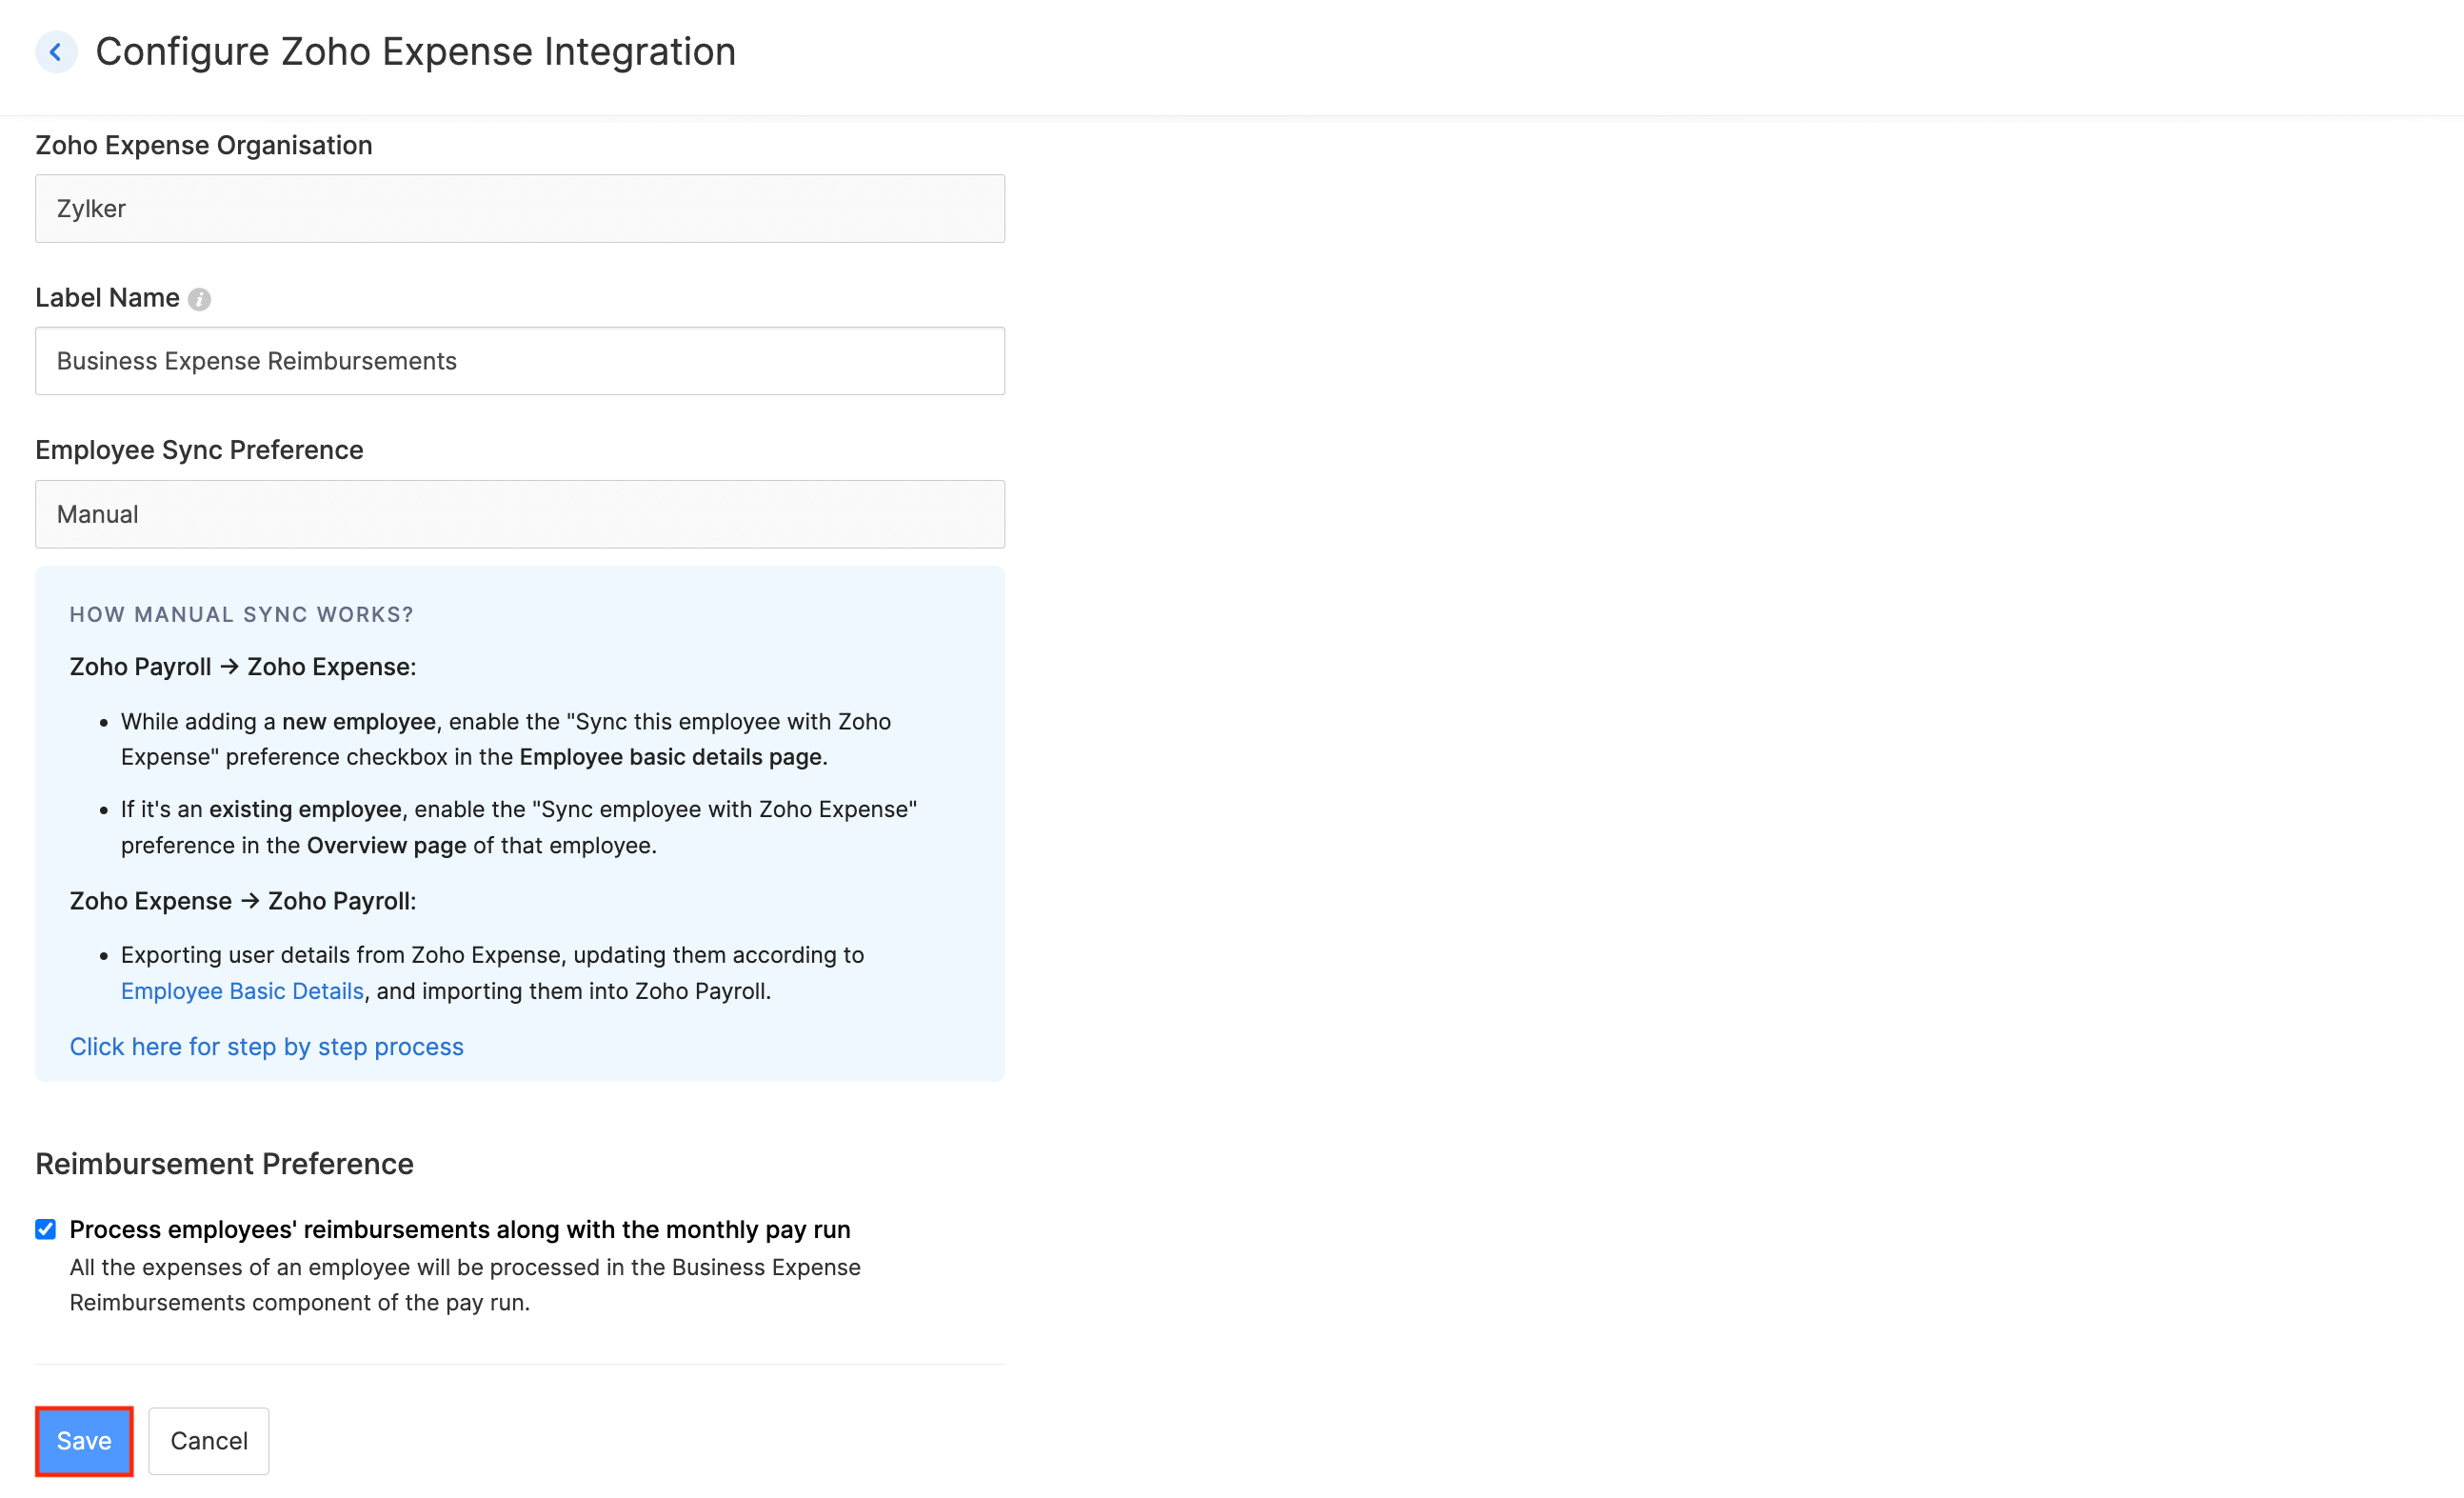
Once you create an organization in Zoho Payroll, you can set up the integration. To do this:
- Click the Gear icon in the top right corner of the page in Zoho Payroll.
- Click Zoho Apps.

- Click Configure Now next to Zoho Expense.
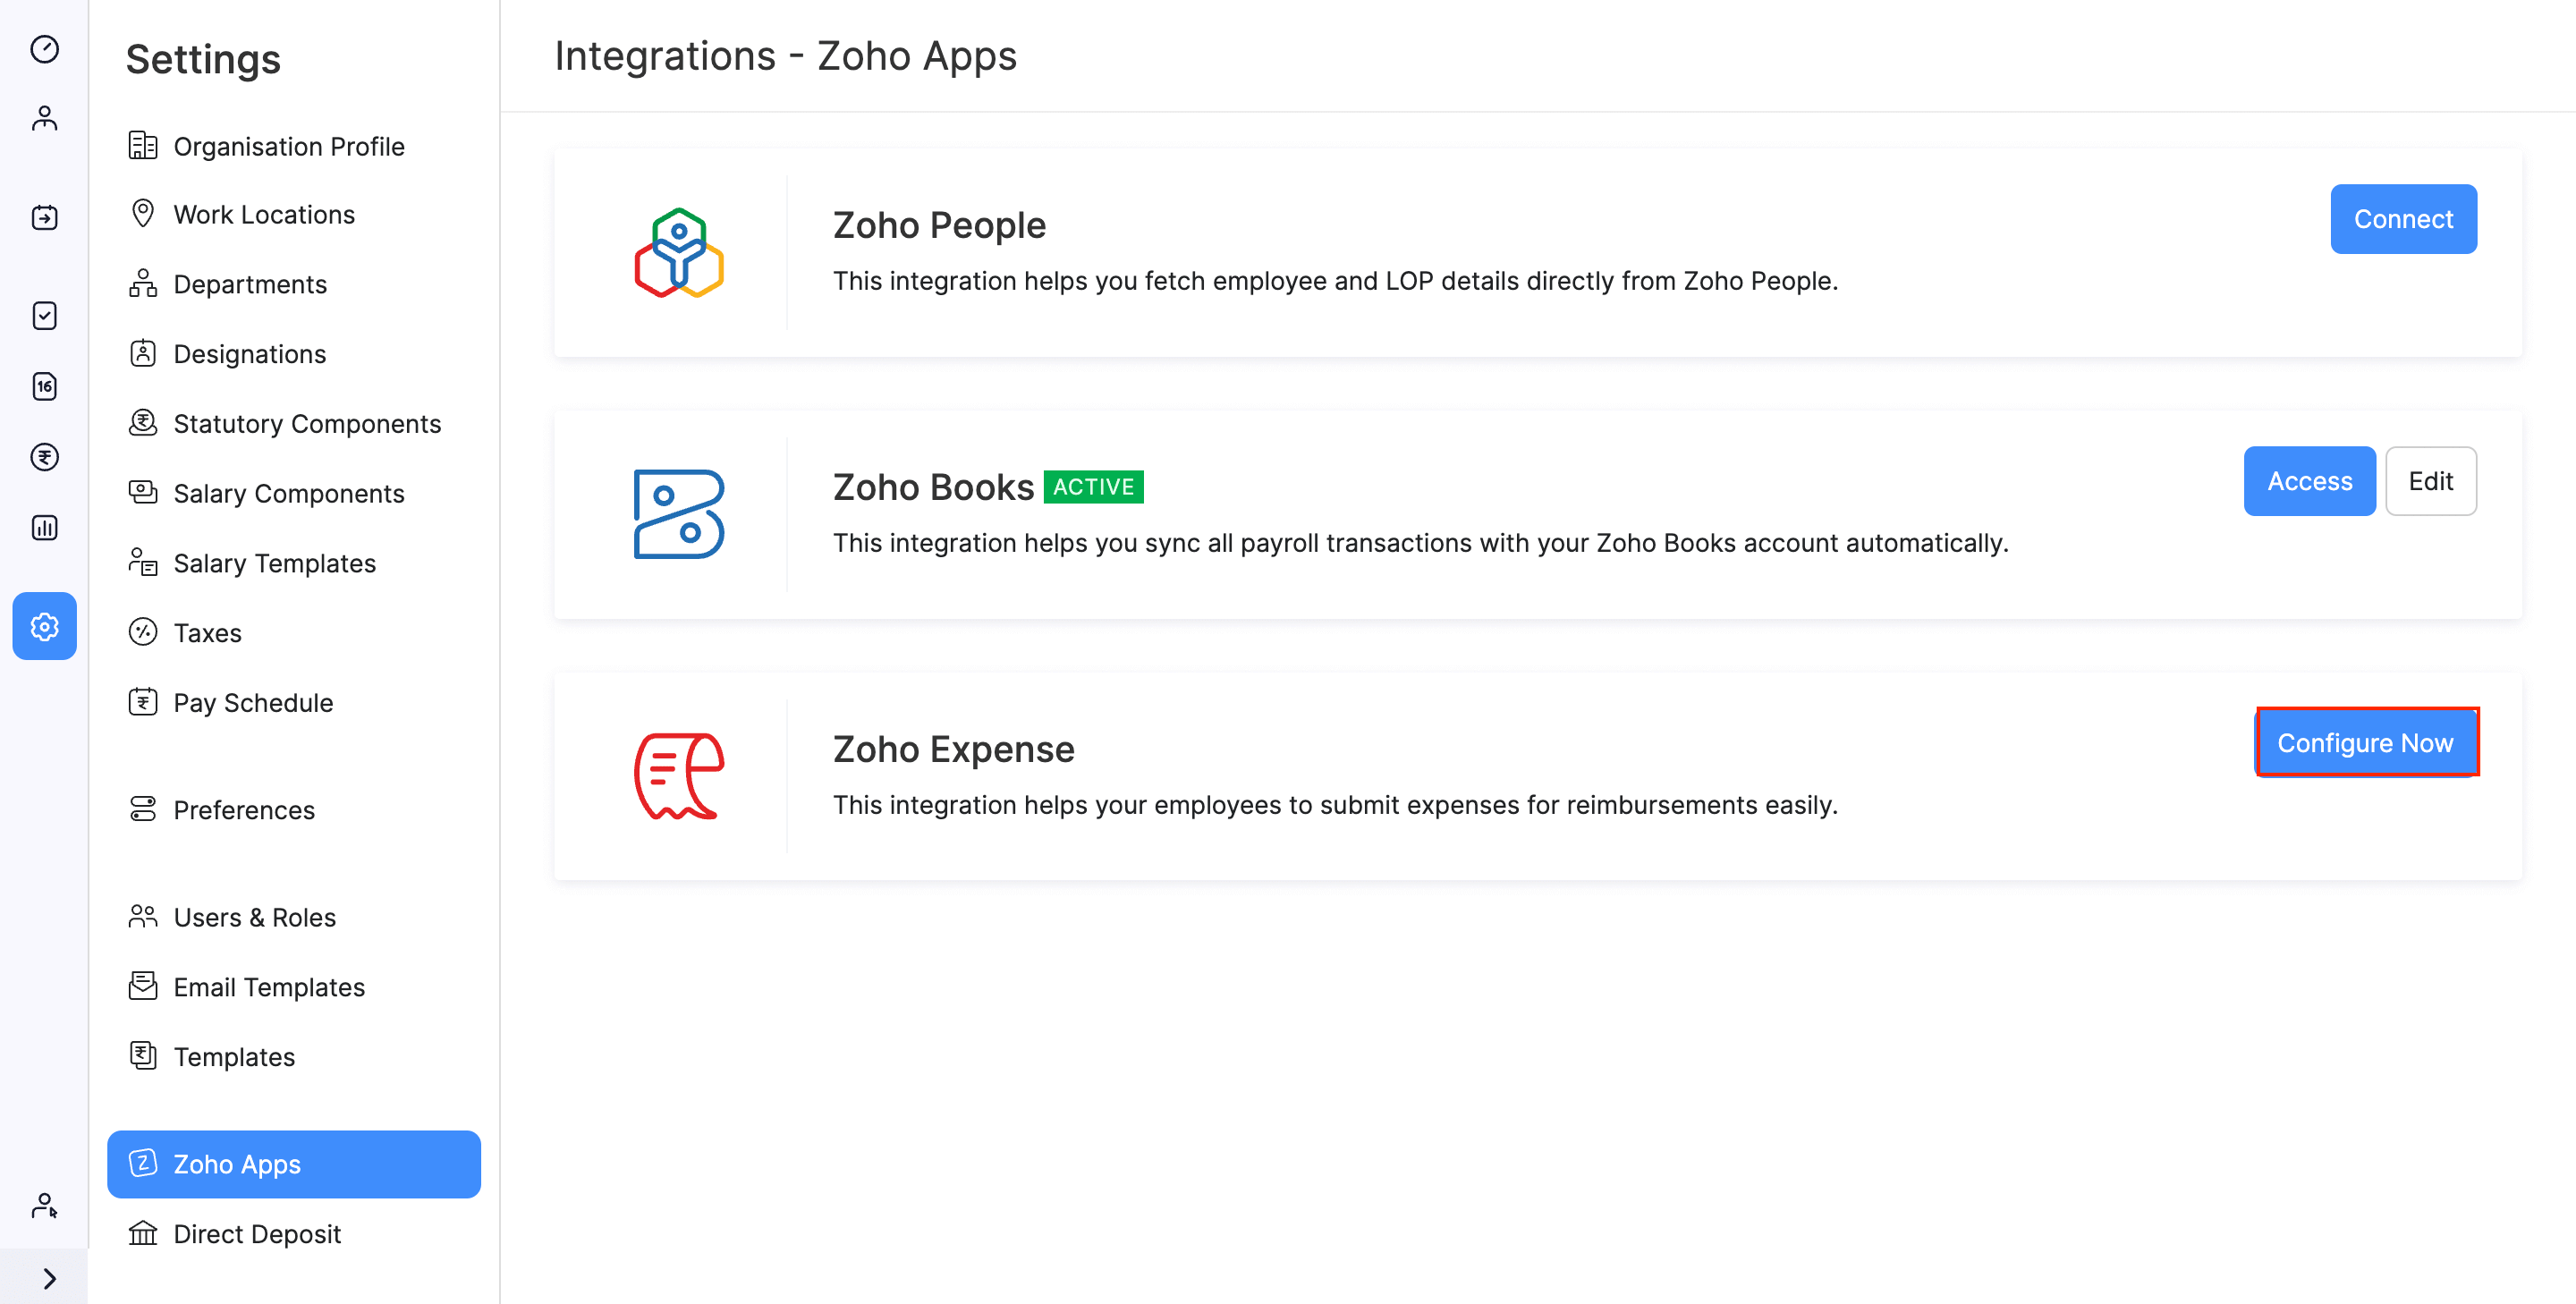
- In the page that opens, you can set up the integration settings. The organization in Zoho Expense will be preselected.
- The user sync between Zoho Expense and Zoho Payroll has to be done manually. You can add the users in Zoho Expense as employees in Zoho Payroll and the employees in Zoho Payroll can be added as users in Zoho Expense.
- Click Save to save your preferences. Your integration will be enabled.
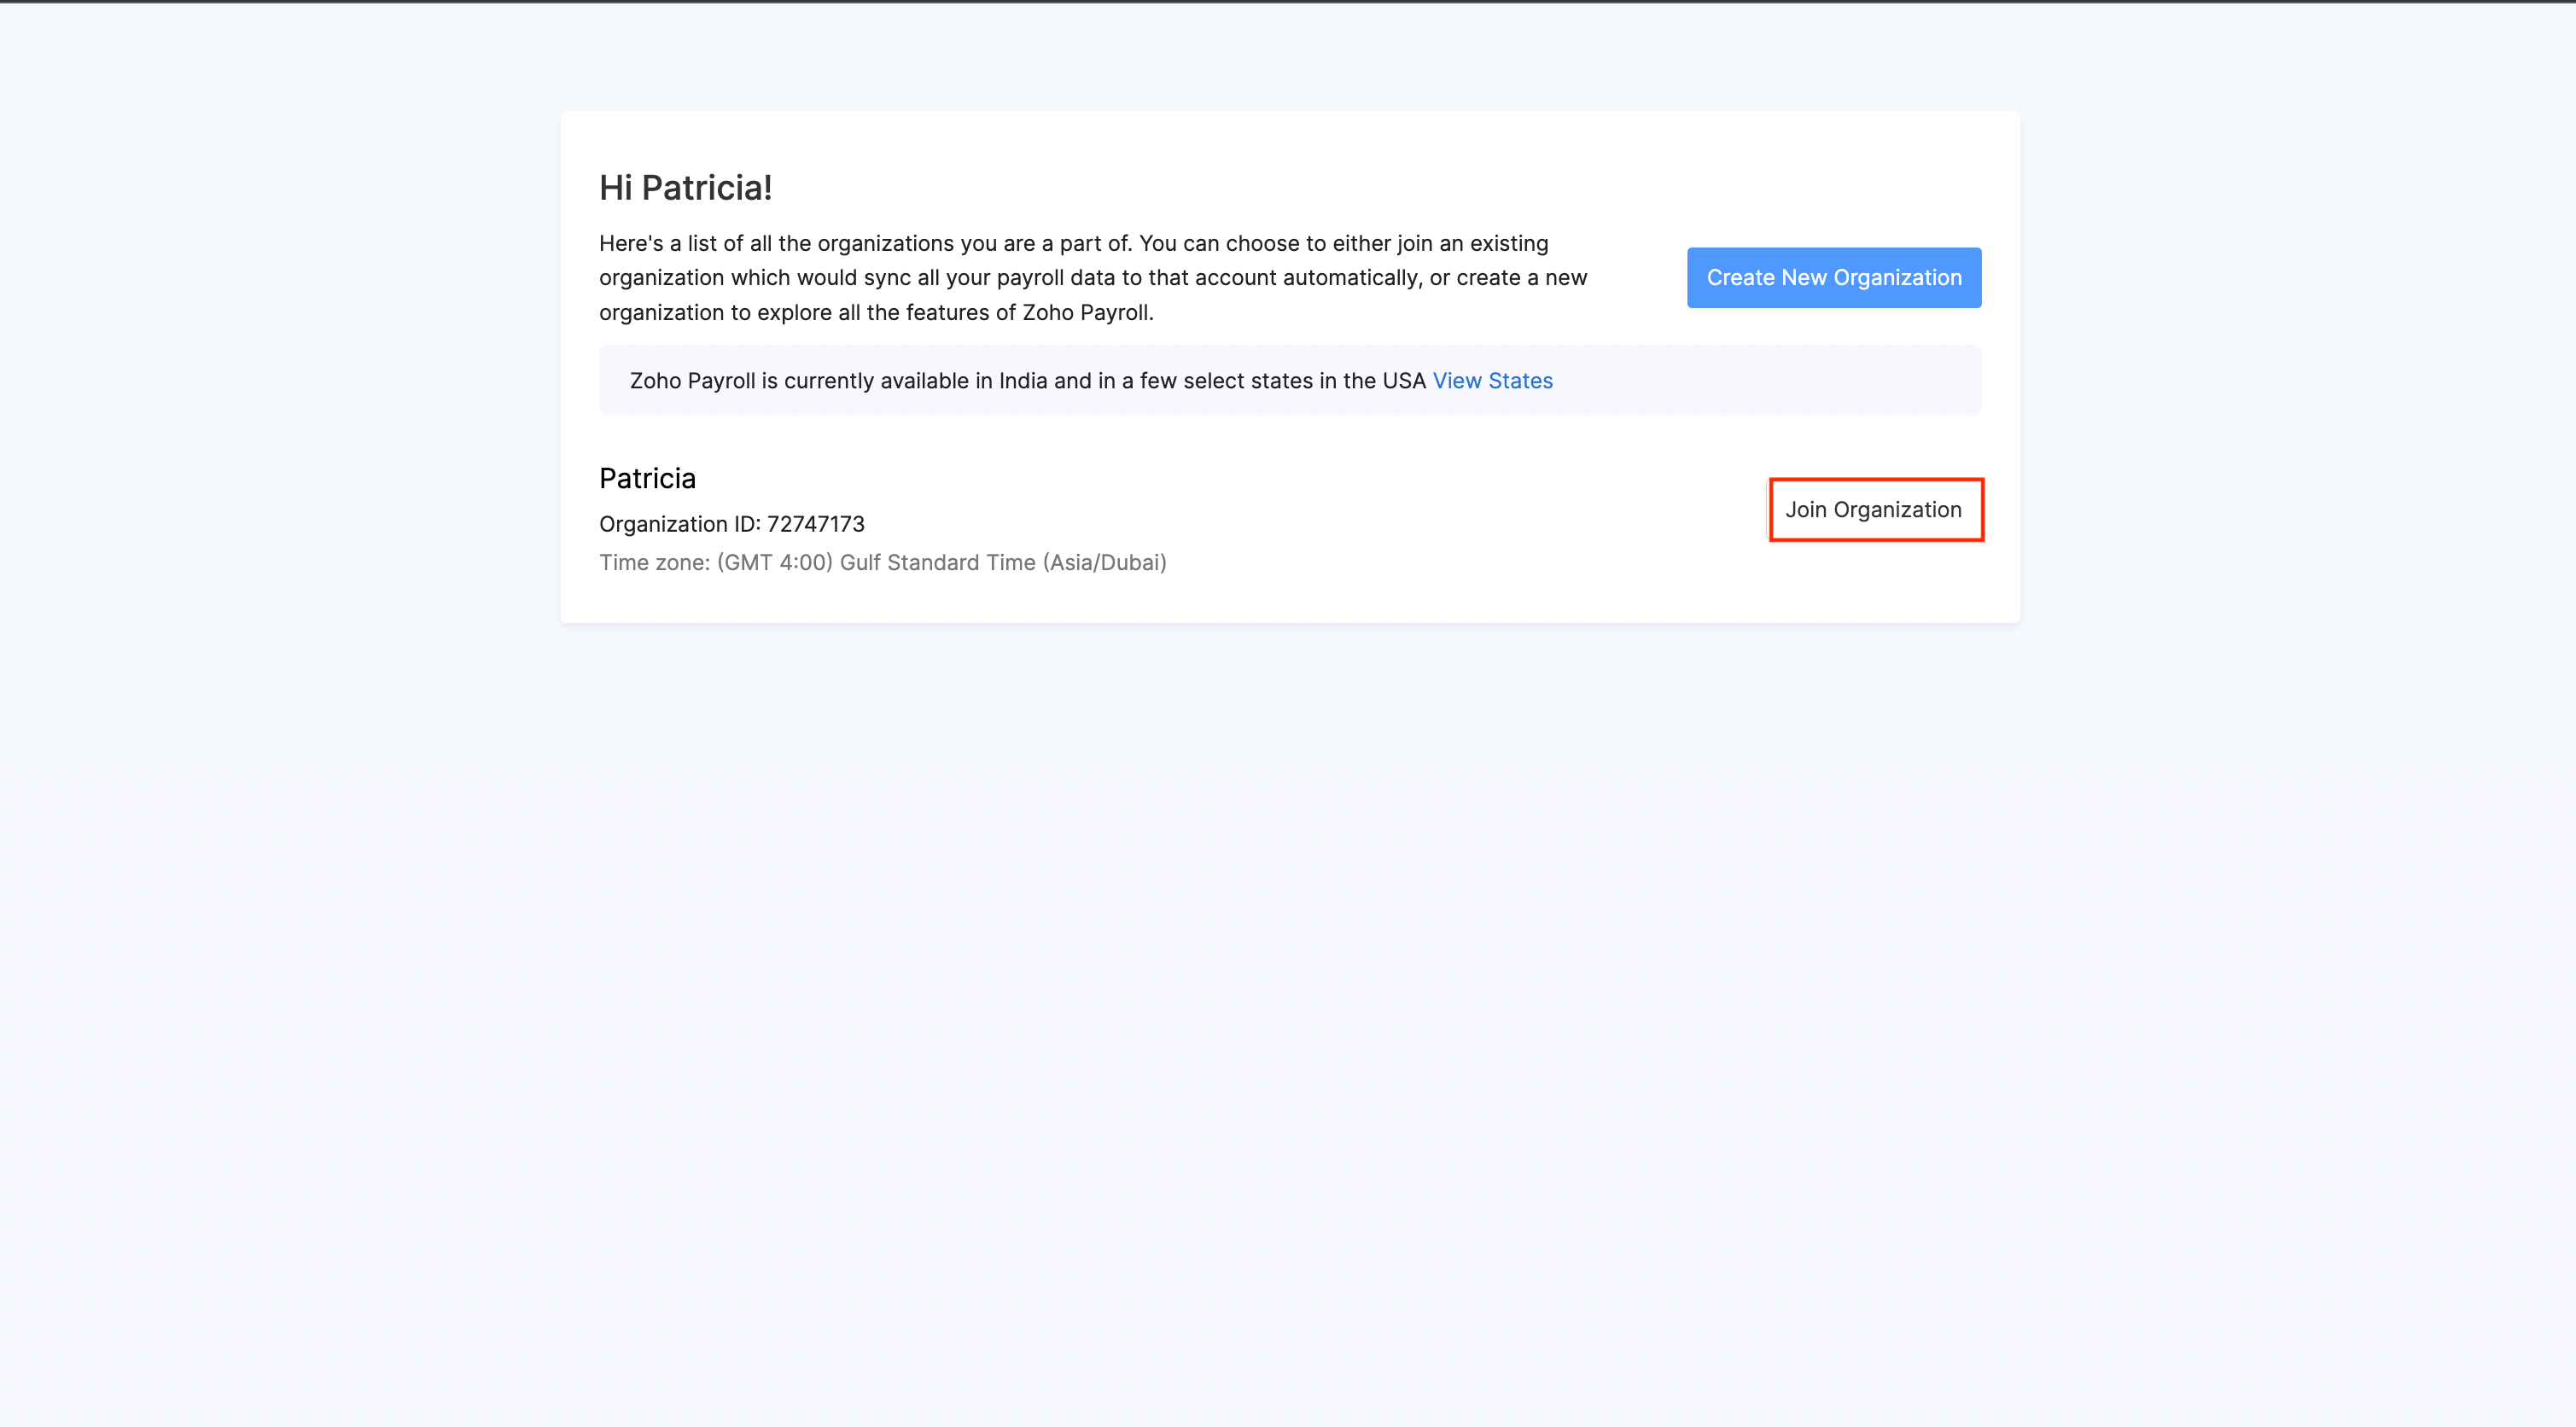
I already have an account in both Zoho Expense and Zoho Payroll
Since you should have the same organization ID in both Zoho Expense and Zoho Payroll, you are required to create a new organization in Zoho Payroll with the same ID as the organization you have in Zoho Expense. However, you can also create a new organization in Zoho Expense with the same ID as the organization in Zoho Payroll.
Protip: If the organizations in both Zoho Payroll and Zoho Expense have the same organization ID, then you can set up the integration directly.
To create a new organization in Zoho Payroll with the same ID as in Zoho Expense:
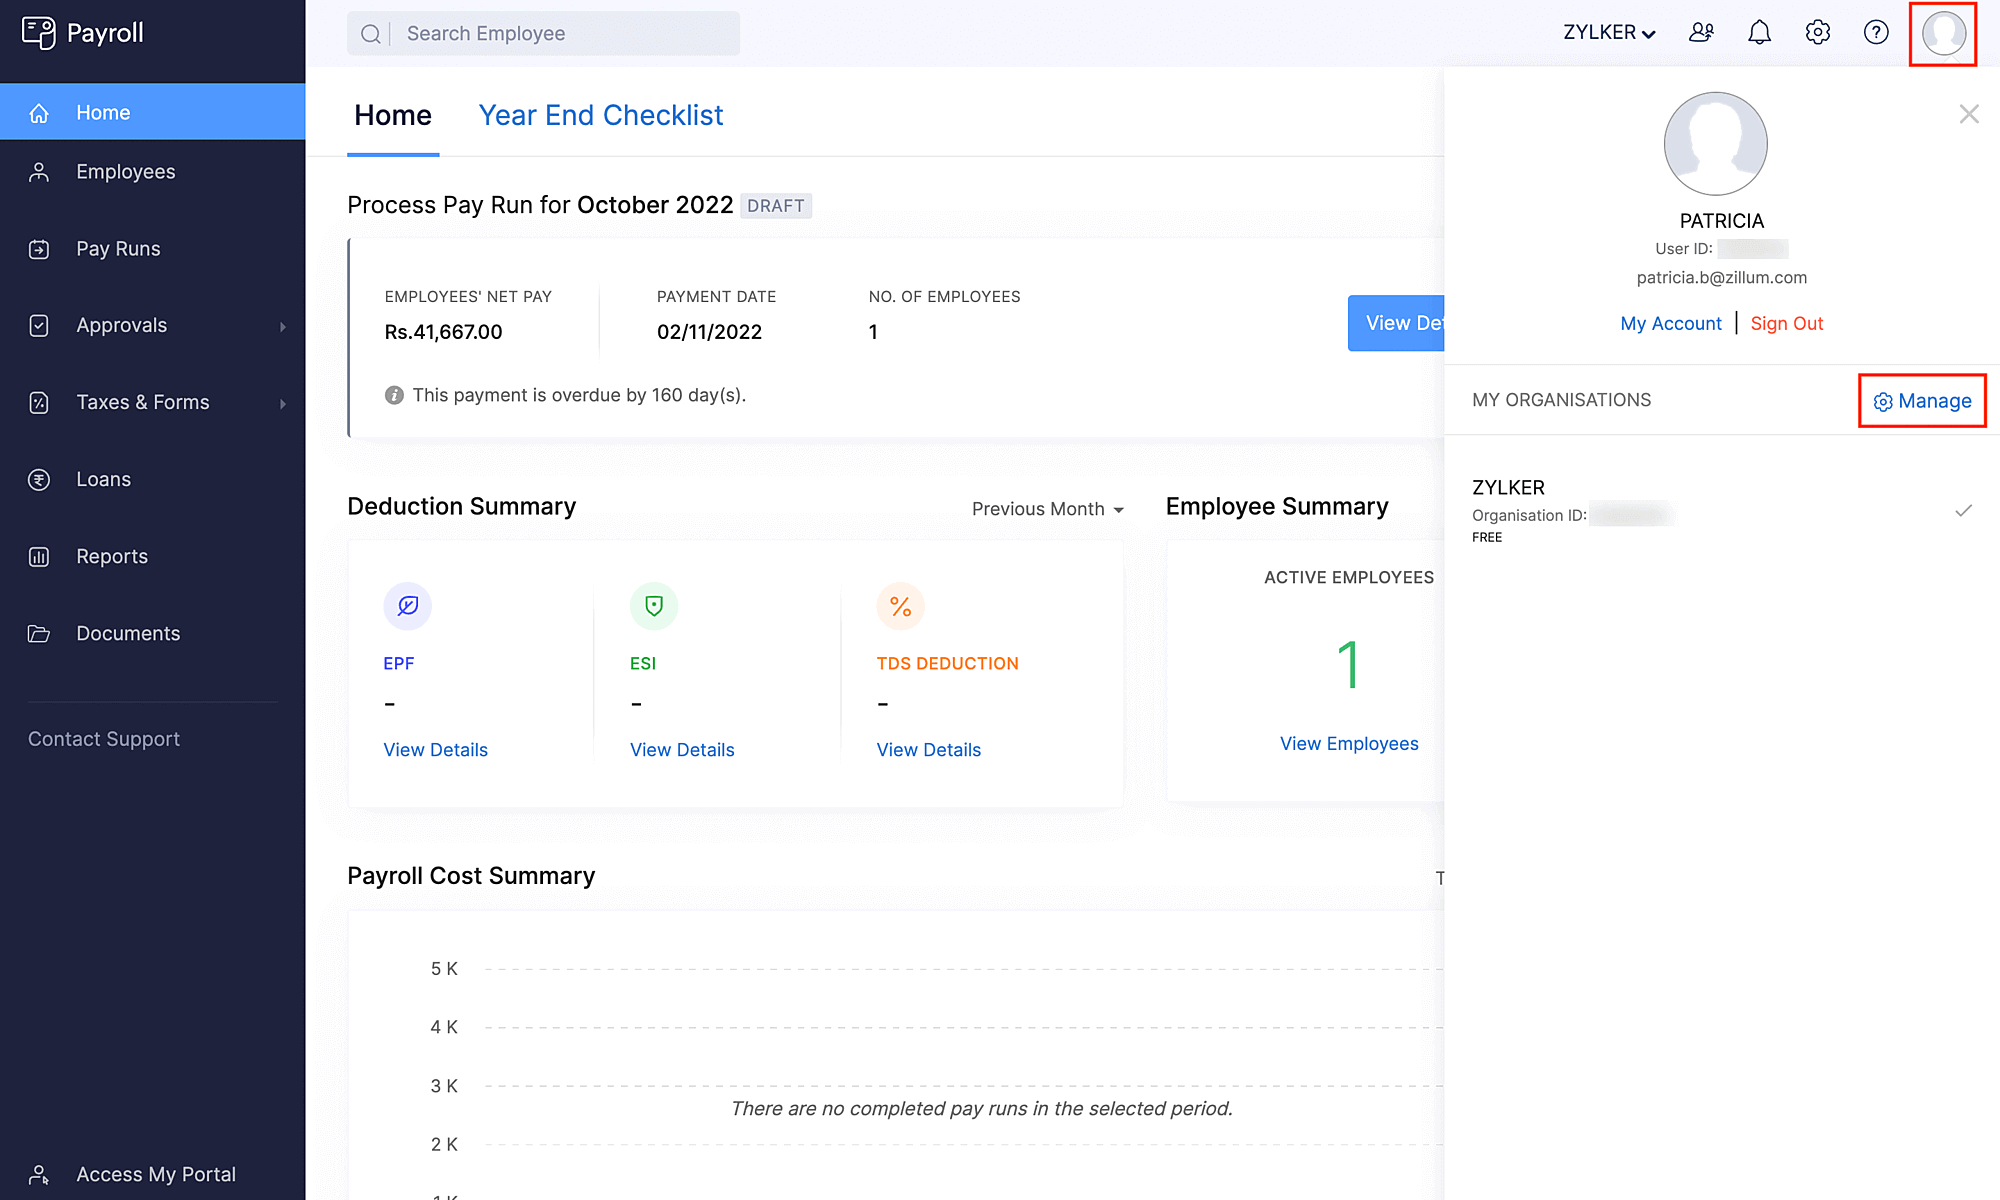
- Log into your Zoho Payroll account.
- Click your organization name at the top right side of the page.
- On the slider that opens, click Manage.
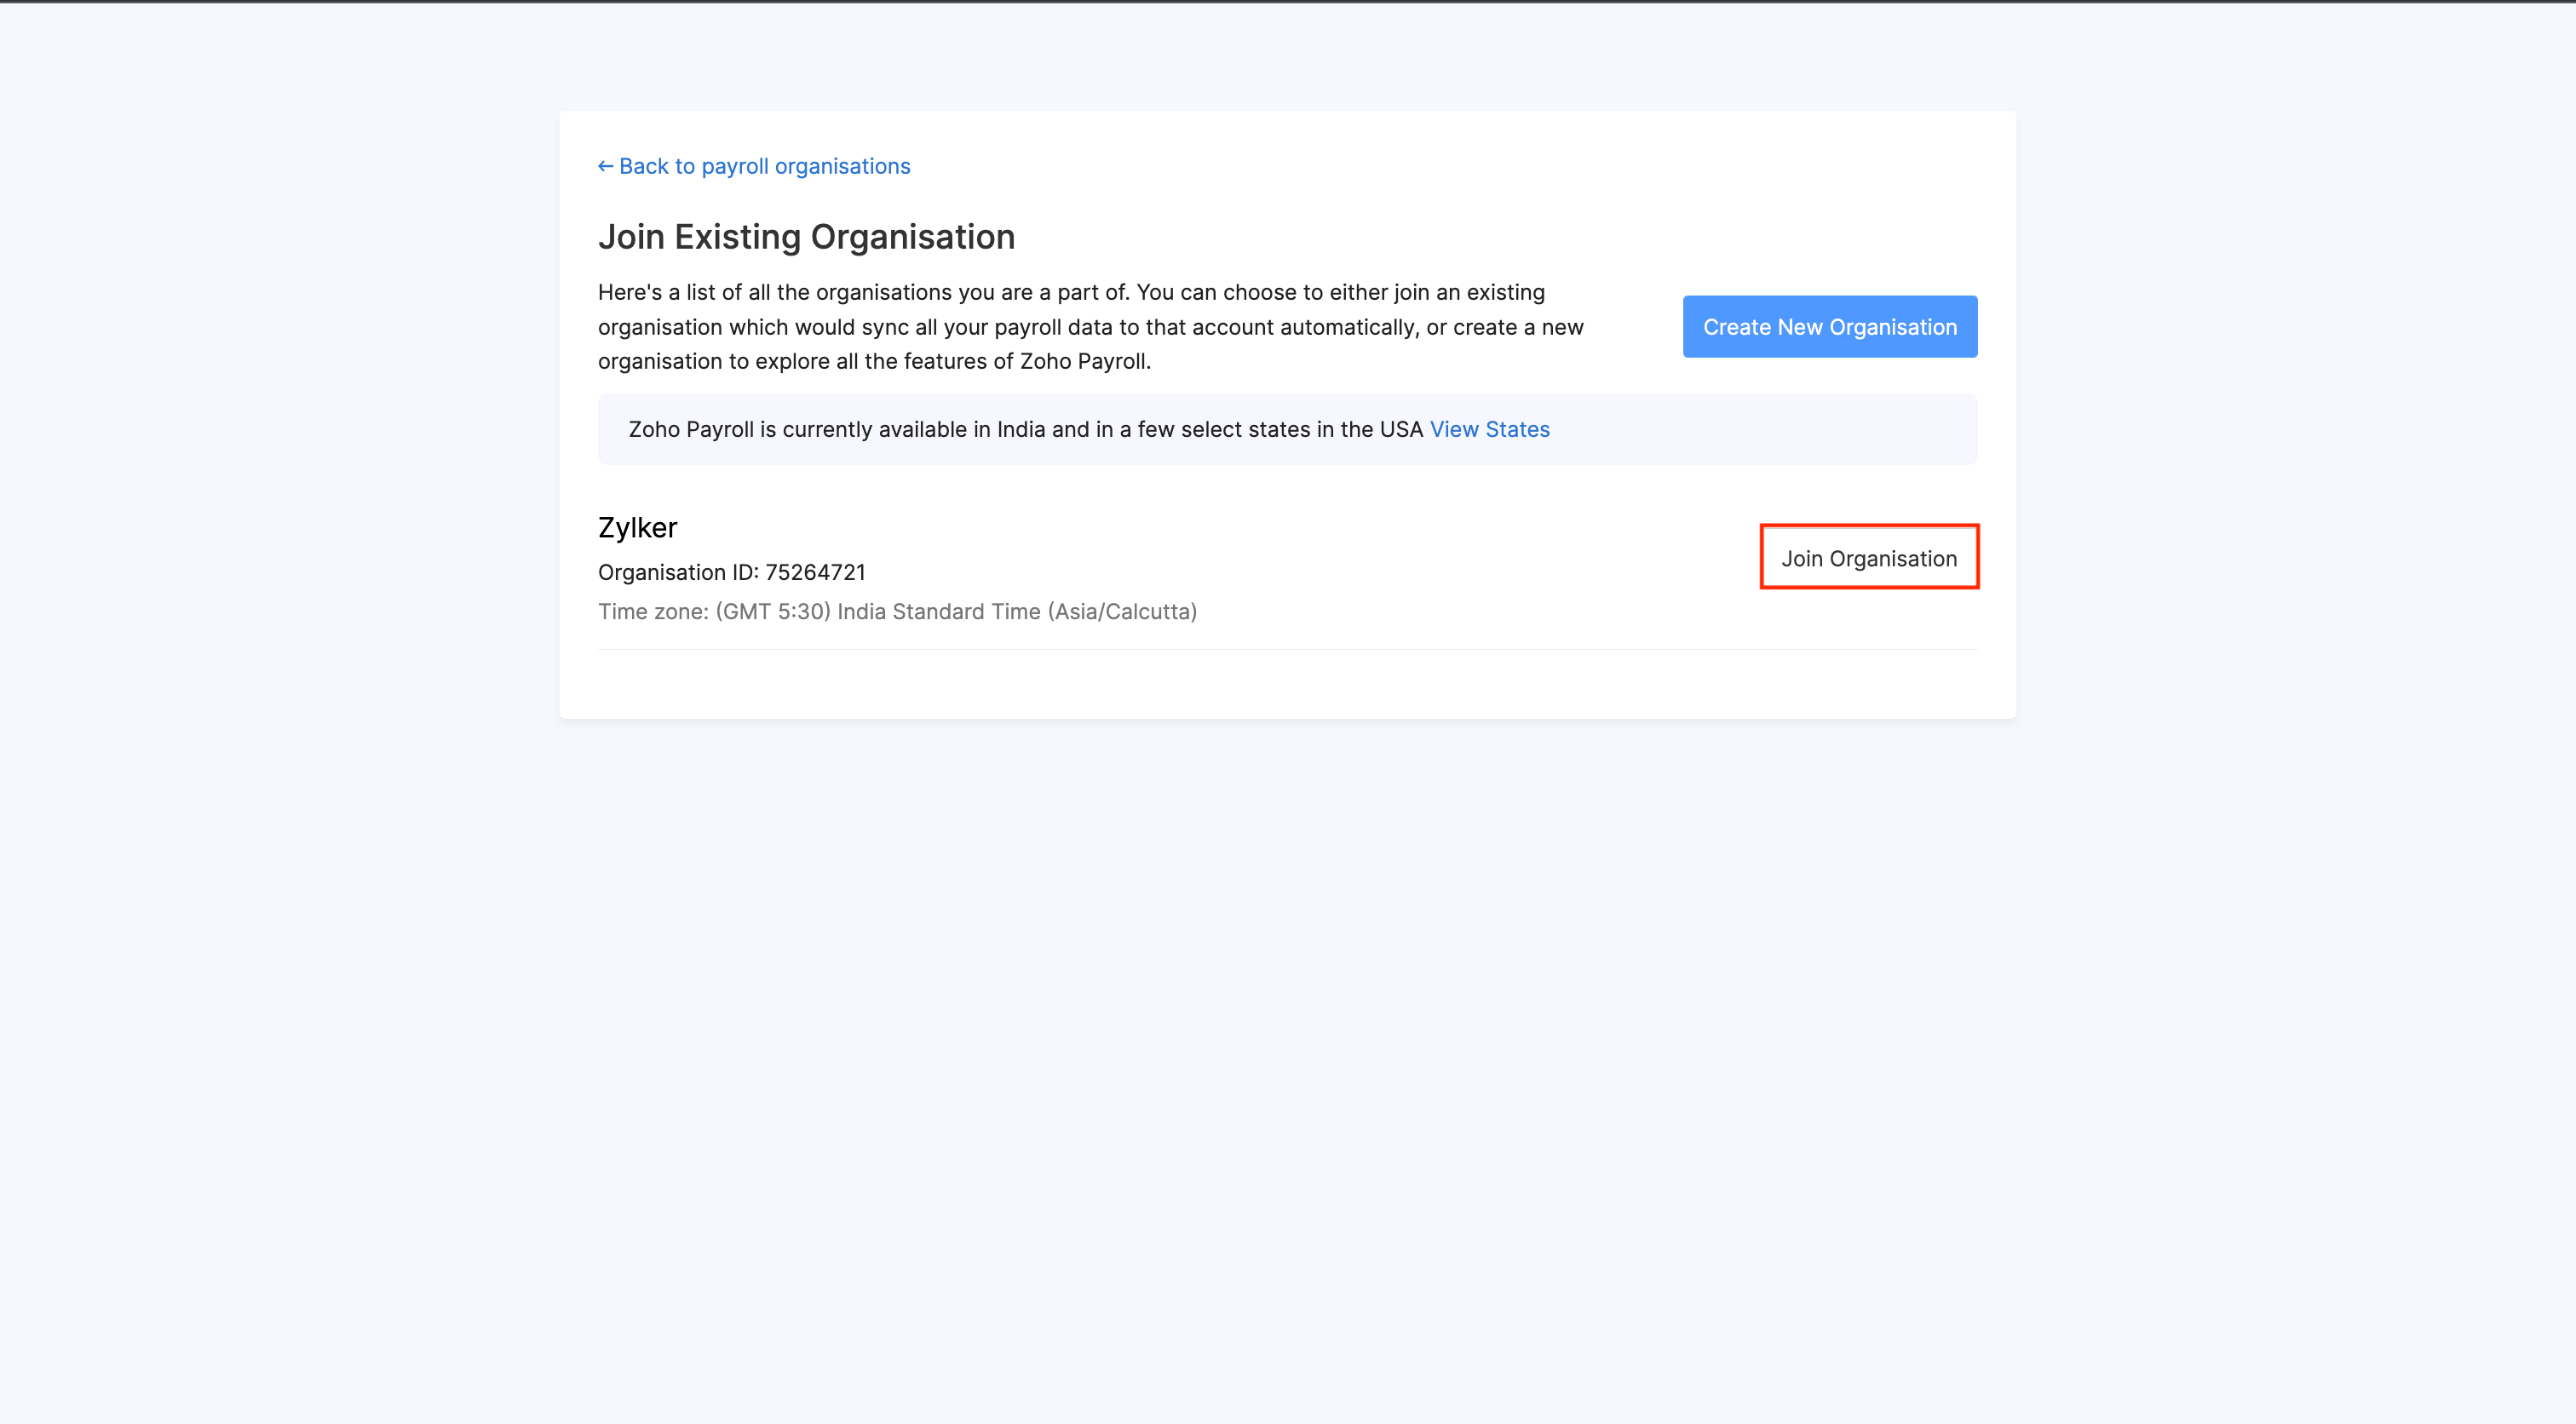
- Click Join existing organization.
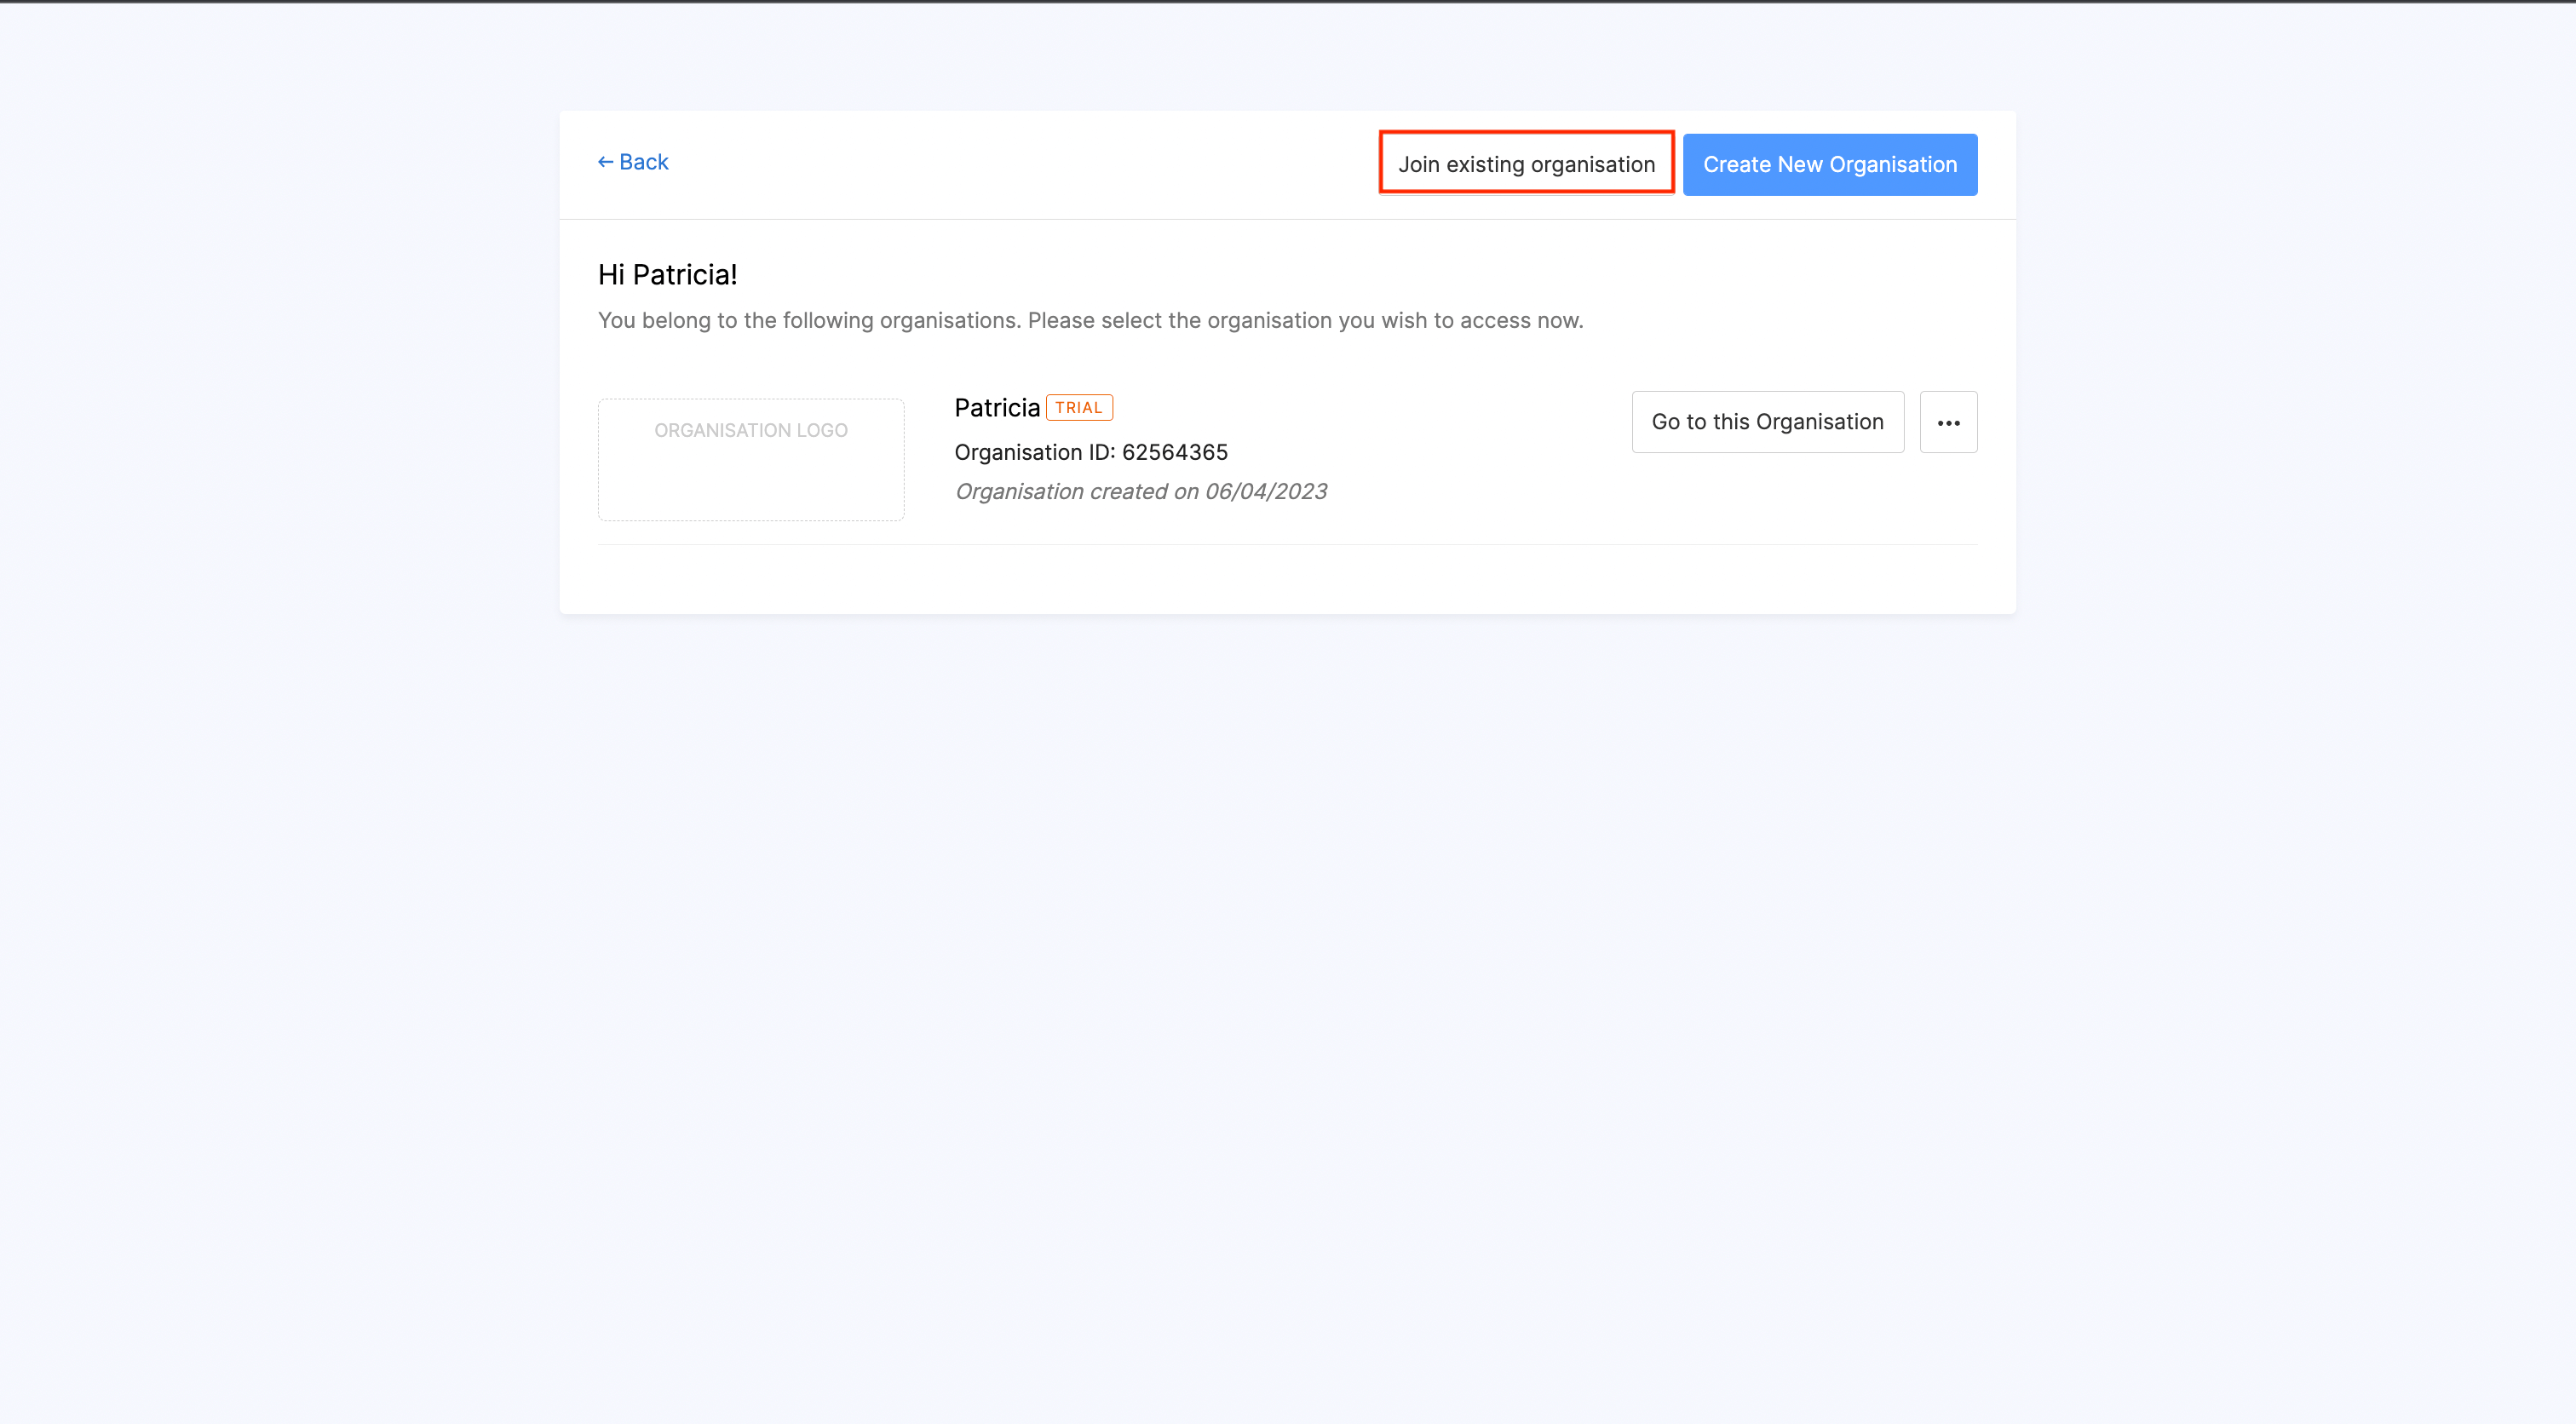
- Next to the name of the organization that you belong to in Zoho Expense, click Join Organization. Once this is done, a new organization with the same organization ID will be created on Zoho Payroll.
- In the page that opens, complete the organization setup, provide your tax information, configure your pay schedule, statutory components, and salary components.
Once you create an organization in Zoho Payroll, you can set up the integration. To do this:
- Log into your Zoho Payroll account.
- Click the Gear icon in the top right corner of the page in Zoho Payroll.
- Click Zoho Apps.
- Click Configure Now next to Zoho Expense.
- You’ll be redirected to a page where you can set up the integration. The organization in Zoho Expense will be preselected.
- The user sync between Zoho Expense and Zoho Payroll has to be done manually. You can add the users in Zoho Expense as employees in Zoho Payroll and the employees in Zoho Payroll can be added as users in Zoho Expense.
- Click Save to save your preferences. Your integration will be enabled.
Add Users from Zoho Expense to Zoho Payroll
Once you’ve integrated Zoho Payroll with Zoho Expense, you can import the users from Zoho Expense as employees in Zoho Payroll. Here’s how:
- Sign in to your Zoho Expense organisation.
- Click Admin View.
- Go to Settings on the left sidebar.
- Go to Users under Users and Control.
- Click the More icon at the top right corner and select Export Users.
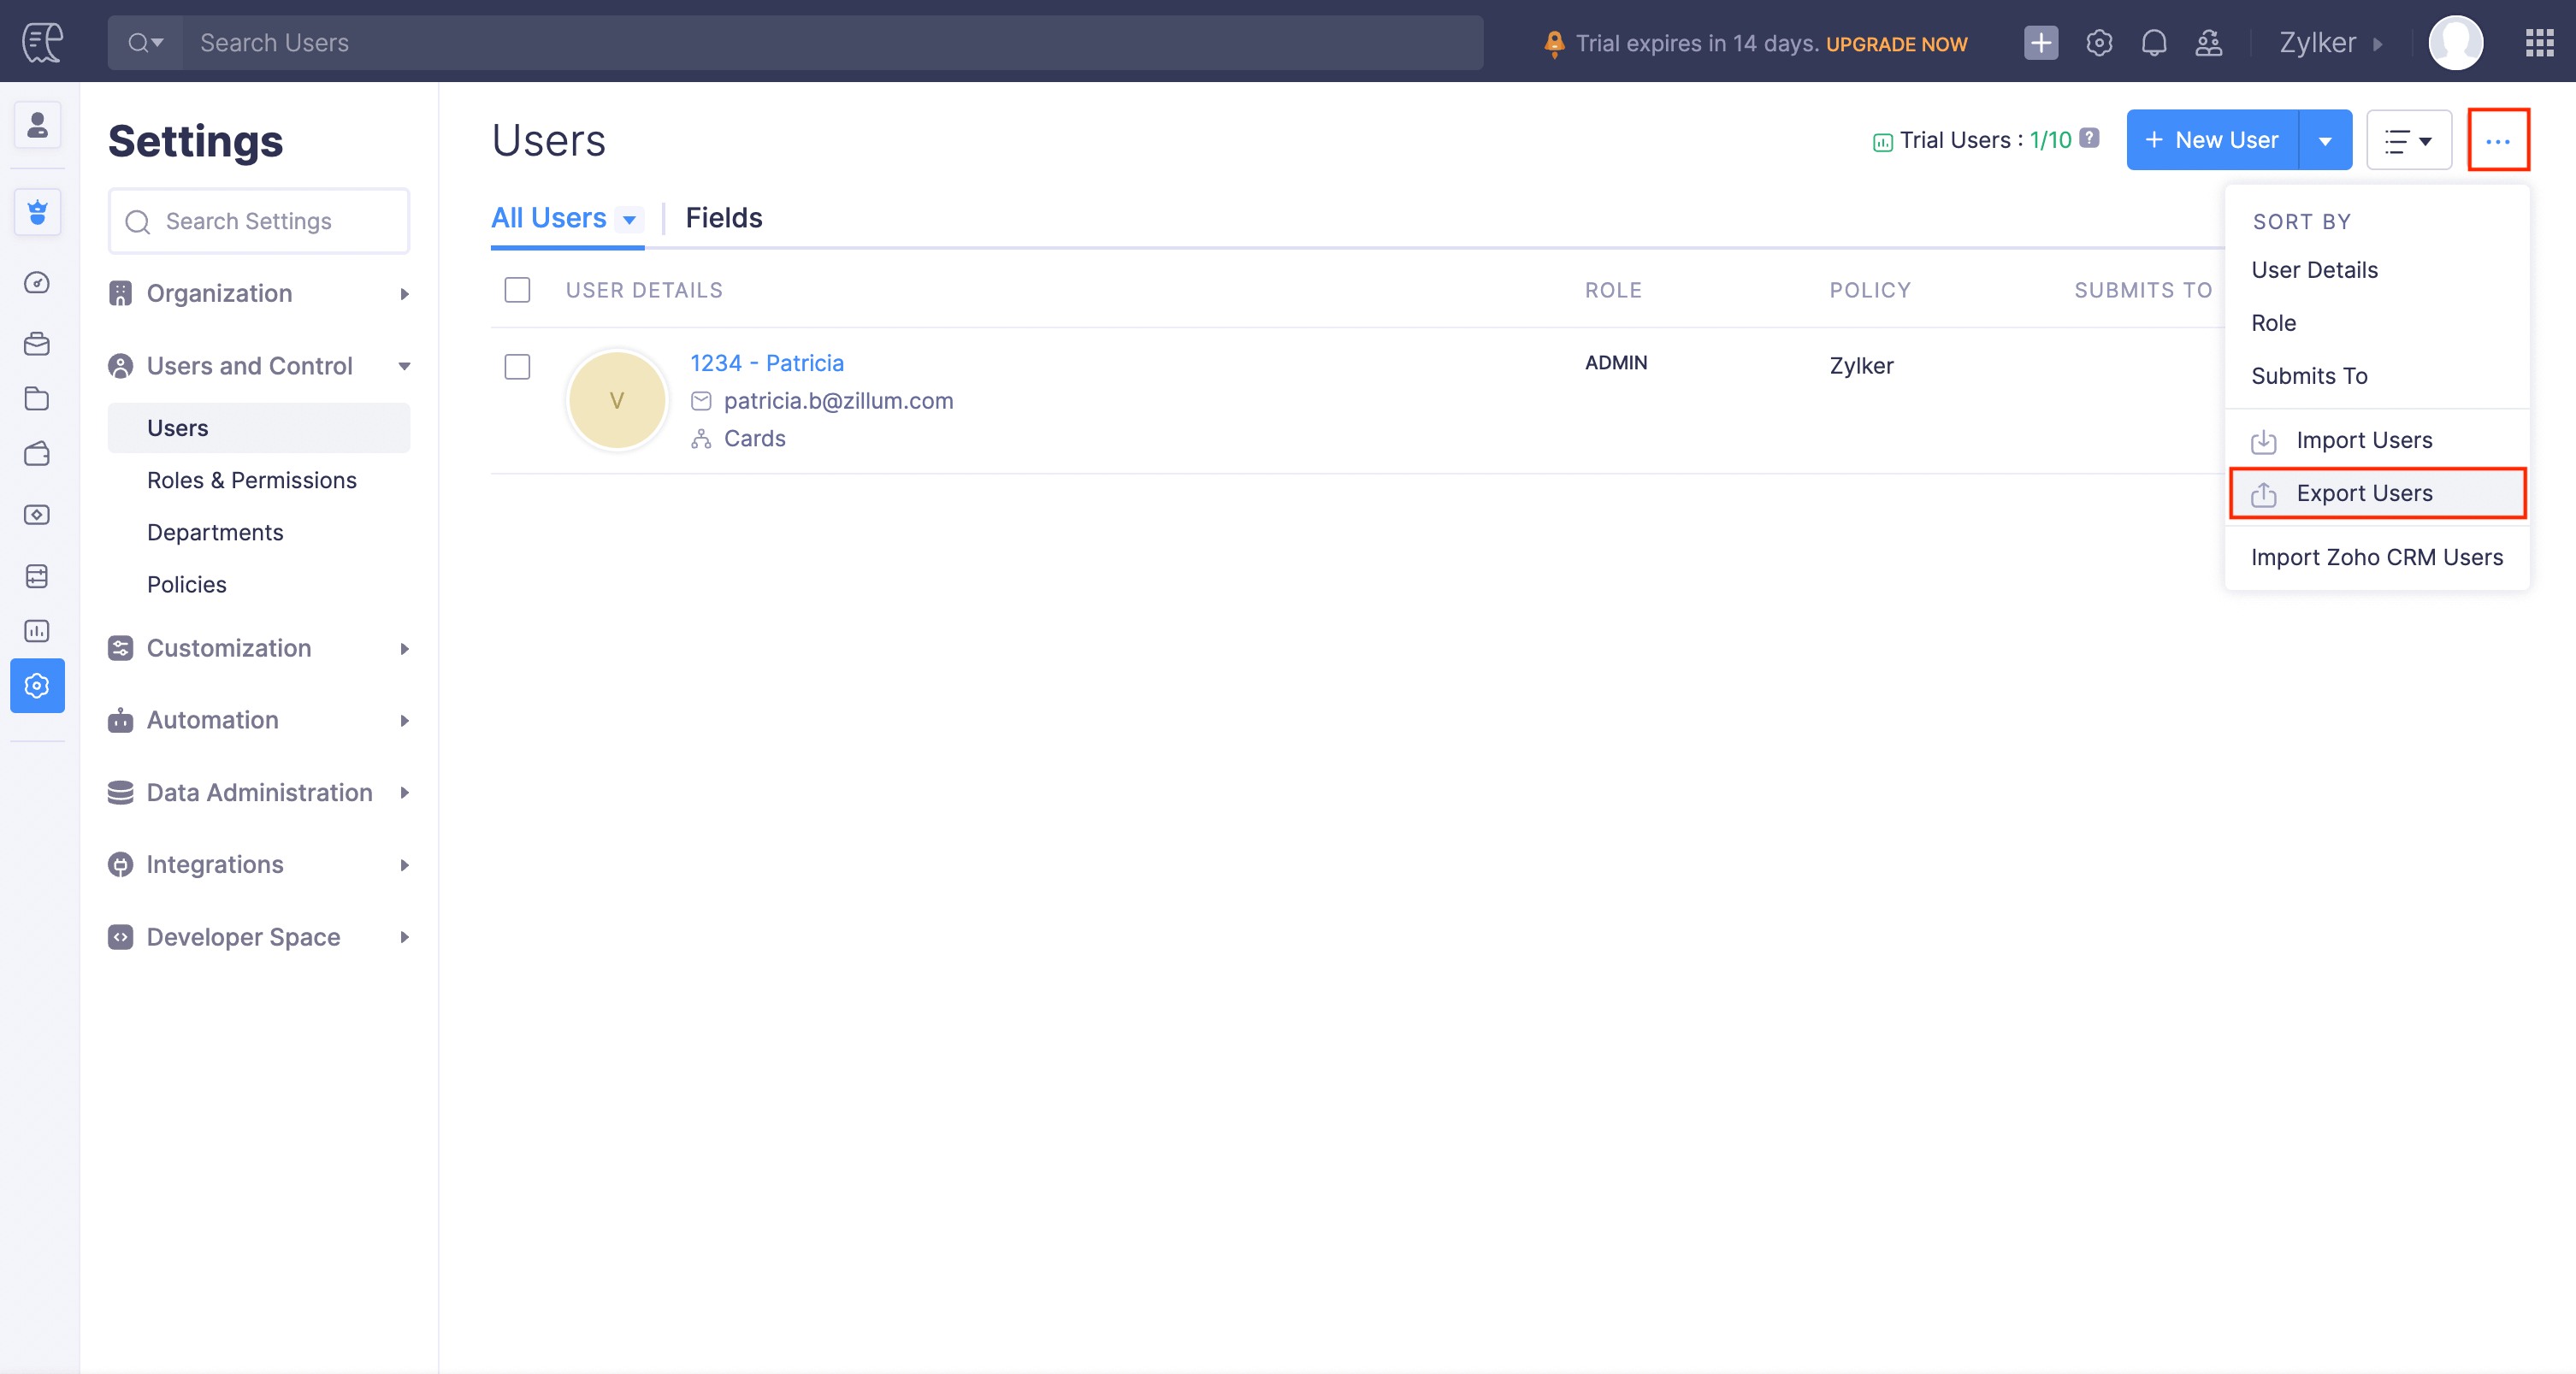
- Select Users as the entity.
- Click Export.
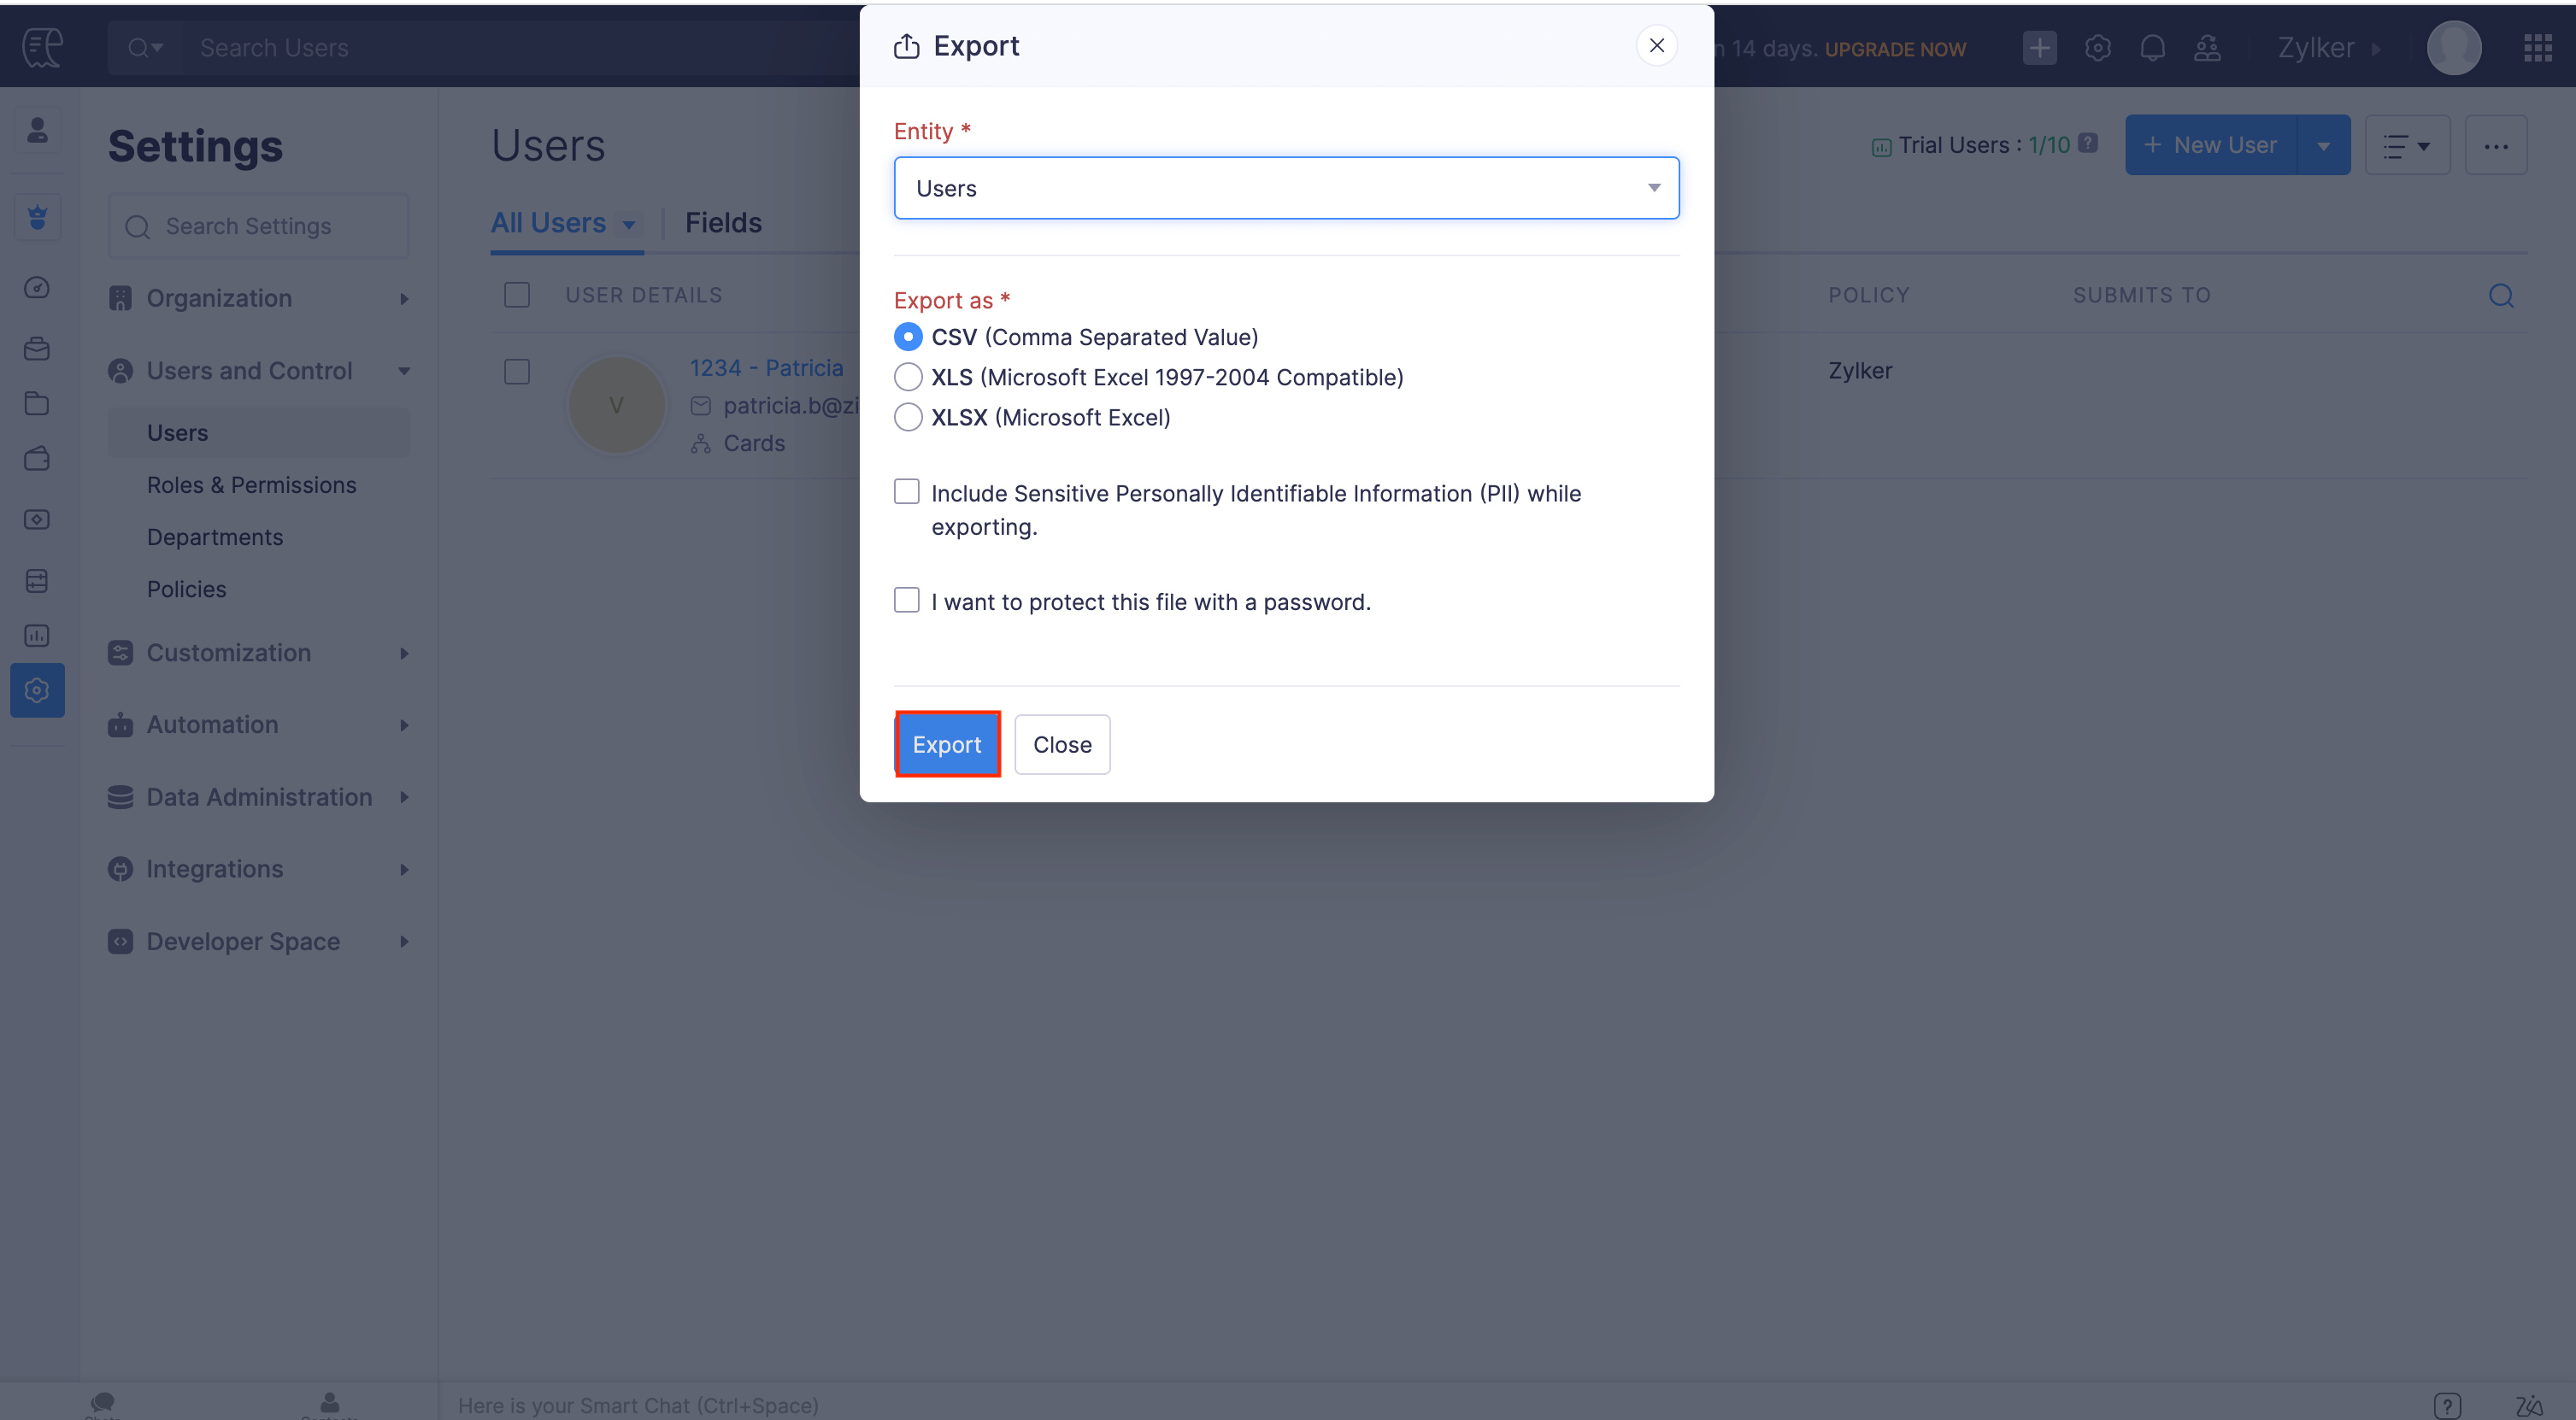
The exported file will be downloaded to your system. Next, open the exported file and map the rows and columns according to Employee Basic Details data type in Zoho Payroll. You can contact support@zohopayroll.com if you need further assistance.
Once you’ve mapped the fields, import the users to Zoho Payroll. Here’s how:
- Log into your Zoho Payroll account.
- Click Employees on the left sidebar.
- Click the More icon in the top right corner and select Import Data.
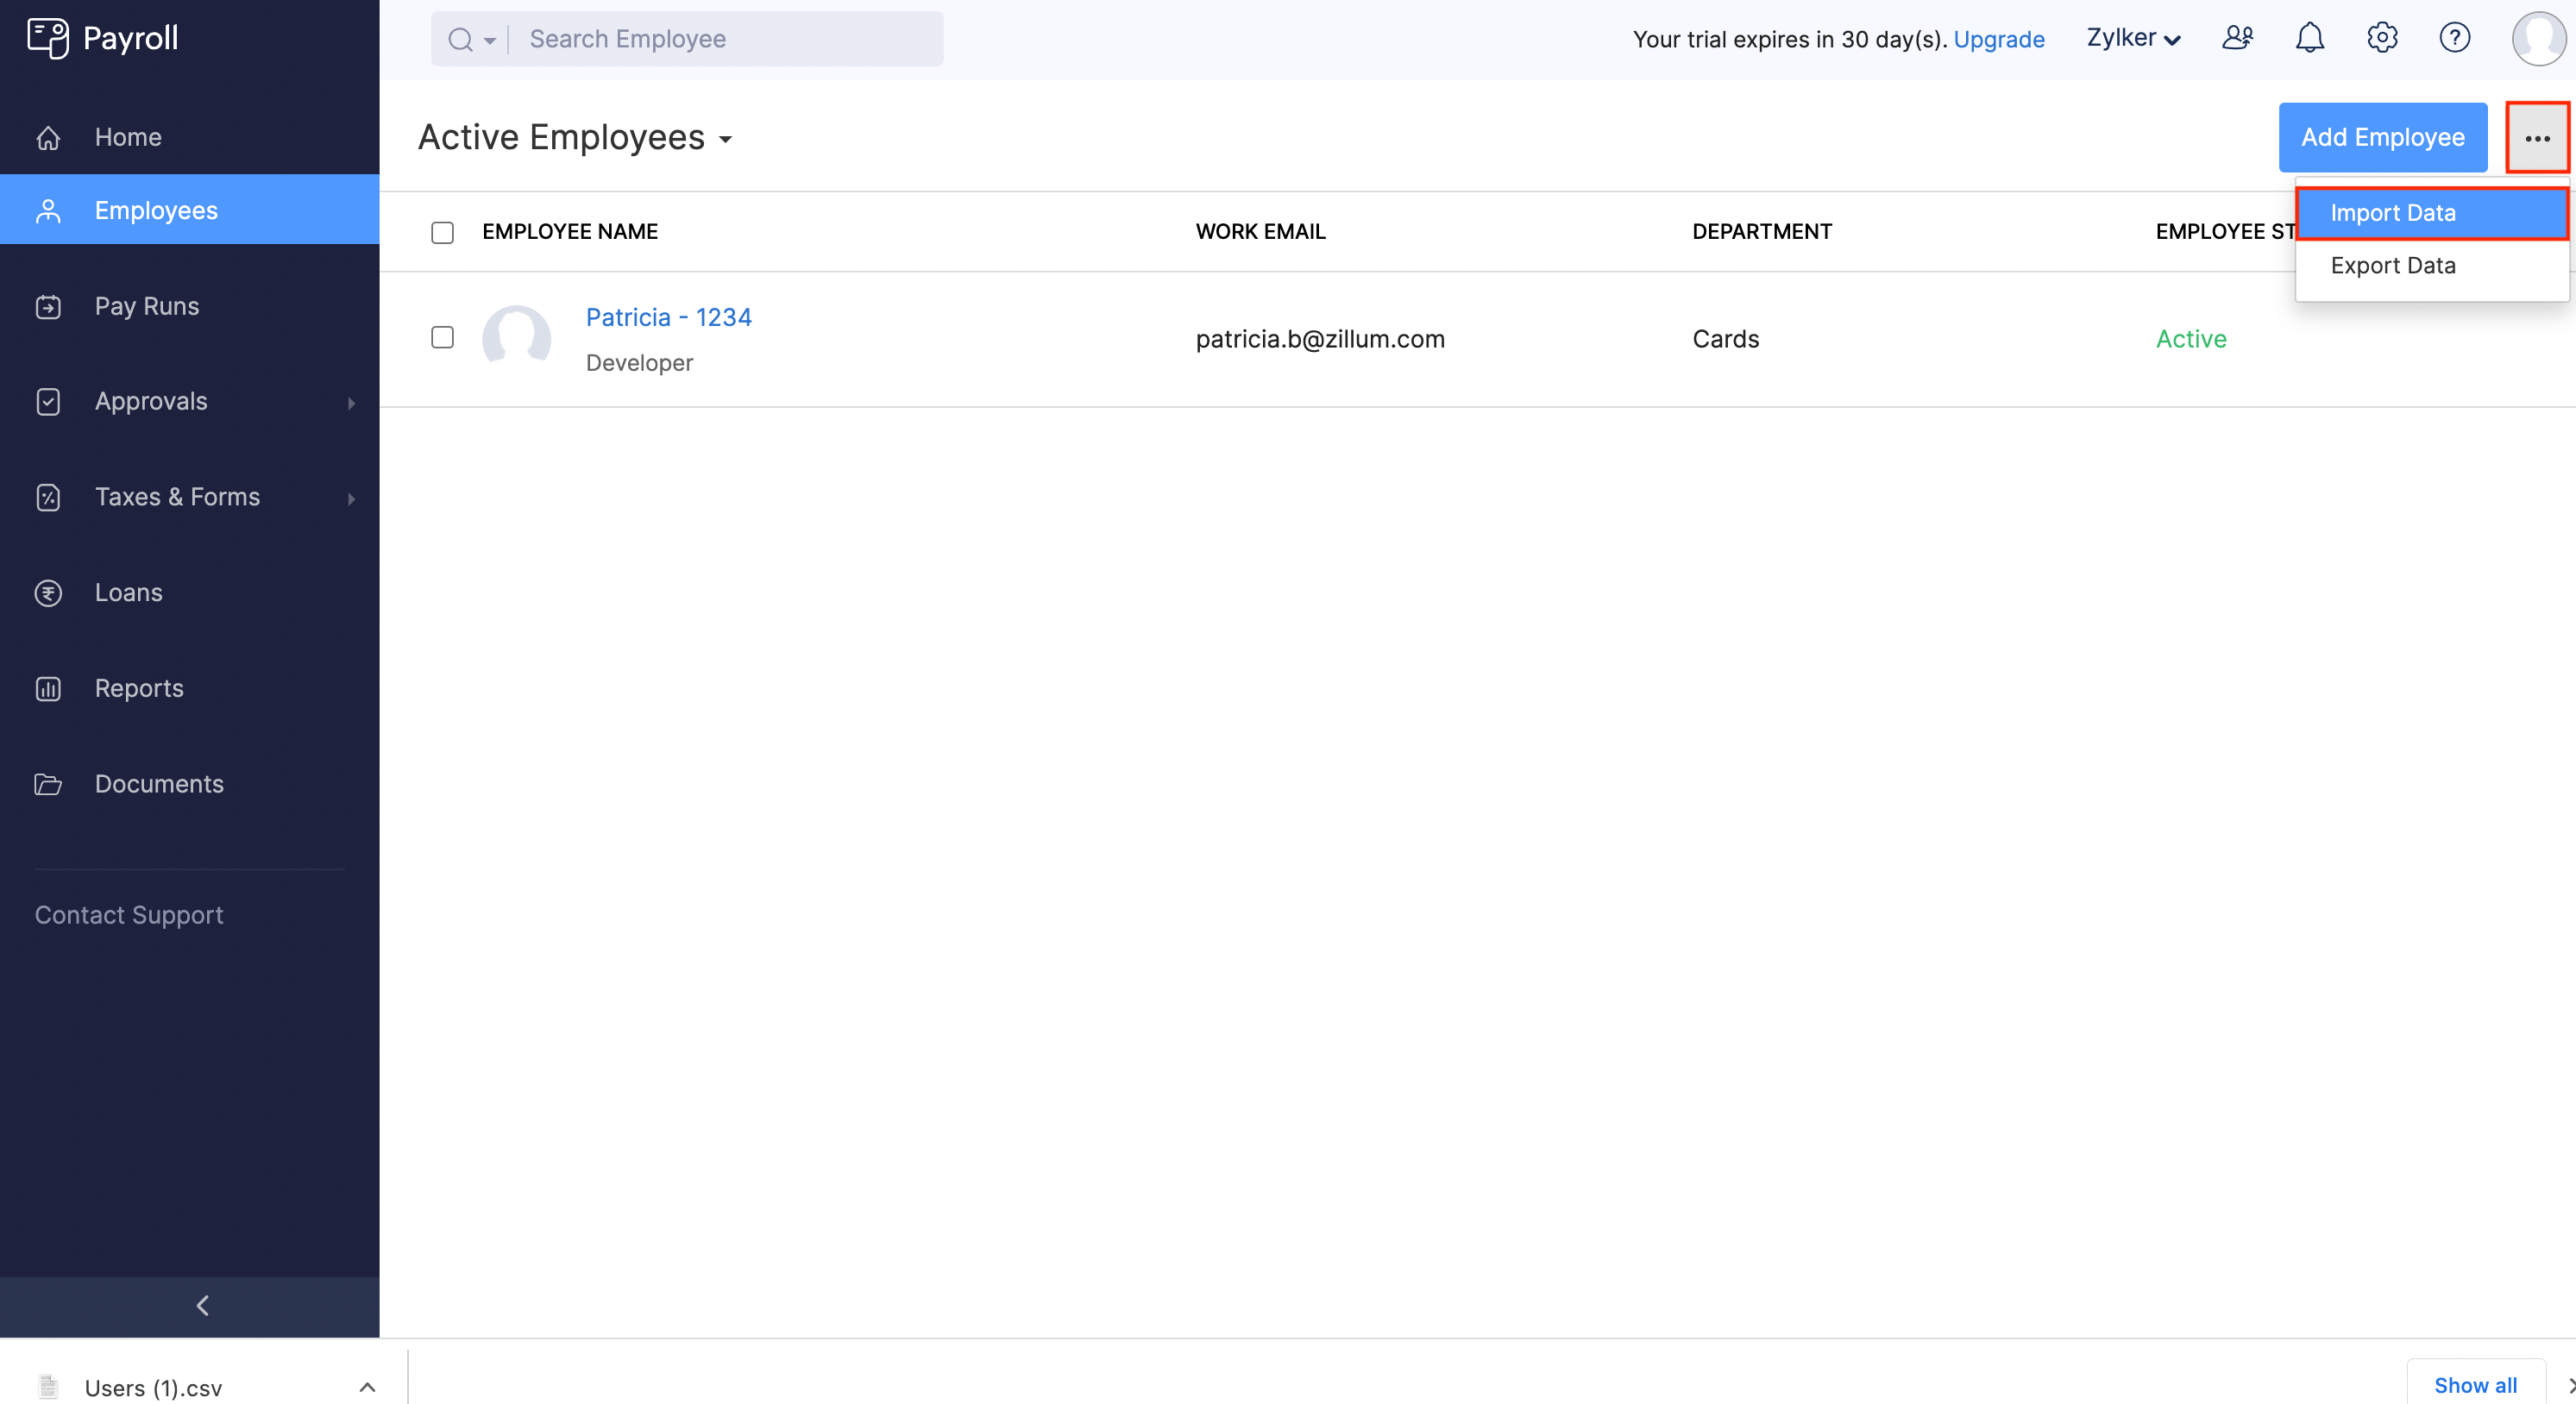
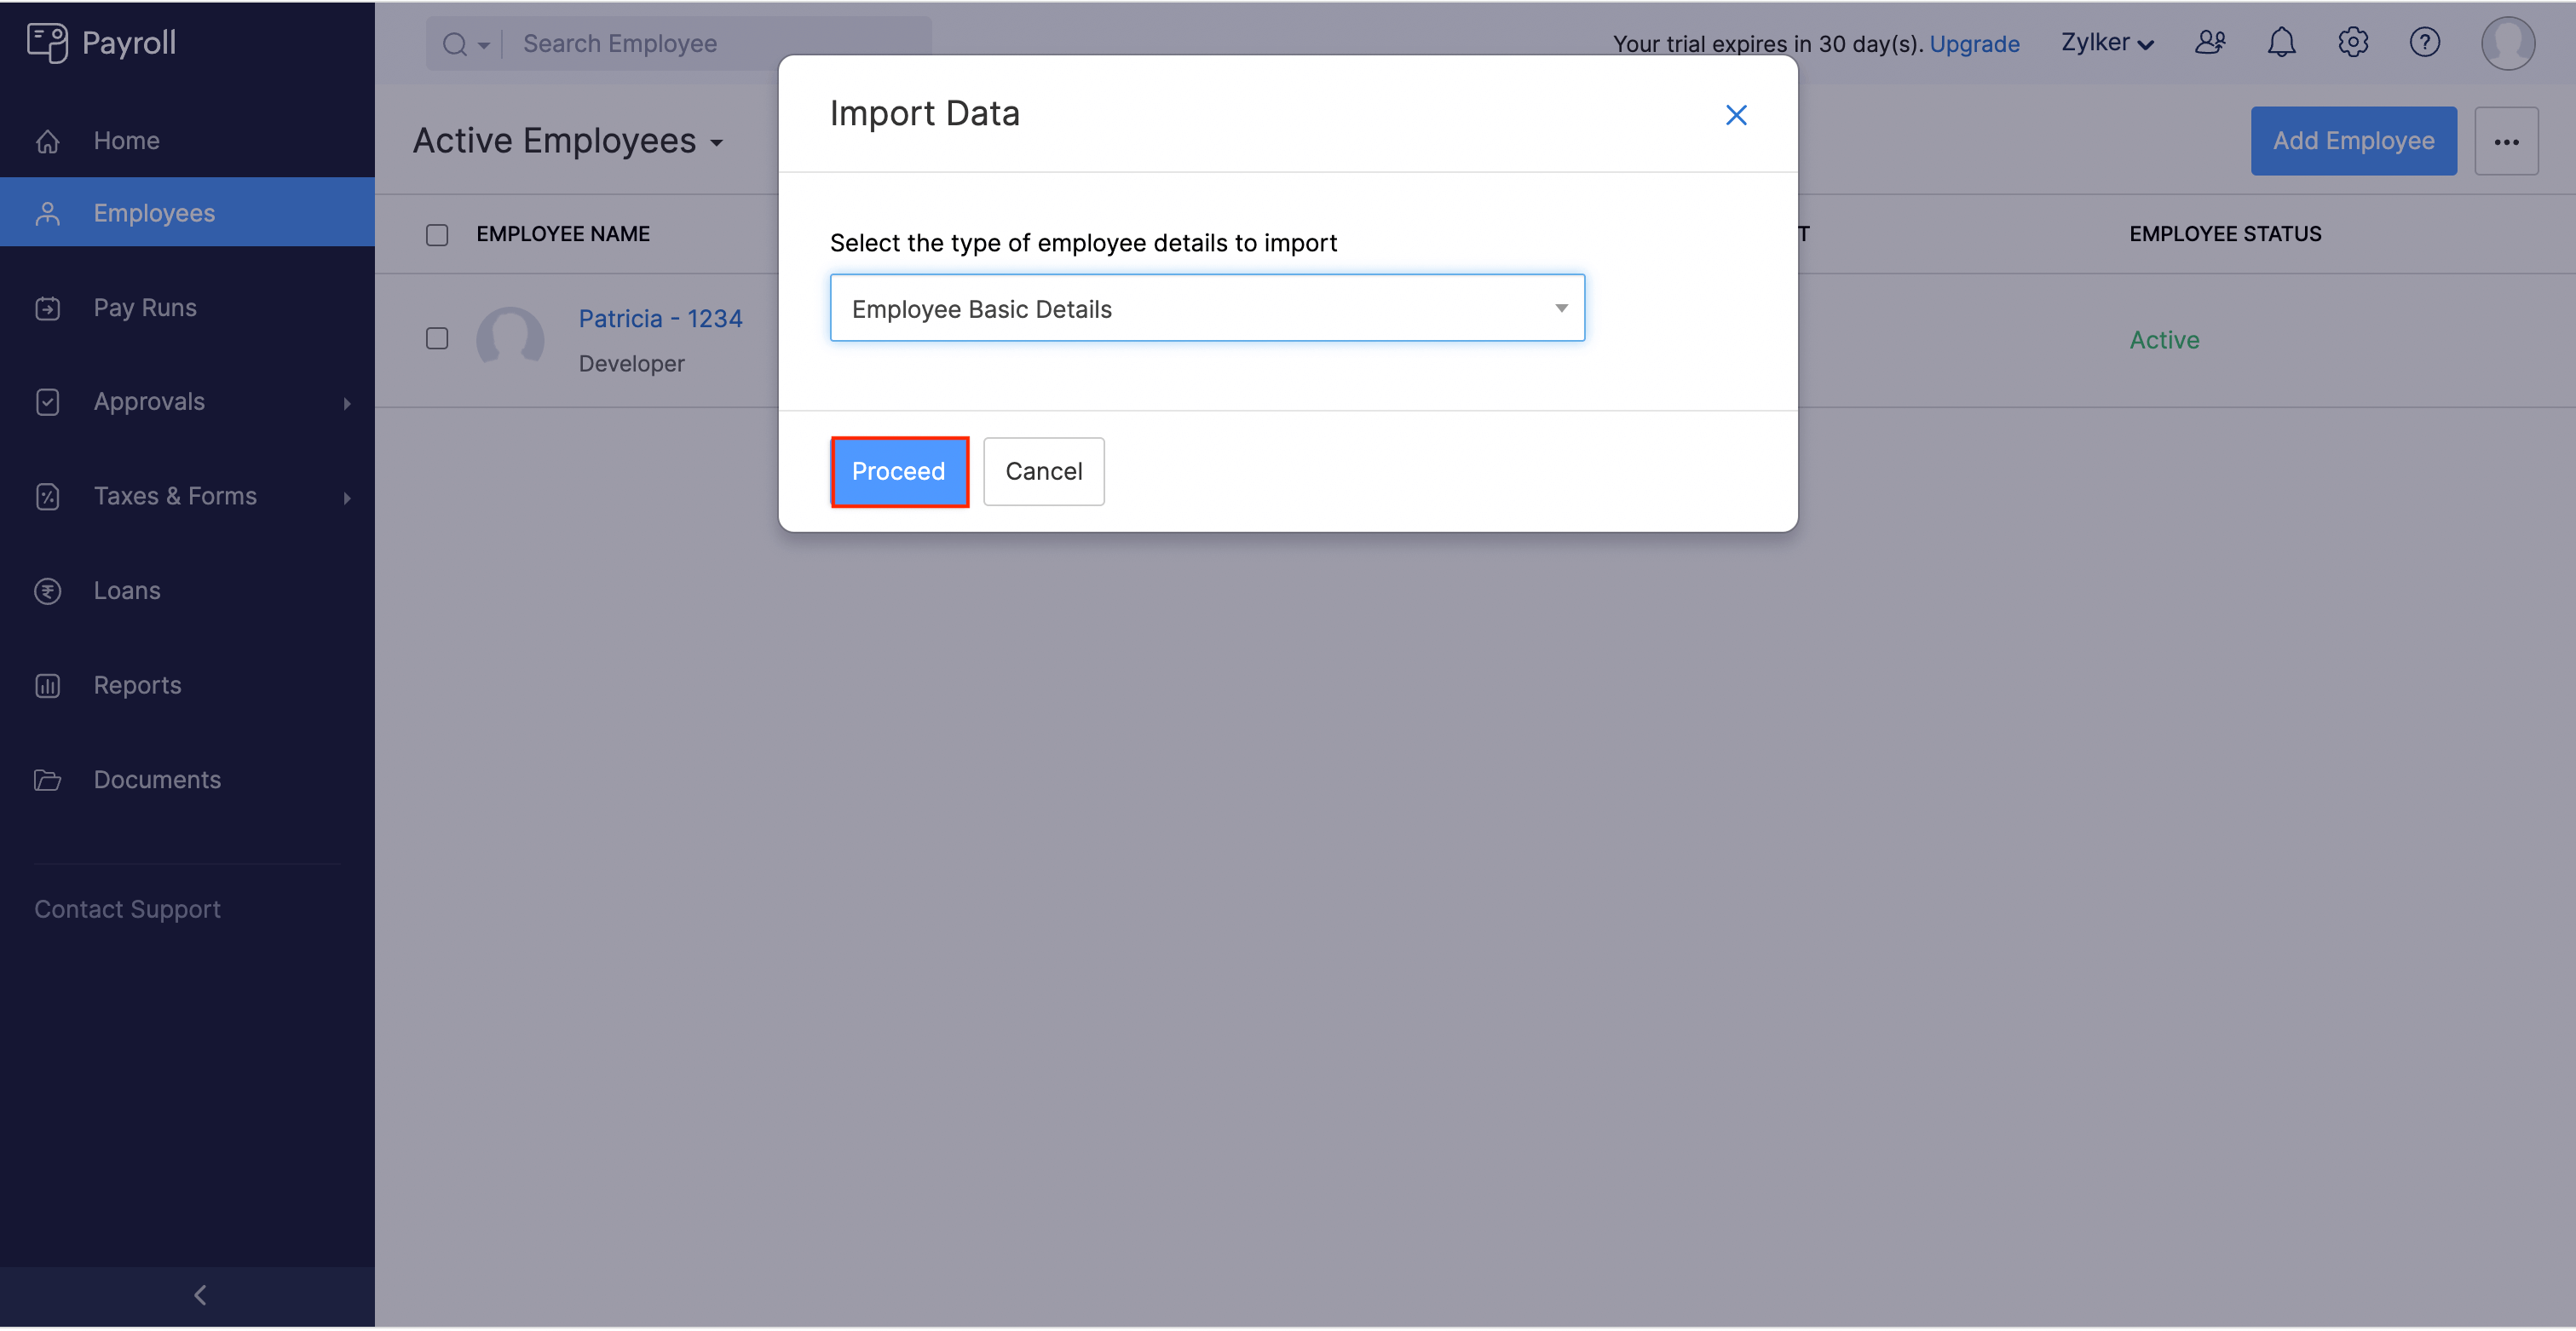
- Select Employee Basic Details as the type of Employee Details to import.
- Click Proceed.
- Upload the modified file you exported from Zoho Expense.
- Click Next.

- Map the fields and click Next.
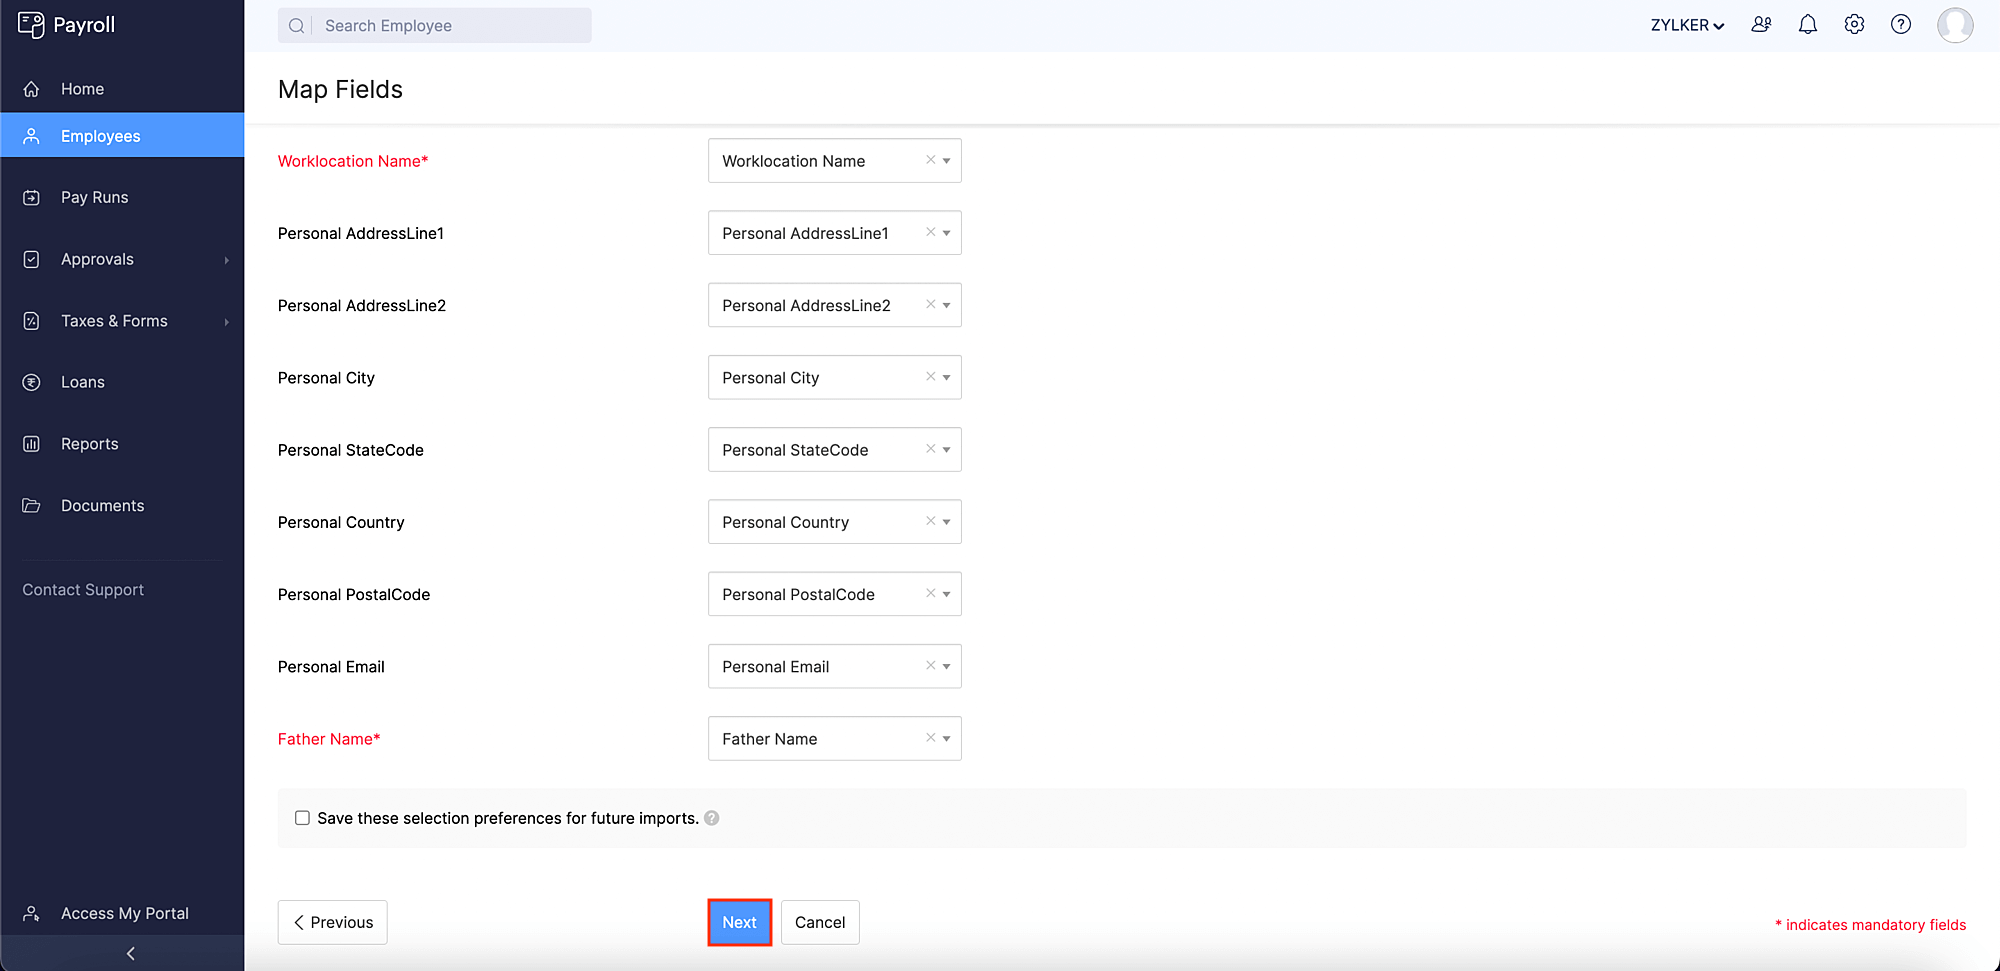
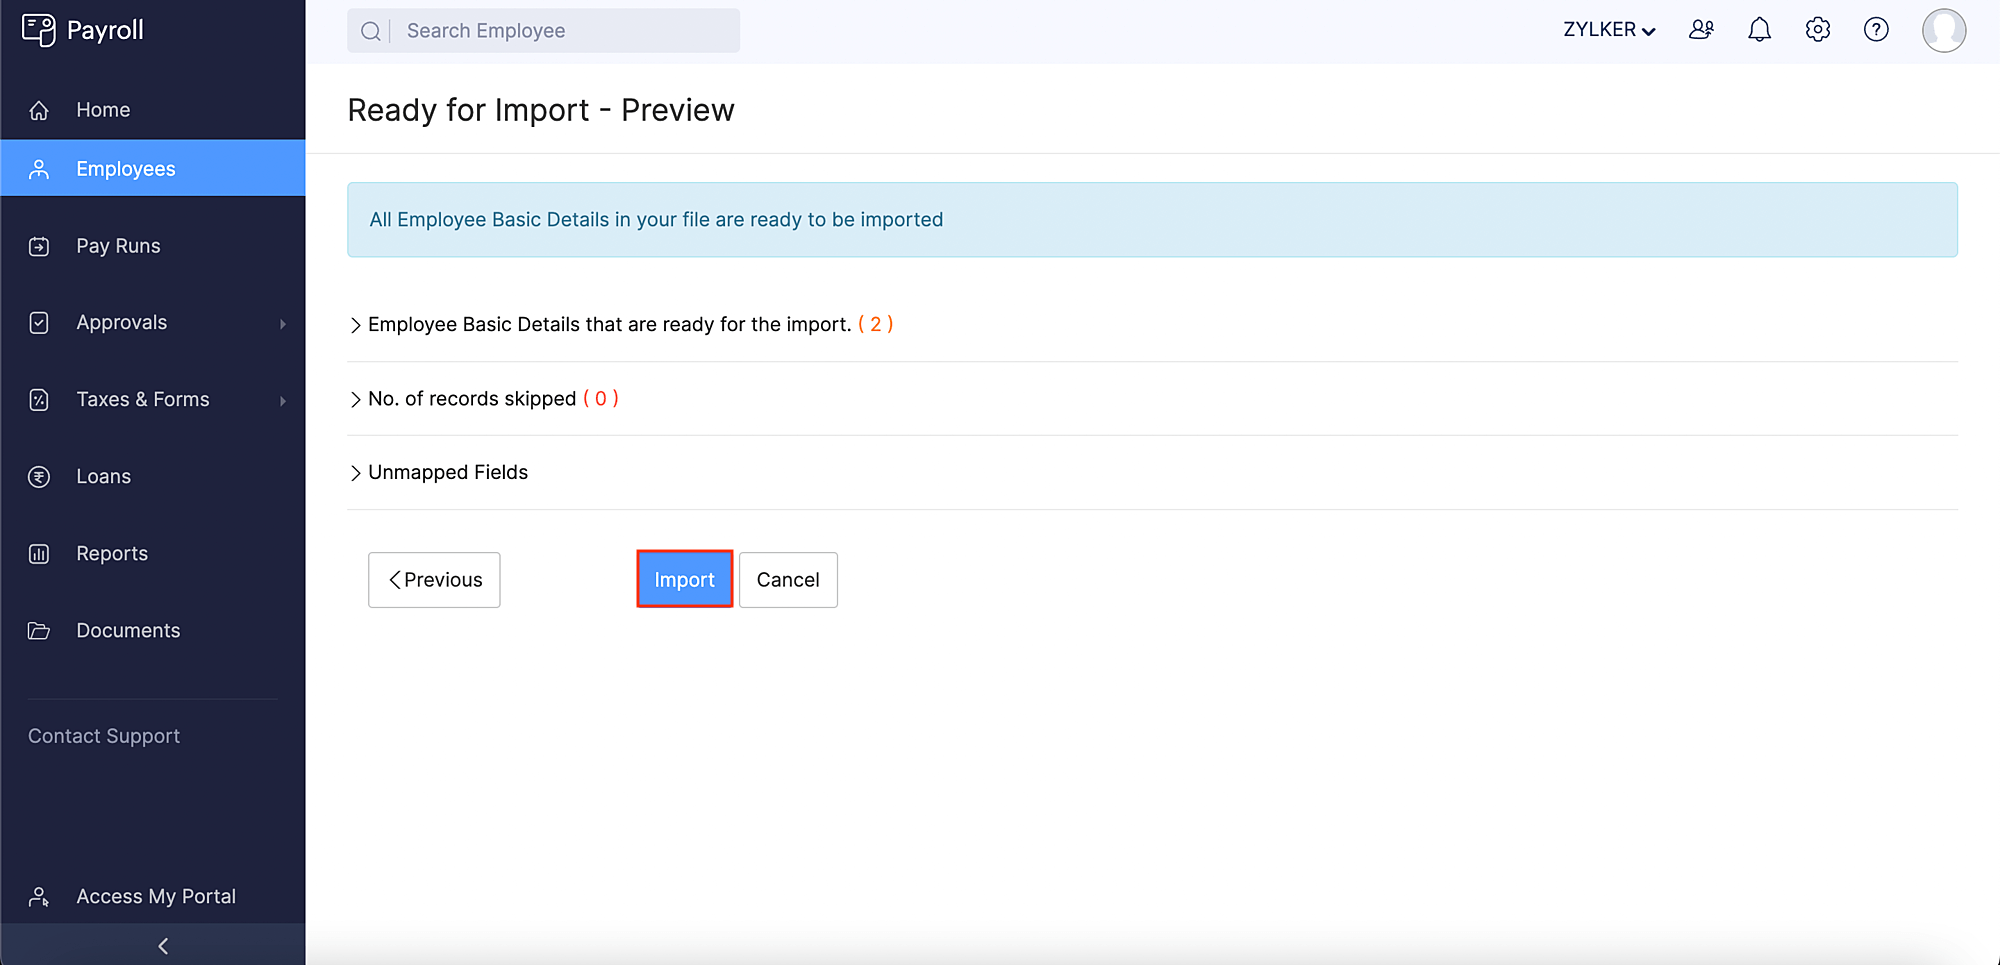
- Preview the import summary and click Import.
The users in Zoho Expense will now be synced as employees in Zoho Payroll.
Note: You can also add users from Zoho Payroll to Zoho Expense.
Change Report Status
Once you configure and save the integration settings, a new status, Awaiting Reimbursement via Payroll will appear for all the approved reports in your Zoho Expense organization. You can change the status of the reports that you want to process via Zoho Payroll and the reimbursements or refunds will be paid along with the pay run. To change the status:
- Open Zoho Expense.
- Click Admin View.
- Go to Reports on the left sidebar.
- Click the report for which you want to change the status.
- Click the Reimburse dropdown at the top right side of the page and select via Zoho Payroll.

- In the popup that opens, click Change Status. The report will be marked as Awaiting Reimbursement via Payroll and the report’s amount details will be included in the employee’s pay run in Zoho Payroll.
- To change the status of the reports in bulk, select the reports, click the Reimburse dropdown and select via Zoho Payroll. In the popup that opens, click Change Status. The selected reports will be changed to the new status.
Process Reimbursements or Refunds in Zoho Payroll
Once you’ve integrated and marked the reports as Awaiting Reimbursement via Payroll in Zoho Expense, you can process the reports’ reimbursements and refunds along with the salaries in Zoho Payroll.
Prerequisite: Only the admins and the users with the required permission can process the pay runs in Zoho Payroll.
Insight: Reimbursements will be added to the employee’s salary, as it’s an amount that the business is paying back to its employee for the business expenses that were incurred by them. Refunds will be deducted from the employee’s salary as it’s an amount that the employee has received in excess from the business. However, only the total amount, i.e, Reimbursements (-) Refunds will be displayed in the employee’s pay run on Zoho Payroll.
To do this:
- Log into your Zoho Payroll account.
- Click Pay Runs on the left sidebar.
- Complete your pay run setup, if you haven’t already.
- Once you’ve completed your setup, go to Pay Runs on the left sidebar again.
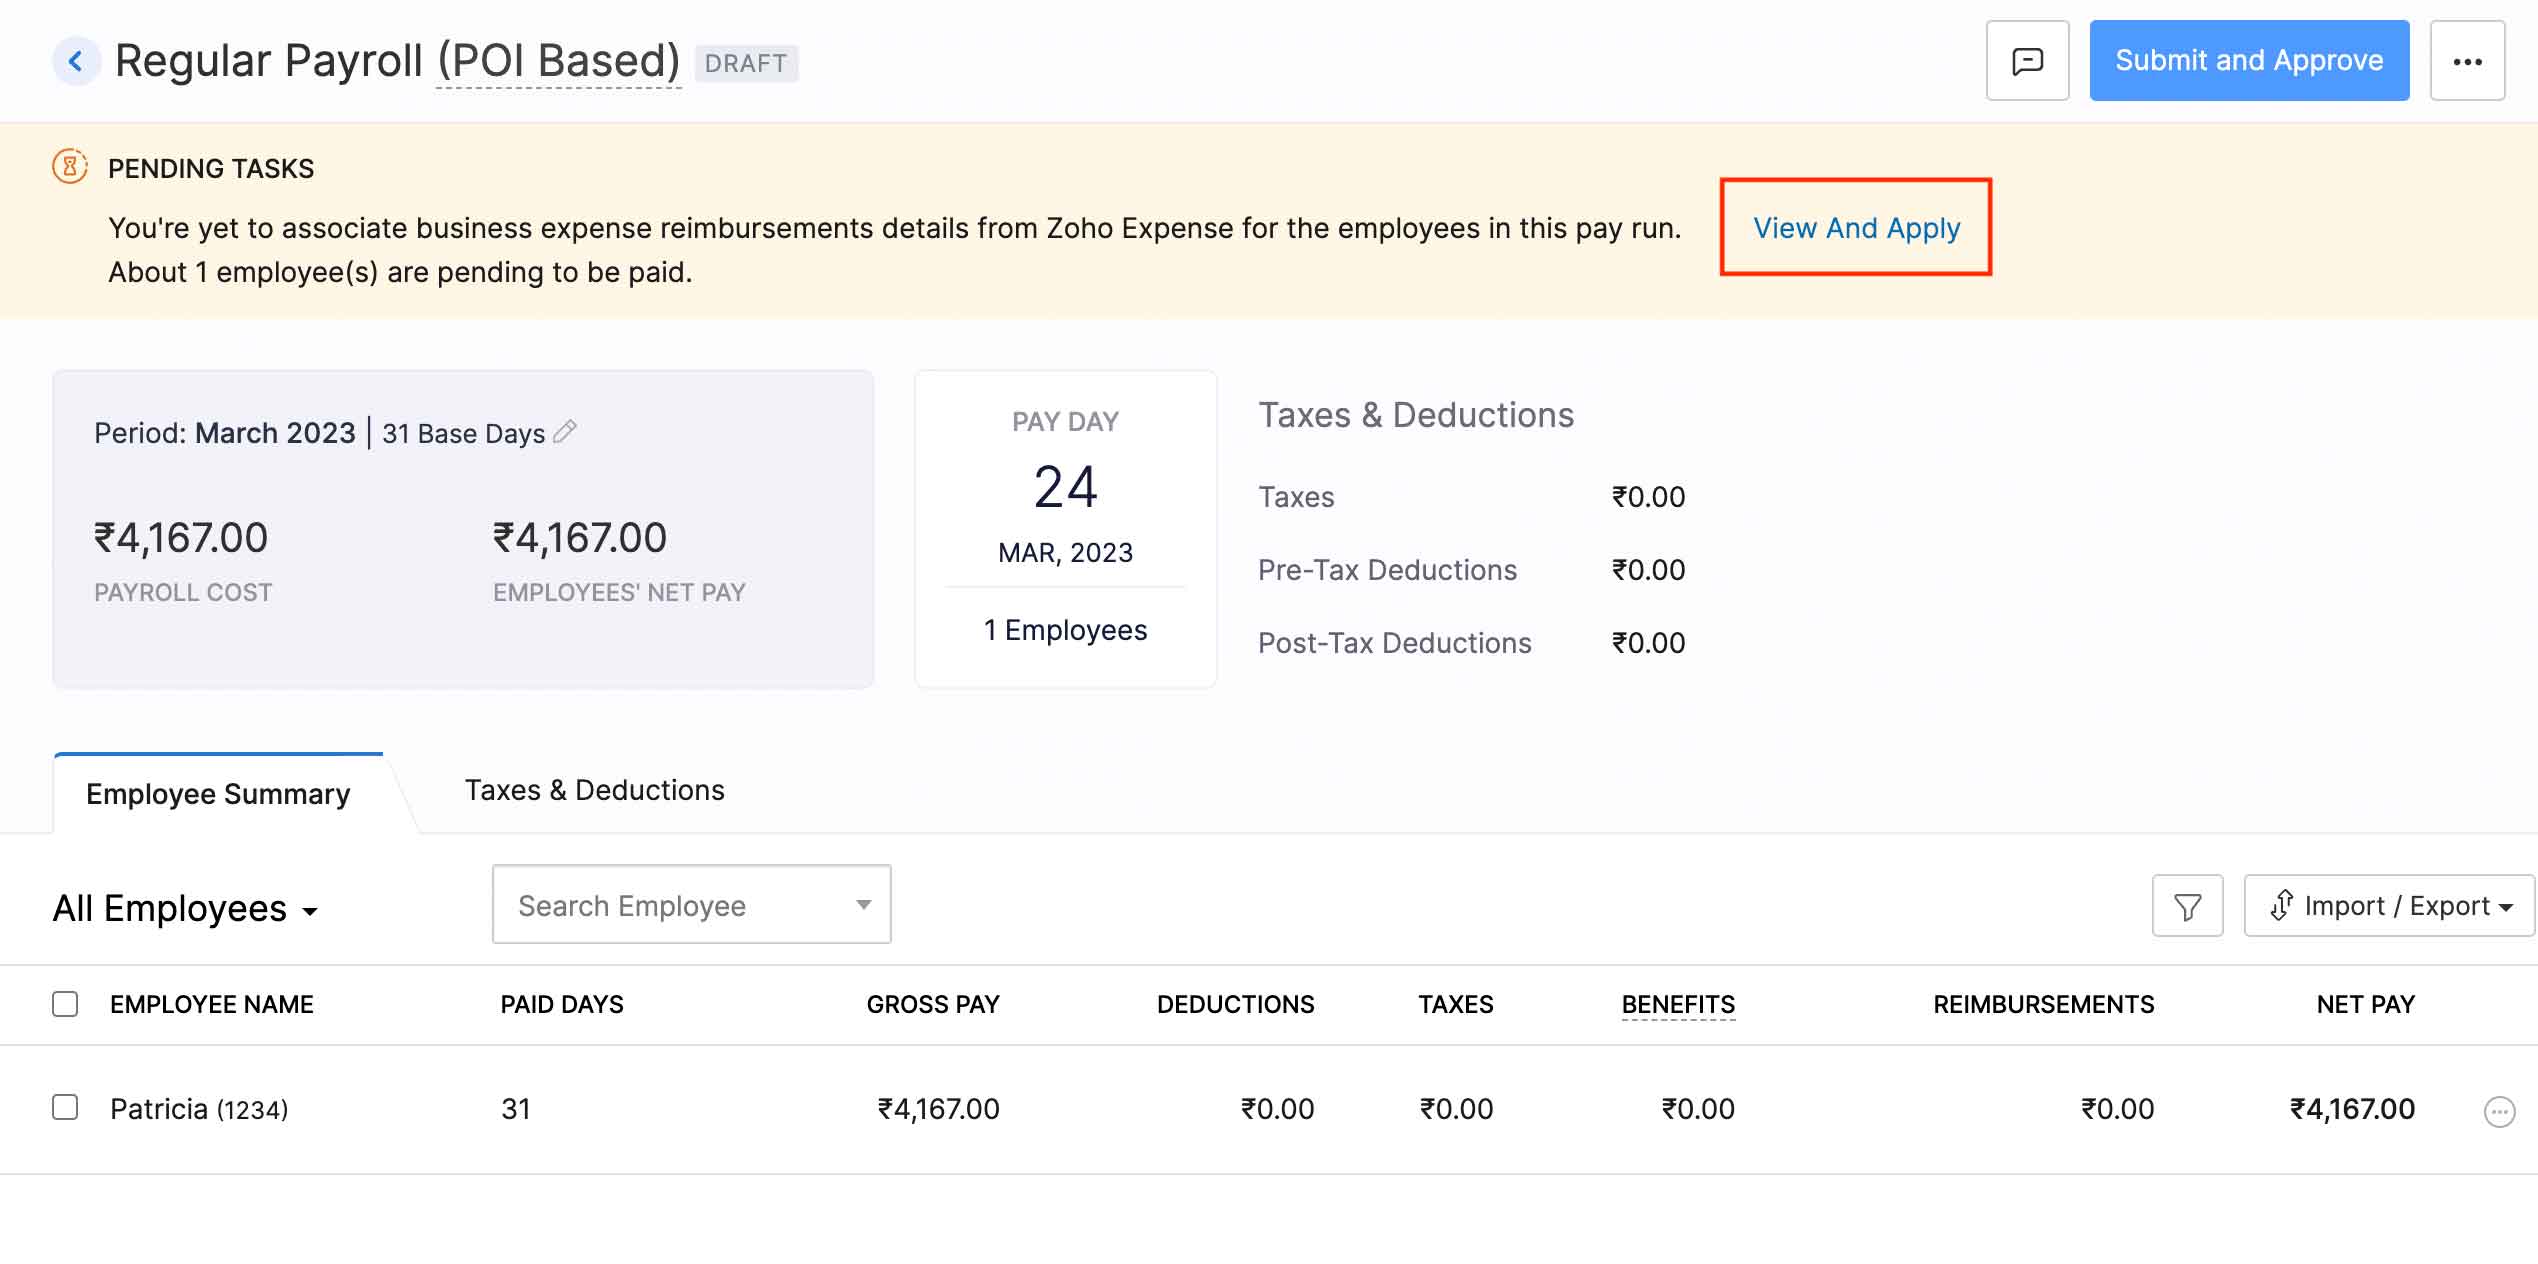
- Click Create Pay Run.

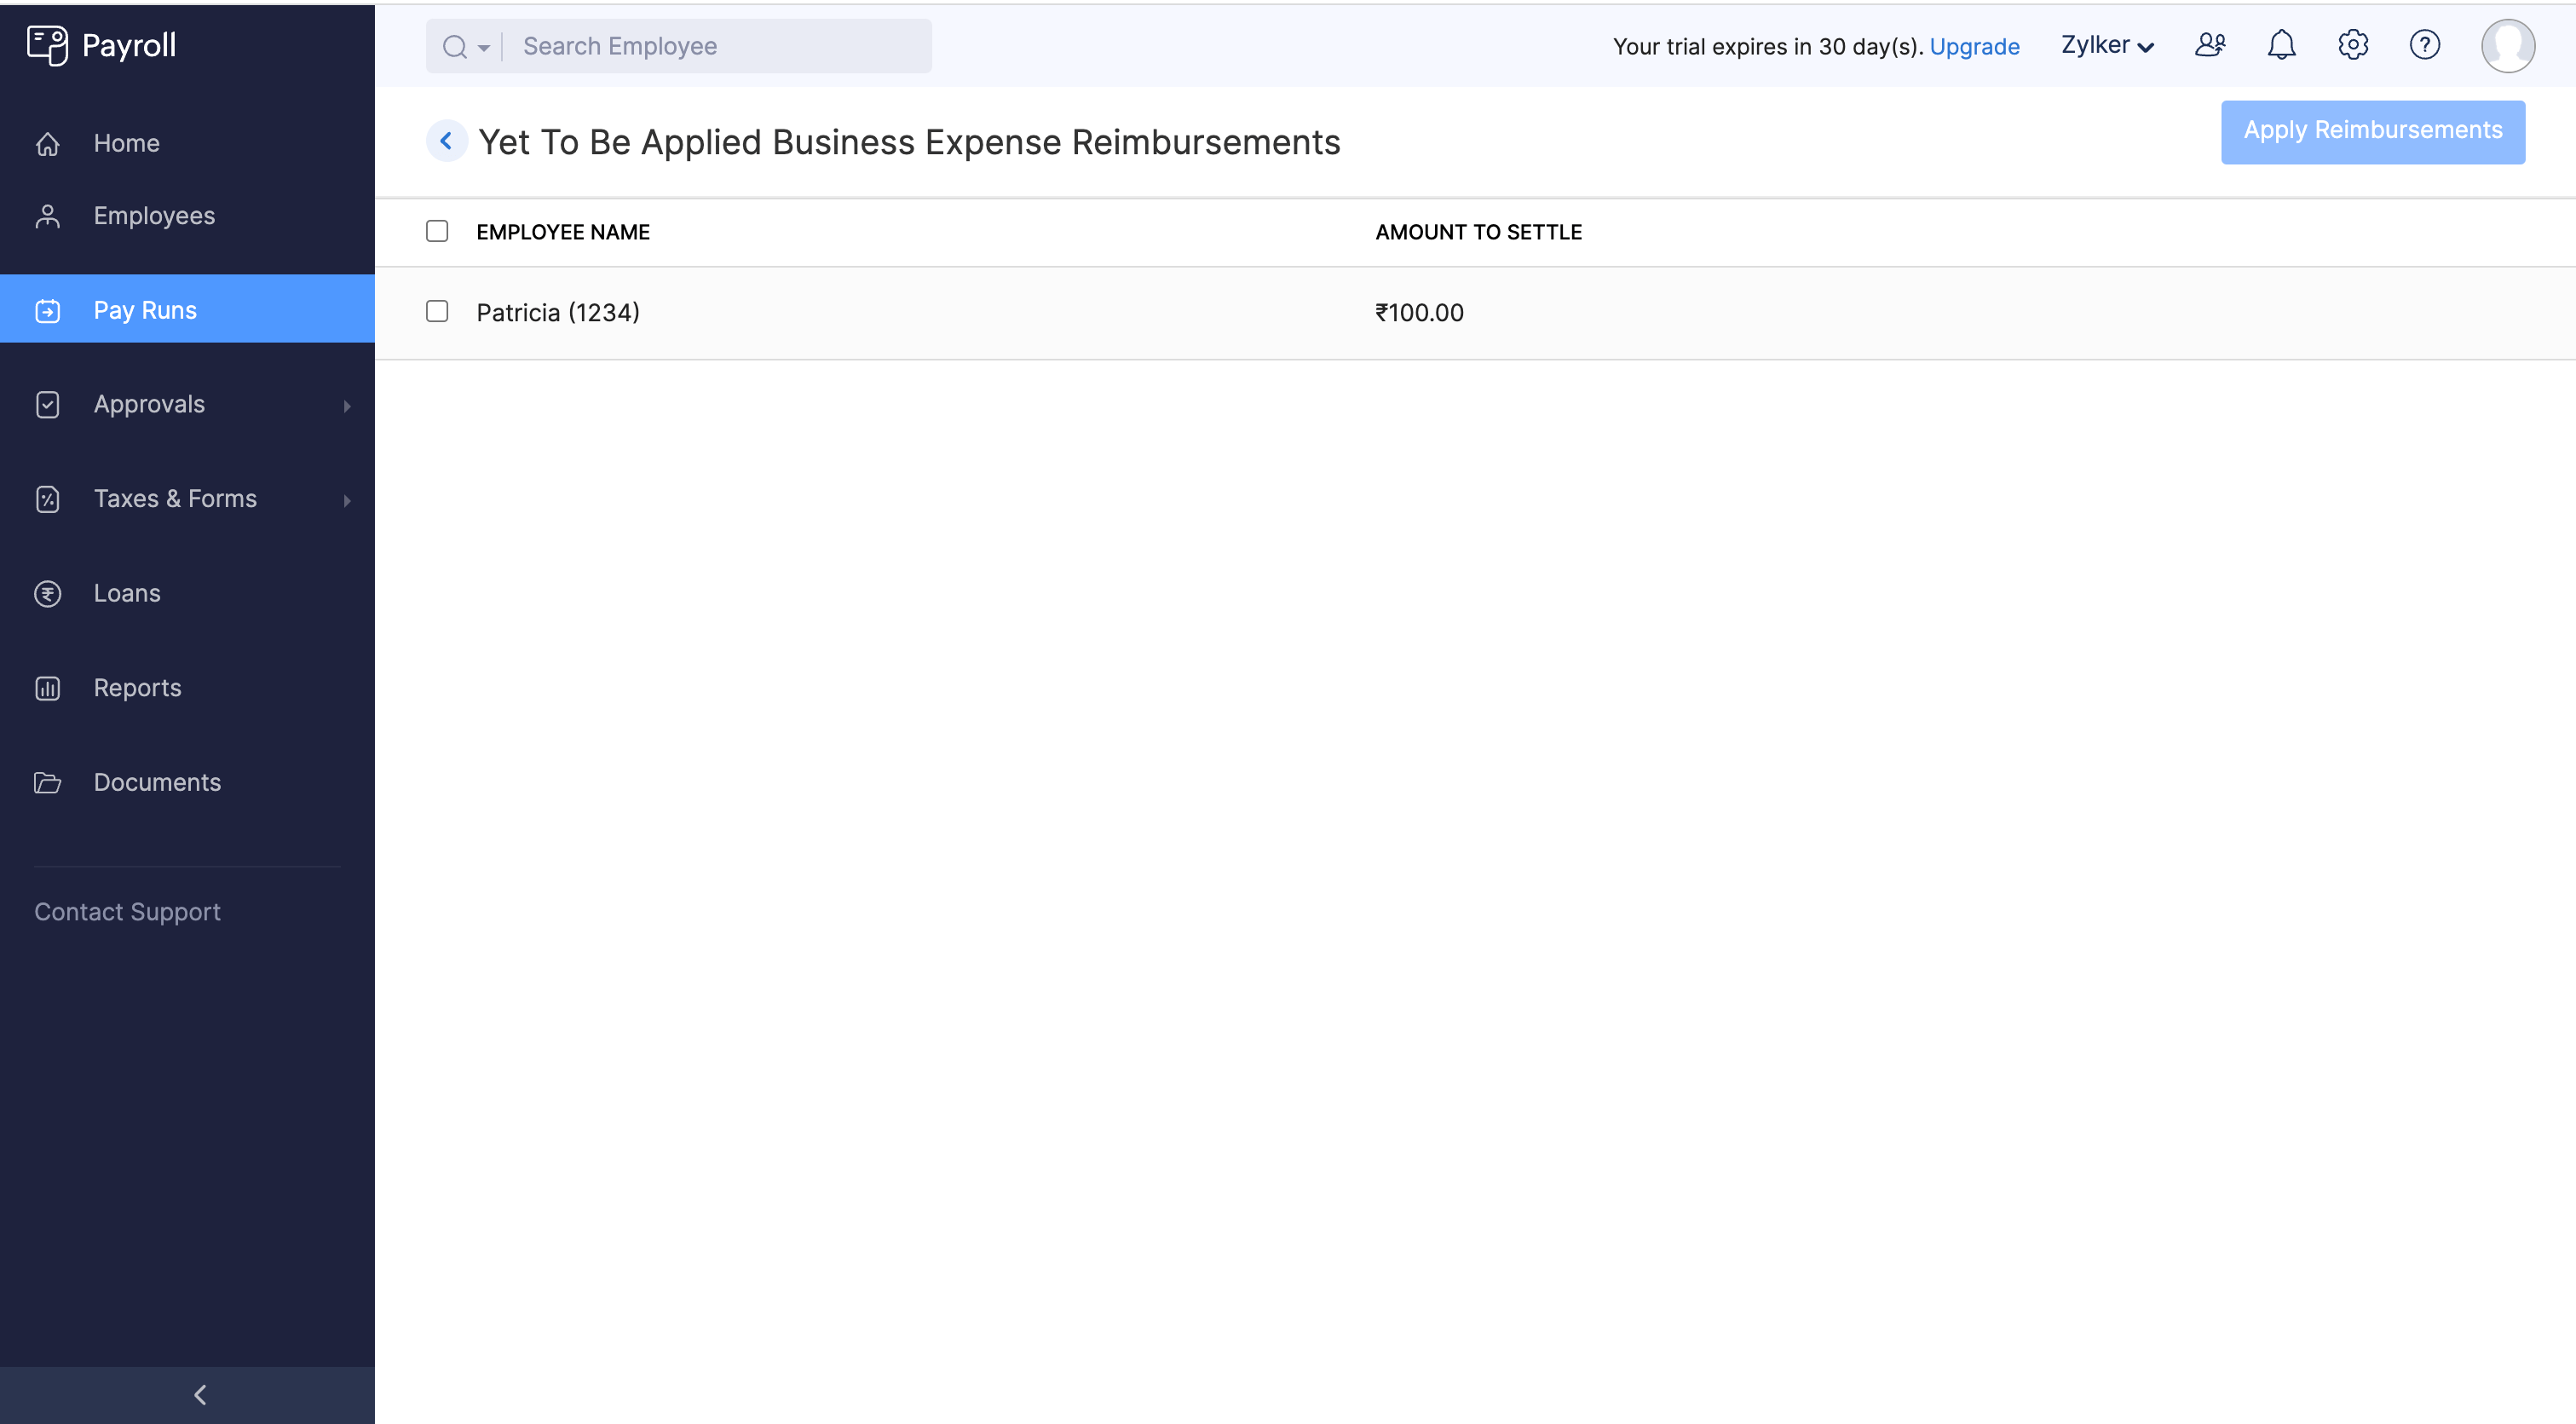
- In the Pending Tasks banner, click View and Apply to view the aggregate of reimbursements and refunds that are pending for the employee.
- Select the reimbursements and refunds you want to process with this pay run and click Apply Reimbursement. The reimbursement will be applied to the employee’s pay run.
- If you want to remove the applied reimbursement, click the More icon at the right corner of the employee and click Remove Business Reimbursement.
- Click the name of the employee to get a detailed view of the employee’s salary breakup.
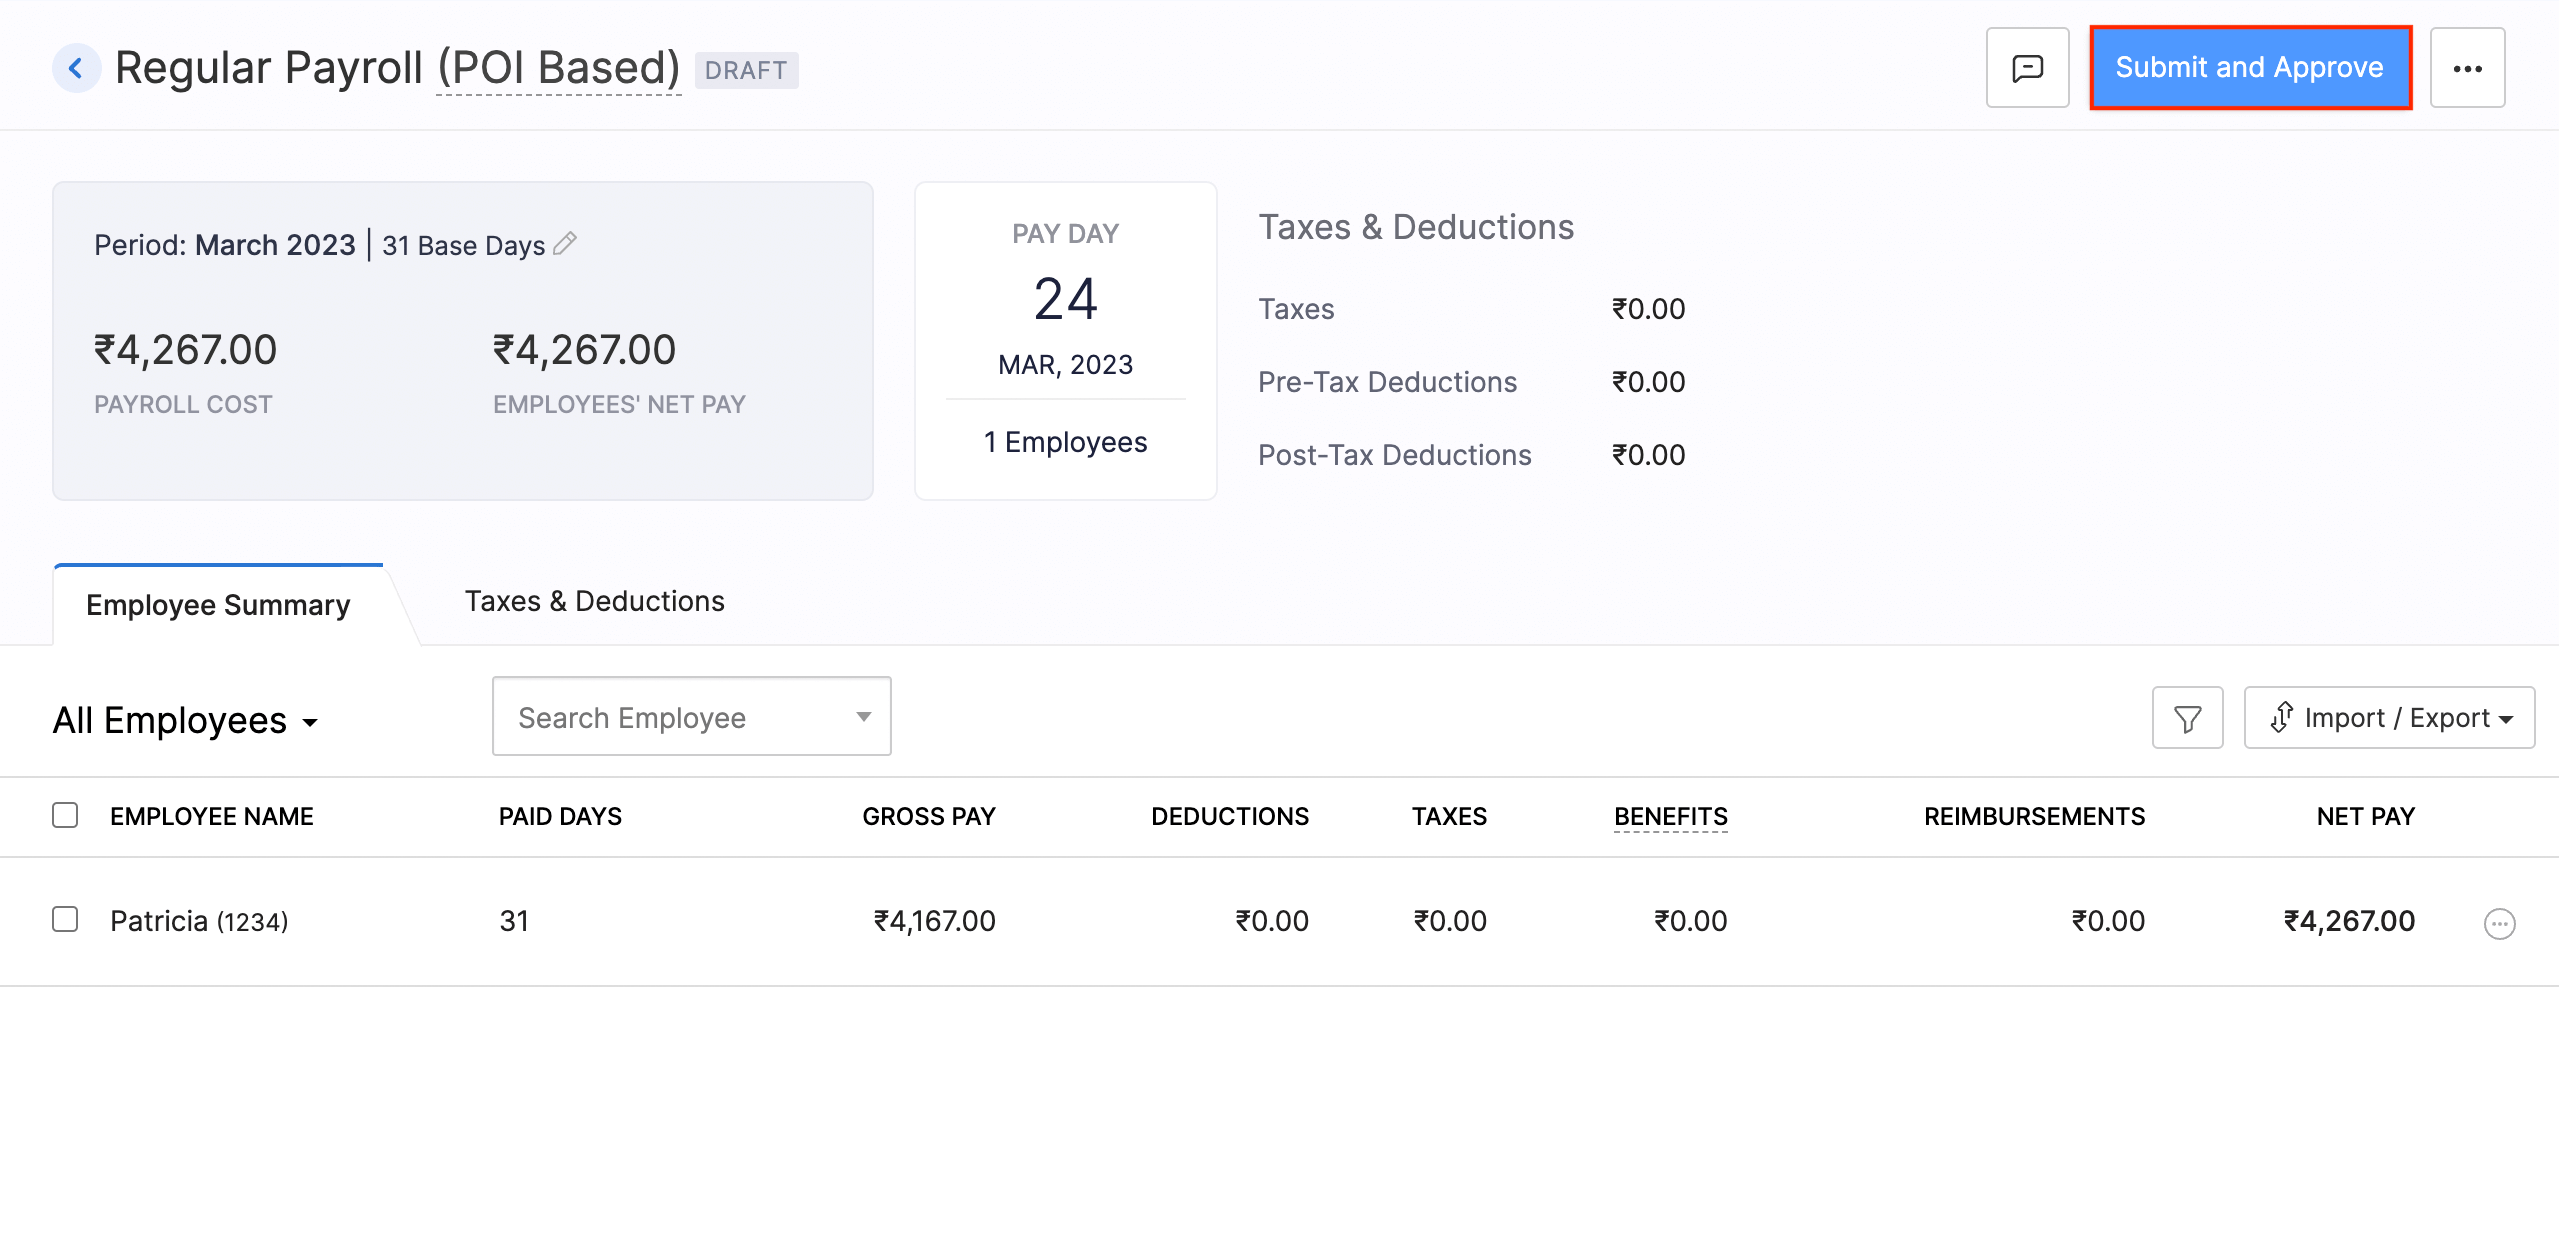
- Review the pay run and click Submit and Approve at the top right side of the page. The pay run will be approved.
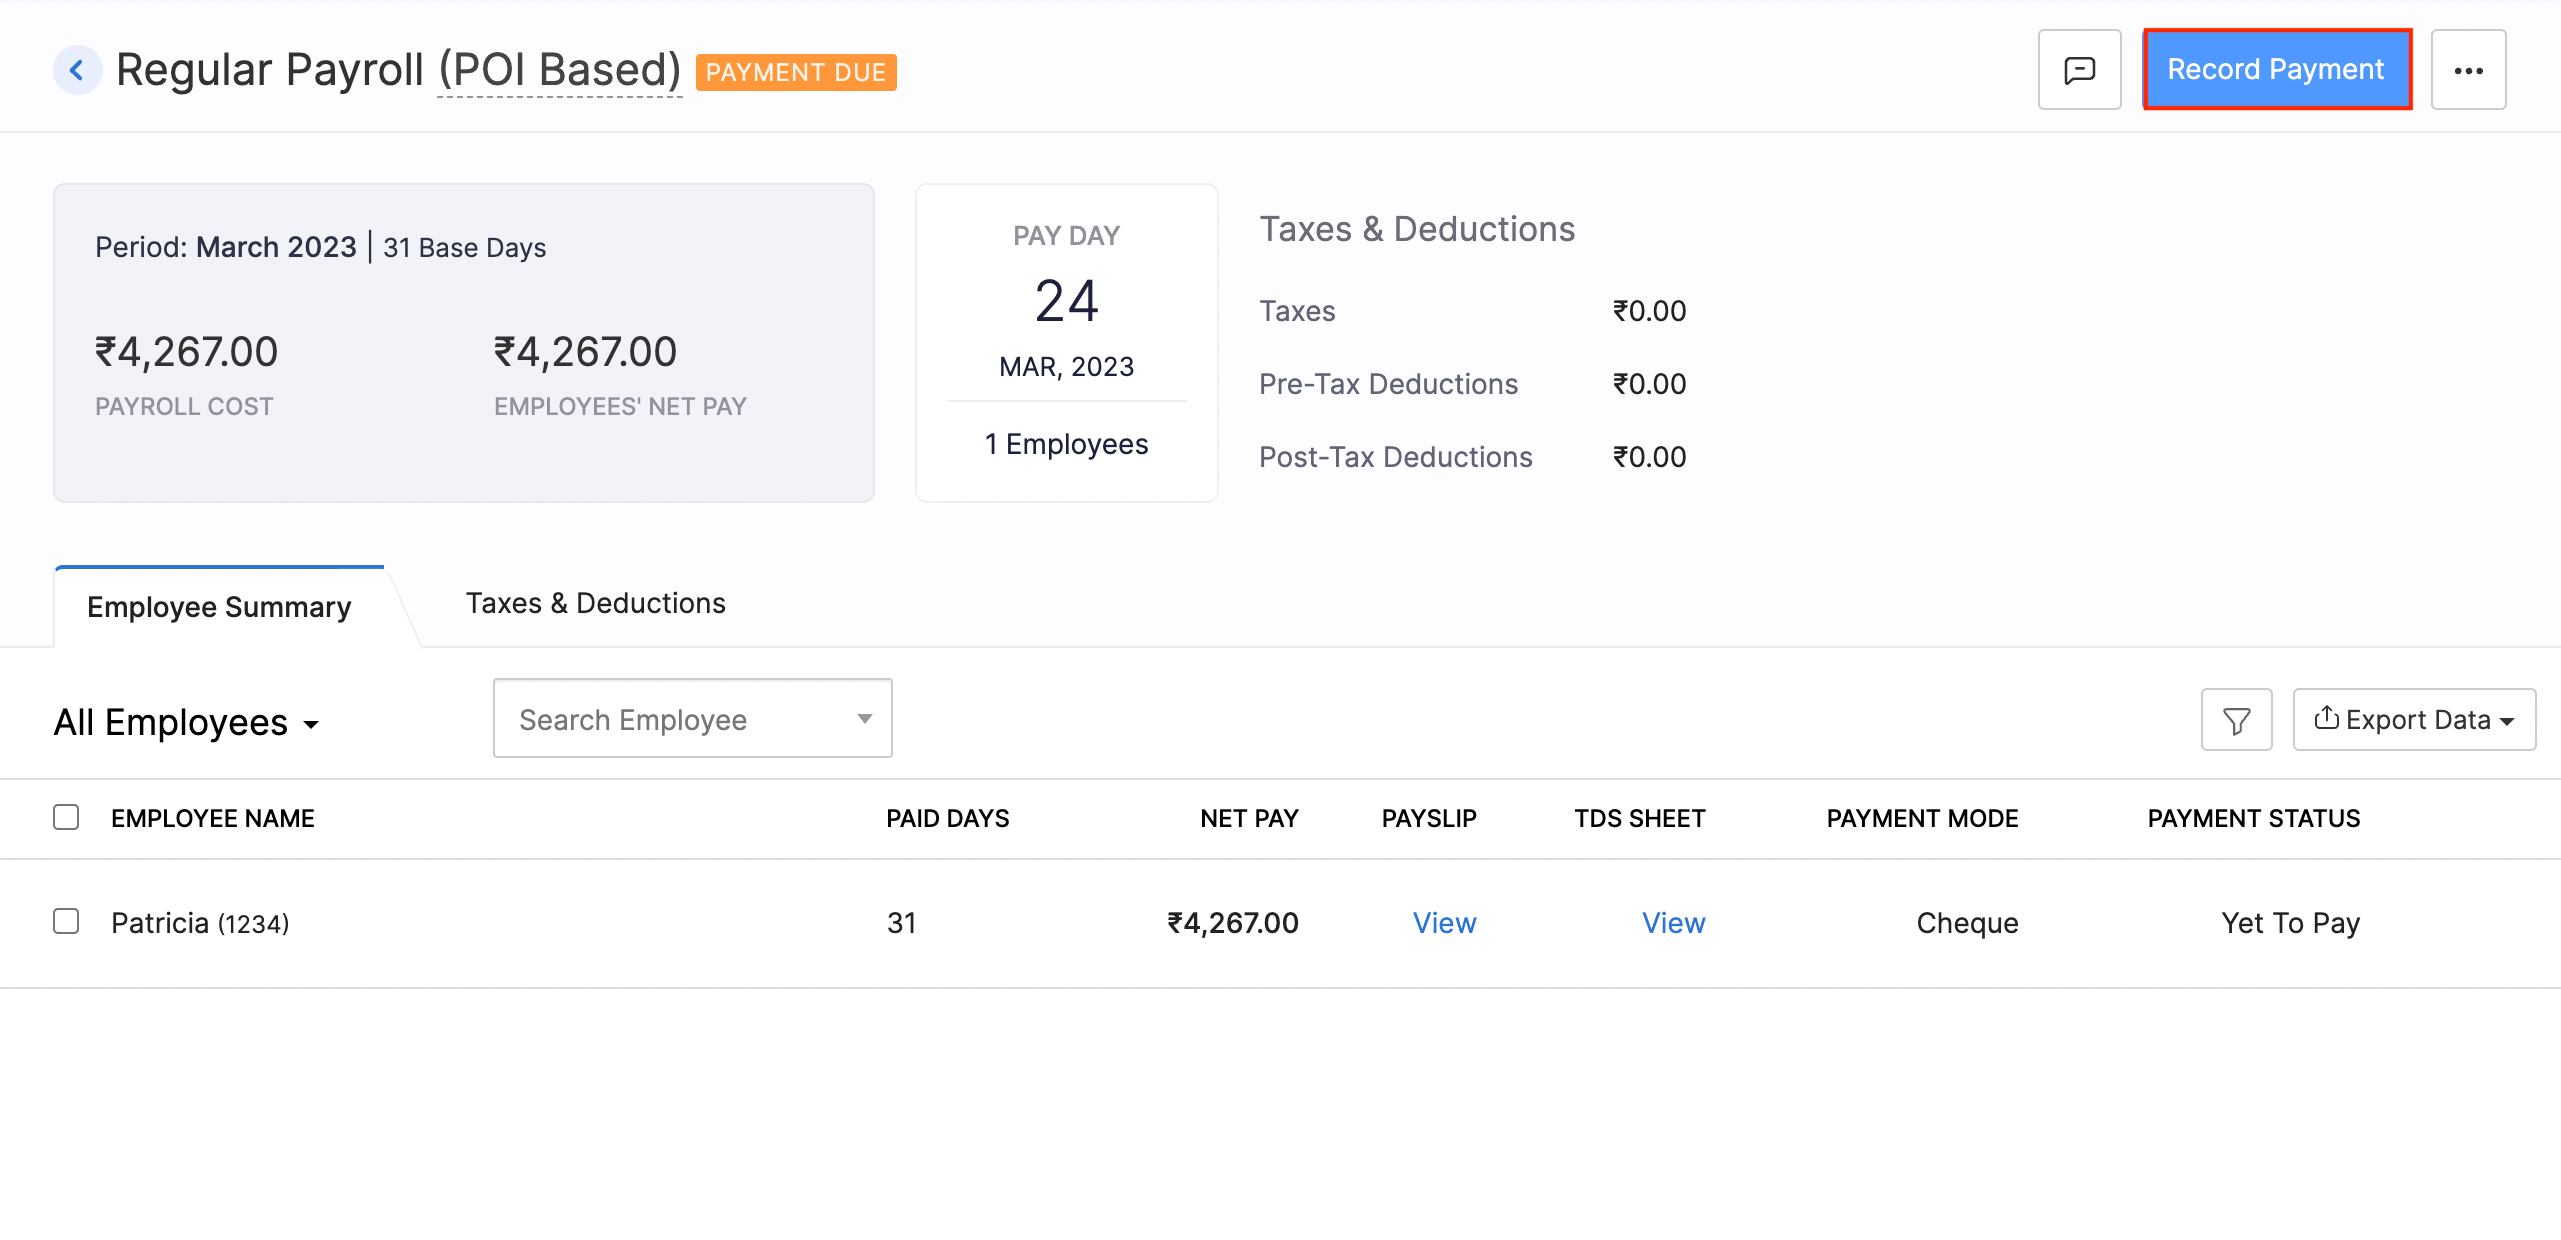
- Once that is done, you can pay the employees and record it in Zoho Payroll by clicking Record Payment at the top right corner of the page.
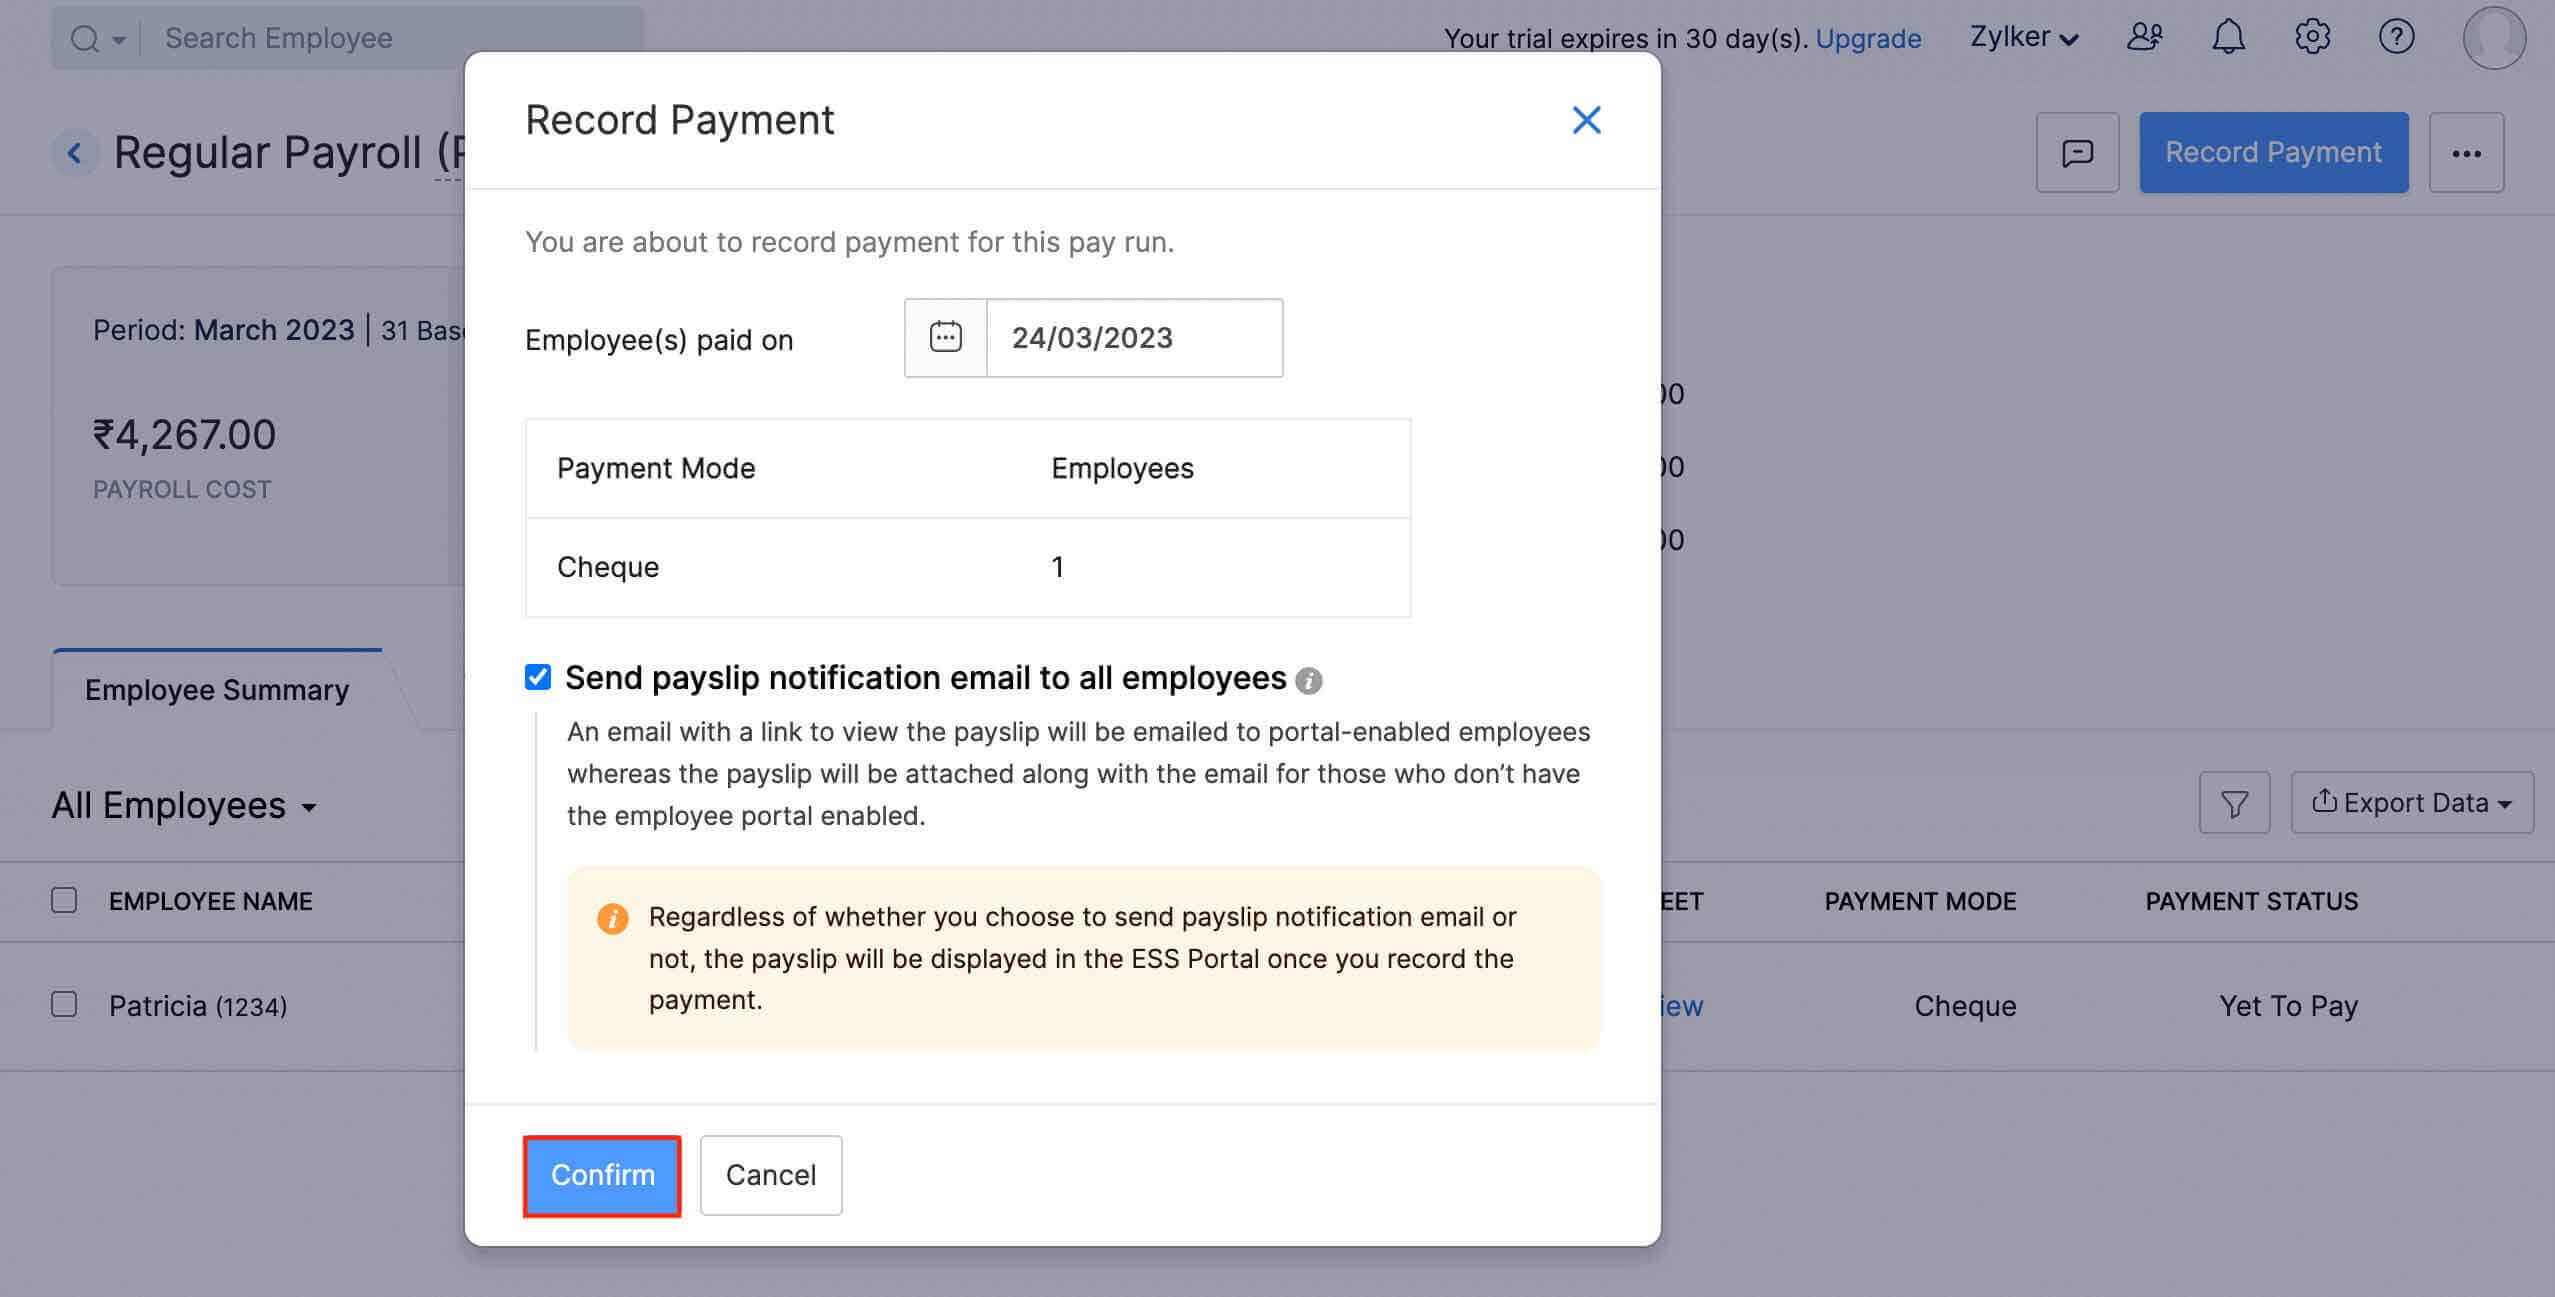
- In the page that opens, click Confirm.
Note: If you’ve enabled Direct Deposit for your employees, once you approve the pay run you can initiate the payment for the pay run.
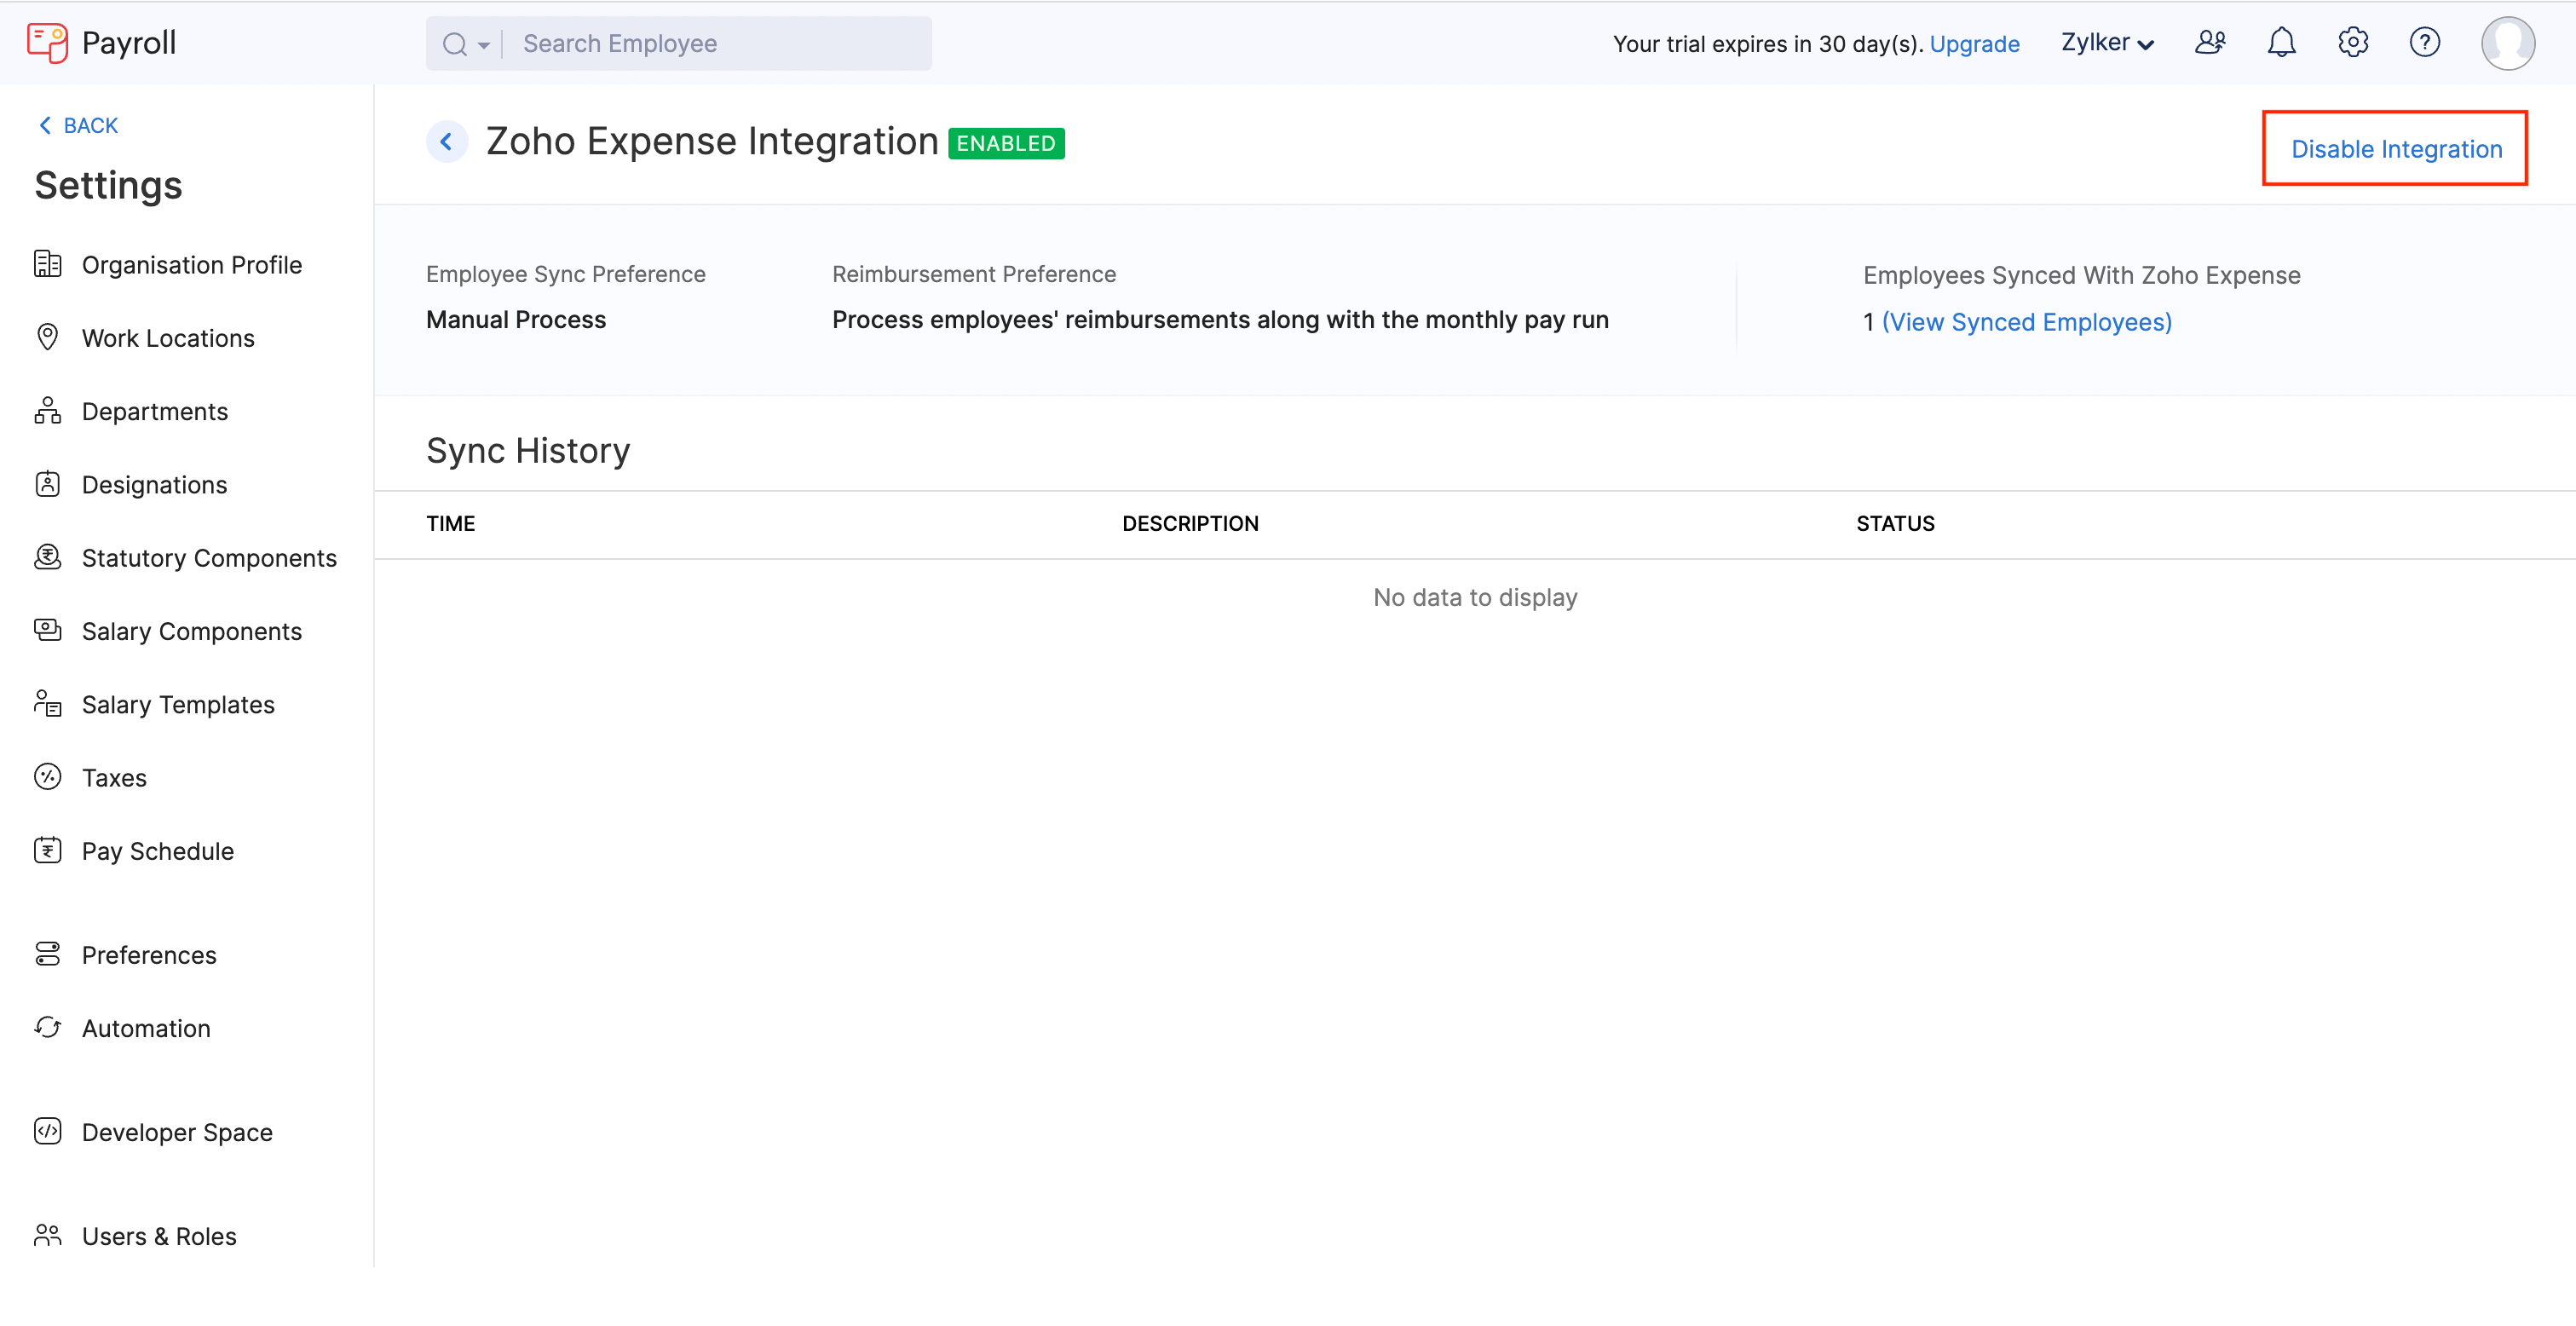
Disable the Integration
Once you disable the integration, the reimbursement details will not be sent to Zoho Payroll. However, the users who were synced between the apps can use both the apps and their data will not be deleted. To disable the integration:
- Log in to your Zoho Payroll account.
- Click the Gear icon at the top right corner of the page.
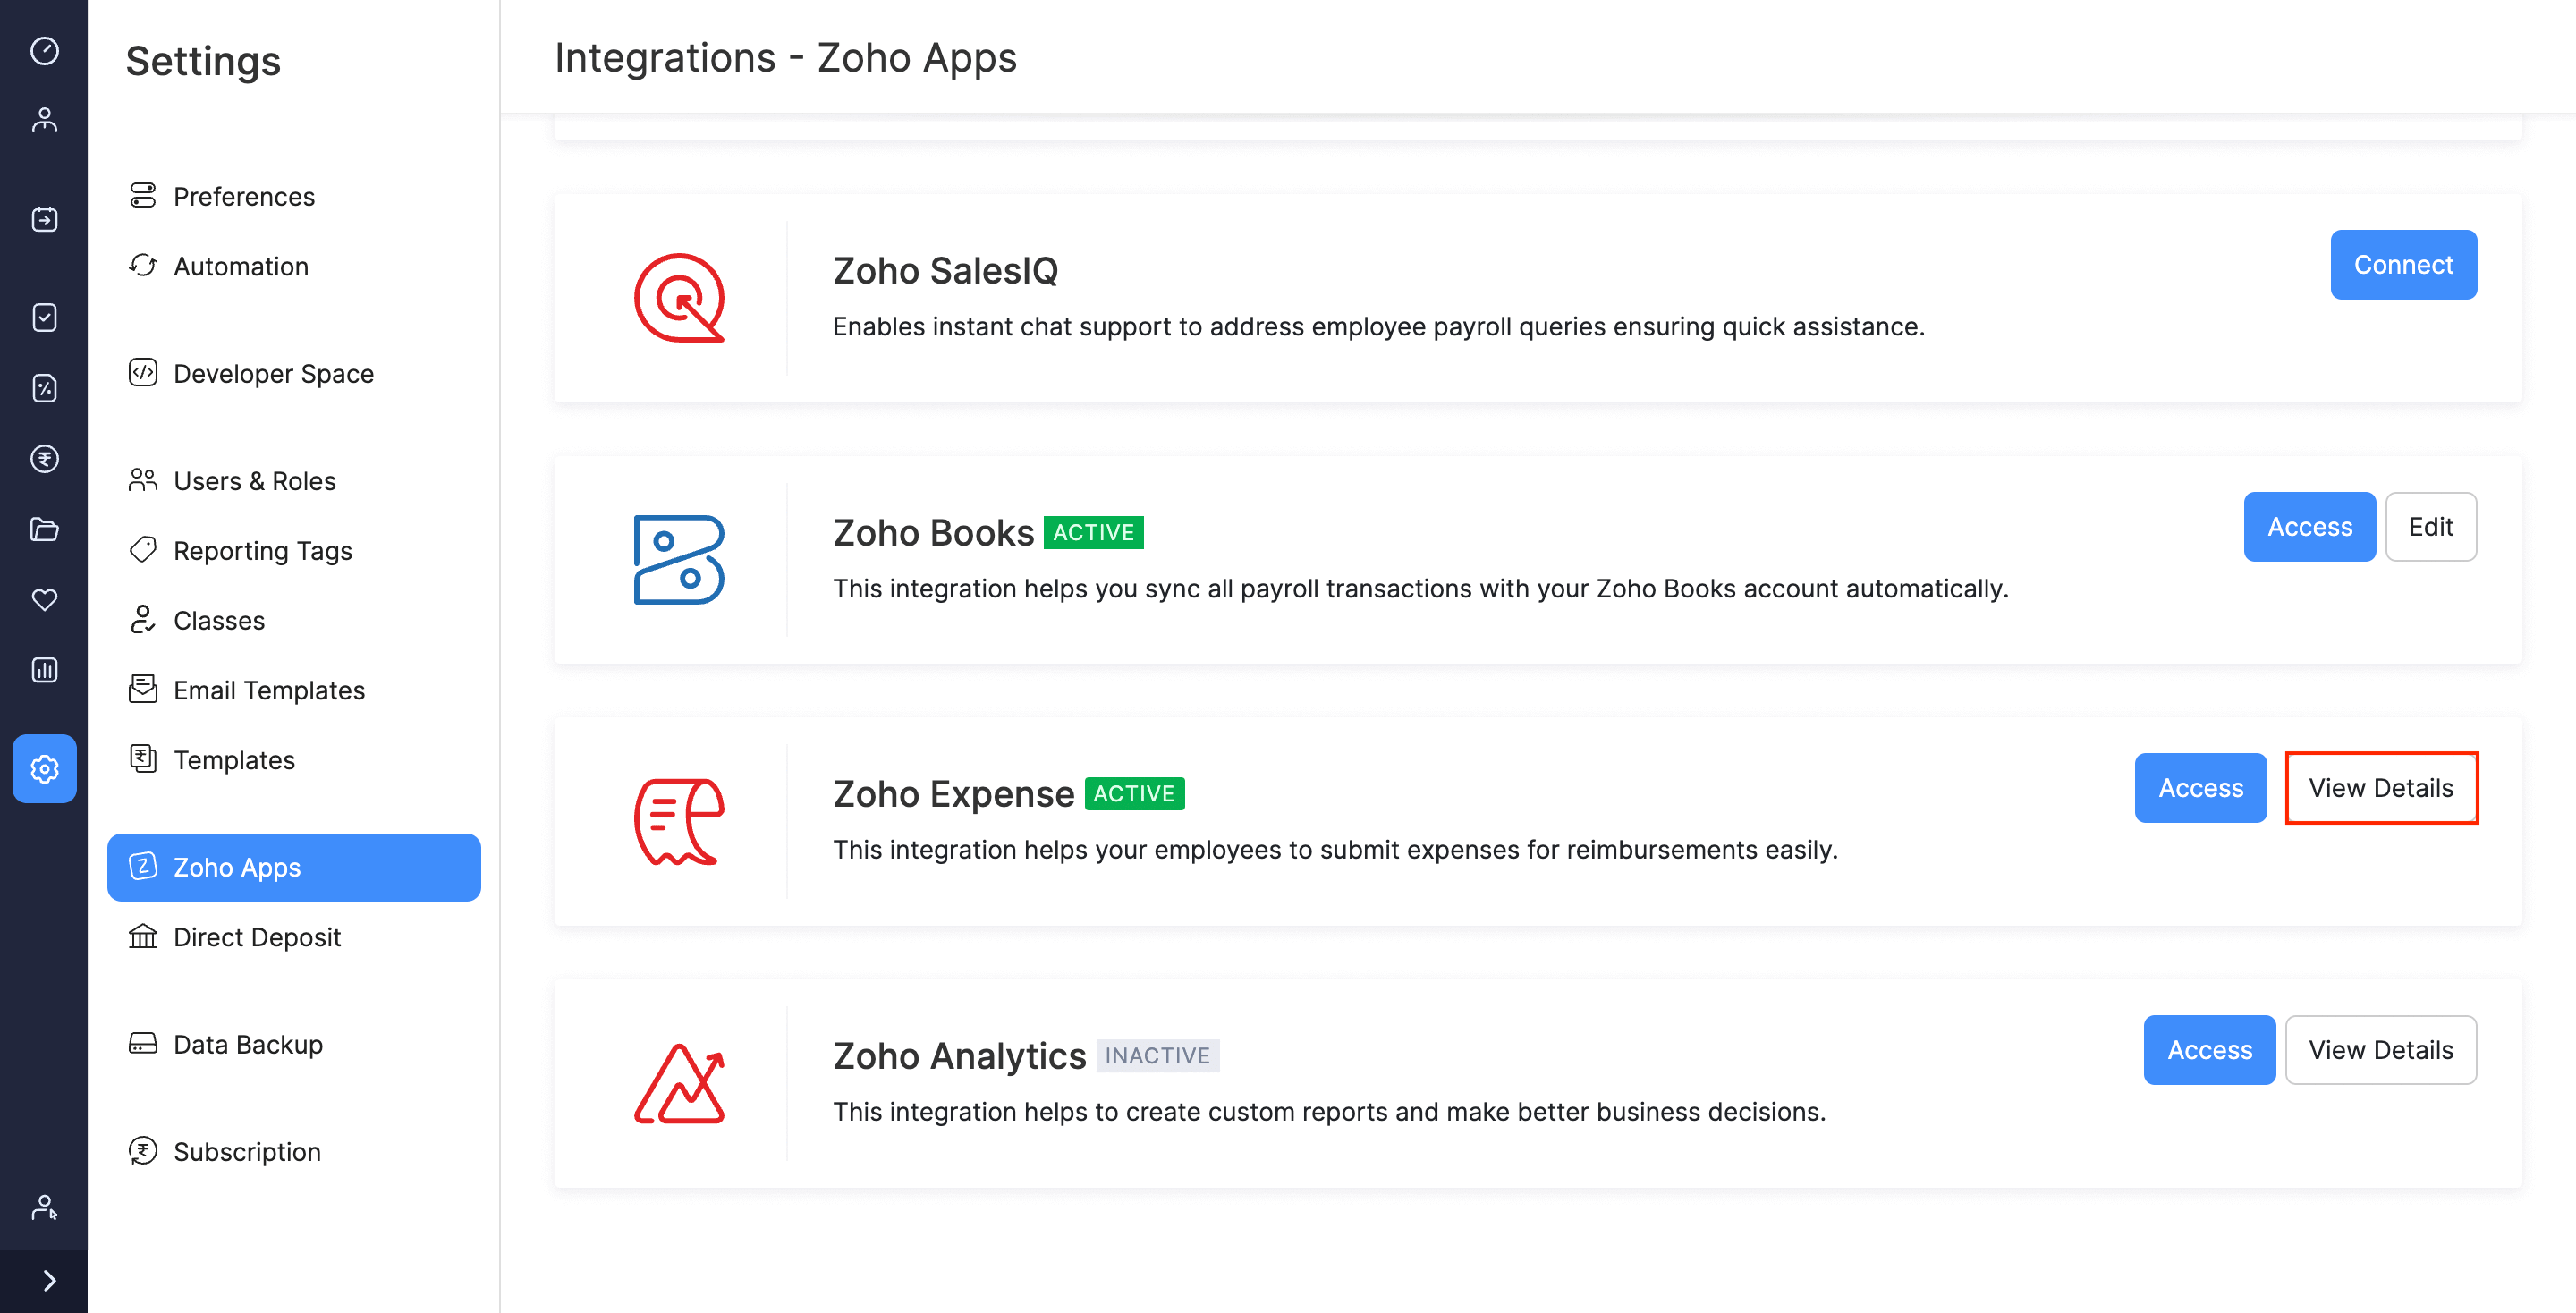
- Click Zoho Apps.
- Click View Details next to the Zoho Expense integration.
- Click Disable Integration. Your integration will be disabled and you can enable it again, if required.