
Validation Rules
Validation Rules in Zoho Books help you create new rules that set restrictions for the data being recorded. So, when a user tries to enter data in a field that you have set a restriction for, it passes through the validation rule. If the value you enter in the field violates the condition you’ve set, an alert message is displayed and the transaction is not created. The user will also be able to set multiple criteria for a single validation rule.
Note: This feature is available only for certain plans of Zoho Books. Visit the pricing page to check if it’s available in your current plan.
Let us understand how validation rules work with the help of few scenarios.
Scenario 1: Patricia runs a catering business where she handles client orders and provides services. When customers ask for details, she sends them a quote with a small discount. If she’s unavailable, her team responds to customers. However, her staff sometimes offers higher discounts than she approves of. To prevent this, Patricia quickly sets up a rule that limits discounts to no more than 10%.
Scenario 2: Peter also wants his employees to enter the terms and conditions of an ongoing-offer in the transaction. He creates a rule and ensures that the users are not able to create a transaction without entering the terms and conditions.
Create Validation Rule
You can create a validation rule by setting certain criteria for the fields in a transaction. Here’s how:
- Go to Settings in the top right corner.
- Select the module for which you would like to create a validation rule.
- Go to the Validation Rules tab.
Note: For custom modules, go to the Rules tab and then select Validation Rules.
- Click + New Validation Rule in the top right corner.
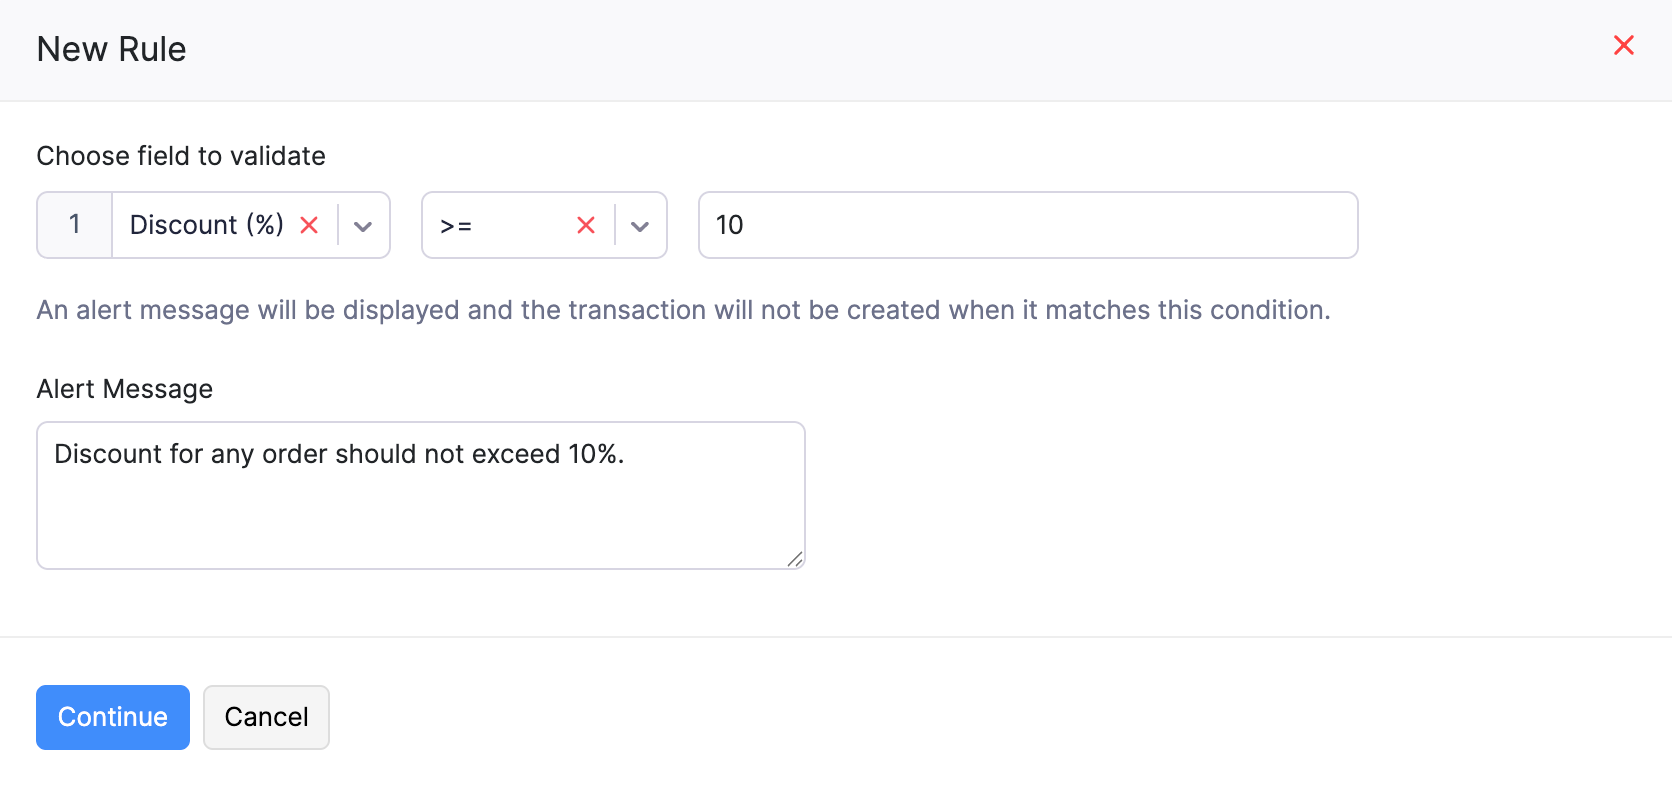
- Enter a Validation Rule Name.
- Click + Add Rule and add the condition to be met in the pop-up.
- Enter the Alert Message to be displayed when the transaction violates the validation rule.
- Click Continue.
- If you want to add more rules, click + Add Rule and repeat the steps mentioned above.
- Click Save once you’ve configured the validation rule.
Insight: A validation rule created in Zoho Books will be applicable for other integrated Zoho apps as well. Let’s say, you’ve created a validation rule for sales orders in Zoho Books and your organization is integrated with Zoho Inventory as well. Now when you try to create a new sales order in Zoho Inventory, the fields will be validated based on the rule you set up in Zoho Books.
Multiple Criteria and Subrules
A validation rule is applicable for all transactions. However, if you would like to apply it for specific transactions based on multiple criteria, or create a new rule with the same condition, refer the following:
Add Multiple Criteria
When you create a validation rule, it will be applicable for all transactions by default. You can also choose the rule to be applied to transactions based on specific criteria.
Scenario: (Based on Scenario 1) Peter had created a validation rule where the Discount cannot exceed 10% for the transactions created. However, he would like to customize this further as all transactions cannot have a maximum discount of only 10%. So he sets the criteria that the rule should be applicable only when the transaction total is under $100 and when there are shipping charges too.
Here’s how you can add multiple criteria:
- Go to Settings in the top right corner..
- Select the particular module and go to the Validation Rules tab at the top of the page.
- For new rules: While creating a validation rule, enter the details and click Save. On the page that follows, click the Edit icon next to the rule.
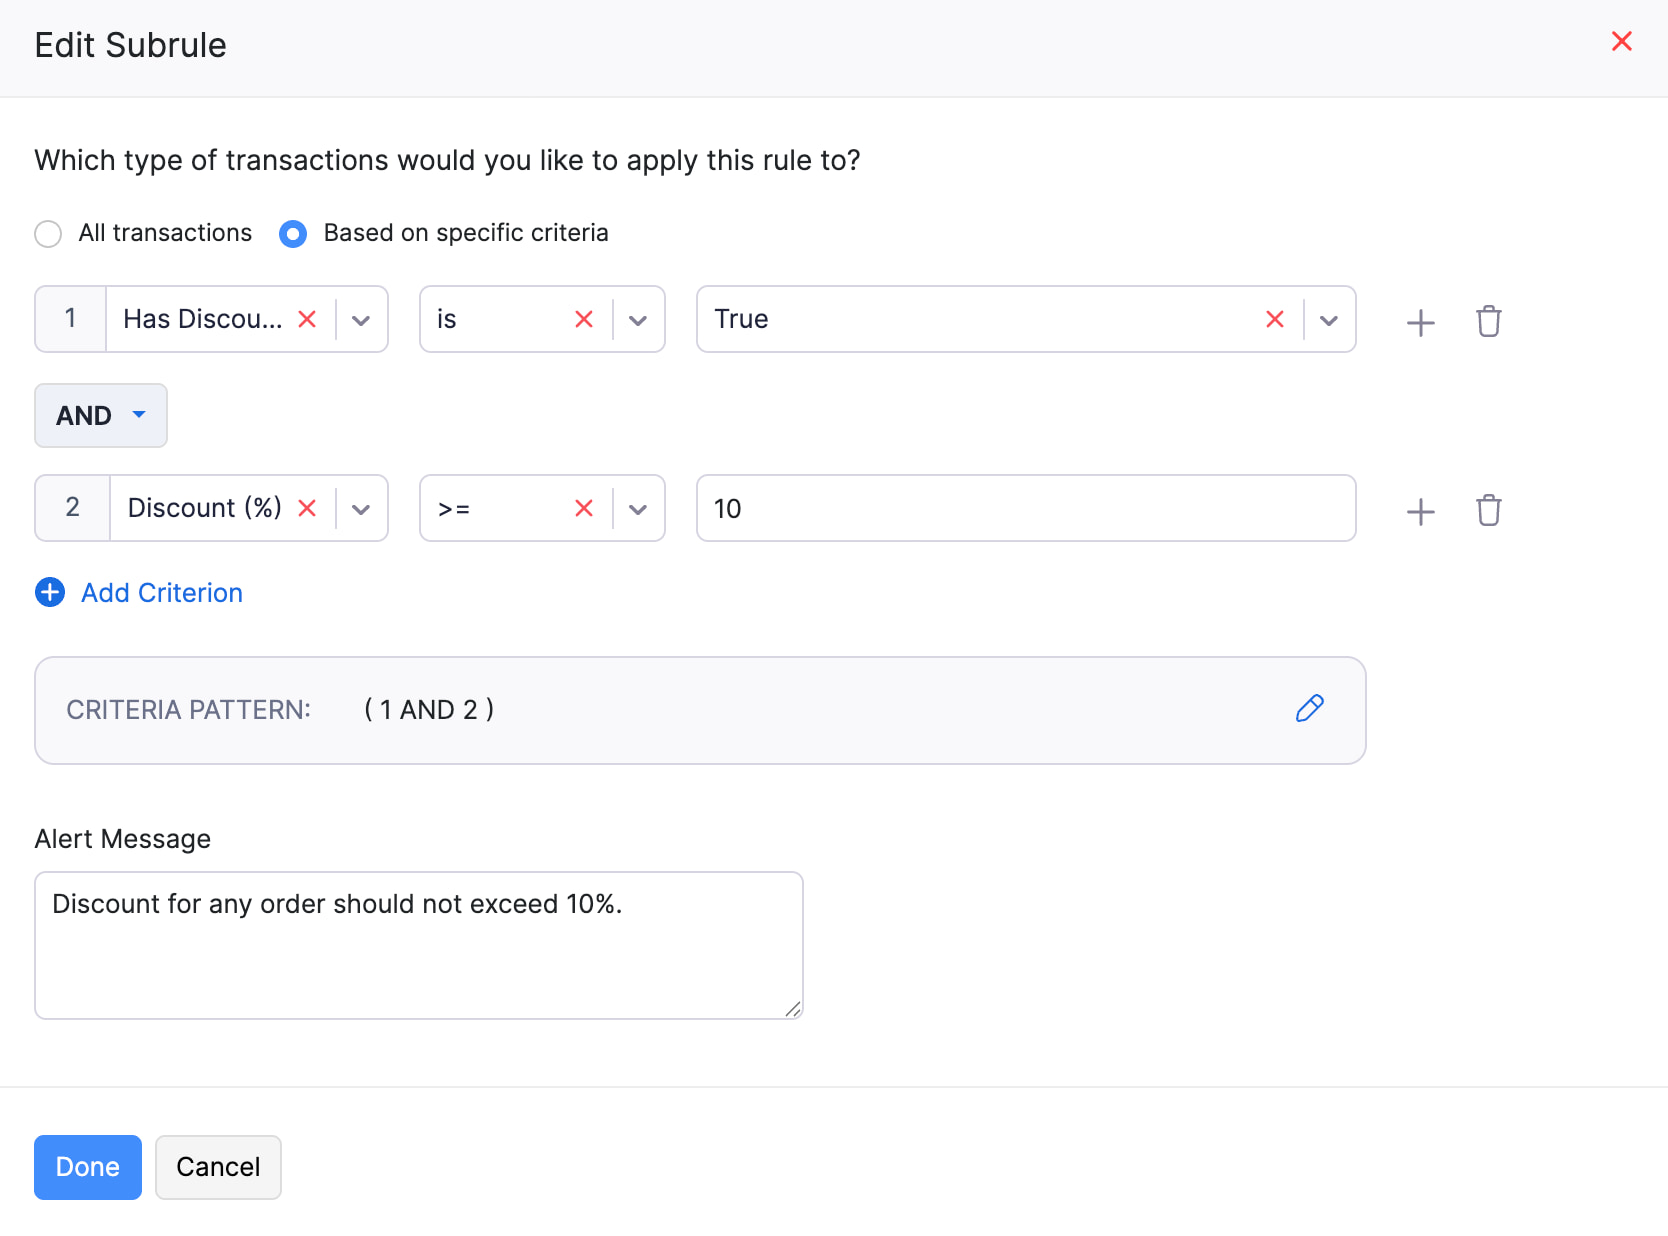
For existing rules: On the Validation Rules tab, hover over the required rule, click the Dropdown icon, and select Edit. On the Edit Validation Rule page, click the Edit icon next to the rule. - Click Based on specific criteria in the pop-up.
- Set the required criteria using the options provided.
- Click + Add Criterion for more options and click the Delete icon to remove criteria.
- Click the Edit icon to change the criteria pattern based on your preferences and click Save.
- Click Done.
Add Subrules
If you would like to include an additional rule to your existing condition, you can add Subrules. This is applicable only when you’ve chosen to apply the rule to transactions based on specific criteria.
Scenario: Peter had created a rule where the Discount cannot exceed 10% while creating transactions and had also customized it by adding certain criteria. Now, he’d like to use the same condition (<= 10% discount) but create a new rule that this condition is applicable only during off-seasons (July-Nov). So he creates a new subrule with the transaction date to be > July 1.
Here’s how you can create subrules:
- Go to Settings in the top right corner.
- Select the particular module and go to the Validation Rules tab.
- Select the field for which you have created a validation rule.
- Click + Add Subrule and a pop-up appears.

- Enter the Criteria and the Alert Message.
- Click Done.
- Verify the subrule you had created and click Save for the changes to reflect.
Execute Validation Rules
Once a validation rule is created and saved, it will be applicable for all transactions created henceforth. When any new transaction violates a validation rule, the alert message configured in the validation rule will be displayed to the users.
Edit a Validation Rule
You can make changes to a validation rule by updating its details. Here’s how:
- Go to Settings in the top right corner.
- Select the module for which you created the validation rule.
- Go to the Validation Rules tab.
- Hover over the validation rule you want to edit.
- Click the Dropdown icon and select Edit.

- Make the necessary changes and click Save.
Mark a Validation Rule as Inactive
You can temporarily disable a validation rule by marking it as inactive. Here’s how:
- Go to Settings in the top right corner.
- Select the module for which you created the validation rule.
- Go to the Validation Rules tab.
- Hover over the validation rule you want to mark as inactive.
- Click the Dropdown icon and select Mark as Inactive.

Mark a Validation Rule as Active
You can enable an inactive validation rule by marking it as active. Here’s how:
- Go to Settings in the top right corner.
- Select the module for which you created the validation rule.
- Go to the Validation Rules tab.
- Hover over the inactive validation rule you want to mark as active.
- Click the Dropdown icon and select Mark as Active.

Delete a Validation Rule
- Go to Settings in the top right corner.
- Select the module for which you created the validation rule.
- Go to the Validation Rules tab.
- Hover over the validation rule you want to delete.
- Click the Dropdown icon and select Delete.

- Click Yes, Delete in the pop-up to confirm your action.
 Yes
No
Yes
No
Thank you for your feedback!