Organization Settings

Organization

The Organization section in Zoho eProtect allows you to view and manage the overall settings for your organization.

Profile

The Profile page provides generic information such as the name of the organization, contact details, and your current subscription plan.
organization profile

Subscription

The Subscription page allows you to view and manage your Zoho eProtect's plan and add-on details. To view your current plan click Subscription from the Organization section on the left pane.

Note:

If you are using the beta version, the subscriptions page provides a generic overview of your organization's details.

Display Name Format

You can choose the preferred display name format for your users. Follow these instructions to set the default name format:

  1. Log in to the Zoho eProtect and select Organization on the left menu.
  2. Navigate to the Display Name Format section.
  3. Select the desired option:
    • Select the First Name, Last Name option if you want the First name to be displayed followed by the Last name.
    • Select the Last Name, First Name option if you want the Last name to be displayed followed by the First name.
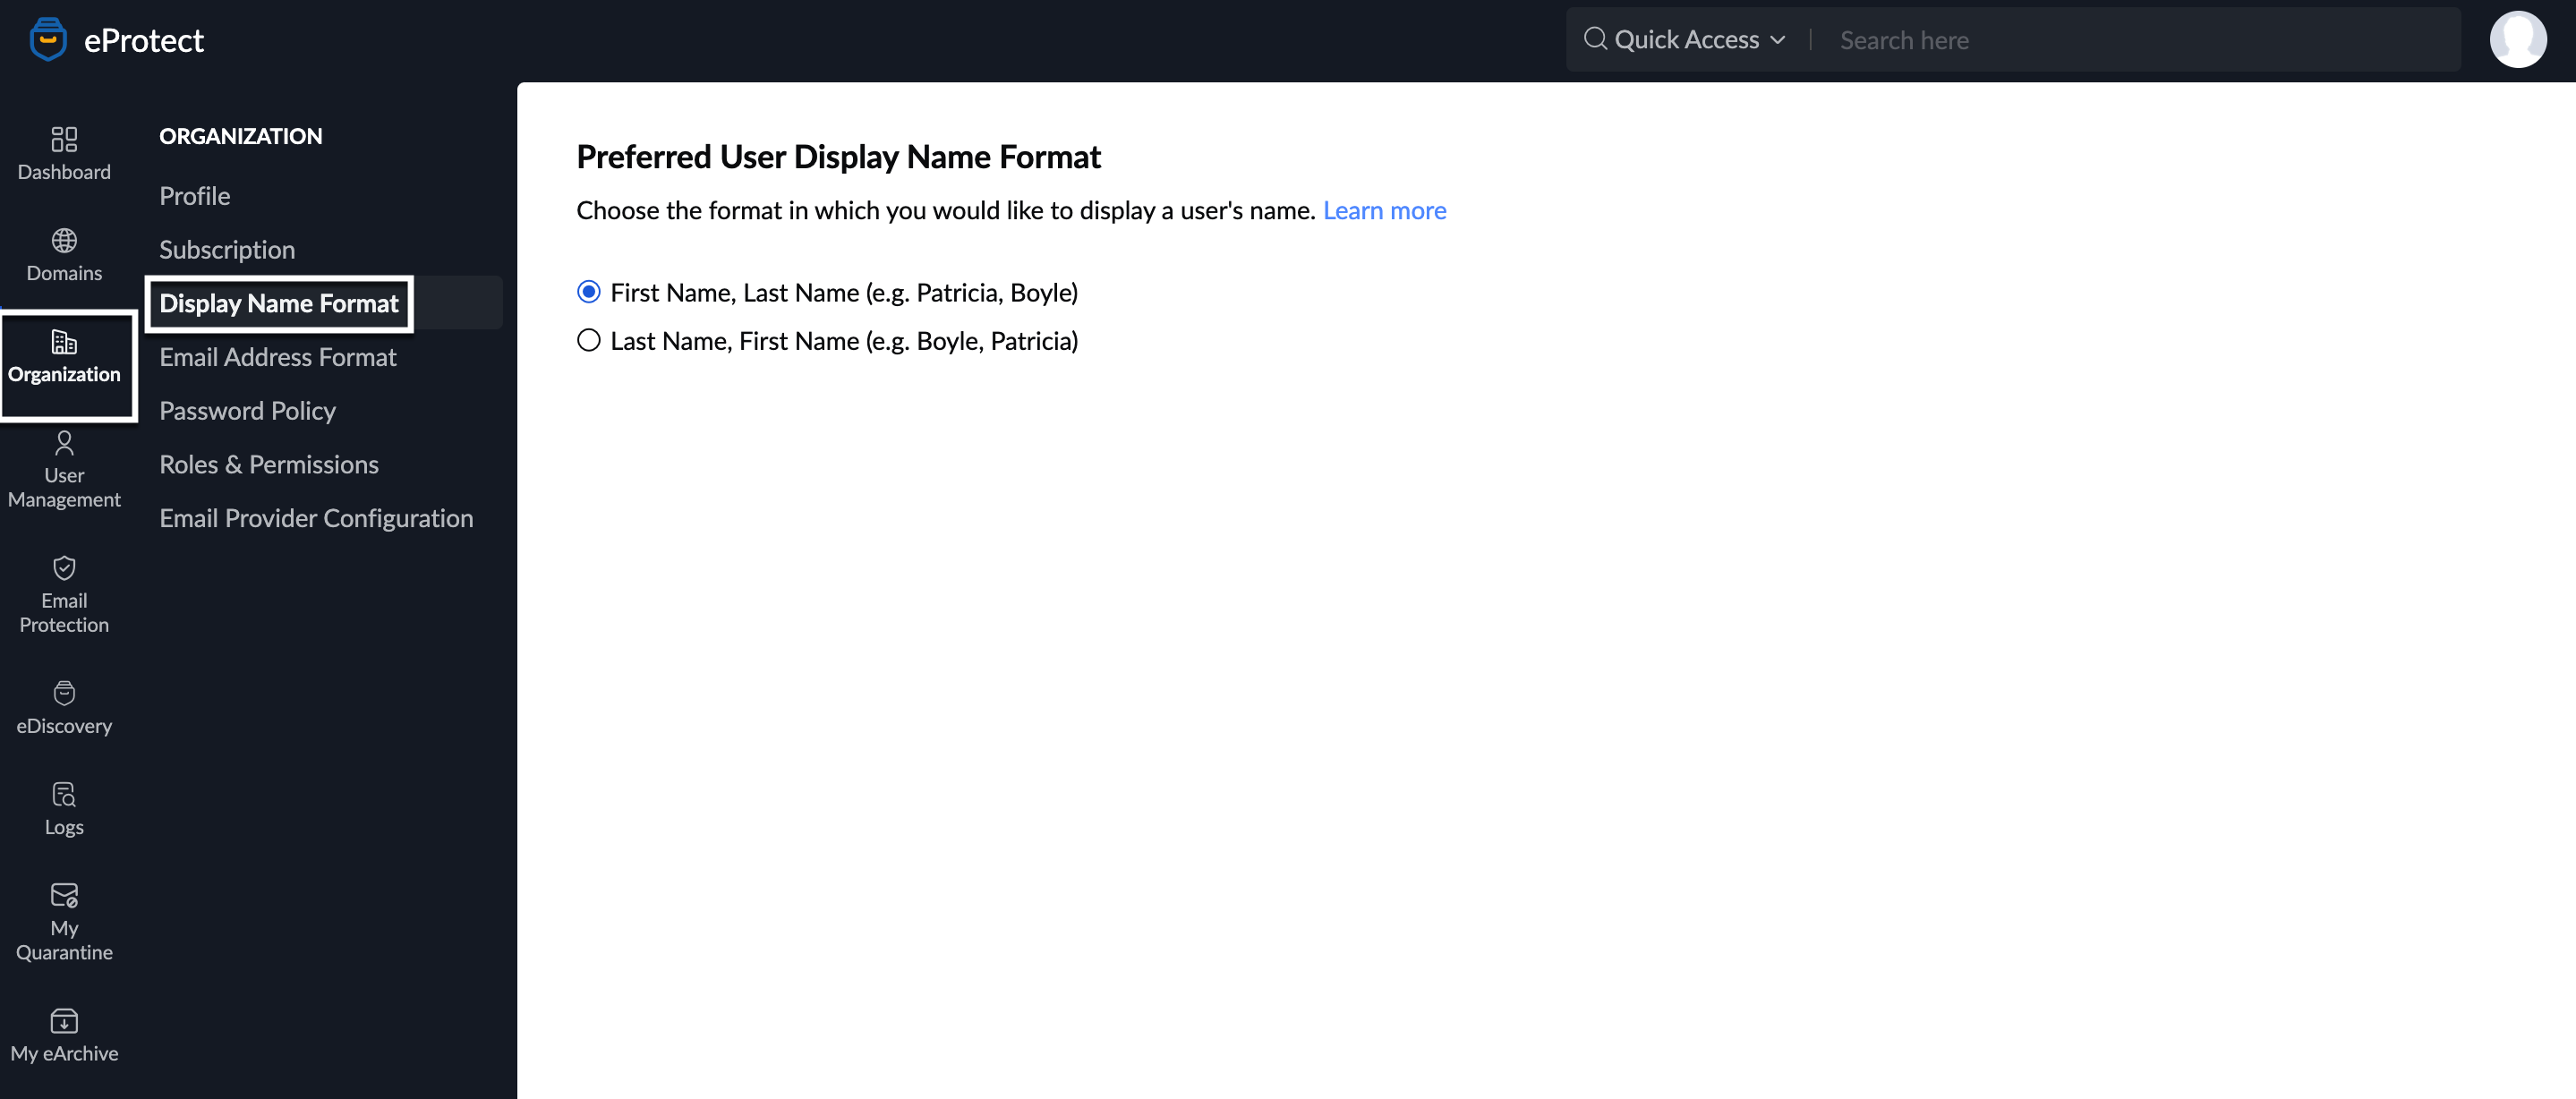
      display name format

The names of your organization's users will be displayed in the preferred order in the User Management section.

Email Address Format

The preferred format for creating a user's email address can be defined from the Organization section. Follow these steps to configure the default email address format:

  1. Log in to the Zoho eProtect and select Organization on the left menu.
  2. Navigate to Email Address Format.
  3. Select the relevant options from the dropdown lists.
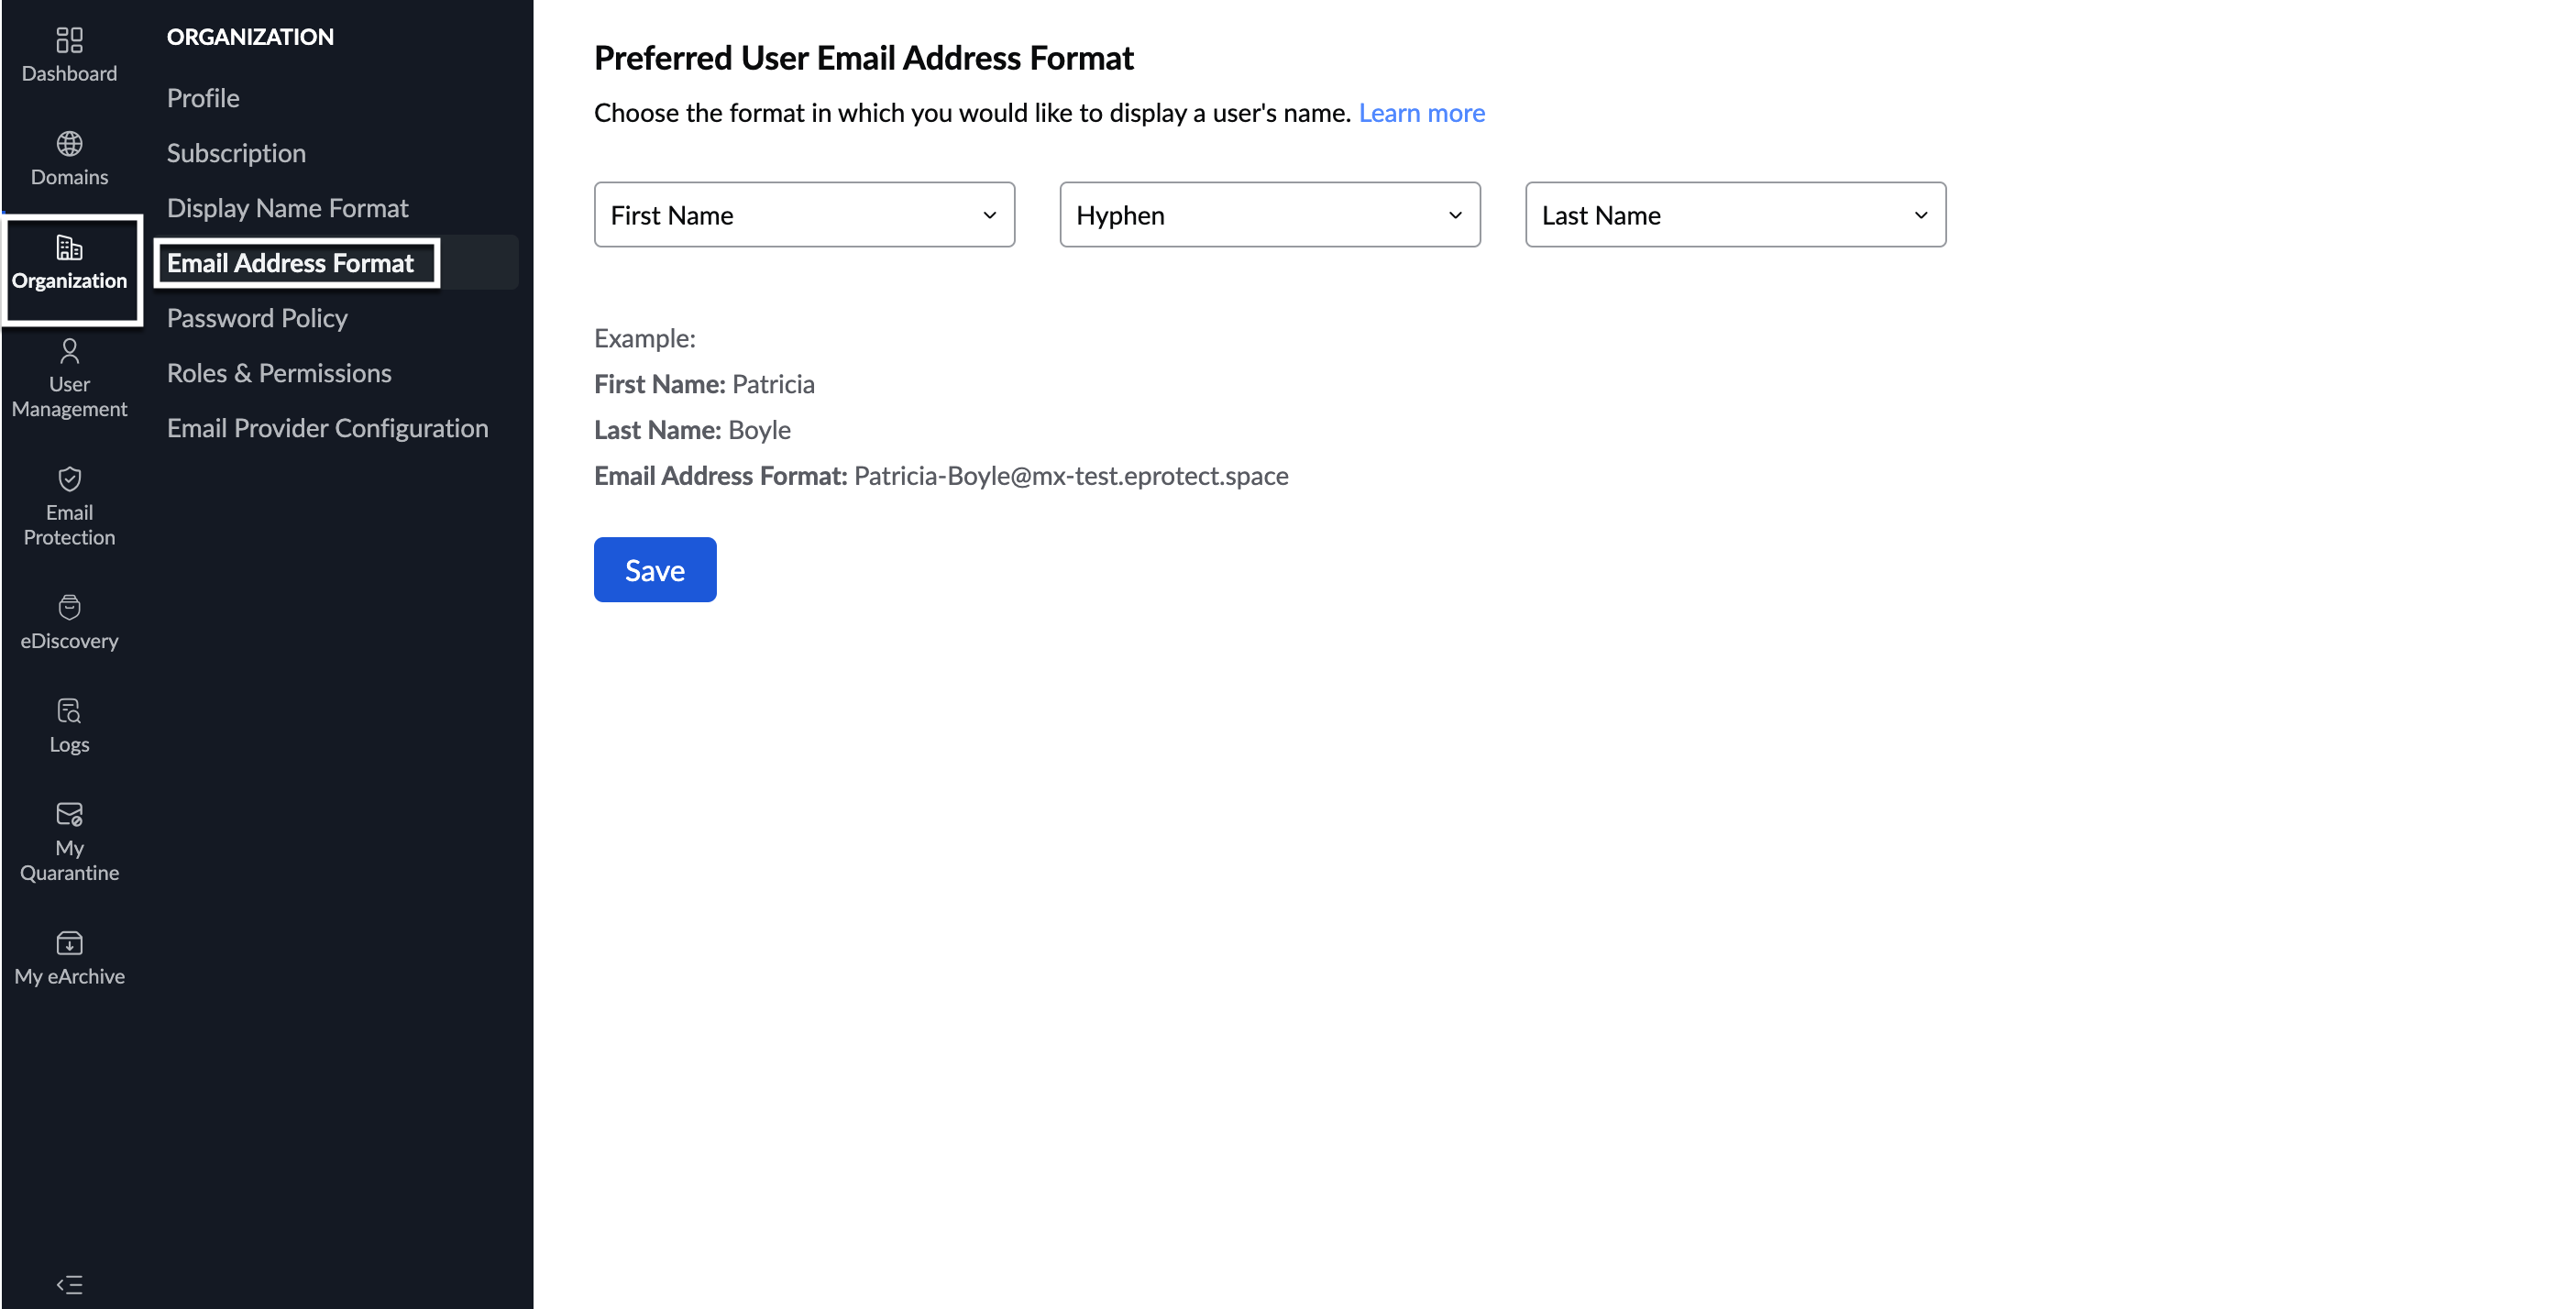
    email address format
  4. While creating a new user, when you enter the First Name and Last Name, an email address will get auto-populated in the email address field based on the format chosen.

This format will also be taken into account if you're adding users manually or importing user details into your organization account. If the First Name and Last Name fields are given, but the Username field is not given, an email address will be created for each user based on the given format.

Password Policy

Administrators of an organization can define a set of rules on how one should create a password for their custom email address, to keep the email account secure. By setting a password policy, you can mandate admins to use strong passwords and make sure your account stays secure.

Table of Contents  

Configure Password Policy

Follow these steps to configure the password policy:

  1. Log in to Zoho eProtect.
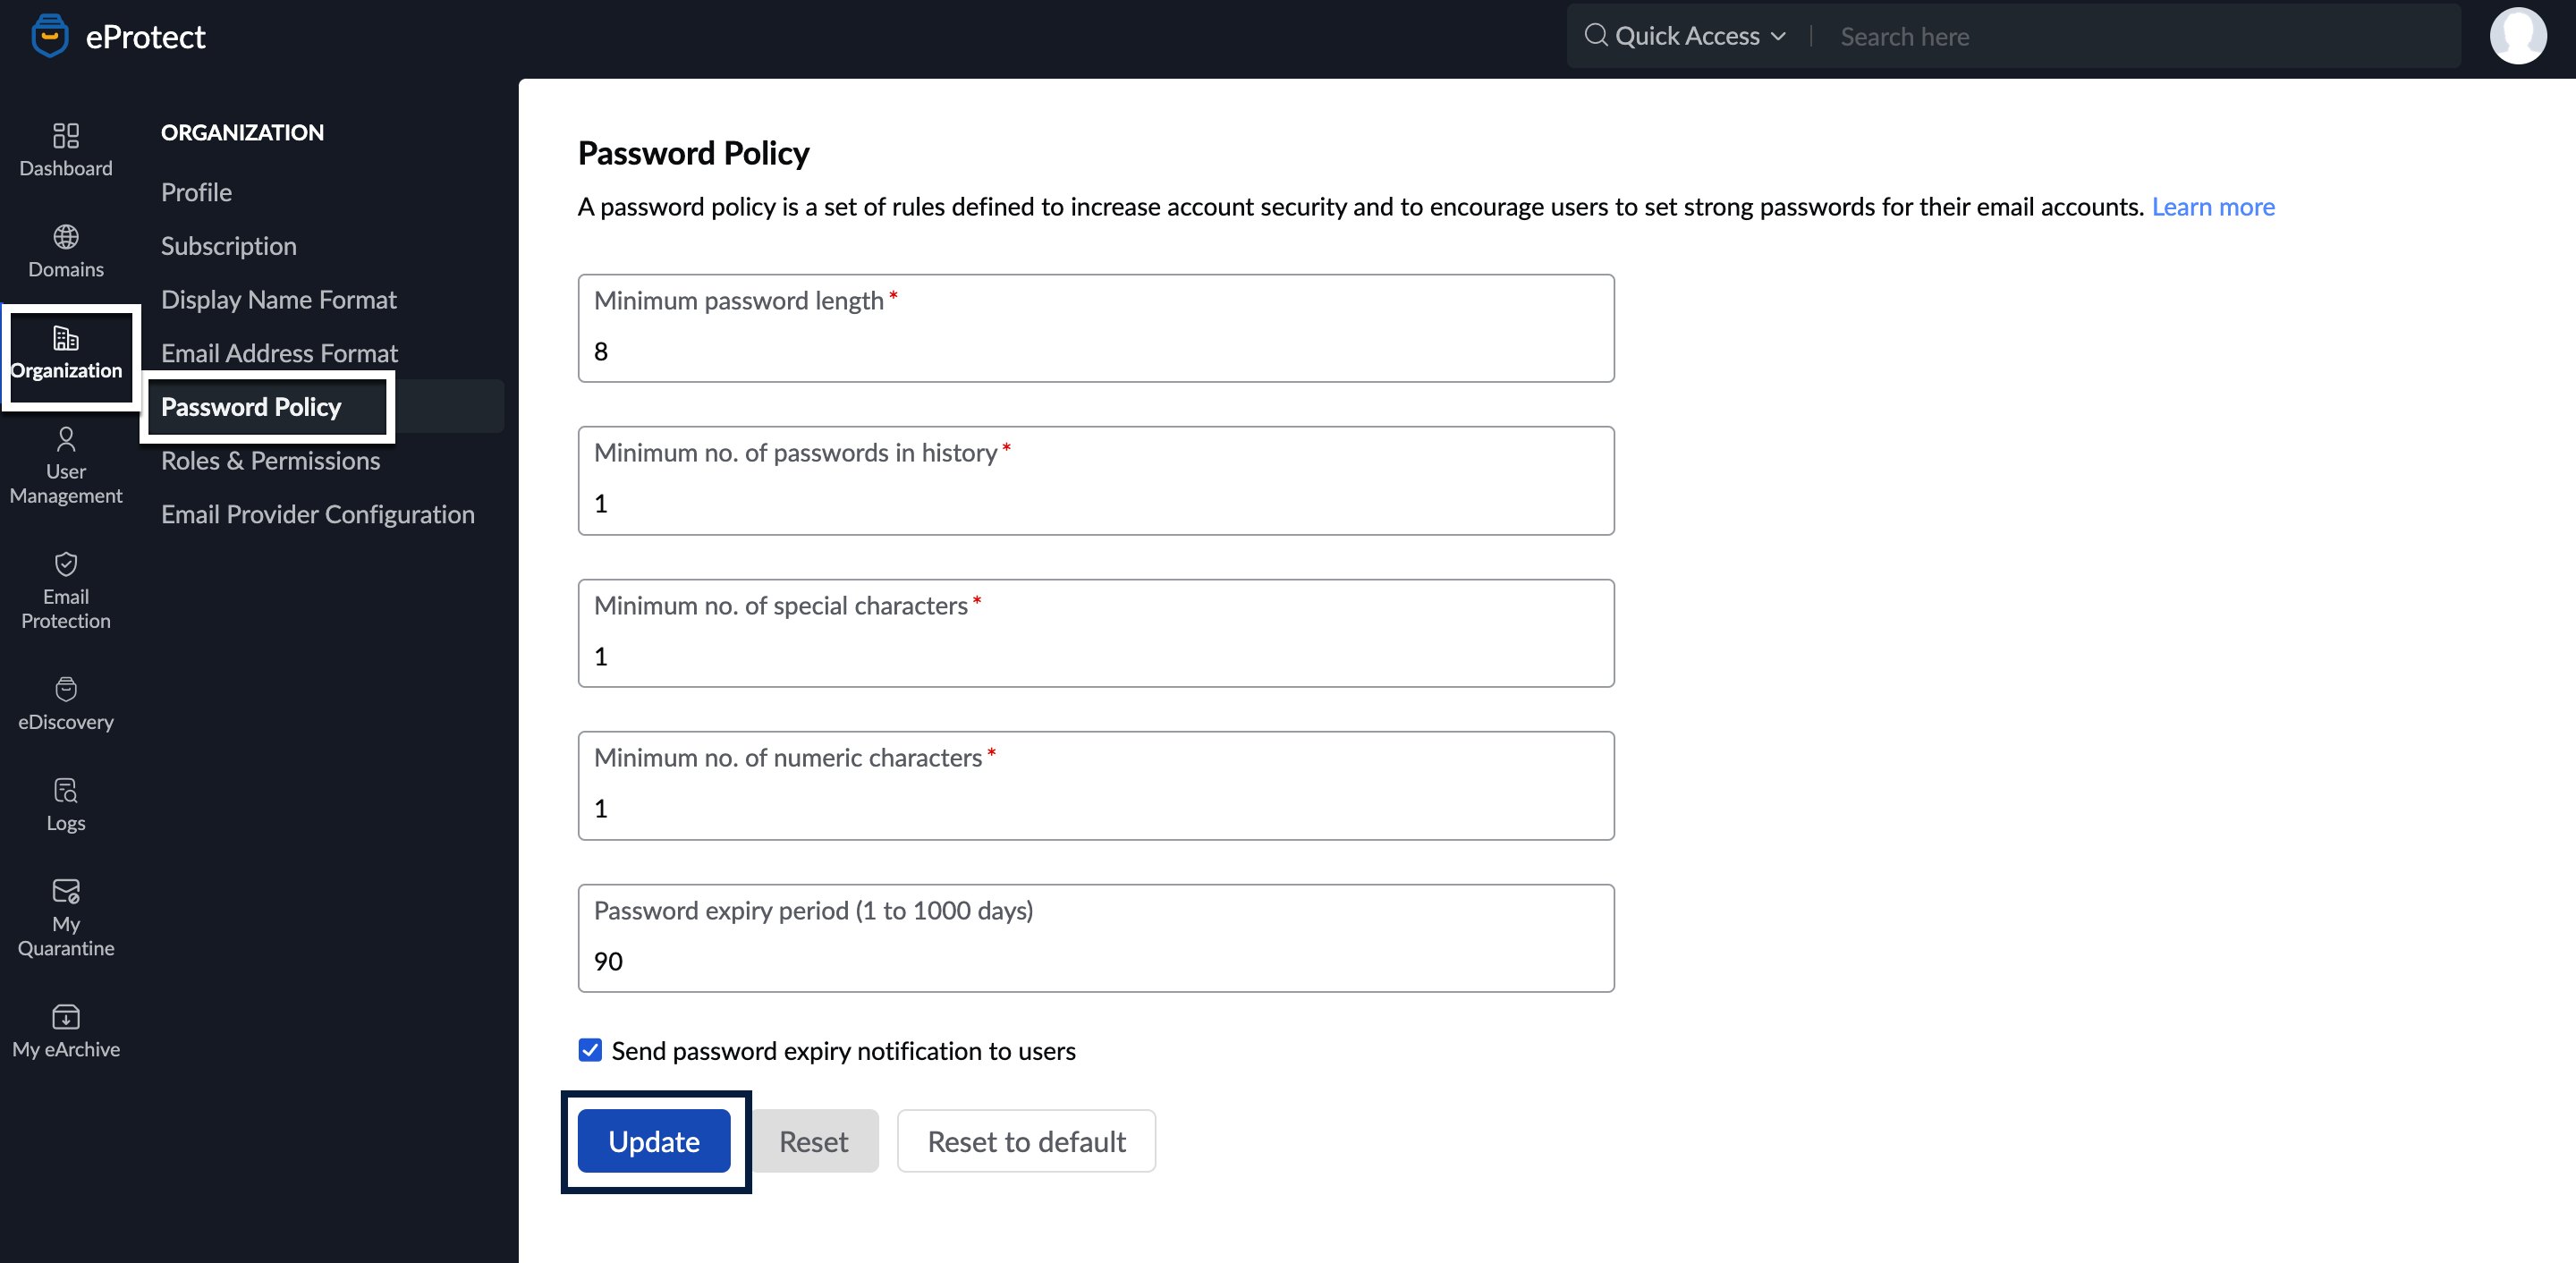
  2. Navigate to Organization in the left pane and select Password Policy.
  3. On the Password Policy page, specify the values for the respective fields.
  4. Once done, click Update.
    eProtect password policy

You can also reset the edits you made from the previous setting by clicking Reset and go back to the initial configuration that Zoho eProtect set as default by clicking Reset To Default.

Rules you can set under Password Policy

Below are the password policy rules that you can set for your organization:

Minimum password length

You can set the minimum length of Password for your organization members in the parameter. Once you set the minimum length, the next time the users change their Passwords, they will be forced to choose a password with minimum characters chosen in the Policy. By default, the minimum length required for passwords is 8.
You can make it even higher, in case you want the users to use a passphrase instead of a password but can't go lower than 8.

Minimum number of passwords in history

This ensures that the users do not repeat their previous passwords. The repeated use of the same passwords makes the passwords easily guessable by others. The optimum value for the minimum number of passwords not to be repeated is 3. If you specify 3, the users will not be able to reuse the previous 3 passwords they have used.

Minimum number of special characters

In addition to the Mixed Password criteria, the admin can specify a condition about the minimum number of special characters ($,#,^,@, etc.) in the Password. The optimum number of Special Characters is 1 or 2.

Minimum number of Numeric Characters

Similar to the number of special characters, the administrator can also specify the condition about the minimum number of numeric characters (0-9) in the Password. The optimum number of numeric characters is 1 or 2.

Password Expiry Period (Days)/ Password Duration

The Passwords can be set to expire periodically, where the users will change their passwords after every 'n' number of days. This ensures that the users change their passwords periodically. The Password of each user will automatically expire after the 'n' number of days from the date the Password is changed. When you set up the policy for the first time, the policy will be in effect from the previous date on which the password was changed and not from the date on which the Policy has been enforced. 
Ex: If you want to force all the users to change their Passwords, you can set the expiry period as '1' day so that they will all be forced to change their passwords in the next login. However make sure that you immediately reset the policy, as otherwise, the users will be asked to change the password every day they log in. 
The optimum value for Password expiry is 30 to 45 days.

Note:

These suggestions can vary based on the nature of the organization and its users.

Password best practices

In general, apart from the Password policy, ensure that your users follow the following best practices. 

  • Never reuse passwords
  • Use Passphrases instead of Passwords
  • Do not share the passwords with anyone
  • Do not write the passwords
  • To have a memorable but strong password, keep a memorable passphrase and swap alphabetic characters with similar-looking numbers or symbols (Ex: use 0 instead of O, use @ instead of a., and so on).
  • Ensure that you log out of your accounts at the end of the day
  • Do not save your password in the browsers
  • Never give out your password in phone calls or emails
  • Do not login to your account on Public computers if it looks suspicious

Roles and Permissions

Not everyone in your organization will be able to access Zoho eProtect. The super administrator and users assigned as Administrators in Zoho eProtect will get access to eProtect. Below are the different roles available in Zoho eProtect:

eProtect roles and permissions

Super Administrator

The Super Administrator is by default the user who signs up and sets up the domain in Zoho eProtect. The Super Administrator can provide Administrator privileges to other users or change the Super Administrator of the organization to another Administrator in the Organization.

Administrator

The Administrator is a role provided to a user, who needs to manage users in the organization, in addition to the Super Administrator. You can also define custom admin roles for users based on select privileges. For certain users, like legal admins, who require access only to the eDiscovery portal data, but do not require admin access to the mail settings or the eDiscovery settings of the organization, an "Admin" access would be an overkill and may compromise the controls within the organization.

This also creates a significant amount of risk as all the users can access, control, search, export or even delete other user's data. As this data is sensitive, it is advisable to limit access to each user based on the specific requirement.

List of custom admins in eProtect:

  • Application Administrator
  • Email Protection Roles
  • eDiscovery Roles

Except for the Super Administrator, each admin can be grouped under two types of Roles:

System Role

System Role is a role which is pre-defined in the system and has full-fledged access to all the actions in eDiscovery. Users who need complete access to all actions in the eDiscovery portal should be assigned to this role. This being a System role, its permissions cannot be modified.

Note:

Enabling or disabling the eDiscovery service and user management permissions are not included in this Role. Users who need control over these two actions also will need to be added as Admin. Refer here to provide Admin privilege to a user.

Custom Role

For more fine-grained control, Admins can create Custom Roles. Separate customer roles can be created for application admin, email protection admin, and eDiscovery admins. Admins can define as many Custom Roles as required and assign the users as required. With custom roles you can:

  • Define and customize permission for roles.
  • Associate users to a Custom Role.
  • Members will have access only to the actions allowed by the custom role that they are associated with.

Follow these steps to create a Custom Role:

  1. Log in to Zoho eProtect.
  2. Navigate to Organization in the left pane and select Roles & Permissions.
  3. Select the desired custom admin role:
    • Application Administrator
    • Email Protection Roles
    • eDiscovery Roles
  4. Click Add Custom Role under the Custom Role tab.
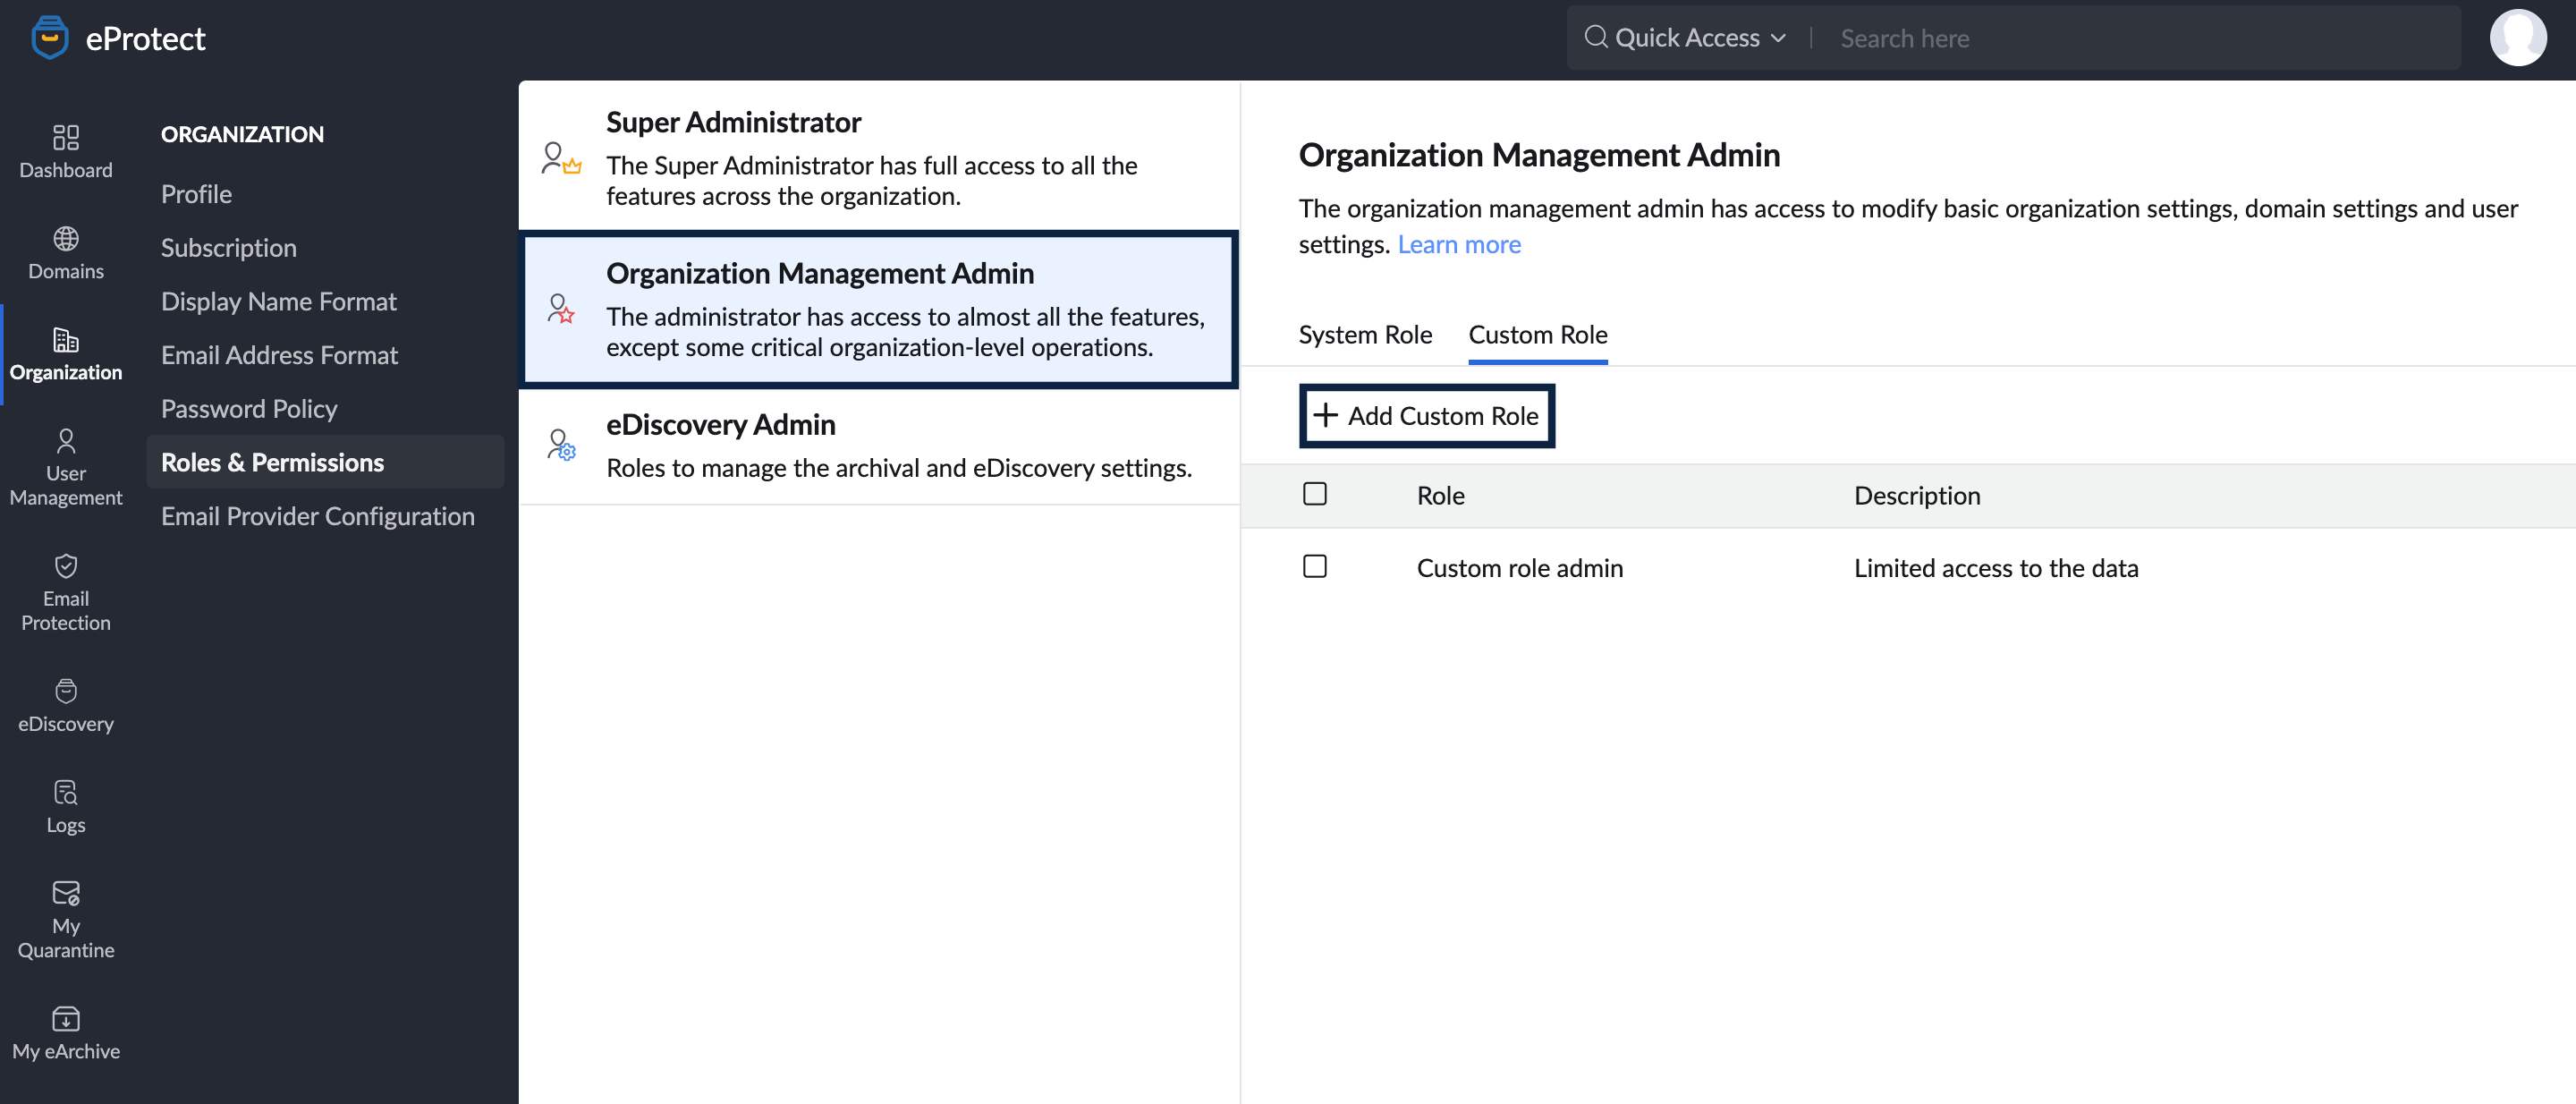
    add custom role in eProtect
  5. Mention the Role Name and Description.
  6. From the Permissions list, you can enable the required level of permission within each module like Domain, User, Group, Department, and audit.
  7. You can fine-grain the access based on the level of control under each module such as View, Create, Update, Delete, and Download.
  8. Once the level of controls is selected under each module, click on Save to apply the changes.

    Note: The Permissions list will be different for Email Protection and eDiscovery roles.
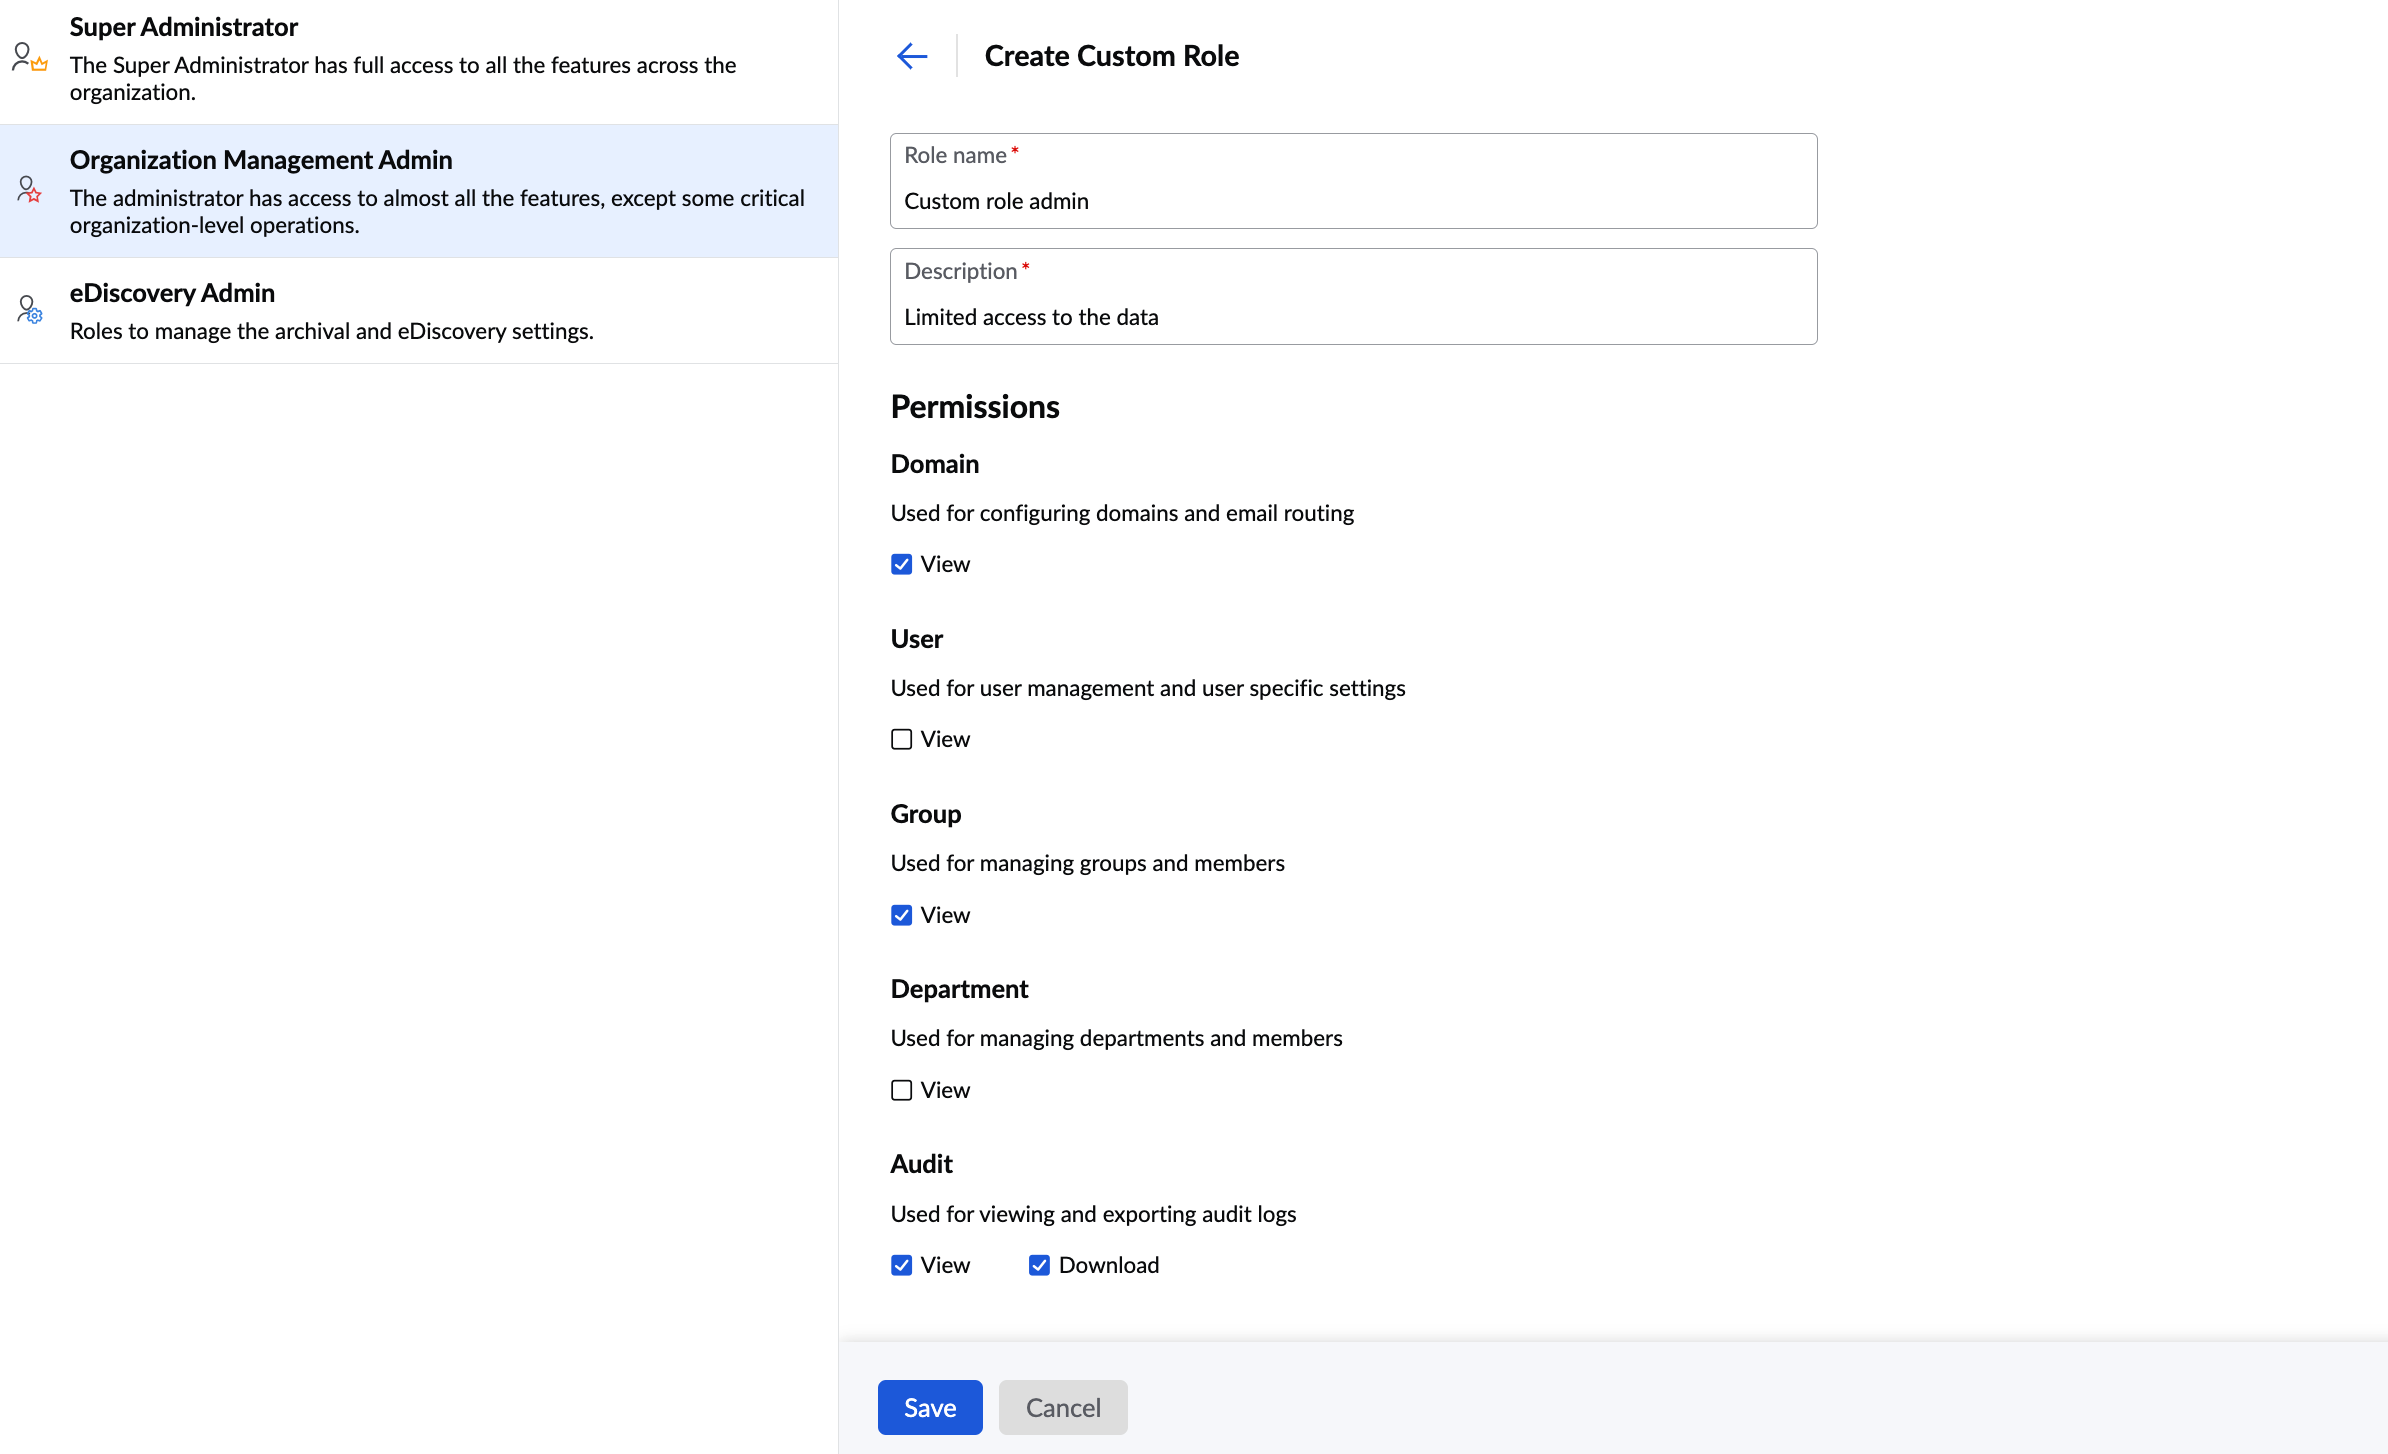
    create custom role
  9. Now, go back and click on the Role Name from the list to view the general description and permissions enabled for the same.
  10. Select the Associated User tab to view or add users for the said Custom Role.
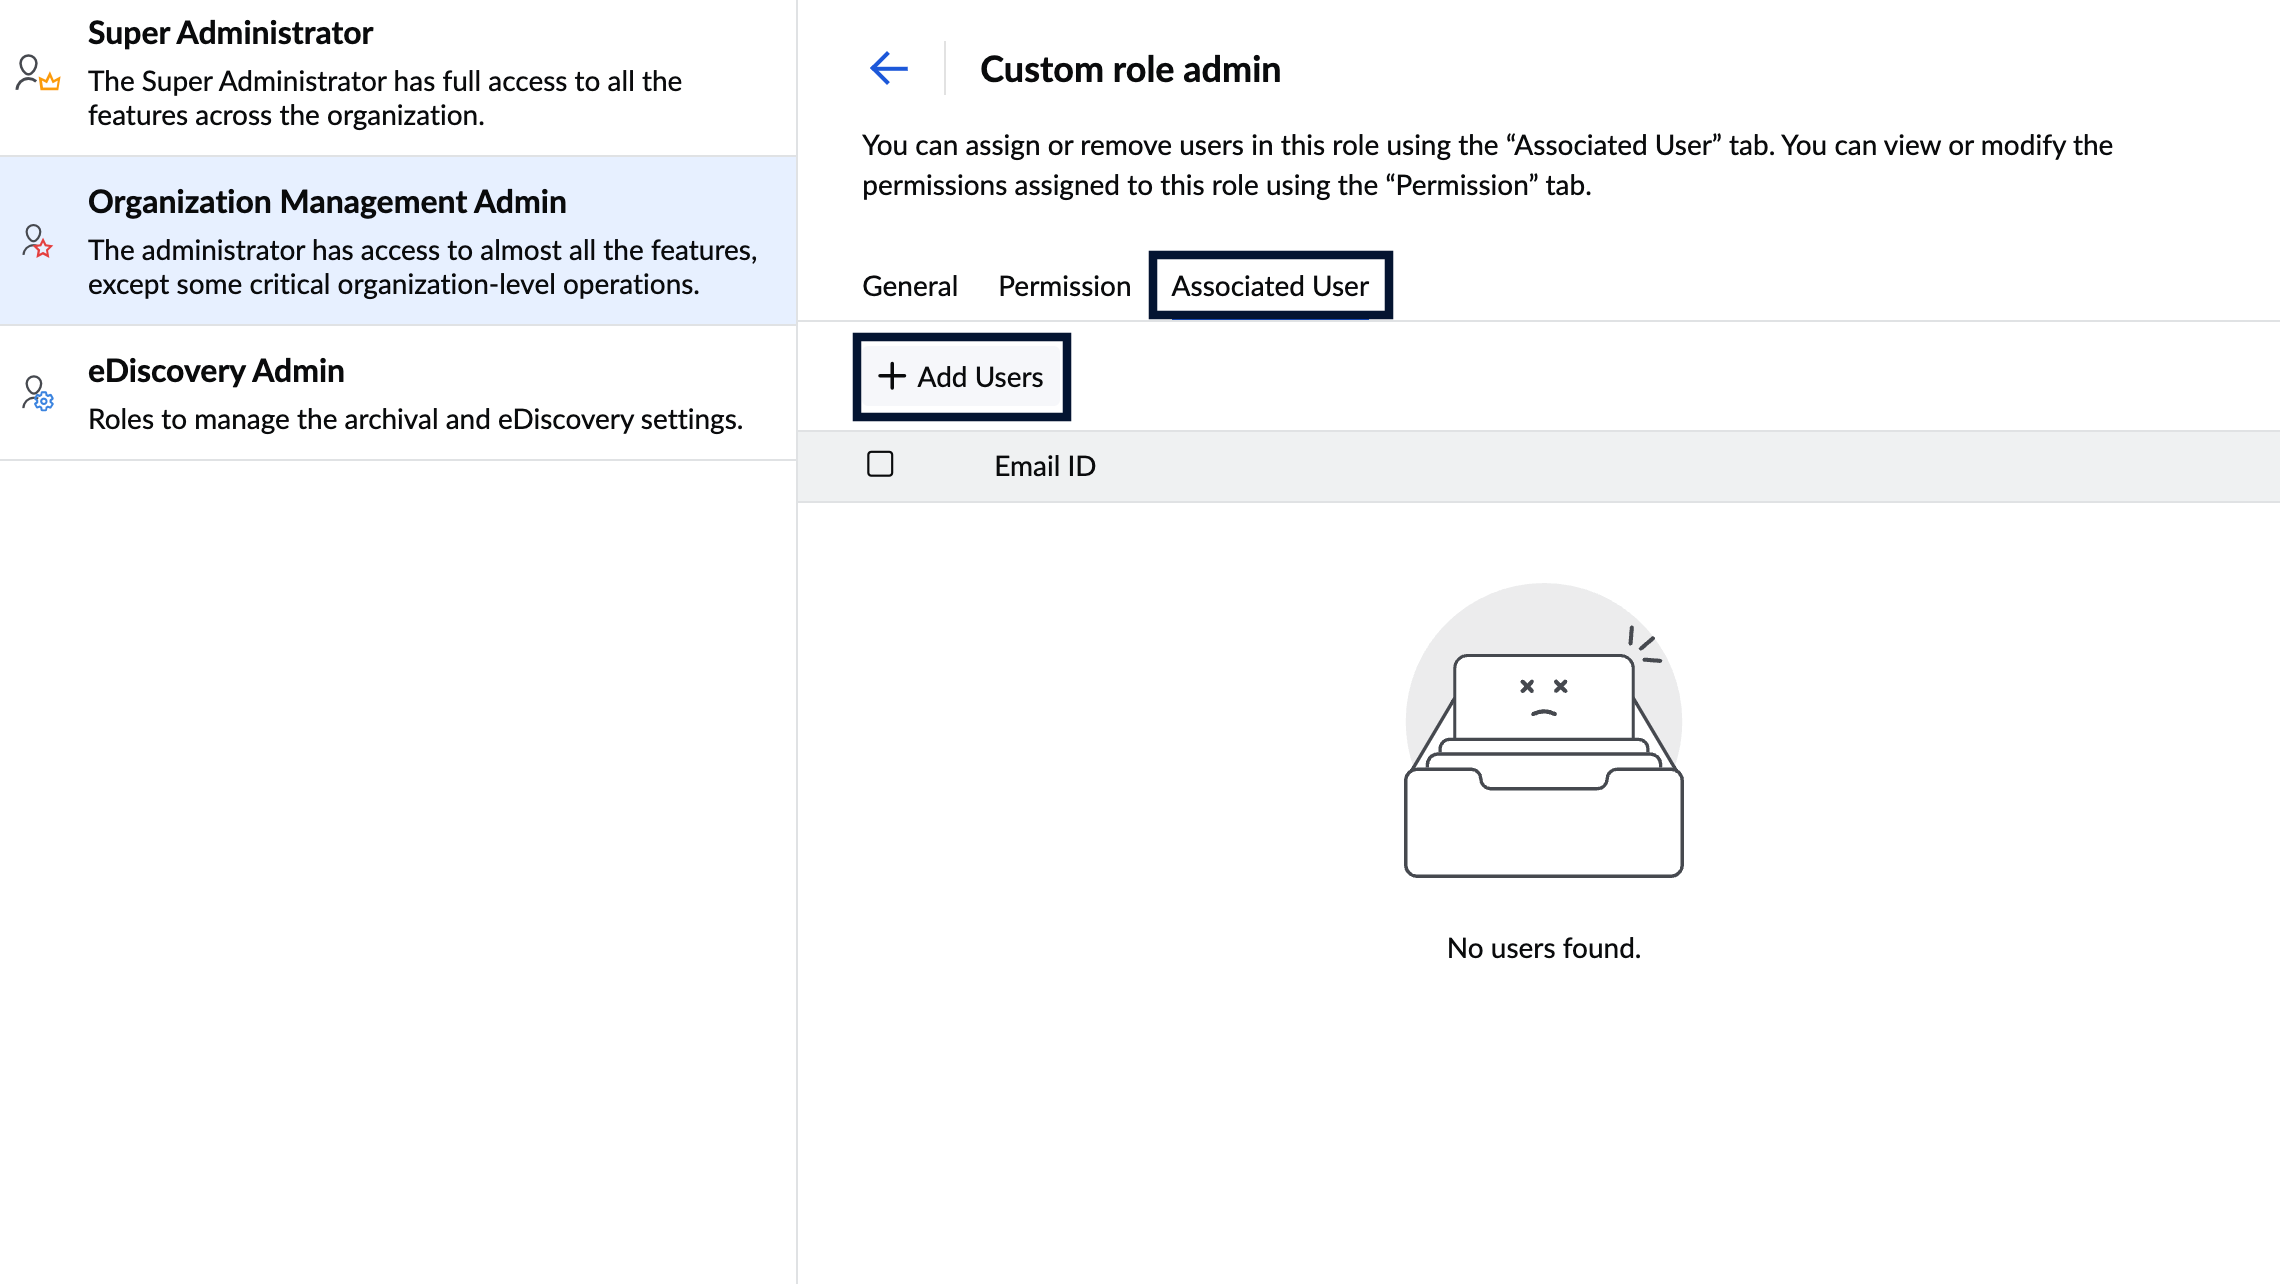
    associate users for a custom role
  11. Click Add Users, add the desired users and click the Add button to save the changes.
  12. If required, hover over a user and click the delete icon to remove a user from the Custom Role.

Note:

  • You can assign the role to either one or several users at once.
  • In case two or more users are assigned the same role, all these users will have the same privileges.
  • If a single user is associated with two or more roles, the user will have combined permission of the roles selected.

Member

The members are end-users, whose emails are to be retained or scanned for threats and do not need any admin capabilities like adding users and so on.

Note:

Emails that the super admin and admins receive, will also go through Email Protection settings configured in eProtect.

Privileges

Apart from managing the organization's email security and archival settings, a super admin and admin have additional privileges. The table given below describes the privileges for each role in Zoho eProtect:

RolePrivilege
Super Administrator
Administrator
Steps to change Super Admin

Even though the Super Admin, by default, is the user who initially set up your organization, it can be changed.

Things to note:

  • There can only be one super-admin for an organization.
  • The Super Admin role can be assigned only by the Super Admin.
  • The member you want to make as Super Admin should already have the Admin role (custom Administrators are not eligible).

To change an Admin to Super Admin, follow these steps:

  1. Log in to Zoho eProtect and select Organization on the left pane.
  2. Navigate to Roles and Permissions and select Super Administrator.
  3. Click Change Super Administrator. A pop-up window will list all the Admins in your organization. 
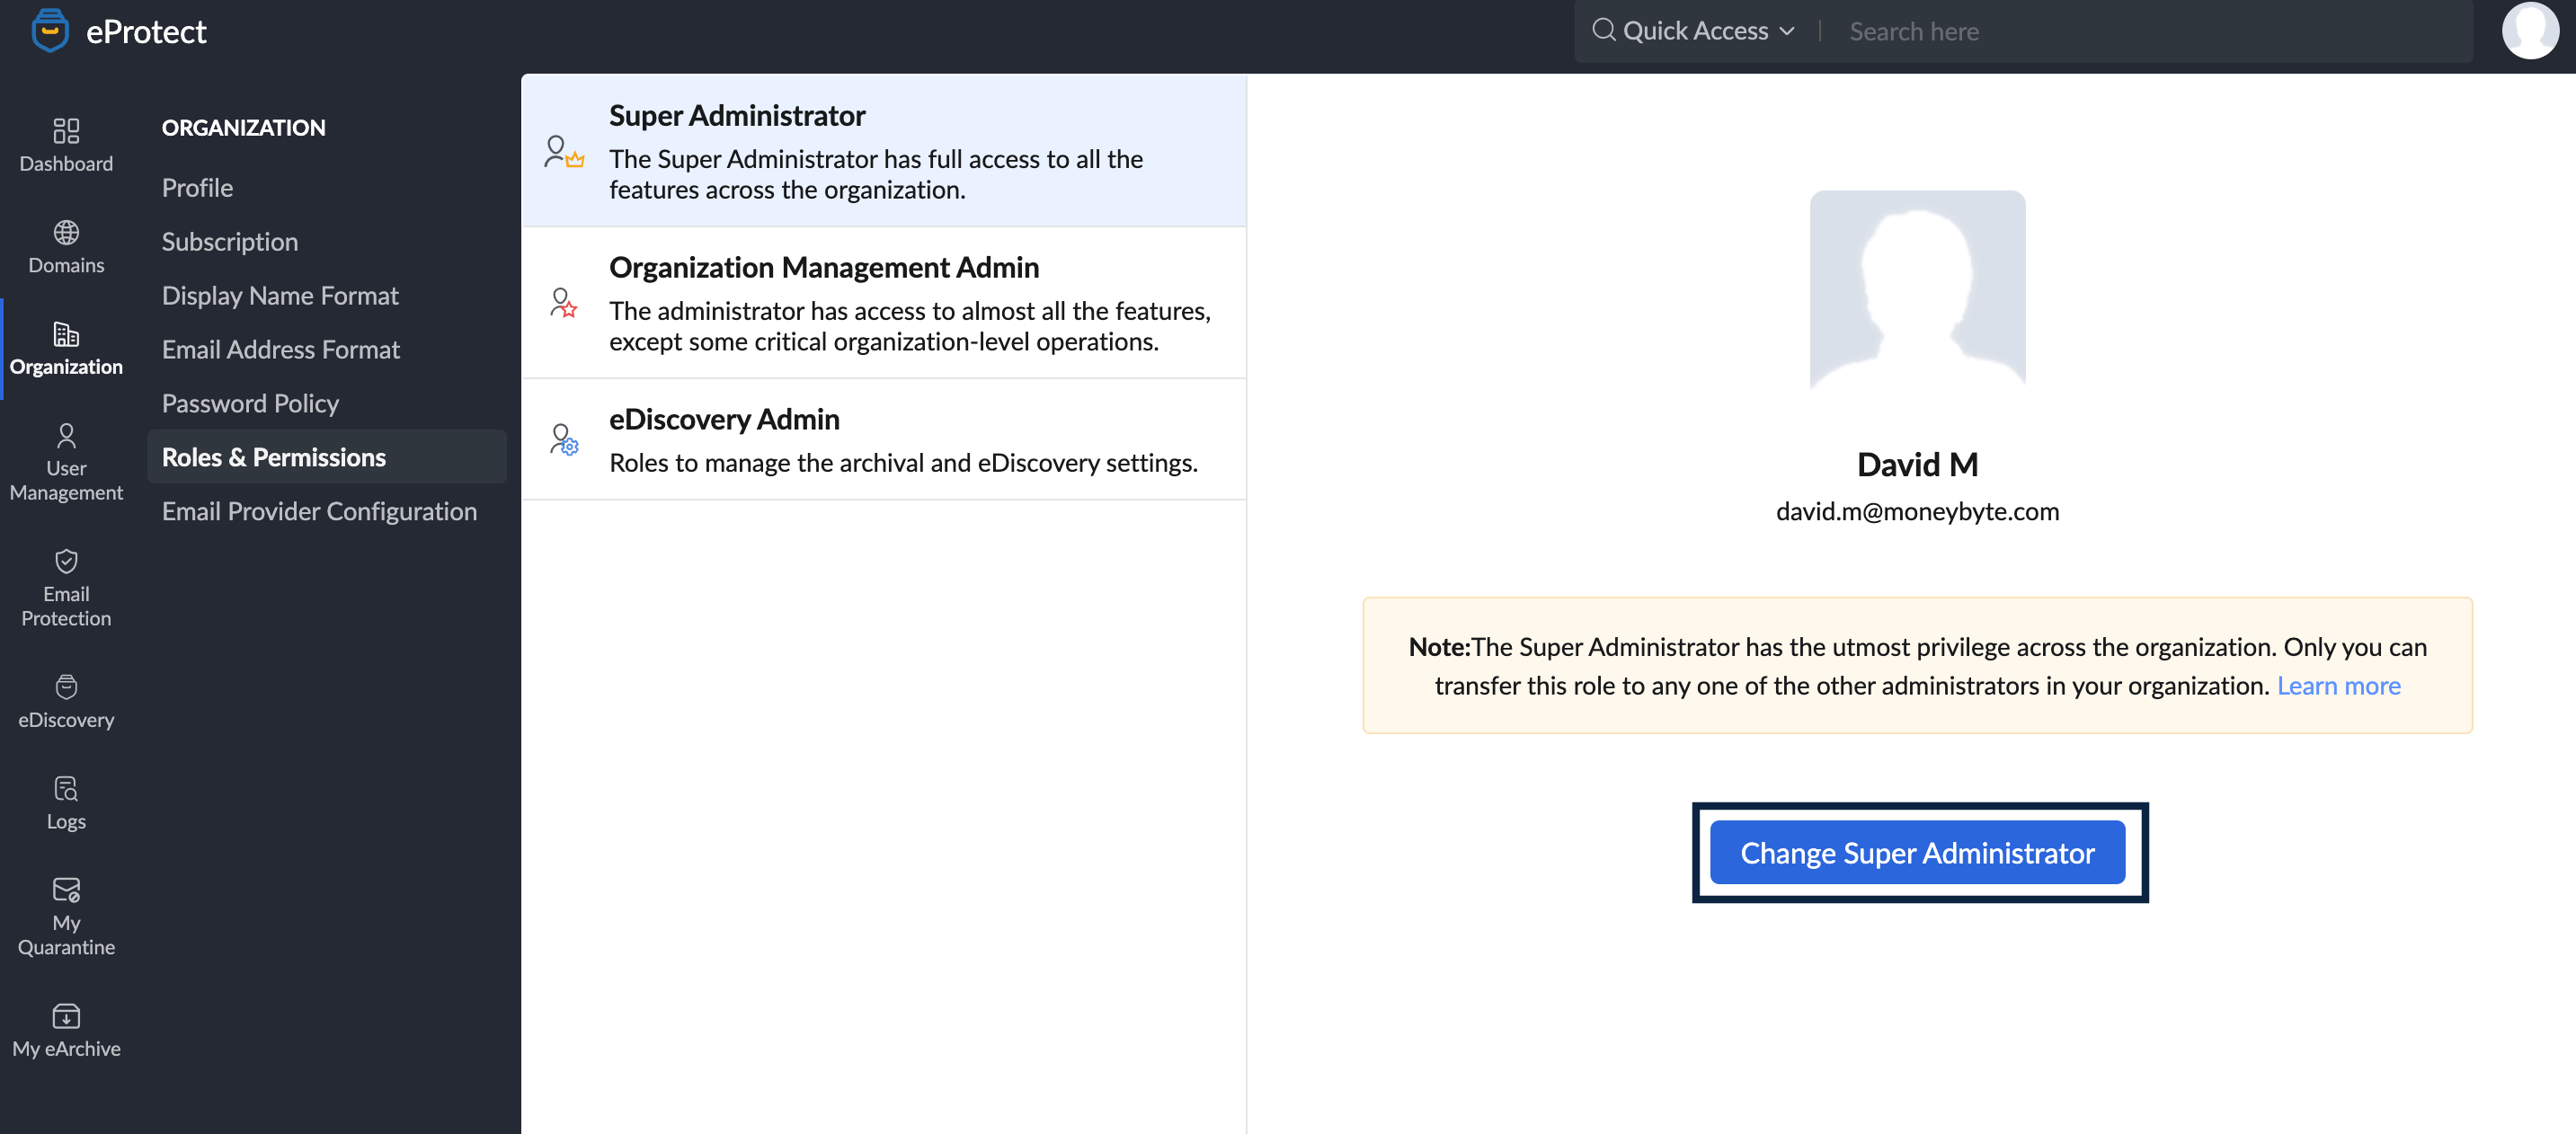
  4. Click Make Super Admin next to the member you would like to assign as super-administrator.
  5. Once you choose a different super admin, the previous super admin's role will change to Admin.

Note:

If you are a Zoho One user, refer to Zoho One's Managing Admins help page.

    Dashboard

    The Dashboard page provides your organization's eDiscovery and Email Protection statistics in the form of widgets. The dashboard header provides an overview of your organization with details such as domain name, organization name, Super Admin Email address, and Subscription details. You can filter the stats based on your preferred date range using the drop-down.

    Table of Contents

    eDiscovery Dashboard

    The eDiscovery Dashboard is the default page when you land in Dashboard. Use the drop-down from the upper right corner to filter the report based on the preferred date range.
    eProtect dashboard

    Below are the statistics that you can see in the eDiscovery Dashboard:

    • Mailboxes Archived
    • Total Storage Used
    • Open Investigations
    • Legal Holds
    • Archived Email Stats
    • Top Storage Users
    • Open Investigations
    • Holds
    • Exports
    • Exports & Deletes
    • User Summary
    • Hold Summary

    Email Protection Dashboard

    Zoho eProtect provides a separate dashboard for spam control. Click Email Protection from the left pane under Dashboard. Use the drop-down from the upper right corner to filter the report based on the preferred date range.
    email protection dashboard

    Below are the statistics that you can see in the Email Protection Dashboard:

    • Users Protected
    • Emails Analysed
    • Spam Identified
    • Threats Blocked
    • Inbound vs Rejected Emails
    • Authentication Failures
    • Outbound vs Bounced Emails
    • Email Traffic Statistics
    • Incoming Quarantine Reports

    User Management

    Table of Contents

    Users

    The Users tab gives you an overall view of the users in your organization, their eDiscovery/ Email Protection status (enabled/disabled) and the department to which each user belongs. An administrator can manually enable or disable the eDiscovery and Email Protection services for users who joined newly or for whom the service was already enabled.

    Click on a user's name to view detailed information about the user. Here, you can see which eDiscovery ingestion filter is associated with each user. By default, users are associated with the EDISCOVERY_Filter configured at the time of your organization setup. To define a new ingestion filter, refer to Ingestion Filter.

    The actions that you can do from the Users section are as follows:

    Create a user manually

    Follow these steps to create a user manually:

    1. Log in to Zoho eProtect and select User Management on the left menu.
    2. Click Create on the Users page.
    3. Enter the user's First Name and Last Name. The Username gets auto-generated. You can change this if required.
    4. Enter a password in the Password and Confirm Password fields.
    5. If you want the user to change his/her password in their first login, select Force user to change password on first log in.
    6. Use the Select Department drop-down to add the user to an existing department in the organization.
    7. Enable/disable Email Protection and eDiscovery as per your requirement.
    8. Click the Save button.

    Import users via CSV

    Follow these steps to import bulk users using a CSV file:

    1. Log in to Zoho eProtect and select User Management on the left menu.
    2. Navigate to Users, click Import and select Import using CSV file from the drop-down menu.
    3. Click the Import button.
    4. Use the drop-down menu to select the preferred domain to which you wish to import the users.
    5. Select Choose file.
    6. You can either drag and drop or Choose the file to upload. The users in your CSV file will be displayed for you to further scrutinize. You can choose to import all or only select users depending on your requirement.
    7. Click Proceed once you choose the users.
    8. On the START IMPORT page, Name your import for future reference.
    9. Enter the password for the users being imported and reconfirm the password.
    10. If required select the desired options from the below:
      • Force users to change password on next log in
      • Import users only if provided group exists
    11. Click Start.
    12. The import status on success and failure of user upload will be displayed. If the import status does not refresh automatically, you can click the refresh icon. You can start using other features in eProtect and access the import status in the Import using CSV file page.

    Steps to change the role of a Zoho eProtect member

    You can change the role of any user to admin and admin to a user by following these steps:

    1. Log in to Zoho eProtect and select User Management on the left pane.
    2. In the Users page, select the checkbox on the user for whom you want to change from Member to Admin.
    3. Click the Change role drop-down and select Admin. The user's role gets updated and you can see an admin icon near the username.

    Delete Users

    If you want to delete users for some reason, you can delete manually one user at a time or delete bulk users using a CSV file.

    Follow these steps to delete users manually:

    1. Log in to Zoho eProtect and select User Management on the left pane.
    2. Navigate to the Users page and hover over the user whom you want to delete and click the delete icon.
    3. Alternatively, select the checkbox on the user whom you want to delete and select Delete from the top menu.
    4. Enter your admin password, select Delete from all Zoho services (if required) and click Ok. The selected user gets deleted from your organization.

    Follow these steps to delete bulk users via CSV:

    1. Log in to Zoho eProtect and select User Management on the left pane.
    2. Navigate to the Users page and select Delete via CSV from the top menu.
    3. You can either drag and drop or Choose the file to upload. The users in your CSV file will be displayed for you to further scrutinize.
    4. Enter your admin password, select Delete from all Zoho services (if required) and click Delete. The users in the CSV file get deleted from your organization.

    Other Actions

    In addition to the above, you can also filter the users and export them. Follow these steps to filter or export the users:

    1. Log in to Zoho eProtect and select User Management on the left pane.
    2. Navigate to the Users page and select Filter from the top menu.
    3. Select the preferred filter from the drop-down to narrow down the result.
    4. To export the users, select Export from the top menu.
    5. Select Encrypt with password to prevent unauthorized access to your data.
    6. Enter a password to protect the CSV file and click Export. The user list gets downloaded as a CSV file.

    Groups

    Groups are common email addresses shared by a set of users for a common purpose. This section lists the groups that are added to your organization account. Click on a group's name to view the details or to change any group-specific settings. You can do the following actions on the Groups page:

    Create Group

    Follow these steps to create a new group:

    1. Log in to Zoho eProtect and select User Management on the left pane.
    2. Navigate to the Groups page and select Create from the top menu.
    3. Enter a Group Name, Group Email Address, and choose Moderator's mailboxes and User mailboxes.
    4. Click the Save button.

    Once you add a group, you can then edit the group settings.

    Import Group

    If you have your organization's groups in the form of a CSV file, you can import them easily. Follow these steps to import multiple groups via CSV:

    1. Log in to Zoho eProtect and select User Management on the left pane.
    2. Navigate to the Groups page and select Import from the top menu.
    3. Select Import using CSV file and click Import.
    4. Using the drop-down menu, select the domain in which the groups are to be imported and click Choose file.
    5. You can either drag and drop the CSV file or Choose the file to upload.
    6. Verify the group details and click Proceed.
    7. Enter a name for the import for future reference and click Start.
    8. Click the refresh icon to view the latest import status.

    If the details in the CSV file are valid, the groups get added to eProtect.

    Edit Groups

    You can edit the group members, and define unique anti-spam settings for the group. Follow these steps to manage your groups:

    1. Log in to Zoho eProtect and select User Management on the left pane.
    2. Navigate to the Groups page and select the group which you want to edit. The General settings appear and list the user id and email addresses.
    3. To add users to the group, follow these steps:
      1. Click Add from the top menu.
      2. You can either Search and add organization users or Add all organization users.
      3. In the Select Users dialog, search for the desired users and click Add. The selected users get added to the right pane.
      4. Once you are done selecting the users, click the Add button. The selected users are successfully added to the group.
    4. To add bulk users via CSV, follow these steps:
      1. Click Import from the top menu.
      2. You can either drag and drop or Choose the file to upload.
      3. Select Import. Users in the CSV file are added to the group.
    5. To export the users list, select Export from the top menu and select Encrypt with password and click Export.
    6. To delete bulk users via CSV, follow these steps:
      1. Select Bulk Remove from the top menu.
      2. You can either drag and drop or Choose the file to upload.
      3. Click the Delete button. Users in the CSV file get deleted from the group.
    Steps to modify Anti-spam settings for groups

    Follow these steps to manage the anti-spam settings for groups:

    1. Log in to Zoho eProtect and select User Management on the left pane.
    2. Navigate to the Groups page and select the group which you want to edit.
    3. Select the Anti-Spam Settings tab. Any existing email addresses or domains added to the Allowed / Blocked list can be seen.
    4. Click Add from the top menu and choose either Allowed Emails, Blocked Emails, Allowed Domains or Blocked Domains.
    5. Enter one or more email addresses/domains separated by a comma and click Save.

    The email address or domain gets listed as per the option you selected.

    Other Actions

    Groups can also be exported or deleted as per the organization's requirements. To export or delete a group, follow these steps:

    1. Log in to Zoho eProtect and select User Management on the left pane.
    2. Navigate to the Groups page and select the group which you wish to export or delete.
    3. Hover over the group and click the delete icon to delete that group.
    4. Alternatively, select the checkbox next to the group and click Delete from the top menu.
    5. Enter the password and click Ok. The selected group gets deleted.
    6. To export a group, select Export from the top menu.
      • Select Include only groups, members, and member details.
      • Select Encrypt with password to prevent unauthorized access to your data.
    7. Click the Export button. The group gets saved as a CSV file.

    Departments

    Departments are groupings of users within the organization. You can assign users to a department and apply the custom policy or scope to enforce a uniform configuration across the users in a department. The Departments page displays the Department Name, Description and Member Count. Use the search bar at the upper right corner to narrow down the result. You can do the following actions on the Departments page:

    Create Department

    Follow these steps to create a new department:

    1. Log in to Zoho eProtect and select User Management on the left pane.
    2. Navigate to the Departments page and click Create on the top menu.
    3. Enter the Department Name, an optional Description, choose the Parent Department and click Create.

    The department gets created. You can now add users to the department.

    Import Departments

    If you have already saved the organization's departments in a CSV file, you can follow these steps to import bulk departments via CSV:

    1. Log in to Zoho eProtect and select User Management on the left pane.
    2. Navigate to the Departments page and click Import from the top menu.
    3. Select Import using CSV file from the drop-down menu and click Import.
    4. Select Choose file and upload the CSV file which has your organization's department.
    5. Review the department details and click Proceed.
    6. Enter a name for the import for future reference and click Start.
    7. Click Refresh from the top menu to view the latest status of the import.

    The departments in the CSV file get added to eProtect.

    Add users to a department

    Users can be added to a department from the Users page or from the Departments page. Follow these steps to add users to a department:

    1. Log in to Zoho eProtect and select User Management on the left pane.
    2. Follow the Create users manually steps to add a new user to the department.
    3. To modify an existing user's department from the Departments page, follow these steps:
      1. Navigate to the Departments page and select the department. You can view the existing users in the department if there are any.
      2. Click the department name of a user under Department.
      3. Choose the preferred department from the Change Department dialog and click Change. The user's department gets updated successfully.
      4. Alternatively, navigate to the Users page and click the department name for a user and choose the preferred department.
      5. Click the Change button. The user's department gets updated successfully.

    Other Actions

    After you create or import departments, you can export or delete a department if required. Follow these steps to export or delete a department:

    1. Log in to Zoho eProtect and select User Management on the left pane.
    2. Navigate to the Departments page.
    3. Select Export from the top menu.
    4. Choose Include only departments, members and member details if you do not want additional fields.
    5. Select Encrypt with password to prevent unauthorized access to your data.
    6. Enter a password to protect the CSV file and click Export. The user list gets downloaded as a CSV file.
    7. Follow one of these steps to delete a department:
      • Hover over the department and click the delete icon. Enter the password and click Ok.
      • Select the checkbox next to a department and select Delete from the top menu. Enter the password and click Ok.

    Note:

    • You can delete a department which does not have a sub-department.
    • Once you delete it, the users in that department get added automatically to the main parent department.

    Audit Logs

    All the actions of the administrators in Zoho eProtect will be recorded in the Audit Logs section. An admin can view the activities done in eDiscovery, Email Protection and the General eProtect settings sections from here.

    Follow these steps to view Audit Logs:

    1. Log in to Zoho eProtect and select Audit Logs on the left menu.
      eProtect audit logs
    2. Select the appropriate Category in the Filters drop-down:
      • Ediscovery
      • General
      • Email Protection
    3. To refine further, include additional filters from the below options based on your requirement:
      • Action Filter
      • Operation is 
      • Performed By
      • Performed For
    4. Select the date range for which you need to view the logs.
    5. Click Refresh preview or Download audit as per your requirement.

    The audit logs can be viewed or downloaded to your computer.