
Items Operations
Manage Items
Edit an Item
To edit an item:
- Go to Items on the left sidebar, and select Items.
- Select the item you want to edit.
- In the Item Details page, click the Edit icon in the top right corner.

- After you make the required changes, click Save.
The item will now be updated with the details you’ve edited. When you create new transactions with this item, the updated information will be reflected in them.
View All Transactions Involving an Item
To view all transactions involving an item:
- Go to Items on the left sidebar, and select Items.
- Select the item for which you want to view transactions for.
- In the Item Details page, click the Transactions tab at the top.
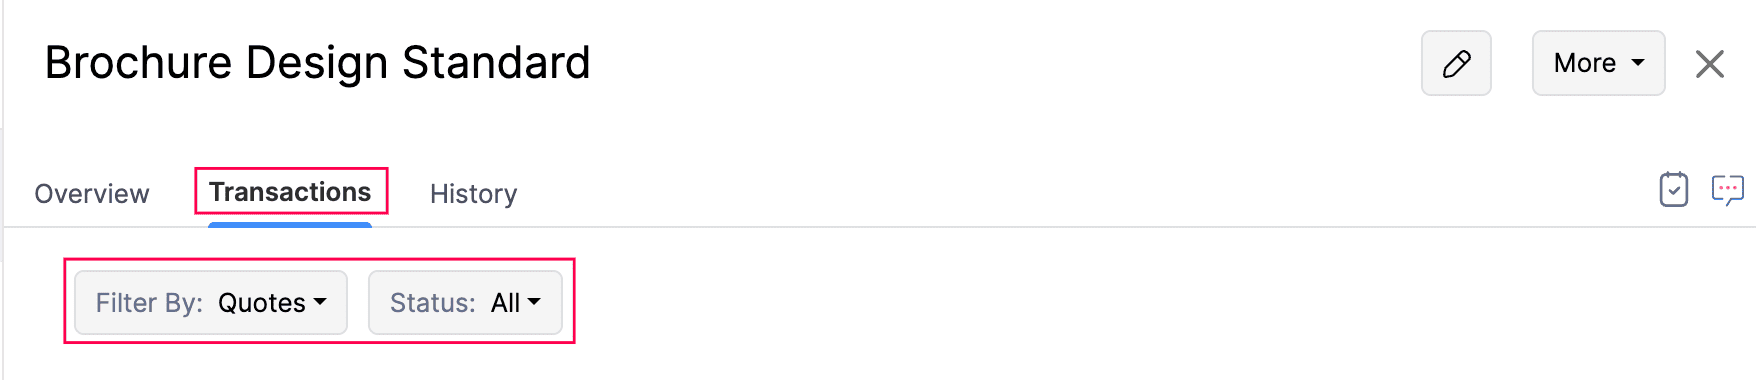
You can now see all transactions involving the item. Use the Filter By option to filter transactions by transaction type and status.
View Item Action History
To view the actions performed on an item:
- Go to Items on the left sidebar, and select Items.
- Select the item for which you want to view the action history.
- In the Item Details page, click the History tab at the top.

You can now view the complete history of actions made to the item.
View Associated Price Lists for an Item
Price lists can be created for items. To view the associated price lists of an item:
- Go to Items on the left sidebar, and select Items.
- Select the item for which you view associated price lists.
- In the Item Details page, click the Associated Price Lists dropdown.
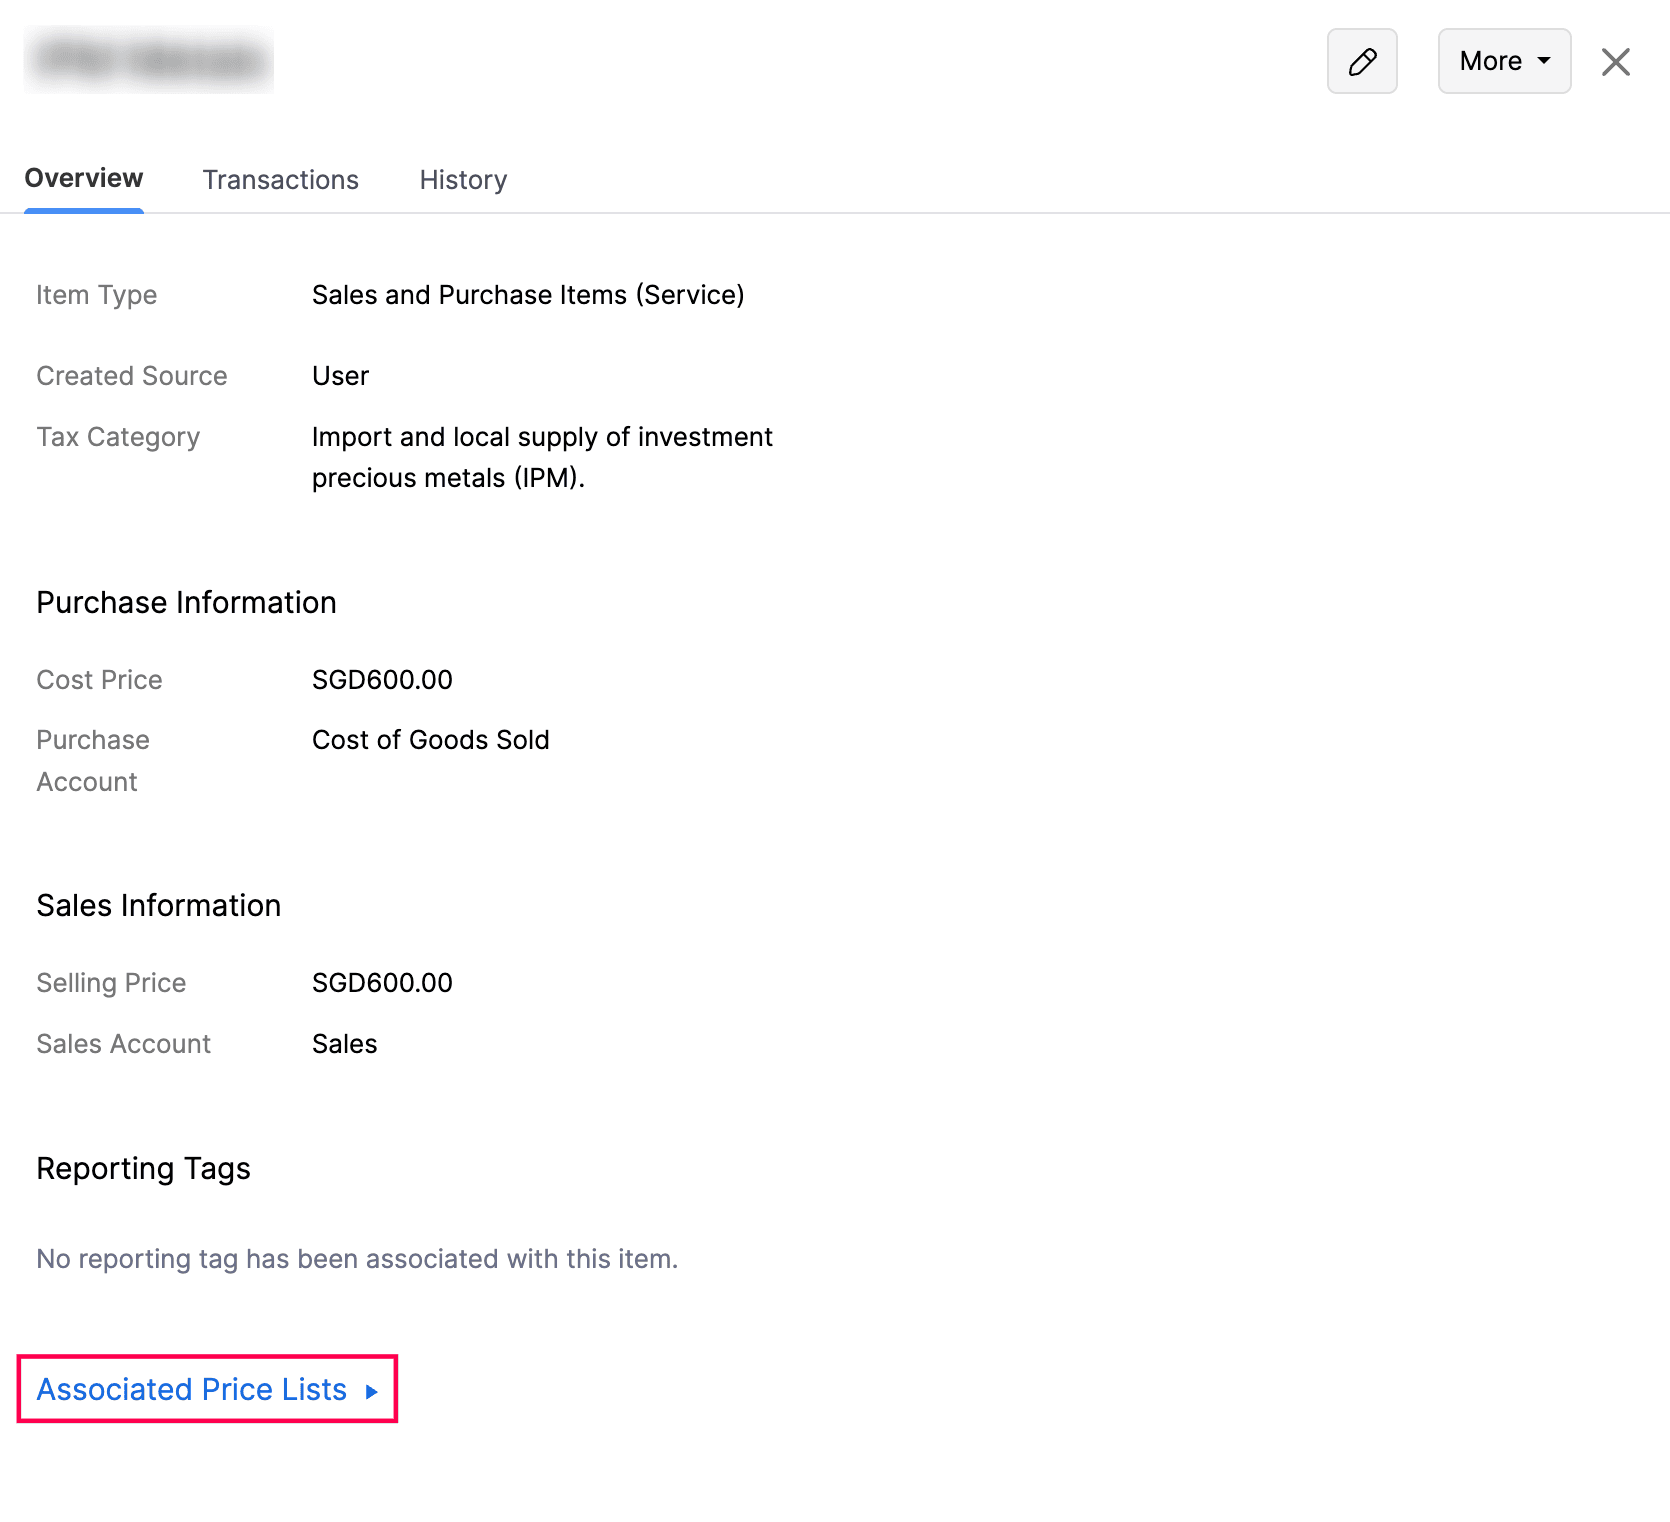
The price lists linked to the item will now appear in the dropdown.
Insight: If no price lists are associated, follow the same steps as above > click + Associated Price List, select a price list in the popup > click Save.
Customize Columns in the List View Page
To customize columns in the List View page:
- Go to Items on the left sidebar, and select Items.
- Click the Customize icon in the top left corner and choose Customize Columns from the dropdown.

Based on your selection, the chosen columns will be displayed on the List View page.
Clone an Item
To clone an existing item into a new one with the same details:
- Go to Items on the left sidebar, and select Items.
- Select the item you want to clone.
- In the Item Details page, click More in the top right corner, and select Clone Item from the dropdown.
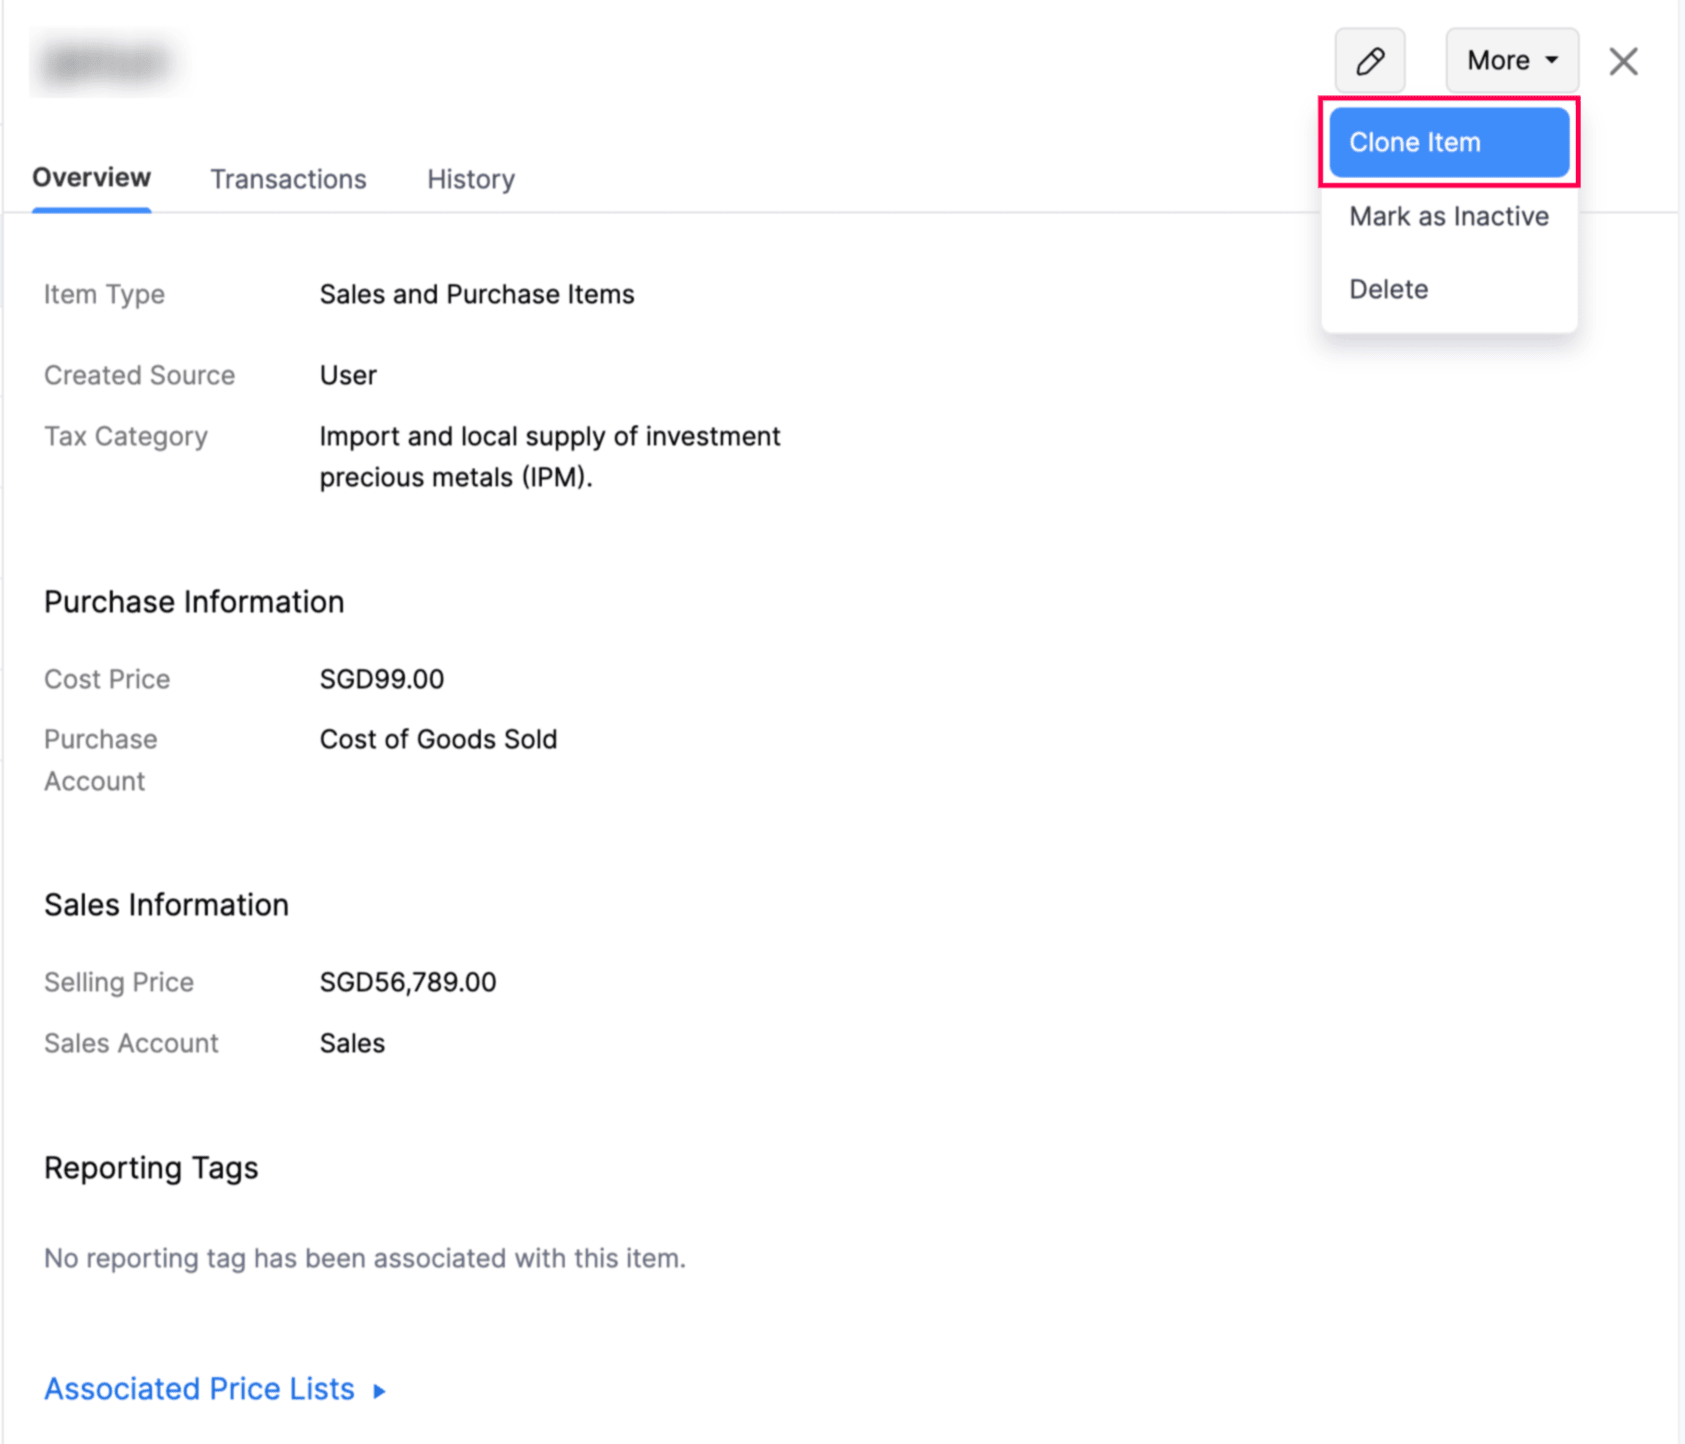
In the New Items page, you’ll be shown the details of the existing item you cloned. Modify it if required, and click Save.
The existing item will now be cloned into a new one with the same details.
Mark an Item as Inactive
- Go to Items on the left sidebar, and select Items.
- Select the item you want to mark as inactive.
- In the Item Details page, click More in the top right corner, and select Mark as Inactive from the dropdown.
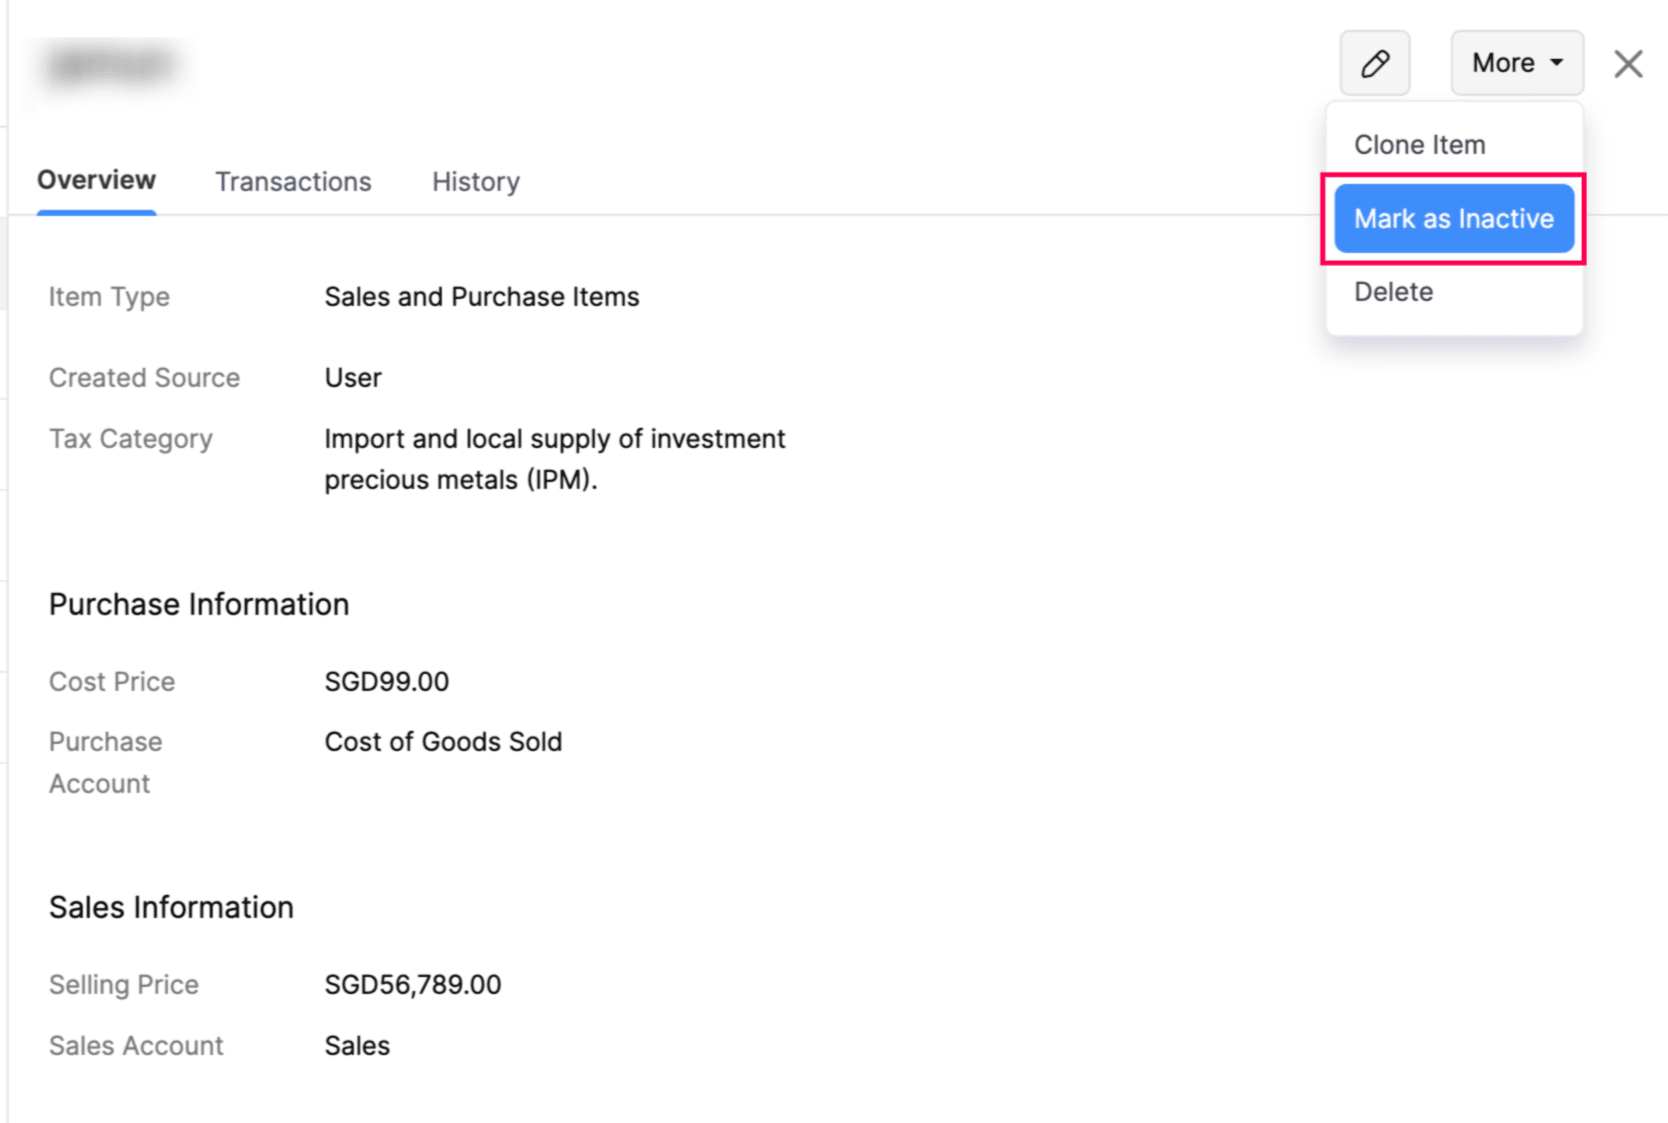
The selected item will now be marked as inactive.
Mark an Item as Active
- Go to Items on the left sidebar, and select Items.
- Select the inactive item you want to mark as active.
- In the Item Details page, click More in the top right corner, and select Mark as Active from the dropdown.
The selected item will now be marked as active.
Delete an Item
Insight: You cannot delete an item if it’s associated with transactions. First, delete the transactions that include the item, and then proceed with the deletion. Alternatively, you can mark the item as inactive.
To delete an item:
- Go to Items on the left sidebar, and select Items.
- Select the item you want to delete.
- In the Item Details page, click More in the top right corner, and select Delete from the dropdown.
- In the popup, click Delete to confirm.

The selected item will now be deleted.
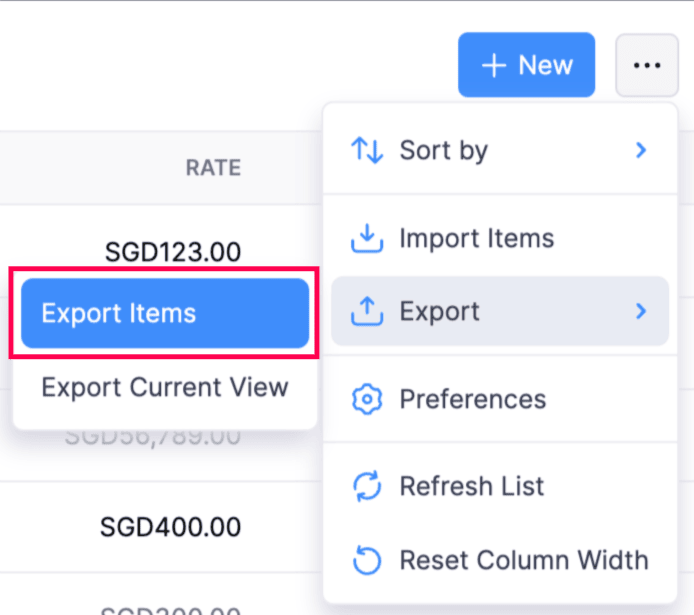
Export Actions
Export Items
Pro Tip: If you have more than 10,000 items, initiate a backup for your Zoho Books data and download it instead of exporting it manually. Learn more about how to back up your data.
If you need to back up your data or migrate to another accounting system, you can export the items from Zoho Books. Here’s how:
- Go to Items on the left sidebar, and select Items.
- Click the More icon in the top right corner, select Export, and choose Export Items from the dropdown.
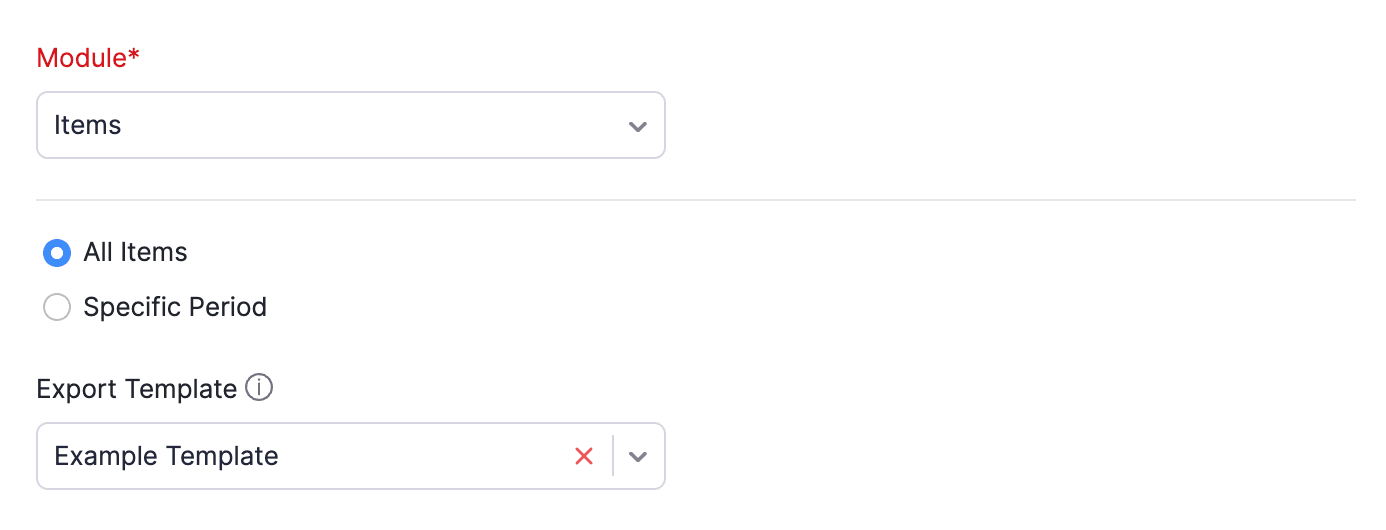
In the Export Items popup, complete the following fields:
- Select Module: By default, the module will be Items.
- All Items or a Specific Period: Choose All Items to include all your items in Zoho Books in the export, or Specific Period to export items created within a specific date range. If you select Specific Period, set the Start Date and End Date to export items created during that time frame.
- Export Template: Choose a template to customize the format and columns for your export. Select a template from the dropdown to export the file with your chosen fields. To create a new template, click + New Template from the dropdown.
Note: When you create an export template, you must configure at least three fields.
- Decimal Format: Choose how the currency for items is displayed.
- Export File Format: Choose the format (CSV, XLS, or XLSX).
- Include Sensitive Personally Identifiable Information (PII) while exporting: Check this to include sensitive details, such as custom fields if you’ve created and used any that contain sensitive information accessible only to admins of your organisation in the export.
- File Protection Password: Enter a password to lock the file.
Click Export.
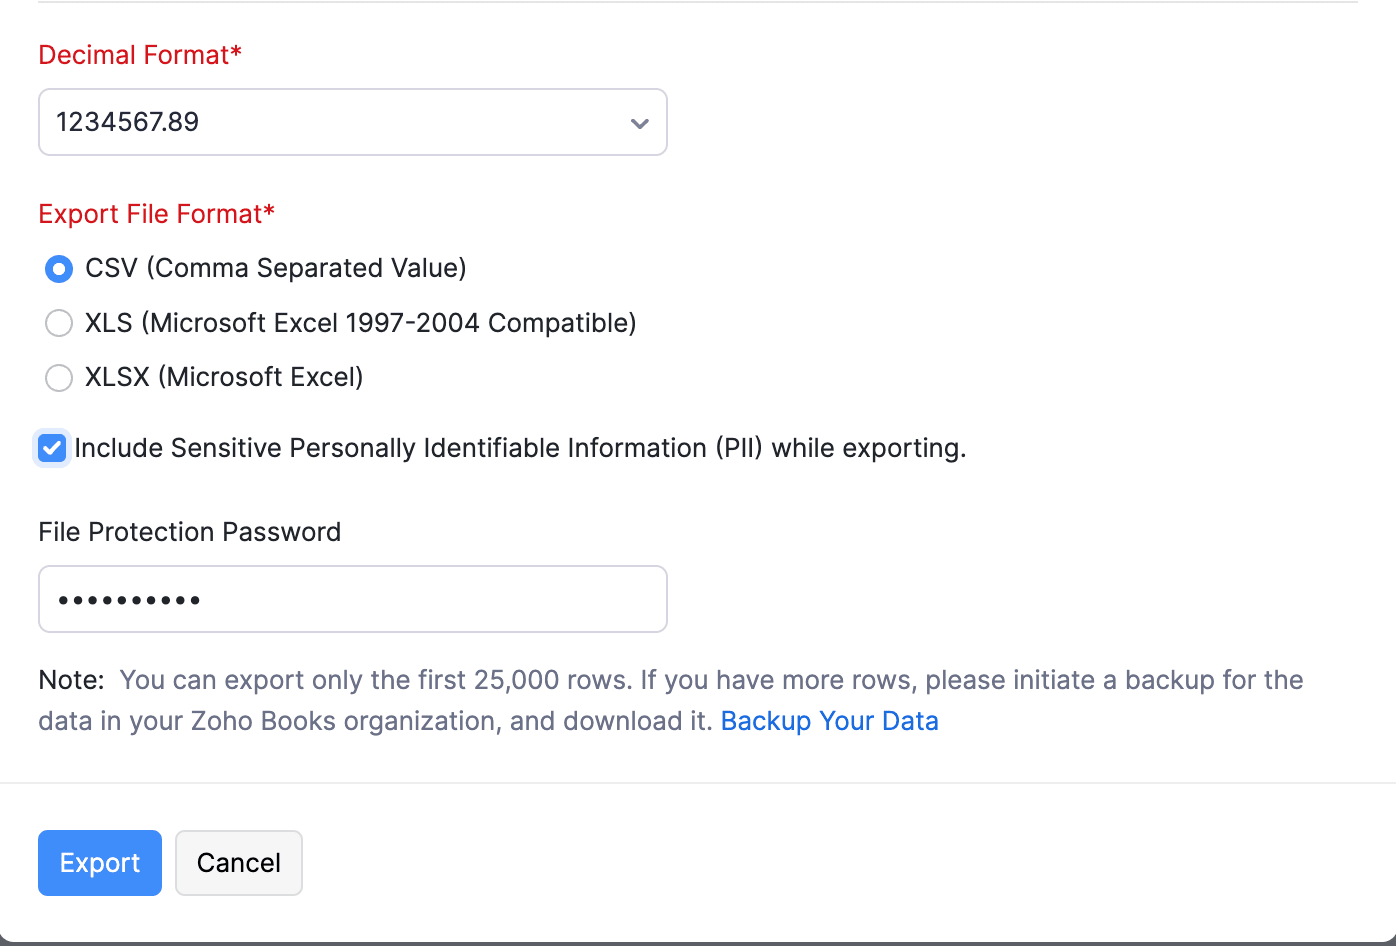
The file will now be downloaded to your device, containing the items with your selected preferences.
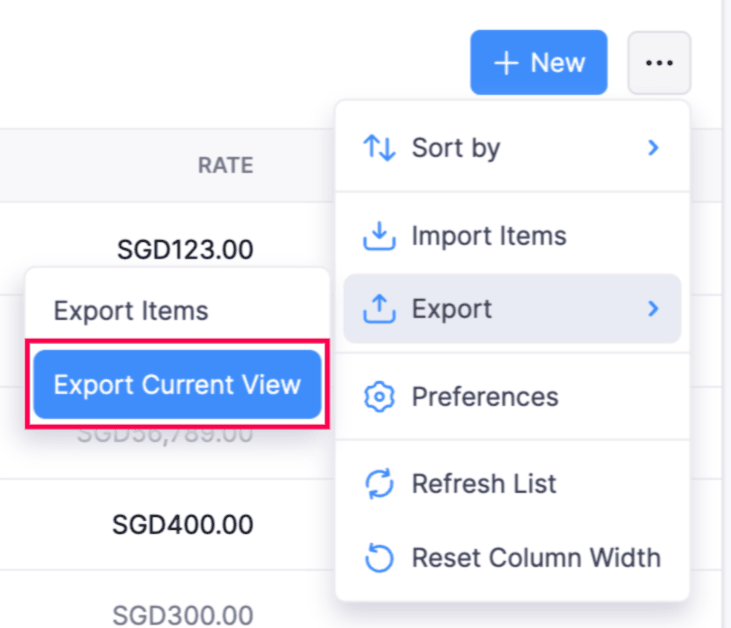
Export the Current View of Items
Pro Tip: You can export up to 25,000 rows. If you have more rows, please initiate a backup for the data in your Zoho Books organisation. Learn more about how to back up your data.
You can export the items in the same order as they appear on the Items List View page by exporting the current view of items. Here’s how:
Go to Items on the left sidebar, and select Items.
Click the More icon in the top right corner, select Export, and choose Export Current View from the dropdown.
In the Export Current View popup, complete the following fields:
- Decimal Format: Choose how the currency for item prices should be displayed.
- Export File Format: Choose the format (CSV, XLS, or XLSX).
- File Protection Password: Enter a password if you want to lock the file.
Click Export.
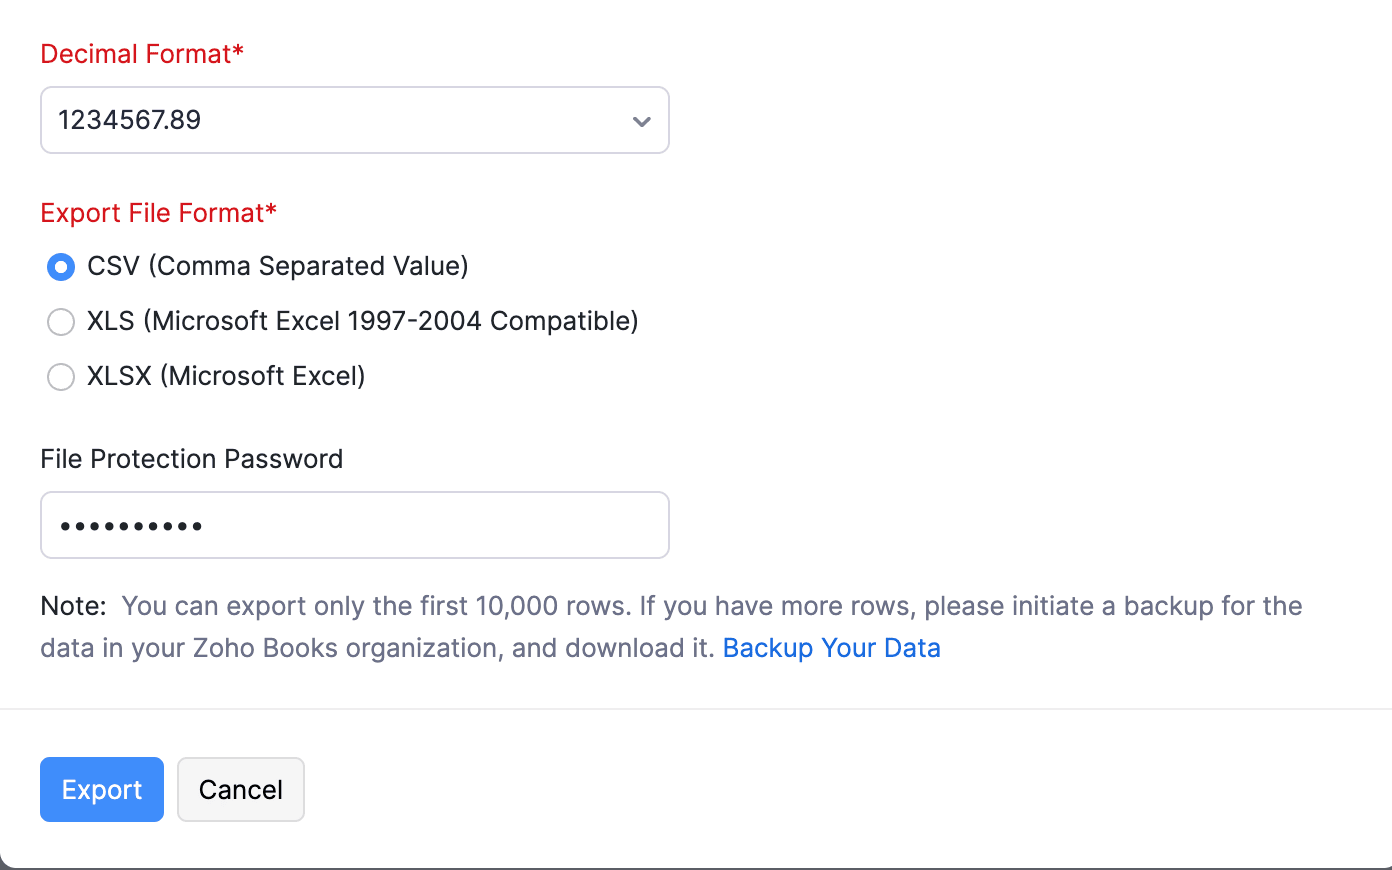
The file will now be downloaded to your device, containing only the columns shown on the Items List View page in Zoho Books.
Bulk Actions
Update Item Fields in Bulk
To update the fields in multiple items at once:
- Go to Items on the left sidebar, and select Items.
- Select the items you want to update.
- Click Bulk Update at the top.

- In the popup, select a field you want to update from the dropdown, and enter the value to use in the field.
- Click Update.
The field value you entered will now be updated in all the items.
Update the Tax Category for Items in Bulk
- Go to Items on the left sidebar, and select Items.
- Select the items you want to update.
- Click Update Tax Category at the top.

- In the Search Tax Category popup, search and select the new tax category.
- In the next popup, click Update.
The selected fields in the item will now be updated with the new value.
Create a New Transaction for Selected Items
You can select multiple items at once and quickly create a sales or purchase transaction instead of adding items one by one on the transaction creation page. To create a new transaction for selected items:
- Go to Items on the left sidebar, and select Items.
- Select the items which you want to include in the transaction.
- Click the New Transaction dropdown at the top, and choose the sales or purchase transaction you want to create.
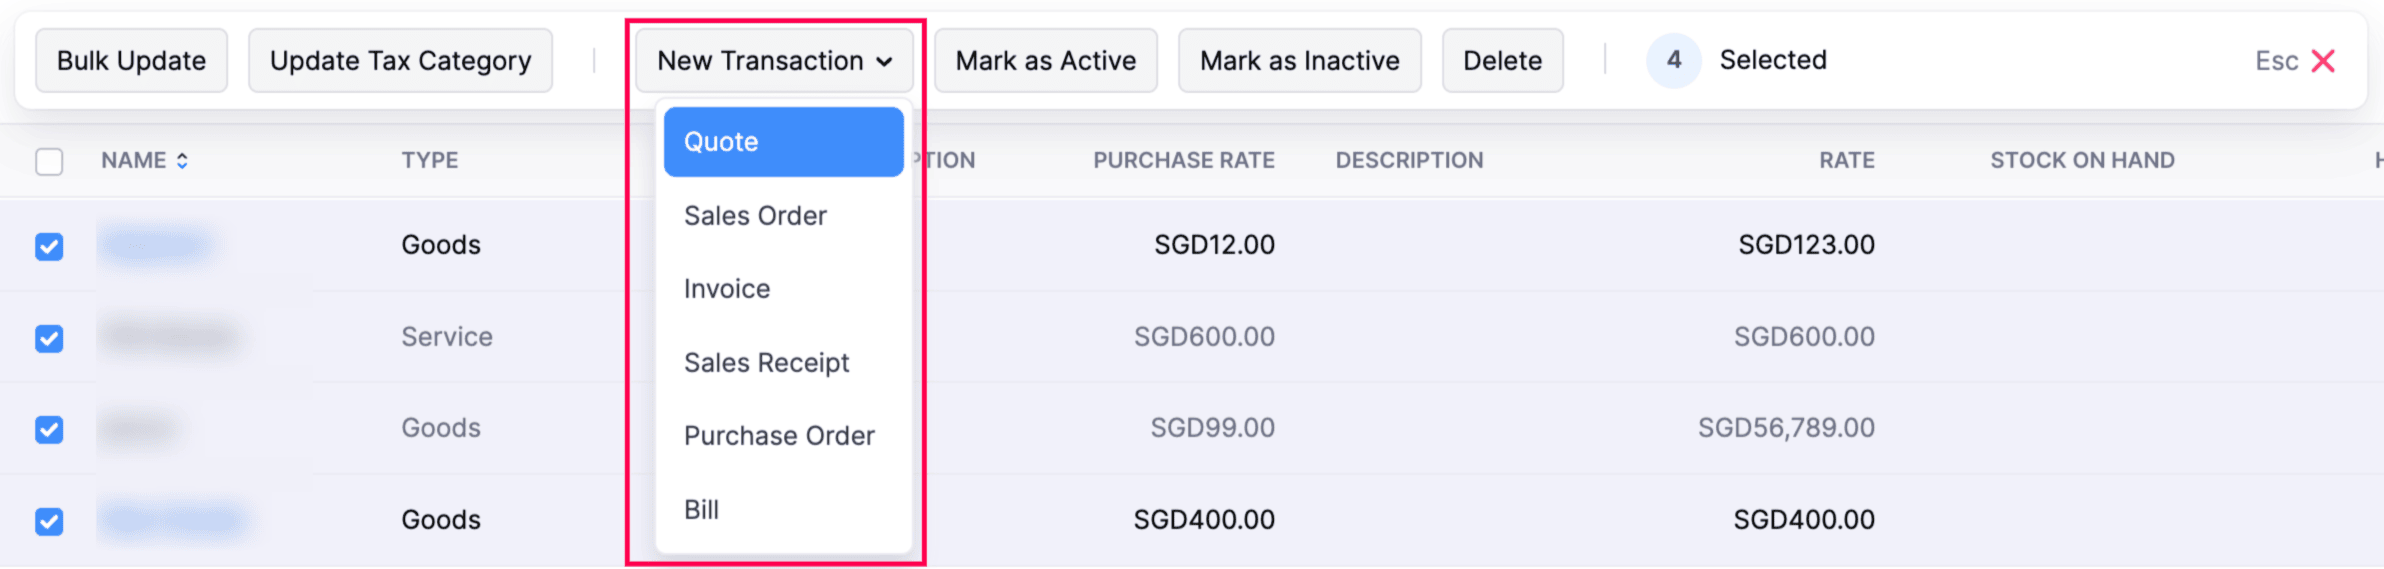
Note: You can create the following sales and purchase transactions:
- Quotes
- Sales Orders
- Invoices
- Sales Receipts
- Purchase Orders
- Bills
- You’ll be redirected to the New Transaction page with your selected items. Choose the customer and complete the other necessary fields.
- Click Save as Draft to save the transaction as a draft, or Save and Send to send the transaction to the customer or vendor.
The new transaction will now be created with the selected items.
Mark Items as Inactive in Bulk
To mark multiple items as inactive at once:
- Go to Items on the left sidebar, and select Items.
- Select the items you want to mark as inactive.
- Click Mark as Inactive at the top.

The selected items will now be marked as inactive.
Mark Items as Active in Bulk
To mark multiple inactive items as active at once:
- Go to Items on the left sidebar, and select Items.
- Select the inactive items you want to mark as active.
- Click Mark as Active at the top.

The selected items will now be marked as active.
Delete Items in Bulk
Insight: You cannot delete items that have associated transactions. First you’ll need to delete the transactions that include the item; and then proceed with deleteting the item itself. Alternatively, you can mark the items as inactive.
To delete multiple items at once:
- Go to Items on the left sidebar, and select Items.
- Select the items you want to delete.
- Click the More icon at the top, and select Delete from the dropdown.

- In the popup, click OK to confirm.
THe selected items will now be deleted.
 Yes
No
Yes
No
Thank you for your feedback!