
Item Preferences
General Item Settings
Modify the Decimal Rate for Item Quantity
To modify the decimal rate for your item quantity:
- Go to Settings.
- Select Items under Items.
- In the General tab, choose your preferred decimal rate from the Set a decimal rate for your item quantity option.
- Click Save.
The selected decimal rate will now be applied to item quantities.
Allow Duplicate Item Names
Prerequisite: You must mark the SKU (Stock Keeping Unit) field as active and mandatory before enabling the option to allow duplicate item names. Go to Settings > Items > Items > Field Customization > SKU, and select Mark as Active. To make it mandatory, follow the same steps and choose Mark as Mandatory from the dropdown.
To allow duplicate item names:
- Go to Settings.
- Select Items under Items.
- Under General tab, check Allow duplicate item names.

- Click Save.
You can now create items with duplicate names. The SKU field will be used as the primary field for mapping during item imports.
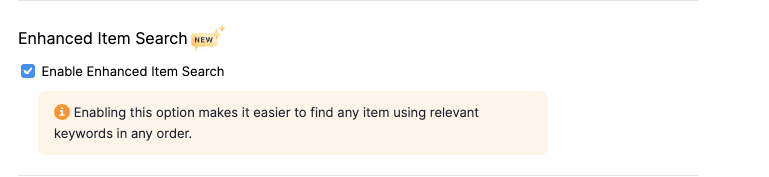
Enable Enhanced Item Search for Items
You use Enhanced Item Search to find items more easily using relevant keywords in any order. To enable this:
- Go to Settings.
- Select Items under Items.
- In the General tab, under Enhanced Item Search, check Enable Enhanced Item Search.
- Click Save.
Enhanced Item Search is now enabled, and you can search for items using relevant keywords.
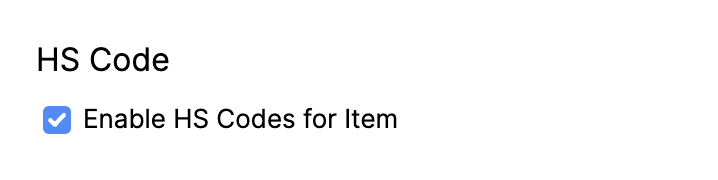
Enable HS Code for Your Items
You use HS codes to classify your goods in international trade, mainly for customs and statistics. To enable it:
- Go to Settings.
- Select Items under Items.
- In the General tab, under HS Code, check Enable HS Codes for Item.
- Click Save.
You can now enter HS codes for items when creating them.
Pricing and Inventory Settings
Enable Price Lists
Price Lists let you set custom rates for items you buy or sell. To enable it:
- Go to Settings.
- Select Items under Items.
- In the General tab, under Price Lists, check Enable Price Lists.
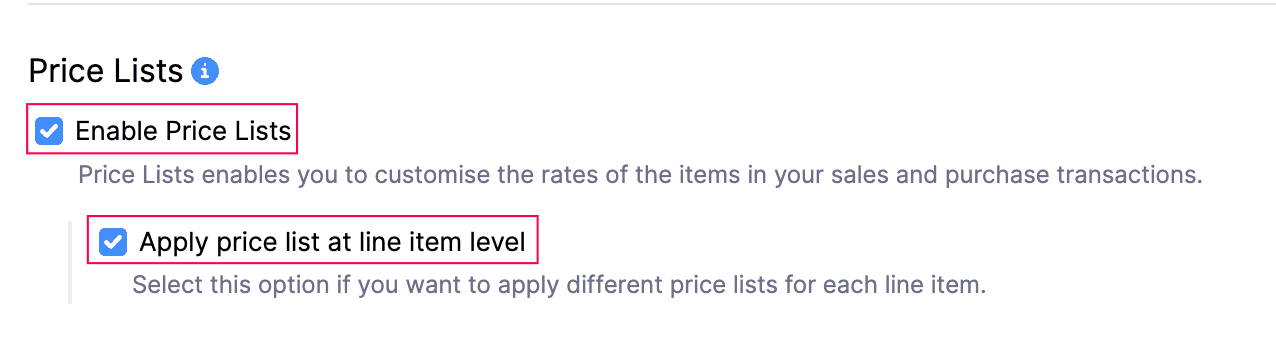
- Check Apply price list at line item level below it if you want to use different price lists for each line item.
- Click Save.
Once enabled, you can create price lists and use them in your transactions.
Enable Inventory Tracking
Inventory tracking lets you monitor the stock levels of your items in real time. You can track item quantities, get updates when the stock is low, and view inventory movements across sales and purchases. To enable it:
- Go to Settings.
- Select Items under Items.
- Under Inventory, check Enable Inventory Tracking and choose the Inventory Start Date.
- Click Save.
Once enabled, you can turn on inventory tracking for individual items and start tracking their stock.
Stock Control Settings
Prevent Item Stock From Going Below Zero
To prevent item stock from going to zero:
- Go to Settings.
- Select Items under Items.
- Scroll down, and check Prevent Stock from going below zero.

- Click Save.
Once you enable this option, you cannot create transactions that reduce your stock below zero.
Note: If you’ve enabled Locations, you’ll see options to prevent stock from going below zero in the respective Branches or Warehouses.
Display Out of Stock When Stock Drops Below Zero
To display an Out of Stock warning when an item’s stock drops below zero:
- Go to Settings.
- Select Items under Items.
- Scroll down and check Show an Out of Stock warning when an item’s stock drops below zero.

- Click Save.
Once you enable this option, a warning appears when an item’s stock drops below zero in the inventory.
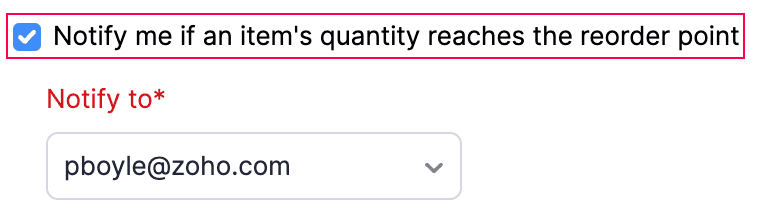
Notify a User at the Item Reorder Point
To notify a user when an item’s quantity reaches the reorder point:
- Go to Settings.
- Select Items under Items.
- Scroll down and check Notify me if an item’s quantity reaches the reorder point. In the Notify to dropdown, select the user’s email address to receive the notification.
- Click Save.
Once you enable this option, Zoho Books sends an email to the selected user when the item’s quantity reaches its reorder point, which you set while enabling inventory tracking.
Track Landed Cost on Items
Landed Cost is the total expense of bringing a purchased product into your warehouse, excluding the cost of goods. It includes freight, shipping, customs, and other fees incurred until the goods are received. Tracking landed costs helps you know the true cost of your products, so you can price them accurately and protect your profits. To enable tracking of landed costs on items:
- Go to Settings.
- Select Items under Items.
- Scroll down and check Track landed cost on items.

- Click Save.
Once enabled, you can add landed costs when creating bills for vendors. Learn more about how to add landed costs to a bill.
Customize Item Fields, Buttons, and Related Lists {customize-item-fields-and-views}
Field Customization in Items
Add custom fields for your items and define the information to be entered in each field. Learn more about how field customization works.
Custom Buttons in Items
Add custom buttons and links in the Items module, configure their functionality, and set redirection links. Learn more about how custom buttons and links work.
Related Lists in Items
Create related lists in the Items module to fetch and view data from within the app and third-party applications. This helps cross-reference data from different modules. Learn more about how related lists work.
 Yes
No
Yes
No
Thank you for your feedback!