
Taxes

Every business must pay taxes based on where it operates and what type of business it is. Zoho Inventory helps you manage all your taxes in one place. The app includes taxes specific to your country, different tax rates for various products and services, and tax groups that you can set up to meet your business requirements.
Enable VAT
To enable VAT in your organization:
- Go to Settings.
- Select Taxes under Taxes & Compliance.
- In the VAT Settings page, fill in the following fields:
- VAT Registration Number Label: Select TIN as the label that appears next to your VAT registration number on your transactions.
- VAT Registration Number: Enter the VAT registration number issued to you by FIRS.
- VAT Registration Date: Enter the date when FIRS registered your business for VAT.
- Click Save.
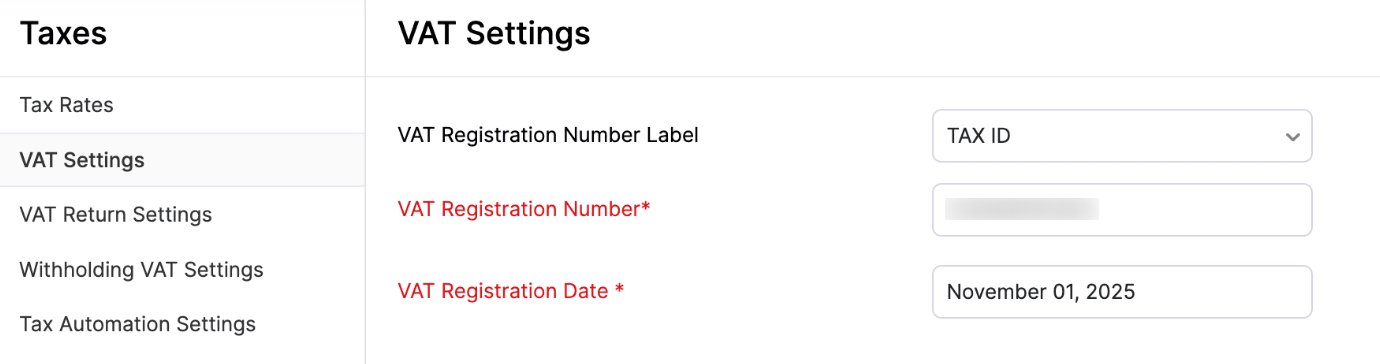
Your VAT settings will be configured.
VAT Rates
Default VAT Rates
The following VAT rates will be available by default in the Nigeria edition of Zoho Inventory. You cannot delete or mark these rates as Inactive.
| VAT Name | Rate(%) |
|---|---|
| Standard Rate [SR] | 7.5 |
| Zero Rate [ZR] | 0 |
How VAT Rates are Auto-Applied to Items in a Transaction
A tax rate is applied automatically to an item in a transaction using two key details:
- Item’s Tax Category: When you create an item, you select its tax category (for example, hardware, services, and more). Based on the selected tax category, the VAT rate that’s applicable to the item is determined.
- Customer’s Country/Region in Billing Address: You select the customer’s country or region in the billing address. This helps identify whether the transaction is local or overseas and ensures the correct VAT rate is applied (e.g., 0% or 7.5%).
Based on these details, the correct VAT rate is automatically applied to each item in a transaction.
VAT Operations
Create VAT Rates
Apart from the list of default rates, you can create VAT rates to meet your business requirements. Here’s how:
- Go to Settings.
- Select Taxes under Taxes & Compliance.
- Click Tax Rates in the left pane.
- Click + New VAT in the top right corner.
- In the New VAT page, fill in the following fields:
- VAT Name: Enter a name for the VAT rate.
- Rate (%): Enter a percentage for the VAT rate.
- Click Save.
The VAT rate will be created.
Create VAT Rates in Bulk
You can also create VAT rates in bulk. Here’s how:
- Go to Settings.
- Select Taxes under Taxes & Compliance.
- Click Tax Rates in the left pane.
- Click the dropdown next to + New VAT in the top right corner, and select Create VAT Rates in Bulk.
- In the next page, fill in the required details.
- Click Save.
The VAT rates will be created in bulk.
View Details of a VAT Rate
You can only view the details of default tax rates in Zoho Inventory. Here’s how:
- Go to Settings.
- Select Taxes under Taxes & Compliance.
- Click Tax Rates in the left pane.
- Hover over the required default VAT rate, click the dropdown next to it, and select View.
The details of the VAT rate will be displayed.
View Associated Records
You can view the records (like sales and purchase transactions, tax groups, and more) for the VAT rates you created manually. Here’s how:
- Go to Settings.
- Select Taxes under Taxes & Compliance.
- Click Tax Rates in the left pane.
- Hover over the required VAT rate, click the dropdown next to it, and select View Associated Records.
The list of records will appear in the right pane.
Edit VAT Rates
You can edit a VAT rate you’ve created to update it’s details. To do so:
- Go to Settings.
- Select Taxes under Taxes & Compliance.
- Click Tax Rates in the left pane.
- Hover over the required VAT rate, click the dropdown next to it, and select Edit.
- In the Edit VAT Rate page, make the required changes.
- Click Save.
The VAT rate will be updated.
Mark VAT Rates as Inactive
If you don’t want to use a VAT rate in your transactions, but don’t want to delete it, you can mark it as Inactive. Here’s how:
- Go to Settings.
- Select Taxes under Taxes & Compliance.
- Click Tax Rates in the left pane.
- Hover over the required VAT rate, click the dropdown next to it, and select Mark as Inactive.
The VAT rate will be marked as Inactive. To use it again in your organization, follow the same steps and mark it as Active again.
Delete VAT Rates
Prerequisite: Before deleting VAT rates in Zoho Inventory, you must delete the records associated with the VAT rate.
If you don’t want to use a VAT rate in your organization, you can delete the VAT rates. To do so:
- Go to Settings.
- Select Taxes under Taxes & Compliance.
- Click Tax Rates in the left pane.
- Hover over the required VAT rate, click the dropdown next to it, and select Delete.
- In the confirmation pop-up, click OK.
The VAT rate will be deleted.
Tax Automation Settings
Configure Address Preferences for Tax Automation in Sales Transactions
Zoho Inventory lets you choose which address to use when you apply VAT to your sales transactions. To do so:
- Go to Settings.
- Select Taxes under Taxes & Compliance.
- Click Tax Automation Settings in the left pane.
- Under Address Preference for Sales Transactions, choose one of the following preferences:
- Billing Address: Apply VAT based on your customer’s billing address.
- Shipping Address: Apply VAT based on your customer’s shipping address.
- Click Save.
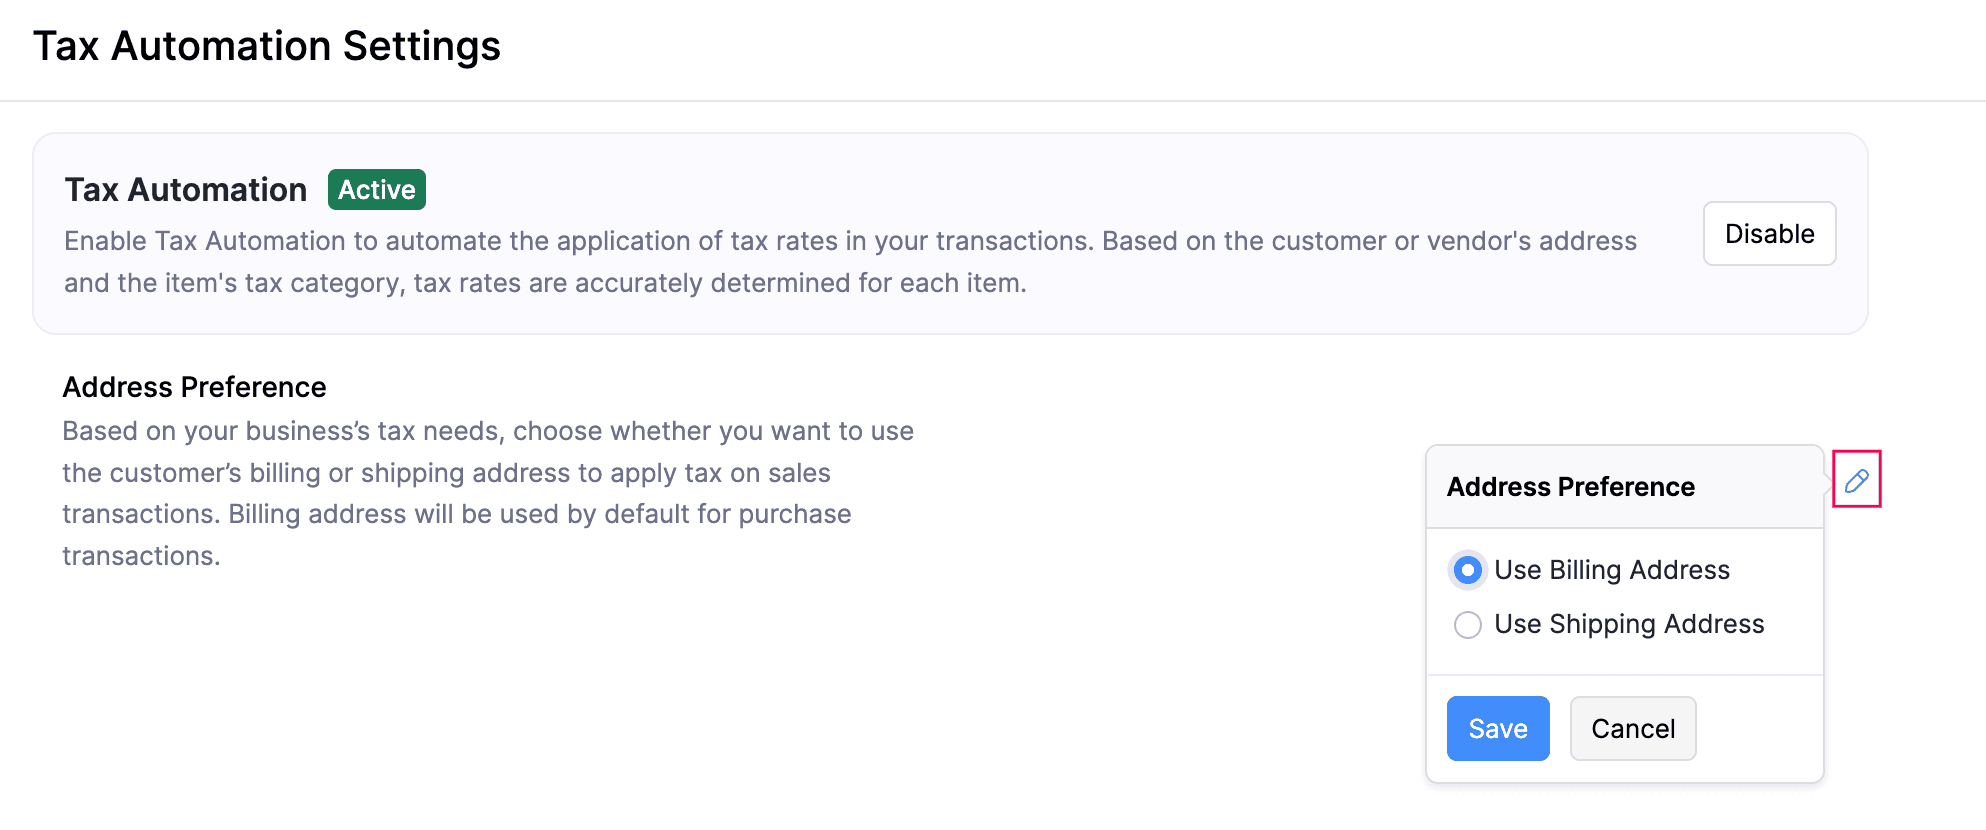
The VAT will now be applied to your sales transactions based on the address you selected.