
Items

The items in Zoho Inventory are the products and services that your business sells to customers or purchases from vendors. You can use Zoho Inventory to create and manage all your items in one place. Set default tax rates, track inventory, updated prices, and add items directly to sales and purchase transactions. This helps you keep your records accurate, manage stocks easily, and follow tax rules.
Create Items
To create an item in Zoho Inventory:
Go to Items on the left sidebar and select Items.
Click + New in the top right corner.
In the New Item page, fill in the following fields:
- Type: Choose if its a physical good or service.
- Name: Enter the item name.
- SKU: Provide the stock keeping unit.
- Unit: Choose the item’s measurement unit. For example, dozen, box, and more.
- HSN/ISIC Code: Enter the 8-digit HS code for the item if its a physical good, and enter the 4-digit code for the item if its a service.
- Tax Category: Click the Search icon next to this field. In the pop-up that appears, search for the item’s tax category ans select the one that matches the item type. For example, if you’re creating an item named Bluetooth Wireless Earbuds, type Electronics and choose the tax category that applies to the product or service. The applicable tax will be automatically applied based on the selected category.
- Drag image(s) here or Browse images: Upload the item’s images, if required.
Enable Sales Information and fill in the following fields:
- Selling Price: Enter the item’s selling price.
- Account: Select the sales account.
- Description: Add a brief description if necessary.
Enable Purchase Information and fill in the following fields:
- Cost Price: Enter the item’s cost price.
- Account: Select the purchase account.
- Description: Add a brief description if necessary.
- Preferred Vendor: Select a preferred vendor for this item.
Enable Track Inventory for this item and fill in the following fields:
- Inventory Account: Select the inventory account.
- Opening Stock: Enter the stock available at the start of the accounting period.
- Inventory Valuation Method: Choose FIFO (First In, First Out) to sell the oldest stock first, or select WAC (Weighted Average Costing) to calculate the cost of items based on the average cost of all available stocks in Zoho Inventory.
- Opening Stock Rate per Unit: Enter the cost per unit of the opening stock.
- Reorder Point: Enter the minimum stock level for the item. You’ll receive an in-app notification when the quantity reaches this level, so you can reorder on time.
Click Save.
The item will be created. You can now create transactions for the item.
Create Brand
To create a new brand from the item creation page:
- Click the Brand dropdown.
- Click the Gear icon below the dropdown.
- Click + New Brand.
- Enter the name and click Save and Select.
Create Manufacturer
To create a new manufacturer from the item creation page:
- Click the Manufacturer dropdown.
- Click the Gear icon below the dropdown.
- Click + New Manufacturer.
- Enter the name and click Save and Select.
Create Items with Variants
Items with Variants help you manage different versions of the same item while keeping them grouped under a single product record. Variants can differ based on attributes such as size, color, model, or configuration.
Insight: Items with variants can be managed as independent items. You can record and track opening stock separately for each variant.
Scenario: Jason runs a textile showroom where he sells a variety of T-Shirts. Let’s say the T-Shirts available in the colors Blue, White, Red and in sizes S, M and L. So the variants would be T-Shirt/Blue/S, T-Shirt/Blue/M and T-Shirt/Blue/L. Likewise, there can be six more variants. To add these items one at a time into Zoho Inventory would be a tedious and repetitive task. However, using the Item Variants feature, he can add any number of such items in the time of adding just one.
To create variants,
- Go to Items in the left side bar under Items.
- Click the + New icon in the top right corner.
- In the Item Type, select Contain Variants.
- In the Variations section, add the required Attributes and Options. To add more attributes, click + Add More Attributes.
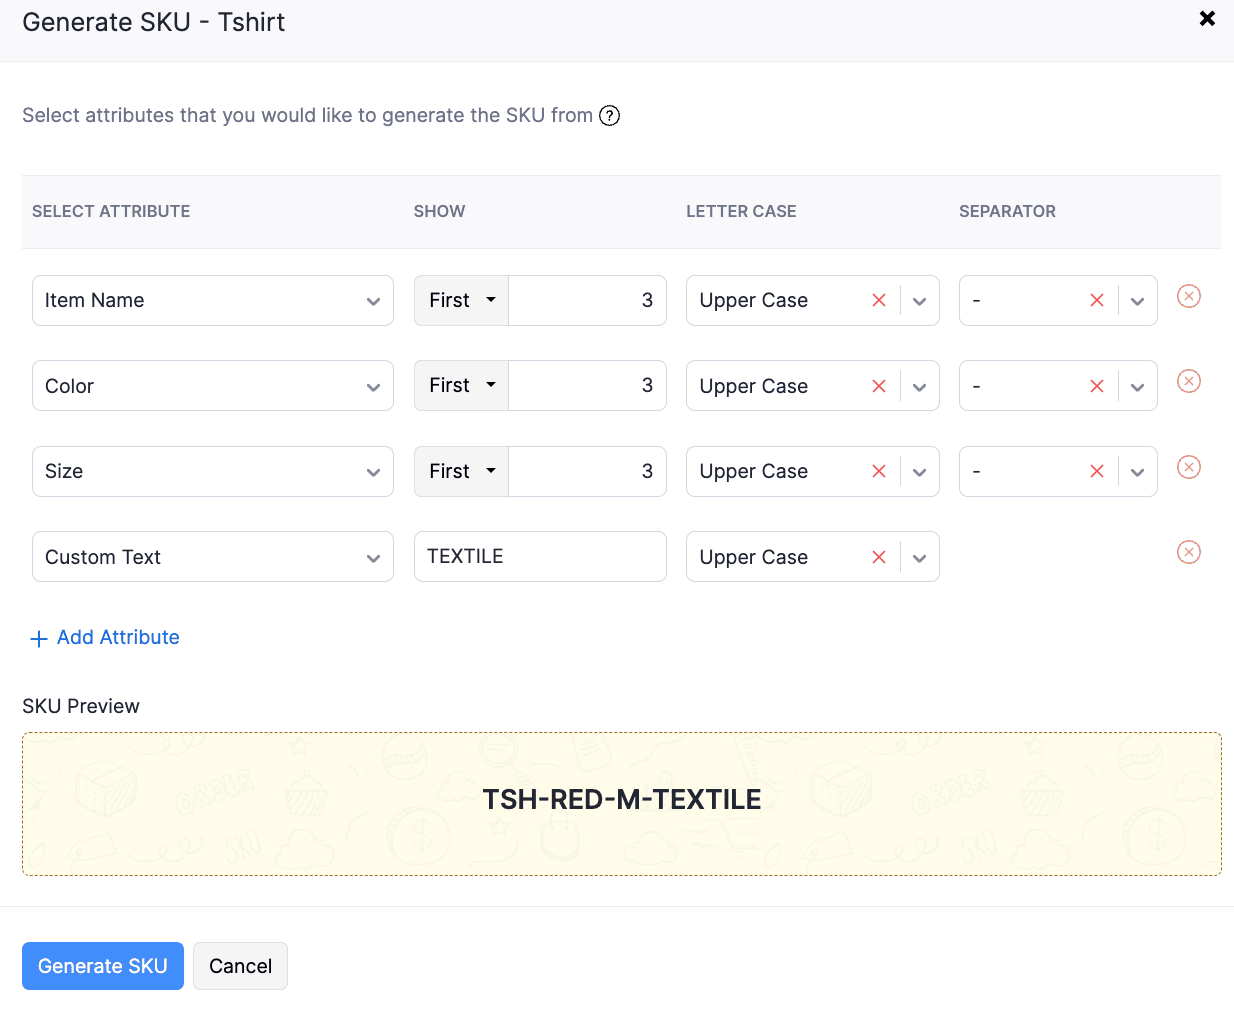
- You can either manually enter SKU or automatically generate. To generate automatically,
- Click the Generate SKU option under the SKU column.
- Add or remove the Attributes.
- Under the Show field, specify the number of letters to display for each attribute. You can choose to display the letters from the First or Last part of the attribute value.
- Select the preferred letter case (Uppercase or Lowercase) from the drop down under Letter Case.
- Choose a separator for the SKU, such as -, /, :, ., #, or ×.
- To add custom text to the SKU, under the Select Attribute column click the dropdown and select Custom Text. Enter the required text.
- To remove an attribute from the SKU pattern, click the ⓧ icon next to the separator field.
- Once you have configured the pattern, click Generate SKU to create SKUs for all variants.
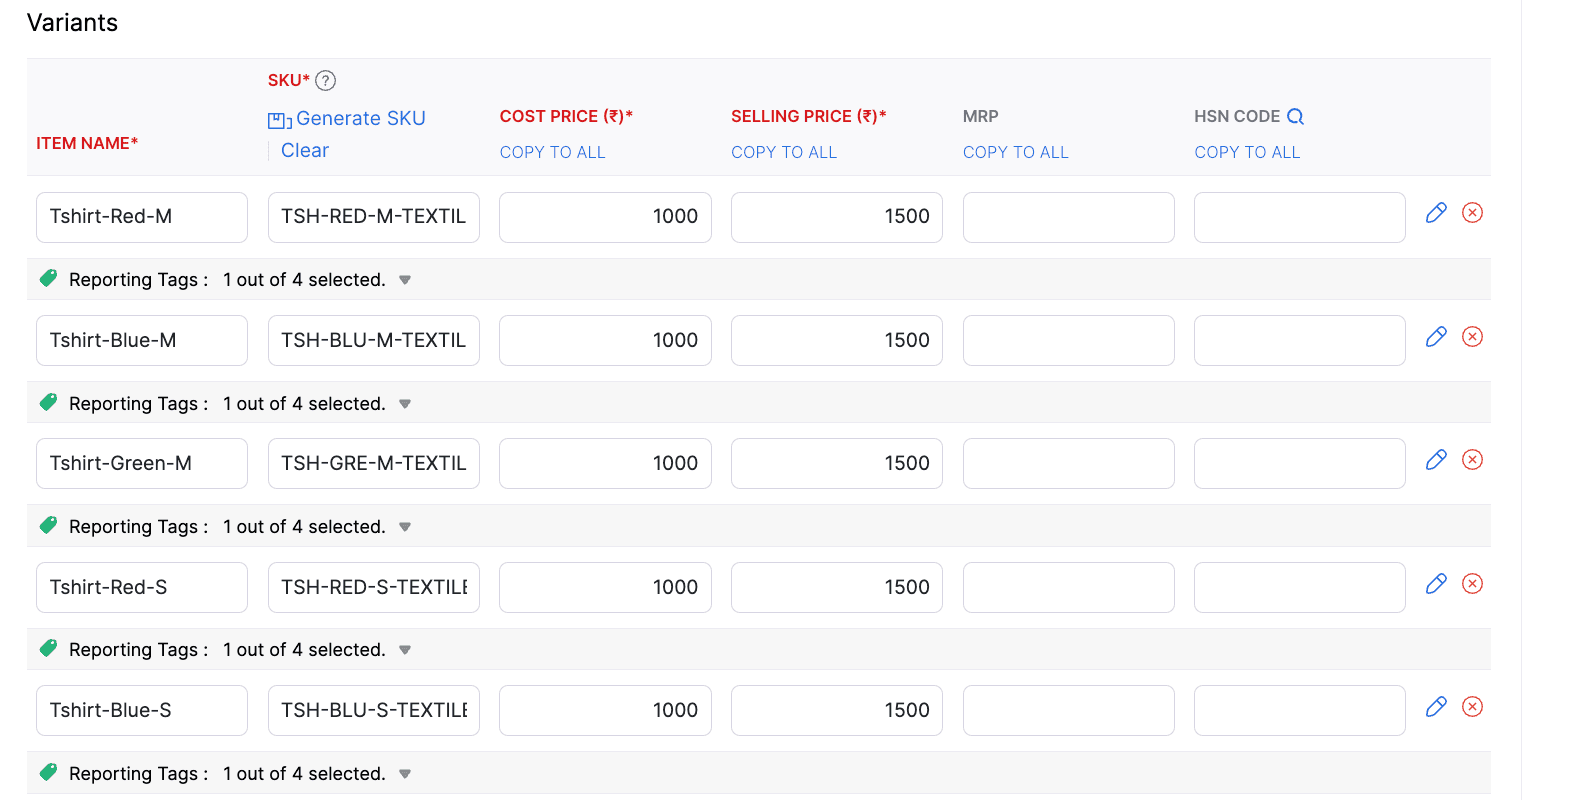
- Enter the Cost Price and Selling Price for each variant.
Insight: If the Cost Price or Selling Price is the same for all variants, enter the value for one variant and click Copy to All to apply it to all variants at once.
- Click the Pencil icon to add identifier details. You can also view the custom fields and enter their values. Click Save.
- To rename a variant, click its name field and edit it as required.
- To remove a variant, click the x icon next to the Pencil icon.
- You can add Reporting Tags for each variant item in the section below.
- Once done, click Save.
Collapased View
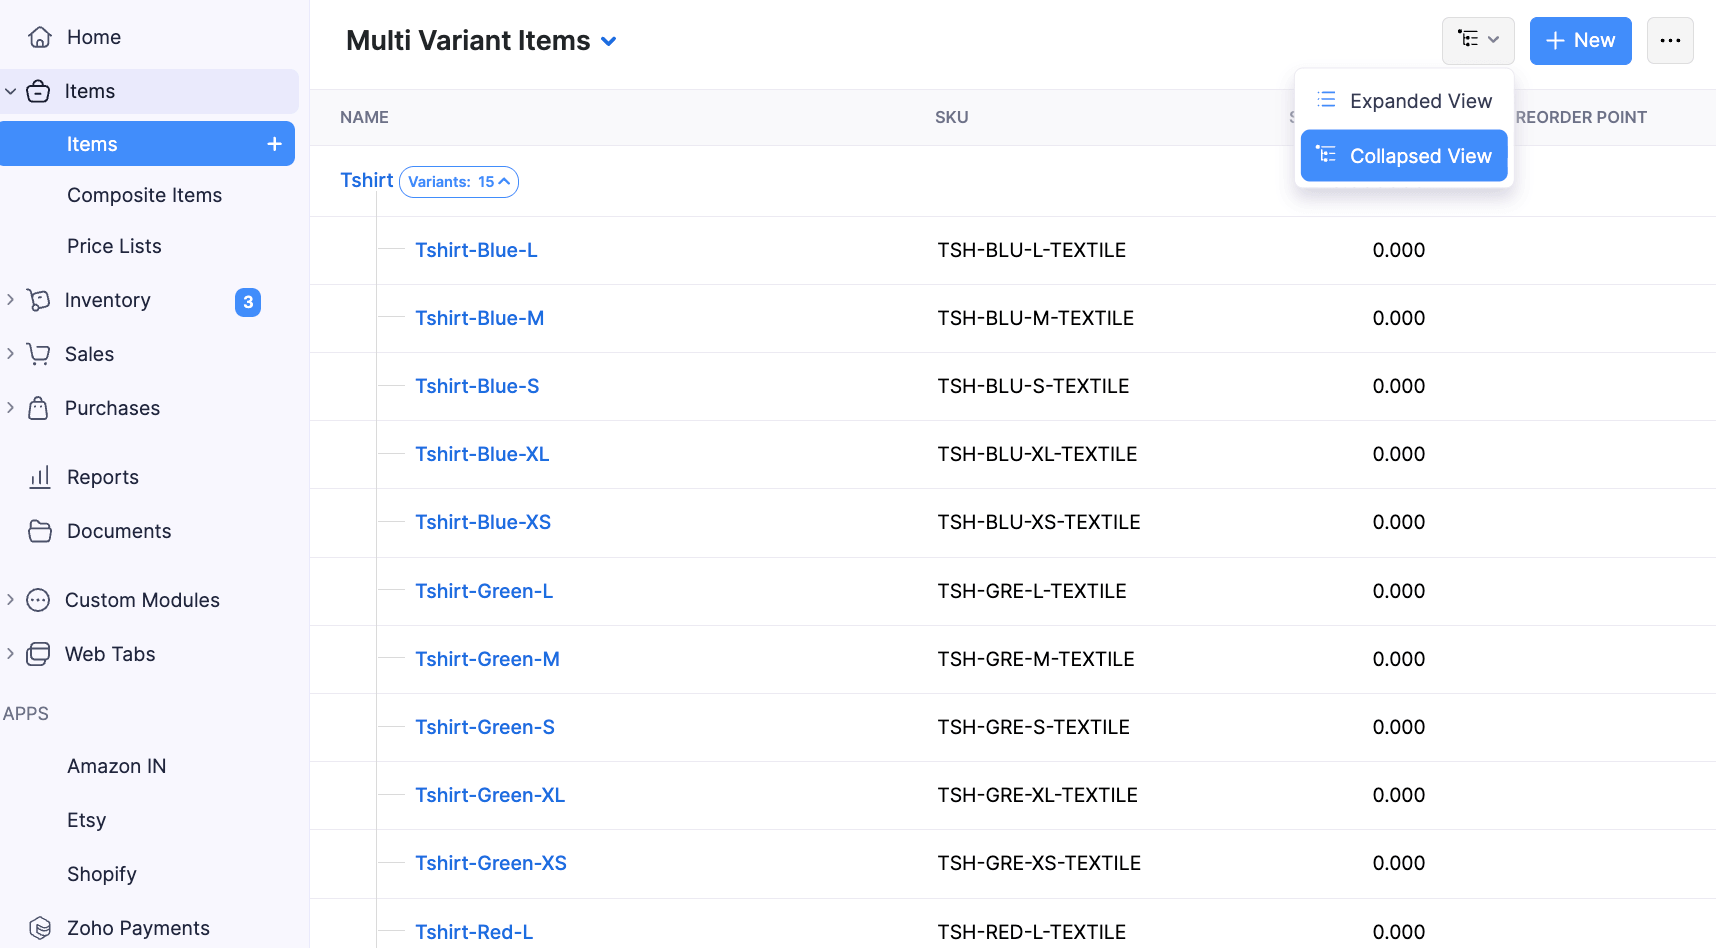
To view the associated variants of the item in the items list view page,
- Navigate to Items under Items the left sidebar.
- Click the View icon in the top right corner.
- Select Collapsed View from the dropdown.
Advanced Inventory Tracking
Zoho Inventory provides two advance features to track your stock flow accurately. But first, make sure to enable Advance Inventory Tracking in your item preferences and check the Track Inventory option in the New Item page to access the advanced inventory tracking options for your item.
Insight:
- Your current subscription plan in Zoho Inventory must allow you to access the advanced inventory tracking features.
- Each item can be tracked either by serial numbers or by batch numbers, but not both.
Track Serial Numbers
To track your item by serial numbers:
Open the new item page and fill in the necessary details.
Choose the Track Serial Number option under Advanced Inventory Tracking.
If you’ve entered an opening stock, you can add serial numbers for the given opening stock in the field below.
If you have enabled multi-warehouse in your organization, click the ellipsis icon at the end of each warehouse row and click Add Serial Numbers.
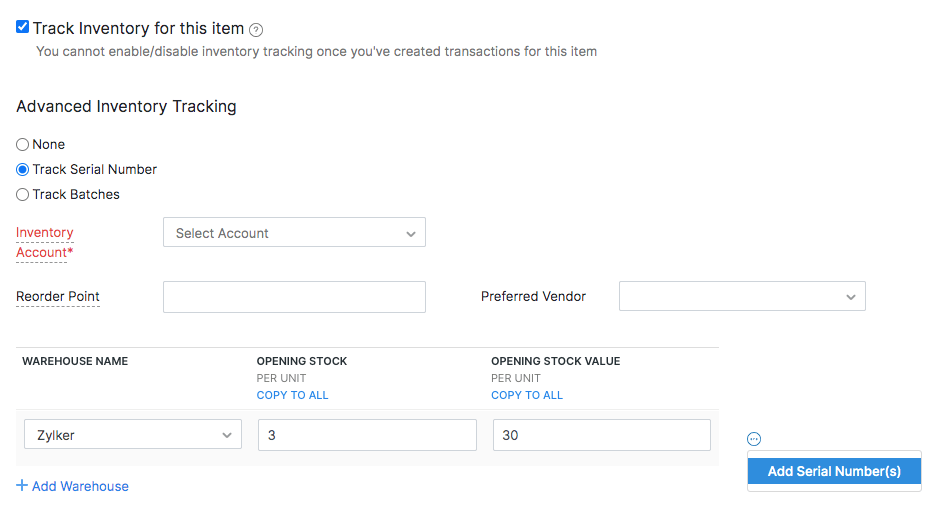 5. Enter the serial number for the opening stock given in each warehouse.
Insight:
- You can enter up to 200 serial numbers for an opening stock.
- You can either enter the serial numbers manually or scan the barcode of the item.
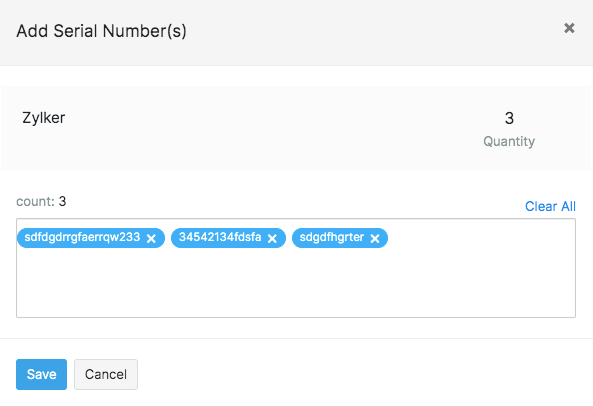 6. Click Save. The serial numbers will now be available for your sales transactions. You can also choose to save the item and enter the serial numbers at a later point while creating a bill.
Pro Tip: You can also add serial numbers to composite items.
Track Batch Numbers
Open the new item page and fill in the necessary details.
Choose Track Batches under Advanced Inventory Tracking.
If you’ve entered an opening stock, you can add batch details for the given opening stock in the fields below.
If you have enabled multi-warehouse in your organization, click the ellipsis icon at the end of each warehouse row and click Add Batches.
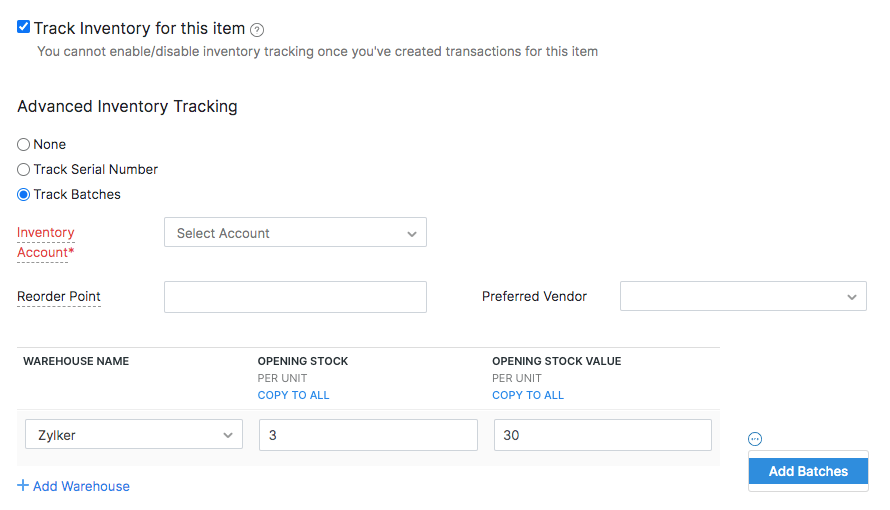 5. Enter the batch details for the opening stock given in each warehouse.
Insight: You can enter up to 100 batch numbers for an opening stock.
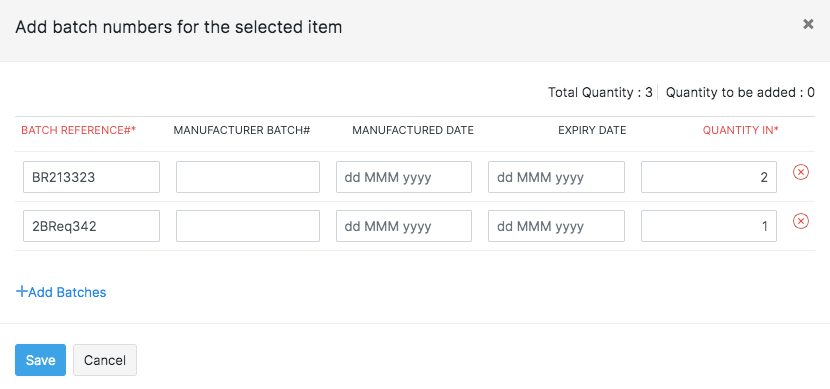
Field Name
Description
Batch Reference#
A unique number which will serve as a reference for you to save and track your batches in Zoho Inventory. This is not the manufacturer batch number.
Manufacturer Batch#
Batch number provided by your manufacturer.
Manufactured Date
The date on which the item was manufactured.
Expiry Date
The date until which the item is consumable.
Quantity in
Quantity of the item that you wish to add in each batch.
Insight: You can enter decimal quantity (up to 6 decimal places) for batches. For instance, a certain quantity of milk has to be divided into batches. In Zoho Inventory, you will be able to add 1.91L in batch 1 and 3.560L in batch 2 and so on.
- You’ll also be able to enter batch numbers for items while recording a new bill.
Import Items
If you have existing items stored locally or you’re migrating to Zoho Inventory from another accounting system, you can easily import items. To import them:
- Go to Items on the left sidebar and select Items.
- Click the More icon in the top right corner, hover over Import, and select Import Items.
- In the Import page, click Choose File to select the file you want to import.
- After you select the file, under the Configure tab, complete the following fields:
- Duplicate Handling: Choose Skip Duplicates to ignore importing items that already exists in Zoho Inventory, or Overwrite to update existing items with details from the import file.
- Character Encoding: The default is UTF-8 (Unicode). Select a different encoding only if your file uses one.
- Field Delimiter: The default is Comma (,). Change it if your import file uses a different delimiter.
- Click Next.
- In the Map Fields page, check if all the fields are mapped to the right headers in the import file.
- Enable Save these selections for use during future imports if you want to reuse the mapped fields for future imports.
- Click Next.
- In the Preview page, click Import. The items will be imported into your Zoho Inventory organisation.
Import Items from Zoho Books
Zoho Books is an in-house accounting platform that is built to seamlessly integrate with Zoho Inventory. This means that all your customer information, item information, transactions etc., entered in one of these platforms will automatically be available in the other, thus, preventing double entry.
If you already have an organization in Zoho Books, learn how you can integrate it with Zoho Inventory.
Import Products from Zoho CRM
You can pull the items into Zoho Inventory from Zoho CRM. Learn more about:
- Integrating Zoho Inventory with Zoho CRM.
- Configuring your product sync.
- Triggering an instant sync between Zoho Inventory and Zoho CRM.
Pro Tip: The items synced from Zoho CRM will only have sales information. To enable inventory tracking for these items, you must first edit them and enable purchase information.