


Create Custom Modules
In this help document, you will learn how to create a custom module in Zoho Expense, add fields, tables, and sections to it using the form builder, and start creating or importing records.
Scenario: The admin at Zylker creates a custom module called Business Units to track spend by BU and cost center. The module has fields for BU Name, BU Head (a lookup to Users), Cost Center (a dropdown with options like Engineering, Marketing, Sales, and Support), and ERP Account Code. The admin creates one record for each BU. Next, the admin adds a custom lookup field to the Reports module and another to the Trips module, both pointing to the Business Units module. After reports and trips are submitted and approved, the admin assigns each one to the right BU by editing the report or trip and selecting the BU from the lookup field. This lets the finance team filter and export reports and trips by BU to reconcile spend against each cost center and ERP account code.
Create a Custom Module
To create a custom module:
- Click Admin View on the left sidebar.
- Go to Settings on the left sidebar.
(OR)
Click Settings in the top right corner of the page. - Select Overview under Custom Modules.
- Click + New Module in the top right corner. You’ll be redirected to the Create Module page.
- Fill in the following details in the Module Details section:
Field Description Module Name Enter a name to identify your custom module. Plural Name Enter the plural form of the module name. This is used wherever the module name appears in plural context across the application. Description Enter a brief description of the module’s purpose. - In the Primary Field Properties section, configure the primary field for the module:
Field Description Label Name Enter the label name of the primary field. This field serves as the unique identifier for the custom module’s records. Data Type Select the data type for the primary field. Prevent Duplicate Values Choose Yes if you want the data entered in this field to be unique. Otherwise, click No. - Click Save.
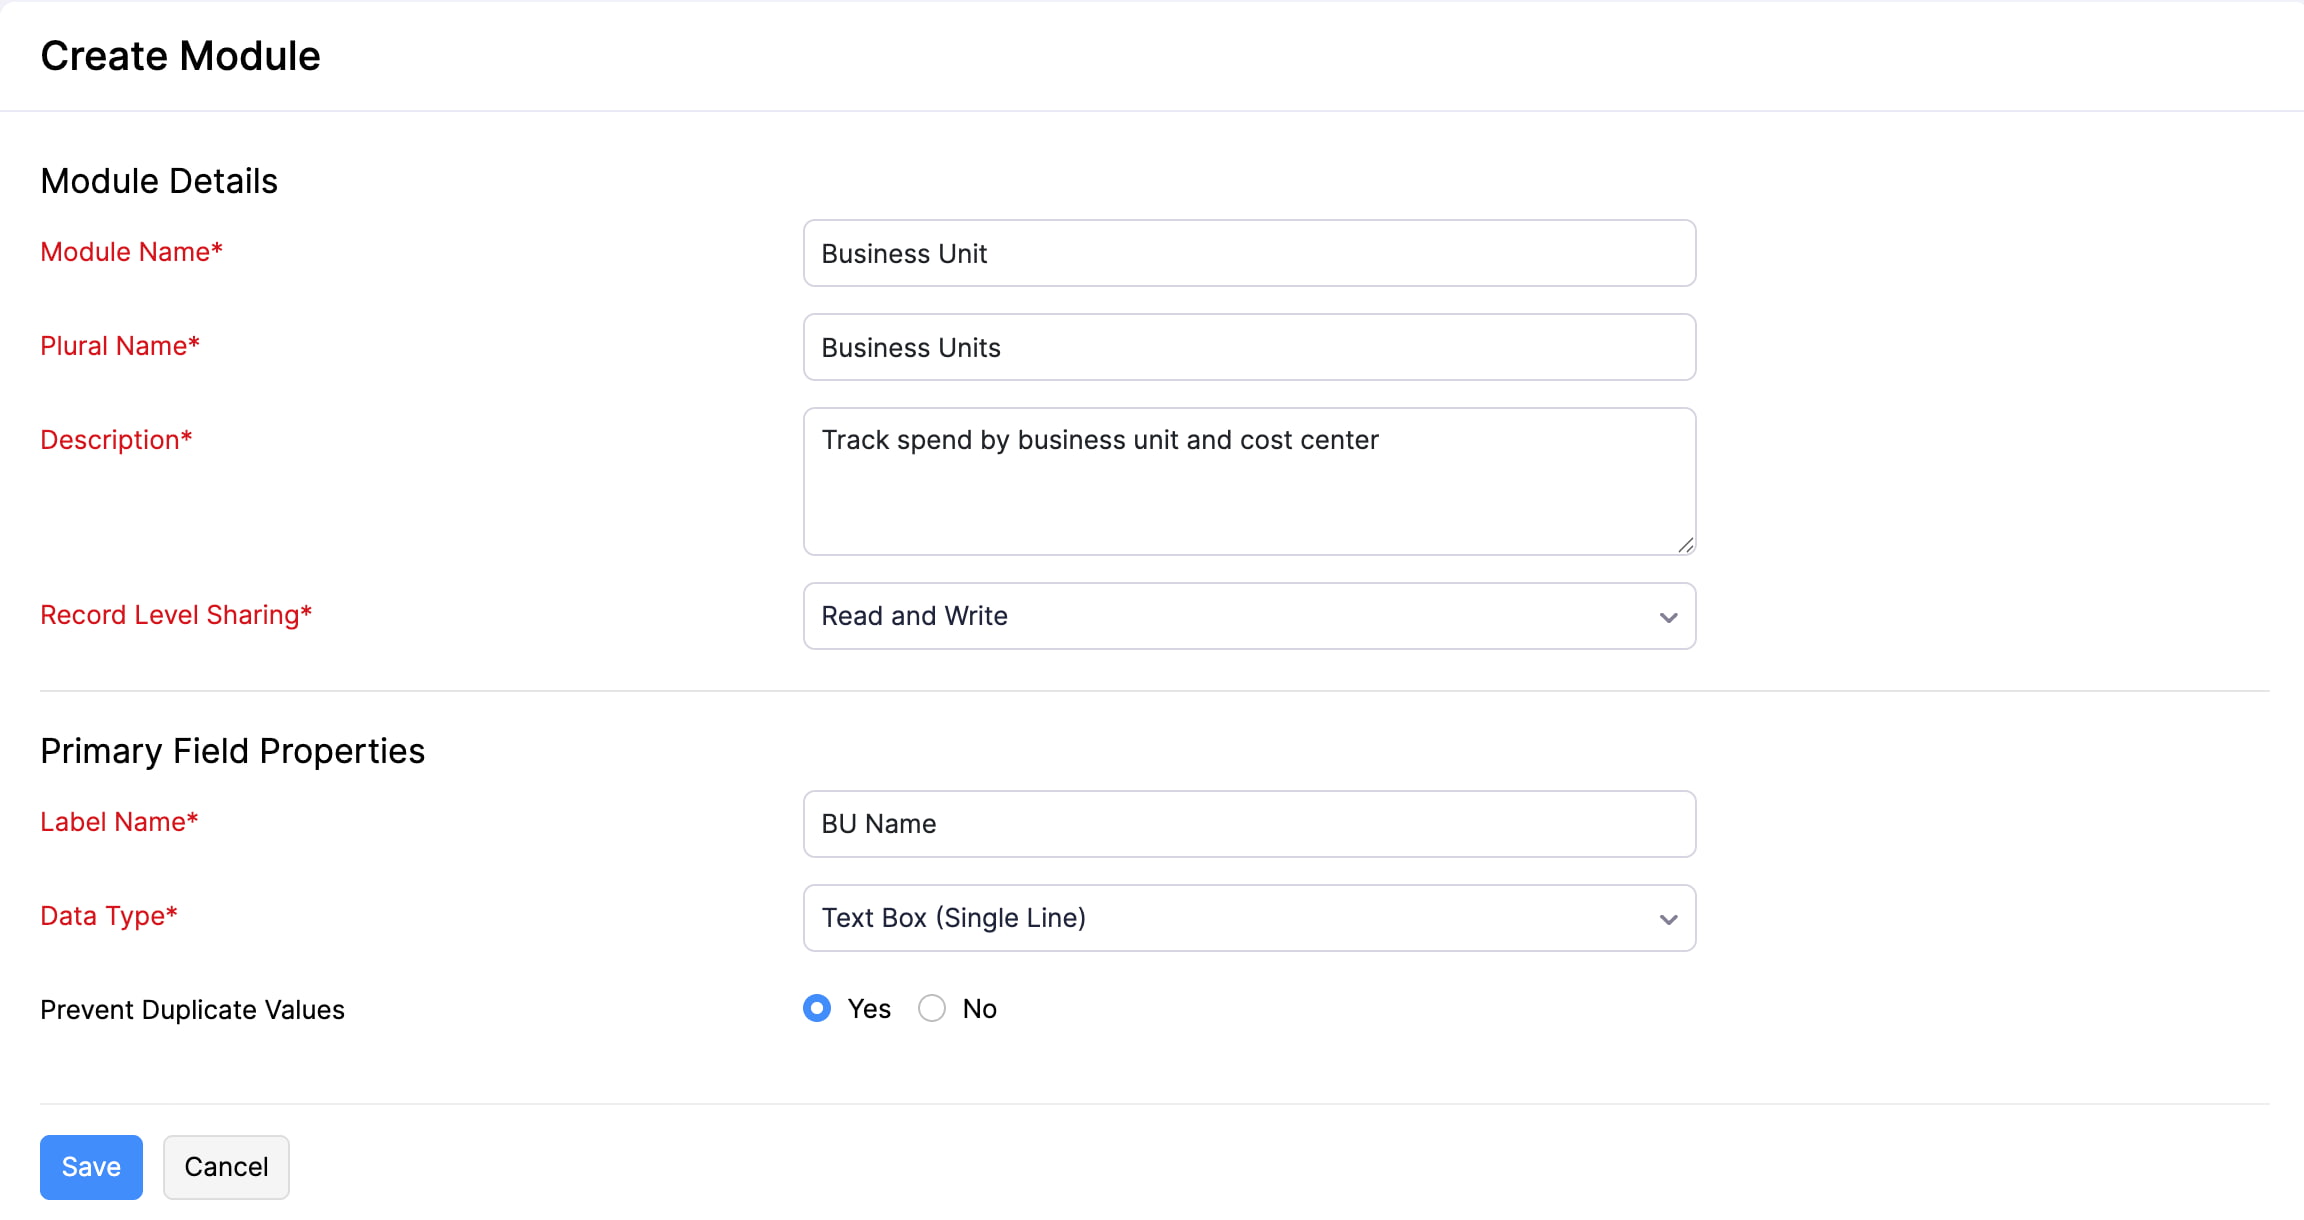
Insight: The primary field is the unique identifier used to identify a custom module’s records. You can edit the name of the primary field later if required. However, you will not be able to delete it.
Note: By default, users of custom roles won’t have access to newly created custom modules. To grant access, update the user roles under Custom Module Permissions.
Add Fields
When you create a custom module and save it, the form builder opens automatically. You can start adding fields right away.
To add fields:
- Drag and drop the required data type from the New Fields section in the left pane into the preferred section in the form. A pane will appear on the right side of the screen.
- Enter the necessary details for the field.
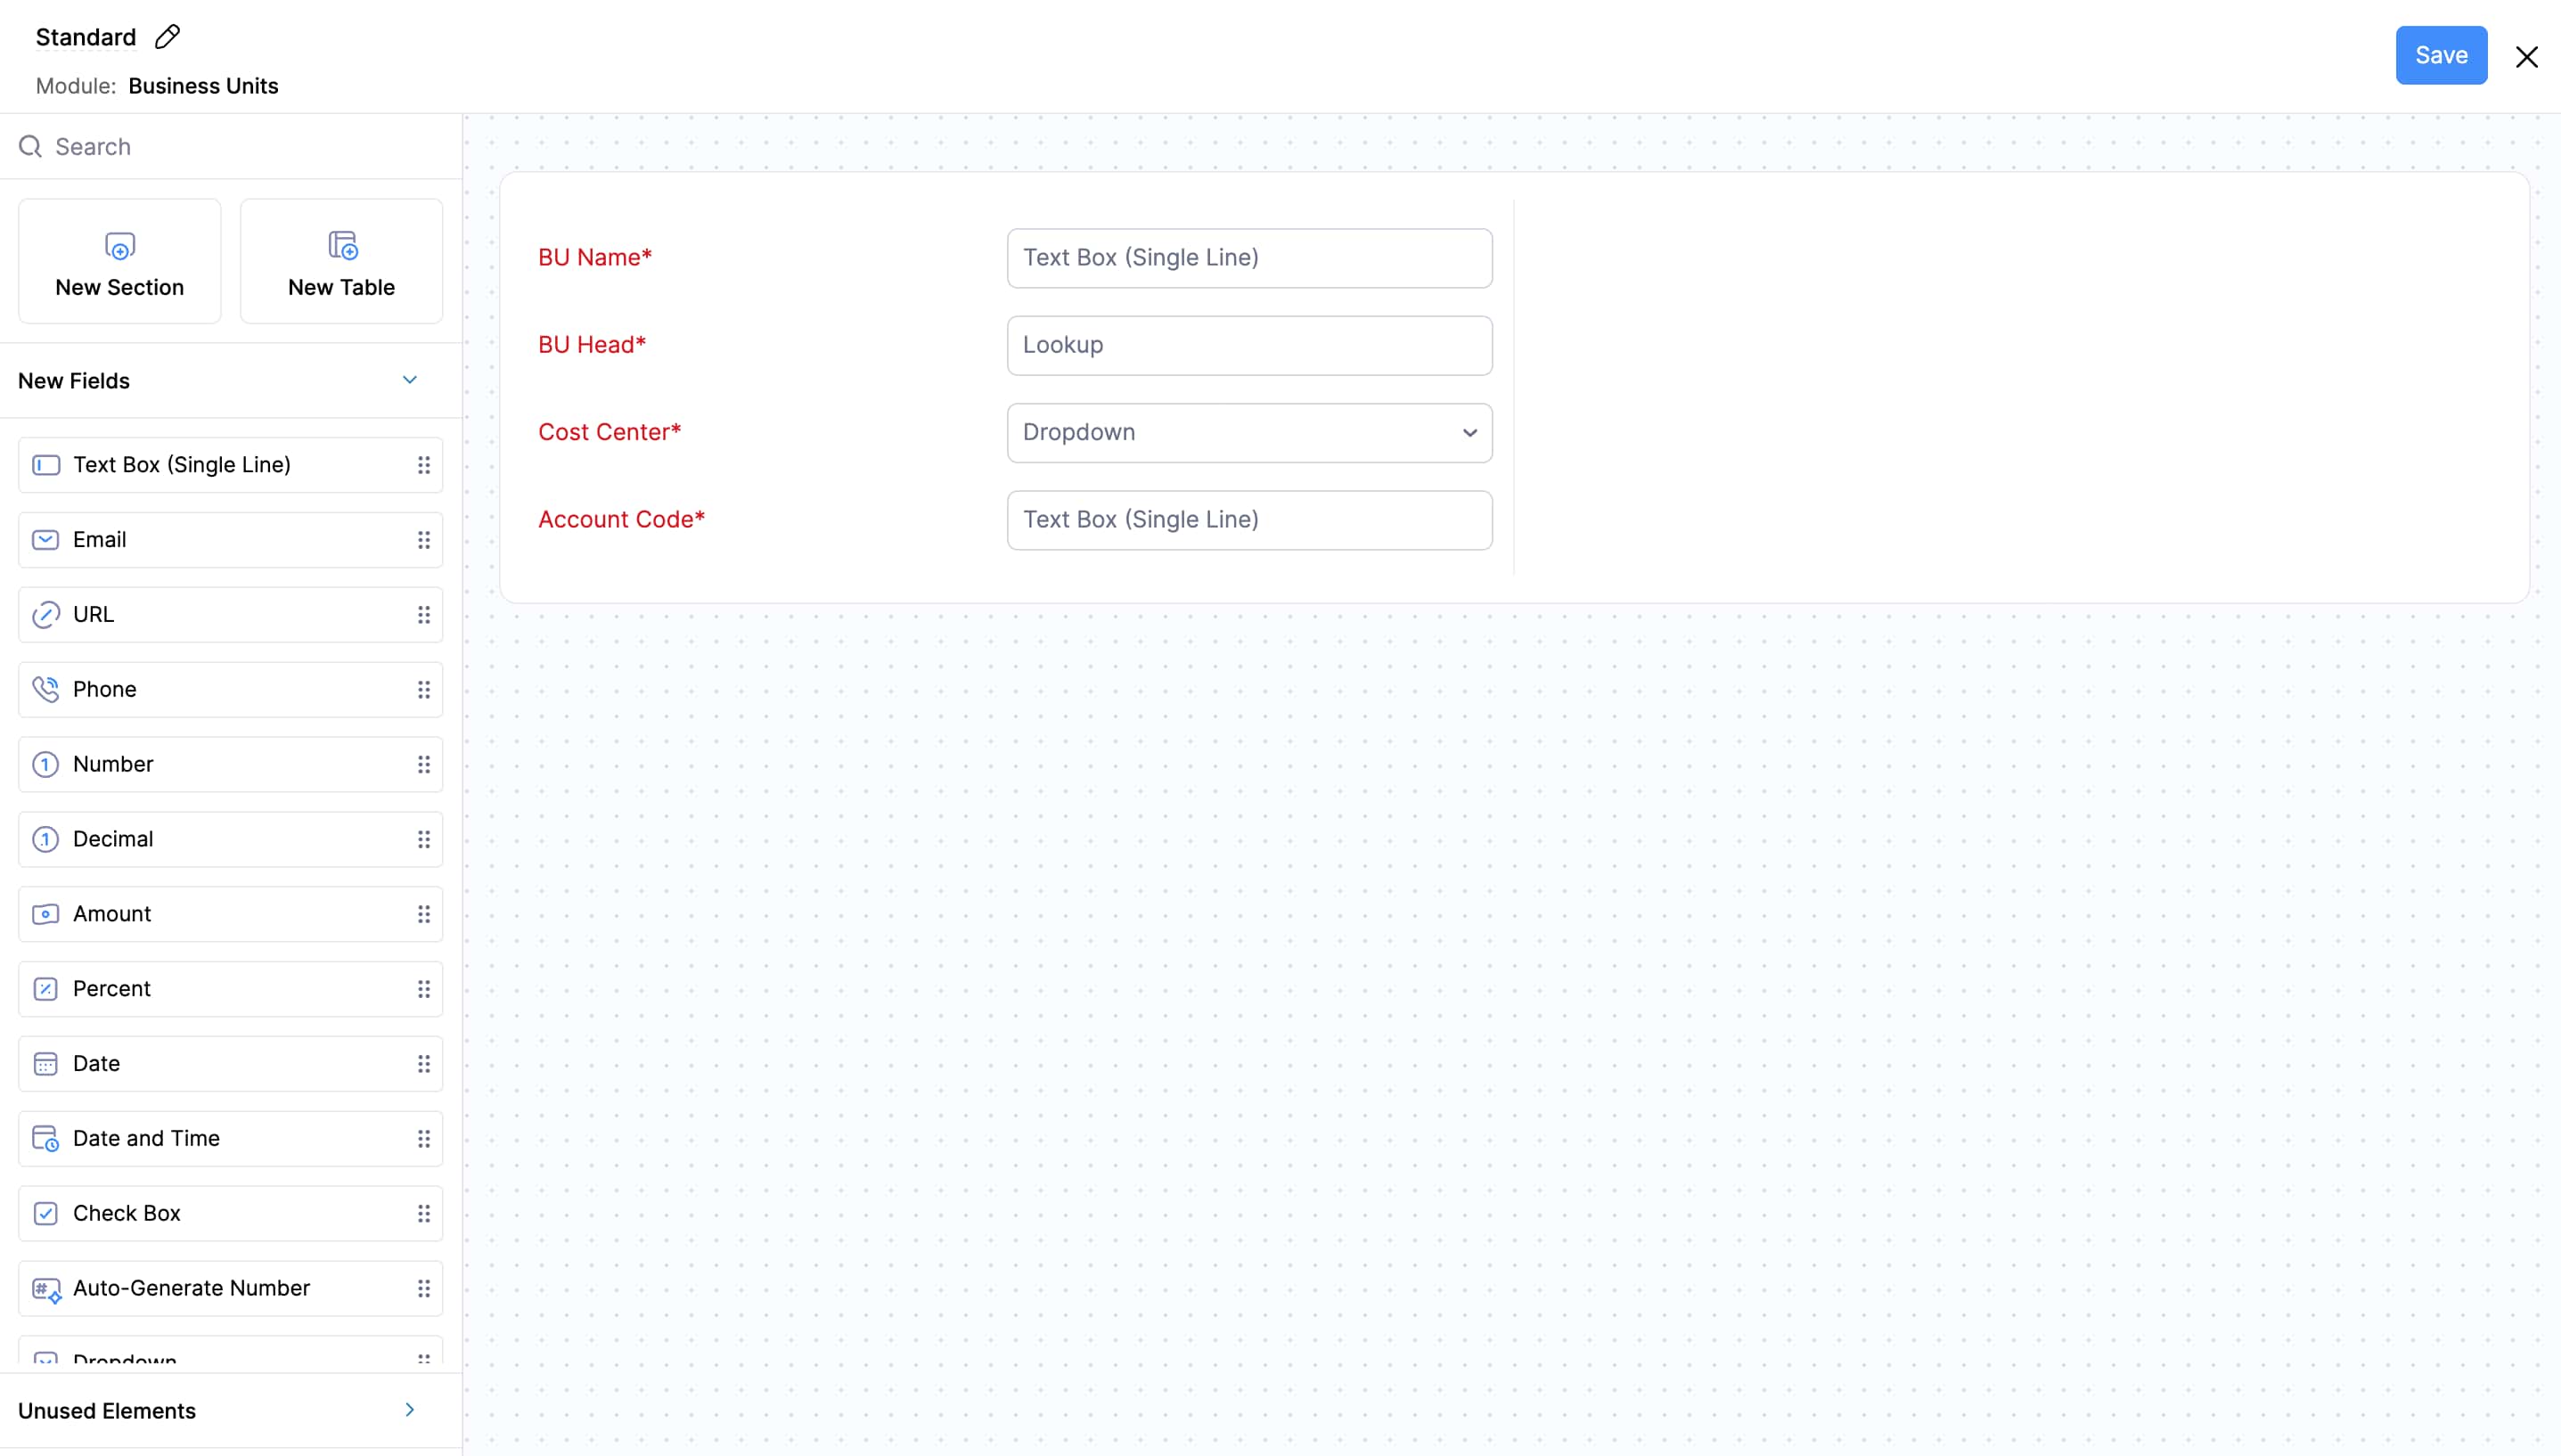
The following data types are available:
| Data Type | Description |
|---|---|
| Text | A single-line text field for short entries. |
| A field to capture email addresses. | |
| URL | A field to capture web addresses. |
| Phone | A field to capture phone numbers. |
| Number | A field to capture numerical values. |
| Decimal | A field to capture decimal values. |
| Amount | A field to capture monetary values. |
| Percent | A field to capture percentage values. |
| Date | A field to capture dates. |
| Date and Time | A field to capture date and time values. |
| Check Box | A yes/no toggle field. |
| Dropdown | A field with predefined options for selection. |
| Multi-select | A field with predefined options where multiple values can be selected. |
| Lookup | Link records from one module to another. |
| Auto-generate | Automatically generate a sequence of numbers each time a new record is created. |
| Attachments | Attach PDFs, images, and documents to the record. |
| External Lookup | Link modules from other apps such as Zoho CRM, Zoho Creator, and Zoho Desk. |
| Multi-line | A text area for longer entries. |
- If the data in this field can be used to identify a person, select a Personally Identifiable Information (PII) option to protect the privacy of users:
PII Option Description Yes, it’s PII. Encrypt and store it. The data is encrypted and stored. Only users with PII access permission can view it. Advanced search is not available for this field. Yes, it’s PII but not sensitive. Store it without encryption. The data is stored without encryption. Only users with PII access permission can view and perform advanced search using this field. No, it’s not PII. The data is stored without encryption. All users can view and perform advanced search using this field. - Enter a Default Value if you want a pre-filled value to appear when creating new records for this module.
- Select Is Mandatory if the field must be filled before saving a record.
- Click Done at the bottom of the pane to create the field.
- You can edit or delete a field by hovering over it in the form builder and clicking the Edit or Delete icon.
- Once you’ve added the required fields, click Save in the top right corner.
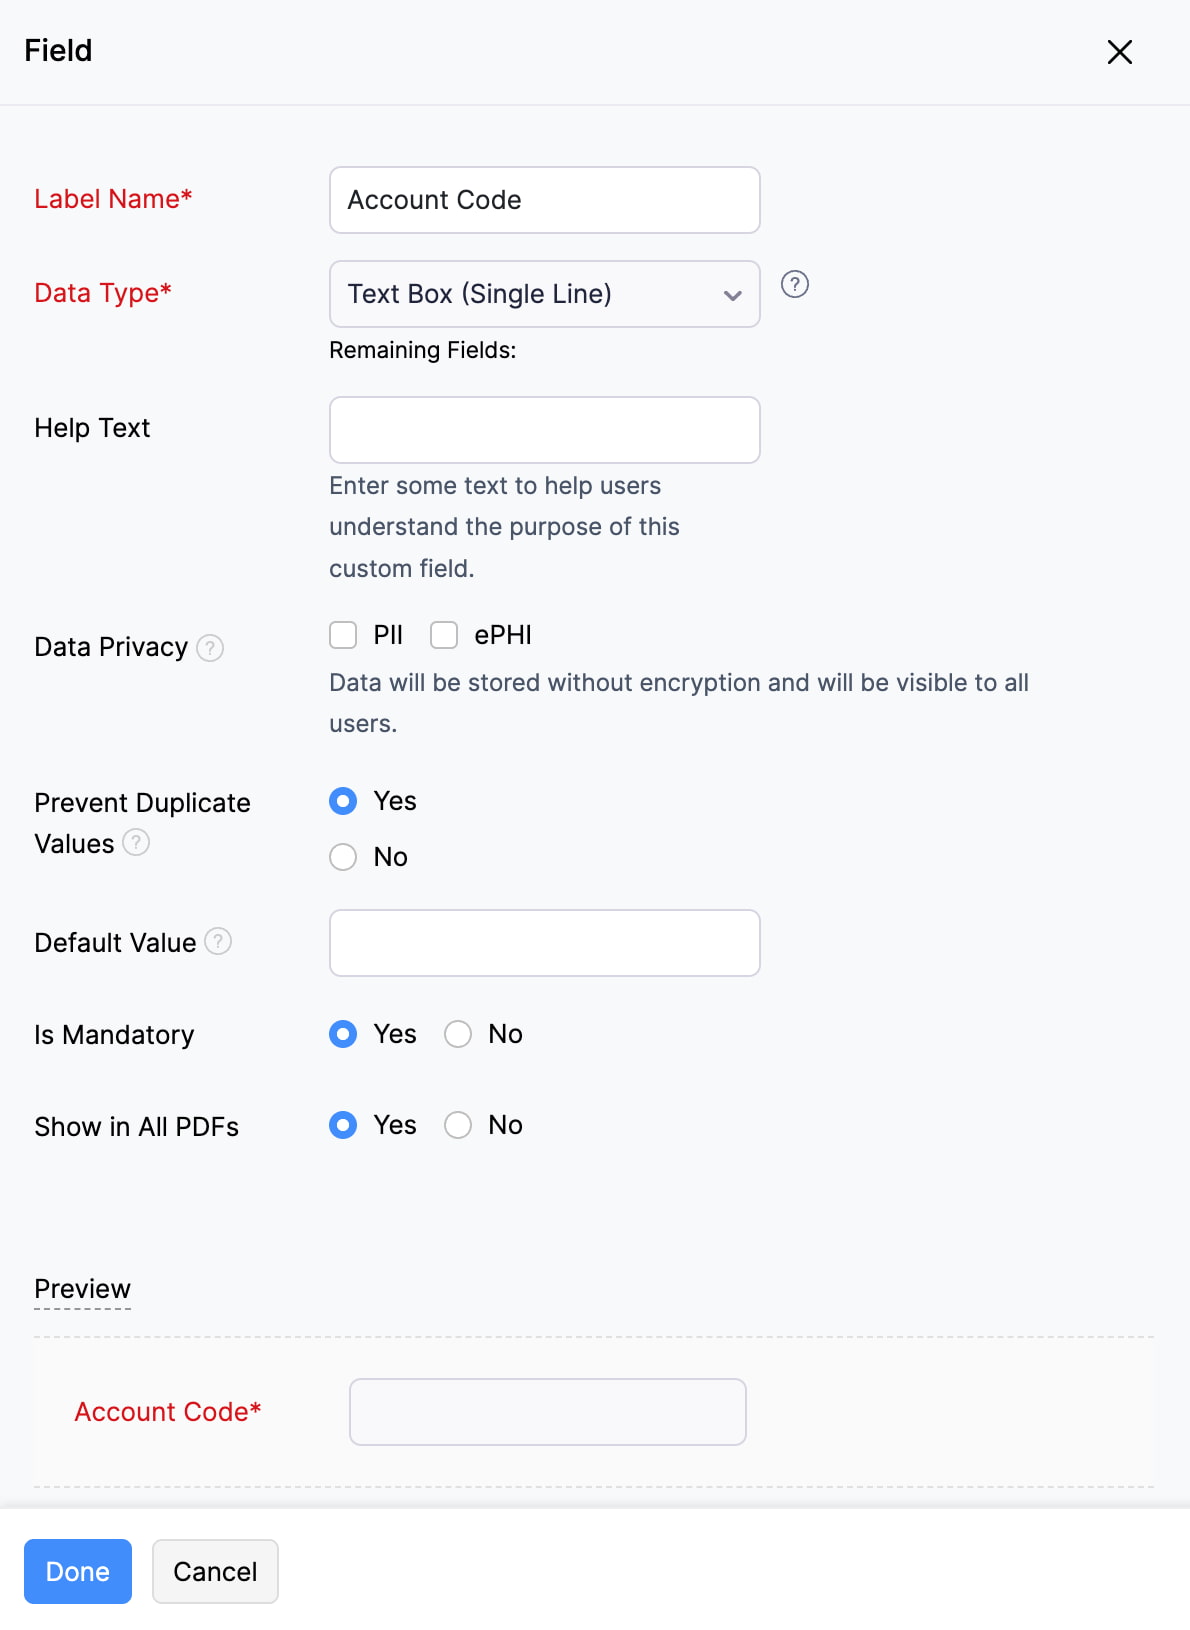
Insight: You can create up to 135 custom fields per module. The custom fields usage is displayed at the top of the Fields & Tables tab.
To add fields to an existing module later:
- Click Admin View on the left sidebar.
- Go to Settings on the left sidebar.
(OR)
Click Settings in the top right corner of the page. - Select the custom module under Custom Modules.
- Go to the Fields & Tables tab.
- Click Manage Fields and Tables in the top right corner. The form builder page will open.
- Follow the same steps as above to add fields.
Add Tables
You can create tables for the custom modules you create. Inside the table, you can add the required line items. The table will be added as a separate section in the form, and you can add fields as columns and customize them.
To add a table:
- Drag and drop New Table from the left pane into the preferred position in the form. The table will be added as a new section in the form.
- Enter the following details:
Field Description Table Name Enter the name of the table. Table Columns Click + New Column and select a data type from the dropdown. A column will be added to the table. You can update the column name by clicking the newly created column and entering the required name. Table Summary A summary section for the details provided in the table. Click + Summary Field and select a data type from the dropdown. A field will be added under table summary. You can change the field name by clicking the field name text and entering the required name. Aggregate is used to perform mathematical operations such as Sum, Average, Maximum Value, or Minimum Value on the data. This is available only for columns of the Amount, Decimal, Integer, and Percentage data type. Allow reordering of rows Check this option if you want to reorder the table rows when creating or editing records in the custom module. Set the maximum number of rows allowed in this table Check this option if you want to set the maximum number of rows that can be added to the table. Is this table mandatory? Click Yes if you want to make the table mandatory when creating or editing records. If not, click No. Show in all PDFs Click Yes if you want the table to be displayed in the custom module’s PDF templates. If not, click No. - You can edit or delete the table by hovering over it and clicking the Edit or Delete icon.
- Click Save in the top right corner.
To add tables to an existing module later:
- Click Admin View on the left sidebar.
- Go to Settings on the left sidebar.
(OR)
Click Settings in the top right corner of the page. - Select the custom module under Custom Modules.
- Go to the Fields & Tables tab.
- Click Manage Fields and Tables in the top right corner. The form builder page will open.
- Follow the same steps as above to add tables.
Add Sections
You can create sections within the form to organize fields and position them wherever you prefer.
To add a section:
- Drag and drop New Section from the left pane into the preferred position in the form.
- To add new fields, drag and drop data types from the New Fields section from the left pane of the page into the section.
- To add existing fields, drag and drop fields from the Unused Elements section from the left pane of the page into the section.
- Hover over the section and click the Edit icon to update the Section Name and select the Number of Columns.
- You can delete a section by hovering over it and clicking the Delete icon.
- Once you’ve built the form, click Save.
To add sections to an existing module later:
- Click Admin View on the left sidebar.
- Go to Settings on the left sidebar.
(OR)
Click Settings in the top right corner of the page. - Select the custom module under Custom Modules.
- Go to the Fields & Tables tab.
- Click Manage Fields and Tables in the top right corner. The form builder page will open.
- Follow the same steps as above to add sections.