Summary
Shopify is a user-friendly ecommerce platform that helps businesses take their sales online and reach customers through multiple channels like websites, mobile applications, marketplaces, and so on. Since it is a simplified platform, from small scale businesses to large enterprises, anyone can take their business online without any need of technical expertise. Once the business goes online, users can easily monitor the complete sales flow from receiving the orders to post sales analytics through the Shopify admin tool. Integrating Zoho POS and Shopify helps you manage your business both offline and online, creating an opportunity to serve your customers through multiple sales channels.
How does this integration benefit you?
Integrating your Shopify store with Zoho POS can help you manage inventory and achieve omni-channel sales.
Imagine you own an apparel store where you handle online sales through Shopify and offline sales via another platform. Since these two platforms are not integrated, you need to maintain inventory and manage sales separately. Every time you wish to alter item detail, you must do so on both platforms independently, which can be time-consuming when modifying multiple items together. Since the update is done manually, there is a risk of human error, which may affect your sales. In this scenario, you can integrate your existing Shopify store with Zoho POS POS to manage your inventory and sales together. Once integrated, the inventory can be used to achieve omni-channel sales and expand your online presence using integrations and add-ons such as Zoho Commerce and the Zoho POS Mobile Store.
Integrate Shopify Store
Acquire Access Token
Note
If this is the first time you are creating an app in Shopify, you must enable Allow custom app development before Step 4.
Log in to your Shopify account.
Click Settings on the home page.

Navigate to Apps and Sales Channels, and then select Develop Apps.

Click Create an app.

Enter the app name and click Create app.

Navigate to API Credentials and click Configure Admin API Scope.

Select the below API scopes and click Save.
read_inventory
write_inventory
read_products
write_products
read_customers
read_orders
write_orders
read_fulfillments
write_fulfillments
read_locations
read_merchant_managed_fulfillment_orders
write_merchant_managed_fulfillment_orders
Click Install App.

Click Reveal Token to view the access token, then copy it. It can only be viewed once, so copy and save it for later.

The access token that you copied can be used while setting up Shopify in Zoho POS.
Setup Shopify in Zoho POS.
Note
If this is the first time you are accessing the Shopping cart, click Enable Online Sales and follow from step 2.
Navigate to Settings > Integrations > Shopping cart.
Click Setup Now in Shopify.

Enter the Store name and enter or paste the Access Token, then click Connect.

After 30 minutes of successful authentication, all your existing data will start syncing through the auto-sync process.
Sync items and Orders
Data Synchronization
After the initial auto sync,
From Shopify to Zoho POS > All the existing items and orders with the customer details created in the Shopify will be synced with Zoho POS.
From Zoho POS to Shopify > All the stocks details of the common items present in Zoho POS will be synced with Shopify.
After the initial sync, all the data will be synced periodically with Zoho POS. After every auto-sync,
All the sales orders created in Shopify will be automatically generated for you inside Zoho POS.
Any new customers who make purchases from your Shopify store will be automatically added to your contacts inside Zoho POS.
The available stock of your items will be updated to Shopify automatically whenever there is a change in your physical stock levels.
When you create shipments for the orders from Shopify, the shipping information you have in Zoho POS will be automatically updated to your Shopify account.
After every auto-sync, the details of the data synced will be listed in the Overall Sync History.
Overall sync history
You can see the details of the data synced in this screen. Using sync date and time, sync type, and sync interval, you can view the details of sync listed under these three columns.
Records Synced: Displays the number of data that has been successfully synced.
Failures: Displays the number of data that have failed to sync. You can click the cell to view the reason for the failure.
Total Records: Displays the total number of data that attempted to be synced, which includes both Record Synced and Failures.
To access Overall Sync History:
Navigate to Settings > Integrations > Shopping cart.
Click Show Details next to the store you want to access.

Enter the Overall Sync History.

After checking the sync history, if you find any mismatching, missing, or failed syncs, you can retry the sync for that particular sync by clicking Resync in the last column of the same row.
Manual Sync
Even though all the data is synced periodically between Shopify and Zoho POS via auto-sync, sometimes you may need to sync this data manually to reflect the changes immediately.
For example, your auto-sync time interval is 15 minutes, and you have made some changes to the selling price of some items in Shopify. Since the current auto-sync interval is 15 minutes, you have to wait 15 minutes for the change to be reflected in Zoho POS. During peak business hours, even little wait times can have an influence on sales. Instead of waiting for auto-sync, you may perform manual sync immediately and have the changes reflected in Zoho POS.
Navigate to Settings > Integrations > Shopping cart.
Click Show Details next to the store you want to access.
Click Manual sync.

In the Sync Records Manually pop-up, choose either:
Last Sync time: To fetch the records from the latest sync time.
Specific Period: To fetch the records from a specific time interval with dates and timings irrespective of the latest sync time.
Click Initiate Sync.

After a successful sync, you can check the details of the manual sync by clicking Show Sync History below the Sync Manually section. You will be redirected to the sync history of the respective module.
Add Items to Zoho POS
After syncing the data, all the products created in Shopify will be synced with Zoho POS. However, these products will only be added to Zoho POS's inventory after your confirmation. This approach is implemented so that you can just add the necessary products to Zoho POS's inventory.
Imagine you run an entertainment store that sells music CDs, mp3s, and greeting cards with the help of Zoho POS. However, mp3s are only sold through your Shopify store. Due to maintenance costs, the price of products in the physical store is slightly more than in the online store. Since mp3s are only sold through Shopify, these items do not need to be added to Zoho POS's inventory. Furthermore, the products are sold at different prices, so the pricing must be adjusted before adding them to Zoho POS's inventory. Using the existing approach, you can sync every item but add only what's required now with necessary changes.
Navigate to Settings > Integrations > Shopping cart.
Click Show Details next to the store you want to access.
Enter the Overall Sync History.
Click the number on the Records Synced cell next to the Item fetch history.

You can perform three different actions on an item:

Confirm: Add the item to Zoho POS's inventory by clicking Confirm.
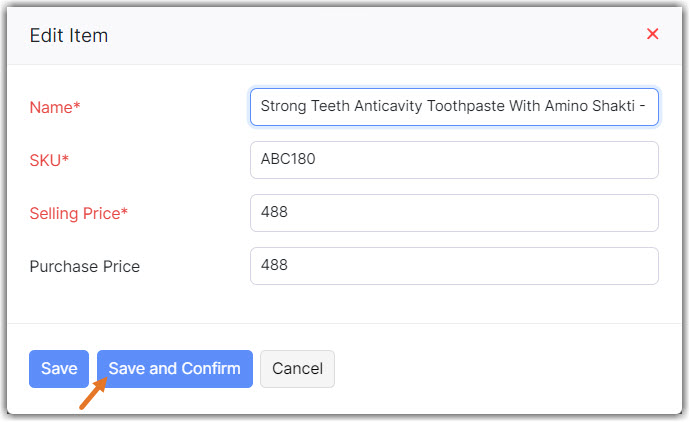
Update: Make changes to the item details like the Item Name, SKU, Selling price, and much more, and add it to Zoho POS's inventory by clicking Save and Confirm.
Link to an existing item: Link this item to an already existing item in Zoho POS's inventory. This option is helpful when you have items already existing both in Zoho POS and Shopify but are sold under different names. Choose an item from the Item Merge interface pop-up and click Merge to link the item from Shopify to its master item from Zoho POS.

To confirm items in bulk
If you want to directly add multiple items at the same time into Zoho POS's inventory, you can add them.
Navigate to Item fetch history.
Click Setup Now in Shopify.
Click the check box next to the items that you want to confirm and select Confirm Selected Items.

Note
We can only process an order if all of the items in it are in Zoho POS's inventory. If any of the items are not present in Zoho POS's inventory, they will be shown as unconfirmed items in the details section of the order.
Location Mapping
In general, if you only have one store with no other locations or warehouses on Shopify and Zoho POS, the data will be synced between Shopify and Zoho POS's inventory. However, if you have a store that uses multiple warehouses, you must link the right location to the appropriate Shopify store or account in order to sync the data effectively.
These are some of the scenarios based on which you need to map the location.
Single Warehouse Mapping
Imagine you run an electronics store with two warehouses and make online sales throughout India with the help of Shopify. Since warehouse 2 is located on the outskirts of the city, you want to manage all of your online sales through that warehouse to ease transportation. In this scenario, you should map warehouse 2 as your primary location so the data sync will happen between your Shopify store and warehouse 2.
Navigate to Settings > Integrations > Shopping cart.
Click Show Details next to the store you want to access.
Click Enable in the Choose a warehouse to track your orders and stock updates from section.

Choose your warehouse from the drop-down list at the Warehouse Preferences pop-up section and click Save.

Multi Warehouse Mapping
Imagine you run a hypermarket store with two warehouses and make online sales throughout India with the help of Shopify. Now, you are running your sales through both of your warehouses at two different Shopify locations. In this scenario, you can map the proper warehouses to their Shopify locations, assuring that data is synced between the locations.
Navigate to Settings > Integrations > Shopping cart.
Click Show Details next to the store you want to access.
Click Enable in the Locations in Shopify > Warehouses in Zoho POS section.
Read and understand the possible changes, then click Proceed.

Click Fetch Shopify Locations under the SHOPIFY LOCATIONS section to fetch the existing locations from your Shopify store.

Click the drop-down under the WAREHOUSES section to choose and map the right warehouses to the respective Shopify locations and click Save.
