


Introduction - Invoices
An invoice is a financial document which indicates the supply of goods or services between a vendor and a customer.
How does an invoice work?
The workflow of an invoice in Zoho Billing is as follows:
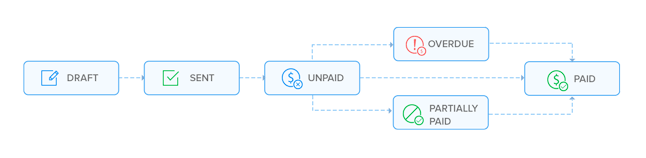
Create Invoice
You can create an invoice in Zoho Billing from the sales module or directly from the dashboard.
From the Sales module
- Go to Sales > Invoices.
- Select + New button in the top right corner of the page.
- Select the Customer Name, Invoice Date and other details.
- Enter the Item Details.
- After entering the required details, click:
- Save as Draft — to review the invoice before marking it as Open.
- Save & Send — to mark the invoice as Open and send it to your customer right away.
| Field | Description |
|---|---|
| Customer Name | The customer for whom the invoice is created. |
| Place of Supply | The location where the supply takes place. |
| Invoice# | Invoice number is auto-generated when the invoice is marked as Open. You can configure the prefix and series by clicking the Settings icon next to this field. |
| Invoice Date | The date on which the invoice is created. |
| Terms | The time period within which the customer is obliged to repay the invoice amount. |
| Salesperson | A salesperson can be allocated to each invoice. |
| Item Details | Type or select the items from the Items Details dropdown. |
| Tax | Select a tax type from the dropdown to apply to the selected item. |
Zoho Billing determines the VAT basis and transaction type based on line items that have a non-zero VAT rate applied to them:
- If all such items are services, the transaction type is set to Services and the VAT basis is Cash.
- If even one of those items is a good, the transaction type is set to Goods and the VAT basis is Accrual, regardless of whether other items in the invoice are services.
- Currently, an invoice cannot include both goods and services. If you need to bill for both in the same period, create separate invoices for each transaction type.
From the Dashboard
- In the Dashboard, click the + icon at the top of the page.
- Select Invoices under Sales.
Mark an Invoice as Open
When you mark an invoice as Open, Zoho Billing finalises the transaction, locks the invoice, assigns a transaction number, and applies a digital signature. The date and time at which this happens is called the issued time. Zoho Billing uses the issued time to determine which period a transaction belongs to in the tax archive and period closing summaries.
- An invoice must be marked as Open before it can be sent to your customer. Draft invoices cannot be sent directly.
- Once an invoice is marked as Open, it cannot be edited or deleted. You can create a correction invoice to make changes, or cancel the invoice instead of deleting it.
To mark an invoice as Open:
- Go to Sales on the left sidebar, and select Invoices.
- Select the invoice in the Draft status that you want to mark as Open.
- Click the More icon in the top-right corner and select Mark as Open.
- In the confirmation pop-up, click Mark as Open.
The invoice will be marked as Open and its status will change to Open.
Import Invoices
If you already have invoices in your business, Zoho Billing lets you import them in CSV, TSV, or XLS format.
To import invoices:
- Go to Sales > Invoices.
- Click the More icon in the top right corner of the page.
- Select Import Invoices.
- Click the Choose File button under Upload File. You can download a sample CSV or XLS file for your reference by clicking sample csv file or sample xls file.
- Choose the Character Encoding and File Delimiter for your file.
- If you want your invoice number in the imported file to be auto-generated, mark the box Auto-generate Invoice Number.
- You can also Link Invoices to its corresponding Sales Orders by marking the box.
- Click Next.
- Ensure that all the fields are mapped correctly in the Map Fields page.
- To use a similar import format next time, mark the box Save these selections for use during future imports.
- Click Next.
- Click Import.
- When an imported invoice is marked as Open, Zoho Billing assigns a transaction number automatically following the configured transaction number series.
- Open invoices cannot be deleted. If you need to review an invoice before marking it as Open, import it in Draft status first and mark it as Open only when you are certain the details are correct.
- Imported invoices are included in the tax archive and daily period closing summaries.
Edit Invoice
To change details of an existing invoice:
- Go to Sales > Invoices and select the invoice whose details you want to edit.
- Click the Edit icon.
- Make the necessary changes and click Save.
Send Invoice to Customer
If you have saved an invoice as a draft and later marked it as Open, you can send it to your customer manually. Here’s how:
- Go to Sales > Invoices and select the invoice you want to send.
- Click Send Mail.
- Go through the template and click Send.
Mark Invoice as Sent
You can manually mark an invoice as Sent. This allows you to record payments for the invoice. To mark an invoice as Sent:
- Go to Sales > Invoices.
- Select the invoice which is in the Open status that you want to mark as Sent.
- Select Mark as Sent.
If you have enabled Customer Portal for the customer, they can view the invoice in their portal and perform actions.
Share Invoice Link
You can generate a link for an invoice in Zoho Billing and share it with your customers. Using this link, your customer can view and pay for that invoice.
Note: Only invoices with the Sent status can be shared.
To generate and share an invoice link:
- Go to Sales > Invoices.
- Select the invoice for which you want to share the link.
- Click Share.
- You can generate the link for Public or Private & Secure access.
- If you have selected Private & Secure, your customer can view the invoice from their Customer Portal.
- If you have selected Public, click Generate Link.
- Copy the URL and share it with your customer.
Make Invoice Payments via Public Link
When your customer opens the shared URL or clicks Pay Now in the email sent for invoice payment, a page displaying the invoice number, invoice date, and status opens.
- They can pay for the invoice from this page by clicking Pay Now.
- If your customers wish to view the invoice, they can click View Invoice next to the invoice number.
- Enter their email address in the popup to verify their identity.
- Click Verify.
They can now securely access and view the invoice details.