Quickstart Guide for Extensions
Extensions—prebundled software components that can add a set of custom features to your Zoho CRM—enable developers to deliver a range of functionality not available by default on our system. This allows our partners to streamline the customization process and extend the capabilities of Zoho CRM, including integration with other third- party services.
To facilitate the exchange of smart extension solutions, we've established the Zoho Marketplace where users can list extensions they’ve created with Zoho Developer Console. Once an extension has been listed, other Zoho CRM customers will be able to install directly from the marketplace.
To model how you can create your own extensions, this guide will walk you through the process for an extension, named “Roll up amount to Account.”
This extension adds the closed won potentials of any account and shows the total revenue of all the potentials over the Account module. Let's assume you've received and fulfilled orders for a product 15–20 times in a given period of time. To better target your marketing budget, you want to know which customers are generating the highest revenues. To get this information, you could use the Reports module to analyze sale performance, but with this custom extension, you can automate the process and simplify your workflow.
Step 1: Extension Pre-requisites
- Get access to Developer Console
- Identify and prepare extension requirements
Step 2: Create Your extension
- 2.1 Set up your extension
- 2.2 Name the workflow rule
- 2.3 Specify the rule trigger
- 2.4 Set the criteria
- 2.5 Associate your custom function to the workflow rule.
Step 3: Testing the Extension
Step 4: Publishing the Extension
Step 1: Extension Pre-requisites
Get access to Developer console
Before you start building your extension, first you’ll need to set up a Zoho Developer account by visiting https://zoho.com/developer.
If you are an existing Zoho customer, you can get access to the Developer Console by logging in using your Zoho credentials.
For new users, to get access to Developer Console
1. Go to https://zoho.com/developer and click Sign Up Now.
2. Fill in the necessary details and click SIGN UP FOR FREE.
3. You will receive an email with a confirmation link to your registered email address. Click that link and follow the steps provided to complete your registration.
Now you have a Zoho Developer account and you can begin the journey of your first extension creation.
Identify and prepare extension requirements:
Before you get started, it can be helpful to create a list of features that the extension is going to add in the Zoho CRM. Not only will this help you strategize the best way to implement the extension, but it will also give you an idea of the steps you need to take before you begin the process of programming your extension. This preparation could include creating a custom field, setting up a custom module or building a webhook for a third-party service. In our example extension, we first need to create a custom field called 'Revenue Generated' in the Accounts
Step 2: Create your extension.
2.1 Set up your new extension
- Click the Extensions for Zoho CRM in the Developer Console homepage.
- Click Create Extension.
- In the New Extension for Zoho CRM page, Specify the Extension's name.
Once the name is specified, a Unique Namespace is automatically populated. Once created the Namespace cannot be changed. - Provide a short description for the extension.
- Click Create.

2.2 Set up a workflow rule within the extension.
Workflow rules are a set of conditions that trigger specific actions within your application, such as sending email alerts, assigning tasks or updating the information in your records.
- Open the Workflow tab in the left-hand panel.
- Choose a name for the rule and give a brief description.
- Click Next.

2.3 Specify your rule trigger:
To set up a new rule, you must choose which type of execution trigger is associated with that rule. There are two types of rule triggers:
- Record Action - trigger rule when records are created, edited, created/edited, deleted or a specific field is updated.
- A Date Field's Value - for records matching rule criteria, trigger rule either monthly or yearly based on the value in the selected date field.
- Select A Record Action from the drop down menu.
- Click Create or Edit.
- Click Next.

2.4 Set Rule criteria:
1. Select Execute workflow whenever the criteria is met.
2. Set the criteria pattern as follows: Stage | Contains | Closed Won
3. Click Next.

2.5 Associating your Custom function to a workflow.
Custom functions allow you to use procedural logic to automate processes that are not covered by Zoho's default actions. In this case, we need to create a function that will roll up all the potential amounts in a particular account and show its summation in the custom field Revenue Potential.
1. Click on Associate button at the bottom of the page.

2. In the following screen, you'll be able to create your custom function using Zoho’s DELUGE script editor. For our example extension, we need the custom function to perform the following sequence of actions:
- Points at a potential and fetches its account id.
- Use the account id to fetch all the potentials in that account.
- Sum up all the closed won potentials in that account and show the result in the Revenue Generated field in the Account module.

code for the custom function:
// Fetch account id from potential
accountid = input.potential.get("ACCOUNTID");
// We run an API to store all the Potential ID's from the account id
potentials = zoho.crm.searchRecordsByPDC("Potentials", ("accountid"), accountid);
total = 0.0;
for each potential in potentials
/* Check each potential's stage and add up the closed won one's */
{
stage = potential.get("Stage").toLowerCase();
if (stage.contains("closed won"))
{
total = (total + (potential.get("Amount")).toDecimal());
}
}
/* Finally update the total amount in the custom field revenue potential we created in account module */
updateResp = zoho.crm.updateRecord(("Accounts"), accountid, { "REVENUE GENERATED" : total });
3. Create a name of custom function and click Save and Close.
Step 3: Test your extension
Once you’ve finished building your extension, it’s time to test it. Zoho makes this easy by providing an isolated sandbox environment where you can test the extension without affecting the actual CRM in which it is going to be installed. Click Test your Extension at the top of the Extension Details page.

The extension can be tested in a sandbox environment.
It provides you with an isolated environment where you can test the extension without affecting the actual CRM in which it is going to be installed.
Step 4: Publish your extension
After successfully testing of the extension you can publish the extension.
Follow the steps:
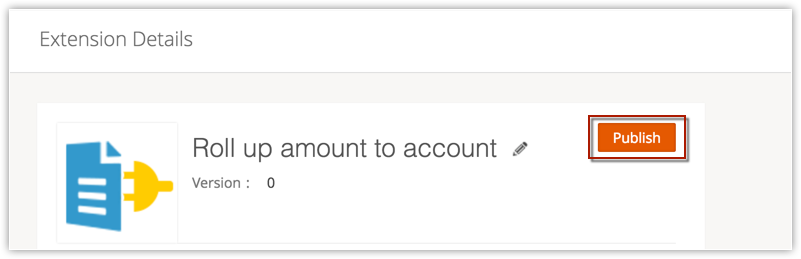
- Open the Extension Details tab in the left-hand panel.
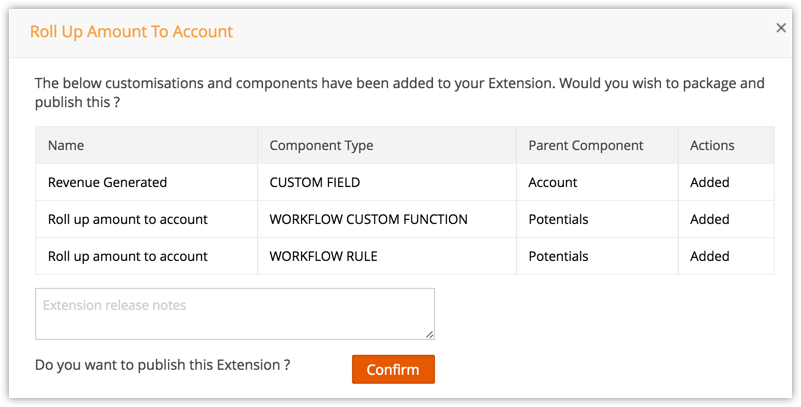
- Click Publish next to the name of the extension. A window will open displaying all the fields and custom function you have added.
- Review your extension, add remarks so that it becomes easier for us to review the extension and click Confirm.
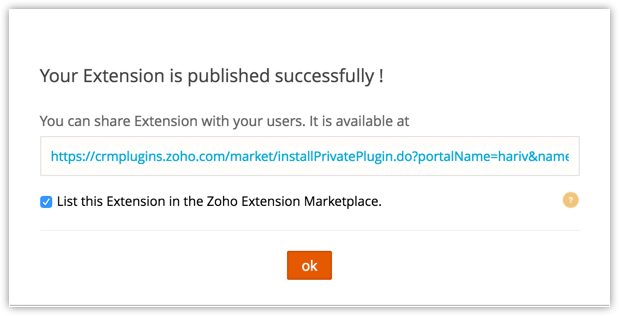
- After you click Confirm, a popup window will appear, displaying the URL for your extension. To install the extension, navigate to the URL by copy the link to another browser window.
- Follow the same process to grant access to others users: simply send them the URL and have them log in to their account to install the extension.
- If you would like to make your extension publicly available on the Zoho Marketplace, click the check box at the bottom of the popup window. Your extension will be submitted to our review team, and if accepted, other users will be able to install it on their CRM systems.


Note
By default, your extension will be private, meaning it will not be listed on the Zoho Marketplace. If you forget to save the URL, you can find it in the Extension Details page.
It is also possible to create an extension that integrates different third-party applications with Zoho CRM, as different customers are in need of different integrations and this will help them achieve their requirement. These are the methods which we support to integrate the extensions with the third-party services :
* Token based authentication by using Custom Variables.
* OAuth 2.0 by using Connectors.
You can now start building your extension here.