Custom Buttons & Links
How Can I...
Based on the specifics of your industry and CRM workflow, add functionality to your interface with custom buttons and links.
Custom buttons
Zoho CRM offers standard buttons that execute predefined actions. For example, Convert is a standard button used to convert a Lead to Contact, Account, or Potential. Similarly, Clone is another standard button that is used to clone any record within your CRM account. If you need to add functionality not covered by our standard interface, you can create a new button and define a set of custom actions to fit your particular workflow.
Every custom button must have a specific action associated with it. You can choose your button action in 2 ways:
- Invoke a URL: Make it easy to access strategic information from within your CRM system with the click of a button. Zoho supports both static and dynamic URLs, giving you a high degree of flexiblity.
- Write your own custom functions: Using our Deluge Script Eeditor, you can define your own button actions by writing a new custom function.
Button Permissions
Custom buttons are available for all standard and custom modules except Activities module of Zoho CRM.
Create a new button
To create a a new button
- Log in to Zoho Developer console and click Extensions for Zoho CRM.
- Select the extension you'd like to modify and click Edit.
- Click Customize in the left pane, then select the Links & Buttons tab.
- Click Create New Button.
- In the Create Your Button page, do the following:
- Choose the module where you want to create a custom button.
- For easy identification, name your button.
The button name should not exceed 30 characters. - Click the Add Description link and specify the details of your custom button.
The description cannot exceed 250 characters. - Choose the location of your custom button from the drop-down list.
Custom buttons can be placed in 5 different places in Zoho CRM - Create/Clone page, Edit page, View page, List View page and next to each record in the list view.
You can add a maximum of 2 buttons in each of these locations.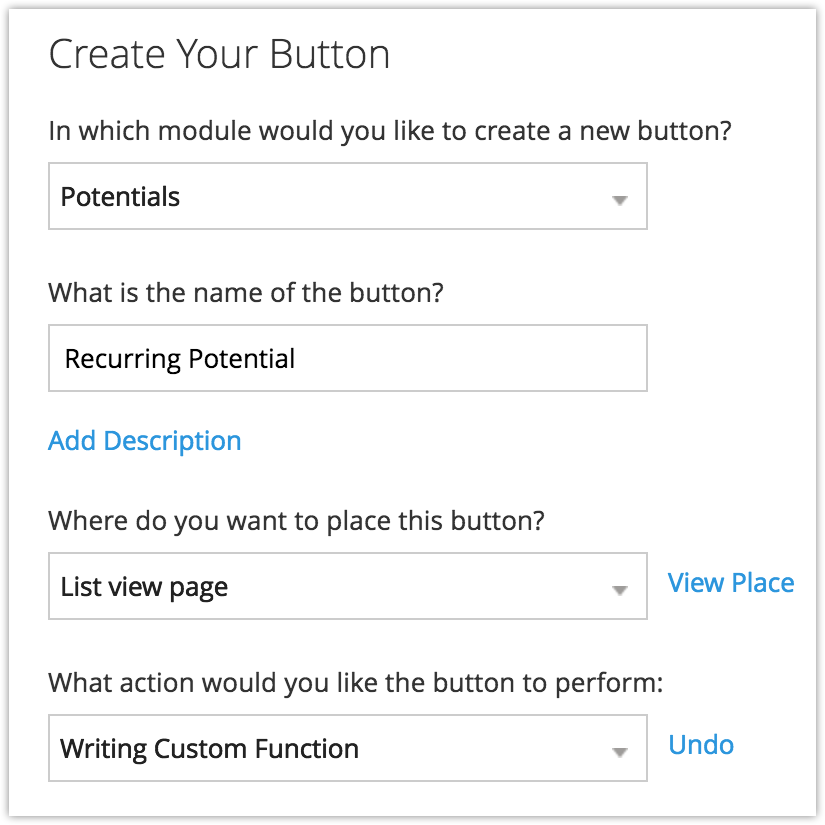
- Choose an action to be executed when a user clicks the custom button. You should define your own button action either by invoking a URL or writing a custom function.
See Also, Button Actions
- Click Save.

Define button action
Every custom button should be associated with an action. You can choose the button action either by Invoking a URL or by Writing your own custom function
Invoke a URL
By invoking a URL, you can initiate an action in your current CRM window, a new window or a new tab. In its simplest form, this allows you to link to a static website that may be useful to your team, but Zoho CRM also supports merge tags, which make it easy to auto-generate links to external websites based off the information contained within your CRM database.
Visit Company profiles of your Leads in Zoho CRM: All the contacts in your account can have a field where you specify the Company Name. By creating a URL that is associated with a particular company, you can directly go to the account's company profile by just clicking the custom button (This custom button can be placed while creating, cloning or viewing a record based on your requirements). For example: The link can be: http://techcrunch.com/topic/company/${Accounts.Company}
Note
- The URL's content can be dynamic, and you can merge the URL with module fields. In case of List view, the merge fields should be seperated by commas.
To invoke a URL
- Create a custom button.
- Open thw Button Action drop-down list and choose Invoke a URL.
- Enter the value to construct the URL.
The URL length should not exceed 3000 characters. - Select the Fields from the drop-down list. This will insert the field variable as part of the URL.
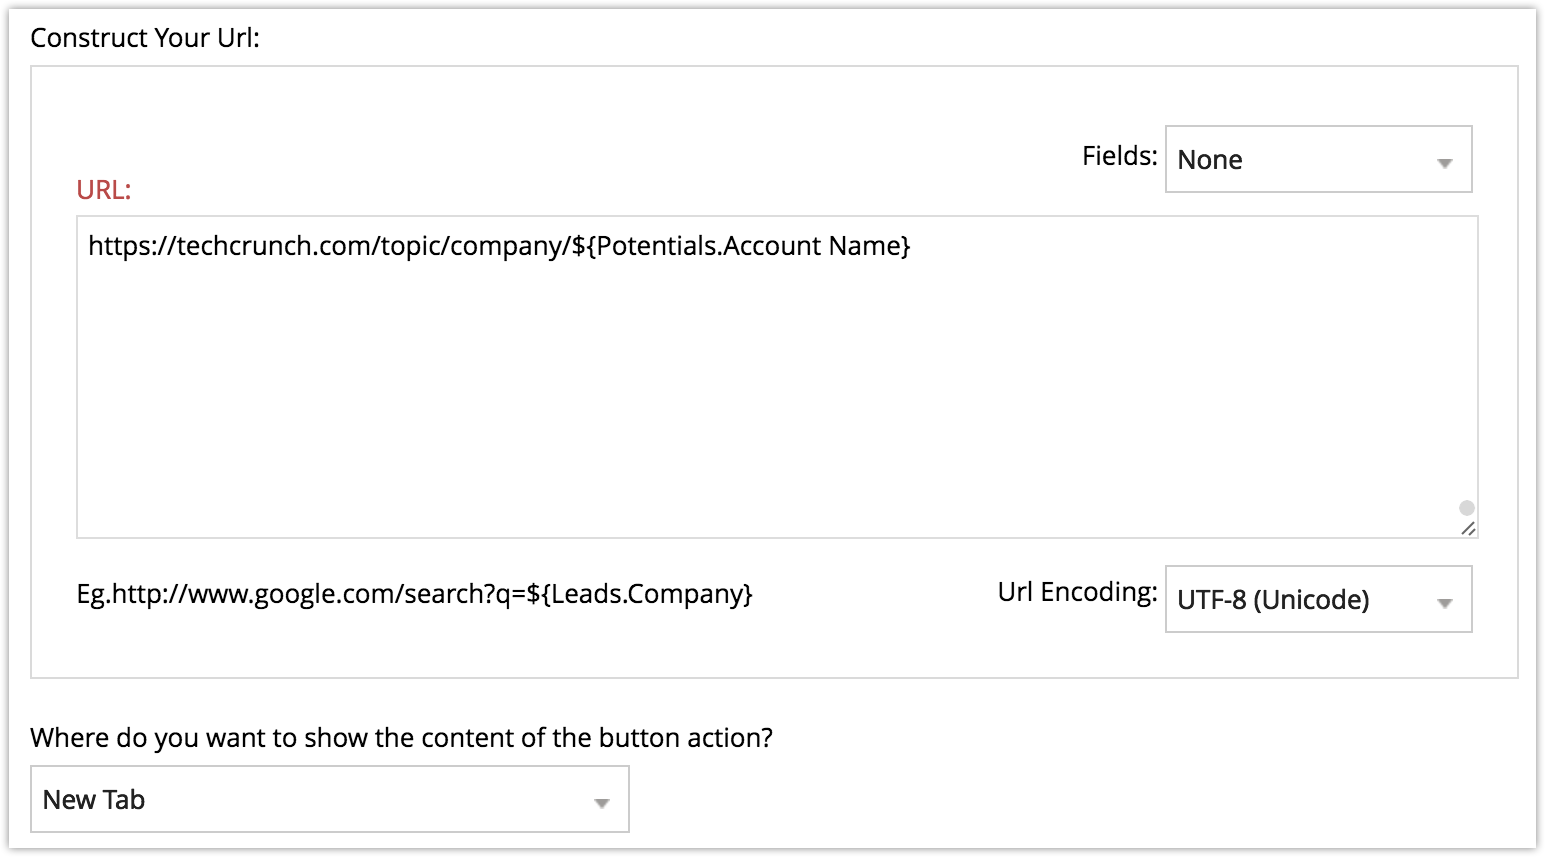
- Choose where you want to show the button action- New tab or New Window or Exisiting tab.
- Click Save.

Writing a custom function
Using our Deluge Script Editor, you can start defining your own button action by writing a new custom function.See Also Deluge Script - Reference Guide .
To write your own custom function
- Create a custom button.
- Open thw Button Action drop-down list and choose Writing Custom Function.
- Follow these instructions in the Workflow Custom Functions dialog box:
- Specify a name for the custom function. (Note: The module will be auto-selected based on the module for which you are creating the custom button.)
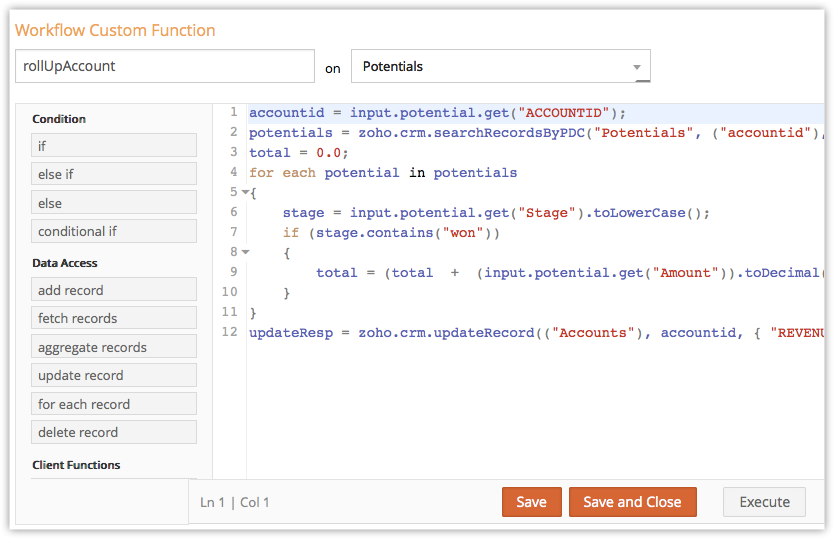
- Write the function in the Deluge Script Editor.
See Also Program Custom Functions

- Click Execute to validate your code.
If there are no errors, your script is ready to associate with the custom button. - Click Save to Button.
The script will be associated with the custom button.
Whenever you click on the custom button, the function will be triggered and the required action will be performed in one click.
Edit a custom button
You can edit the buttons that you create for your extensions whenever required.
To edit a custom button
- Log in to Zoho Developer console and click Extensions for Zoho CRM.
- Select the extension you'd like to modify and click Edit.
- Click Customize in the left pane and select the Links & Buttons tab.
- In the Links & Buttons page, all the existing custom buttons will be listed.
- Choose the required button that you want to edit and click the Edit icon [
 ].
]. - Make the necessary changes and click Save.
Delete a custom button
You can delete the custom button anytime.
To delete a custom button
- Log in to Zoho Developer console and click Extensions for Zoho CRM.
- Select the extension you'd like to modify and click Edit.
- Click Customize in the left pane and select the Links & Buttons tab.
- Choose the button that you want to delete and click the Delete icon [
 ].
]. - A confirmation message will appear. Click Delete.
Note
- For extensions that are already published, any changes will only take effect after you re-publish your extension. Once you've published it again, new users who install your extension will automatically have the most recent version. Existing users will have to update to latest version.
Custom links
Links make it easy for users to access third-party applications and URLs from the CRM interface. With this flexible and customizable extension, you can give users the right information when and where they need it most. To cut down on how much time end users must spend inputting information, merge tags allow you to create dynamic links, which generate unique URLs based on data contained within your CRM.
For example, suppose you want to link your contacts' twitter account in the Record Details page. Rather than adding each URL individually, you want the link to be auto-generated by combining the twitter URL with the data in the Twitter ID field of the Contacts module. To do this, add the merge tag ${Contacts.Twitter ID} to the end of the twitter URL:https://twitter.com/#!/${Contacts.Twitter ID}. Now, if you open the Record Details page for any Contact, you'll see a link to their individual twitter feed.
Add a link
To add links
- Log in to Zoho Developer console and click Extensions for Zoho CRM.
- Select the extension you'd like to modify and click Edit.
- Click Customize in the left pane and select the Links & Buttons tab.
- Click Create Link.
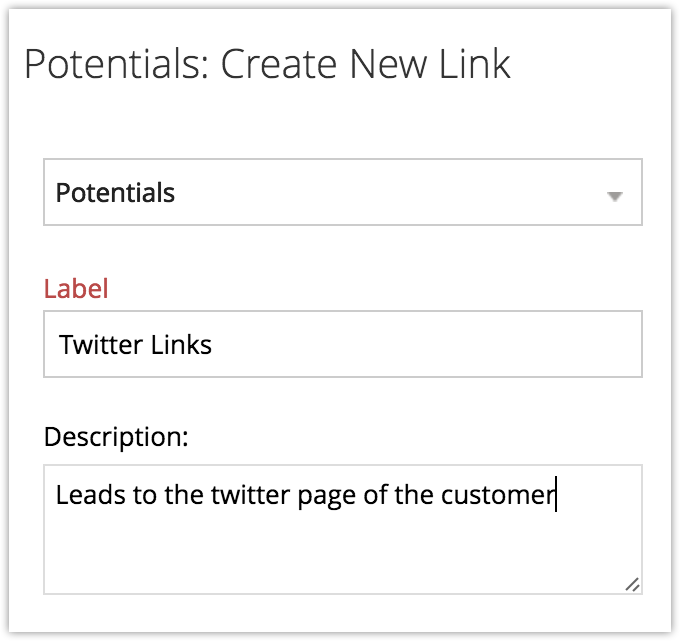
- Follow these instructions on the Create Link page:
- Select the module in which you'd like to create the link from the drop-down list.
The link will appear in the Record Details page for this module. - Enter a name for your link in the Label text box. The name cannot exceed 50 characters.
- Enter a description for your link. The description cannot exceed 250 characters.
- Select the module in which you'd like to create the link from the drop-down list.
- Enter the destination URL in the text box provided. The URL cannot exceed 3000 characters.Note:
If you would like to open a static URL, leave the 'Field Setting' as None. If you would like to use merge tags to auto generate a link based on data from your CRM system, select the field from the Fields drop-down list. This will insert the field variable as part of the URL. Only fields associated with the module you selected when creating your button will appear in the menu box.) - Choose the type of URL encoding.
- Click Save.

Delete a link
You can create a maximum of ten links per module. These links can be deleted if they are no longer useful.
To delete links
- Log in to Zoho Developer console and click Extensions for Zoho CRM.
- Select the extension you'd like to modify and click Edit.
- Click Customize in the left pane and select the Links & Buttons tab.
- Select the module that corresponds to your link.
A list of all the links for that module will appear. - Click Delete icon [] corresponding to the link.
- A confirmation window will appear. Click OK.