Building a Client Side Application
How Can I...
This guide will furnish you with details that will help you in building a client-side application. For ease of understanding, we have chosen a simple "Helloworld" widget to explain the steps involved. Embed this widget in a related list that will display the API response for user and record information of a particular record in your CRM's Leads module.
To know more about Connected Apps and widgets, go here.
Create a Connected App
To configure a widget in your extension, you need to create a connected app. The following steps will guide you through the process in detail:
- Log in to developer.zoho.com which is the Zoho CRM’s developer console.
- Navigate to an existing extension or create a new one inside which you wish to configure your "Helloworld" widget.
- Click Connected Apps located in the left pane.
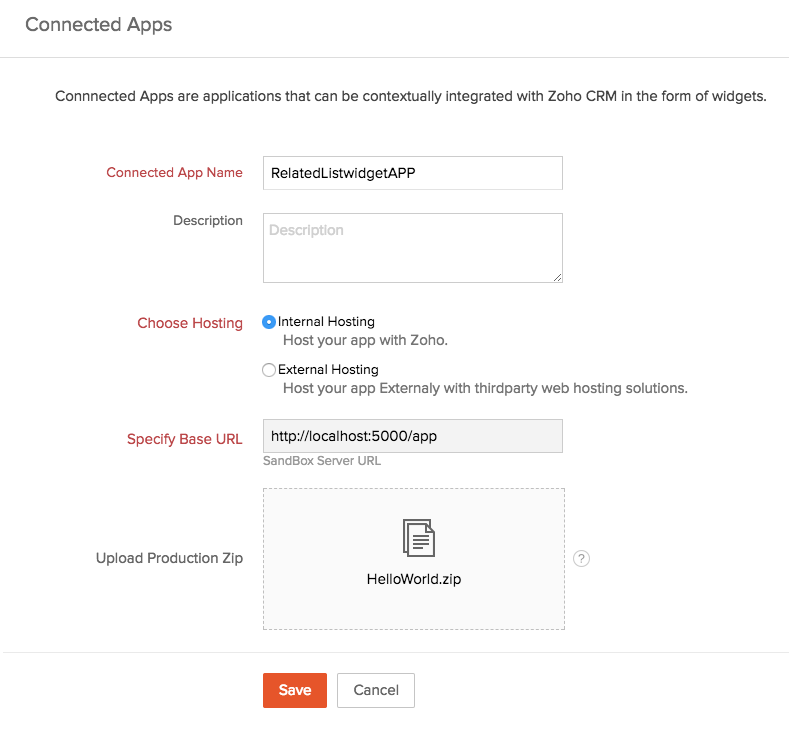
- Provide a name and description for the Connected App.
- Choose Hosting
There are two ways in which the application can be hosted - Internal and External. Zoho cli is the command line interface which uses Zoho's servers to host the App internally. Similarly, the app can be hosted externally using any other web hosting site and made ready for production.
Internal Hosting
The application's static contents can be hosted with Zoho. Zoho's widget development cli helps you to develop, test and package your widgets.
To Host Internally
- In the Connected Apps page, select the option 'Internal Hosting' for Choose Hosting.
- Make use of the commands provided in Zoho cli, to create a "helloworld" project using the command $ zet init.
- Select "Zoho CRM" from the list of services and provide the project name as "helloworld". This initializes your project directory and downloads all the dependencies.
- All the files that are required for rendering your widget needs to be placed inside the "app" folder of your helloworld project.
- Validate and pack the application using appropriate commands (as indicated in Zoho cli). This will create a "hellowworld.zip" file under the folder "dist" of your project directory.
- Start your server using $ zet run command in the port number 5000 (as indicated in Zoho cli). This will help you to start a local HTTP Server that will allow you to run your app locally and test it in your extension's sandbox.
- Upload the zip file "helloworld.zip" by clicking on 'Upload app package'.
- Click Save.
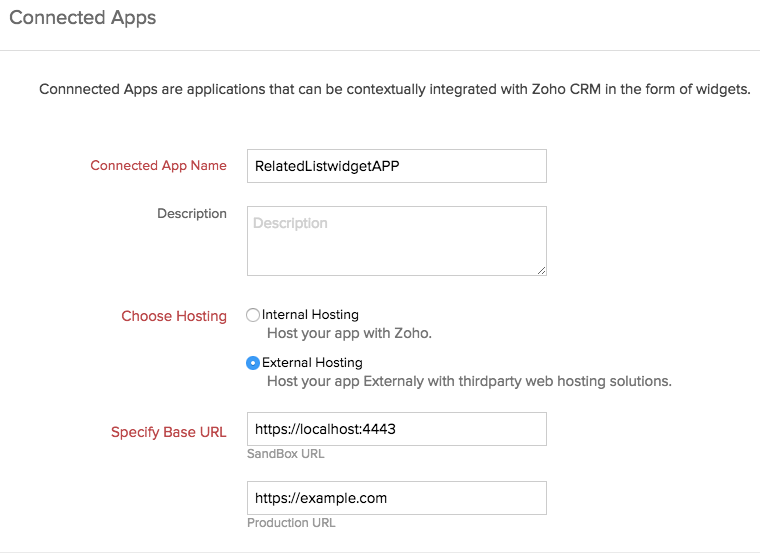
External Hosting
Simple client-side applications can be hosted with Zoho. To integrate complex applications, in-house tools using widgets, choose external hosting.
To Host Externally
- In the Connected Apps page, select the option 'External Hosting' for Choose Hosting.
- Specify the Sandbox URL and Production URL where the source files of your application are available.
- Click Save.
- Start the external server and check the listing of all the source files.
Create the "Helloworld" Widget
This section explains the creation of a sample "Helloworld" Related List Widget in the Lead's Module.
The steps to create the widget are as given below:
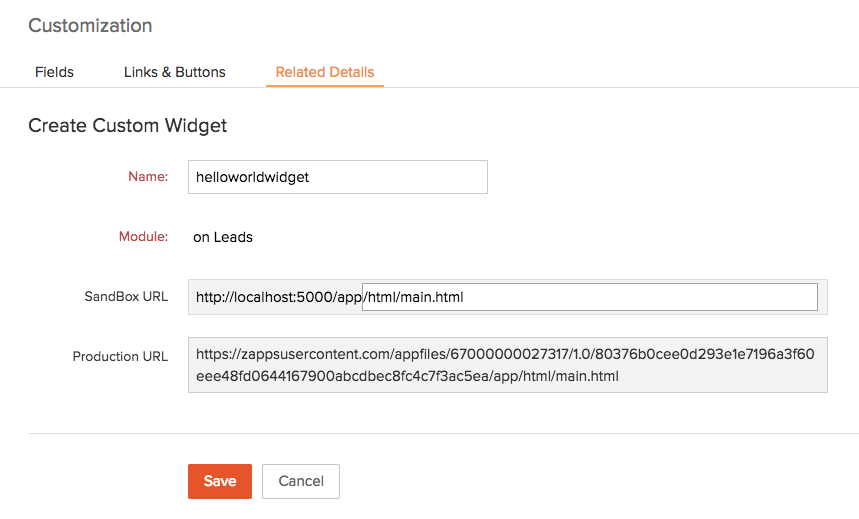
- Click Components located in the left pane.
- Select Related Details tab.
- Click on Add Widgets button.
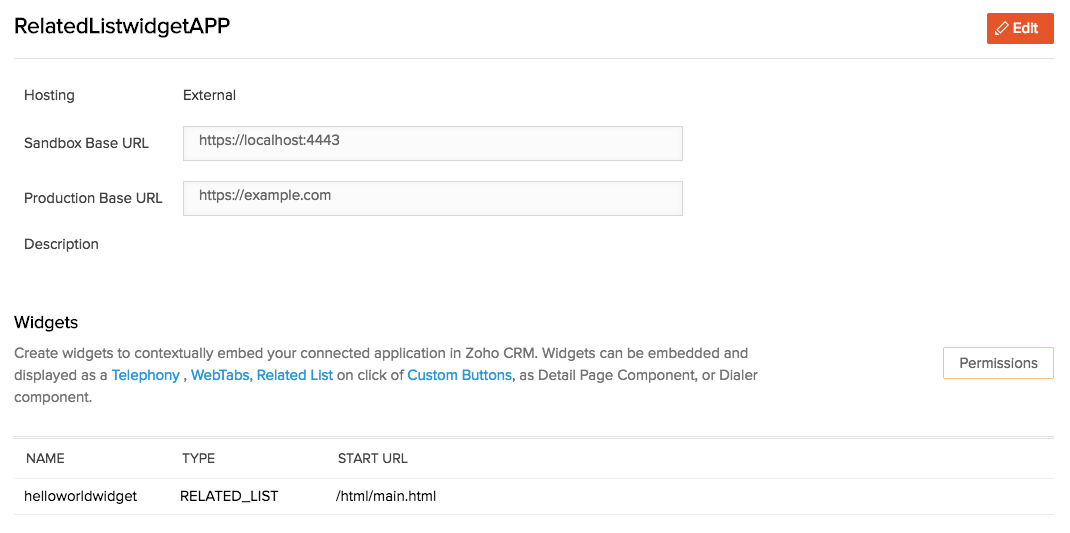
- In the Create Custom Widget page, provide the following details:
- Name - helloworldwidget
- Module - Leads
- SandBox URL - provide a resource path for the widget. Resource path is the relative path to the main view page of your widget. In this case, it is “/html/main.html”.
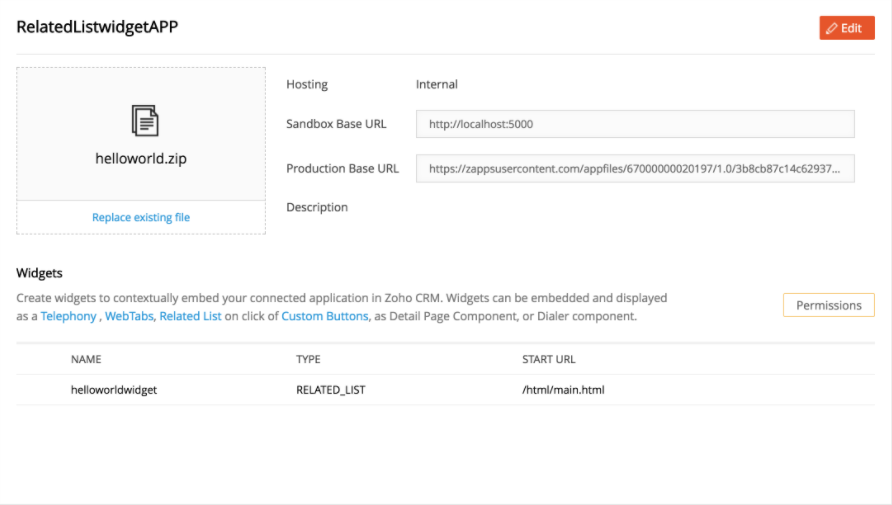
- If the App is hosted internally, the widget is created and associated with the Connected App as shown below:
- If the App is hosted externally, the widget associated with the Connected App appears as shown below:
- Upon successful creation of the related list widget, click Test your Extension in the top right corner of your console.
Note
To allow mixed content:
- Click the shield icon in the far right of the address bar.
- In the pop-up window, click Load anyway or Load unsafe script.

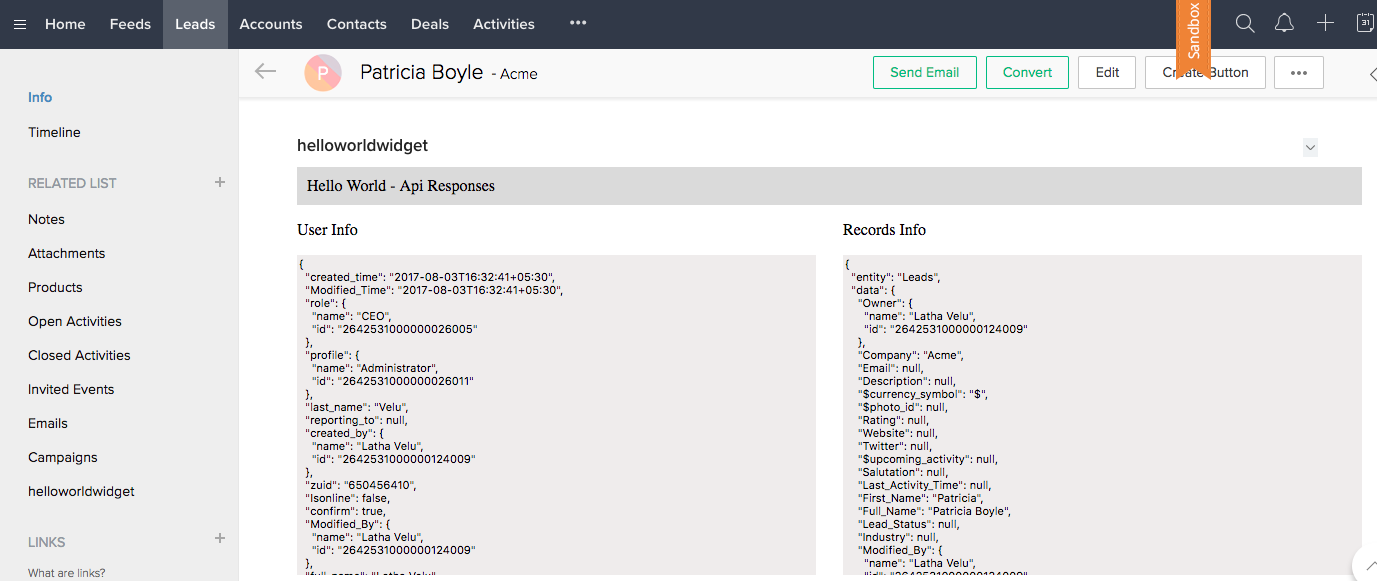
- Open an existing record from the Leads module and scroll down to view the Related List created as part of your "Helloworld" widget.


Setup the files structure for "HelloWorld" Widget
The source code for a simple “helloworld” widget is available here.
The “HelloWorld” application consist of the following files:

File | Description |
main.html | Main UI Layer of the widget. |
style.css | Style sheet for the html. |
custom.js | Business logic is defined here. It tells how the app behaves to events happening inside Zoho CRM. |
ZohoEmbededAppSDK.min.js* | Zoho CRM’s Javascript sdk. |
Let’s take a look at the detailed description for these files.
main.html
Primary user interface of the app where SDK library, custom js and style sheets are included.
style.css
Custom style sheet for the app is defined here.
custom.js
Custom script file where the app's business logic is defined and the SDK is initialized along with event listeners.
ZohoEmbededAppSDK.min.js*
Javascript SDK that allows you to control zoho CRM’s UI and manipulate data on the logged in user’s context. You can find the latest version of our SDK here.
"HelloWorld" application returns the User information and Record information of a particular lead record in Zoho CRM as the API response.The output is rendered in a Related List widget.
Register the Event Listeners
And in some cases where contextual data should be passed to the connected app, you need to register for the appropriate events. Registering an event means defining a function that will be executed when a certain event is triggered by your application. Event can be something that the browser does or something a user does. Following are examples of some events:
- DialerActive - Triggered everytime softphone window is toggled
- Dial - Triggered when Call icon inside ZohoCRM is clicked
- PageLoad - Triggered when ever an entity Page (Detail page) is loaded
Below given sample code can be used to subscribe to a PageLoad event in your widget:
})
The below code snippet is used to initialize your widget and start listening to events in your CRM application:
ZOHO.CRM.CONFIG.getCurrentUser() is the API that returns the user infomation such as name, Id, role, profile etc.The code to invoke an API is
});