Using the Survey Extension
How Can I...
The end user of a Vertical CRM solution with the Zoho Survey extension can create, publish, and send surveys. The details of how the end user can perform these and other operations are detailed in the sections below.
Create a survey
To create a survey, perform the following steps:
- Log in to the Vertical CRM application.
- Click the logo at the top left corner and select Survey.
The vertical survey will be opened in a new web page tab.
- In the My Surveys page, click Create a New Survey.
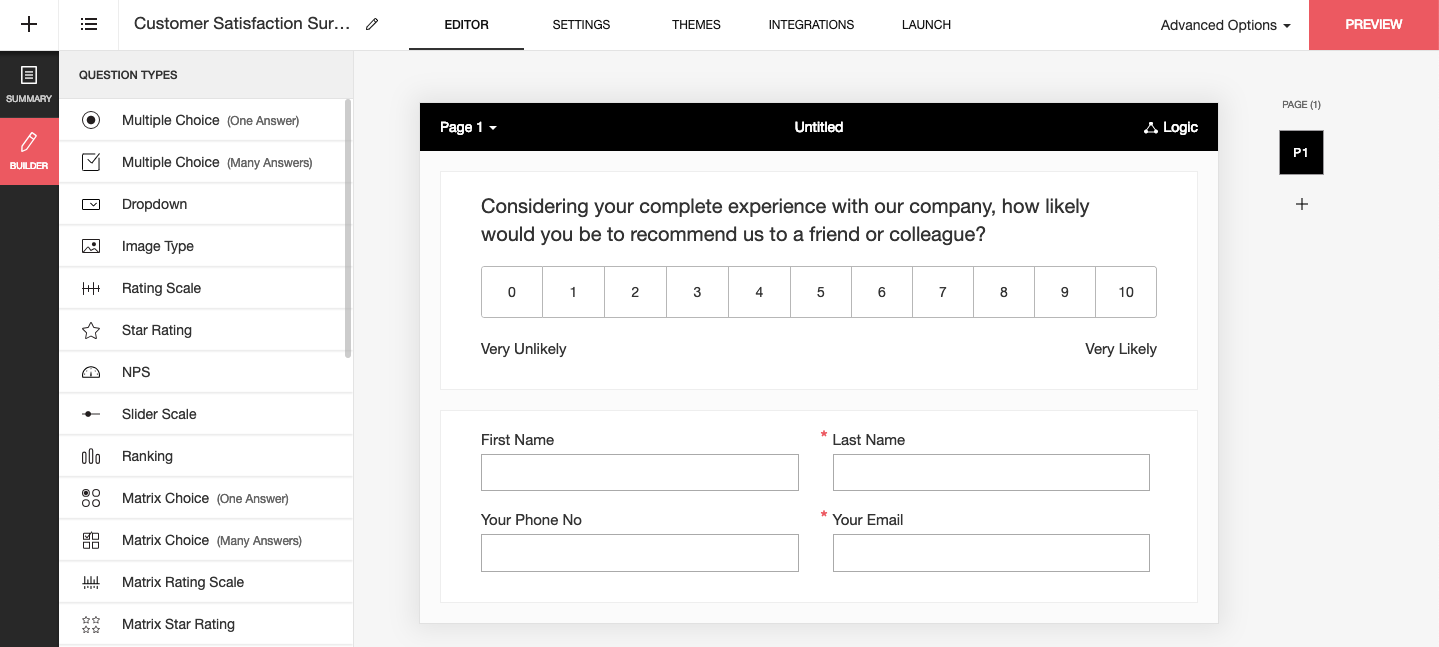
You can create a survey using a blank template, a pre-built template, or an existing survey. - Enter a name for the survey in Survey Name field and click Create Survey.
- Add the necessary fields and questions.


Publish a survey
To publish your survey, perform the following steps:
- Click Publish for your survey in the My Surveys page.
Click Publish in the following page.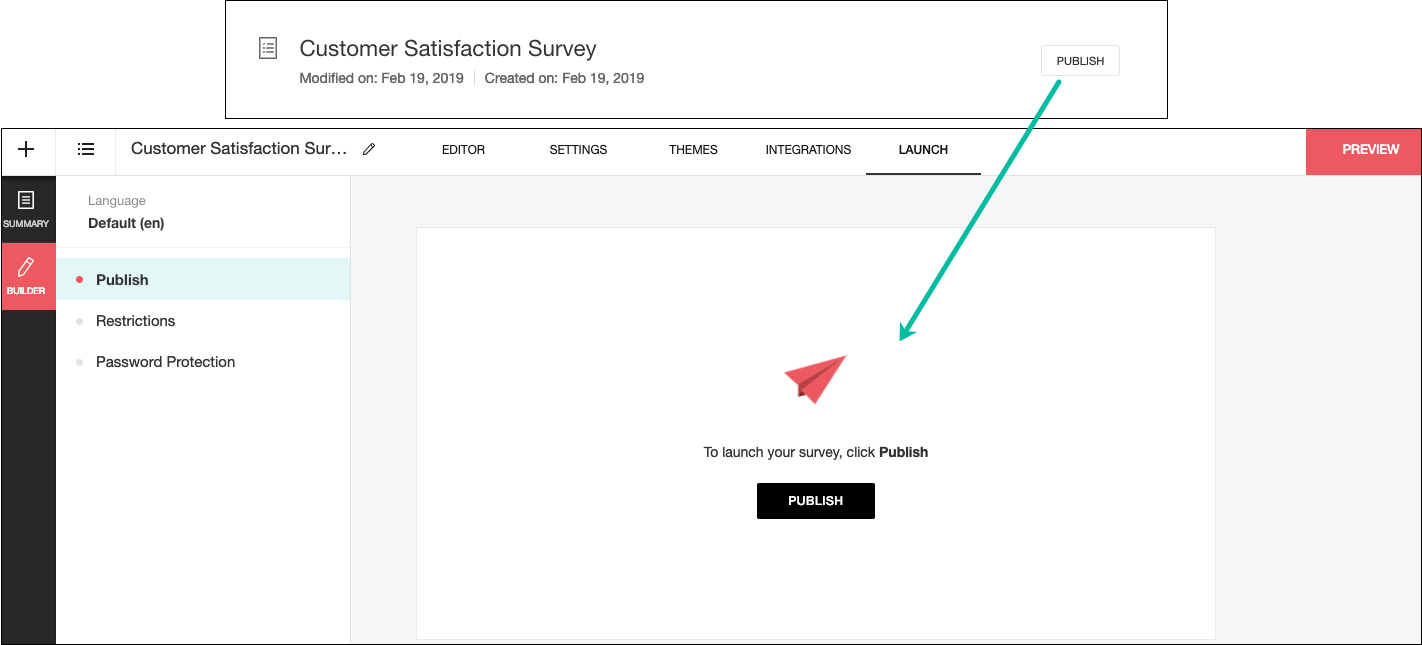
- Click Web Link in the left panel.
The survey link will be generated and displayed here.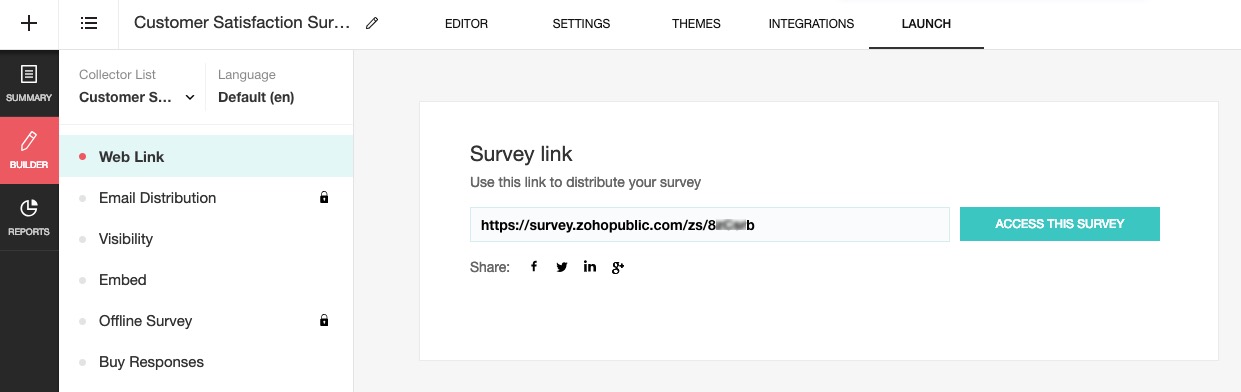


Send a survey
You can send the survey to the contacts in the Vertical CRM via email. To do this, you will need to create an email template with the survey link. This email template can be used to send the survey to the desired contacts.
To create an email template, perform the following steps:
- Log in to the Vertical CRM application.
- Go to Setup > Customization > Templates.
- On the Email tab, click New Template.
- In the Create Email Template pop-up, select the module to create the template for and click Next.
- In the Template Gallery page, select a template and perform the following steps:
- Enter a template name and subject.
- Click the Survey Link icon (see screenshot below) to insert the link of the survey into the body of the email.
- In the Insert Survey Link pop-up, select the survey to include in the email from the Select the Survey dropdown list and click Insert.
- Click Save.


Note
- While creating an email template, the Insert Survey Link button appears for the Leads, Contacts, or Cases module or any other custom module whose records contain email addresses, e.g., Vendors. It also appears for the Sales Orders and Invoices modules.
- For an user to create email templates and insert survey links, they need to have the Manage Email Templates permission enabled in their profile.
These are the following options to send the survey to contacts:
- Automated Emails Using the Workflow Rule
Workflow rules can be used to automatically send the survey link to contacts and leads in a Vertical CRM application. For example, in a school, a workflow rule can be created to send parents a K-12 Parent Satisfaction Survey (using the pre-built template in the Survey extension) each academic year. Refer to Create Workflow Rules for details. - Individual Emails
You can manually send individual survey emails to contacts and leads using the Send Email option in the View page.
Or the List View page.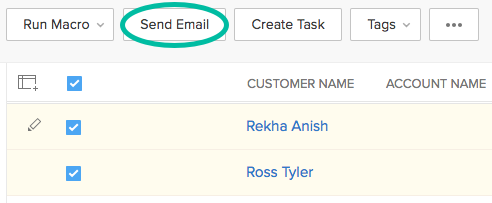
In the compose email pop-up, you can either Choose Template (use an email template with the survey link) or Insert Survey Link.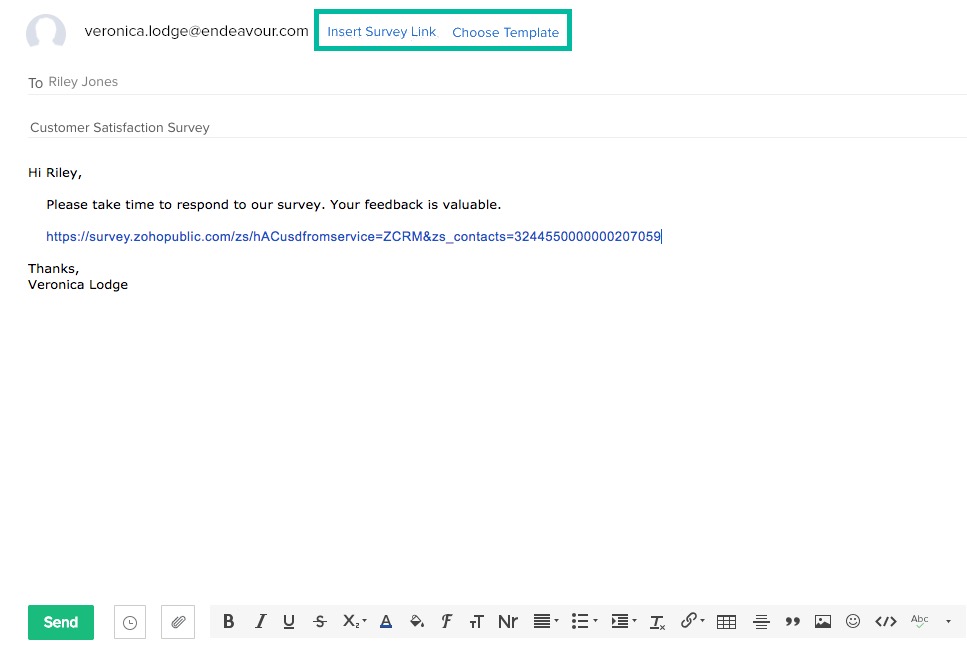
- Mass Emails
You can send survey emails in bulk using the Mass Email feature.
Using the Mass Email feature:- Log in to the Vertical CRM application.
- In the List View page for the required module, click the more options icon and select the Mass Email option.
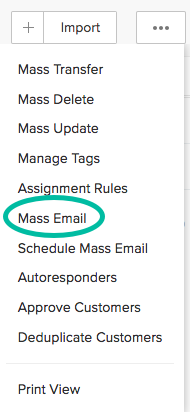
- In the Mass Email page, under the Email Template tab, select an email template and under the Select Records tab, specify the criteria for the records to send the email survey to.


View survey responses
The responses to surveys sent using the Survey extension can be viewed contextually within a Contact or Lead record. Whenever the end user gets in touch with a contact or lead, they can use the information received from the responses to have a fruitful interaction.
Follow the steps below to view the survey responses. The entries will be shown only if the Insert Survey Link option is used.
- Log in to the Vertical CRM application.
- Go to the View page of the record for the contact or lead the survey was sent to.
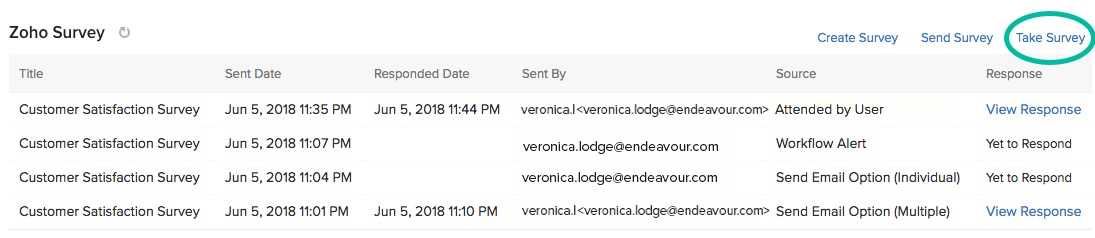
- Click the related list titled Zoho Survey (see screenshot below). The Sent By and Source columns indicate whether the survey was sent from Vertical CRM application via Individual Email, Mass Email, or Workflow Alert.
The Zoho Survey related list is available for any module record that supports an email field, including custom modules. - Click the View Response link to see the survey responses.
If the respondent has not yet taken the survey, Yet to Respond will be displayed in the Response column.
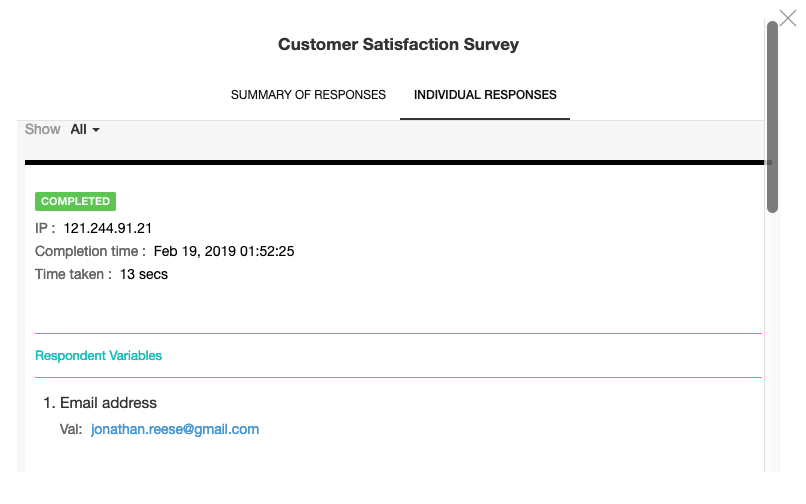
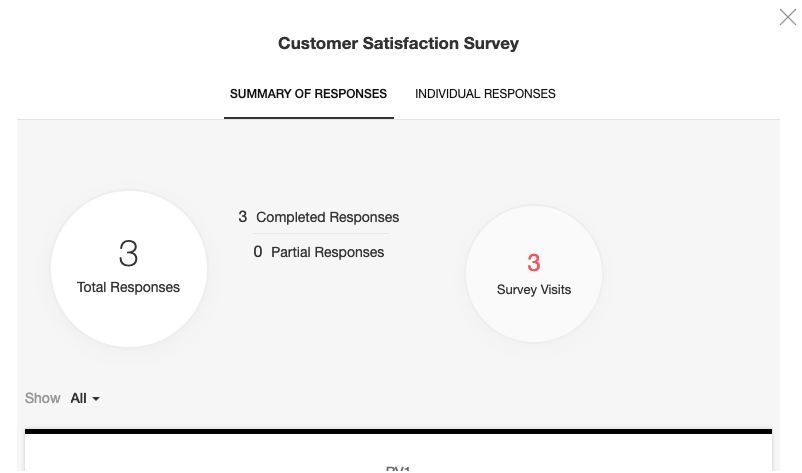
- Click the View Response link, to view the details of the survey in the following tabs:
- Individual Responses: Displays the responses to the survey questions and other details such as time taken for response and IP address of sender.
- Summary of Responses: Displays all statistics related to the survey.
- Individual Responses: Displays the responses to the survey questions and other details such as time taken for response and IP address of sender.


Note:
- The View Response link may not be displayed if the respondent has taken the survey but the mass emails were sent from outside the Vertical CRM application.
- The entries will be added in the related list titled Zoho Survey only if
- Insert Survey Link option is used for sending the survey.
- Take Survey option in the Zoho Survey related list is used.
Take a survey on behalf of a customer
In addition to sending surveys via email, the end user can also respond to the survey on behalf of the contact or lead. For example, in a Vertical CRM application for a travel agency, the call center executives can call the customers to get their feedback regarding a trip they have taken recently.
To take the survey on behalf of your customer, follow the steps below:
- Log in to the Vertical CRM application.
- Go to the View page of the record for the contact or lead you are taking the survey for.
- Click the related list titled Zoho Survey (see screenshot below).
- Click the Take Survey link.
- In the Take Survey pop-up, select a survey from the Select the Survey dropdown and click Take Survey.
- Answer the questions in the survey and click Submit.
The surveys taken by the Vertical CRM end user on the contact or lead's behalf will have Attended by User in the Source column of the Zoho Survey related list.

Note:
Besides taking a survey, the end user can also create a survey or send a survey to customers from the Zoho Survey related list by clicking the Create Survey or Send Survey options.
Update Vertical CRM records with survey responses
You can sync the fields or questions in your survey with the fields in the relevant Vertical CRM application module. This eliminates the manual work of copying the survey responses into the Contact or Lead module. The Vertical CRM fields must be mapped to the survey questions before you send out the survey. The answer to a question is automatically added as the value for the mapped field.
To sync the survey data with your Vertical CRM application data:
- Click the name of a survey from the My Surveys page.
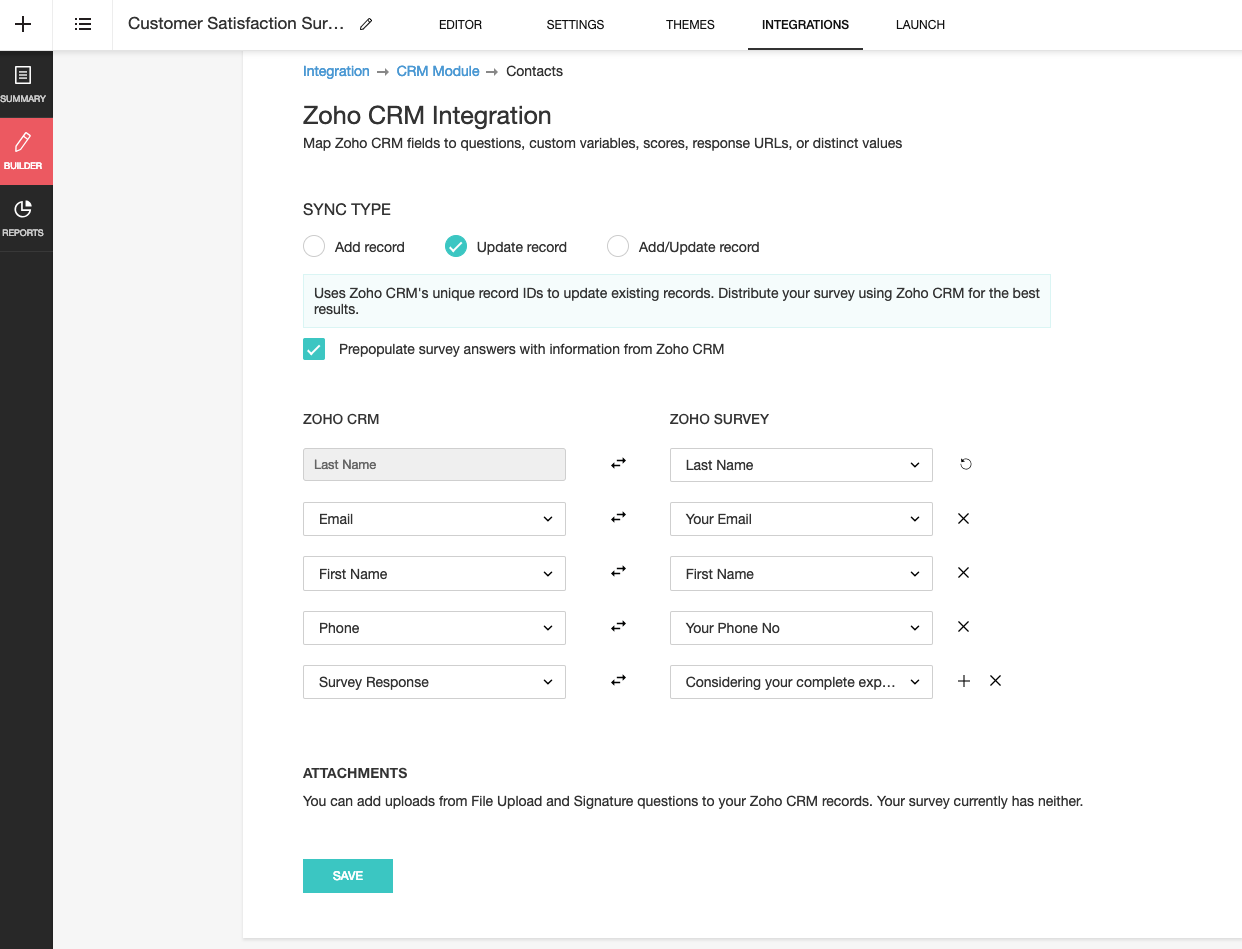
- Click Builder in the left panel and select Integrations tab.
- In the Zoho CRM Integration page, select a module to map the responses to the survey to and click Next.
You can only associate one module with a survey at a time. - Map the survey questions to the fields in your application module, e.g., you can map the field value for Last Name in your survey to the Last Name field in the Contacts module.
The mandatory fields in each module must be mapped. - Map fields by clicking Add [+]. You can remove a mapping by clicking Remove [X].
- You can sync the survey data with your Vertical CRM data in the following ways:
- Add Record: A new record will be added without performing a duplicate check.
- Update Record: The record will be updated. Records are matched based on email address. For the update operation to take place, the survey should be sent using the Insert Survey Link option.
- Add/Update Record: A new record will be created after a duplicate check is performed based on email address. If a duplicate is found, the existing record will be updated.
If two records have the same email address, the record with the latest Creation Date will be updated. If the survey doesn't collect email addresses, you will only be able to add records, not update or add/update.
- Select Pre-populate mapped fields from CRM to Survey (see screenshot below) if you want the Survey extension to display the existing values of fields already available in Vertical CRM, e.g., if the Name of the lead or contact is already in the CRM, the recipient does not need to type their name when they take the survey. Their name will be prepopulated.
- Click Save.

Remove the integration
The integration can be removed at any time. Any responses sent after the removal of the integration will not be synced with the Vertical CRM module fields. Remove the integration by clicking Remove Integration in the CRM Integration page.
Manage surveys
You can edit and delete surveys you have created.
- Log in to the Vertical CRM application.
- In the My Surveys page, move your mouse over the name of a survey.
- The Edit and Delete options will appear.

