Using Projects in Vertical CRM
How Can I...
Create Projects
The end user of the Vertical CRM solution which has the Zoho Projects extension can create projects using the project templates created in the application. To create a project, the end user can follow one of below methods:
Method 1: From the Accounts module
You can create projects from the Accounts module. The account will be added as a Client Company in the project.
- Log in to the Vertical CRM application.
- Navigate to the Accounts module and select a record.
- Click the Projects related list.
- In the related list, click New Project.
- Enter the necessary details in the Create New Project overlay.


Method 2: From the Projects tab
- Log in to the Vertical CRM application.
- Select the Projects tab in the top navigation bar.
- Select the Projects tab in the inner navigation bar and click New Project.

- In the New Project overlay, perform the following steps:
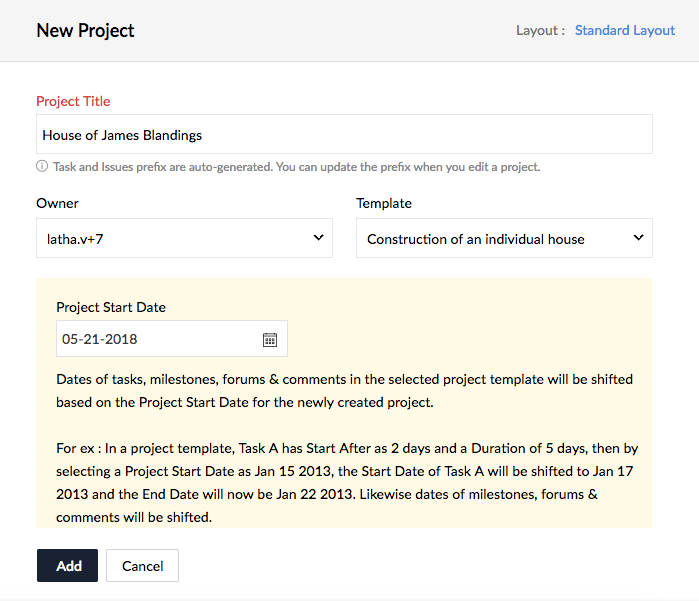
- Enter a name for the project in Project Title field.
- Choose a Template.
The end user can select from built-in project templates. All the milestones, task lists, tasks, and other properties from the chosen project template will be copied to the newly created project. - Choose a date for Project Start Date.
By default, the Project Start Date will be set to today's date. - Select an Owner.
- Select Show this project overview by default.
- Select an existing Group Name or add a new group name by clicking the
 symbol.
Group names are used to segregate projects into categories. Each group name added for a project is available for selection across projects. - Select a Billing Method. This field will only be editable if the Vertical CRM is integrated with Invoices.
- Choose a value for Default Billing Status.
The default value in this field will be the value set for the Default Billing Status in Setup > Org Settings > Task & Timesheet > Timesheet Settings. The value can be changed if required. - In the Customize Tabs For This Project section, select the names of the tabs to be displayed within the project.
- Choose whether to set the Project Access to Private or Public.
Private users are the client company's users.
Public users are all Vertical CRM users. - Click Add.
Note
When you create a project from an existing project template, the Project Start Date option is enabled. For example: in project template X, Task A has a Duration of 5 days and it Starts After 2 days. When you choose template X and set the new Project Start Date to Jan 15th 2018, Task A's Start Date will be moved to Jan 17th 2018 and the End Date will be Jan 22nd 2018. The newly selected Project Start Date will automatically shift all your milestones, tasks, subtasks, forums, and documents in the selected project template.


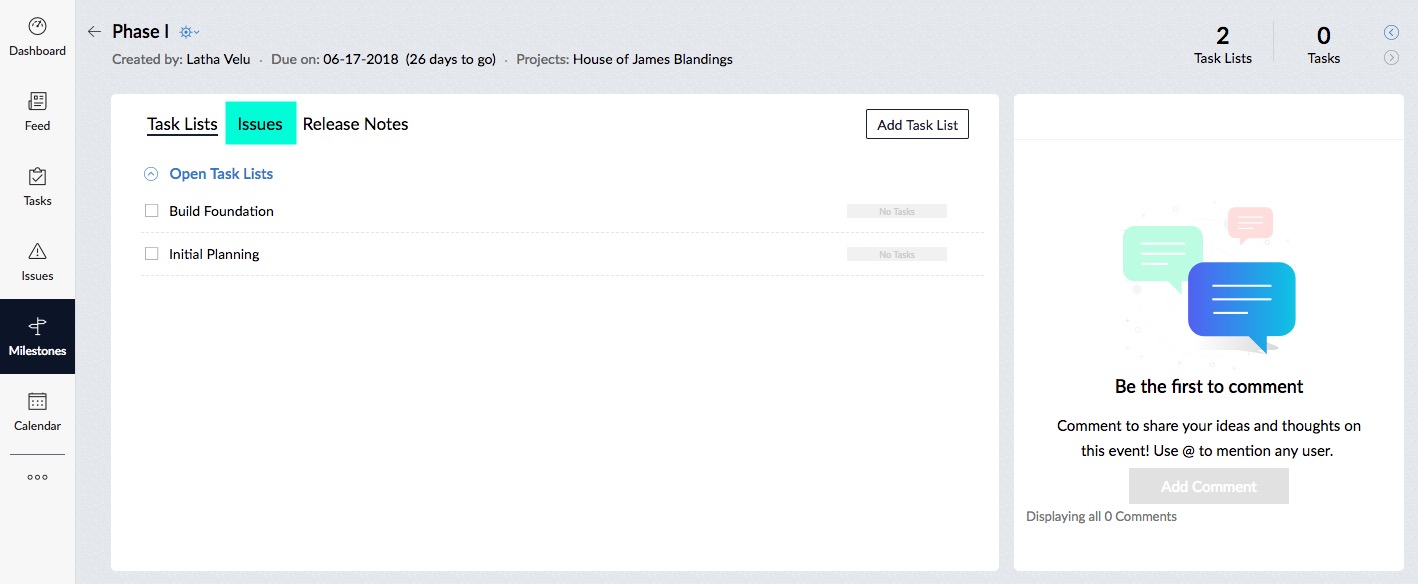
Use Milestones
You have the following options within the Milestones tab in the left navigation bar:
- Filter milestones: Click the filter icon and apply filters for the Owner and Status of the milestone.
- Export milestones: Click the ellipses (...) at the top right corner and select Export to PDF. You can choose to encrypt the contents of the PDF.

- Add comments to milestones: Click the name of the milestone to add comments to and click Add Comment. Add any files, screenshots, or other attachments and click Add Comment. You can also mention any bugs: Select the Issues tab, click Associate Issues and enter the details of the bug.
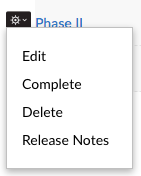
- Edit milestones: Hover your cursor over the name of the milestone to edit, click the more options icon [
 ] and select one of the following:
- Edit: Modify the details of the milestone.
- Delete: Delete the milestone.
- Complete: Mark the milestone as complete.
- Release Notes: View a list of the completed tasks and bugs in the milestone.


Use Task Lists
You can add comments, attachments, and screenshots in the Task Lists view.
- Select the Tasks tab in the left navigation bar.
- Click the name of the task list to add comments to.
- Click the comments icon [
 ] in the top right corner.
Enter your comments, upload a file, or take screenshots and click Add Comment.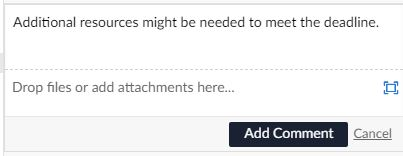

From within a task list, you can do the following:
- Select the Milestones tab in the left navigation bar.
- Navigate to the task list to perform operations on.
- Click the comments icon [] at the top right corner. Enter comments, upload a file, or take screenshots and click Add Comment.
- Click Add Task to add a new task to the task list.
- Click the more options icon [] next to the name of the task list and Edit, Delete, Complete, Follow, and Print notifications options will be available.
- In the Status column in the task list, change the status (Open, Closed, or a custom status) of the task.
- Select Chart View.
- Click the comments icon [
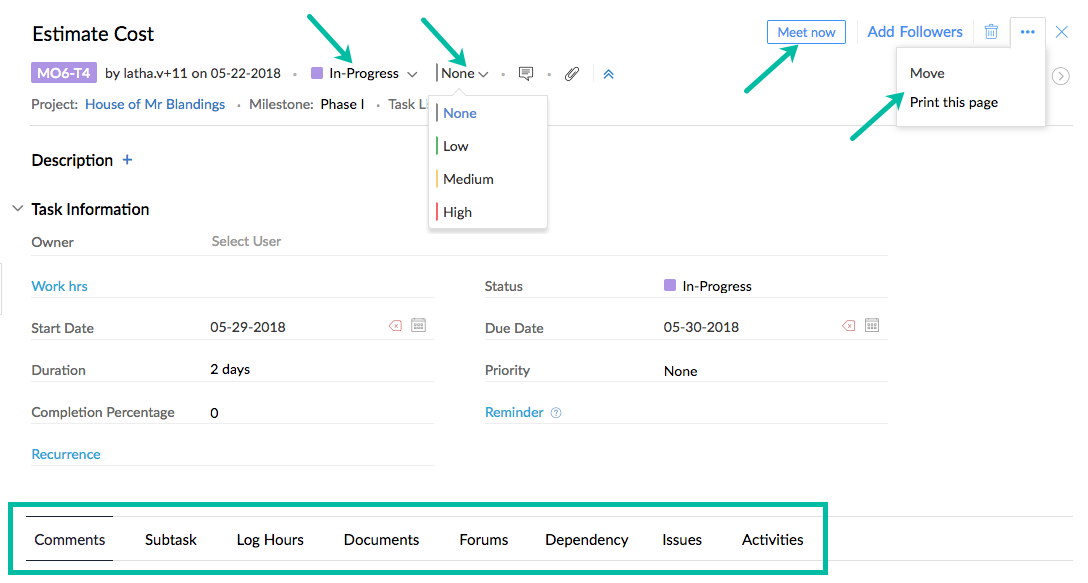
Use Tasks
You have the following options within the Tasks tab in the left navigation bar.
- Click the name of the task to perform operations on and select from the following options (refer to the screenshot below):
- Change the status of the task.
- Assign a priority, if required.
- Meet Now: Invite users of the Vertical CRM application to a discussion or meeting through Zoho Meeting.
- Print the details of the task.
- The following options can be accessed from the options at the bottom of the screen:
- Add comments
- Subtask
- Log hours: for the time spent for the task.
- Documents
- Forums
- Add dependent tasks
- Issues
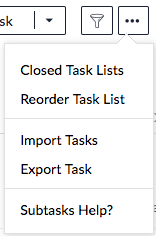
- The following options are available in the list view of Tasks.
- Reorder Tasks
- Import Tasks in MPP/MPX (MS Project files), xls, json, or csv format.
- Export Tasks to xls or csv format.


Views
The tasks can be displayed in different views.
| Name | Description |
| Classic | Default view for task lists and tasks. You can customize the columns. |
| Plain | Tasks are sorted based on due date. This view displays all tasks and their dependencies with their task level. |
| Kanban | Shows the tasks categorized by their status (refer to the screenshot below). |

You can add a new status type for the task in the Kanban view. To do so, click the Add Status link.