Managing Web Tabs
How Can I...
Web tabs help users to open web pages like company-wide announcements, web applications, etc. inside CRM. All the users of your Vertical CRM application can view these web tabs.
Create web tabs
To create web tabs
- Log in to Zoho Developer Console and click CRM for Verticals
- In the Vertical CRM page, select the application in which the webtab has to be added.
- Click Customize in the left pane and select Web Tabs tab at the top of the page.
- In the Web Tabs page, click Create Web Tab.
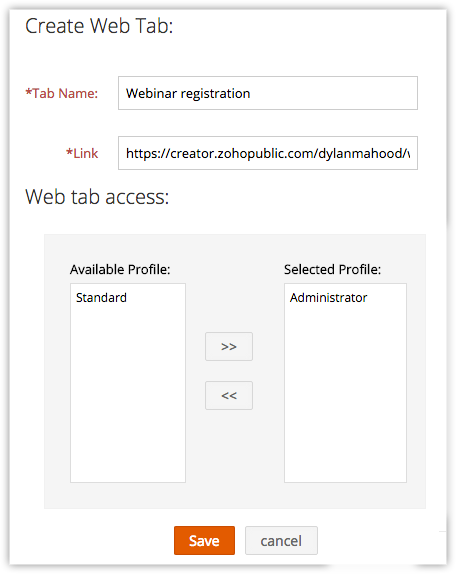
- Enter the name of the web tab in Tab Name box.
- Enter the URL in the Link box.
- Select the profiles from the list to provide access to the web tab.
- Click Save.

Note
- The web tabs that you create will not be linked to the other modules in your CRM.
If you delete a web tab, data in the other modules will not be affected. - You cannot create tabs with the same name as that of the existing modules in your CRM (eg. Leads, Potentials, Reports, etc.).
- You may not be able to add some third-party web pages in the web tab. These websites restrict their content from loading inside another websites to avoid clickjacking attacks. They use the X-Frame-Options HTTP response header to indicate whether or not a browser should be allowed to render a page in an iframe.
Delete Web Tabs
You can delete the unwanted web tabs that are no more in use and create new ones to provide access various web services.
To delete web tabs
- In the Vertical CRM page, select the application that contains the webtab to be deleted.
- Click Customize in the left pane and select Web Tabs tab at the top of the page.
- In the Web Tabs page, click the Delete icon corresponding to the web tab that you want to delete.
- In the confirmation dialog box, click OK.