Enable customer self-service.
Your customers just need answers to their questions. They don't want to engage in hour-long conversations with your agents. Give them what they need when they need it.
Help Center is an online self-service portal where your customers can access your Knowledge Base and user community at anytime. If they still can't find answers, they can quickly submit a ticket by signing into their account.
Self-service not only helps your customers find instant solutions, but it also saves a lot of your agents' time and allows them to focus on other important tickets which require human intervention.
Customize your Help Center.
Setting up your Help Center is very simple and you can do that from Zoho Desk itself. You can play around with the themes and templates to mimic the look and feel of your website. You can also use the drag-and-drop features to add or delete sections from your help center.
You also have the option to make your help center sections visible to everyone, or make them visible only to your existing customers.
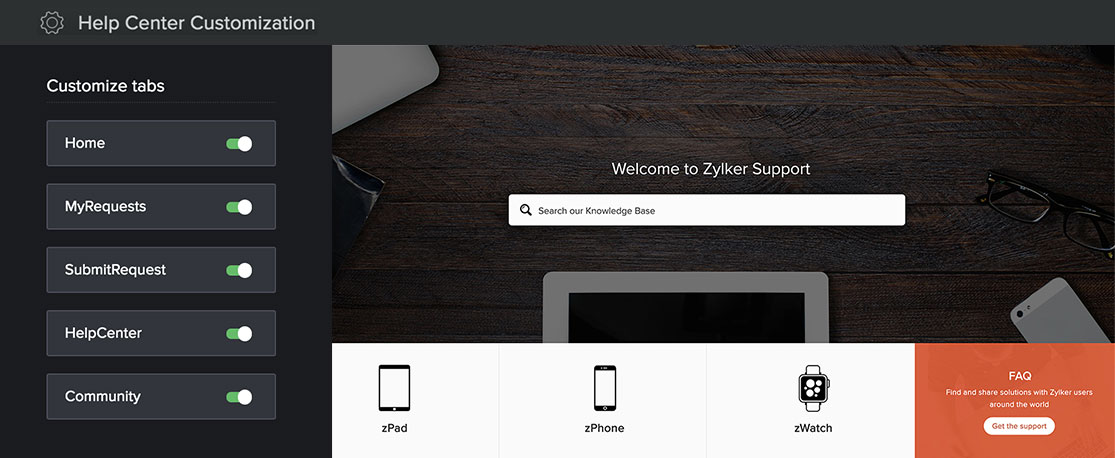
Here's a guide on how to customize your help center.
Create your Knowledge Base.
Populate your Knowledge Base with product help articles and FAQs. This will help your customers find solutions on their own. Once you enable the Help Center, your customers automatically get access to the Knowledge Base.
Here's how you can set up your Knowledge Base.
Enable Multi-Branding.
Manage Help Centers for all your brands under one roof. You can organize your KB and Community by linking them with these brands. So, when you click on a brand in your Help Center, you will be taken only to the KB and community of that particular brand.
The better you organize your content, the easier will it be for your customers to access what they need.
Find out all about enabling multi-branding here.
Drive Customer Engagement.
Retaining your customers is as important as acquiring them. The key to building strong customer relationships lies in the meaningful conversations you have with them.
You can post announcements about your new products or offerings and keep them updated. You can also educate them on the benefits of your products and help your customers get the most out of them.
Your customers can interact with one another in this forum. They may also post questions relating to your products and you can answer right there. This cuts down on the time and effort your customers will otherwise have to spend creating a ticket and talking to a support agent.
If you can't provide your customers solutions in the moment, you can convert their question into a ticket from the same window so your agents can respond.
You can find all the instructions about setting up a community here.
Get answers to your questions (with) ASAP.
Don't make your customers go in search of answers. Instead, give them access to your Help Center from wherever they are on your website.
Embed this ASAP widget in any webpage for your customers to be able to access your Help Center, without having to switch between screens. They can access your Knowledge Base and Community, chat with an AI-powered bot or raise a ticket, all of this through a single widget!
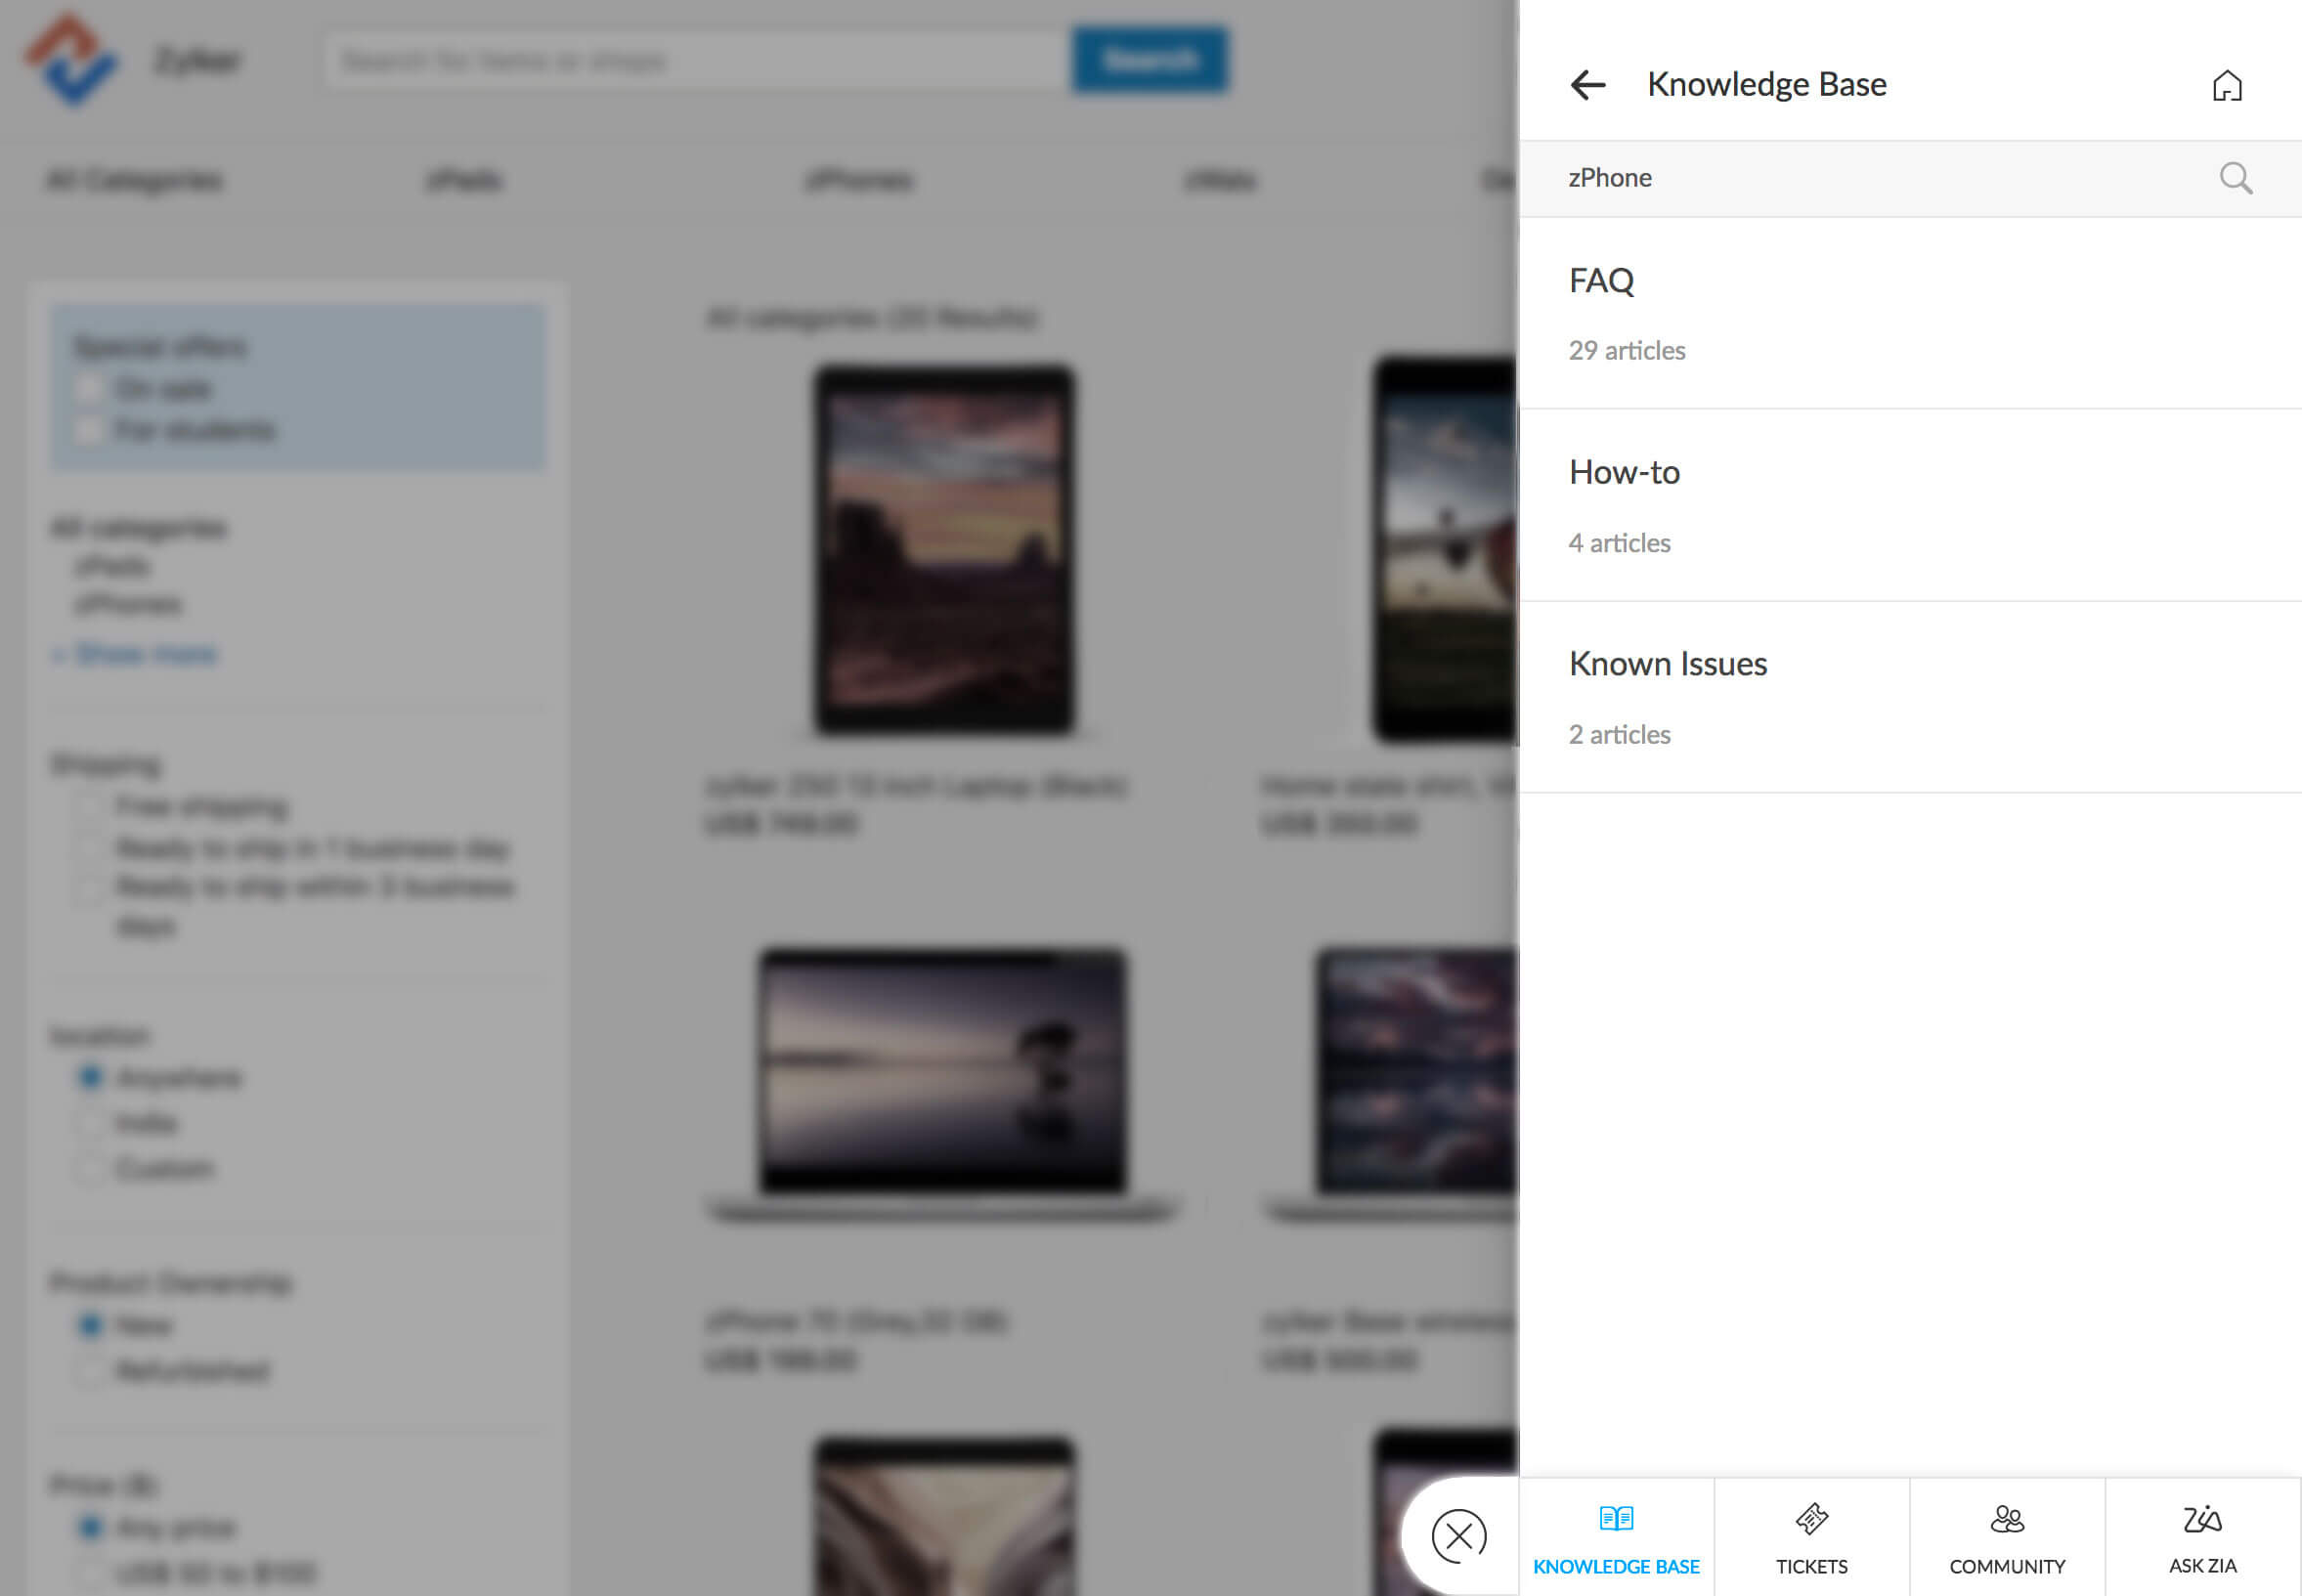
If you can't provide your customers solutions in the moment, you can convert their question into a ticket from the same window so your agents can respond.
Here's a link to a step-by-step guide on how to enable ASAP.
Automate ticket assignment.
 Watch a video
Now that you have enabled self-service, you will start receiving tickets from your Help Center as well as your email channel. When the inflow of tickets goes up, it's hard for you to assign them to your agents manually. That's why you need to create assignment rules.
Assign tickets based on your agents' expertise.
Your support team is very likely to have agents have expertise in handling tickets pertaining to a specific department or channel. Ensure every ticket goes to the right person by creating a direct assignment rule.
By setting up this rule, you can route the incoming tickets to their respective departments in your help desk and have your expert agents attend to them.
Here's a link to a guide on how to set up this rule.
Assign tickets based on the rate of inflow.
As your support team grows, so will your ticket load. You need to make sure that every ticket gets assigned to an agent. In this case, you can't assign tickets manually and a direct assignment rule would overload a few agents while leaving the others out.
That's why you should set up a Round Robin rule. It balances the workload of your agents and distributes the incoming tickets equally among all the agents in your team. This way, you don't leave even a single ticket unattended.
Find the step-by-step guide to setting up this rule here.
Adhere to your SLAs.
Now that you have created assignment rules, tickets will easily be assigned to your agents. Next step is to ensure that these tickets are responded to, before they're overdue.
Add your SLAs.
Every ticket comes with a deadline which is clearly defined in the service level agreement. You may have different SLAs which work for your different departments. All you need to do is, add them to your Zoho Desk account and link them with their respective departments.
Escalate when required.
Once you add your SLAs, you can set up the Escalation rules. If an agent doesn't respond to a ticket within the deadline, an escalation rule will send it to someone above your agents in the organizational hierarchy.
Such an escalation helps a team lead or a manager re-prioritize tasks for their agents and make sure the overdue tickets are handled quickly.
If a single escalation isn't enough, you can enable multi-level escalation to bring them to your notice or to that of any other Senior Executive.
Re-prioritize and re-assign.
When a ticket gets escalated, it goes to the notice of the higher management. When this happens, you can set up rules to change the priority of that particular ticket automatically, so the ticket owner knows to work on it promptly. Since escalations are critical, it's best to assign them to your expert agents. Zoho Desk can do that for you automatically.
Find all you need to know about setting up SLAs in Zoho Desk, here.
Keep everyone informed.
Stay updated on the progress of every ticket with email and SMS notifications.
Keep your customers in the loop.
It's important that you keep your customers and all other associated contacts (CC'd users) updated on the status of their ticket at every step.
You can set up this rule to send you notifications when you receive a ticket; when you receive the customer's response to the ticket; when someone adds, edits, or deletes a public comment; and when you close their ticket.
More updates for your agents.
The more you keep your team updated on the status of a ticket, the better will they be able to work as a team. With this rule, you can also let your teams know when a ticket has been assigned to them or let your departments know when a ticket from another department has been moved to theirs.
This way, you can make your agents and teams aware of what's going on within the help desk and make collaboration easier.
Customize your notification templates.
Sending notifications from Zoho Desk doesn't mean you can use only our predefined templates. You can create your own email and SMS notification templates to match the voice of your brand.
Click here to learn how to set up a notification rule.
Now that you have the whole ticketing process set up within Zoho Desk, let's see how you can monitor your help desk activities, maintain reports, and gain actionable insights.
More data and better insights.
Do you feel you spend more time preparing reports than on actual analysis and decision-making? If your answer is yes, then it's time you explored Zoho Desk's Reports and Dashboards.
The Headquarters
Keeping track of all the key parameters of your team's performance and managing your routine operations just got much easier.
Now you can find the updated metrics of your support process at your 'Headquarters' in Zoho Desk.
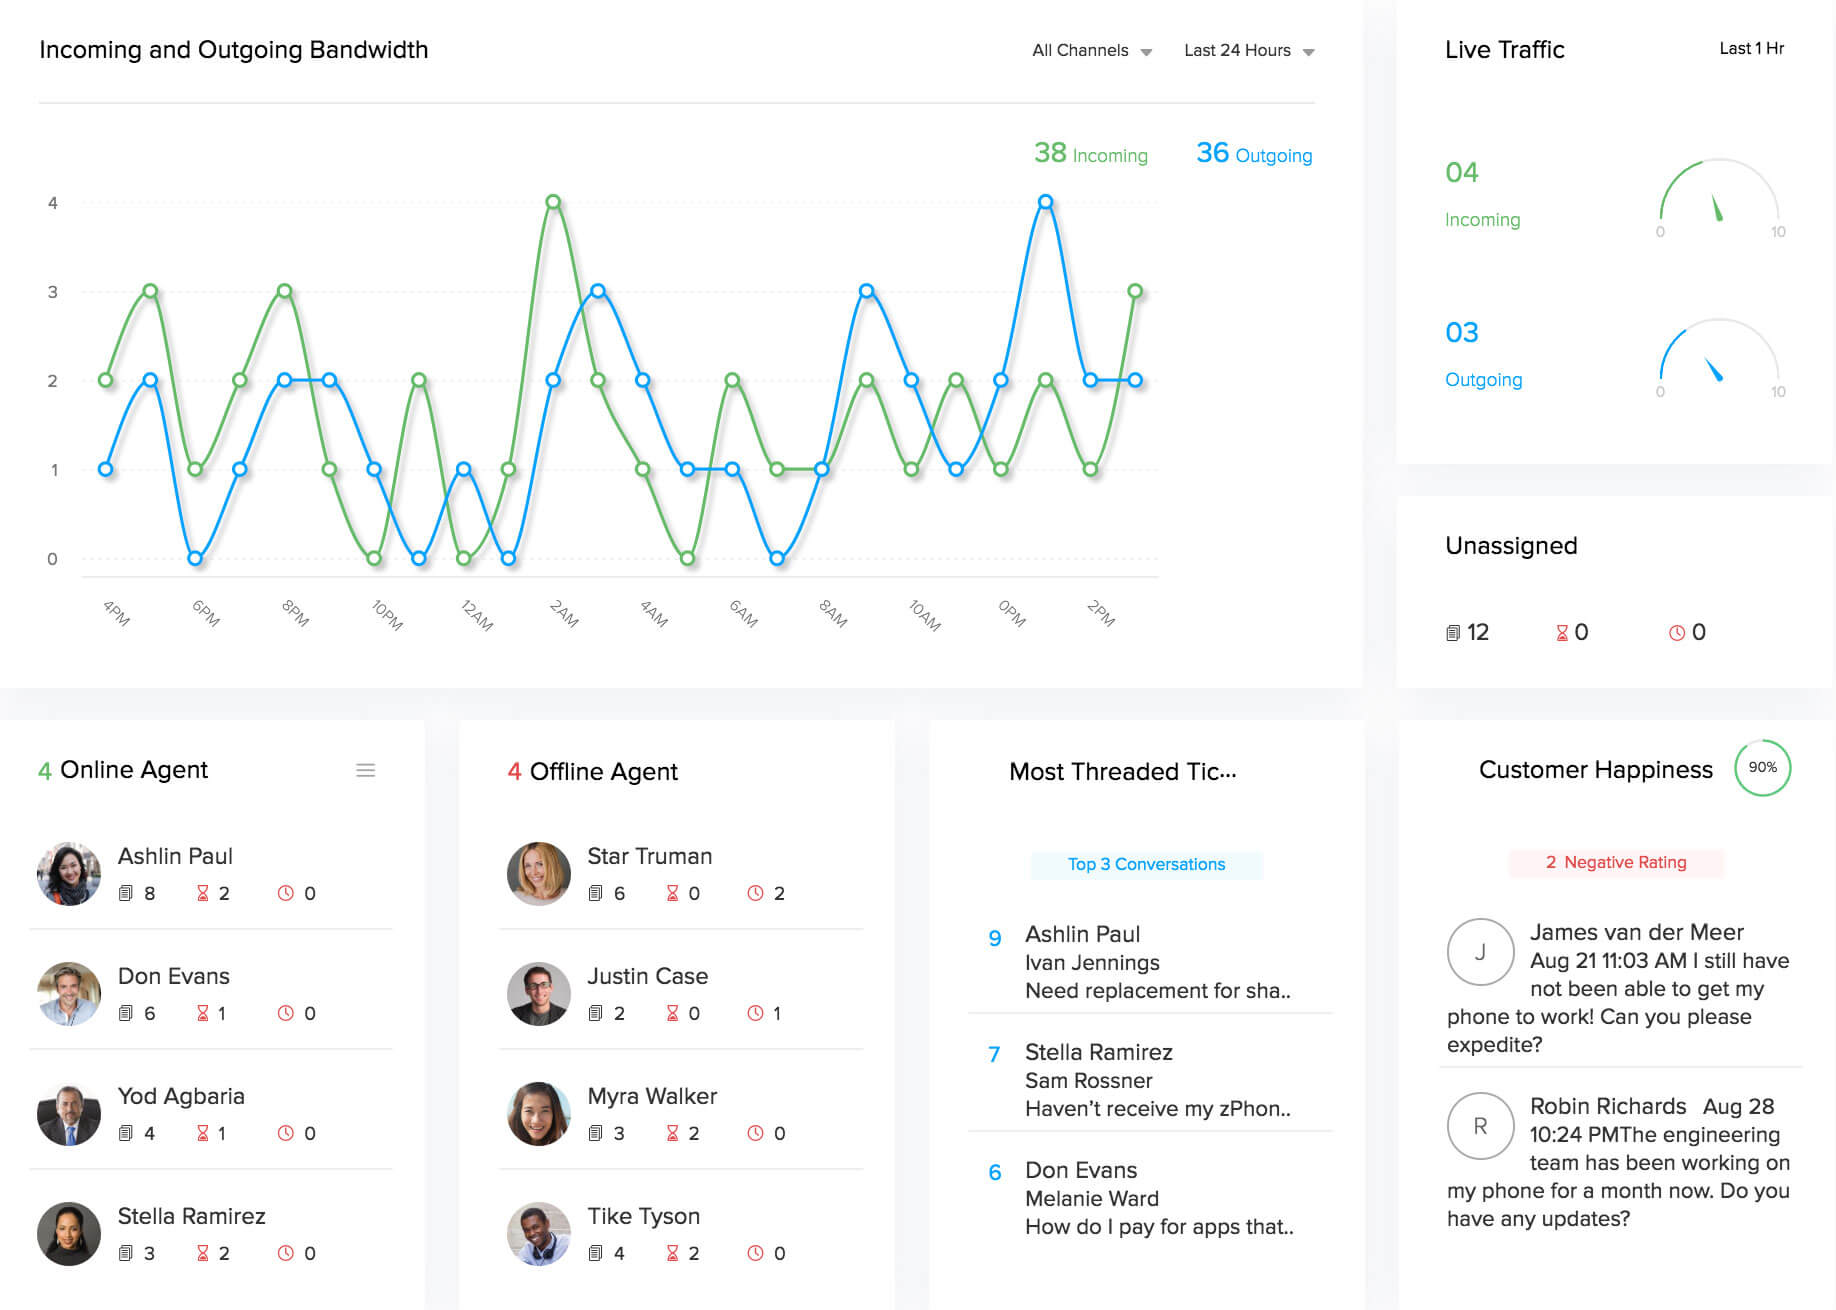
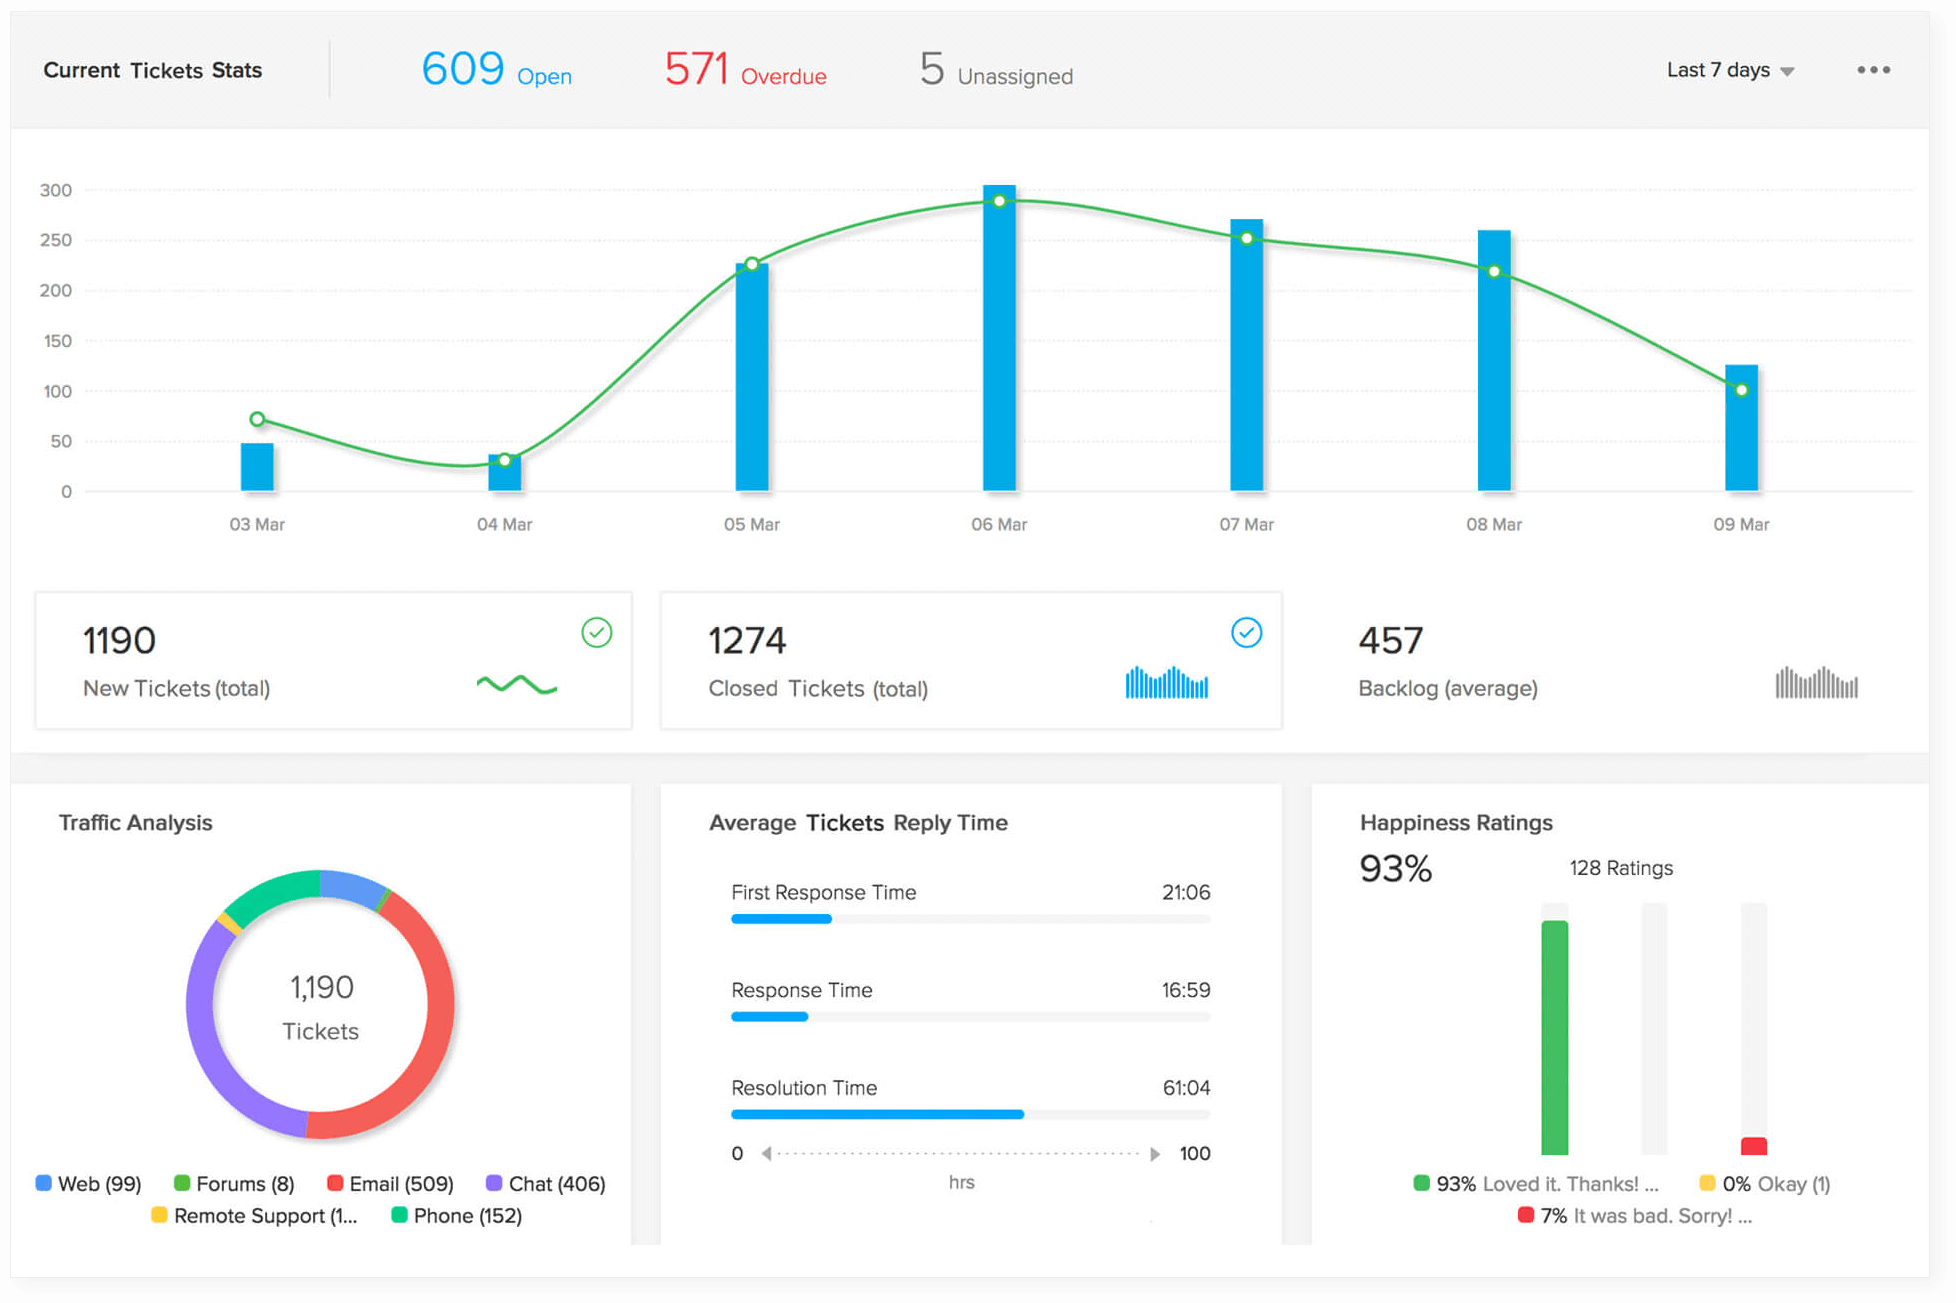
Monitor the ticket traffic.
Watch the count of incoming and outgoing ticket responses to get an overview of your team's productivity.
Maximize your team's productivity.
Get a glimpse of the most threaded, overdue, and unassigned tickets and those which are due in the next hour. If you notice tickets piling up on an offline agent, you can assign them to any other online agent to prevent SLA violations.
Understand and improve Customer Happiness.
Get insights on the overall happiness ratings your customers have given you. Get to the roots of every negative feedback to win back those disappointed customers.
Dashboards
Monitor your performance metrics better with dashboards.
Get the overall picture in one glance.
Understand the basic stats of your tickets with the simplest representation of data. In this dashboard, you can see all the stats related to your tickets, like status, ticket traffic by channel, response and resolution times, and happiness ratings.
Ticket dashboards
With these dashboards, you can analyze trends in ticket statuses easily and compare them with the Average Handling Time to understand your team's productivity.
Product Dashboards
These dashboards give you consolidated reports of tickets about each product.
Time-based Dashboards
These dashboards give you a clear picture of how much time your agents take to respond to and close a ticket. You can use these to study your agent activity better and give them appropriate feedback to improve their performance.
Agent Dashboards
This is like a score card. If you are looking for reports to assess your agents' individual performance, then this dashboard is all that you need. It displays all your agents' KPAs, like average response and resolution times, the number of tickets assigned to them, and happiness ratings.
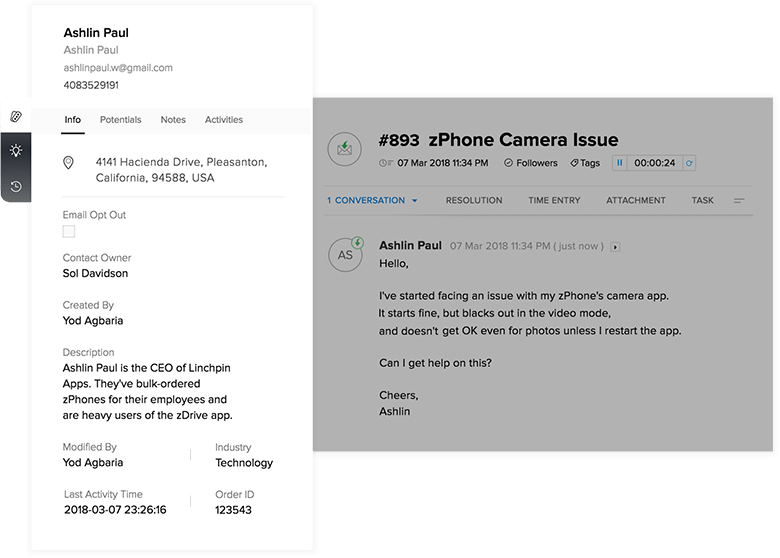
Contact Dashboards
Manage contacts based on the tickets they raise and the conversations they've had with you.
With this dashboard, you can create a repository for every contact and manage their tickets effectively.
Here's all you need to know about setting up dashboards.
Create reports your way.
Measure your team's performance with custom reports that suit your needs at every level in your customer service effort.
Every report is unique in terms of the content, audience, and purpose, so it's important that you use the right formats to make the most of these insights.
Under the Reports module in Zoho Desk, you can create Tabular, Summary and Matrix reports.
Tabular reports
This report simply lists data in rows and columns without any subtotals. You could use this format for creating consolidated views.
Summary reports
This displays data and summarizes it with subtotals. You could use this format to generate reports on the number of incoming tickets during a specific period, for example.
Matrix reports
A matrix report is more like a pivot table. With this, you can analyze large data sets by grouping them under different rows and columns with specific field values, and get subtotals of the selected fields.
Read all about creating custom reports here.
Take reporting a step ahead with Advanced Analytics!
To foresee trends and make proactive business decisions, you need more elaborate reports which give you insights on customer service metrics that you might otherwise overlook.
With Advanced Analytics, you can create reports with more customized views and filters that fit your processes the best. All you need to do is, import data from your help desk and you're good to go.
This integration gives you a set of predefined dashboards for understanding agent performance, customer analytics, deadline compliance, the last 30 days' trend, and your overall help desk activities.
You can create different types of charts like line, bar, pie, funnel, and web. You can also customize the look of these charts and use filters to choose the fields and values of your choice.
You could also use the pivot tables to analyze data with an added advantage of sub-grouping. Play around with the filters to summarize and simplify complex data sets.
Increase sales by integrating Zoho Desk with Zoho CRM.
How often do you lose customers because you don't take the necessary steps to improve their experience? How do you ensure that you nurture every lead the right way and convert them to customers? If you are unhappy with the answers you have to these questions, then you should probably integrate Zoho Desk with Zoho CRM.
With this integration, your support agents can see all the details about your contacts, their open and won deals, products associated with every deal, the value of every deal, their Account Managers, and all the information they need, to get the complete context of their conversations.
Strengthen customer relationships.
With access to CRM, your support agents can now understand how crucial a particular contact or a deal is to your organization and their stage in your sales cycle. With this information, agents can drive more meaningful conversations with customers and provide better support.
Turn every negative experience into a positive one.
If your high-value customers leave a negative rating, your Support Agents can bring this to the notice of their Account Managers and help them fix issues better and on a timely basis.
Convert leads into customers.
Using Handshake Mode, your support agents can filter tickets from leads and potentials. When they see any prospect for sales, they can let your sales team know about it and drive sales efforts from there.
Never lose a cross-sale opportunity.
Using the same Handshake Mode, your support agents can also view tickets from customers who have open deals. If they see any chances of a cross-sale, they can again route it to the sales team to take it forward.
And there you go! You're all set to run a full-fledged support process with Zoho Desk!
Now we recommend you explore the other sections of the Trial Room, to check out the other capabilities of Zoho Desk and see what our customers have to say about us!