


Translations
Zoho Expense allows employees to select their preferred language for viewing the app, which can differ from the organisation’s default language. Standard app content such as menus, buttons, and module names is translated automatically when a user switches their display language.
For organisation-specific content, such as Categories, Tags, Violation Messages, Custom Modules, and Custom Fields, translations can be provided through the Translations page. You can add the languages you need, export the translation file, fill in the translated values, and import it back. Once a translation file is imported and marked as active, employees who select that language will see these inputs in their preferred language as well.
Note: This feature is currently in Early Access. Write to us at support@zohoexpense.com to enable it for your organisation.
Add a Language
Add a language to the Translated Language List before exporting and importing a translation file for it.
To add a language:
- Go to Settings on the left sidebar.
(OR)
Click Settings in the top right corner of the page. - Select Translations under Customization.
- Click + New Language in the top-right corner of the Languages tab.
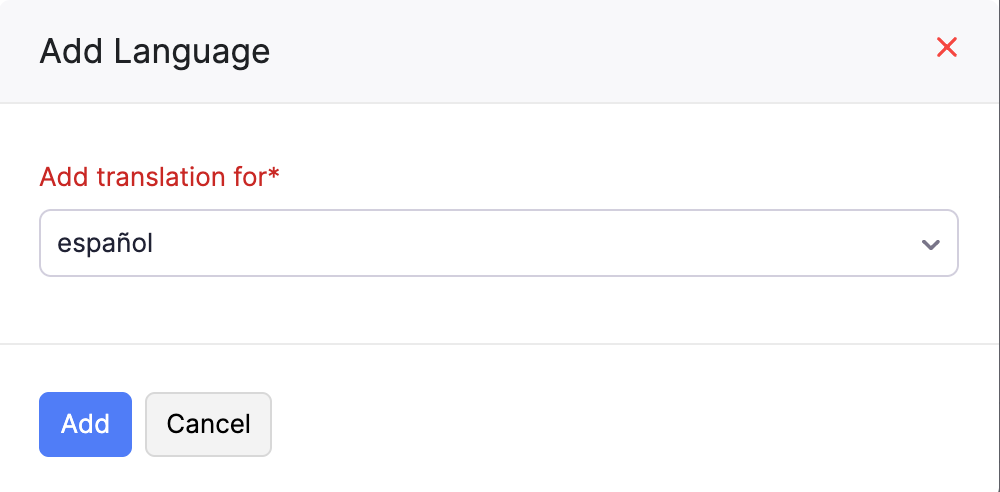
- In the Add Language pop-up, click the Add translation for dropdown and select the language you want to add.
- Click Add.
The language is added to the Translated Language List in the Languages tab. Each row in the list shows:
| Column | Description |
|---|---|
| Language | The language name. The organisation’s default language is marked with a Default badge. |
| Date Added / Last Imported | The date the language was added or when a translation file was last imported for it. |
| Updated By | The name of the user who last added or imported a translation for this language. |
| Import Status | The status of the translation file. Shows Yet to Import if no file has been imported yet, and Imported after a successful import. |
| Translation Status | Whether the language’s translations are active. Shows Active or Inactive. |
The language will be marked as Inactive until a translation file is imported and the language is manually marked as Active. Export a translation file for this language, fill in the translated values, import it, and then mark the language as active.
Export a Translation File
Export a translation file to get a structured file containing all translatable content keys for a language. Add your translated values to this file, then import it back.
To export a single language:
- Go to Settings on the left sidebar.
(OR)
Click Settings in the top right corner of the page. - Select Translations under Customization.
- In the Languages tab, click Export next to the language you want to download a translation file for.
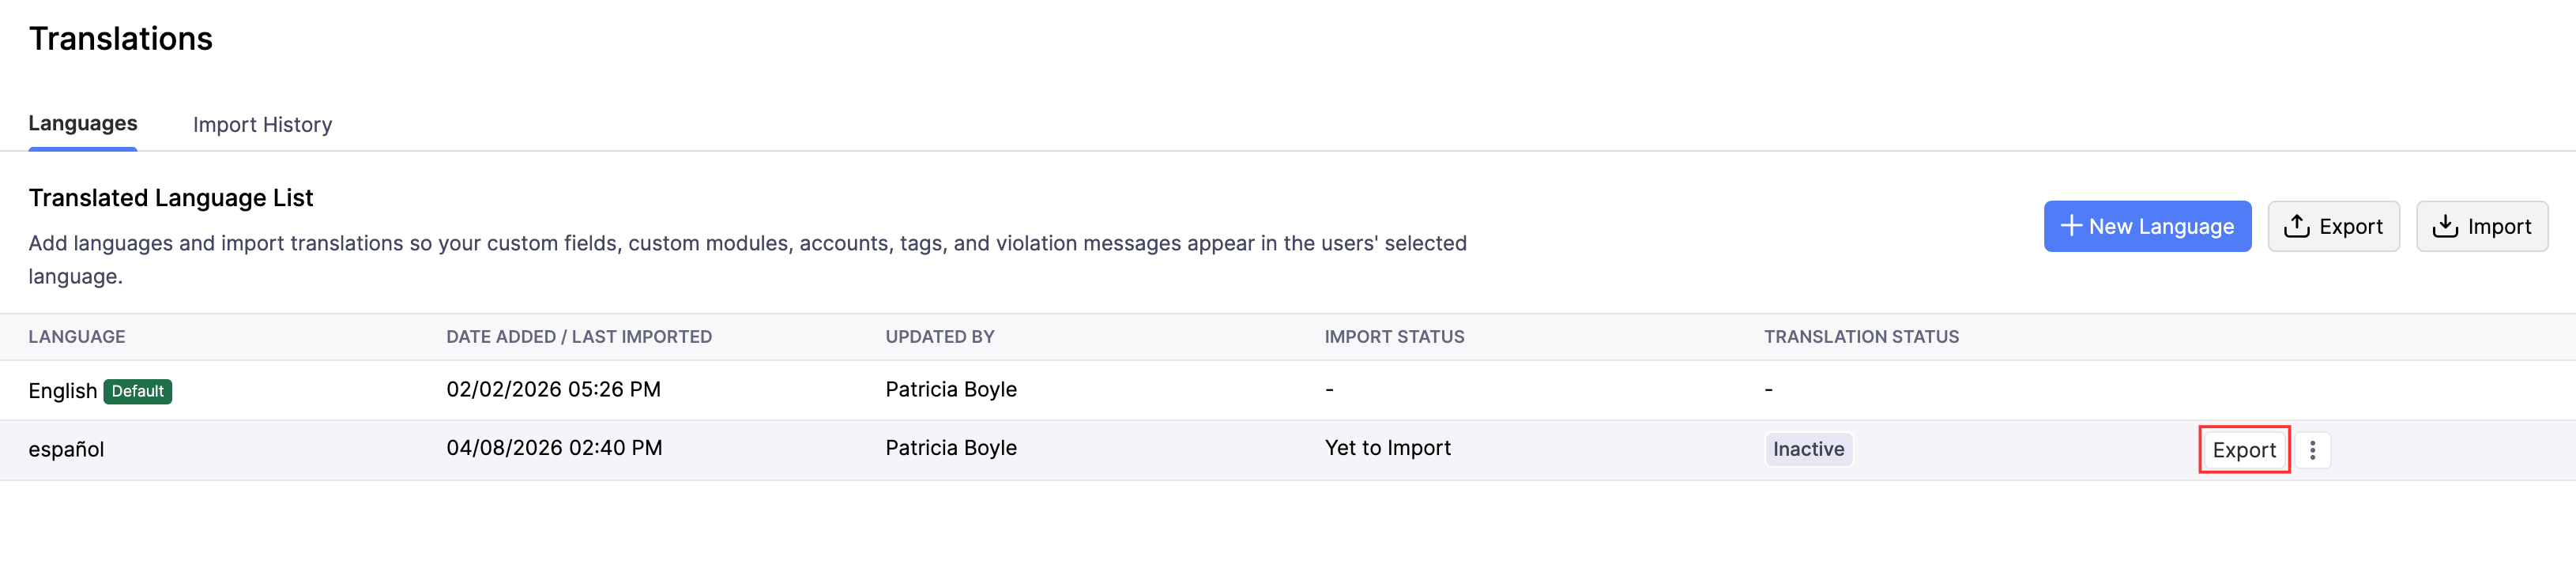
The translation file for that language will be downloaded to your device.
To export all languages in bulk:
- Go to Settings on the left sidebar.
(OR)
Click Settings in the top right corner of the page. - Select Translations under Customization.
- Click Export in the top-right corner of the Languages tab.
A ZIP file containing individual translation files for all languages in the list will be downloaded to your device.
Import a Translation File
After adding your translated values to the exported file, import it back to apply the translations.
Prerequisite: Always export the translation file first, add your translations to the exported file, and then import it. The import parser matches translations by key and language code. Importing a file that was not exported from Zoho Expense can cause mapping errors.
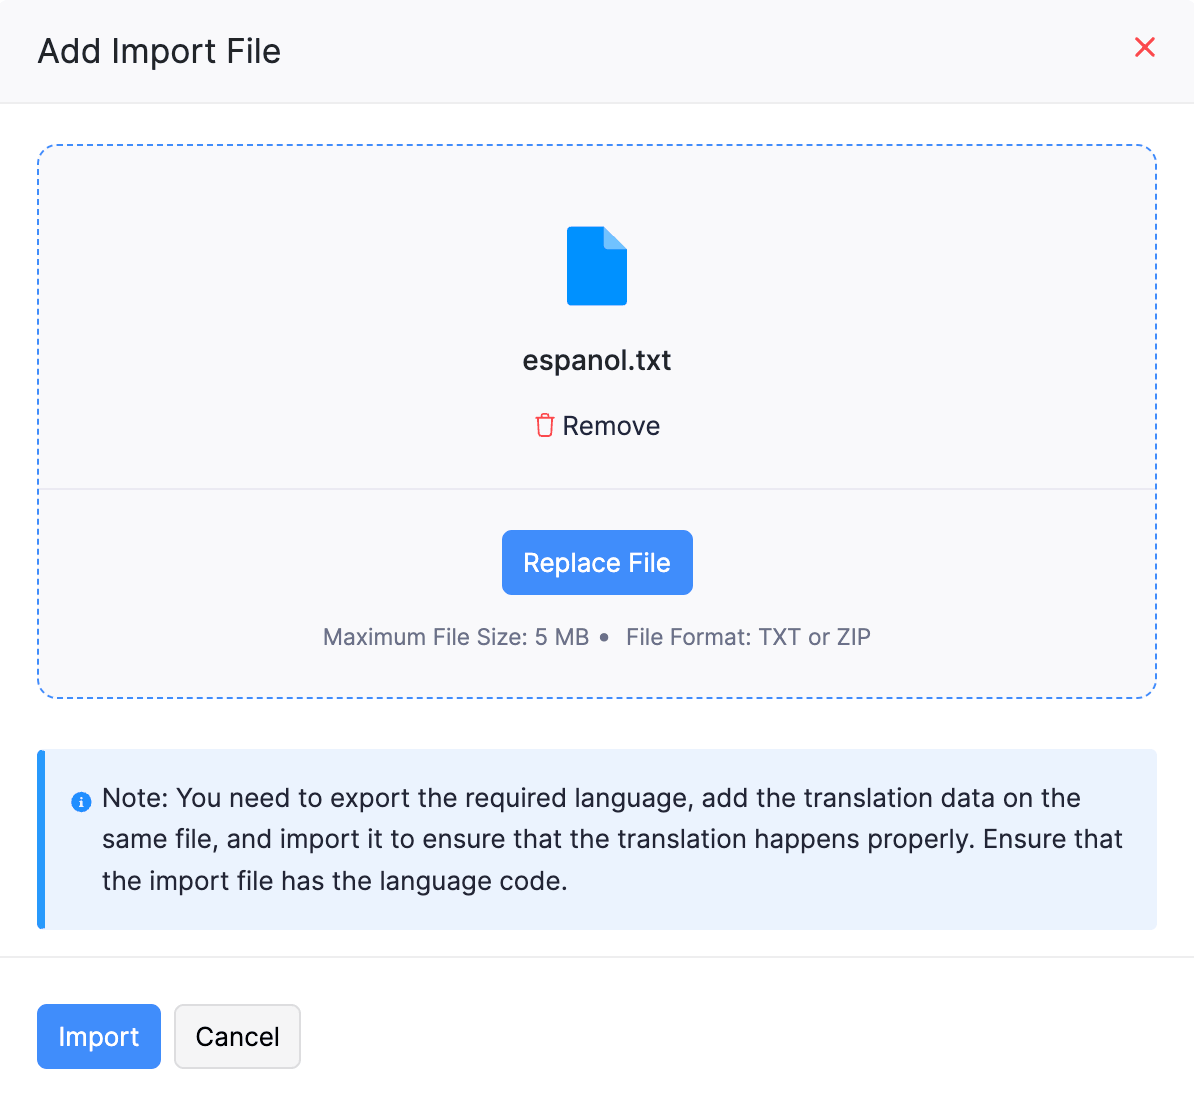
Note: Make sure the import file contains the correct language code. The system uses the language code in the file to map translations to the correct language.
To import a translation file:
- Click Admin View on the left sidebar.
- Go to Settings on the left sidebar.
(OR)
Click Settings in the top right corner of the page. - Select Translations under Customization.
- Click Import in the top-right corner of the Languages tab.
- In the Add Import File pop-up, drag and drop your file into the upload area, or click Choose File to browse for it.
- Supported file formats: TXT or ZIP
- Maximum file size: 5 MB
- Click Import.
Once imported, the Import History tab records the details. The Translation Status stays Inactive until you manually activate the language. See Mark a Language as Active for steps.
Mark a Language as Inactive
You can mark an active language as inactive to stop showing its translations to users without deleting it. The translation file is retained and the language can be marked as active again at any time.
- Click Admin View on the left sidebar.
- Go to Settings on the left sidebar.
(OR)
Click Settings in the top right corner of the page. - Select Translations under Customization.
- In the Languages tab, click the More icon on the row of the language you want to mark as inactive.
- Select Mark as Inactive from the dropdown.
The Translation Status for the language updates to Inactive. Users who select this language will no longer see the translated values.
Mark a Language as Active
After importing a translation file, you must manually mark the language as Active to make the translations visible to users. You can also mark a language as Active again if it was previously marked as Inactive.
- Click Admin View on the left sidebar.
- Go to Settings on the left sidebar.
(OR)
Click Settings in the top right corner of the page. - Select Translations under Customization.
- In the Languages tab, click the More icon next to the language you want to mark as active.
- Select Mark as Active from the dropdown.
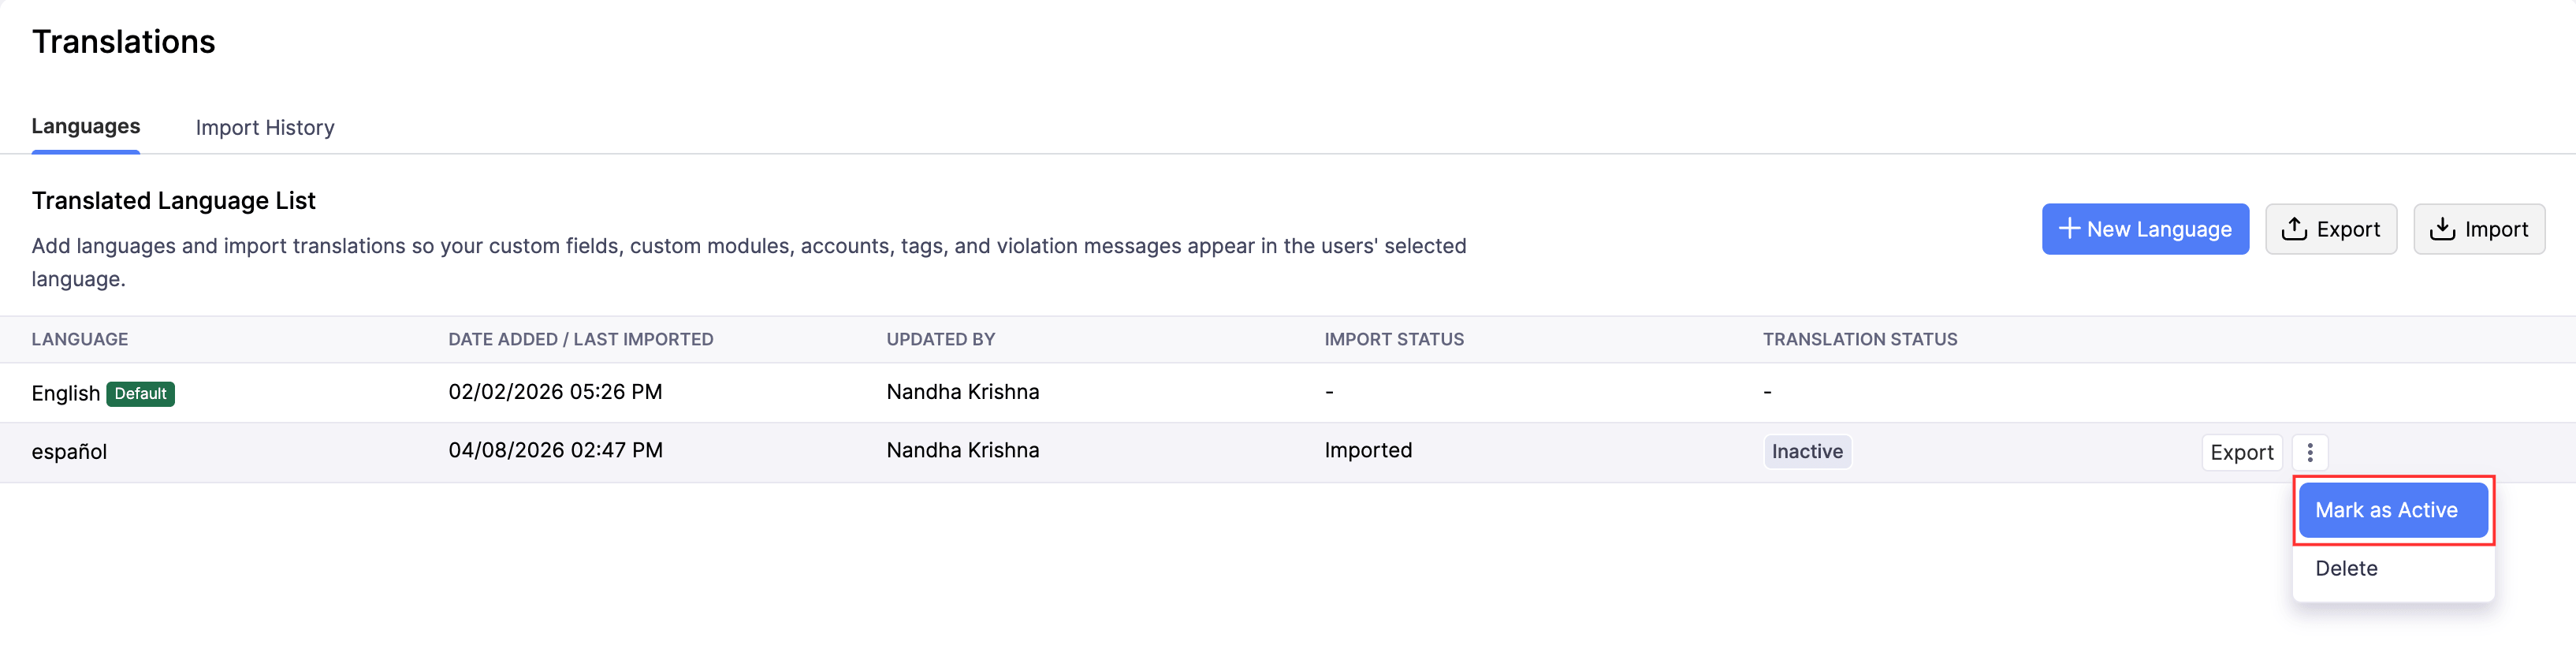
The Translation Status for the language updates to Active. Users who select this language from My Settings will see the translated values throughout the app.
Delete a Language
You can delete a language from the Translated Language List when you no longer need its translations.
Warning: Deleting a language removes it from the Translated Language List. This cannot be undone.
- Click Admin View on the left sidebar.
- Go to Settings on the left sidebar.
(OR)
Click Settings in the top right corner of the page. - Select Translations under Customization.
- In the Languages tab, click the More icon next to the language you want to delete.
- Select Delete from the dropdown.
The language is removed from the list.
View Import History
The Import History tab shows a log of all translation file imports. Each entry shows:
- Import By: The name of the user who imported the file, and the date and time of the import.
- File Name: The name of the file that was imported.
- Language Name: The language the translation file was imported for.
- Added: The number of new translation keys added during the import.
- Updated: The number of existing translation keys updated during the import.
- Skipped: The number of keys that were skipped (for example, keys with no value or invalid format).
To view import history:
- Click Admin View on the left sidebar.
- Go to Settings on the left sidebar.
(OR)
Click Settings in the top right corner of the page. - Select Translations under Customization.
- Click the Import History tab.

Related Topics: