Building a Subform
- A primary product form, which contains details about the main order: mobile phone.
- A sub product form, which contains details about the associated accessories. This is nothing but a subform in CRM.
Scenarios
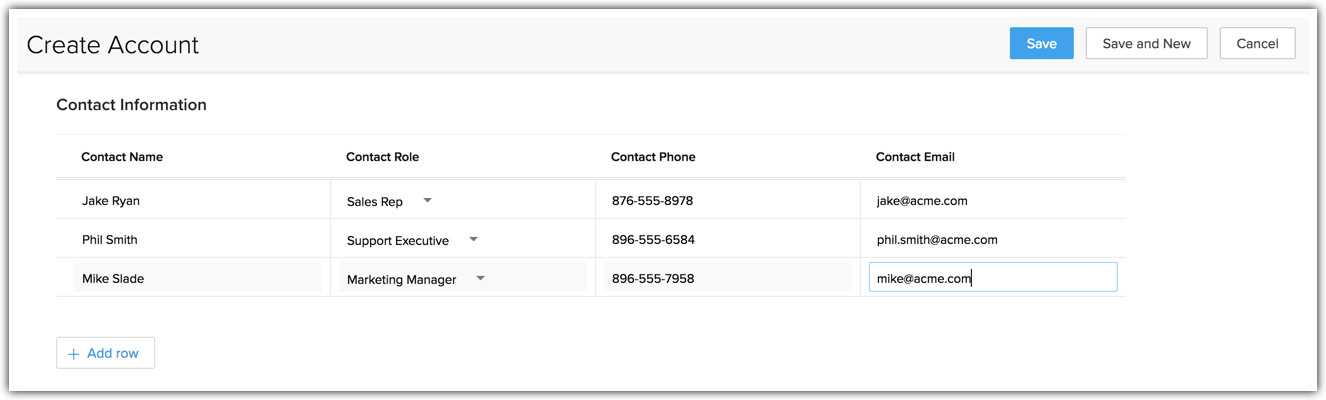
Sales Sector: A subform to associate contact details to accounts
If you have many contacts that you are working with in a specific company, create a subform to jot down the details of the contacts.
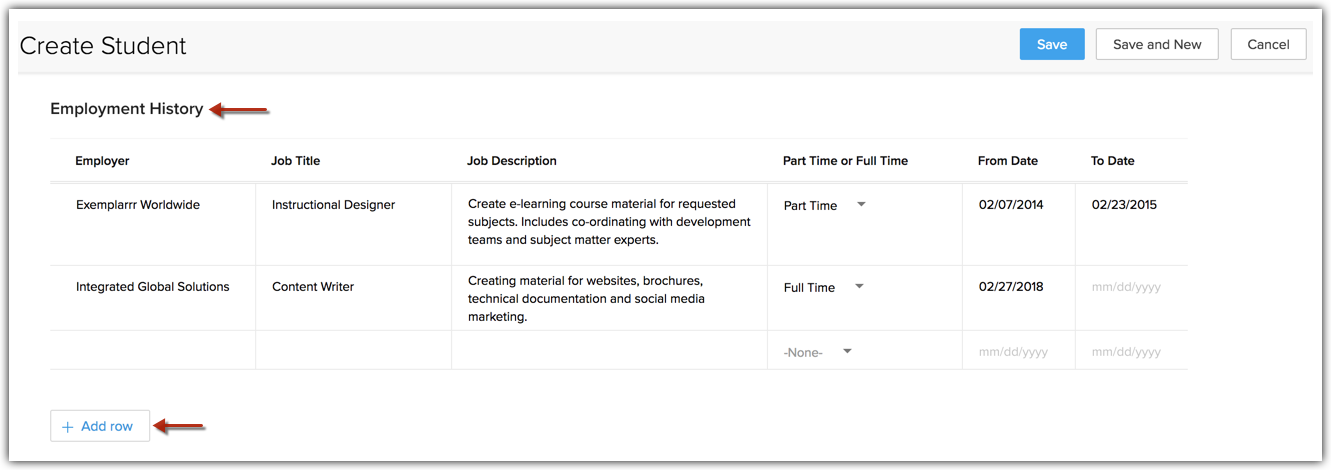
Education Sector: A subform to associate academic details to a student
A Student application form may require the applicant to fill a complete section on Academic Details and Previous employment details, if any. This may contain details about the employer, job title, description and so on. While the primary form is still all about the student, the subform is a table with details about previous companies and associated information.
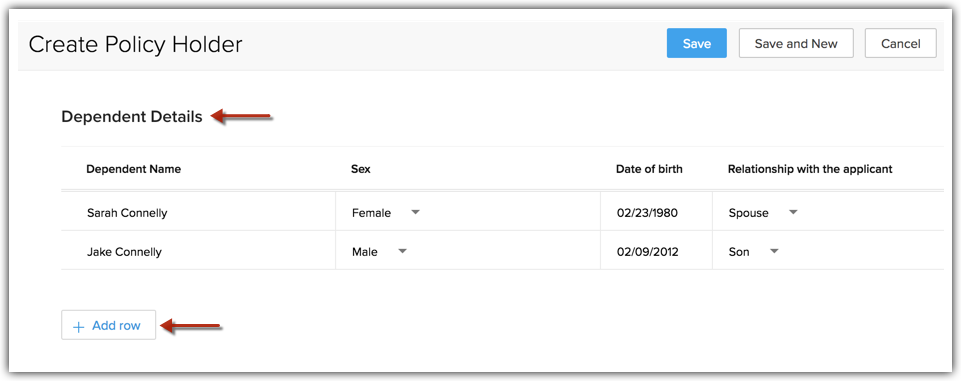
Insurance Sector: A subform to associate dependent details to an applicant
A life insurance form may ask an applicant to fill dependent details - this section would be a form in itself with details required such as Dependent Name, Age, Sex and other identity related information. While the primary form is still about the insurance policy holder, the subform is a table with details about his/her dependents.
Real Estate Sector: A subform to associate References details in a rental application form
A house rental or lease form could contain a section on Floor Plans. These could require details such as apartments, description, area etc. While the primary form is still about a property, the sub form could be about details about the houses under this property.
Retail Sector: A subform to associate products in invoices and orders
Building a subform
A subform is created using the layout editor. You will insert the required types of fields as "Columns" in a subform and add aggregate fields if required. The following sections break down the process of creating a subform in Zoho CRM.
To create a subform
- Go to Setup > Customization > Modules and Fields.
- From the list of modules, click the required module and layout. Example: Products module, Standard layout.
- In the layout editor, drag and drop the Subform block from the New Fields section on the left.
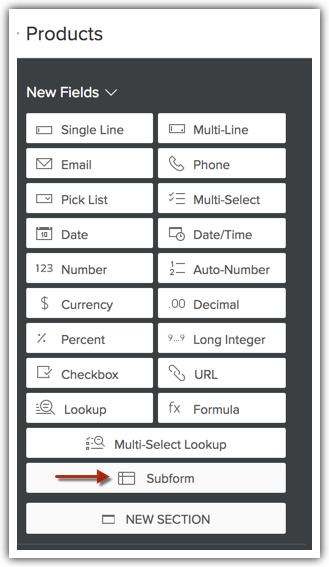
- Name the subform: Example: Sub Products.
Note that subforms are layout-specific. You can have entirely different subforms for Layout A and Layout B of the same module.
Inserting columns in a subform
In the subform, you must next insert the columns required. These columns are nothing but the different types of fields such as single line, number, currency, formula, pick-list field, file upload field, lookup, user field, and so on.
Association of fields from a lookup module
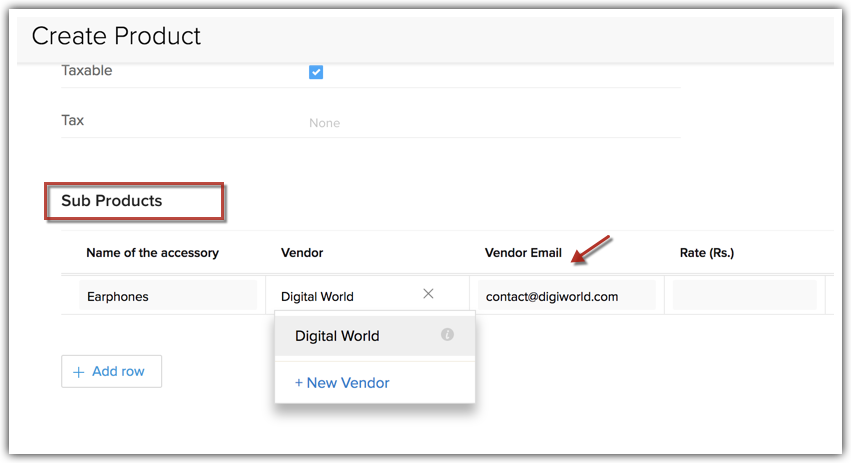
When you add a lookup field to a subform, you can also include fields of the lookup module. For example, when you add Vendors as the lookup module, you will be able to add fields from this module - "Vendor Email" and the like. As you fill line items in this subform, you will see that the Vendor Email field is automatically populated as you look up a vendor. You can edit this field in the subform any time.

- Fields of lookup module will not be populated upon lead conversion, Quote conversion, updating through API, Data Migration, Import, etc.
- User Lookup field is not supported for inventory modules.
- Allow Record Accessibility (Associated users will get access to the records) is not supported on subform user fields.
To insert columns in a subform
- In your subform, click Add Field.
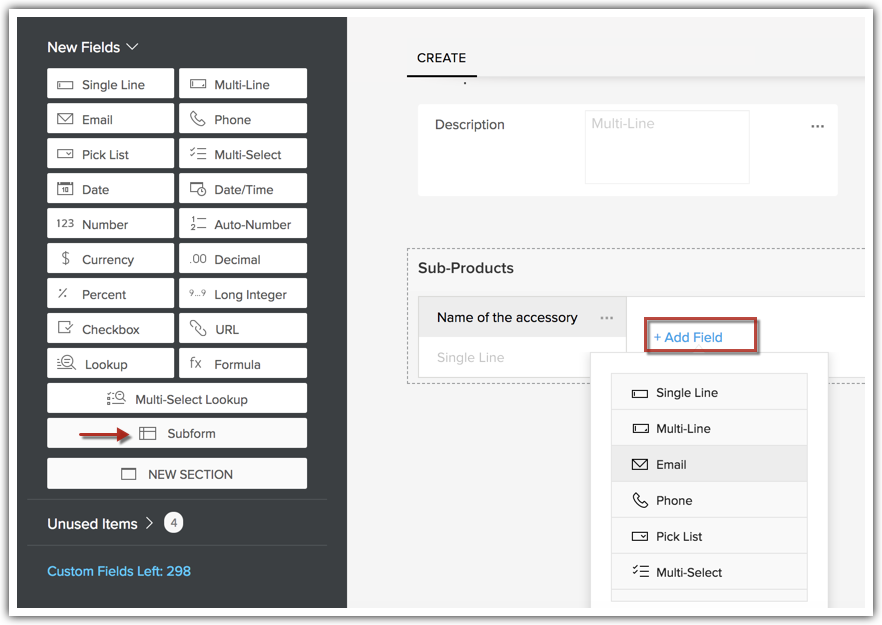
- From the Field Type drop-down list, click the required type of field.
- Name the field and set field properties.
In case you insert a lookup field, you can add specific fields from the related lookup module.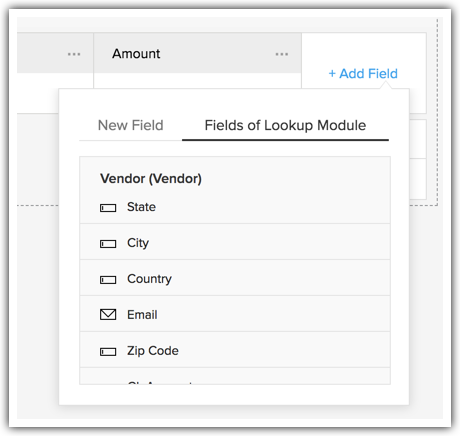
Following are the type of fields you can include in a subform as the form's "Columns".
| Single Line | Pick List | Decimal |
| Multi-Line | Multi-Select Pick List | Percent |
| Email | Date | Long Integer |
| Phone | Date/Time | Checkbox |
| Number | Currency | URL |
| Lookup | Formula | User |
File Upload |
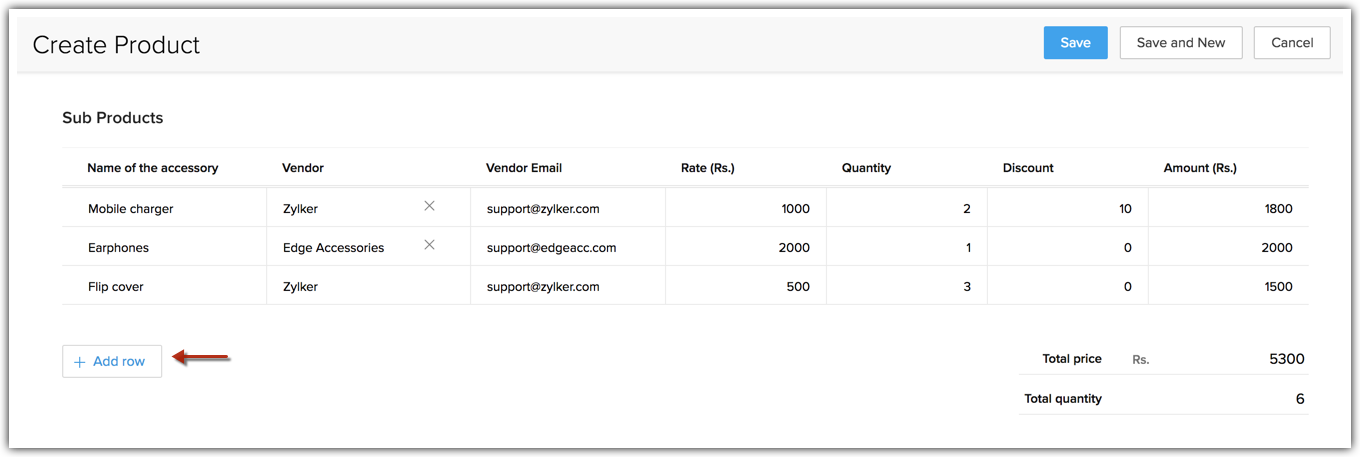
Here is a sample subform for a company that sells mobile phones. While a phone is their primary order, there could be sub products that include accessories. This subform includes columns such as the following:
- Name of the accessory
- Vendor (Lookup field)
- Vendor Email (Field from Lookup module)
- Rate
- Quantity
- Price
- Discount
- Amount.
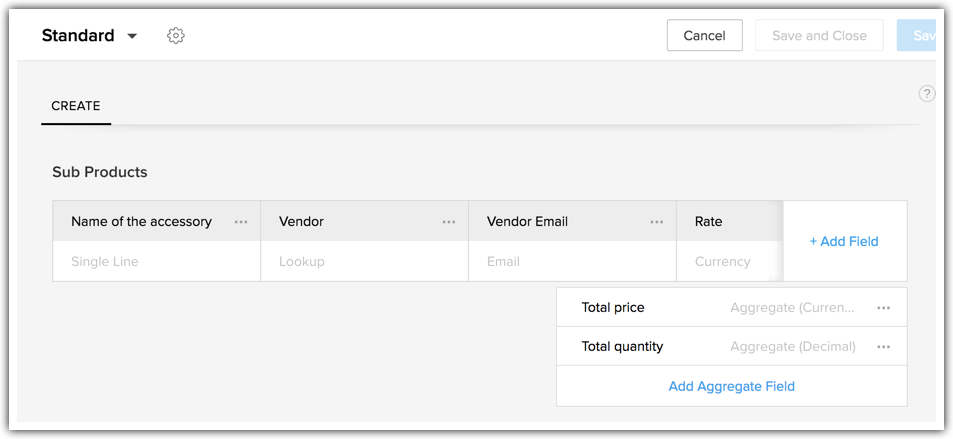
Inserting an aggregate field
- Predefined aggregate functions
These functions, such as SUM, AVERAGE, MAXIMUM, and MINIMUM, are readily available in the system. If you want to sum the price column of all items, an aggregate field named "Total Amount" can be introduced and SUM applied as its function to the Price column. As line items are entered into the "Sub-Products" subform, prices are automatically summed.
Condition-Based aggregate fields: You can also set conditions for the predefined aggregate field such that the aggregation of field values will happen based on specific criteria. You will have the option to aggregate values from all rows or only from those that meet a specified condition.
For example, a quote containing rows for mobile devices sold and accessories sold along with it, you can set conditions such that the aggregate field will show the aggregate only for mobile devices. - Formula Functions
For any other function apart from the predefined aggregate functions, you can define your own Formula Expression using the Formula Tab. For example, your Total Amount field is not a Sum of the total prices but Sum of Total Prices - Discount + Tax. This expression can be defined in the Formula Section appropriately.
When line items are entered in the Subproducts subform, the entered function will be executed automatically. - Manual entries (New Fields)
In cases where you don't want the system to make these aggregate calculations, you can add a New Field. This new field can be a Currency Field, Number or Decimal Field. For example, you want to have an aggregate field called Adjustments, where entries are made on an ad-hoc basis manually. In this case, you can choose New Field, choose the type of field- say currency and add it as an aggregate field.
- Click + Add Aggregate Field within the subform.
- On the Aggregate Fields popup, go to Aggregate.
- Field Label: Enter the name of the field.
- Aggregate Function: From the dropdown, select the function to be used (SUM, AVG, MAX, MIN)
- CRM will automatically calculate the aggregate values based on the settings made here.
- Select the numeric field from the subform based on which the aggregate is to be made.
- Choose the decimal places.
- Check Aggregate specific rows only if you want only specific rows to be considered, and specify the conditions.
- Click Done.
- Click + Add Aggregate Field within the subform.
- On the Aggregate Fields popup, go to Formula.
- Field Label: Enter the name of the field.
- Formula Return Type: Choose from Decimal, Currency, String, Date, DateTime, Boolean.
- In case of Decimal, or Currency: Choose the number of decimal places.
- If predefined functions are not adequate, design an Aggregate Function within the formula section.
- Click Done.
- Click + Add Aggregate Field within the subform.
- On the Aggregate Fields popup, go to New Field.
- Select the type of new field: Number, Currency, Decimal.
- Aggregate field limitations are consistent with the field limitations of the parent module.
- When specifying criteria for aggregate fields, only the subform fields will be included in the options.
- Multi-line fields with large characters types, and file upload fields are not supported on for criteria selection.
Manage Preferences
Once you have entered all the columns and aggregate fields, it's time to set the permissions and properties for the subform and fields in the subform.
Updating subform properties
Mark as required: When you want the subform to carry any data before you save the record, you can mark the subform as required.
- If there is a mandatory field inside a mandatory subform, then that field cannot be empty.
- If a subform is not marked as required, you can save the record with or without values in it.
- If you have not marked a subform as required, but there are fields within the form that are marked mandatory, you can still save the record without any values filled in them.
- If you have a non-mandatory subform, mandatory fields will be applied only when the users provide any value to the subform.
- Update the name of the subform.
- Update Tooltip to describe and guide the users as they fill in the form.
- Mark or unmark the subform as required.
- Limit the maximum row entries allowed in the subform.
- Allow or restrict the option to re-order the row entries.
- You cannot delete a subform, if the form and the fields are marked as required.
Setting field permissions in a subform
- Mark as required: Mark this field as mandatory so that a record cannot be saved without a value for this field.
- Set Permissions: For each profile with access to this field, you can set the permissions of Read and Write, Read Only or Don't Show.
For instance, Deal Amount should be a Read Only Field for Sales Reps but can be a Read and Write field for Managers.
- Edit Properties: Edit the settings of each field based on the field type. Example, Number of characters for String fields, Maximum digits allowed for Number fields and so on.
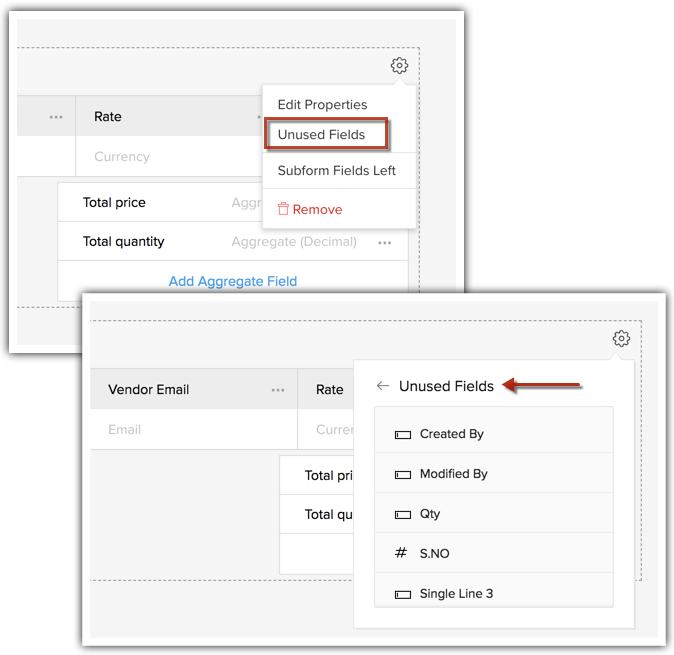
You can also include Tool Tips to explain what is required for each field. - Remove Field: When you don't require a field, you can either delete it permanently or just remove it from this subform.When you only remove it from the subform, these are moved to the Unused Fields list of the form. To restore a removed field, go to the Subform Settings and select Unused Fields. From the list of fields, simply click the field once to restore it to the subform.
Edit subform properties
To edit the properties of a subform
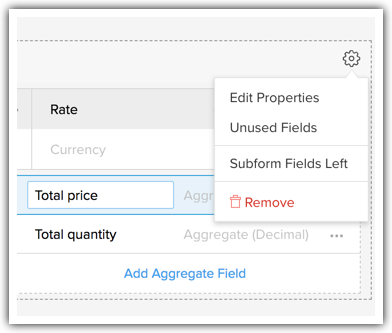
- Click the Settings icon on the Subform section.
- Select Edit Properties from the drop-down list. You may edit the following settings.
- Subform Name: Enter a name for the section.
- Select Show Tooltip if required and enter the tip.
- Select Maximum row entries allowed if you wish to limit the number of entries or rows in a subform. Enter the required number. The range allowed is 1-100 entries.
- Select Re-order option for row entries if you want to allow your user to rearrange the order of the rows entered in a subform.
- Subform Name: Enter a name for the section.
- Click Done.
 For those organizations who have set up mandatory fields in their subforms until now, the subform will also be marked mandatory by default and this property will be synchronized with mobile and API after 15 days from the date of release. Click here for release information.
Check subforms field limits
To check the field limits in a subform
- Click the Settings icon on the Subform section.
- Select Subform fields left from the drop-down list.
- This will open a window with a complete set of details on field limits for each type of field in a subform and how many you have left to be used.
Deleting a subform
To delete a subform
- Click the Settings icon on the Subform section.
- Select Remove.
The subform will be moved to the Unused Items section of the layout.
You can restore it anytime from here or delete it permanently from CRM.
Add Subforms in Mail Merge Templates
You can add subfomrs that were created in a module, in mail merge template and send it to your customers.
For example, information such as details of accessories purchased, life insurance dependency details, history of educational details, etc. which are captured using subforms can be added to your mail merge template.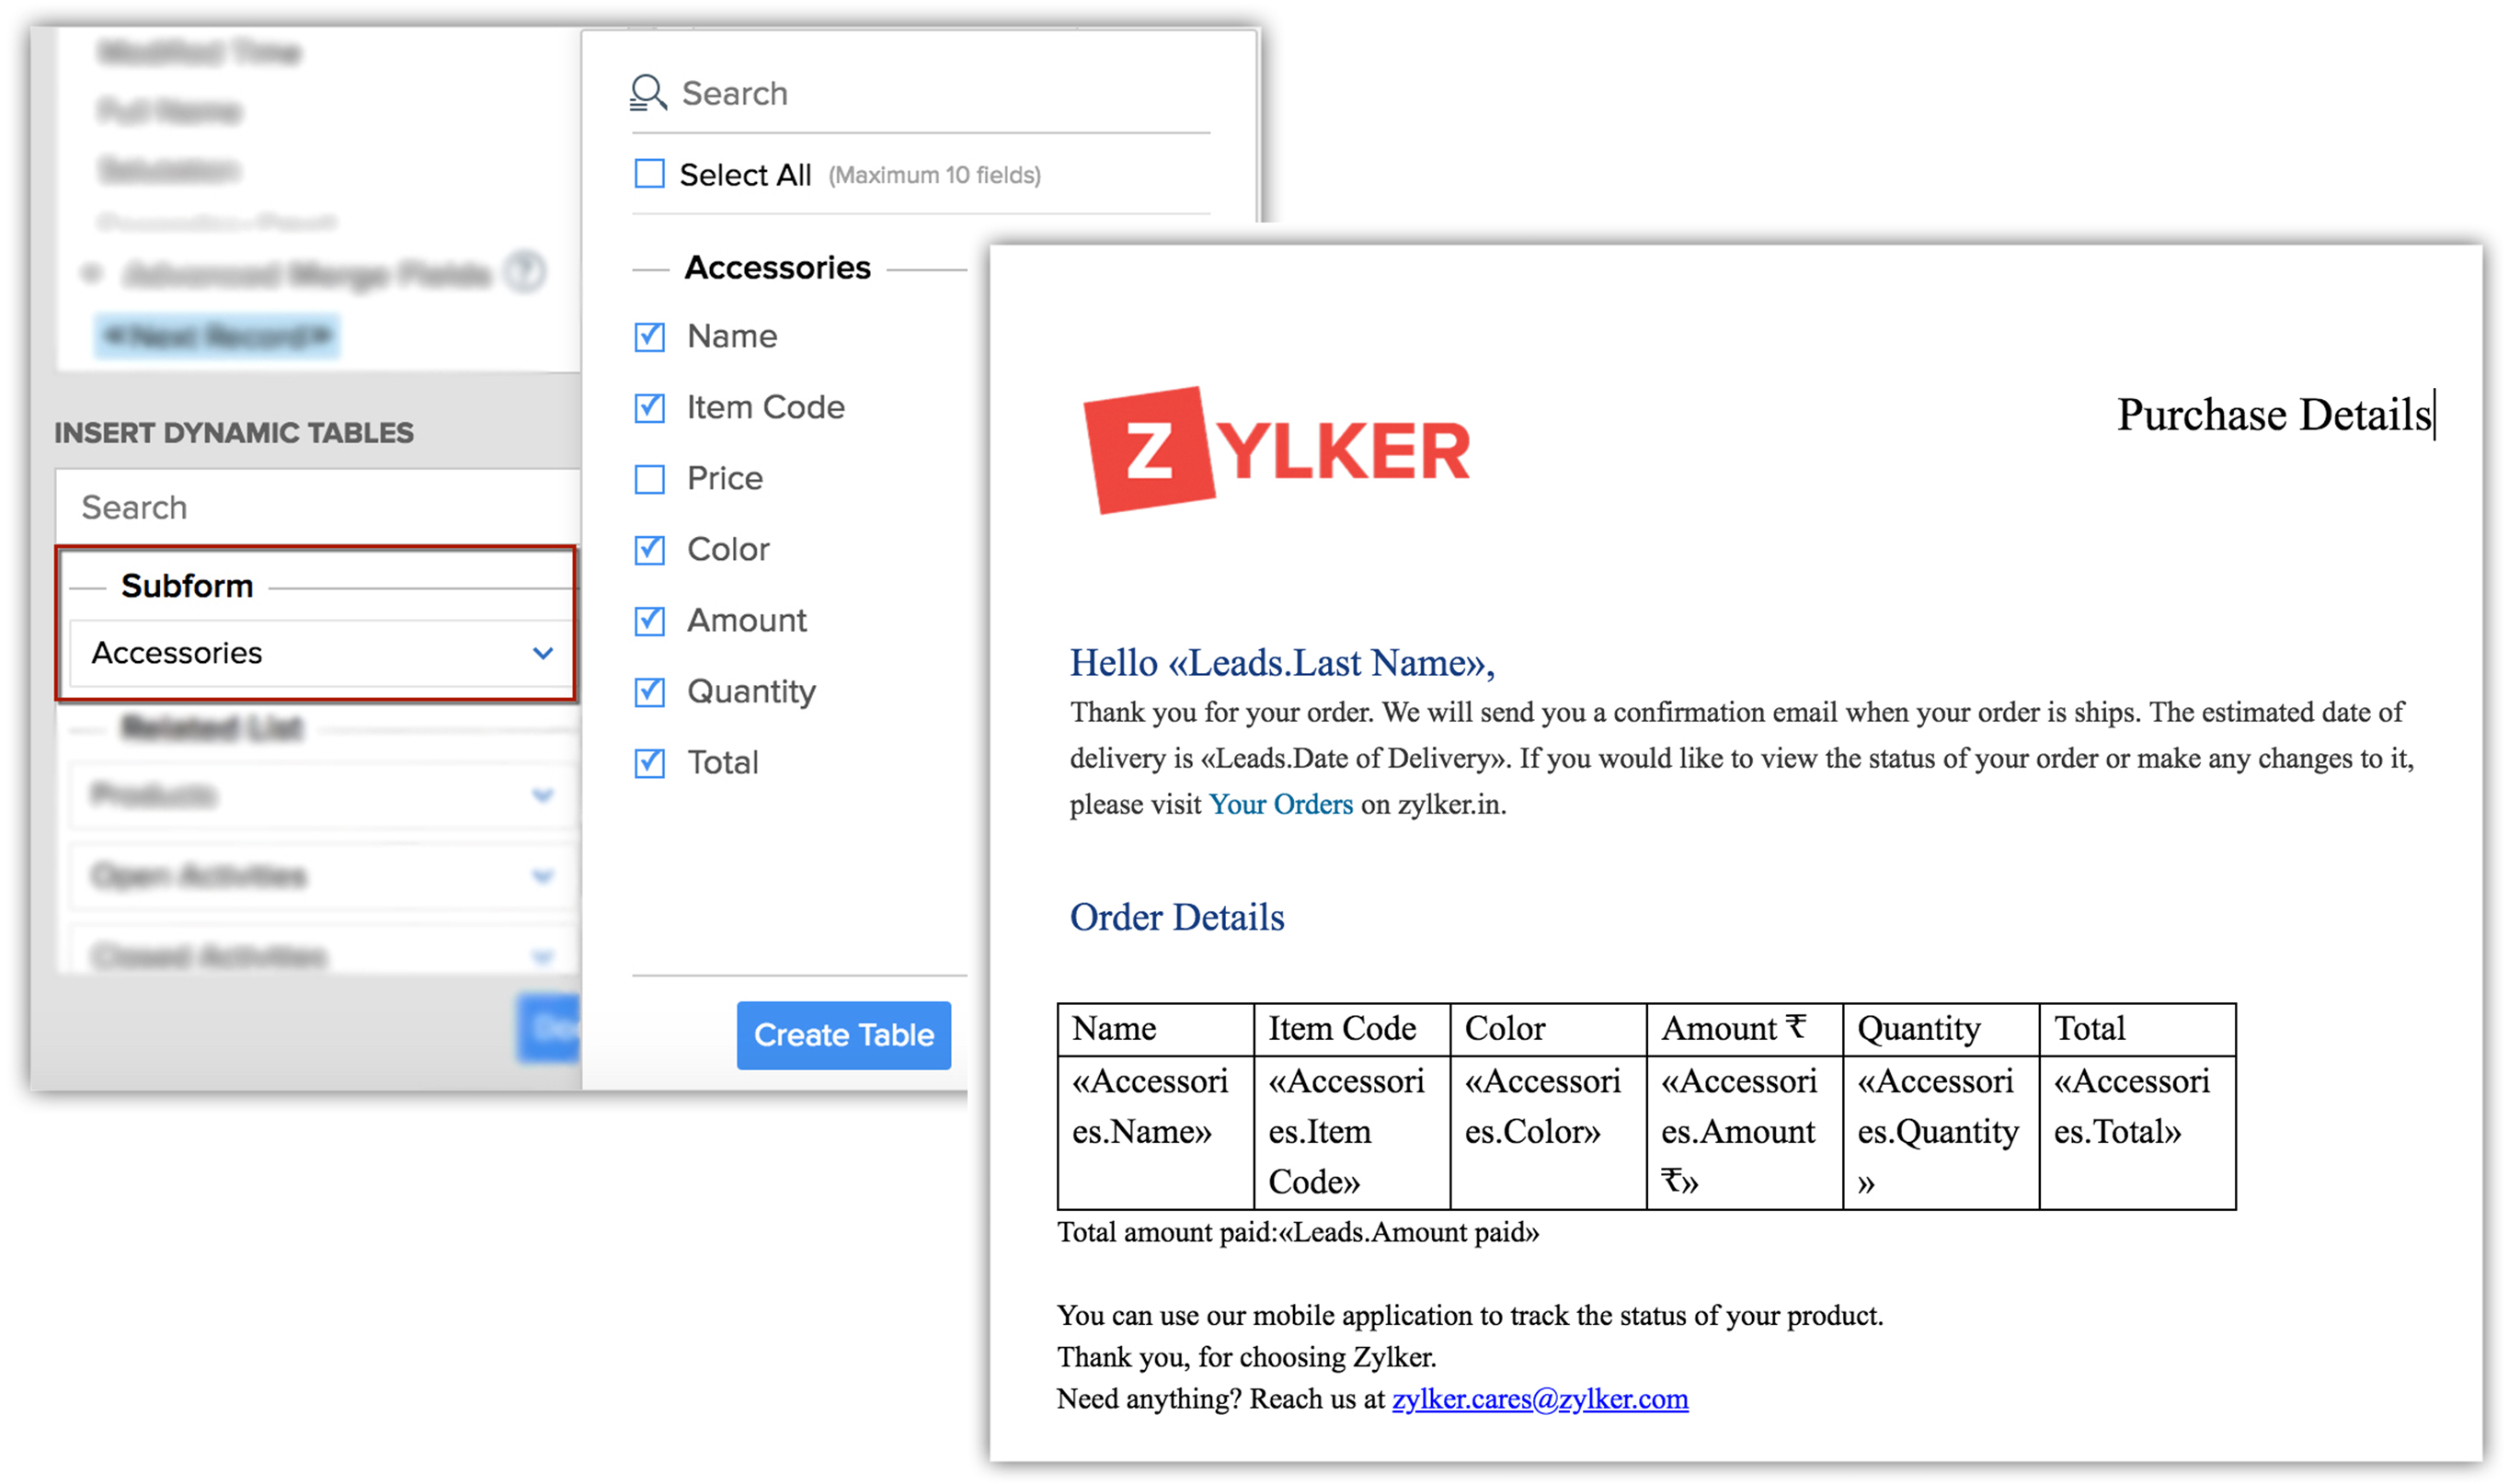
Create reports and dashboards based on subforms
While creating a report for a module, you can base it out of subforms present in the module. For example, when you create report for Products, where you have Sub-products as a subform, this Sub-products subform will be listed under Related Modules section.
If you want to pull up a report of each product and the Sum Total of its sub-products, you can easily get this information by creating a subforms-based report.
To create a report based on subforms
- Go to the Reports module.
- Click Create Report.
- Select the primary module. Example, Products.
- In the Related Modules section, select the required subform. Example, Sub-Products.
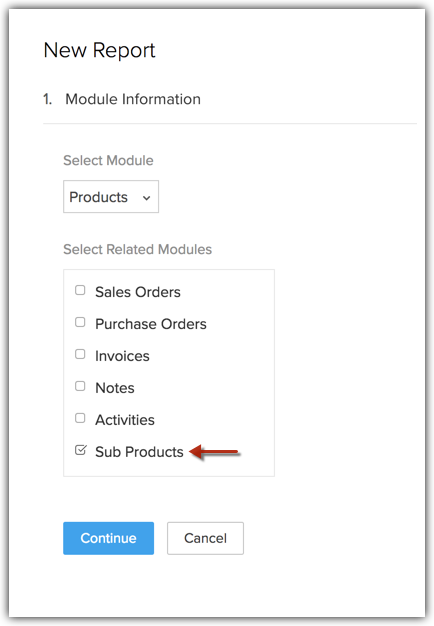
- Click Continue.
- Choose the type of report. Example: Summary Report.
- Click Continue.
- In the Reports Representation section, choose the columns required from the Available Columns section and add them to the Selected Columns. Example, Amount, Discount, Quantity, Rate etc.
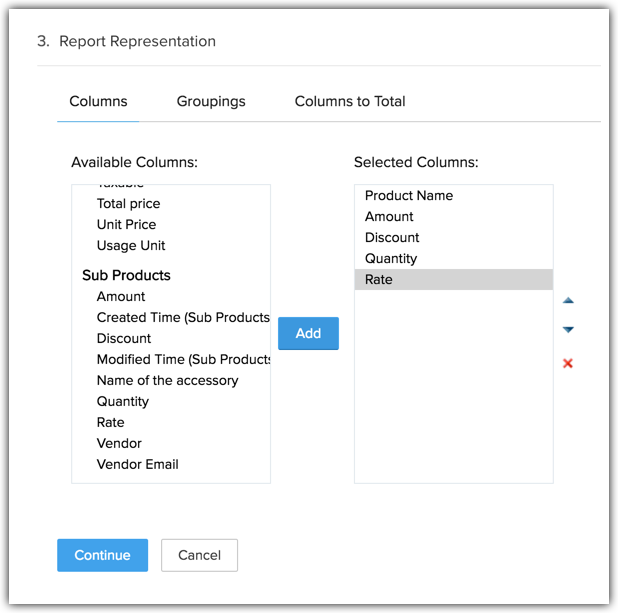
- Click Continue.
- Add any filters if required. Otherwise, RUN the report.
You can also create dashboards from the reports thus created.

Points to remember
- A subform is available in the Enterprise Edition and above.
- You can create 2 subforms per module in the Enterprise edition and 5 subforms per module in Ultimate edition.
- The maximum number of subform fields you can add in a layout is 25.
- The maximum number of entries across all subforms on an aggregate is 200.
- The maximum number of subform fields you can add in a layout is 25.
- The number of aggregate fields you can create falls within the field limits of the parent module.
- Subforms are layout-specific. You can have entirely different subforms for Layout A and Layout B of the same module. This includes the subform fields as well as the aggregate fields.
- Subforms are not available for Tasks, Calls, Meetings (Activities), Pricebooks.
- Fields used in subforms will show up in reports when subforms are selected as secondary modules.
- The fields used in subforms will not show up in the following places.
- Custom view columns.
- Advanced filters
- Layout rules
- Blueprint validation
- Webforms
- Import
- Global Search
- Template merge fields
- Validation rules
- Workflow field update and criteriaHowever, a subform's aggregate fields will be available in the above-mentioned places.
- Custom view columns.
Zoho CRM Training Programs
Learn how to use the best tools for sales force automation and better customer engagement from Zoho's implementation specialists.
Zoho DataPrep Personalized Demo
If you'd like a personalized walk-through of our data preparation tool, please request a demo and we'll be happy to show you how to get the best out of Zoho DataPrep.
- Zoho Workerly Home
- Forums
- Connect With Us:


- Zoho Recruit Home
- Forums
- Connect With Us:
You are currently viewing the help pages of Qntrl’s earlier version. Click here to view our latest version—Qntrl 3.0's help articles.


Zoho Sheet Resources
Zoho Forms Resources
Zoho Sign Resources
Sign, Paperless!
Zoho TeamInbox Resources
Zoho DataPrep Resources
Design. Discuss. Deliver.
Related Articles
Subforms
Add subforms to the modules to include additional information Help guide Building a SubformCreate and Manage Groups
In Zoho CRM, you can create different types of groups (set of users) to manage a set of common records. Groups can be used for setting up team selling, team support, event management by a group of marketing users, etc. Users associated with a ...Customizing Modules
Modules in Zoho CRM, let you categorize and track various aspects of your business such as Sales, Marketing, Customers, Products, Meetings and the like. Modules in Zoho CRM are represented in the form of tabs such as Leads, Contacts, Deals, Tasks ...Using Territories
Understanding Territory Management Using Territory Management, you can segment accounts, contacts and deals into territories. You can build a territory hierarchy by creating territories and sub territories. You can define criteria for each of these ...Using Custom Buttons
Customization is the most powerful way to build a flexible CRM system. In Zoho CRM, you can customize modules, fields, pages, links, and a lot of other elements. In addition to these elements, Zoho CRM now allows you to create new button actions with ...