Creating and Associating SlyteUI Components
Learn how to create a basic SlyteUI Component and how to associate it with CRM
Table of Contents
SlyteUI enables rapid development of UI components and pages with real-time data integration. The following example demonstrates a basic implementation using SlyteUI.
At Zylker, sales representatives frequently perform various calculations. To streamline this process, the admin intends to add a calculator to the interface. Assume you are implementing a UI component that provides a simple calculator.
Create a SlyteUI component
Let us see how to create a simple SlyteUI Component to add a calculator.

- Go to Setup —> Developer Space —> SlyteUI
- Click New Component.
- In the SlyteUI component popup, enter the Name, API Name, and Description, then click Save.
- The SlyteUI IDE will open and prompt you to choose a template.
- You can either select an existing template or start from a blank page to design your component.
- Use the Design Lab and Editor to build your component. In this case, drag and drop the calculator from the Components pane.
- Click Save as Draft to save your SlyteUI component.
- You can click the Review and Publish button to open the Review page, where you can review all the changes as shown below.

- Navigate to the Preview section to test the component in real time. Saving is not required to view changes.Once your component is ready, click Publish, enter the Change Log for the version, and publish the component.

- Once published, your component can be associated with a Custom Button, Related List (RL), Web Tab, or Client Script.
Note
Each time you publish a modification to your component, a new version is created. You can create any number of versions, and the last 30 versions are tracked in the Version History section of the SlyteUI IDE.
Associate your SlyteUI component
A SlyteUI component can be used in multiple places in the CRM. Let us see how to associate the SlyteUI component in different contexts:
Custom Button

- Go to Setup > Customization > Modules and Fields.
- In the Modules tab, click the module where you want the SlyteUI Component to be placed.
- Click the Links and Buttons tab.
- Click +New Button.
- In the Create Your Button page, enter the Name and Description for the button.
- Choose the layout(s) where the button should appear.
- Select the page and position for the button.
- From the Define an actionto be performed dropdown, choose Open a SlyteUI Component as shown below.

- In the Choose SlyteUI Component popup, click Install next to the Component that you need.
- If mandatory arguments are defined during component creation, you will be prompted to the input values. You can either enter a static value or use # to map it to available Zoho CRM fields for that module.
- Select the profiles that should have access to this button.
- Click Save.

Related List

- Go to Setup > Customization > Modules and Fields.
- In the Modules tab, click the module and select the Layout where you want the SlyteUI Component to be placed.
- Go to the Detail View tab.
- Click + Related List.
- In the Add Related List popup, select SlyteUI Component
- In the Choose SlyteUI Component popup, click "Install" next to the Component that you need.

- In the Add Related List Popup, enter the Related List Name.

- If mandatory arguments are defined during component creation, enter the values or map them using # to the relevant CRM fields.
Click Save in the Add Related List popup, and Save the layout.
Note
You can also associate a SlyteUI component to a Related List directly from the detail page of the module.
Web tab

- Go to Setup > Customization > Modules and Fields.
- Click the Web Tabs tab.
- Click + New Tab
- In the Create Web Tab page, enter the Tab Name.
- Set the source to SlyteUI Component.

- In the Choose SlyteUI Component popup, click Install next to the Component that you need.
- Select the profiles who should access the component.
- Choose the Teamspace Permission and Click Save.
Note
Argument support is currently unavailable for Components when associated with Web Tabs.
Client Script containers - Popup and Flyout.
- Go to Setup > Developer Hub > Client Script.
- Click New Script.
- Enter the script details: Name, Description, Page, and Events, then click Next.
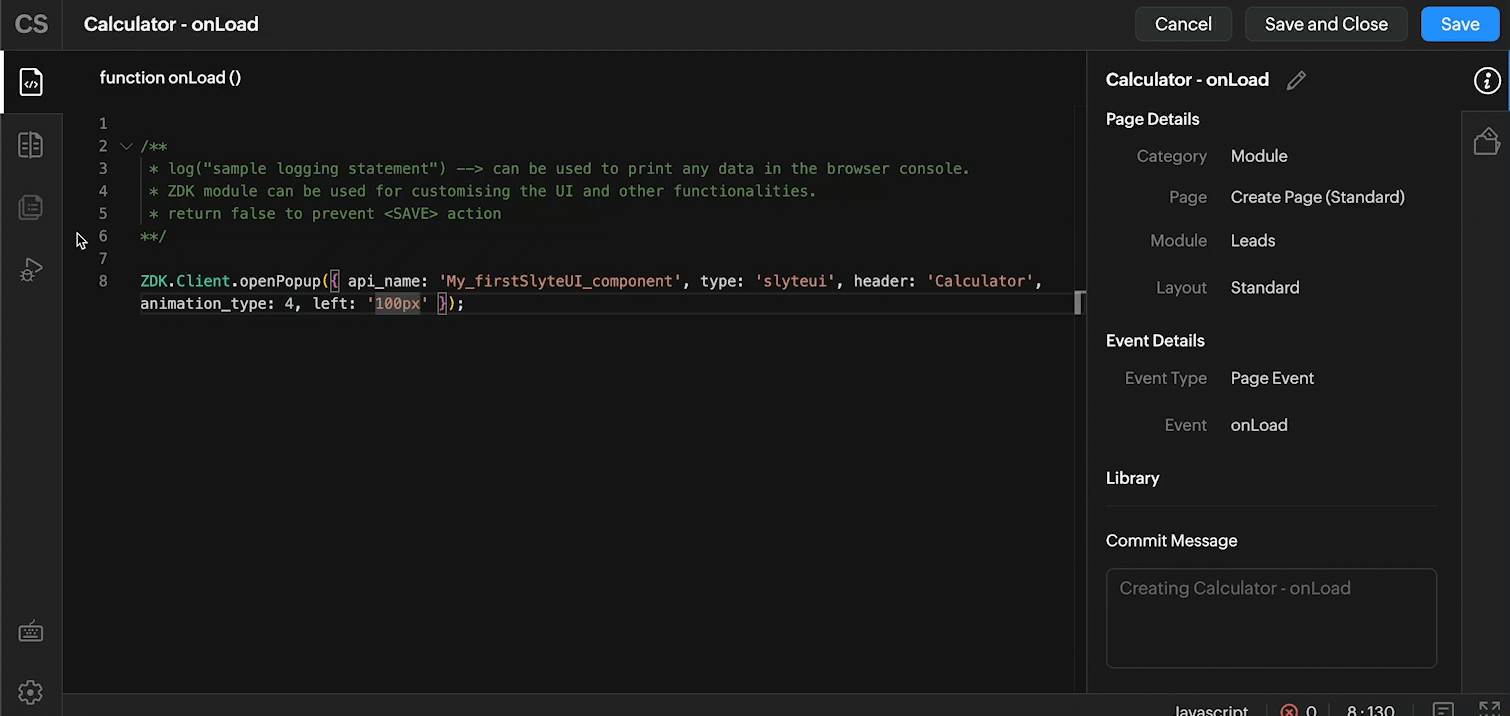
- For example, if you are configuring a script for the onLoad event on the Leads Create page and want to open a SlyteUI component as a popup when the Create page is loaded, use the following snippet:
ZDK.Client.openPopup({ api_name: 'My_firstSlyteUI_component', type: 'slyteui', header: 'Calculator', animation_type: 4, left: '100px' });
Preview the script and click Save.

Note:
To open SlyteUI components in Flyouts, refer to the syntax in the documentation links provided.
Kiosk
You can associate SlyteUI components with a Kiosk screen using the Kiosk Studio.
- Navigate to Setup → Customization → Kiosk Studio, and either click Create Kiosk or edit an existing Kiosk.
- For example, consider a Kiosk with two screens where you want to add SlyteUI components to Screen 2. Select Screen 2, click Edit, and then click Add.
- From the available options, choose Creating and Associating SlyteUI Components, select the required SlyteUI component from the list, configure the parameters if required, and click Done.
- This action associates the selected SlyteUI component with the chosen Kiosk screen.
