1. Preparing your source file
Zoho Creator supports importing data from .xls, .xlsx, .xlsm, .csv, .tsv, .ods, .accdb, .mdb, .json and .numbers file formats. However, it's best you prepare your data by referring to the guidelines below for a smooth import.
Importing data from spreadsheet and tabular formats
Data import guidelines:
- Ensure that the data in your file is UTF-8 encoded.
- One or more forms will be created based on the data you import.
- Each sheet or table that you want to import must contain at least two rows of data in it. The sheet or table won't be detected otherwise.
- Each sheet in your file will be referred to as a table in the import interface, and will become a form in the application.
- Each row will become a record, and each column will become a field. Therefore the rows in a sheet and the cells in a column must contain similar data.
- Column headers must be present in a row. It's alright if there are a few blank rows before it, as the import interface allows you to delete rows.
- Blank rows will be imported. You may delete them before uploading your file, or manage them using the import interface's capabilities.
- Delete the empty columns in all sheets. However, the import interface will allow you to deselect the columns you do not want to import.
- Formulas in Excel files can be imported.
- Data validations defined in the spreadsheet file will become Deluge script in the On Validate workflow block on the corresponding form.
- For importing subform data: Parent and child data must be in separate sheets. The sheet containing the parent data is referred to as "parent table" or "main form", and the sheet containing the child data is referred to as its "subform".
- For importing phone numbers: The phone field in Zoho Creator enables you to capture a valid international phone number. Thus while importing data, you must ensure that each phone number contains:
- The + character and a valid international calling code. Alternatively, you can ensure this part by using the standardize phone numbers operation offered by the import interface, which automatically assigns a calling code based on country data present in another column of the same sheet.
- A valid area code (applies to countries such as the US and UK)
- The right number of digits as per that country's convention
- Limits:
- A cell must contain at most 65,536 characters
- A sheet can contain at most 70 columns
- Your file size can be up to 100 MB if your account is in Zoho’s US DC, and up to 10 MB if your account is in any other DC.
Importing data from database files
Data import guidelines:
- One or more forms will be created based on the data you import.
- Each table in your database file will become a form in the application.
- For importing subform data: Parent and child data must be in separate tables. The table containing the parent data is referred to as "parent table" or "main form", and the table containing the child data is referred to as its "subform".
- For importing phone numbers: The phone field in Zoho Creator enables you to capture a valid international phone number. Thus while importing data, you must ensure that each phone number contains:
- The + character and a valid international calling code. Alternatively, you can ensure this part by using the standardize phone numbers operation offered by the import interface, which automatically assigns a calling code based on country data present in another column of the same sheet.
- A valid area code (applies to countries such as the US and UK)
- The right number of digits as per that country's convention
- Limits:
- A cell must contain at most 65,536 characters
- A table can contain at most 70 columns
- Your file size can be up to 100 MB if your account is in Zoho’s US DC, and up to 20 MB if your account is in any other DC.
2. Uploading your file in Zoho Creator
Navigate to the Edit mode of your application.
Click the Add New (+) button displayed near the top-left of the Design page.
Select Form.
Select Import with data.
Upload data that's in one of the supported file formats. The file can be fetched from:
Local storage - A file stored on your device
URL - A publicly accessible direct download link
Cloud service - Google Drive, Box, OneDrive, Dropbox, or Zoho Docs
- If you are importing a large data file, while the process of importing continues in the background you can use the application or view the status of the import. Click the Access Application button in the popup box to access the live mode of the application.
You can view the status of the import by clicking the View Import Status button.
Click the hamburger menu present in the top-right corner of a report and select Import.
Click the Recent Imports tab in the window that appears, to view the status of the successful and failed imports. The import status can also be tracked in the Import progress pop-up.
When you click on a record which contains failed imports, the reason for the failure will be captured as shown below:
For CSV files, the file size limit is 2 GB. For all other file types, the size limit is 100 MB.
CSV files greater than 100MB can be imported only if they are from a local file. It cannot be imported from cloud or url sources.
If the first 3,000 records fail to import successfully, then the remaining import process will also be stopped.
Choice fields like Dropdown, radio, multi-select, and checkbox won't be available for application/form creation for files more than 100 MB.
Navigate to View Import Status
The Recent Imports tab will contain the status of all your imports with the number of total records imported, and both successful and failed records. Note: The import status will only be available for 24 hours from the time of import completion.Note: Records that failed during importing can be downloaded in CSV format by clicking the download icon present near the record itself. This can be done only when the number of failed records is less than 25 percent of the total records.
Note : Ensure that the data being imported complies with the default and configured validation rules, to ensure an error-free import.Limitations
Zoho Creator will read your file and take you to the import interface's Design tab.
3. The import interface
The import interface sports two tabs - Design and Data .
The Design tab displays your data's physical data model. In other words, it displays the tables present in your file, the columns present in each table, the field type mapped to each column, and the relationships between the tables. The Data tab displays your data, and offers a variety of smart capabilities that enable you to filter, refine, and cleanse the to-be imported data
A nifty feature that the import interface brings is to Undo and Redo up to ten changes. You can also use the standard keyboard shortcuts to perform these operations.These operations will not affect the removed and reset relationships .
4. Selecting tables, columns, and date format
Select / Deselect a table
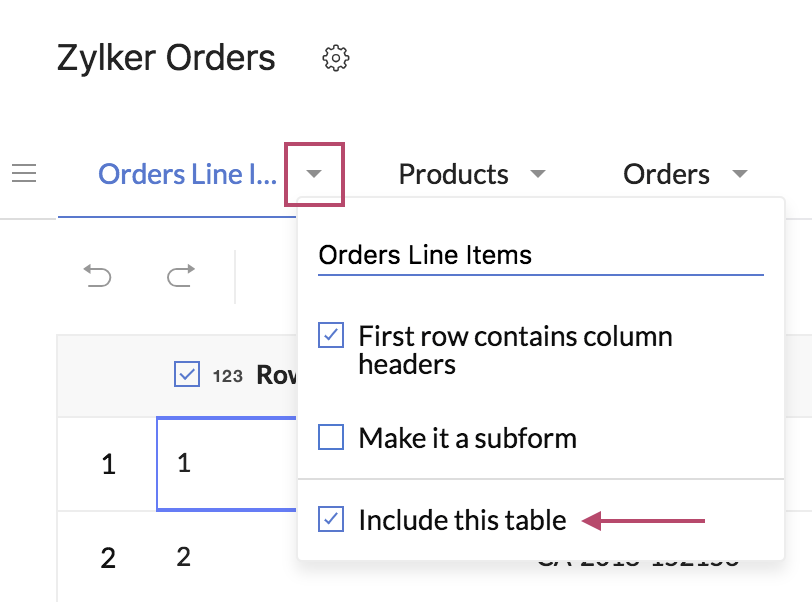
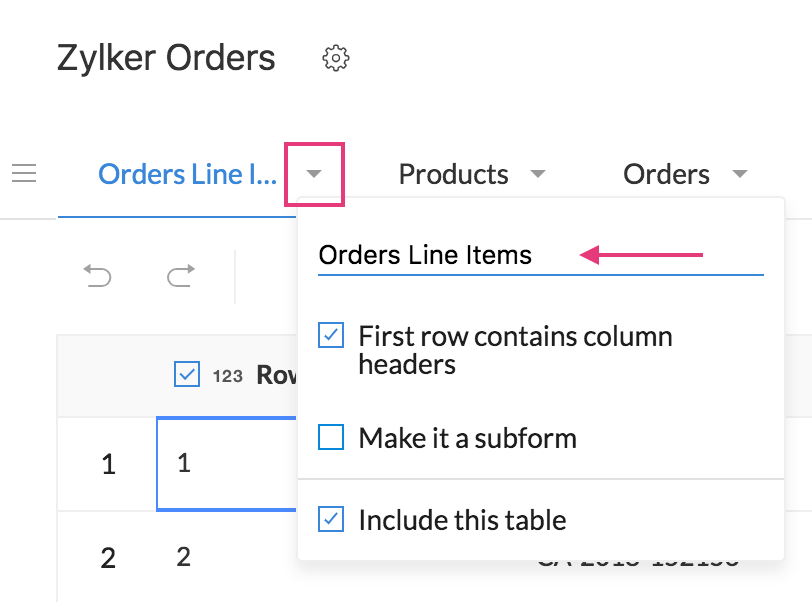
By default, all the tables in your file are selected. You can deselect tables if required. Deselected tables (and consequently the data within them) will not imported in your app. To deselect/select a table:
- From the Design tab, uncheck/check the required table.
- From the Data tab:
- Click the down arrow of the required table.
- Uncheck/check the Include this table checkbox.
Rename a table
By default, the table's name is set with the sheet's name (when you've uploaded a spreadsheet) or the table's name (when you've uploaded a database file). A table's name becomes the corresponding form's display name after import. To rename a table:
- From the Design tab:
- Click on the table's name and edit as required.
- Step off to save the change.
- From the Data tab:
- Click the down arrow of the required table.
- Click on the table's name and edit as required.
- Step off to save the change.
Select / Deselect a column
By default, all the columns are selected. You can deselect columns if required. Deselected columns (and consequently the data within them) will not imported in your app. Uncheck/check a column to deselect/select it, respectively.
Rename a column
By default, the column's name is set with what's there in the file. A column's name becomes the corresponding field's display name after import. To rename a column:
- From the Design tab:
- Click on the column's name and edit as required.
- Step off to save the change.
- From the Data tab, you may simply click on the column's name and edit as required. Alternatively:
- Click the down arrow of the required column, then click Customize Field .
- Edit the column's name as required.
- Step off to save the change.
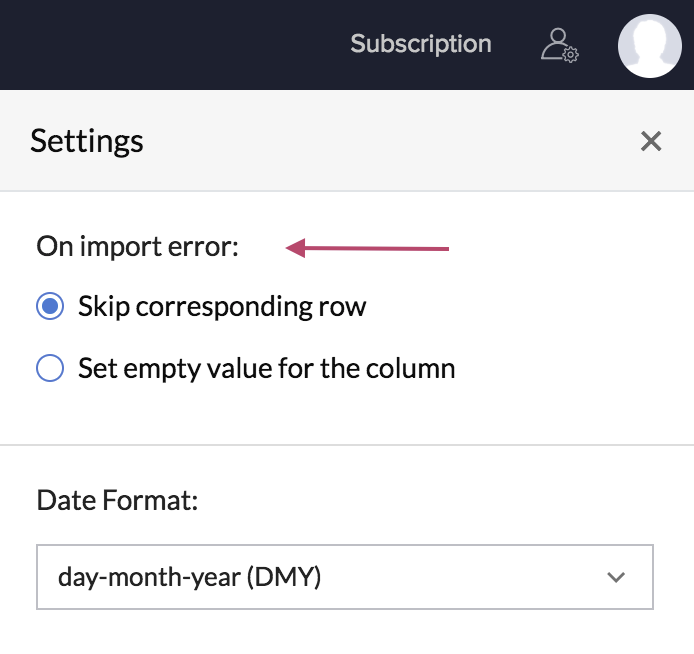
Define what's to happen on import error
The import interface enables brings to you a slew of capabilities to filter, refine, and cleanse data. However, to manage the error that may occur while the data is being imported in to the new application, you can tell Zoho Creator to either Skip the corresponding rows or Set empty value for the column .
- Click the Application Settings (gear) icon next displayed near the top-left corner of the interface. The Settings pane will slide in from the right.
- Select the required choice for On import error .
Set the date format
Setting the data format's paramount as this will tell Zoho Creator how to interpret the date values in your file. To set the date format:
- Click the Application Settings (gear) icon displayed near the top-left corner of the interface. The Settings pane will slide in from the right.
- Select the required value from the dropdown below Date Format .
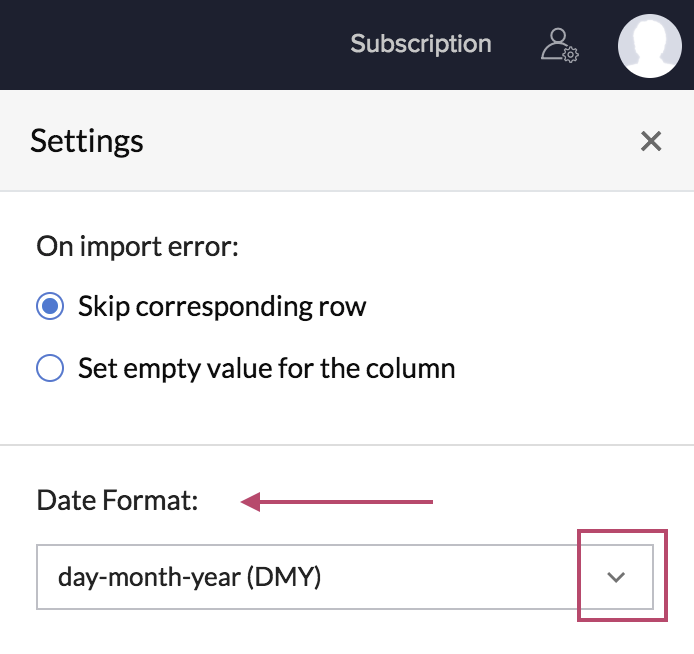
The application has capabilities to recognize date based on locale. A date such as dd.mm.yyyy may not be recognized as date if locale is US and so on import also it will be treated as text. Henceforth, all possible date and time formats will be recognized. If date format is different across the columns then they can be refined into a common format under Standardize Date and Time option.
5. Customize Fields
In the import interface, you can customize the field name, type, and properties using the Customize Fields option.
To customize fields:
From the Data tab, click the down arrow near the column that you want to customize.
Click Customize Field, You will find the options to customize the field.
Rename field: Click on the field name to edit.
Change field type : Select the desired field type from the dropdown below the Field type section.
 Note: For composite fields Name and Address, you will be shown a section for subfield mapping with First name, Last name, and suffix for Name field, and Address Line 1, Address Line 2, and City/District for Address field. You can map these fields with the desired column. Refer to learn more about importing name and address data.
Modify field properties: Under the FIELD PROPERTIES section, you can find the list of options to modify. Depending on the field type, the options in field properties will change as shown in the table below.
Field type | Field Properties | ||||||||||
Initial value | Starting value | Initial decision | Max characters | Max digits | Decimal points | Mandatory | No duplicates | Contains personal data | Encrypt data | Contains health info | |
Name | ✗ | ✗ | ✗ | ✗ | ✗ | ✗ | ✓ | ✗ | ✓ | ✗ | ✗ |
✓ | ✗ | ✗ | ✓ | ✗ | ✗ | ✓ | ✓ | ✓ | ✓ | ✓ | |
Address | ✗ | ✗ | ✗ | ✗ | ✗ | ✗ | ✓ | ✗ | ✓ | ✗ | ✗ |
Phone | ✗ | ✗ | ✗ | ✗ | ✗ | ✗ | ✓ | ✓ | ✓ | ✓ | ✓ |
Single Line | ✓ | ✗ | ✗ | ✓ | ✗ | ✗ | ✓ | ✓ | ✓ | ✓ | ✓ |
Multi Line | ✗ | ✗ | ✗ | ✗ | ✗ | ✗ | ✓ | ✗ | ✓ | ✗ | ✗ |
Date | ✓ | ✗ | ✗ | ✗ | ✗ | ✗ | ✓ | ✓ | ✓ | ✓ | ✓ |
Number | ✓ | ✗ | ✗ | ✗ | ✓ | ✗ | ✓ | ✓ | ✓ | ✓ | ✓ |
Drop Down | ✗ | ✗ | ✗ | ✗ | ✗ | ✗ | ✓ | ✗ | ✓ | ✗ | ✗ |
Radio | ✗ | ✗ | ✗ | ✗ | ✗ | ✗ | ✓ | ✗ | ✓ | ✗ | ✗ |
Multi Select | ✗ | ✗ | ✗ | ✗ | ✗ | ✗ | ✓ | ✗ | ✓ | ✗ | ✗ |
Checkbox | ✗ | ✗ | ✗ | ✗ | ✗ | ✗ | ✓ | ✗ | ✓ | ✗ | ✗ |
Decision Box | ✗ | ✗ | ✓ | ✗ | ✗ | ✗ | ✓ | ✗ | ✓ | ✗ | ✗ |
Rich Text | ✗ | ✗ | ✗ | ✗ | ✗ | ✗ | ✓ | ✗ | ✓ | ✗ | ✗ |
URL | ✗ | ✗ | ✗ | ✗ | ✗ | ✗ | ✓ | ✗ | ✓ | ✗ | ✗ |
Percent | ✓ | ✗ | ✗ | ✗ | ✓ | ✓ | ✓ | ✓ | ✓ | ✓ | ✓ |
Currency | ✓ | ✗ | ✗ | ✗ | ✓ | ✓ | ✓ | ✓ | ✓ | ✓ | ✓ |
Decimal | ✓ | ✗ | ✗ | ✗ | ✓ | ✓ | ✓ | ✓ | ✓ | ✓ | ✓ |
Date - Time | ✓ | ✗ | ✗ | ✗ | ✗ | ✗ | ✓ | ✓ | ✓ | ✓ | ✓ |
Time | ✓ | ✗ | ✗ | ✗ | ✗ | ✗ | ✓ | ✓ | ✓ | ✓ | ✓ |
Subform | ✓ | ✗ | ✗ | ✓ | ✗ | ✗ | ✓ | ✓ | ✓ | ✓ | ✓ |
Lookup multi-select | ✗ | ✗ | ✗ | ✗ | ✗ | ✗ | ✓ | ✗ | ✗ | ✗ | ✗ |
Lookup single-select | ✗ | ✗ | ✗ | ✗ | ✗ | ✗ | ✓ | ✗ | ✗ | ✗ | ✗ |
Auto Number | ✗ | ✓ | ✗ | ✗ | ✗ | ✗ | ✗ | ✗ | ✗ | ✗ | ✗ |
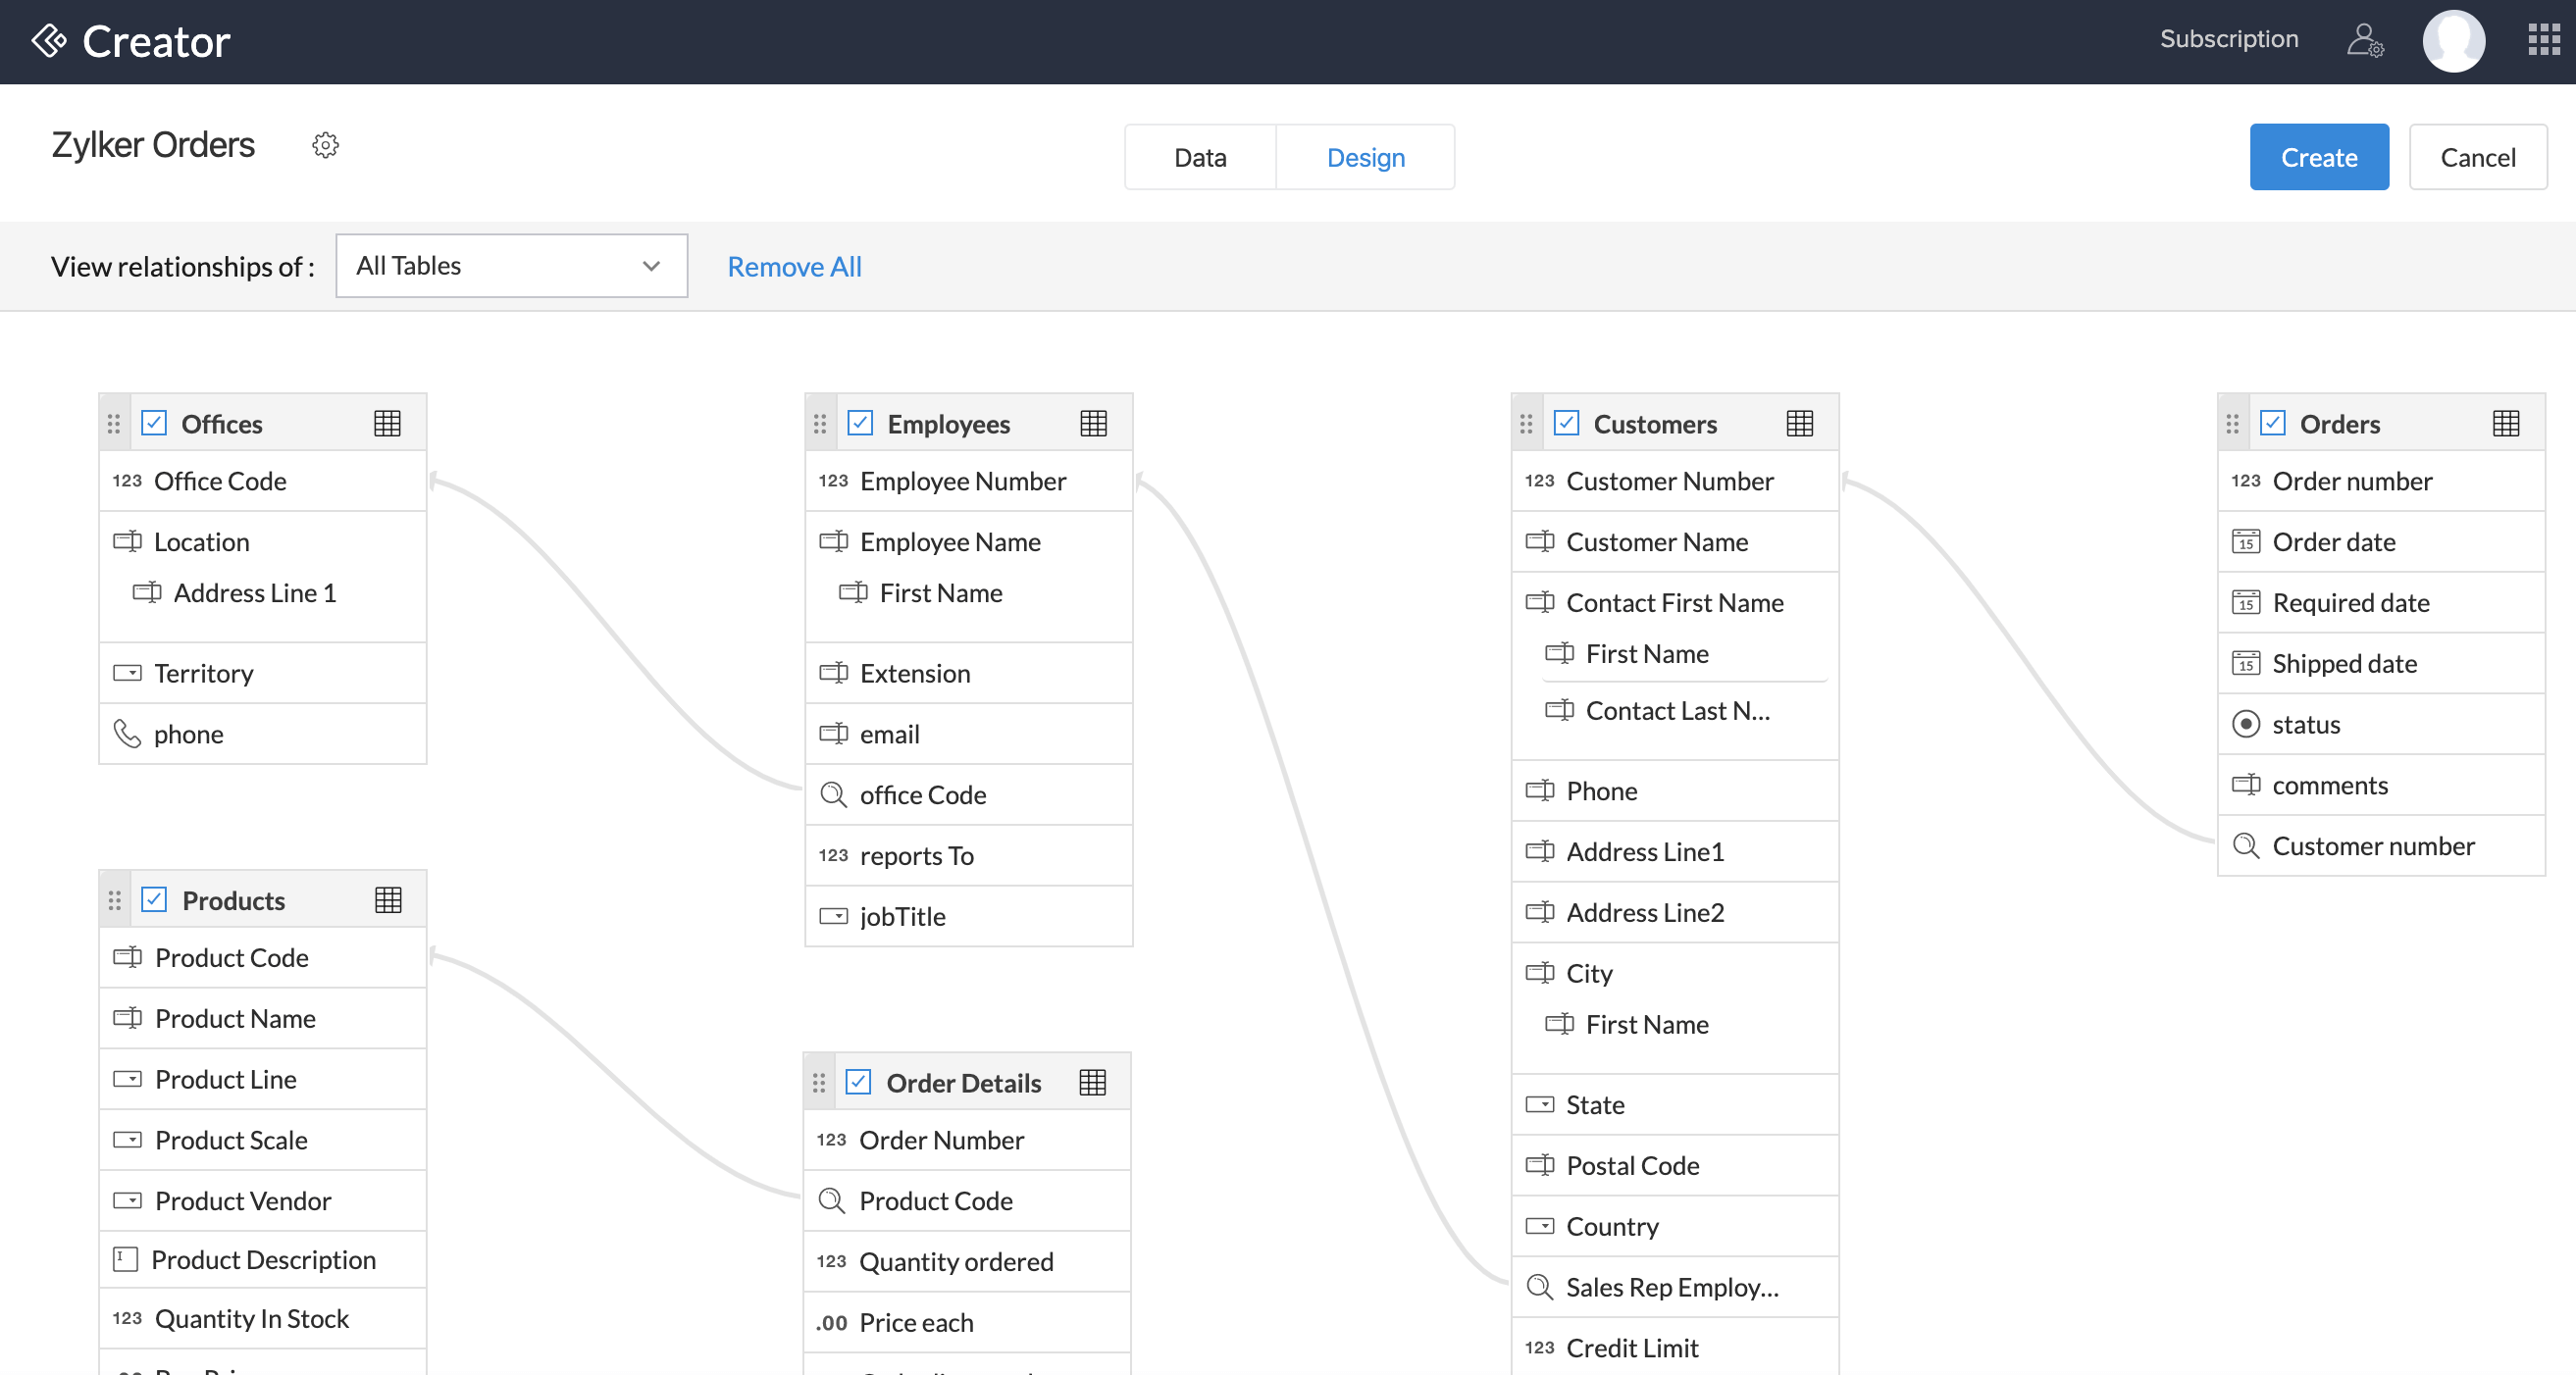
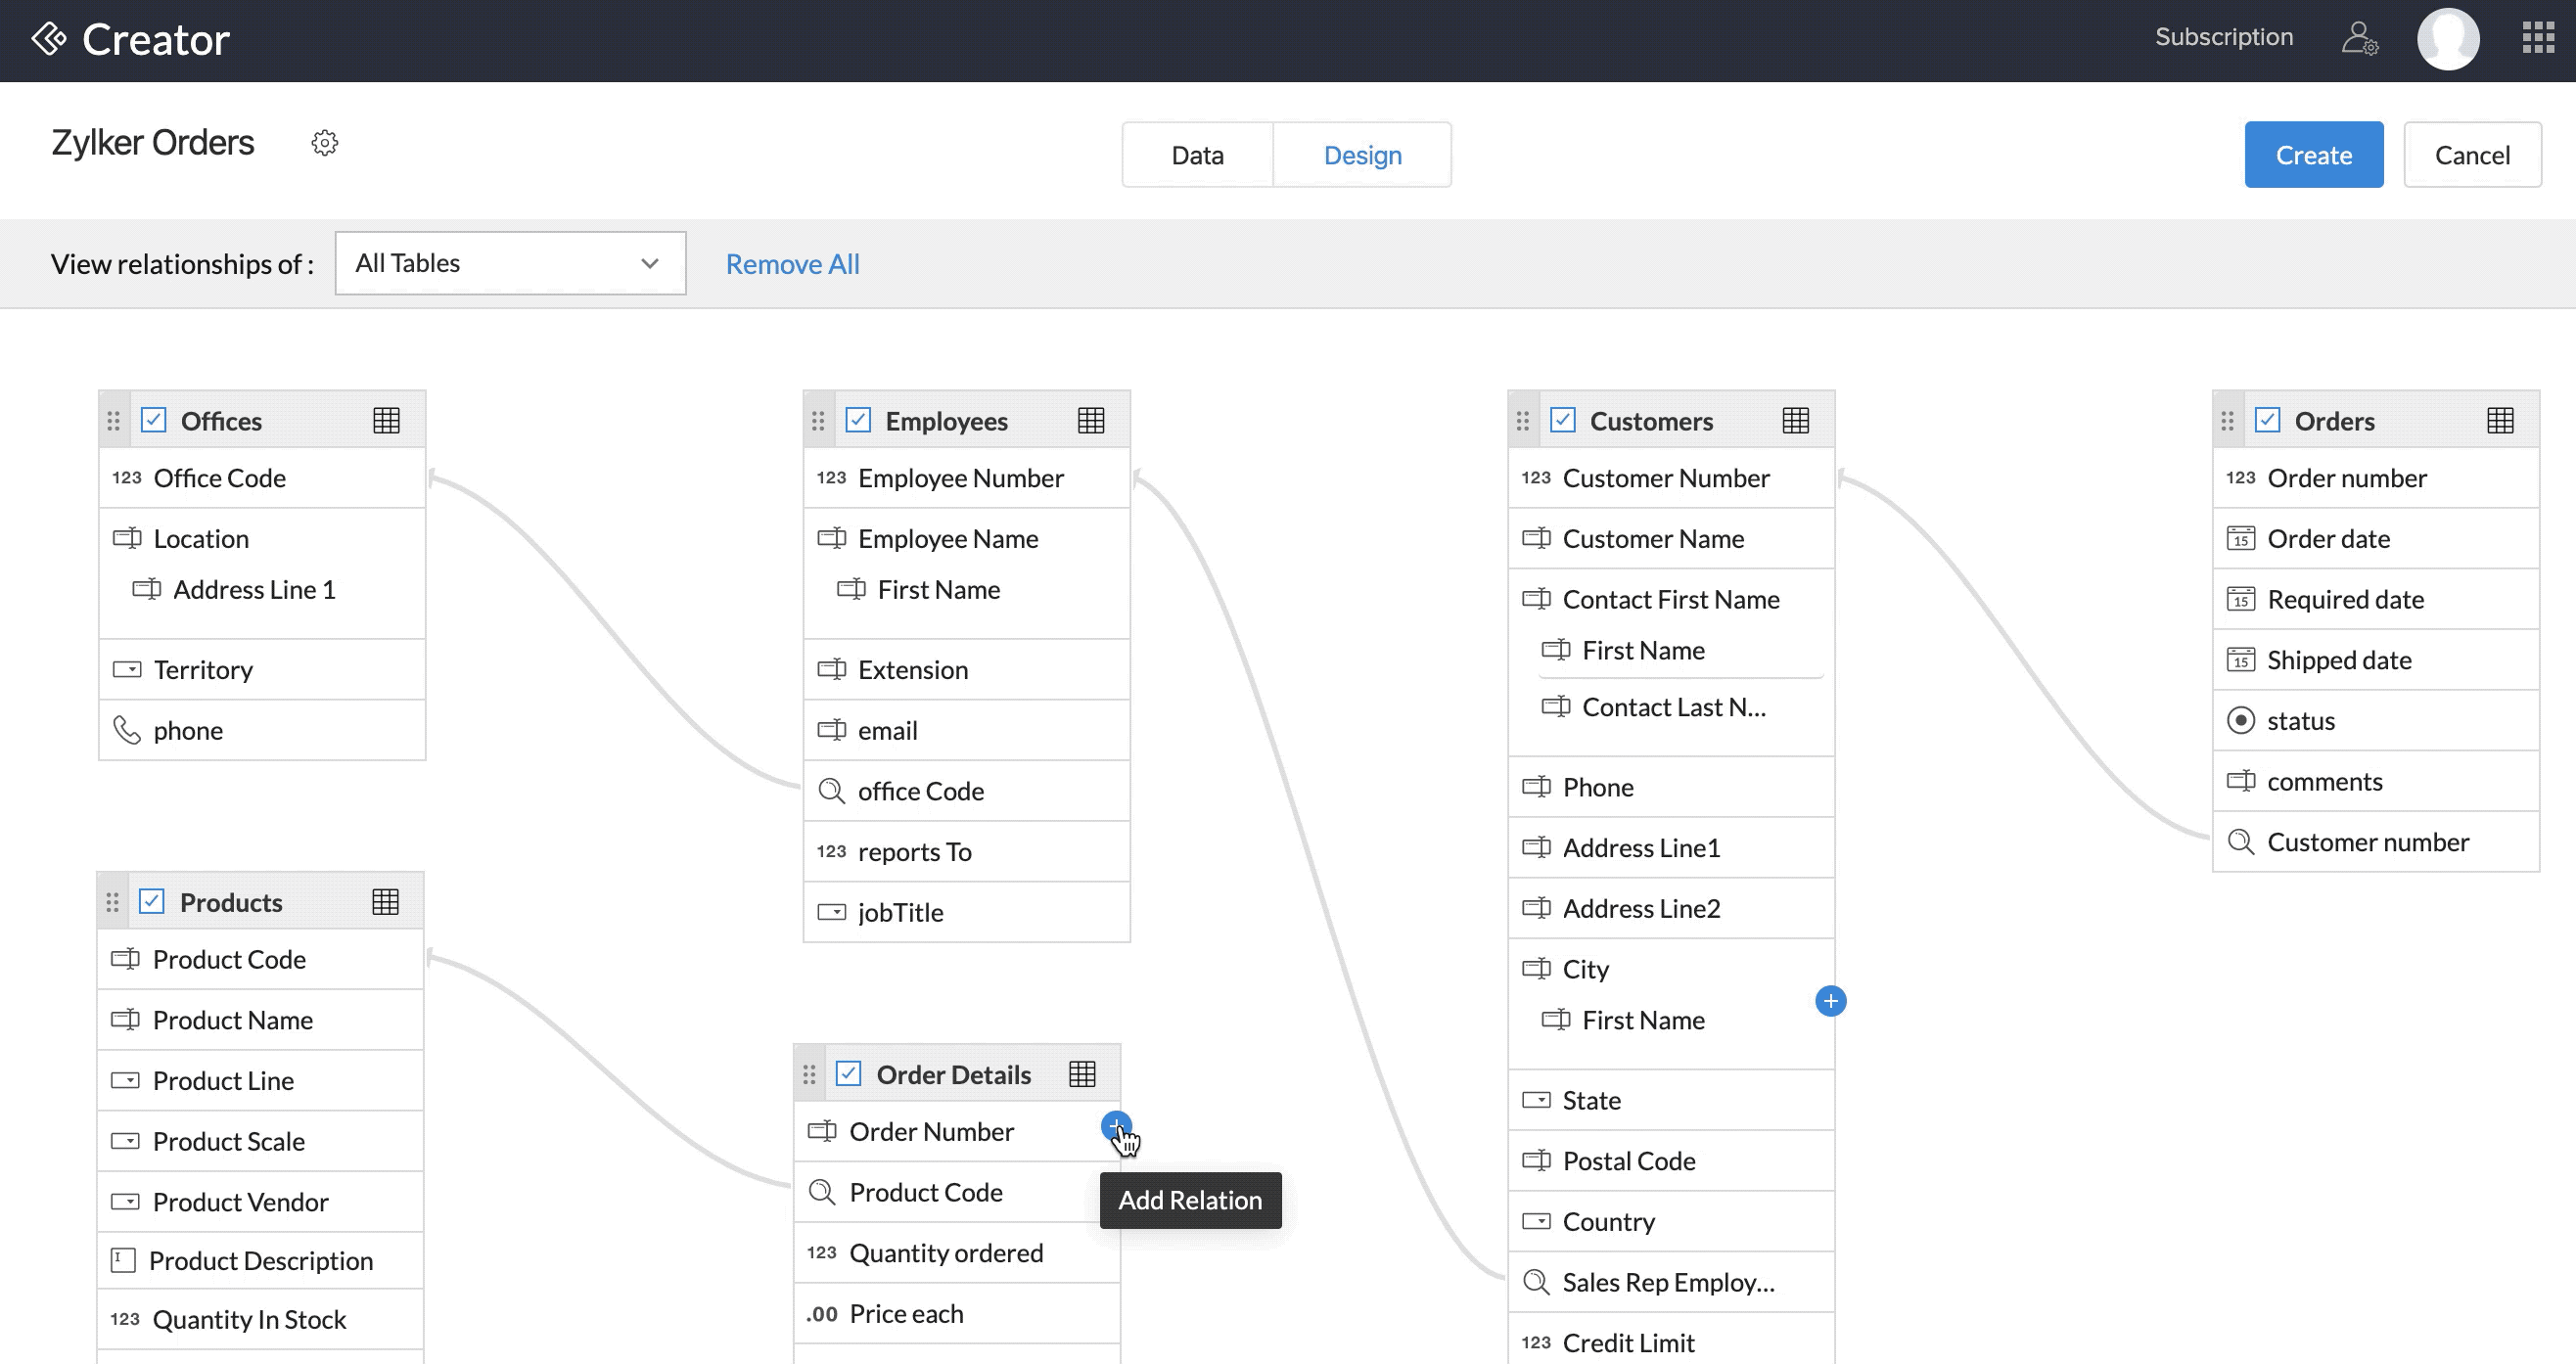
6. Create and manage relationships between form
When you import a file to create a form, Zoho Creator detects the relationships between the tables in your file. The interface allows you to:
- Create and manage relationships between the to-be imported tables via lookup and subform fields
- Create new relationships, via lookup field, between the to-be imported tables and forms that already exist in the app
The Design tab also allows you to view and manage relationships:
- Use the View relationships of dropdown near the top-left corner to view table-specific relationships.
- The All Tables option will be selected by default
- Upon selecting a table, you'll be able to see all the tables it's related to
- Use the Remove button to delete all the relationships of the selected table. If All Tables is selected in the dropdown, then you'll instead see the Remove All button.
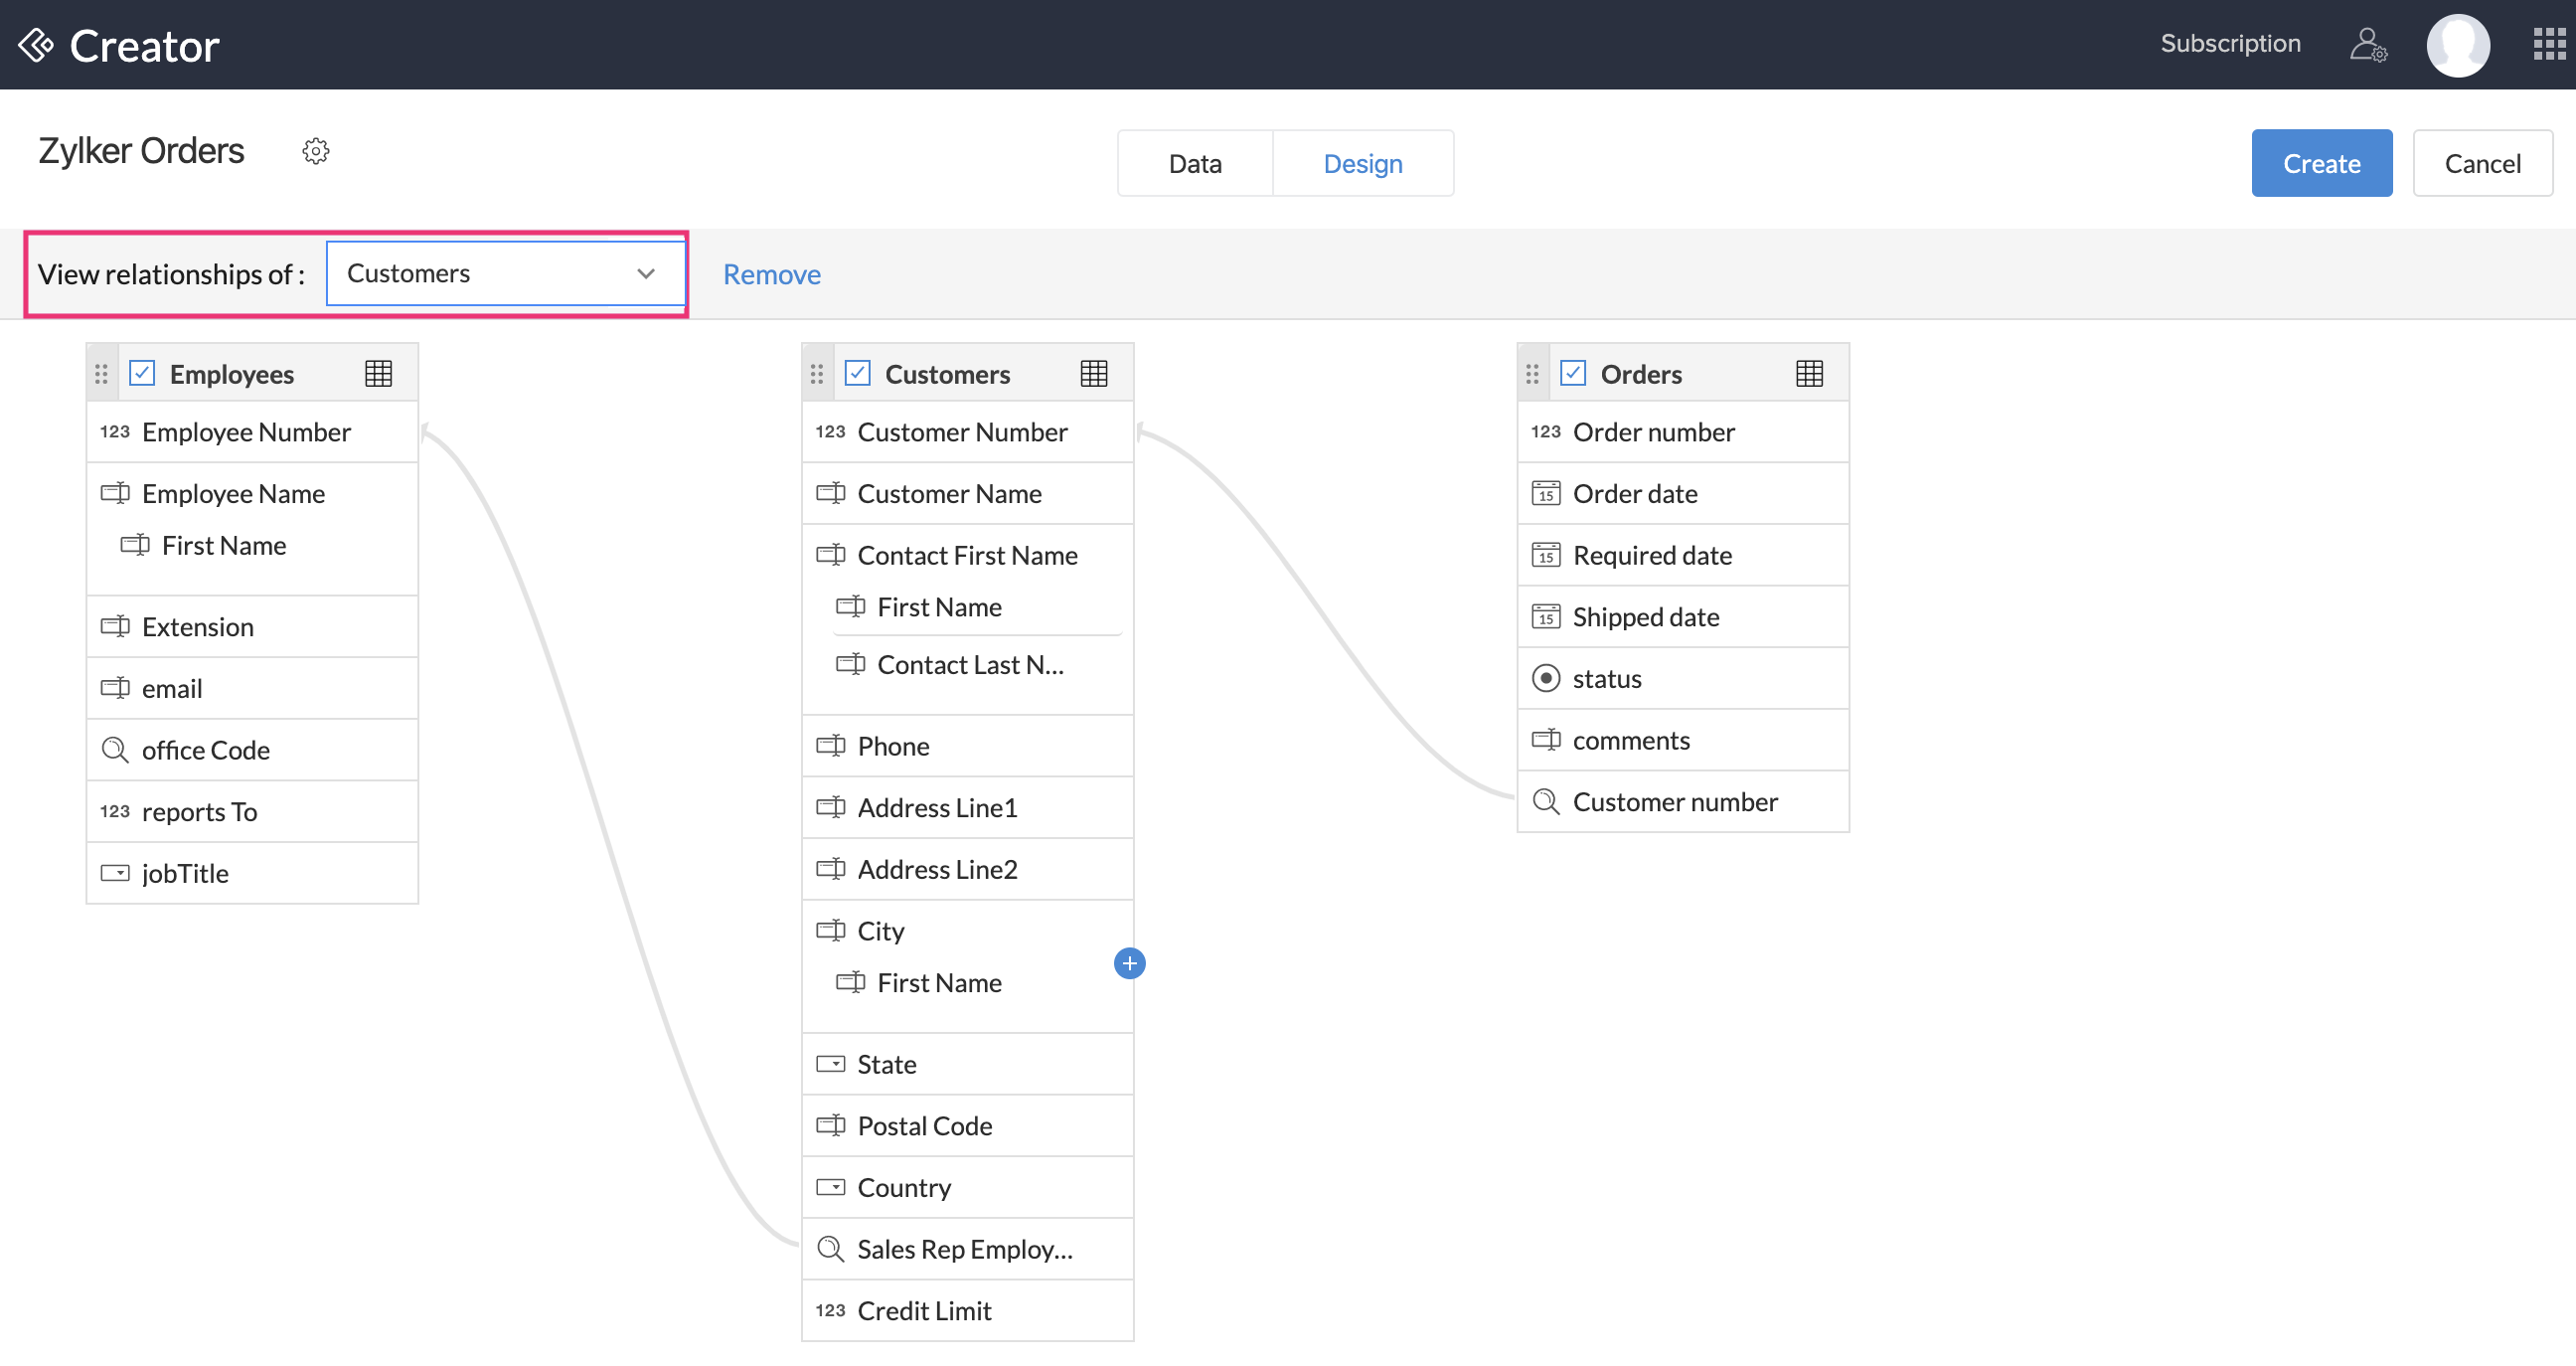
- When All Tables is selected, and you have made changes to the existing relationships, you'll also see the Reset All, button which will reset all table relationships to their original state:
7. Importing data in to specific fields
Zoho Creator offers many types of fields – each meant to capture a specific kind of data. When you import data for creating forms, columns in all sheets/tables are automatically set with an appropriate field type. To change a column's field type:
- Click the down arrow next to the required column, then select Customize Field .
- Set Field type with the required value. Data can be imported in to all field types except add notes, integration, file upload, audio, video, image, and signature.
Refer to the following sections:
- Importing subform data - data that's in a parent-child or master-detail relationship
- Importing names
- Importing addresses
- Importing phone numbers
- Importing boolean data
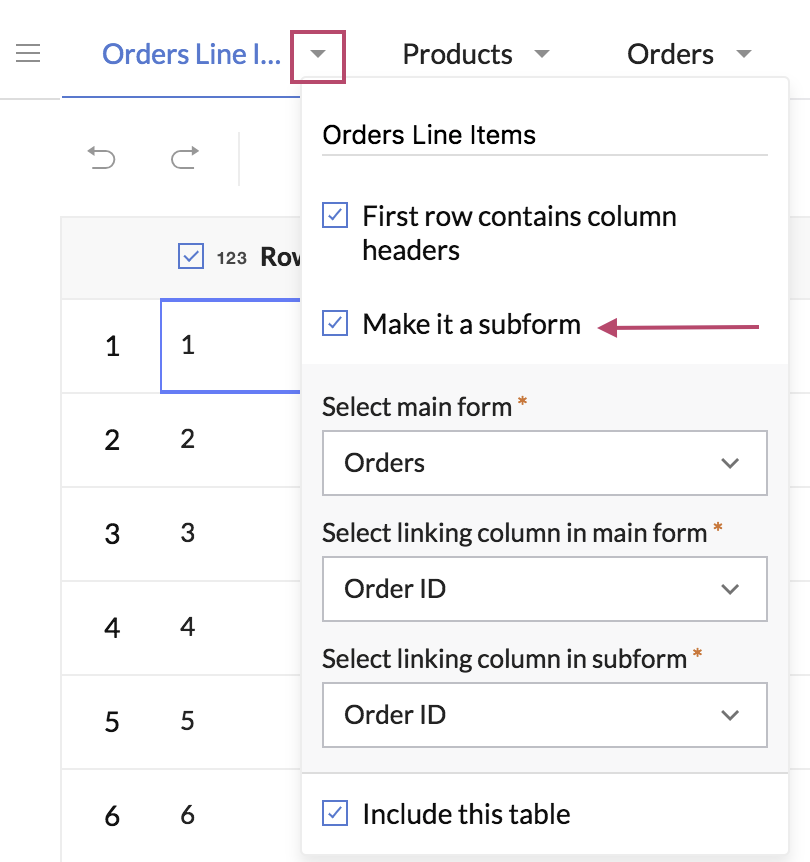
Importing subform data
In Zoho Creator, Subform is a field that best suited in maintaining data that's in a master-detail relationship. For example, in an order management scenario, the Orders and Order Line Items have a master-detail or parent-child relationship where every order can have multiple line items in it.
To tell Zoho Creator that the data in a table contains child data, and to make it as a subform in your app:
- Click the down arrow next to the required table, then check Make it a subform .
- Select the table that contains its parent data. This'll become the parent or main form after the import operation.
- Select the column in the main form that identifies each row uniquely.
- Select the column that's the parent row identifier in the current table.
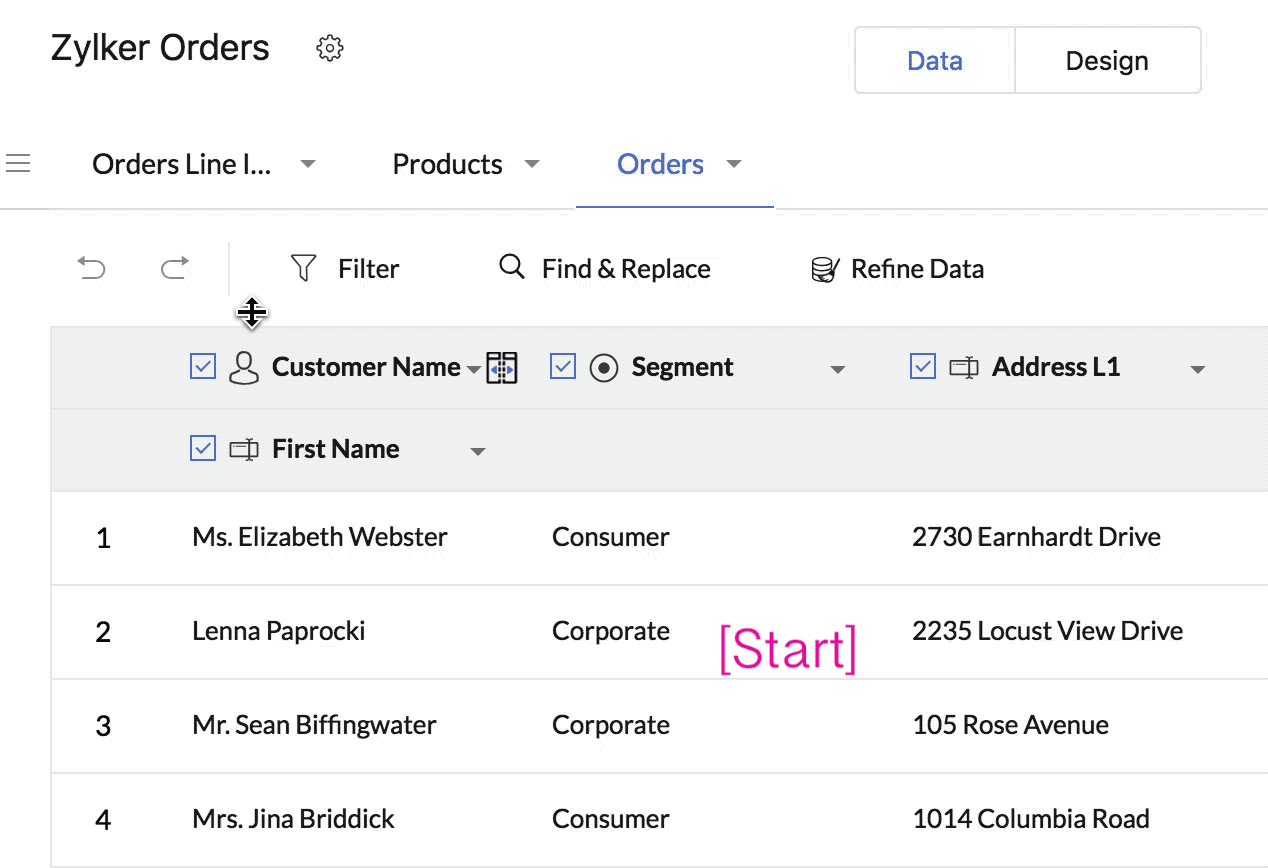
Importing names
In Zoho Creator, Name is a composite field made up of the Prefix , First Name , Last Name , and Suffix subfields. Importing names is supported in both cases:
Case 1 : When the full name is present in one column, you have to:
- Select the column containing name data.
- Click the down arrow next to it, then select Customize Field .
- Set the Field type to Name . The Split icon will appear in the column header.
- Click the Split icon. The system will split the names as follows:
- The white space character will be used to separate a name into prefix, first name, last name, and suffix, in that order.
- Only Mr. , Ms. , and Mrs. will be considered as prefix. The period (.) at the end is a must for identifying the prefix.
Case 2 : When the name is split across multiple columns, you have to:
- Select the column containing first name data.
- Click the down arrow next to it, then select Customize Field .
- Set the Field type to Name . The column will be mapped to the First Name subfield.
- Select the columns containing the other subfield data.
Importing addresses
In Zoho Creator, Address is a composite field made up of the Address Line 1 , Address Line 2 , City/District , State/Province , Postal Code , and Country subfields. Importing addresses is supported in both cases:
Case 1 : When the complete address is present in one column, you have to:
- Select the column containing address data.
- Click the down arrow next to it, then select Customize Field .
- Set Field type to Address . The Split icon will appear in the column header.
- Click the Split icon. The system will split the address data into the subfields using comma (,). All text present before the first comma will be considered Address Line1, and so on.
Case 2 : When the address is split across multiple columns, you have to:
- Select the column containing address data.
- Click the down arrow next to it, then select Customize Field .
- Set Field type to Address . The column will be mapped to the Address Line 1 subfield.
- Select the columns containing the other subfield data.

Importing phone numbers
- Select the column containing phone numbers.
- Click the down arrow next to it, then select Customize Field .
- Set Field type to Phone .

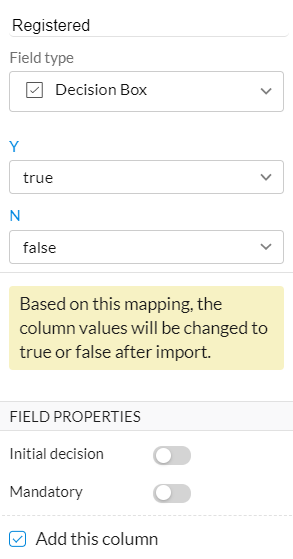
Importing boolean data
Tables in your file may have columns that store values such as true/false, 0/1, yes/no, Y/N. These are referred to as boolean values. Zoho Creator sports the Decision Box field to store such data.
If a column contains only "true" and "false" values, Zoho Creator will itself associate it with the decision box field. In case of other boolean values, Zoho Creator will associate the column with a Radio field. To tell Zoho Creator that a column contains boolean data:
- Select the required column, then click Customize Field .
- Set Field type to Decision Box . Zoho Creator will list the boolean values present in the column.
- Map which value is to be considered true and which false .
- Optionally, set the to-be created field's Initial value property.
8. Cleansing the data
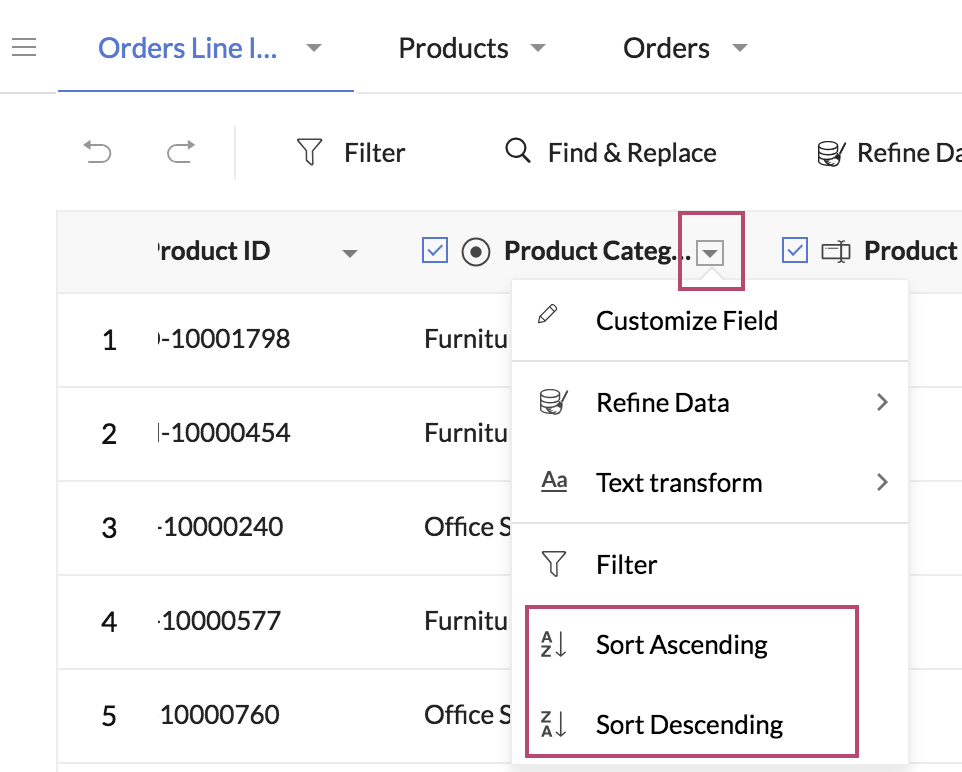
Sort data
Based on a column, you can sort the data in a table in the ascending or descending order. The sorting order you apply will not be carried in to the to-be created forms. This is to let you view data in the required order. Sorting data can help before you perform the data refining operations.
To sort data:
- Click the down arrow of the required column.
- Select the required sorting order.
Remove rows
The import interface allows you to delete rows from the tables. You may find need to remove rows when your sheet (when you've uploaded a spreadsheet) starts with a few blank rows, or when you wish to delete rows that satisfy a criteria (which you can find out by filtering the data)
- Select one or multiple records.
- Right-click, then select Remove rows . A banner will appear indicating the numbers of rows that were deleted.
Tip: The import interface allows you to Undo and Redo up to changes.
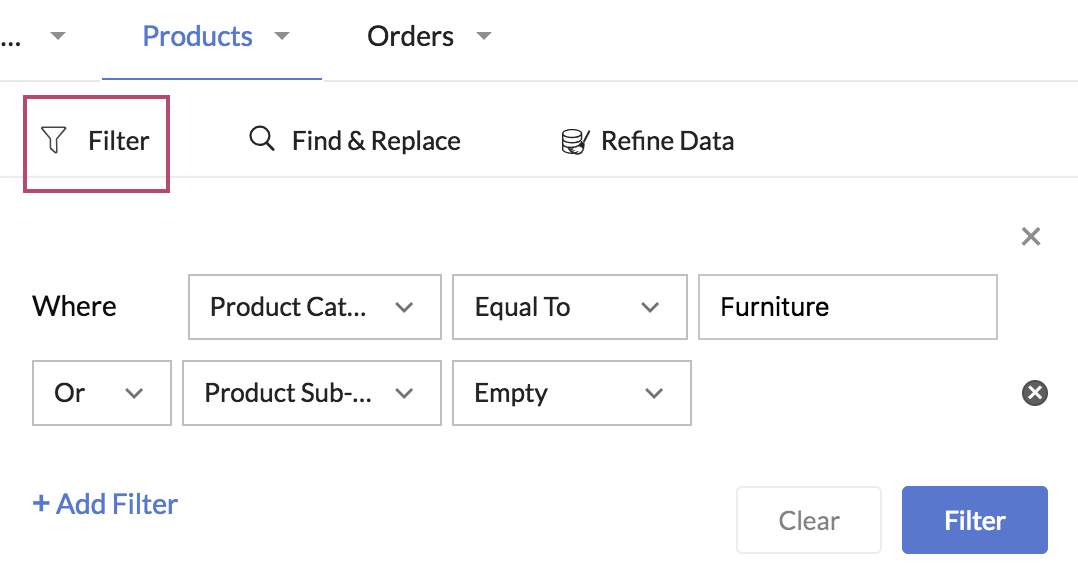
Filter data
Filtering the data in a table can help before you perform the data refining operations. Only the filtered data will be imported in to the to-be created forms. To filter the data in a table:
- Select the required table.
- Click Filter .
- Set the required criteria. The criteria can contain up to 20 sub-criteria.
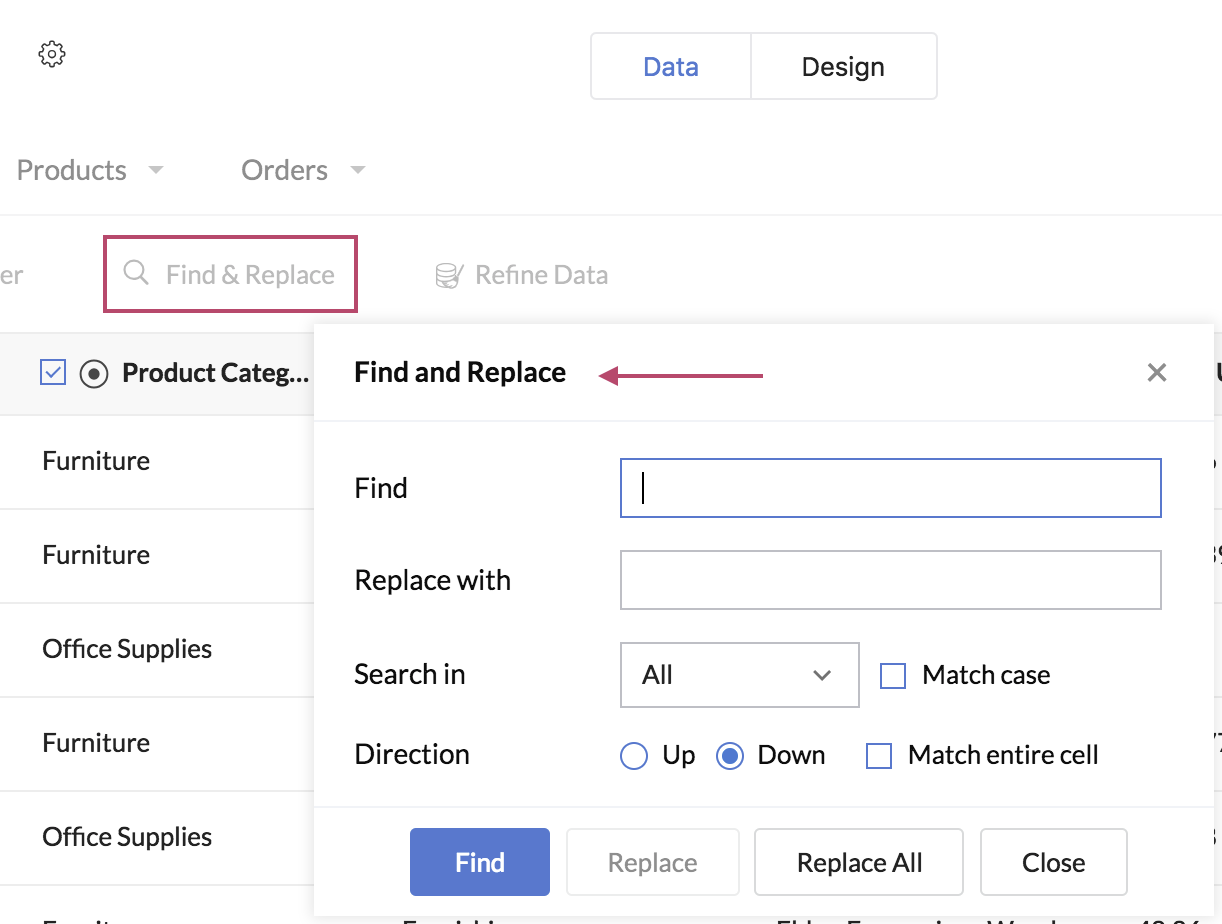
Find and replace data
You can find a value across a table or in one of its columns, and replace it with another. This option's available in the Data tab.
9. Text transform
By using Text Transform, you can standardize the casing of the alphabets in the column and uniform the data in a column.
To transform text:
From the Data tab, c lick the down arrow near the column in which you want to uniformize the text.
Click Text transform and choose the casing to Upper case or to Lower case or to Sentence case depending on your preference.
You can also decode the HTML entities in your data, if any, into their equivalent HTML special character. The HTML reserved characters like " < " will be replaced with their respective entity " < ". This action can be done by using the Unescape HTML entities option. For example, the expression <pre> will be decoded to <pre> on applying Unescape HTML entities .
10. Refining the data
The import interface brings to you the following smart data refining operations.
- Fix Inconsistent Spellings - This enables you in identifying spelling inconsistencies and typographical errors. It'll display Clusters that are nearly similar in terms of number of characters, phonetics, and character repetition. You can modify the values in a cluster with the suggested value, or with a value of your choice.
- Fix Missing Values - This enables you in finding if a column contains empty cells, and fix them in any of the following ways:
- Fill empty cells with the value present in their preceding row
- Fill empty cells with a value of your choice
- Fill empty cells with the most-occurring value in that column
- Remove the rows that do not contain a value in that column
- Split Column - This enables you to split the data in a column in to two. You'll need to define what delimiter (such as whitespace, comma, or hyphen) is to be used to split the data.
- Merge Columns - This enables you to merge the data in two or more columns, in the order they are selected. Optionally, you can define if a separator (such as whitespace, comma, or hyphen) is to be added between the values or the to-be merged columns. You'll get to preview the merged value.
- Explore and Edit - This shows the frequency distribution of values in a column, which can help in deciding if the data is to be modified by find and replace or use Fix Inconsistent Spellings operation.
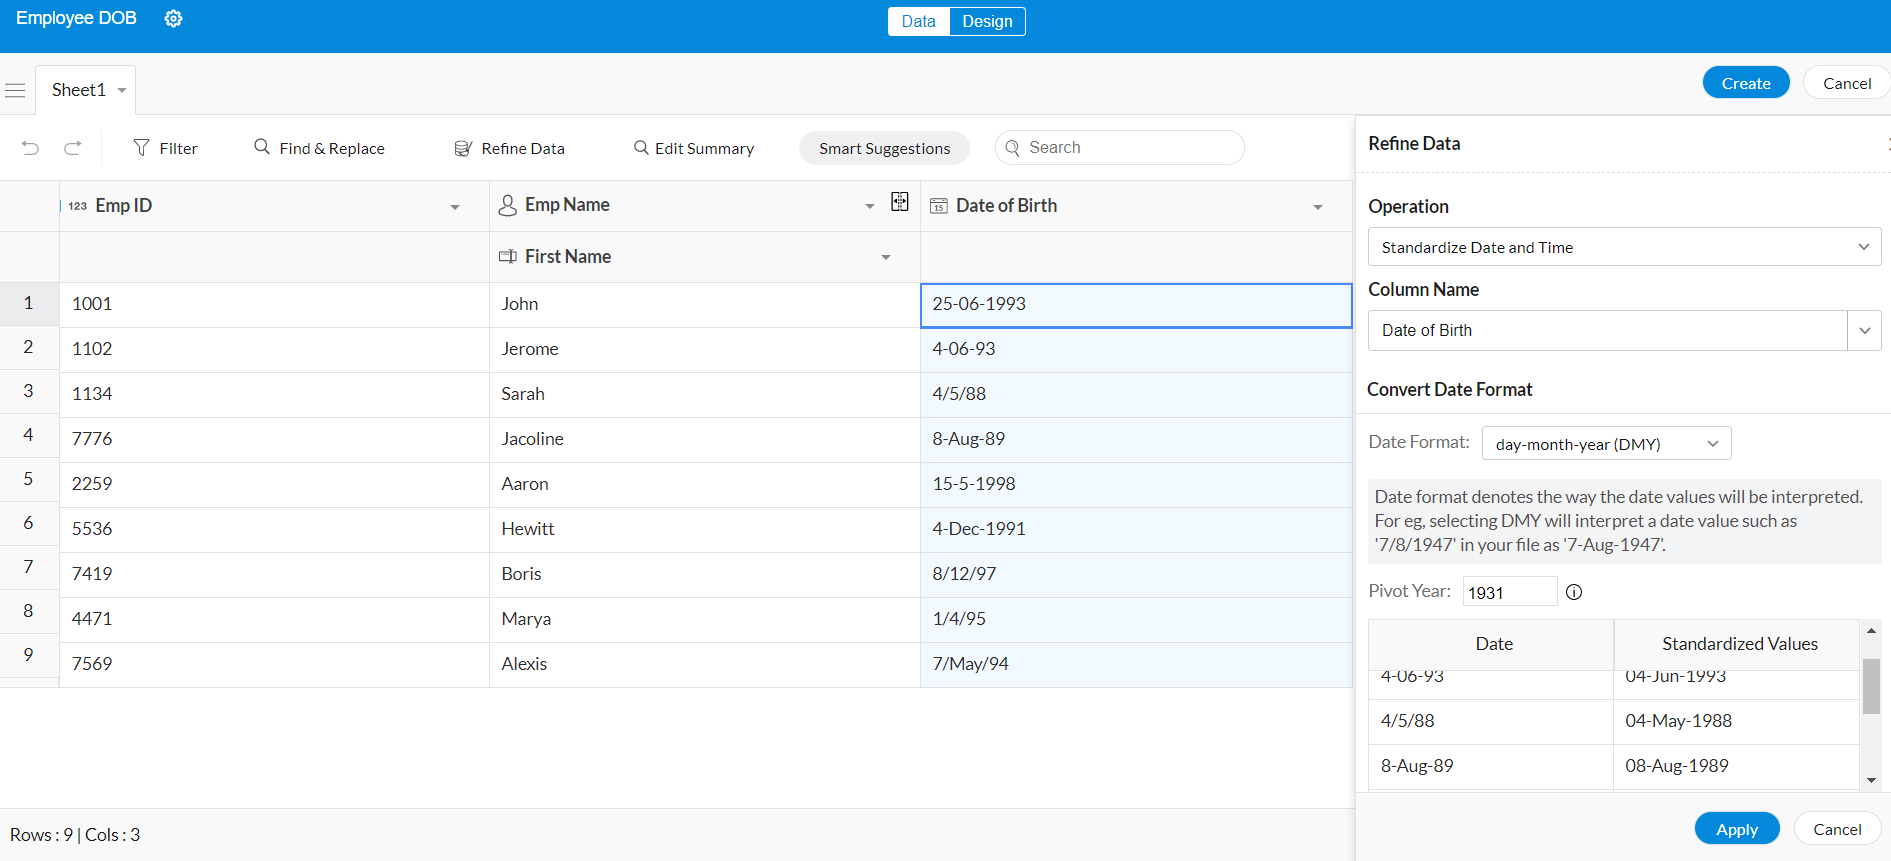
- Standardize Date and Time - This enables you to standardize the Date/Date-Time columns to a common format. With this multiple date formats can be uploaded and standardized. An option to choose the 'Pivot year' will also be available. This pivot year is helpful in the case where the year value has only two digits. In such cases the two-digit year value xx smaller than the pivot year will be expanded into 20xx, and year values larger and equal than the pivot year will be expanded into 19xx
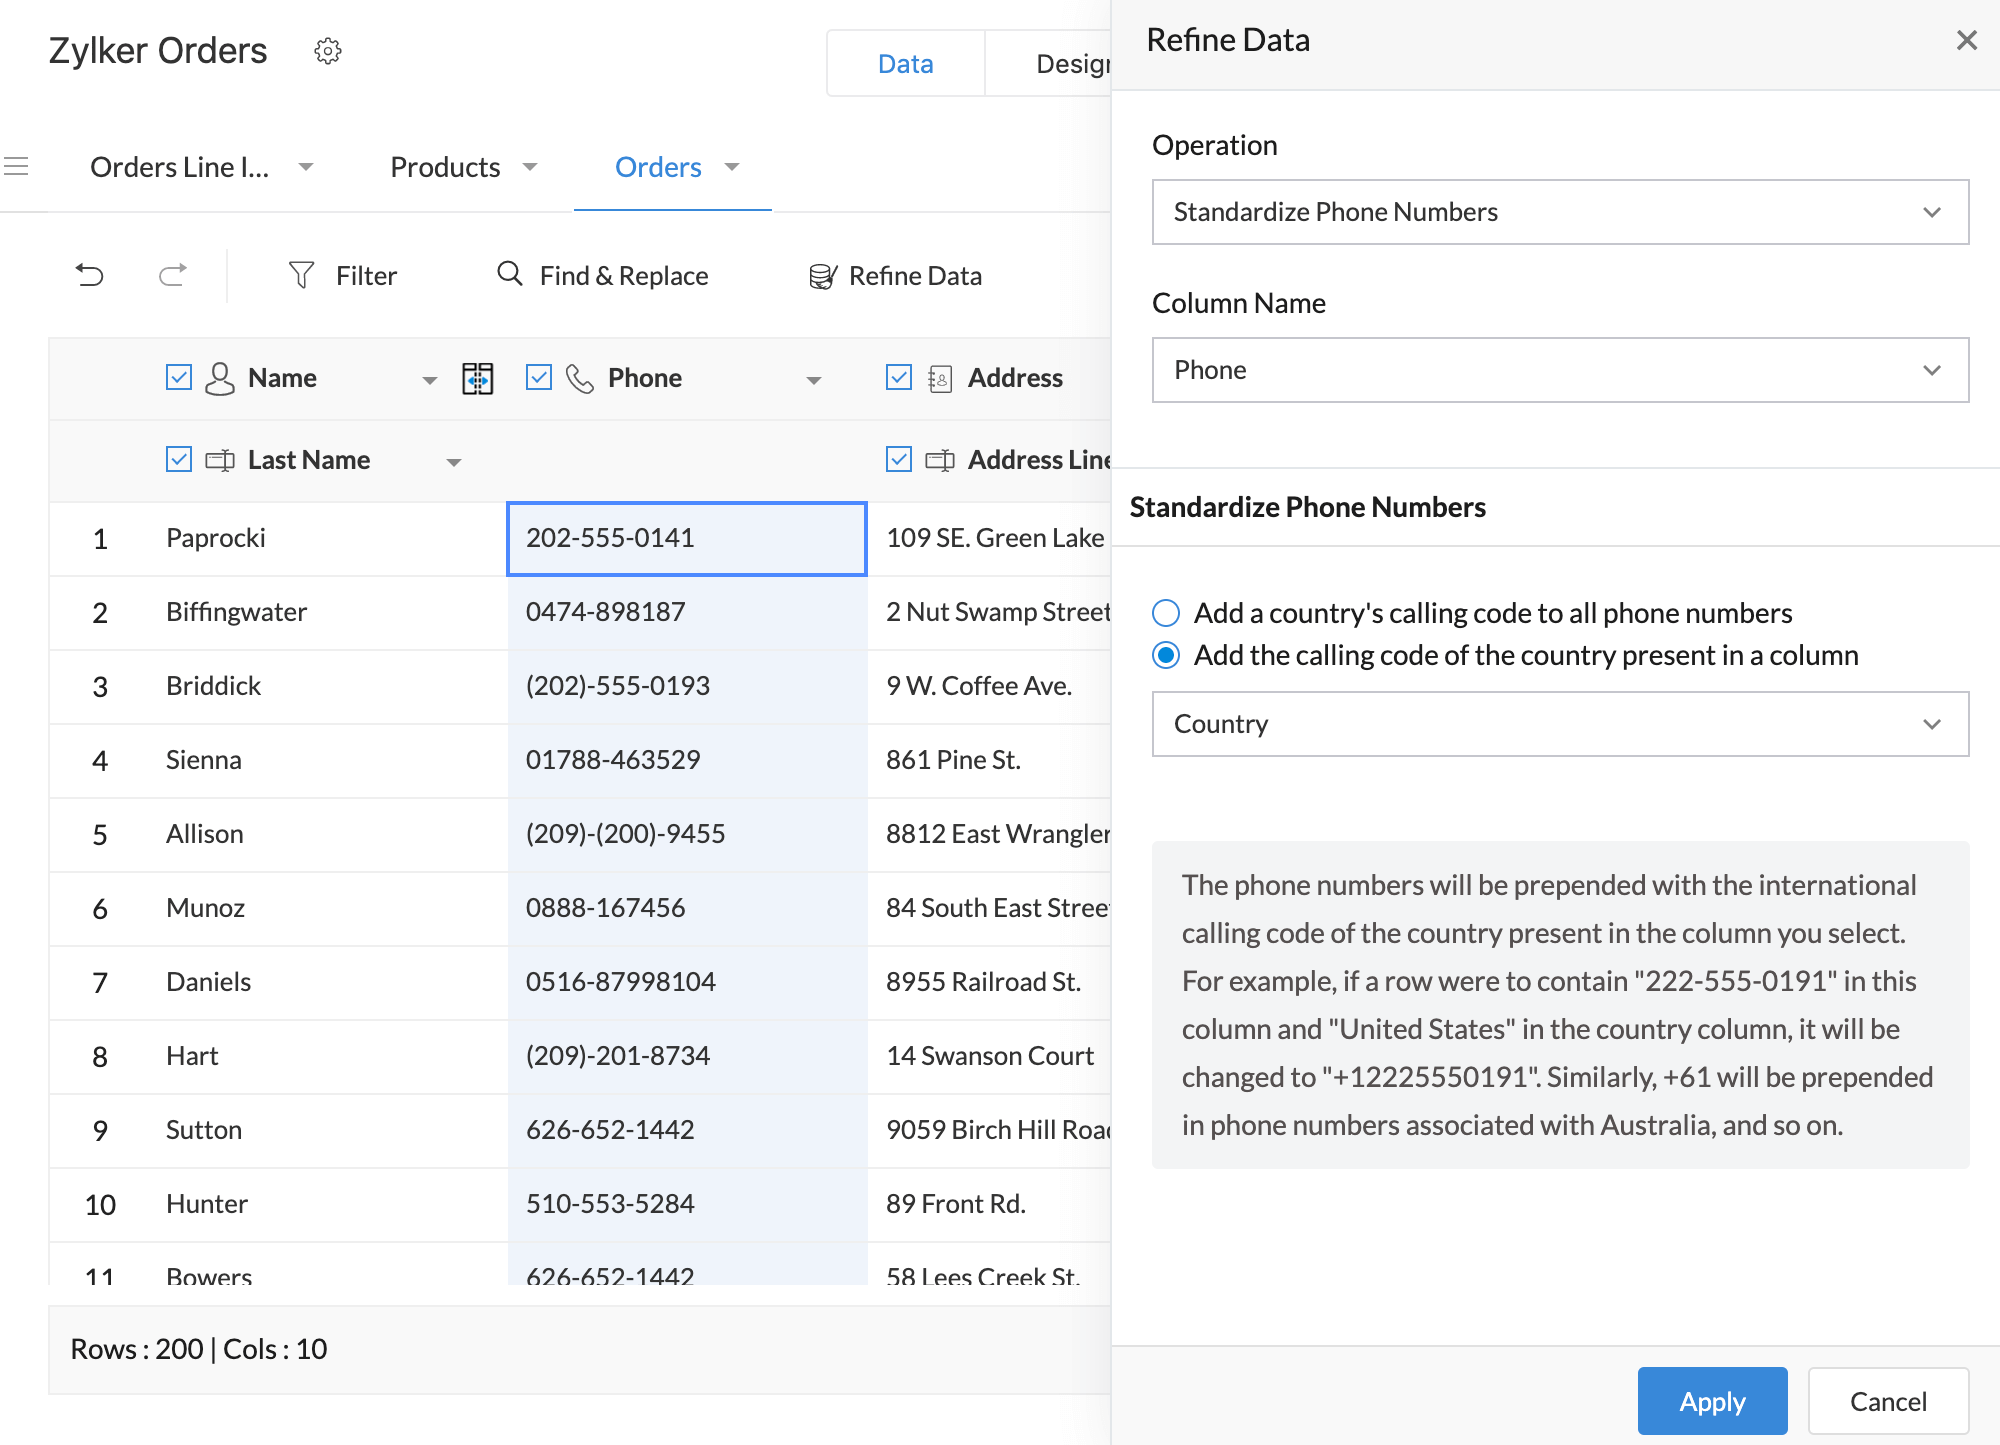
- Standardize Phone Numbers - This enables you to standardize the phone numbers as per the international E. 164 notation. You'll be able to do one of the following:
- Prepend a particular country's international calling code to all the phone numbers in the selected column. For example, if you select United States as the country, +1 will be prepended to all the phone numbers in the selected column. Similarly, +61 will be prepended to phone numbers associated with Australia.
- Prepend the international calling code of the country present in another column of the same sheet. The country data must either be country names, or their standard two-letter or three-letter ISO 3166 codes. For example, if a row were to contain "222-555-019" in the phone number column and "United States" in the country column, it will be changed to "+12225550191".
- Fix duplicate rows - This operation enables you to find and remove duplicate records across one or more columns in your sheet or table. In the remaining duplicate records to be deleted, you can include/exclude rows. When you exclude a row, that row will be greyed out and retained, whereas the remaining duplicate rows will be deleted. The following GIF shows how to include/exclude record looks like:
- Exact match looks for rows that contain the same (case-sensitive) values in the selected column
- Similar match looks for rows that contain values in the selected column that are similar barring case-sensitivity, punctuation, ordering of words, and white spaces
- Fuzzy match looks for rows that contain values in the selected column that are similar, barring typos, phonetic similarities, and transposition errors (where characters are swapped such as "ei" vs "ie" in the word field)
- For text-based and phone number columns, you can choose to look for duplicates using any of the three matches: exact , similar and fuzzy .
- For columns mapped to number, date, time and date-time field types, all three matches will display the same set of duplicate clusters.
- Upon selecting the required cluster of duplicates, the corresponding rows will be displayed on the left. You can set one of the rows as the master record , which will be highlighted in the UI.
- Upon clicking Remove Duplicates button, all rows except the master record of each cluster and those rows that you exclude will be deleted. The following GIF shows how an exact match of duplicate records is removed in the import interface:
11. Restructure Table
- In the Data tab, click Restructure Table .
- Click Proceed to Restructure . You can also refine your data before restructuring by clicking Refine Data.
- A structure will be auto-suggested by splitting the data into smaller tables. Use the dropdown to switch between the suggested and original structures.
- Click on the table name to rename it.
- Drag and drop the column to modify the table design. This will modify the order of fields in that form.
- Drag and drop the columns into another table, to move the column between the table.
- Drag and drop a column out of the table to create a new table. In the popup select the checkbox for Create a lookup column in the old table , if you want to create a lookup with the selected column on the old table, click Create .
- To revert the modification you’ve made to the structure, click Reset. The structure will be reverted depending on the view selected. For example: If you are in suggested view, you will be reverted to the initial suggested structure.
- After reviewing the structure, click Restructure .
Note: Refining your data before restructuring is recommended to get accurate suggestions, as it helps you fix missing values, inconsistent spellings, split/merge columns, and duplicate rows, as well as standardize phone numbers in the uploaded data. Note: -The Original view represents the structure of the data as in the uploaded file in a separate single table structure without any relations. This enables you to manually create a structure of your own.
-The Suggested view represents the auto-suggested structure of the uploaded data by splitting the original table into smaller tables with lookup relations.
-When a column in a table has repeated values, after restructuring, these repeated values will be compiled as unique values, and ID's will be auto-generated for these unique values. This auto-generated column will be mapped with other tables.
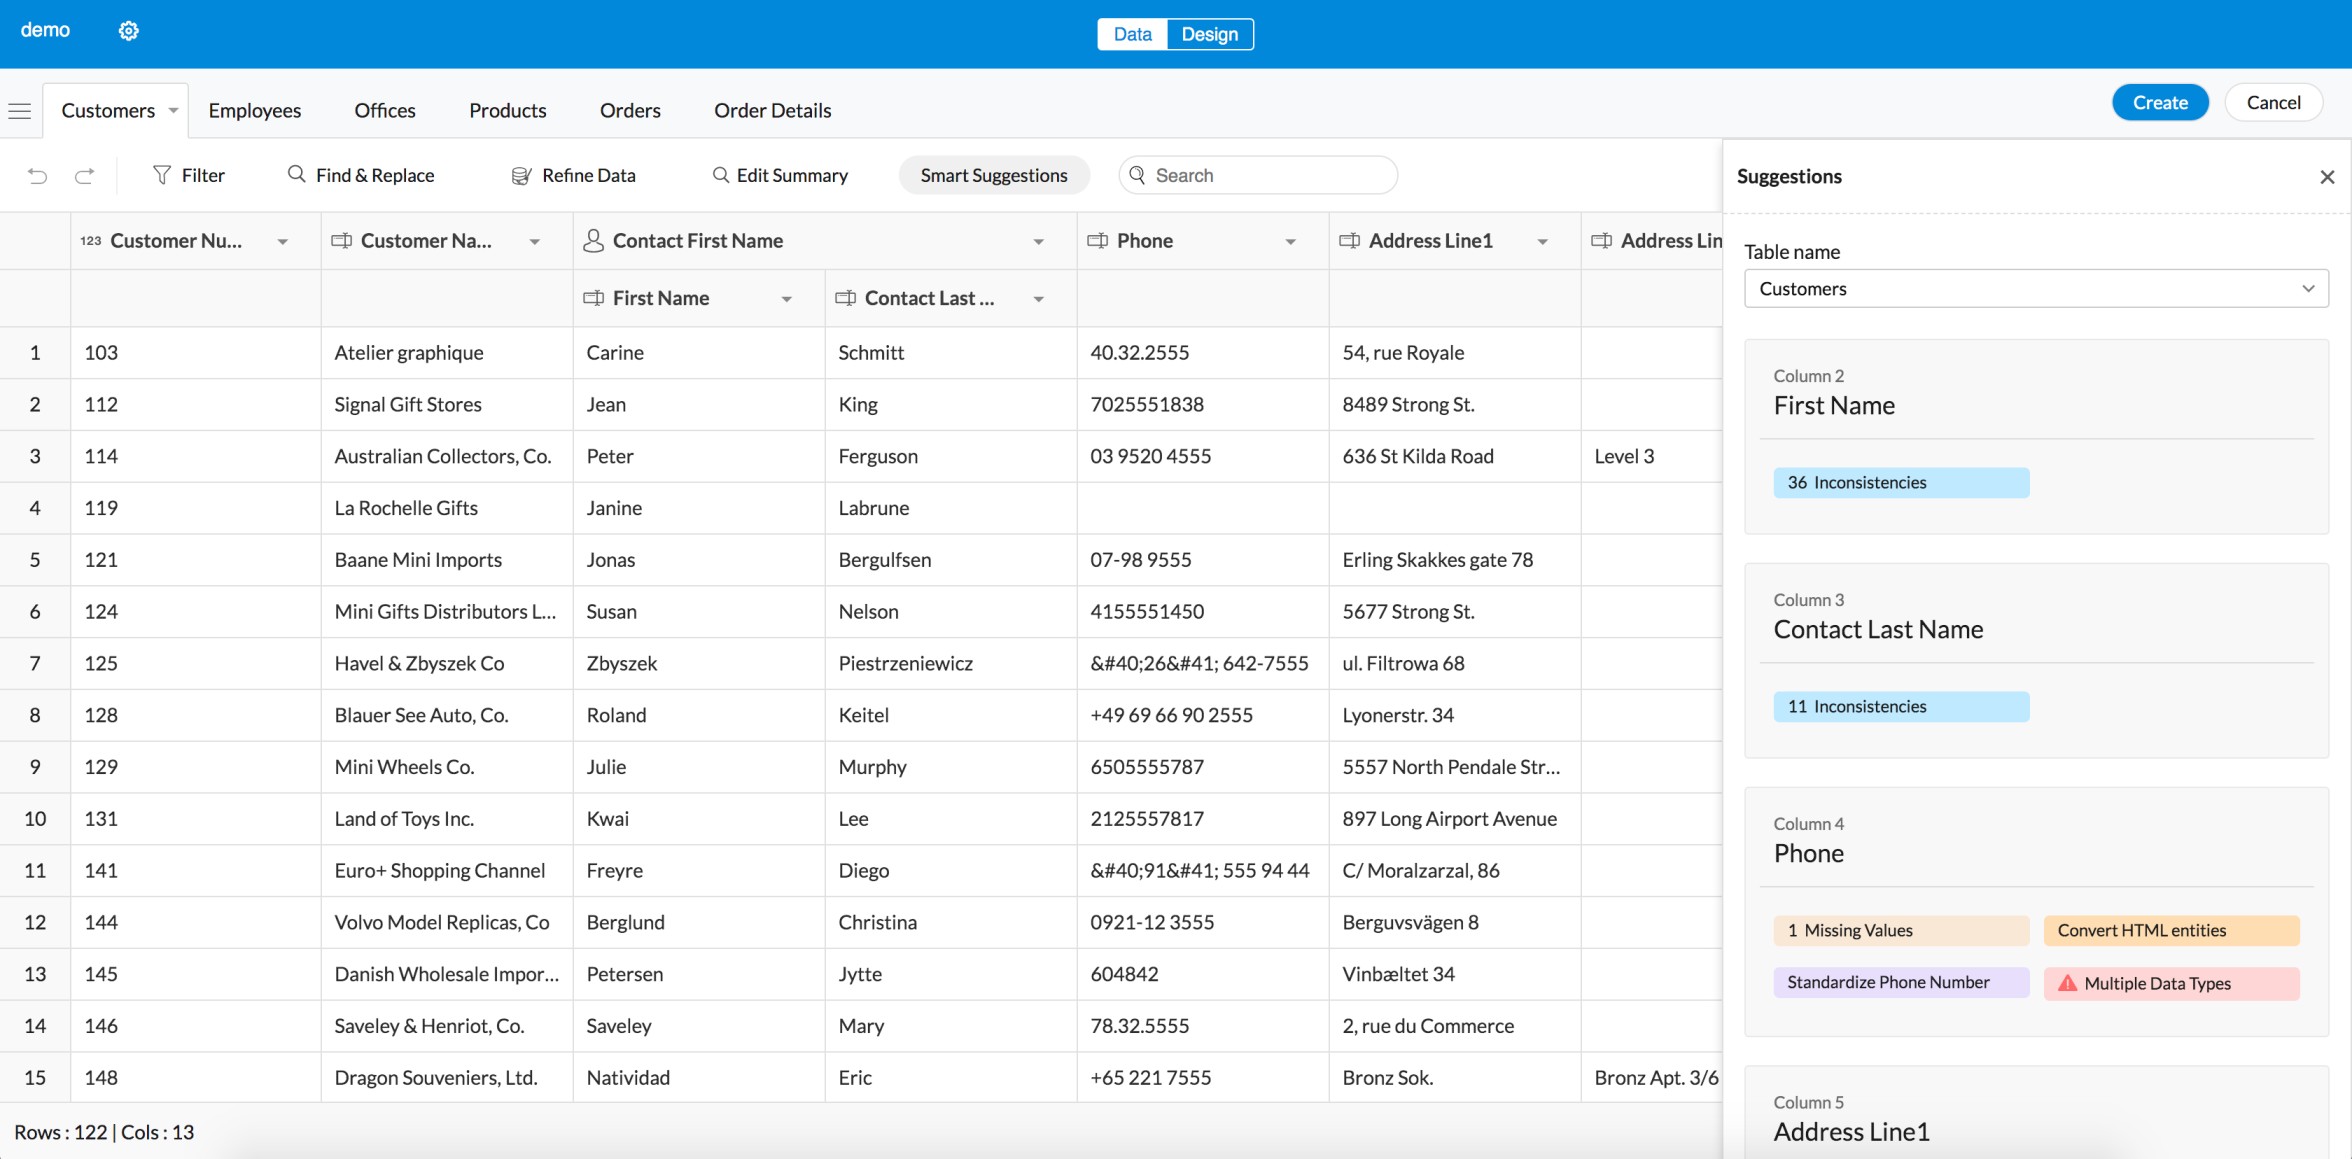
Note: Auto-generated column with ID's will not be inserted if the table contains a column that can be considered as a primary key. 12. Smart suggestions with Zia
Zia(Zoho's Intelligent Assistant) will provide suggestions to you based on problems that may be present in the data that has been uploaded from the file. Zia provides suggestions to a handful of problems which are as follows:
- Restructure table
- Duplicate rows at table level
- Inconsistencies in data
- Multiple data types
- Missing values
- Phone number without standardization
- Name and Address without standardization
- Date/Date-time/Time without standardization
- Data with un-escaped HTML entities
- Values enclosed in quotes
Clicking on the Smart suggestions button will display a slider listing out Zia's suggestions. Each of the above mentioned problems will be detected and displayed as cards.
13. Creating the forms
- After you're done viewing and refining your data, click Create from the top-right corner of the import interface. A pop-up showing the progress will appear.
- Click Data imported successfully in the pop-up to view the data import's summary.
- Click Access Application to access the newly created forms in your app.


