Manage Connections

This help page is for users in Creator 6. If you are in the older version (Creator 5), click here. Know your Creator version.
1. What Does This Page Cover?
Learn to manage the connections you have created for integrating other Zoho or third-party services with your Zoho Creator applications.
2. Availability
Connections:
- Are only available for paid plans of Creator
- Can only be created and managed by the super admin, admins, and developers, while other users can authorize and access them
- Are available in the United States (.com), Europe (.eu), India (.in), and Australia (.au) data centers
- The availability of the payment services differs based on your data center
3. Navigation Guide to Connections
4. Manage Connections
Managing connections offers the following abilities:
- View connection details page
- Edit a connection
- Switch Authorization of a Connection
- Revoke Authorization
- Disable a connection
- Enable a connection
- View connection references
- Delete a connection
- Enable or disable connection access to an application
- Use different authorizations for different environments
- View and manage authorizations of logged-in user connections
4.1 View Connection Details Page
This page lets you view basic details of the required connection and also perform some of the manage operations in connection, such as editing, deleting, enabling/disabling, and revoking authorization. To view the Connection Details Page :
- Navigate to Microservices and click on the required connection card under Connections, as shown below.
The following details will be displayed:
- The display name provided by the user for the connection.
- Link Name: A unique name generated for the connection in the backend. This can be used in Deluge integration tasks and invoke URL scripts to establish authorization.
- List of applications that use the connection.
- Permission: The scopes that were selected by the user while creating the connection.
- Authorization Owner: Represents whether the connection can be authorized only by admin (Admin connection) or by any user (Logged-in user connection)
- Authorization: Specifies if the same authorization is used across all three environments or different authorizations are used for each environment.
- Authorized Account: The display name of the connected account if the connection is authorized.

Note: For the applications that have enabled environments, the authorized account names in all three environments will be listed. If a connection is a logged-in user connection, a link will be available to View all Authorizations to the connection.
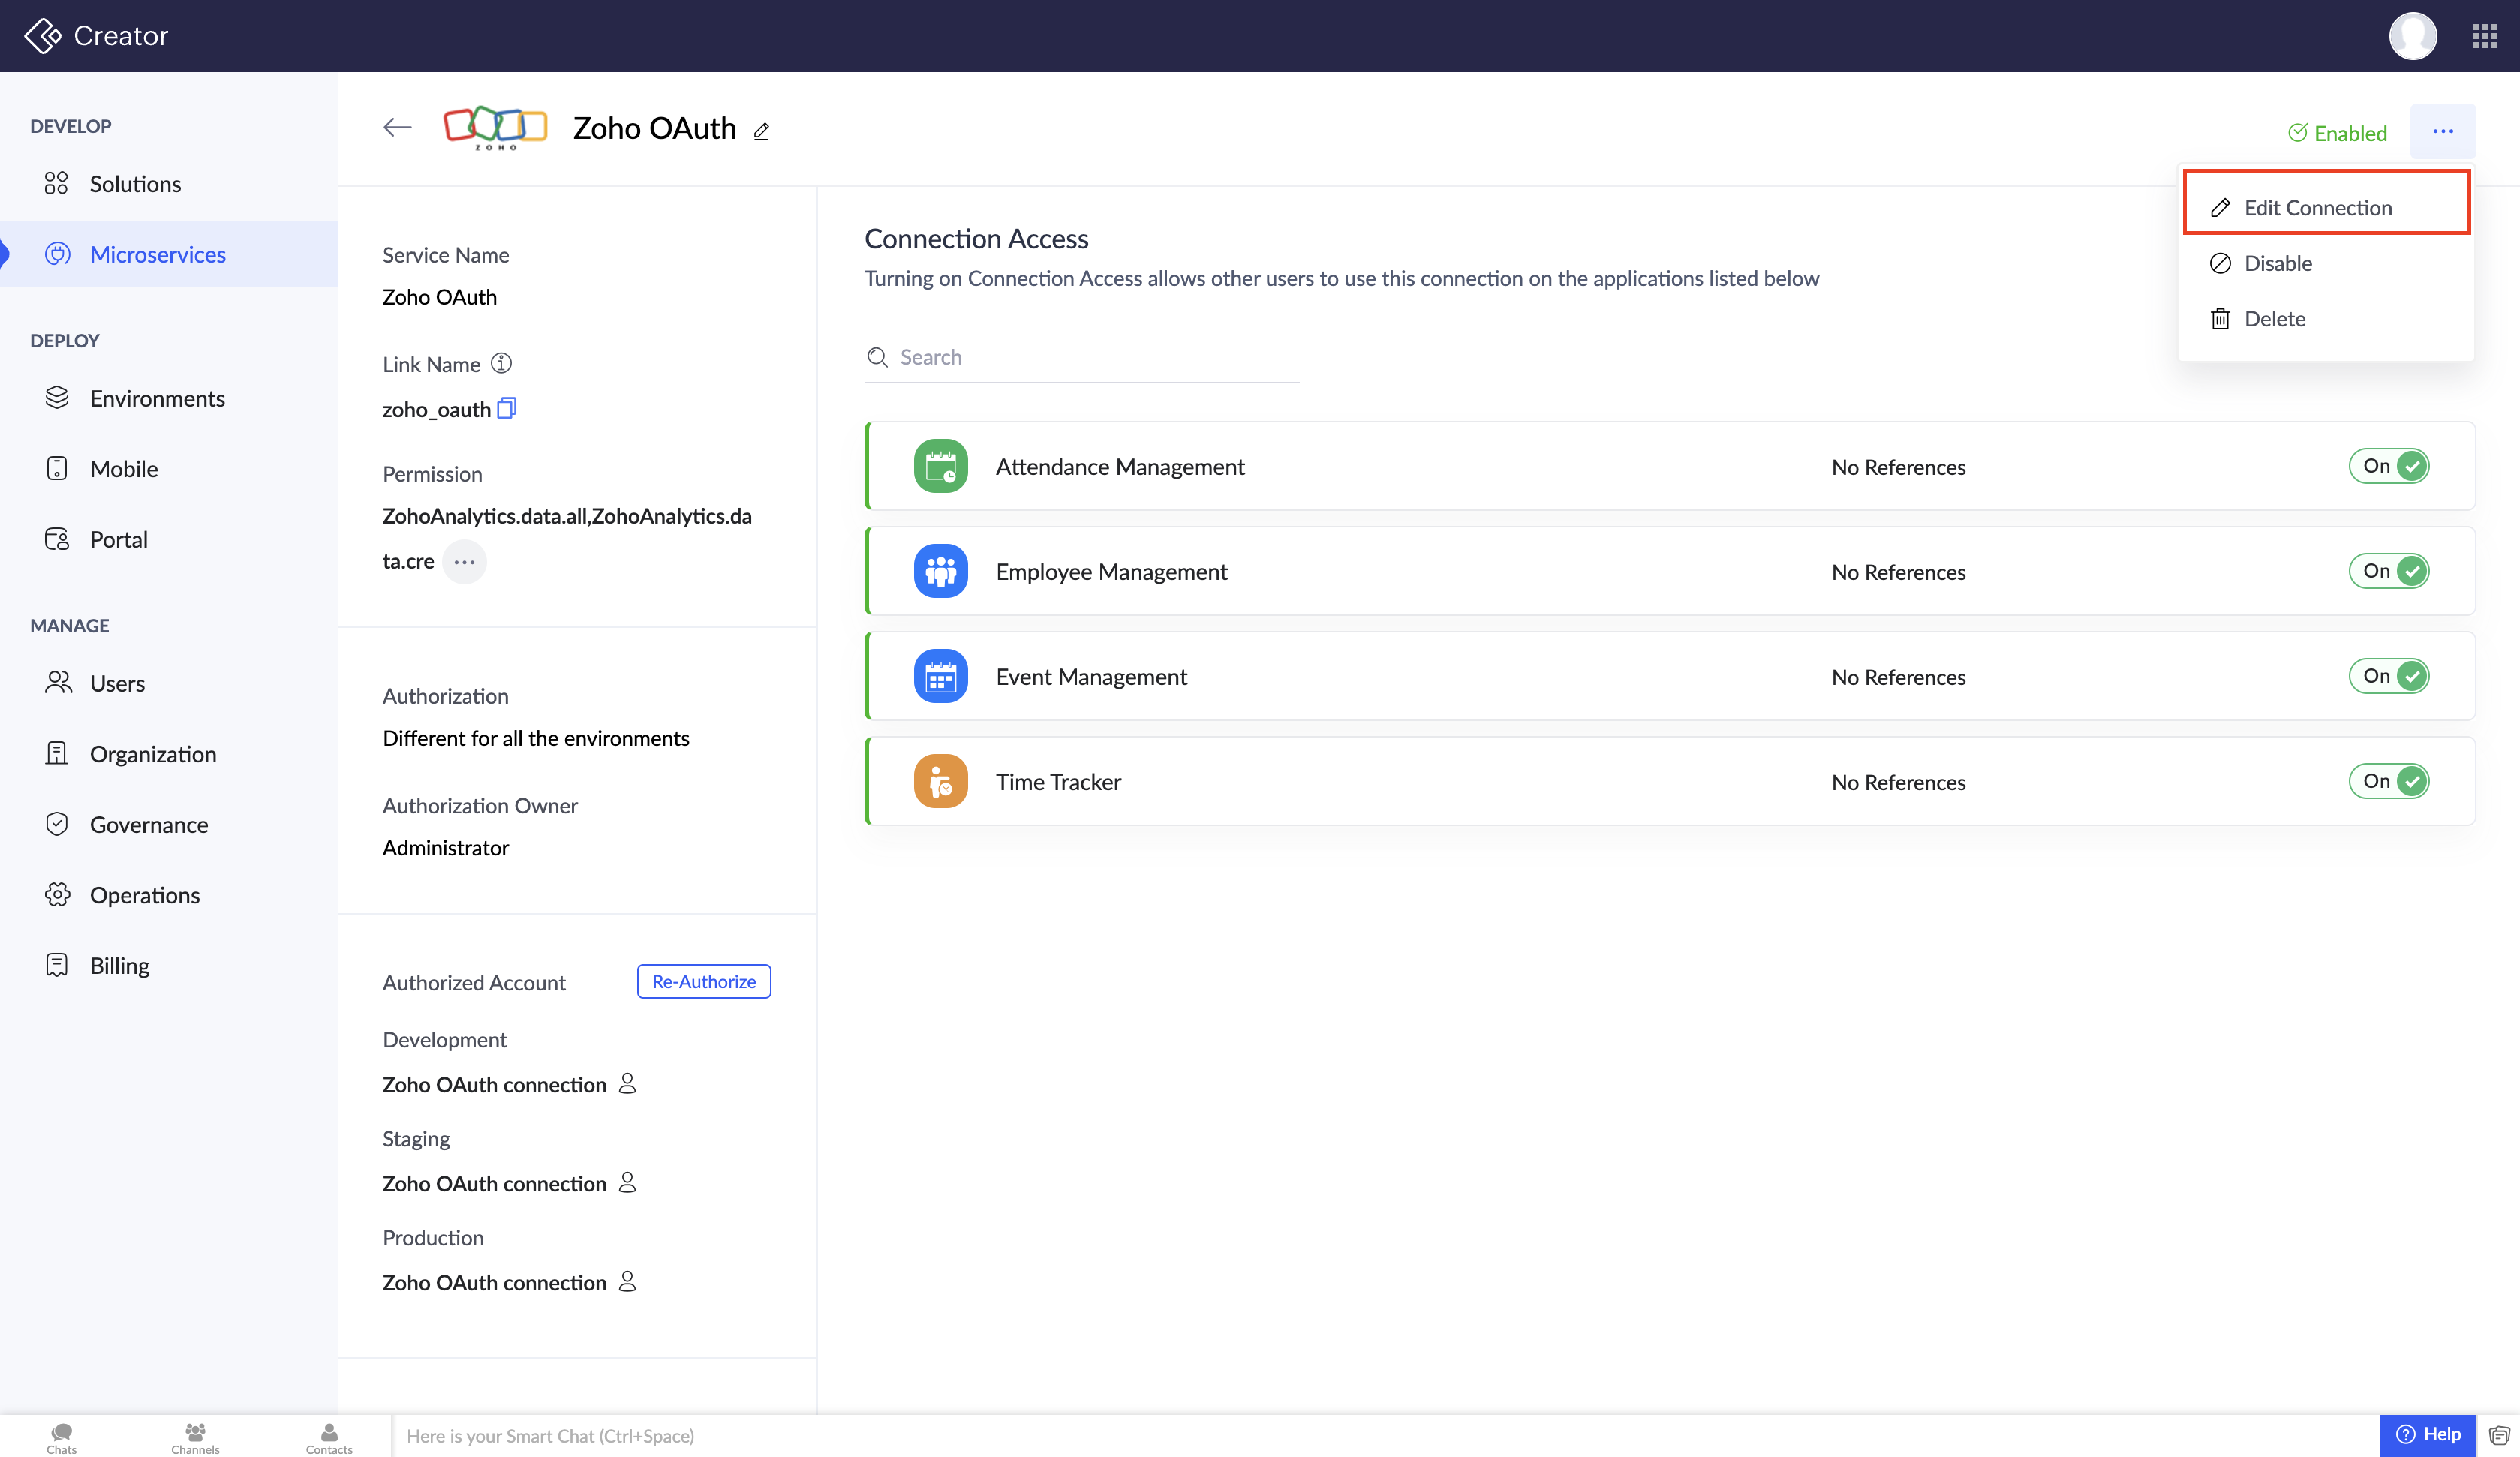
- Connection access: Enable or disable the connection's access to a specific application or view its references to find the accurate places where the connection is used in an application.
- Others: Information such as Created by, Created on, Last modified by, and Last modified on.
4.2. Edit a Connection
Editing a connection involves modifying connection name, connection link name, and scope configuration. To edit:
- Navigate to Microservices and hover over the connection card that you want to edit.
- Click the horizontal ellipsis (three dots) icon at the top-right corner of the card, then click Edit Connection.
- Provide the information you want to update, then click Update.
Note: If you have modified the permissions while editing the connection, you'll be prompted to authorize the connection as your existing authorization becomes invalid.
Alternatively, You can also edit the connection by clicking Edit in the horizontal ellipsis from the Connection Details Page.
Note:
- All the fields except Authorization credentials are editable.
- You can edit the connection name by clicking on the Rename icon placed near the connection display name at the top-left corner.
4.3. Switch Authorization of a Connection

Switching a connection involves the process of granting a new authorization to the connection. It is also necessary in cases such as:
- Expiration of the authorization credentials linked to the connection
- Invalidation or deletion of the auth token from the third-party service
Note:
- Switching the authorization of the system connection can only be done by super admins.
- Admin connection authorization can be switched by all admins.
- When a connection authorization is switched, all the applications that utilize it will henceforth use the new authorization.
To switch authorization:
- Navigate to Microservices. All the connections available in your account will be listed under the Connections section.
- Hover over the connection card that you want to switch, click the horizontal ellipsis (three dots) icon at the top-right corner of the card, and then click Switch.
-
Choose from the Authorized Account dropdown if you want to reuse an already saved account, or click Link New Account to authorize the connection with different account credentials.
-
Provide the authorization details in the popup and click Authorize.
Alternatively, you can reauthorize the connection by clicking Switch next to Authorized Account from the Connection Details page of the desired connection. Provide the account name and perform the subsequent steps (this depends on the authorization mechanism of the desired service) to authorize. Following this, the existing authorization will cease to be effective, and the new authorization will take effect.
4.4. Revoke Authorization
Note:
- Revoking the authorization of the system connection can only be done by super admins.
- Admin connection authorization can be revoked by all admins.
- Revoking a connection authorization of connection will not affect other connections using the same authorization.
When a connection authorization is revoked, the permissions and access to the third party service gets removed and the components using that connection authorization will not function as intended. To revoke a connection authorization,navigate to the Connection Details Page of the desired connection and click revoke icon ( ) as shown below.
For the connections which use different authorization for different environments, click on the revoke icon () near the desired environment to revoke in the connection details page as shown below.
4.5. Disable a Connection
Disabling a connection involves deactivating the connection's functionality, therefore the connection becomes inactive and cannot be used in any of the applications. If the connection used in an application is disabled, it will no longer perform its intended tasks until it is enabled. To disable:
- Navigate to Microservices. All the connections available in your account will be listed under the Connections section.
- Hover over the connection card that you want to disable.
- Click the horizontal ellipsis (three dots) icon at the top-right corner of the card, then click Disable.
Note:
- If the connection is not used in any of your applications, it will be disabled immediately once you click Disable. Otherwise, a popup with details of all the places where you have used the connection will be displayed before you Proceed to Disable the connection.
- If multiple datasources are linked to a connection, it is necessary to disable all the datasources associated with that connection before disabling it.
Alternatively, you can also disable the connection by clicking Disable in the horizontal ellipsis from the Connection Details Page as shown.
4.6. Enable a Connection
Enabling a connection involves activating a previously disabled connection, and restoring its functionality in various areas where it is utilized, such as Datasources, Deluge scripts in Workflows, and Payment workflows. To enable:
- Navigate to Microservices. All the connections available in your account will be listed under the Connections section.
- Hover over the greyed-out connection card that you want to enable.
- Click the horizontal ellipsis (three dots) icon at the top-right corner of the card, then click Enable.
Alternatively, you can also enable the connection by clicking enable in the horizontal ellipsis from the Connection Details Page, as shown.
4.7. View Connection References
References contains a list of all the places, such as data sources or within your application, where the specific connection is being used. To view references:
- Navigate to Microservices. All the connections available in your account will be listed under the Connections section.
- Hover over the desired connection card.
- Click the horizontal ellipsis (three dots) icon at the top-right corner of the card, then click References.
4.8. Delete a Connection
Deleting involves permanently removing the specified connection from your Creator account.
- Navigate to Microservices. All the connections available in your account will be listed under the Connections section.
- Hover over the connection card that you want to delete.
- Click the horizontal ellipsis (three dots) icon at the top-right corner of the card, then click Delete.
- If the connection is not used in any of your applications, it will be deleted immediately once you click Delete in the confirmation popup that appears.
- Otherwise, a popup with details of all the places where you have used the connection will be displayed. You need to delete all the mentioned usage in order to Proceed to Delete the connection.
Alternatively, you can also delete the connection by clicking Delete in the horizontal ellipsis from the Connection Details Page, as shown.
4.9. Enable or Disable Connection Access to an Application
Note: This section is applicable to all types of connections: system connections, admin connections and logged-in user connections.
The Connection Access section in the Connection Details Page lets you enable or disable connection access to particular applications. By doing so, the connection will be available only to those applications with access enabled.
4.10. Use Different Authorizations for Different Environments
Using different authorizations for different environments allows you to personalize the access and permissions of a connection to suit the requirements of each specific environment. This allows you to have different authorizations for different environments while maintaining access privileges specific to each environment. Follow the steps given below to authorize the connection for desired environment.
- Navigate to the connection details page by clicking the connection card and click Authorize.
- Select the Authorized Account from the dropdown and click Reuse.
- In order to authorize a connection with a different credential, click Link New Account. Enter the Name of Authorization Account and select the environment where the authorization needs to be mandated. Click Authorize.
4.11. Manage Authorizations of Logged-in User Connections
When a logged-in user connection is created, it can be authorized and accessed by any logged-in user of that particular application in live or edit mode. However, all the authorization details can be viewed and managed by the admins. Managing the logged-in user connections includes:
- View all authorizations
- Switch authorization
- Revoke authorization
- Mark an account as primary
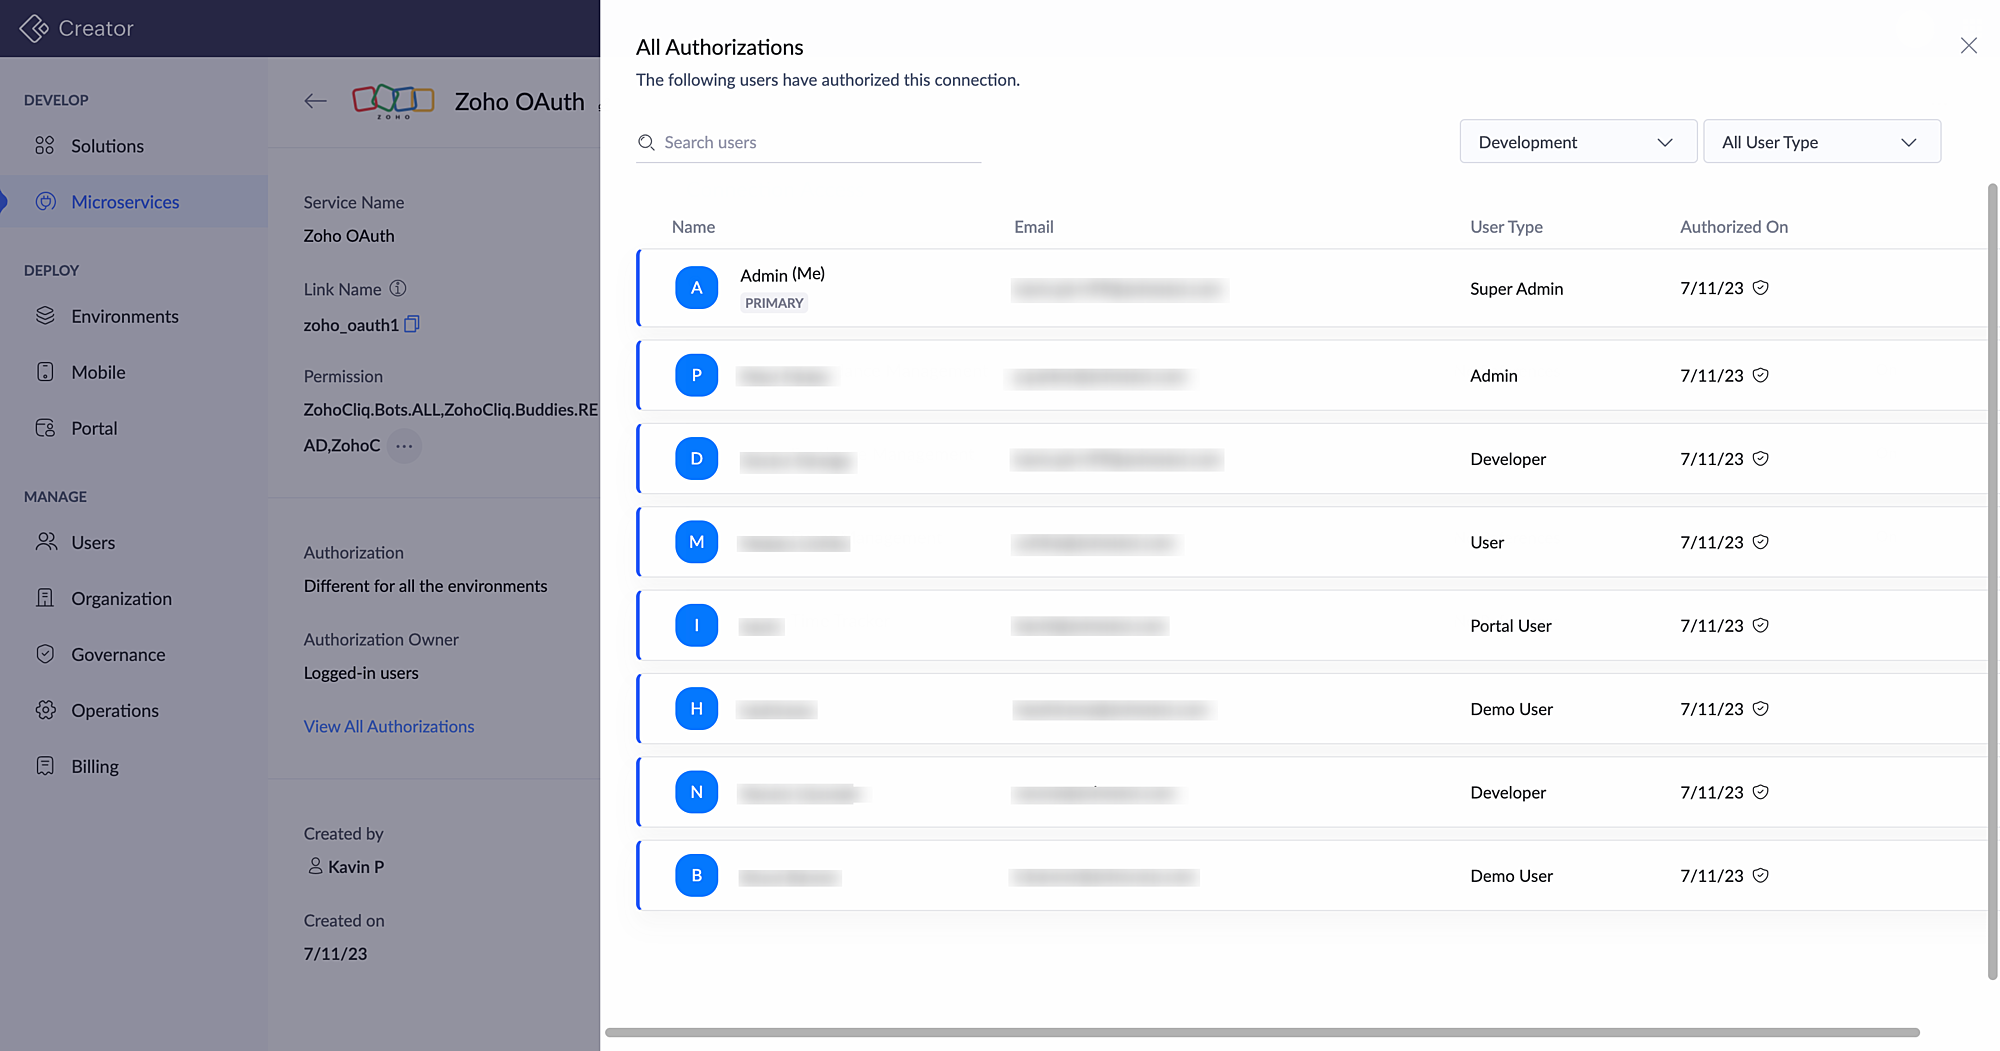
4.11.1. View All Authorizations
The View All Authorizations page provides a comprehensive list of all authorizations associated with the connection. To view all authorizations:
- Navigate to the connection details page by clicking the connection card and click View all Authorizations.
You can view all the authorizations listed with the details of user name, authorization date, user email and user type as shown. You can search for a specific user using the search bar or filter the users list based on user type and environment.
4.11.2. Switch Authorization
Note: Admins and super admins can only switch their own authorizations for the connection from the View all Authorizations page.
Switching a connection involves the process of granting a new authorization to the connection. It is also necessary in cases such as:
- Expiration of the authorization credentials linked to the connection
- Invalidation or deletion of the auth token from the third-party service
Note: When a connection authorization is switched, all the applications that utilize it will henceforth use the new authorization.
To switch authorization:
- Navigate to View all Authorizations page and hover over your authorization.
- Click the horizontal ellipsis and click Switch. You will be prompted to switch the authorization of a connection.
- Choose from the Authorized Account dropdown whether you want to reuse an already saved account. Alternatively, click the Link New Account to authorize the connection with different account credentials.
- Provide the authorization details in the popup and click Authorize.
4.11.3. Revoke Authorization
When a connection authorization is revoked, the permissions and access to the third-party service gets removed and the components using that connection authorization will not function as intended.
Note:
- Admins and super admins can only revoke their own authorizations for the connection from the View all Authorizations page.
- Revoking a connection authorization of connection will not affect other connections or environments using the same authorization.
- Before revoking a primary account, it is recommended to designate another account as the primary. This step is essential to maintain uninterrupted application's functionality, as unlinking the primary account may result in the disconnection of linked datasources and schedulers.
To revoke authorization:
- Navigate to the View all Authorizations page and hover over your authorization.
- Click the horizontal ellipsis and click Revoke.
4.11.4. Mark as Primary
When a logged-in user connection is created, the admin's account, that authorized it for the first time, will be designated as a primary account. However, this primary account status can be transferred to another admin's account. For a logged-in user connection, a primary account is required for creating datasources and schedulers to channelize integrated services through a single account. Learn more
Follow the steps given below to mark an account as primary.
Note: Only admins and super admin can switch the primary account status to another admin's account.
To mark an account as primary:
- Navigate to the View all Authorizations page and hover over another admin's authorization that you want to mark as primary.
- Click the horizontal ellipsis and click Mark as Primary.
- Select Proceed in the confirmation pop-up that appears.
The account will be marked as primary, as shown.
5. Points to Note
- Connections can only be created by super admin, admins and developers.
- System connections can only be authorized by the super admin.
- Logged-in user connections can only be created in C6.
- For creating datasources and schedulers using logged-in user connections, the primary account is mandatory to channelize integrated services through a single account.
- Only the connection with the same authorization for all environments can be used for creating datasource.
6. Related links
Zoho CRM Training Programs
Learn how to use the best tools for sales force automation and better customer engagement from Zoho's implementation specialists.
Zoho DataPrep Personalized Demo
If you'd like a personalized walk-through of our data preparation tool, please request a demo and we'll be happy to show you how to get the best out of Zoho DataPrep.
- Zoho Workerly Home
- Forums
- Connect With Us:


- Zoho Recruit Home
- Forums
- Connect With Us:
You are currently viewing the help pages of Qntrl’s earlier version. Click here to view our latest version—Qntrl 3.0's help articles.
New to Zoho Survey?


Zoho Sheet Resources
Zoho Forms Resources
New to Zoho Sign?
Zoho Sign Resources
Sign, Paperless!
New to Zoho TeamInbox?
Zoho TeamInbox Resources
New to Zoho ZeptoMail?
Zoho DataPrep Resources
Design. Discuss. Deliver.
New to Zoho Workerly?
New to Zoho Recruit?
New to Zoho CRM?
New to Zoho Projects?
New to Zoho Sprints?
New to Zoho Assist?
New to Bigin?
Related Articles
Understand Connections
This help page is for users in Creator 6. If you are in the older version (Creator 5), click here. Know your Creator version What Does This Page Cover? Learn about connections and their types that can be used to integrate your Creator application ...Manage Datasources
Datasource is used to manage a module from a third party service in Creator with the help of the connection created linking the said service. This enables you to access data housed in an external service and use it in your Zoho Creator applications. ...Understand microservices
Microservices are small, independent services or components of app that can easily be deployed to work in tandem with your application. You can build a robust application for your business. However, as your business grows, you will find that the ...Understand prediction field
AI Models have undergone a major revamp and is now rechristened as AI Modeler that lets you build, train, and publish models to be used across your apps. To know more, check out our new help pages. The Prediction field uses Zoho's Artificial ...Add Connections
This document provides a brief understanding of how the connections feature of the Creator 5 is realigned in Creator 6 Current: The purpose of connections is to integrate your Zoho Creator application with various cloud services. In current version, ...
New to Zoho LandingPage?
Zoho LandingPage Resources