Configure Exchange Settings for Calendar Interoperability
Zoho Calendar users can look up the availability status of the Exchange users once the setup is done in the Exchange server. You can configure the setup using the Exchange Web Services (EWS) and Exchange Role Account.
Set up Exchange users
While setting up the availability of Exchange users for Zoho Calendar users, the following points have to be noted:
- The Exchange users should have an Exchange account with a dedicated mailbox.
- The Exchange users should not have a Zoho account. If they own a Zoho account, Zoho Calendar for the account should be disabled.
- If the Exchange user owns a Zoho account, the domain name of the Zoho account should not match the domain name of your organization.
Note
- By default, your calendar interoperability will be enabled for looking up the free/busy status of the users.
- After configuring the Exchange role account, execute the PowerShell command in Exchange Management Shell to set up org-wide Free/Busy for the role account in Exchange.
Authorize Internet Connectivity for Exchange
An Internet connection should be established so that Zoho Calendar can communicate with the Exchange server. This connection requires an SSL certificate.
For more details on SSL certificates, check the Microsoft website:
No changes are required if you're using Exchange Online (Microsoft 365), as it can accept connections from the internet by default.
Create an Exchange role account
After establishing the internet connection, you need to create an Exchange role account. Using this account, Zoho Calendar will communicate with the Exchange server and get the availability status.
The following conditions should be checked for while creating an Exchange role account:
- The Exchange role account should be a low-key account without a dedicated mailbox.
- For Zoho Calendar users to view the availability of Exchange users, the events should be shared with the Exchange role account. If not shared, it will not show up in the availability status.
You can create an Exchange role account by following these steps:
If you have an existing Exchange Account being used for availability lookups, you can use the same account to set up availability address space in the Exchange server.
Note
It is recommended to turn off password expiration for the role account to avoid service disruption.
Setup OAuth 2.0 Authentication
You need to set up OAuth 2.0 authentication if you're using Exchange Online (Microsoft 365). Skip to configure exchange settings in Admin Console if you're using other versions of Exchange.
Action required
Migrate to Microsoft Graph API before October 1, 2026
Microsoft will begin blocking Exchange Web Services (EWS) API requests for Exchange Online on October 1, 2026. After this date, calendar interoperability between Zoho Calendar and Microsoft Exchange Online will stop working for Azure applications that still rely on EWS. To avoid a service interruption, add the required Microsoft Graph API permissions to your Azure application on or before September 30, 2026. This change applies only to Exchange Online (Microsoft 365) — Exchange Server on-premises is not affected.
Set up Microsoft Azure portal
- Register Calendar Interoperability in the Azure portal. Learn more about Microsoft's Register an Application.
- Select App registrations, then click + New registration from the top pane.
- Enter a valid name for your application. Select the appropriate Supported account types (recommended: Single tenant) and leave the Redirect URI as the default. Click Register.
- In the Overview page of the registered application, copy the Application (Client) ID.
- Save the Client ID — you'll need it when configuring OAuth 2.0 authentication in Zoho Calendar.
Under Manage > Certificates & secrets, create a Client Secret for the application. Save the generated client secret securely — you'll need it when configuring interoperability in Zoho Calendar. Learn more about adding a client secret.
Note
The client secret expires based on the validity period you choose. Before it expires, update it in Zoho Calendar under Settings > Calendar Interoperability to ensure uninterrupted free/busy synchronization.
- Under Manage, click API permissions.
- Click + Add a permission and select Microsoft Graph.
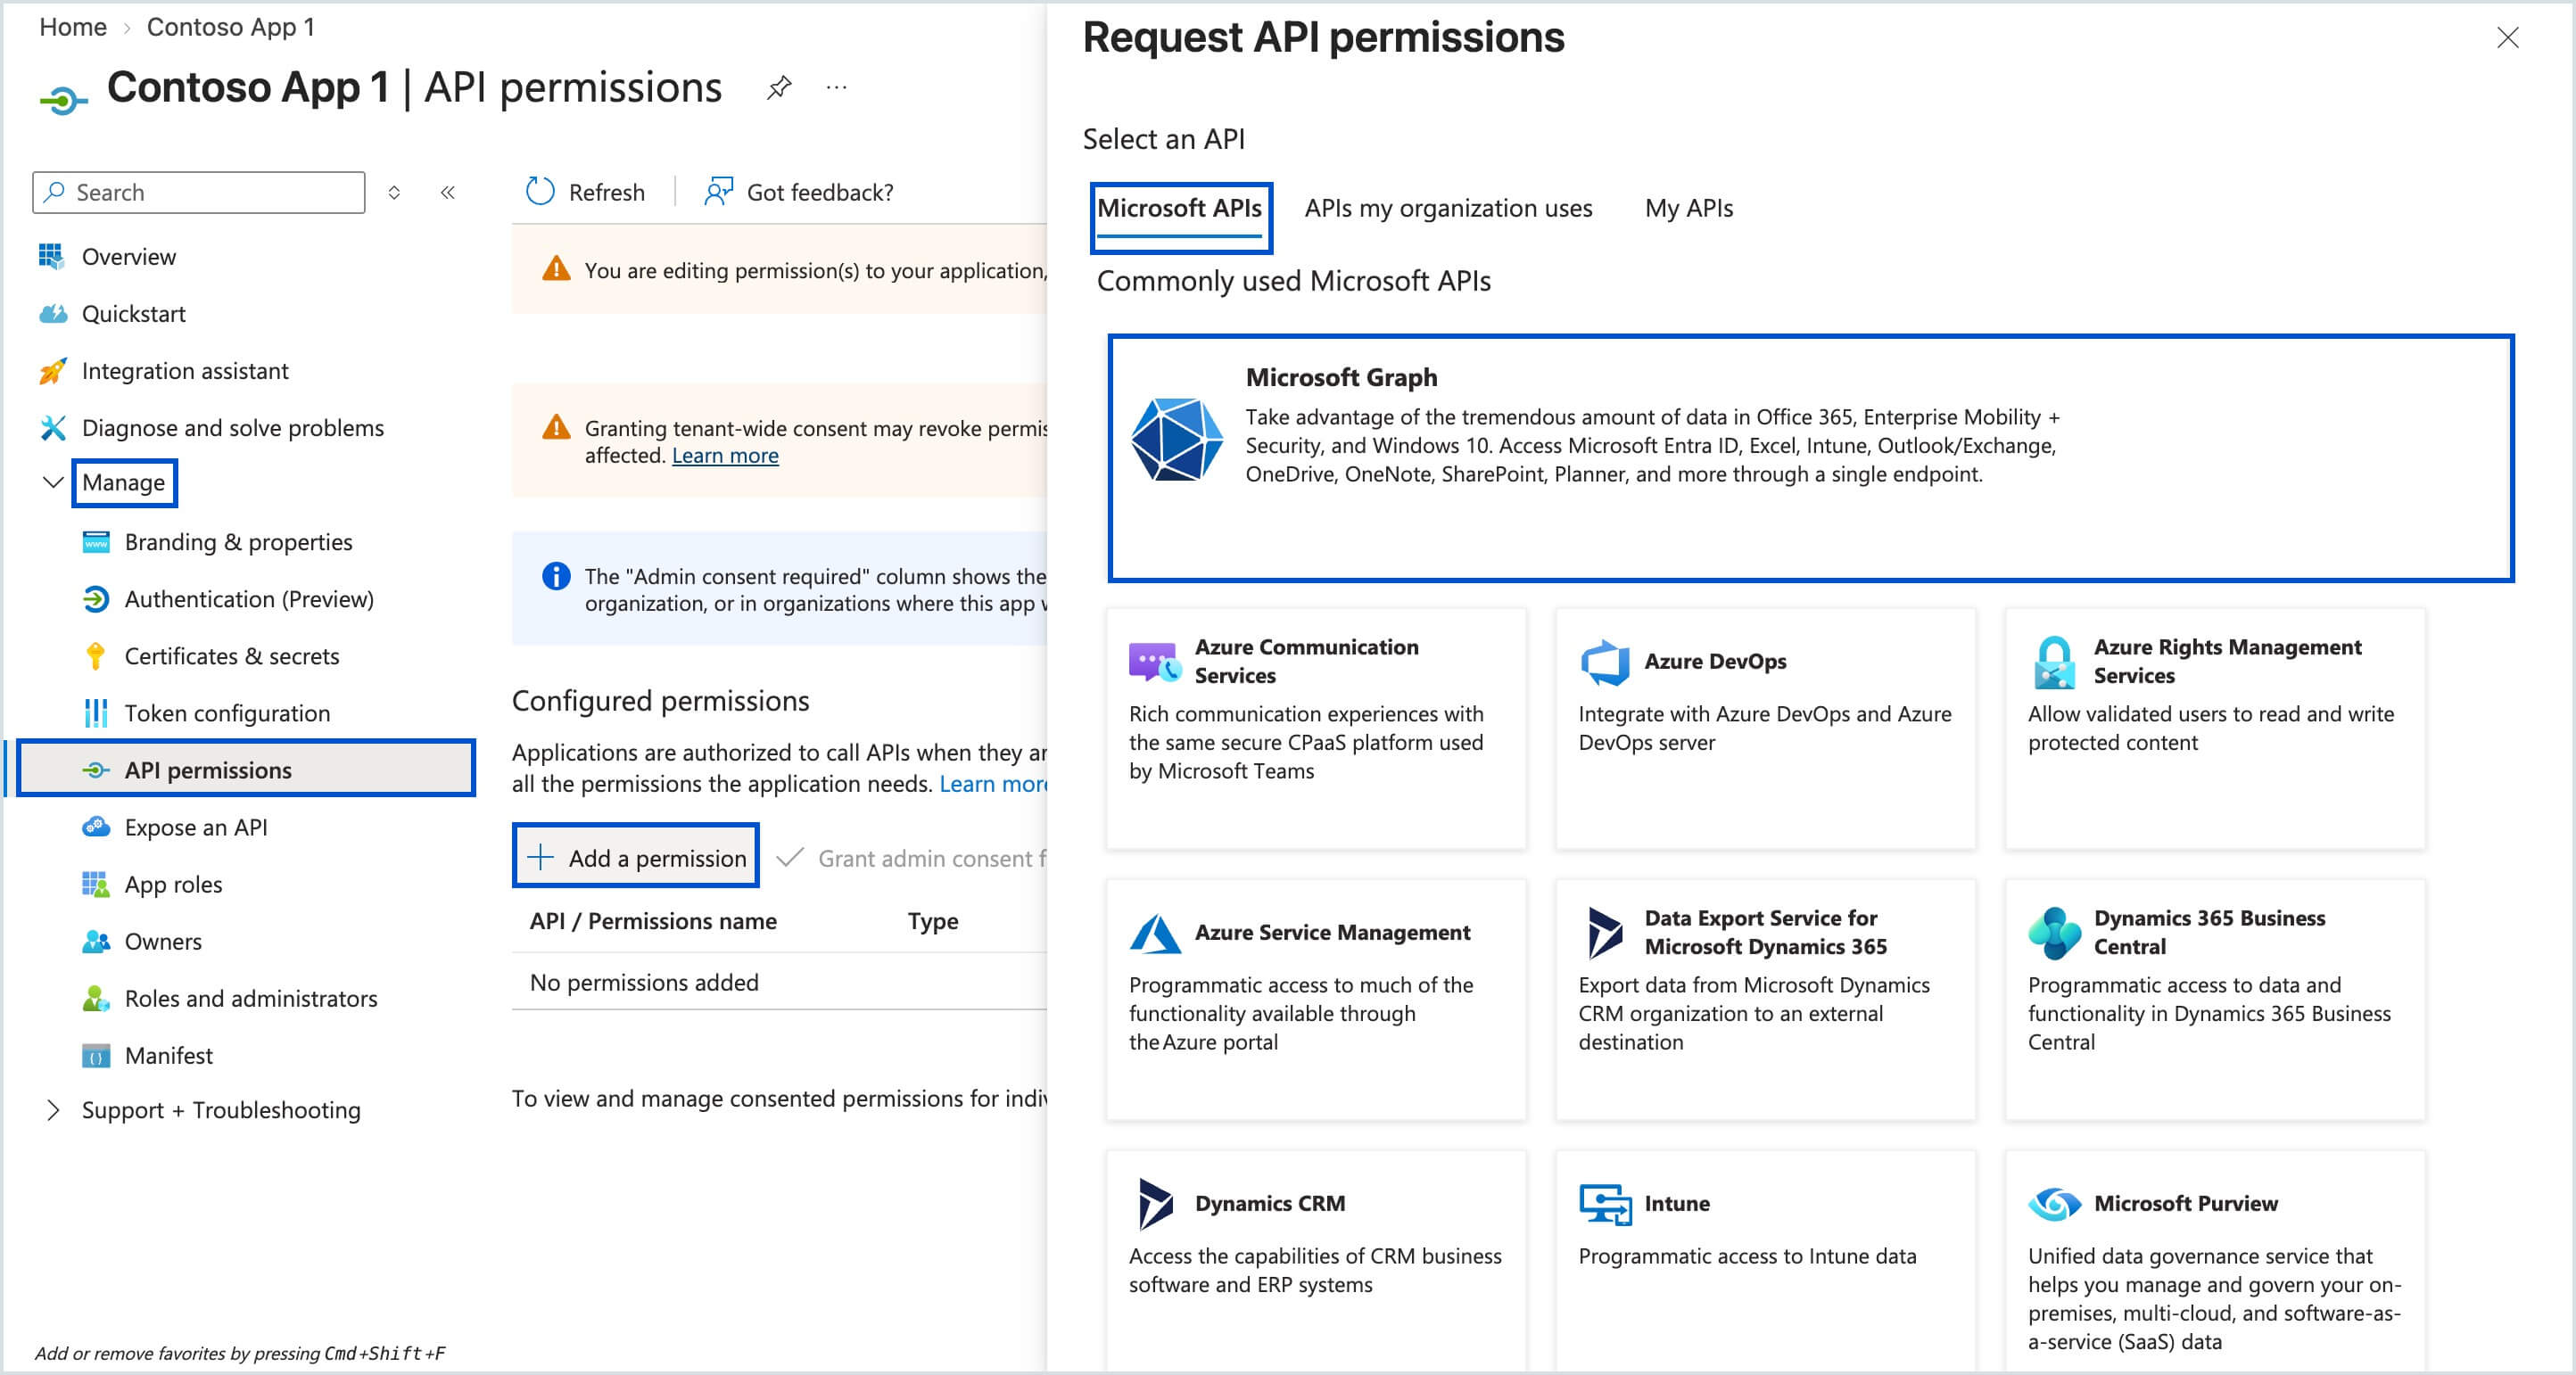
- ChooseApplication permissions. Then add permissions based on what you need to fetch:
- To fetch the free/busy status of users, click + Add a permission, select Microsoft Graph > Application permissions, and enable the following permission by selecting the checkbox under the section mentioned:
- Calendars.Read — listed under the Calendars section.
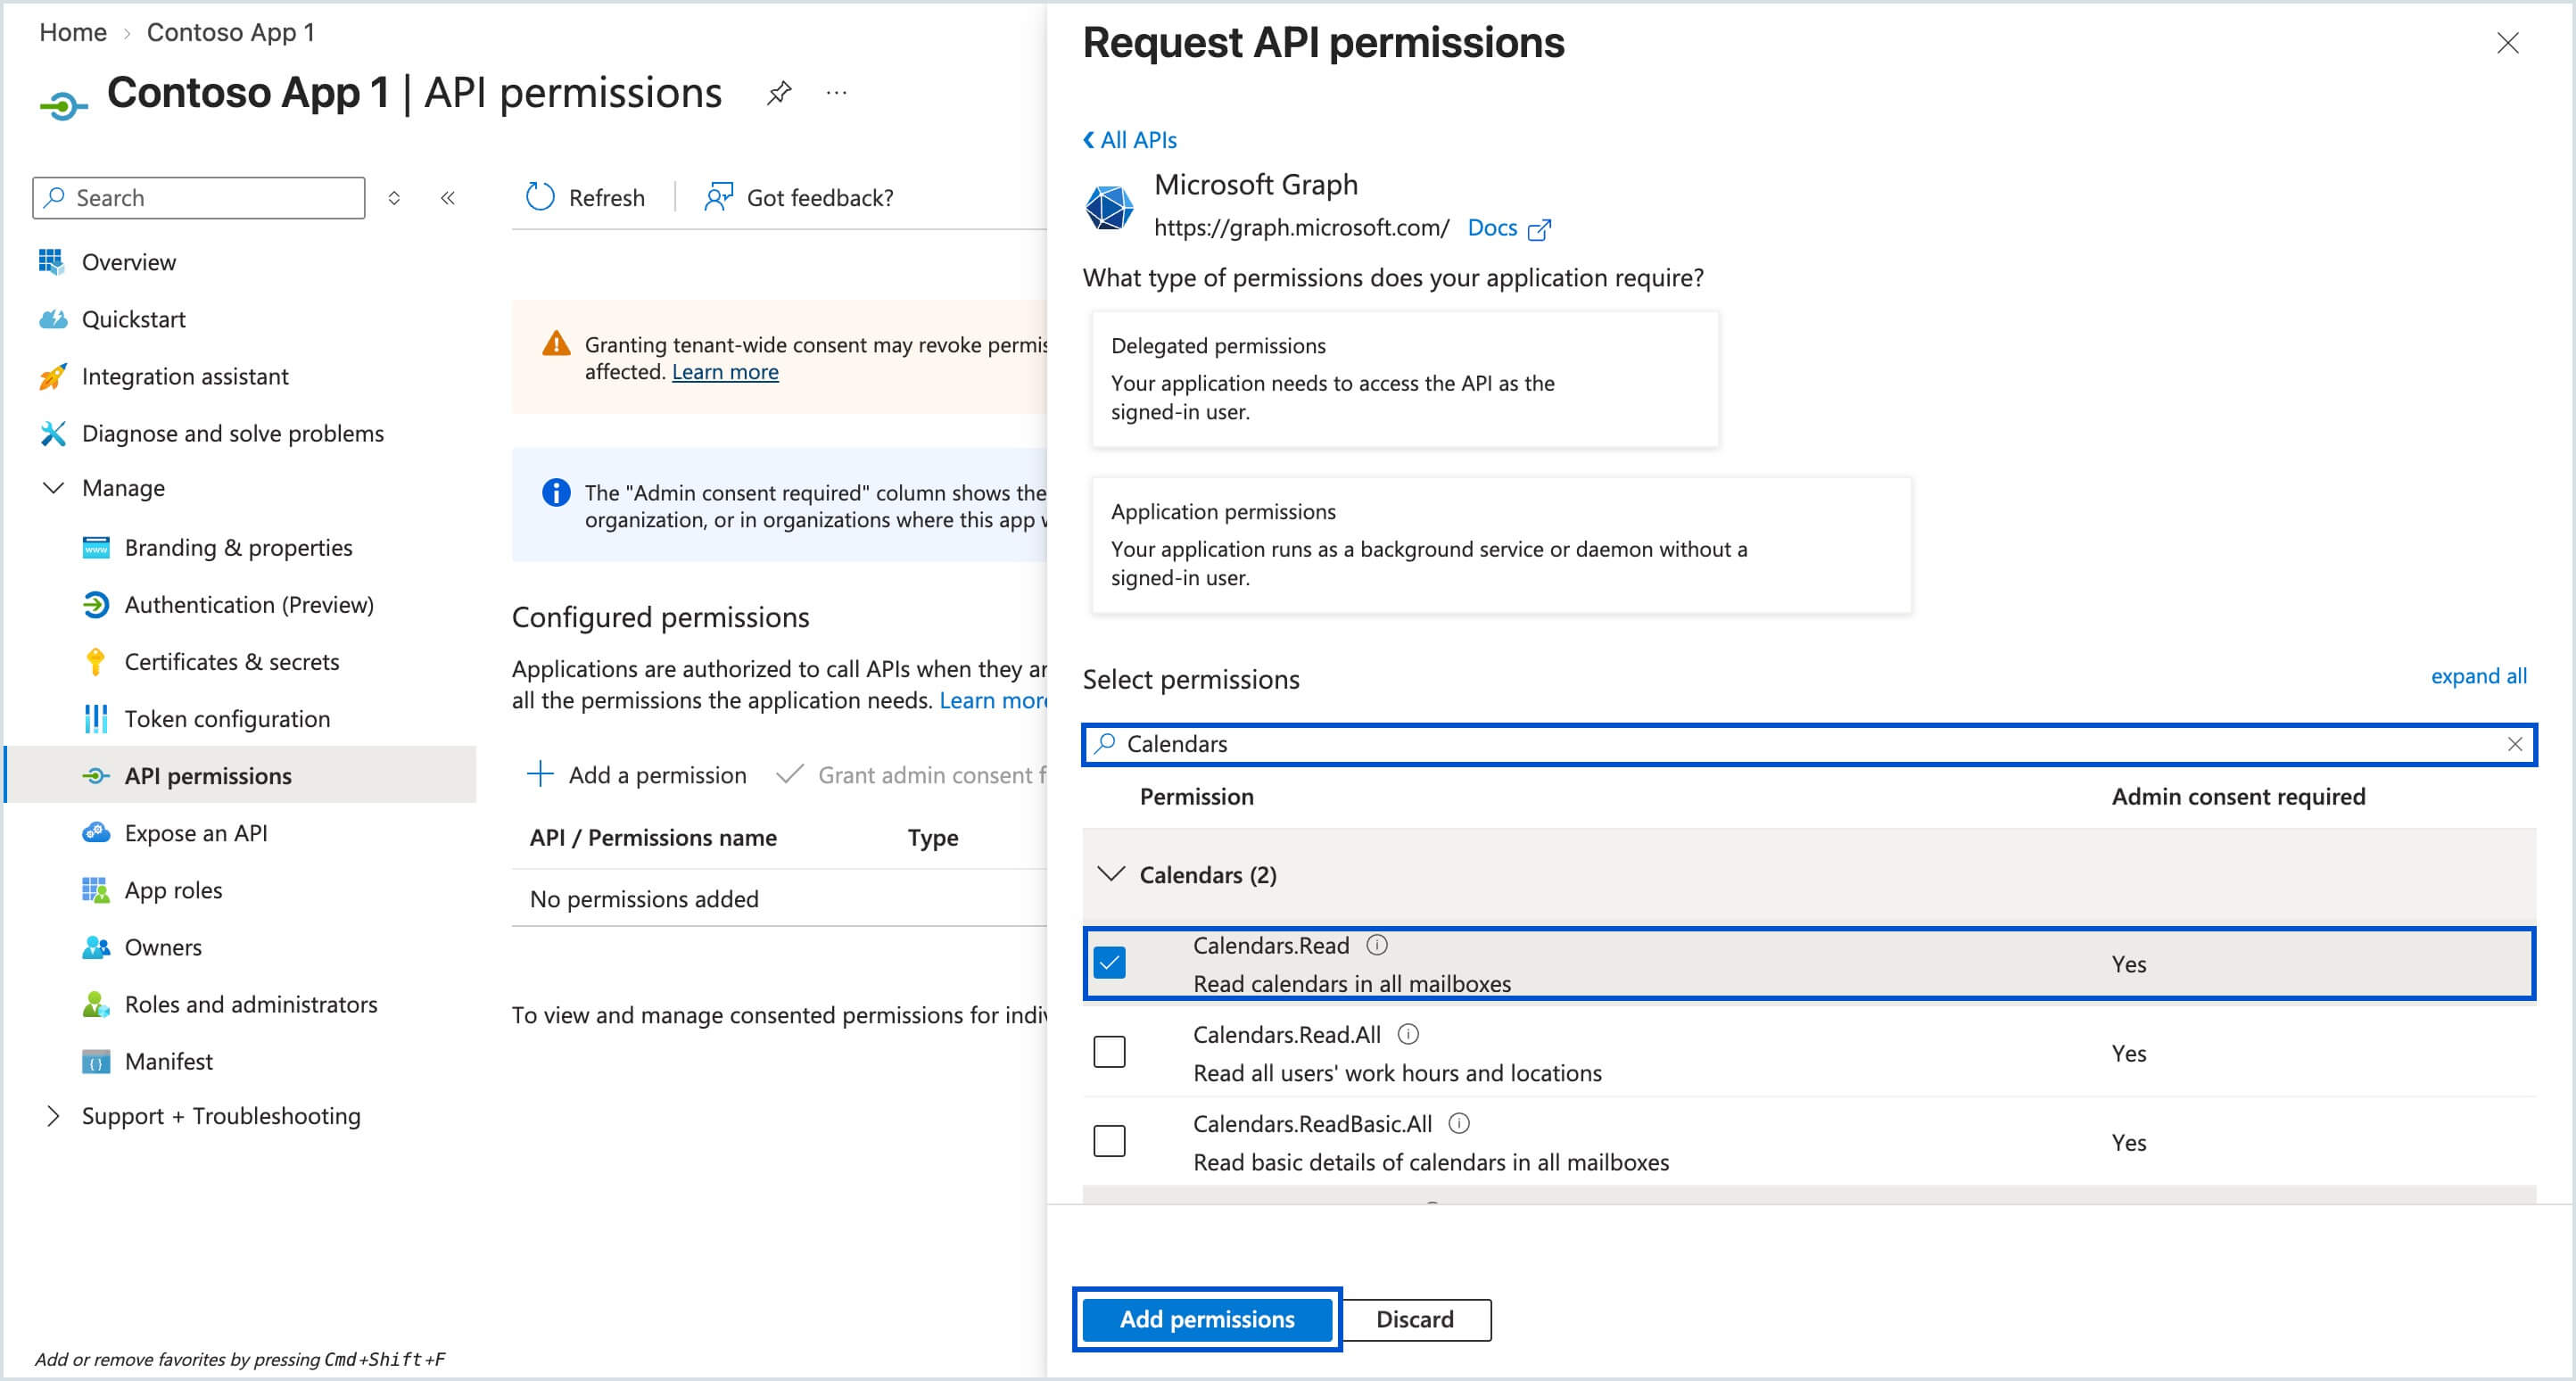
- Calendars.Read — listed under the Calendars section.
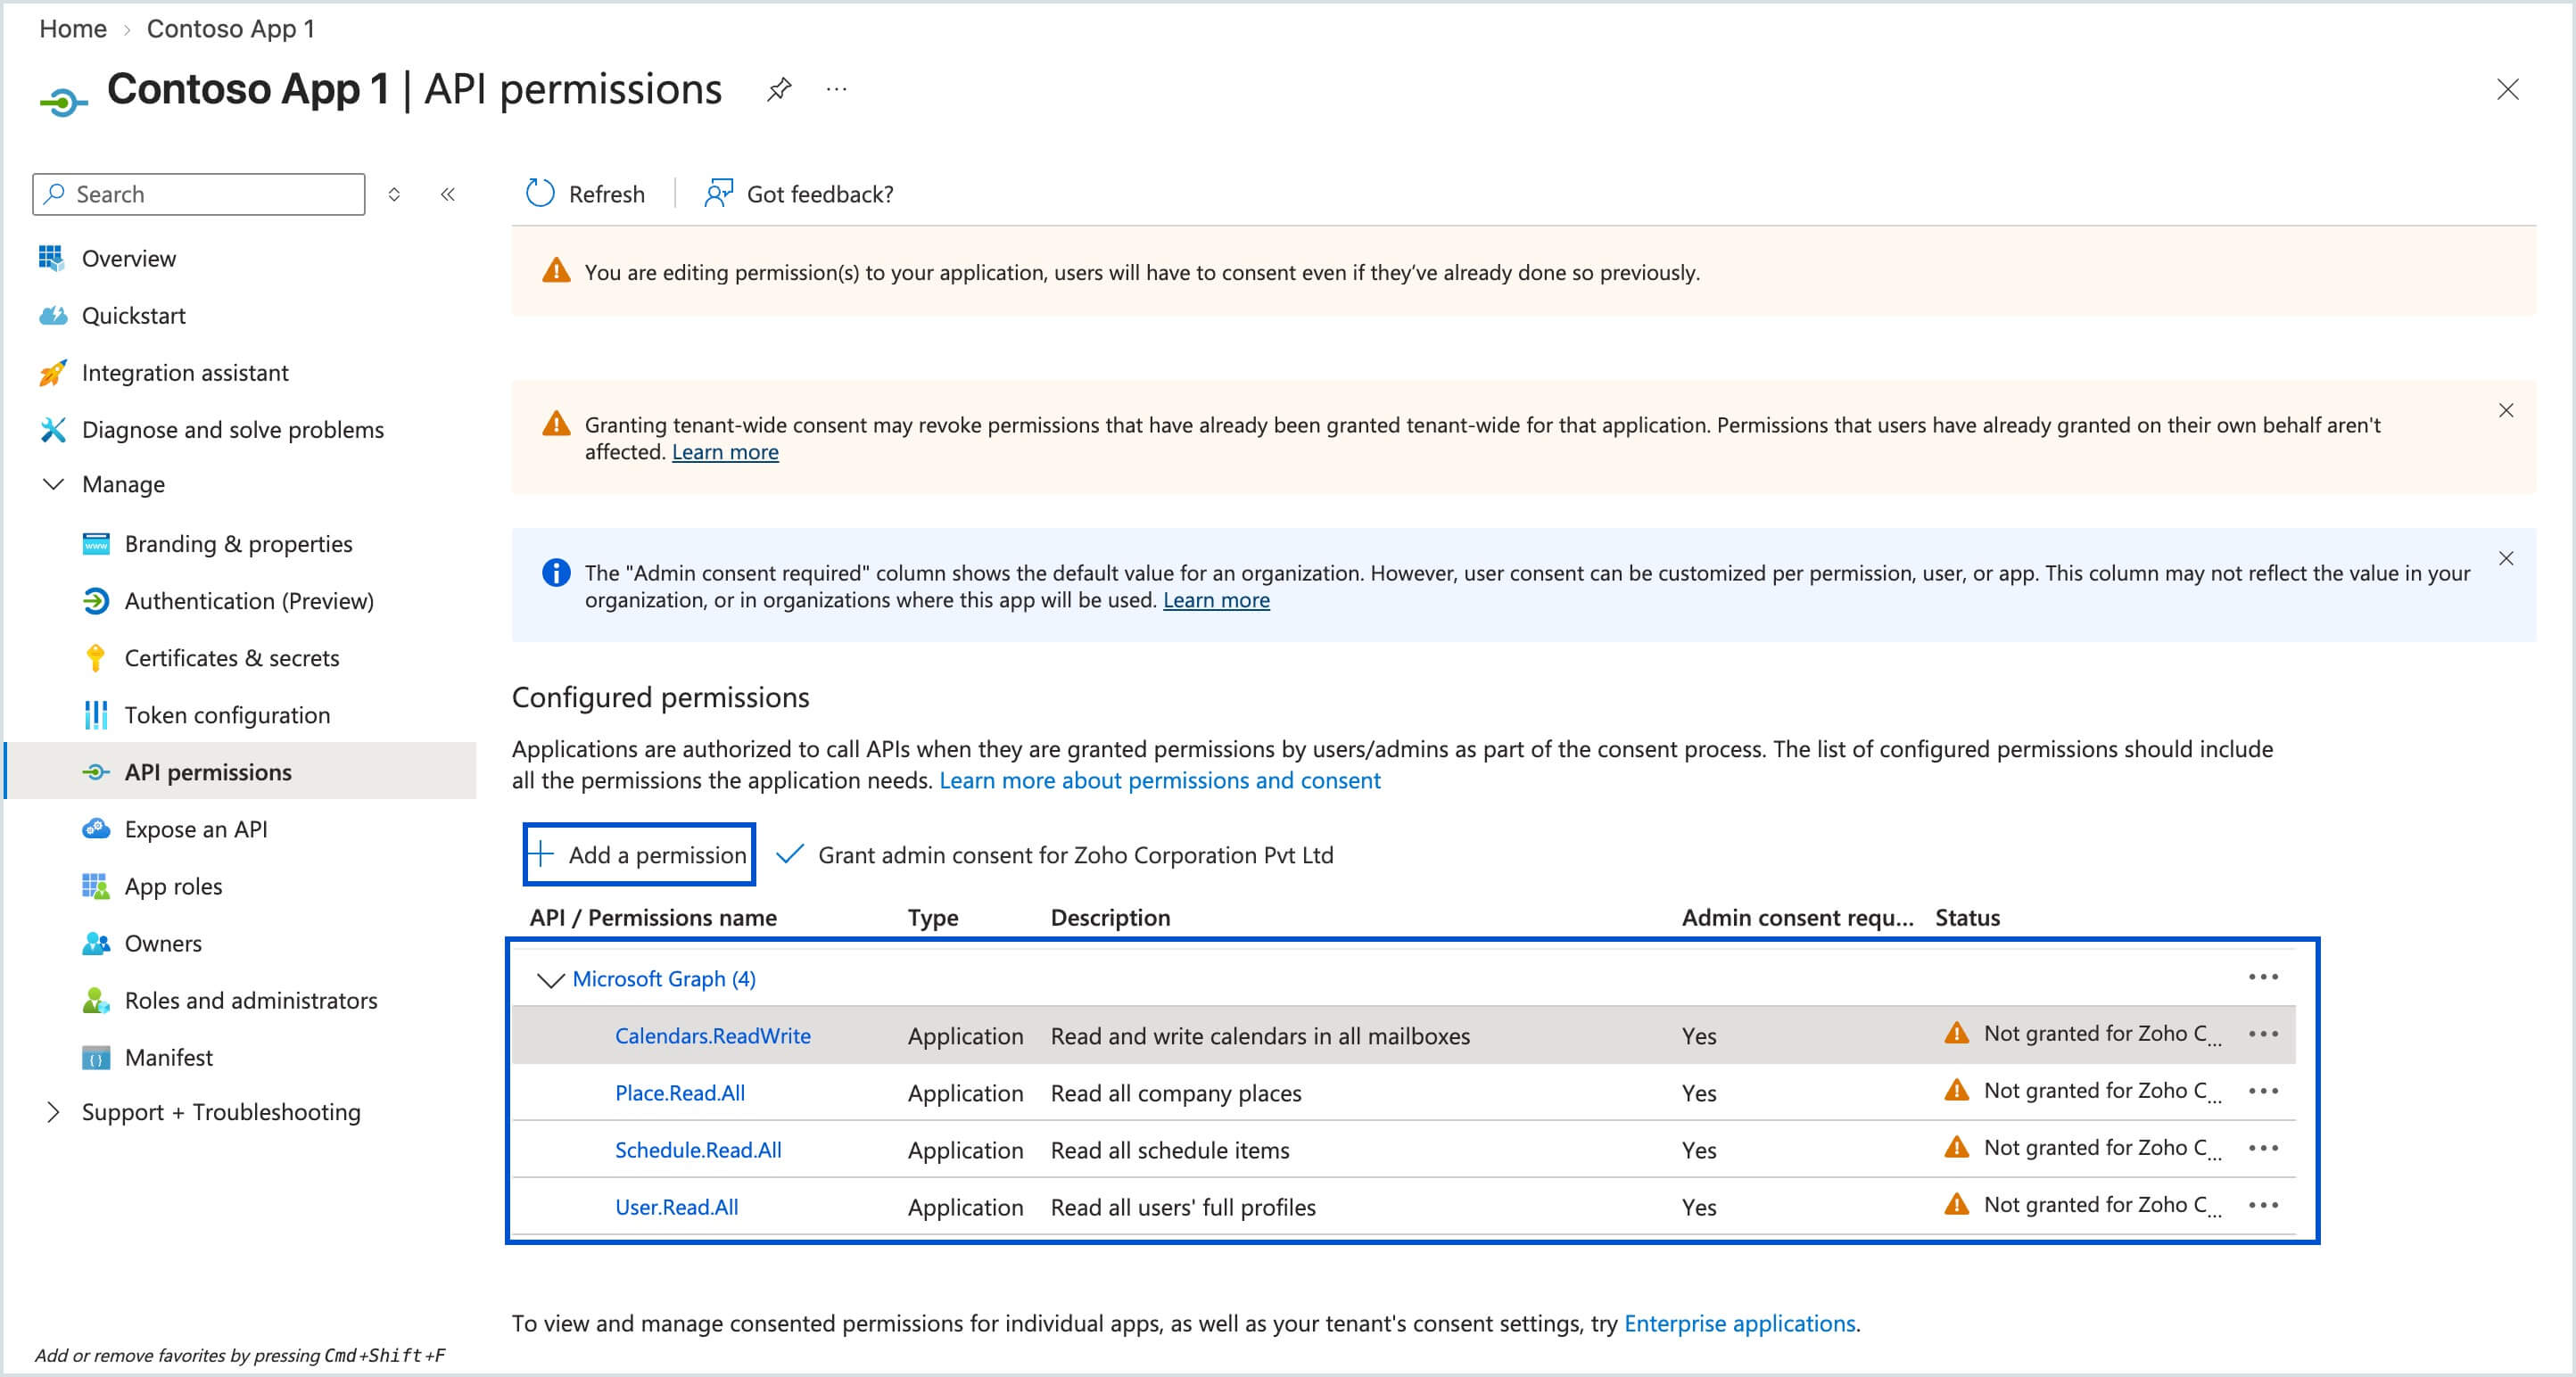
- To fetch the free/busy status of rooms and resources, in addition to the permission already added, click + Add a permission, select Microsoft Graph > Application permissions, and enable the following permissions by selecting the respective checkboxes under their corresponding sections:
- Calendars.ReadWrite — listed under the Calendars section.
- Place.Read.All — listed under the Place section.
- Schedule.Read.All — listed under the Schedule section.
- User.Read.All — listed under the User section.
- To fetch the free/busy status of users, click + Add a permission, select Microsoft Graph > Application permissions, and enable the following permission by selecting the checkbox under the section mentioned:
- Click Add permissions once all selections are made. The configured permissions will be listed under Microsoft Graph in the API / Permissions name column. Learn more about Microsoft's Add Permissions to access Microsoft Graph.
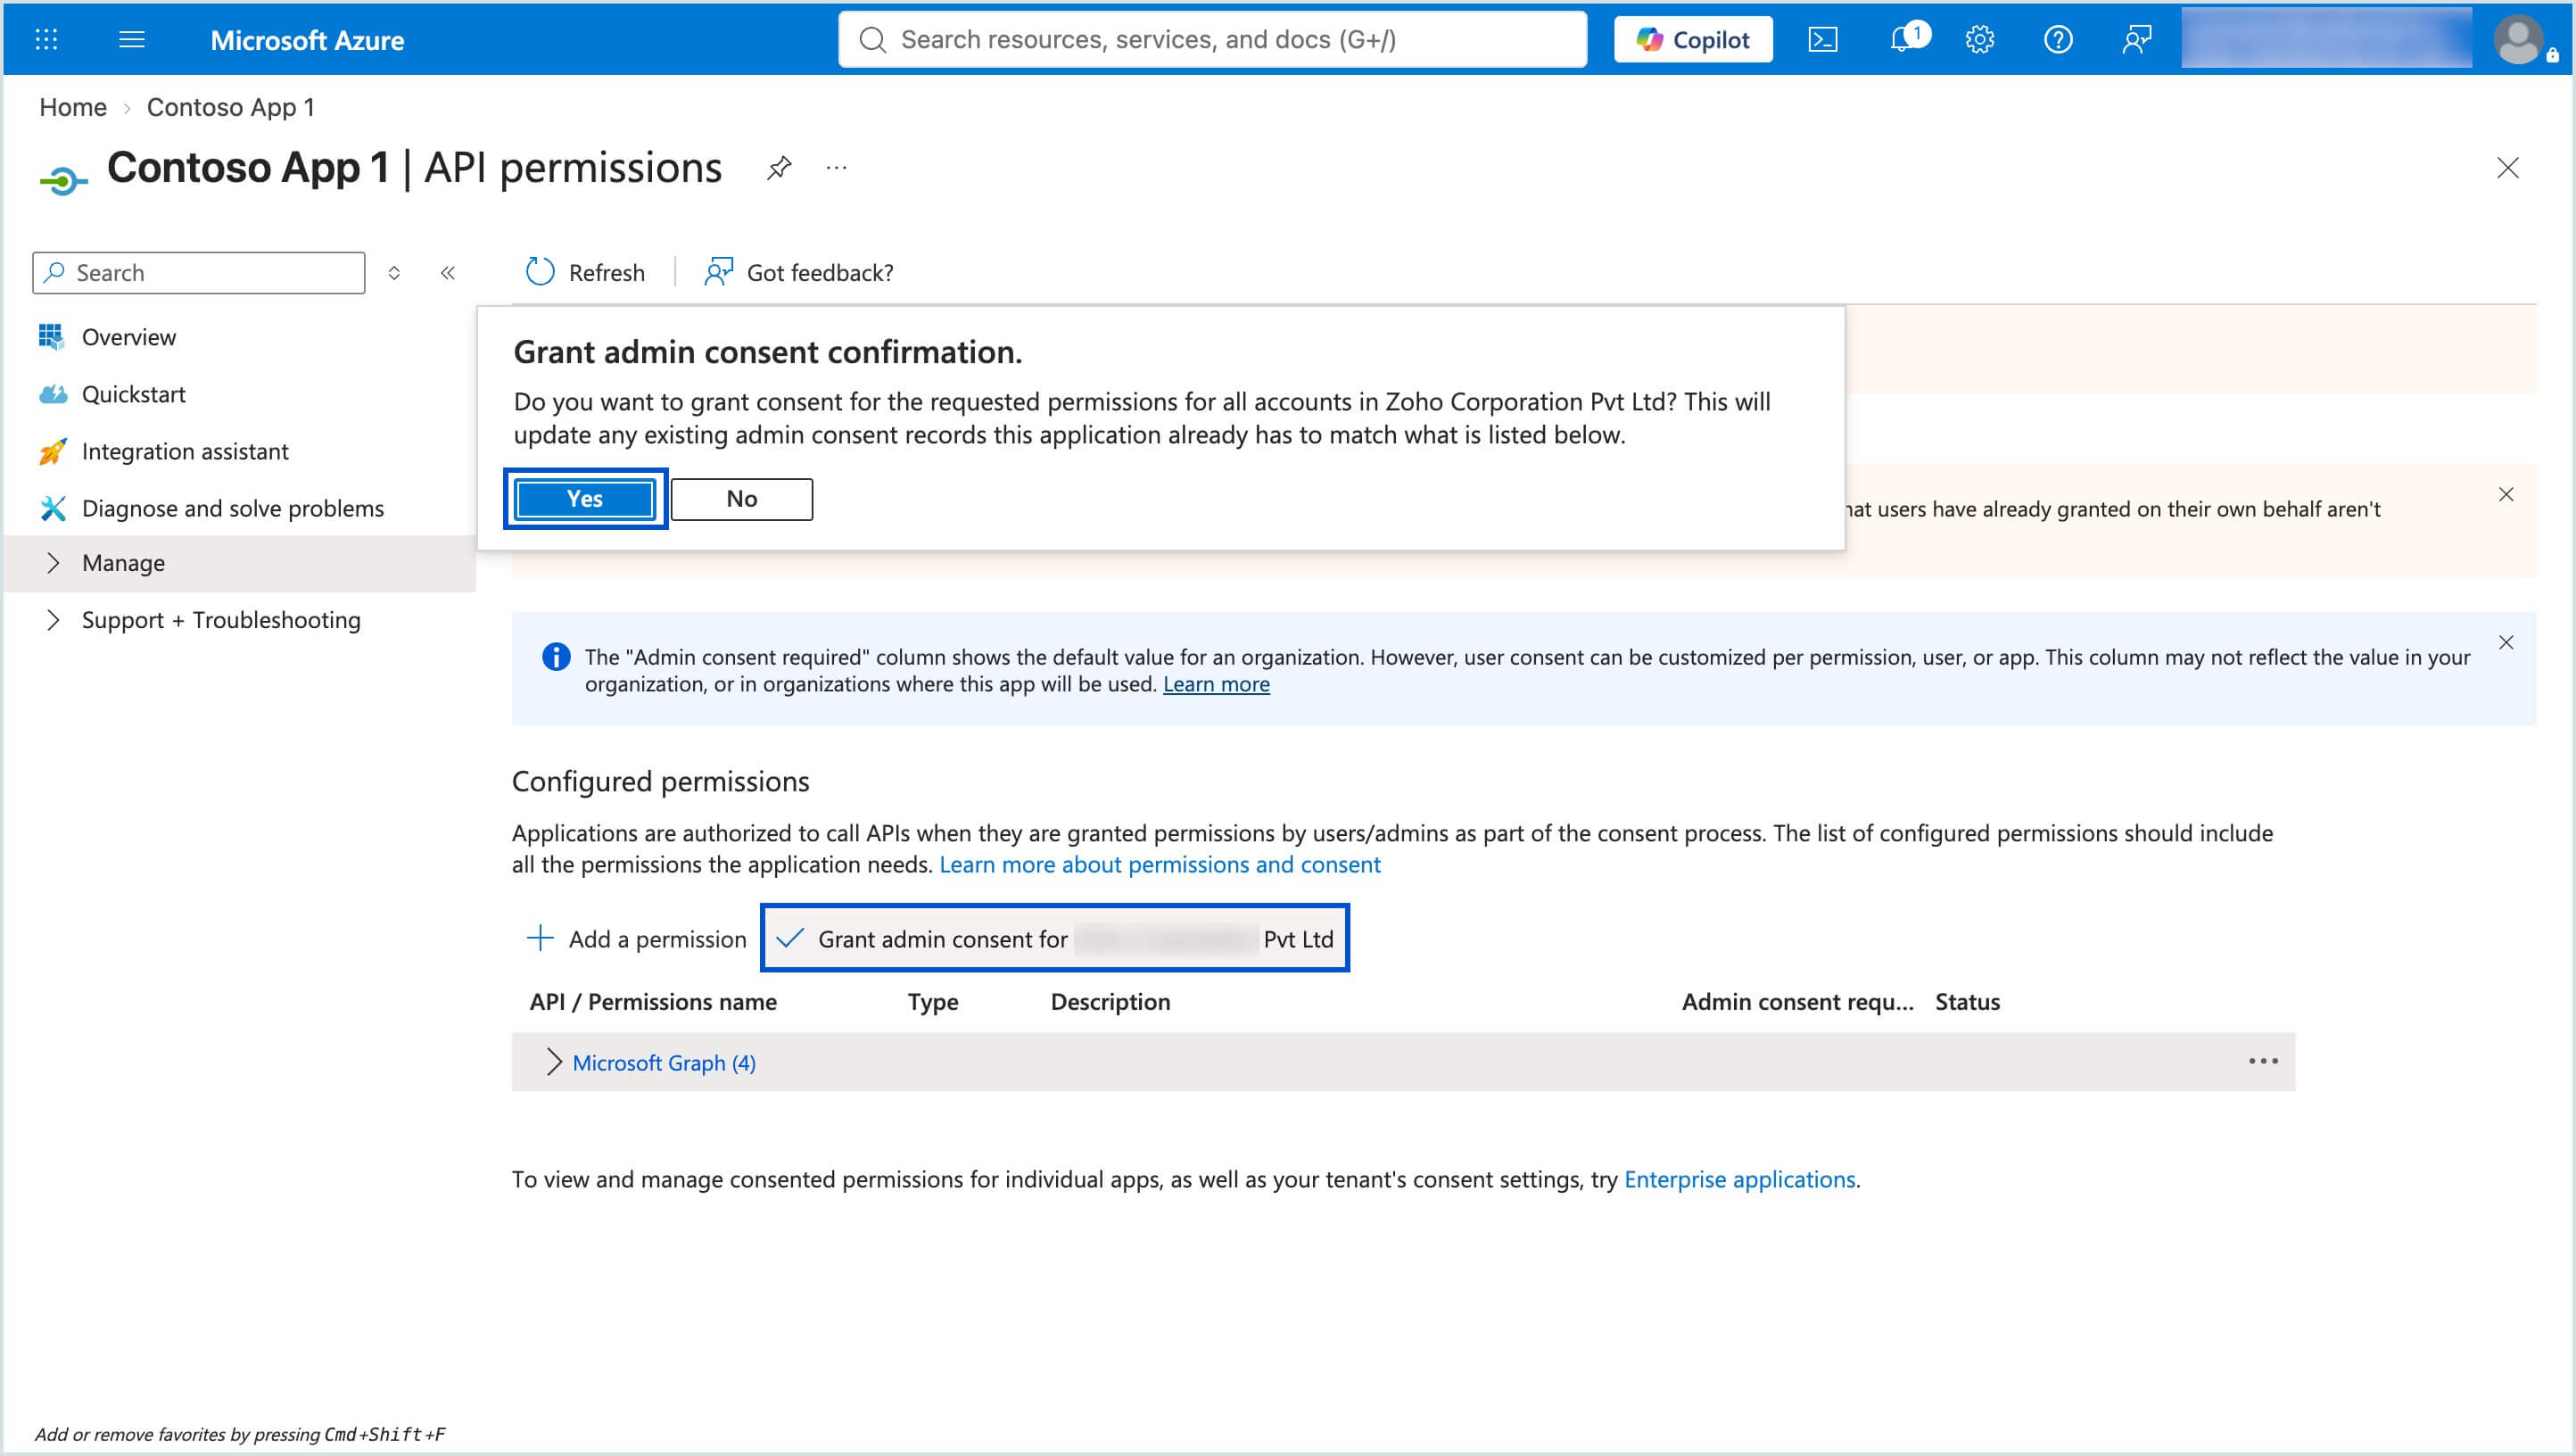
- Under Configured permissions, click Grant admin consent, then click Yes to approve the requested Microsoft Graph permissions.
Note
If you previously set up calendar interoperability, Remove the Office 365 Exchange Online > full_access_as_app permission from your Azure application's API permissions. This permission is no longer required and should be revoked to follow the principle of least privilege.
Find and Save the OAuth 2.0 token endpoint
- Select your registered app from the home page and click the Endpoints button on the top pane to know the endpoint details.
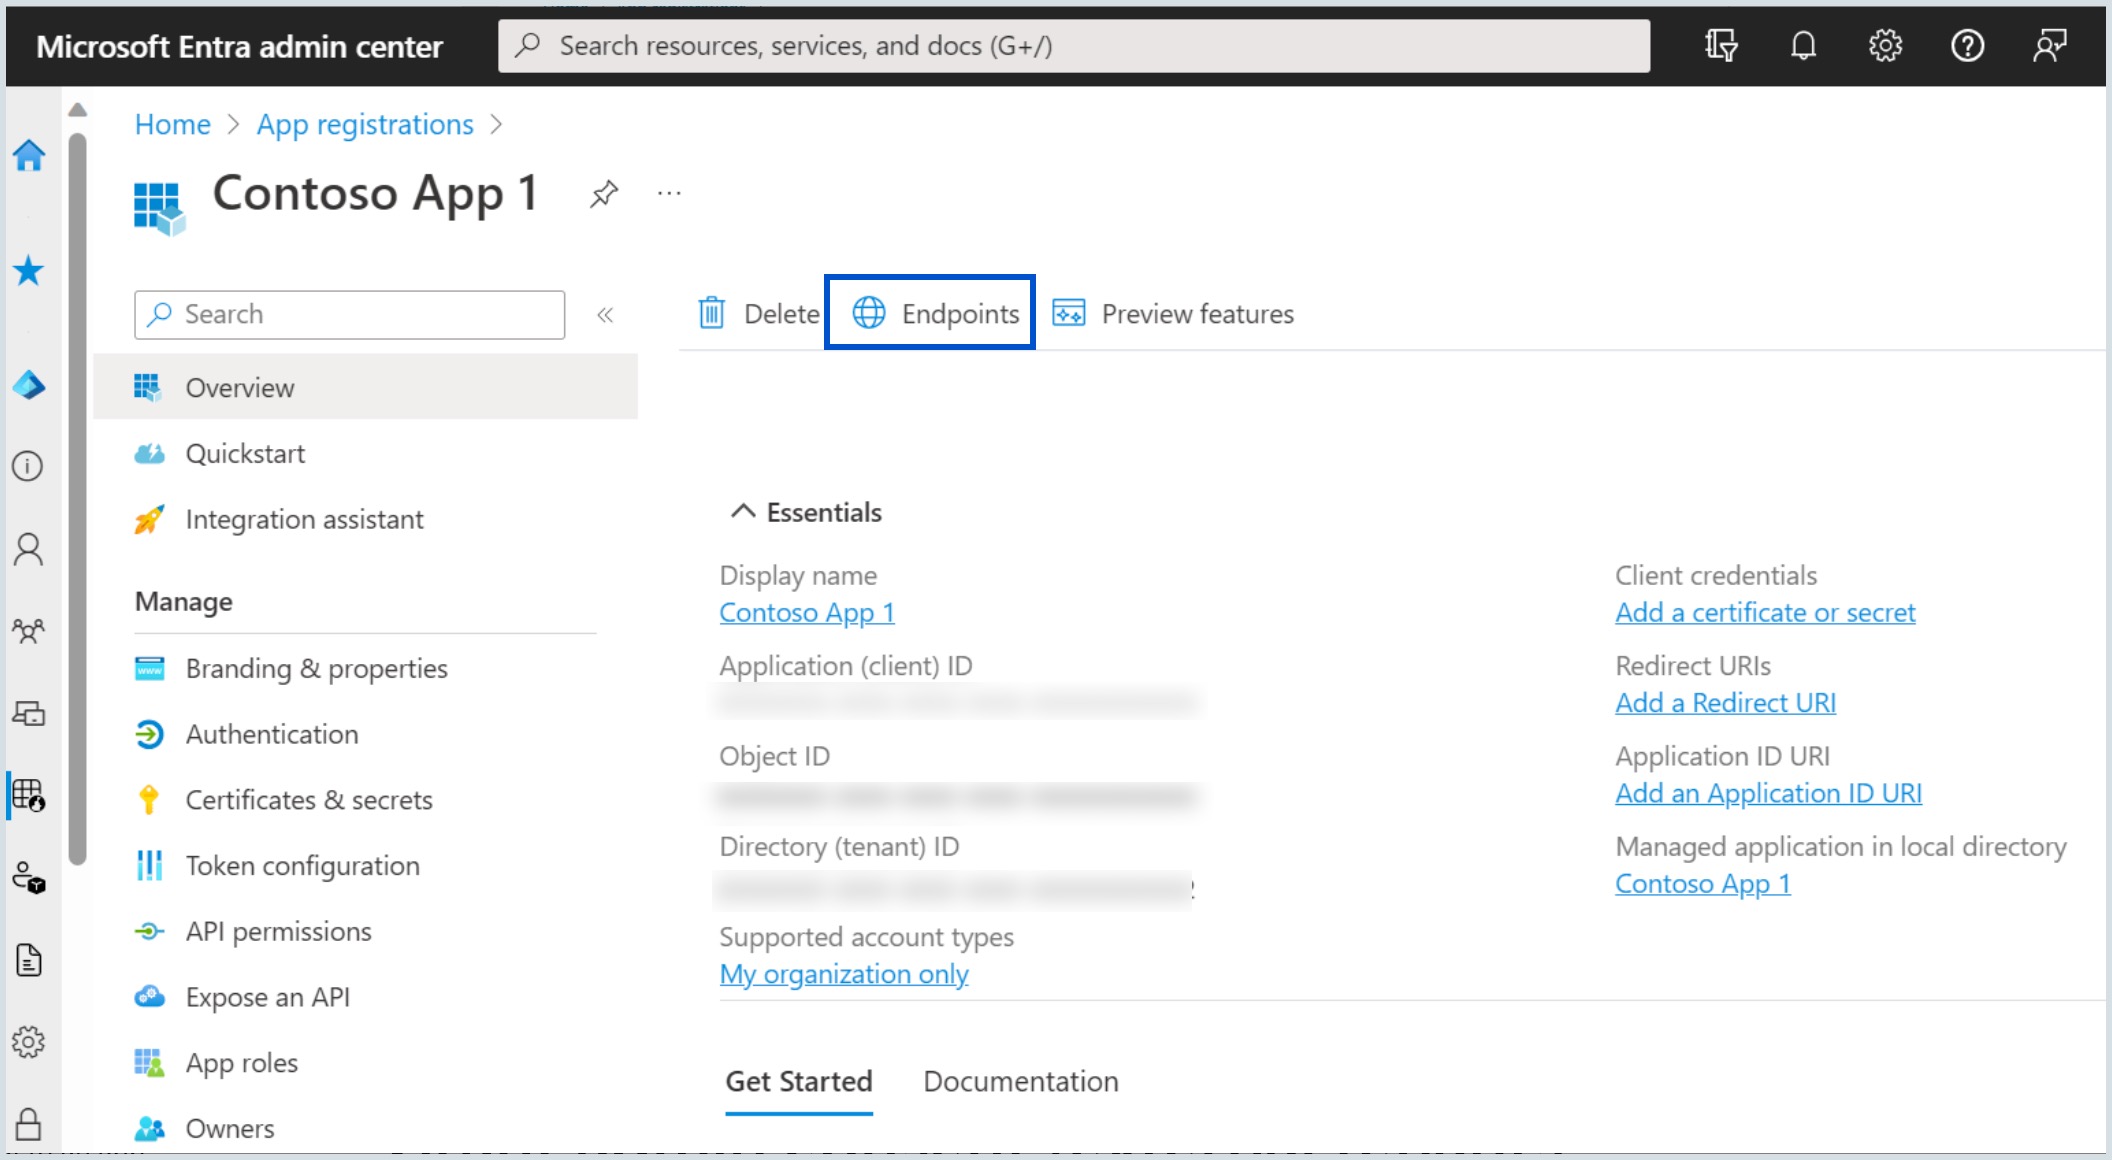
- Scroll down to find OAuth 2.0 token endpoint (v2) and copy the given value.
- Save the endpoint value as it would be required to set up OAuth 2.0 authentication in Zoho.
Configure Exchange settings in Admin Console
Once you have created your Exchange role account, you need to configure your setup in Zoho Mail Admin Console for Zoho Calendar users to check the availability of Exchange users.
- Log in to Zoho Calendar using your primary domain.
- Navigate to the Admin Console from the User profile section.
- Navigate to Interoperability from the left menu and choose Configure in the Exchange option.
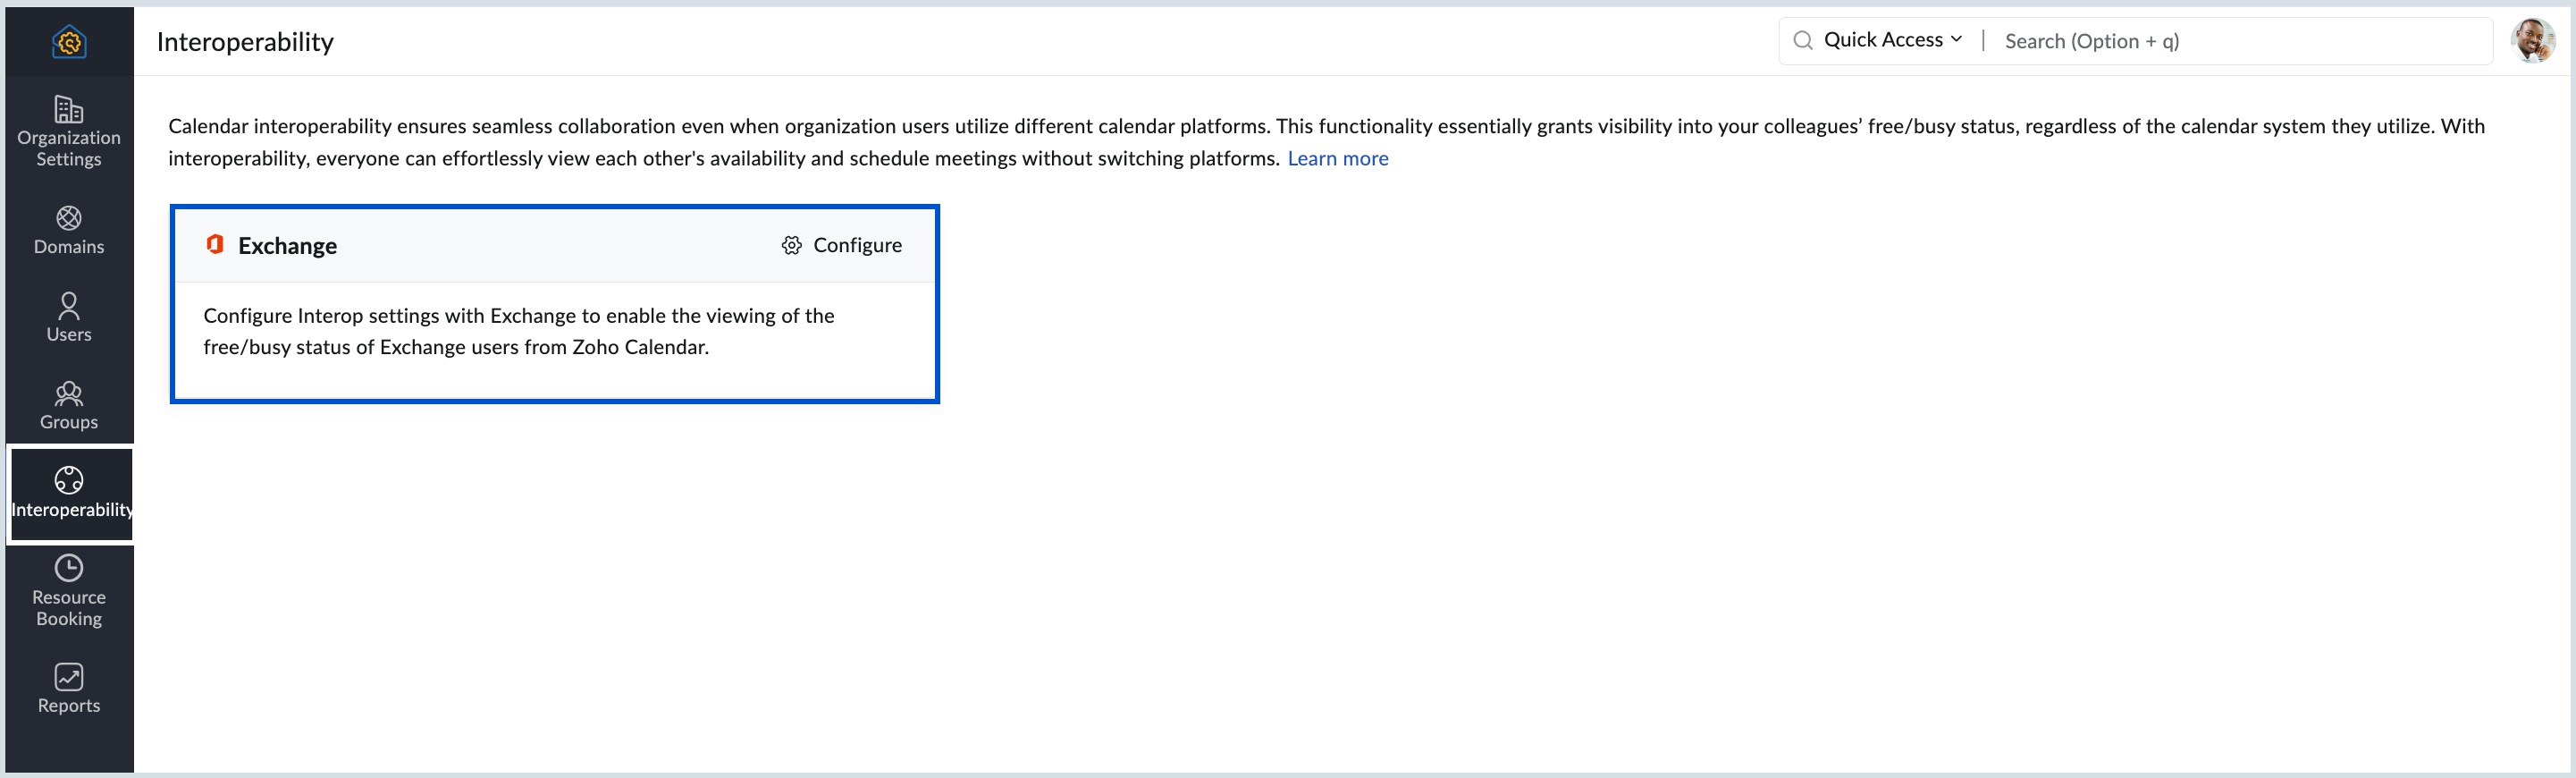
- Go to the Exchange Settings tab.
- In the Exchange settings tab, enter the Exchange Web Services (EWS) URL for your Exchange server. Check here to know more about Exchange Web Services (EWS) URL.
- Enter your Exchange role account address and password under the Exchange user credential.
Choose Basic authentication (for on-premise Exchange server) or OAuth 2.0 (for Exchange Online/ Microsoft 365) from the Authentication Type drop-down.
- If you choose the Basic Authentication (on-premises Exchange Server) option, you need to provide the Exchange Password.
- If you choose the OAuth 2.0 client credentials (Exchange Online or Microsoft 365) option, follow the step given below:
- In the Token endpoint URL field, provide the endpoint URL fetched from the Azure portal. Learn more.
- In the Application ID field, provide the application ID fetched during application registration.
- In the Client Secret field, provide the client secret assigned to your application during registration.
Note
If a new room is added, ensure it is also added to a Rooms List. The room will not be listed unless it is added to a Rooms List in Office365. To learn more about adding new rooms to the rooms list in Office 365, click here.
- Click Add to add the configuration.
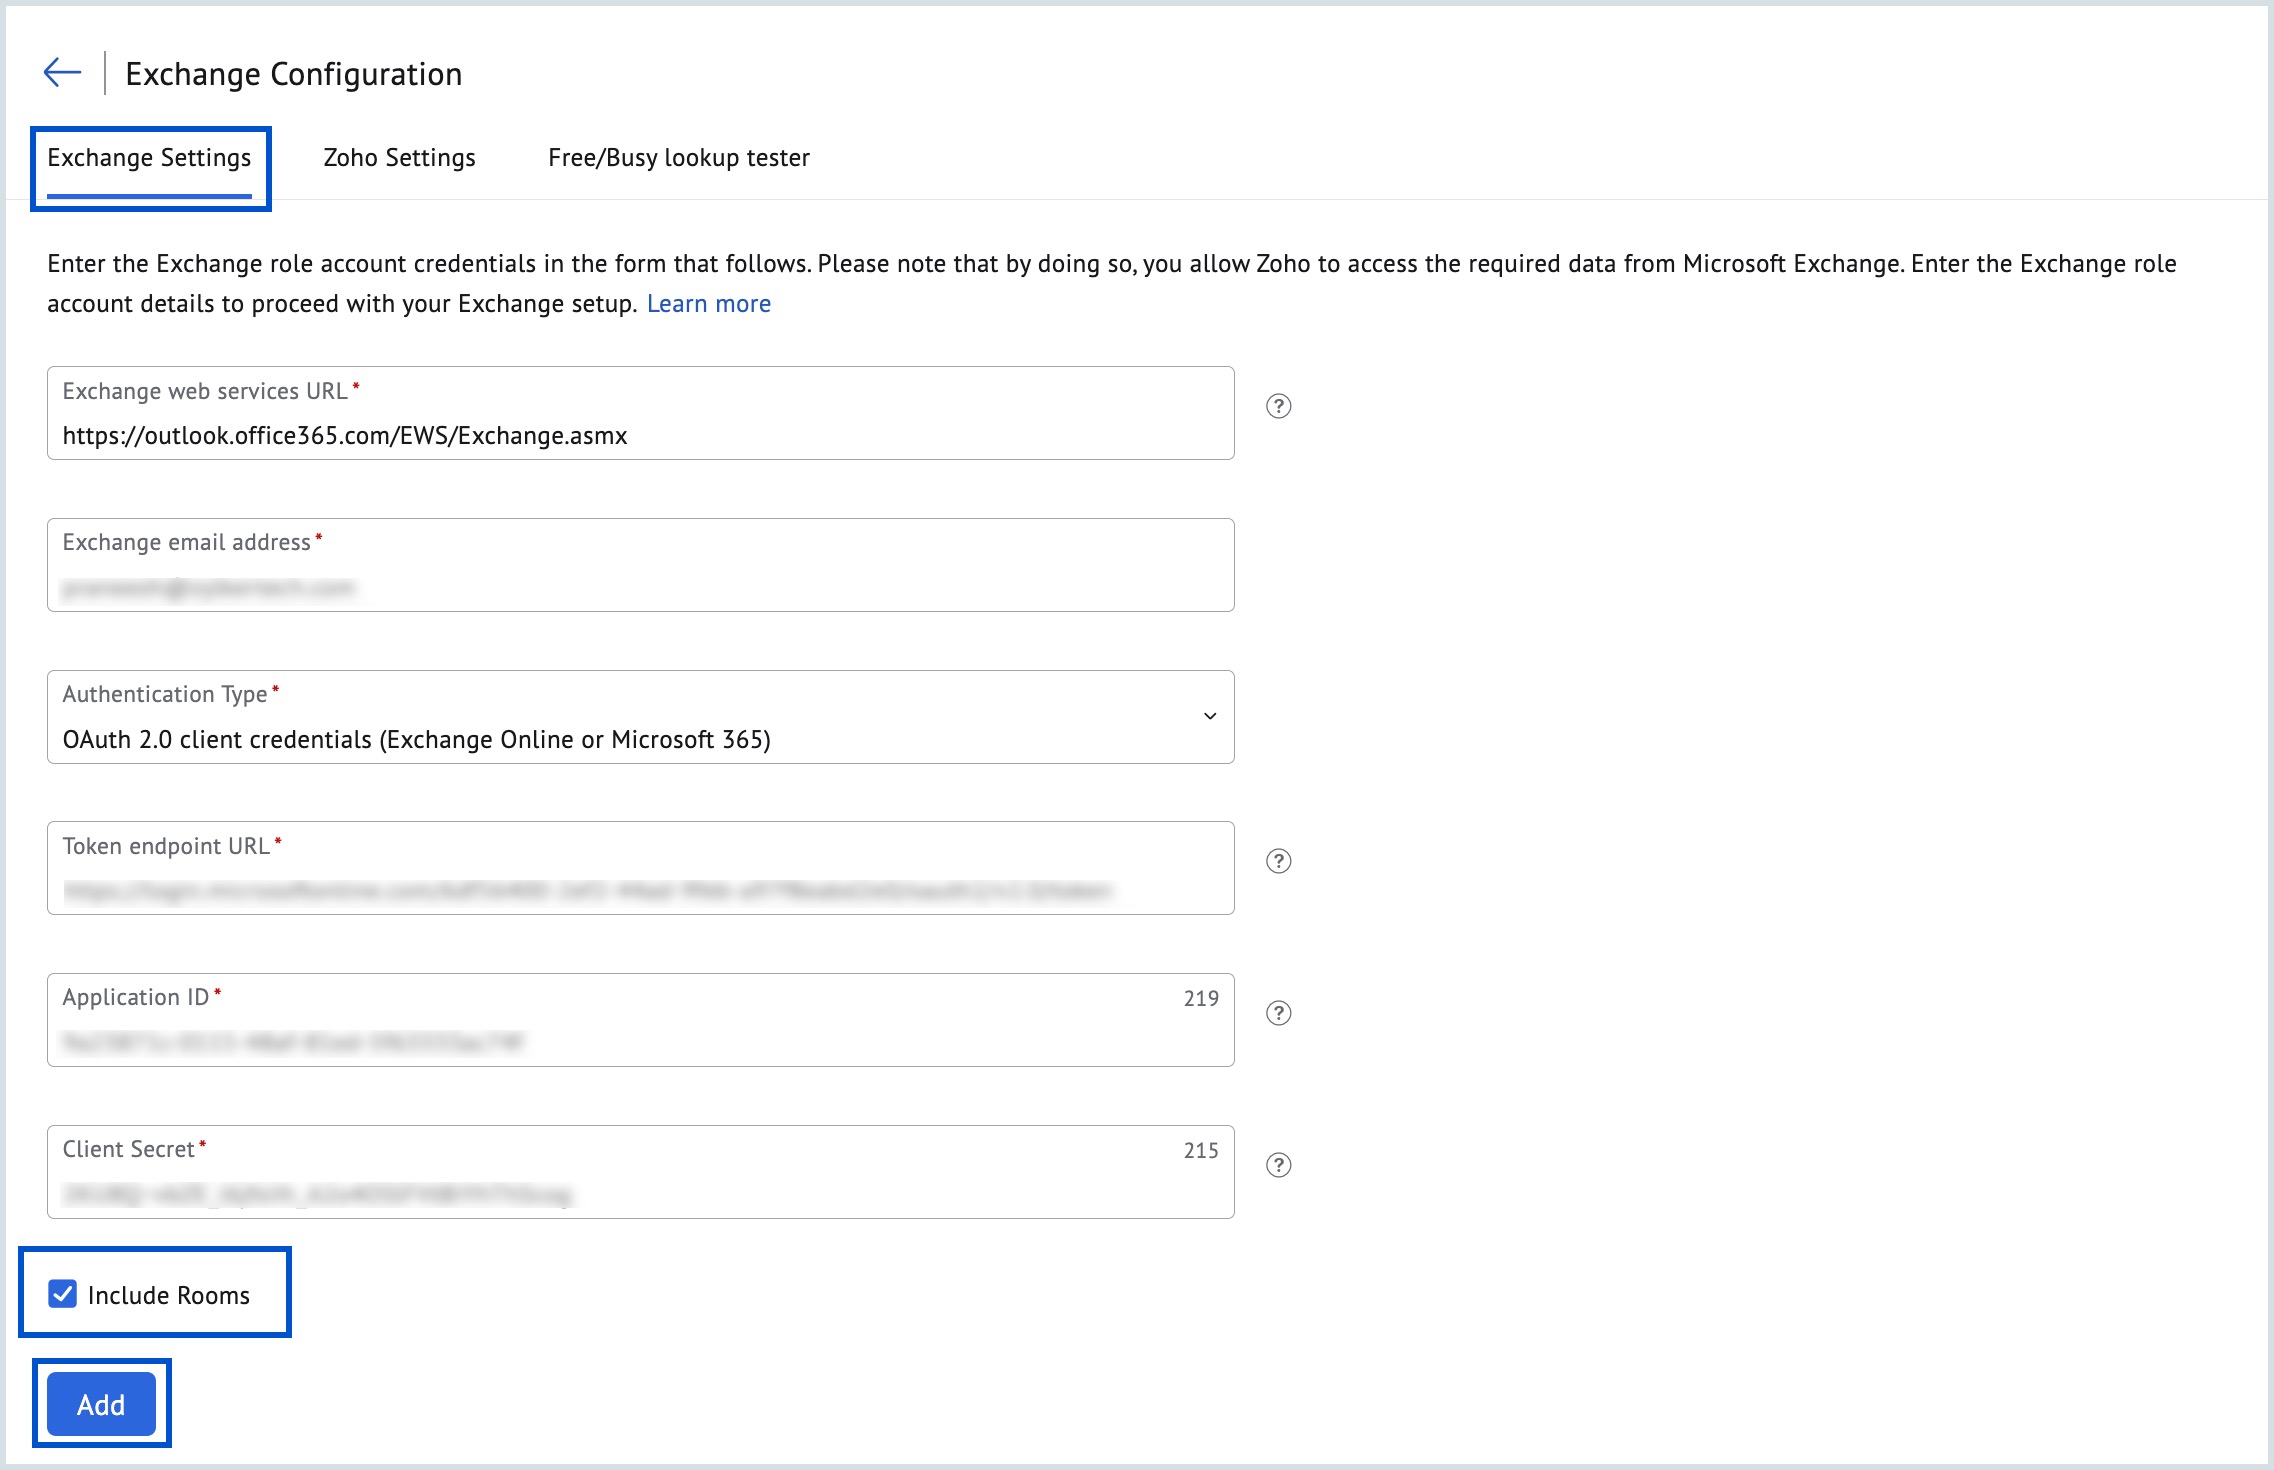
Once the configuration is saved, a powershell code snippet is displayed at the bottom of the Exchange Settings page. Run this powershell command in the Exchange Management Shell to provide organization-wide Free/Busy access to the configured role account.
How to find your EWS URL?
The EWS URL is the same as the URL for the Exchange server where you created the role accounts.
Sample EWS URL:
- https://Exchange server hostname/EWS/Exchange.asmx (for EWS on-premise server)
- https://outlook.office365.com/EWS/Exchange.asmx (standard for Exchange Online/ Microsoft 365)
Open Exchange PowerShell and provide the following command to verify the URL for an on-premises Exchange server:
Get-WebServicesVirtualDirectory | Select name, *url* | fl
If multiple URLs are returned as result, use the result returned for ExternalUrl.
When you have multiple Exchange servers for the same domain in case of a hybrid Exchange environment and you want to view the free/ busy details of Exchange users in your entire environment, use the URL from a server that can access free/ busy details for all Exchange users.