

Customize Hosted Payment Page Templates

After creating a new template, you control exactly how your checkout page looks and behaves.
To access template configuration:
- Log in to your Zoho Billing organization.
- Go to Settings.
- Select Hosted Payment Pages.
- Open the template you want to edit.
- Configure the tabs in the left panel (General Preferences, Order Details, Payment Information, Messages & Notes, Thank You Page) and Save.
Patricia is the Subscription Manager at Zylker Technologies LLC. Her company offers annual software subscriptions through a Hosted Payment Page. She wants to create a branded, secure, and seamless checkout experience for her customers. Using Zoho Billing’s Hosted Payment Page, she customizes the page design, configures customer and payment information fields, sets up user verification and legal agreements, personalizes checkout messages, and even displays a customized Thank You page after a successful subscription in just minutes.
General Preferences
The General Preferences tab controls the visual appearance and behaviour of your checkout page. Use this section to customize branding, layout, buttons, background, and customer verification settings.
Page Properties
In this section, you can customize the overall look of your Hosted Payment Page.
| Field | Description |
|---|---|
| Favicon | A small icon displayed on the browser tab that enhances brand recognition. Click Upload and select a file from your device. Maximum file size is 1 MB. |
| Browser Tab Name | The name displayed on the browser tab when a customer is on your Hosted Payment Page. |
| Width | The width of the page in pixels. Note: This option is available only in the Multi-Page template. |
| Font | The font used across the page. Select from the dropdown. |
| Section Headers | The size (in pixels) and color of section header text. Select a color using the color picker or enter a hex code. |
| Input Field | The size (in pixels) and placeholder color of input fields. Select a color using the color picker or enter a hex code. Note: This option is available only in the Multi-Page template. |
| Field Radius | The border radius of input fields in pixels. Higher values create a more rounded appearance. Note: This option is available only in the Multi-Page template. |
| Order Summary Header | The background color and font color of the Order Summary section. Note: This option is available only in the Multi-Page template. |
Header & Footer
In this section, you can customize the header and footer sections of your Hosted Payment Page.
If you embed the Hosted Payment Page in an iFrame on your website, the header and footer sections are hidden. See Embed as an iFrame.
| Field | Description |
|---|---|
| Display Title Band | Enable this option to show a title band in the header. Use it to display your company name, logo, and description. Note: Available only in the Multi-Page template. |
| Title | The title displayed in the header title band. Use the %CompanyName% placeholder to display your organization’s name automatically. Set the font size and color. Note: Available only when Display Title Band is enabled in the Multi-Page template. |
| Organization Logo | Check this option to display your organization’s logo in the title band. Note: Available only when Display Title Band is enabled in the Multi-Page template. |
| Description | Optional description text in the title band. Enter the text, then set the font size and color. Note: Available only when Display Title Band is enabled in the Multi-Page template. |
| Background Color | The background color of the title band. Enter a hex code or use the color picker. Note: Available only when Display Title Band is enabled in the Multi-Page template. |
| Customize Header Content | Custom HTML or text to display in the page header. You can use the text editor and insert placeholders. HTML is supported, allowing you to embed images. |
| Customize Footer Content | Custom HTML or text to display in the page footer. Use the text editor and insert placeholders as needed. |
| Header & Footer Background Color | The background color for the header and footer content areas. |
| Display Contact Information | Enable this to display your email address, phone number, and website (from your Organization Profile) in the footer. Set the font size and color. Note: Available only in the Single Page template. |
| Enable Social Sharing | Allow customers to share your Hosted Payment Page on social media. Enter a label to display in the footer and a pre-filled message for customers to share. |
Button Properties
In this section, you can customize the appearance of action buttons on your Hosted Payment Page.
| Field | Description |
|---|---|
| Background Color | The button’s background color. Use the color picker or enter a hex code. |
| Background Color on Hover | The button’s background color when a customer hovers over it. |
| Label Color | The color of the button text. |
| Border Radius | The border radius of the button in pixels. Higher values create a rounded button. Note: This option is available only in the Multi-Page template. |
| Label Size | The font size of the button text in pixels.Note: This option is available only in the Multi-Page template. |
Background
In this section, you can customize the background of your Hosted Payment Page.
| Field | Description |
|---|---|
| Color | The background color of the page. Use the color picker or enter a hex code. |
| Image | Upload a custom background image. Maximum file size is 1 MB. |
| Image Position | The position of the background image on the page. Select from the dropdown. |
| Image Repetition | Whether the background image repeats. Select from the dropdown. Repetition is based on the Image Position setting. |
| Scroll Behaviour | Whether the background image stays fixed or scrolls with the page content. |
User Verification
In this section, you can configure how customers are authenticated before they proceed with checkout. This helps provides an ectra layer of security for your customers. User Verification is now available in both Multi-Page and Single Page templates.
| Field | Description |
|---|---|
| Select Verification Mode | Choose how customers are verified before checkout: Proceed Without Verification: Customers can proceed directly without any identity check. A new customer record is created in Zoho Billing using the details entered. Verify with Email: Customers receive a one-time code to their email address before proceeding. If an existing email is entered, no duplicate customer is created. Sign In to Existing Account or Sign Up: Customers must sign in to their existing portal account or create a new one. Signing up creates a new customer with Customer Portal access. |
| Allow customers to update their information | Enable this option to let verified customers update their contact information and add new addresses directly from the Hosted Payment Page. Note: Not available when Select Verification Mode is set to Proceed Without Verification. |
| Allow guest users | Enable this option to let customers skip sign-in or sign-up and proceed as a guest. A customer record is still created based on the checkout details, but no portal access is granted. Note: Available only when Select Verification Mode is set to Sign In to Existing Account or Sign Up. |
For the India edition, mobile OTP verification is available for Hosted Payment Pages and Customer Portal logins. Customers can verify their identity using an OTP sent to their registered mobile number when Verification Mode is set to Verify with Email, Sign In to Existing Account, or Sign Up. This feature is currently in early access. Reach out to us at support@zohobilling.com to enable it for your organization.
When Sign In to Existing Account or Sign Up is selected, the checkout behaviour differs by customer type:
- New customers: Sign up, which creates a customer record and grants Customer Portal access.
- Existing customers: Sign in with existing portal credentials and continue checkout.
- Guest users (when enabled): Skip sign-in and proceed to checkout. A customer record is created but portal access is not granted.
Visitor Behaviour Tracking
You can connect Google Analytics or Meta Pixel to track visitor behaviour on a specific template. This is configured per template from the General Preferences tab.
For full instructions on setting up tracking and viewing the data, see Tracking Visitors.
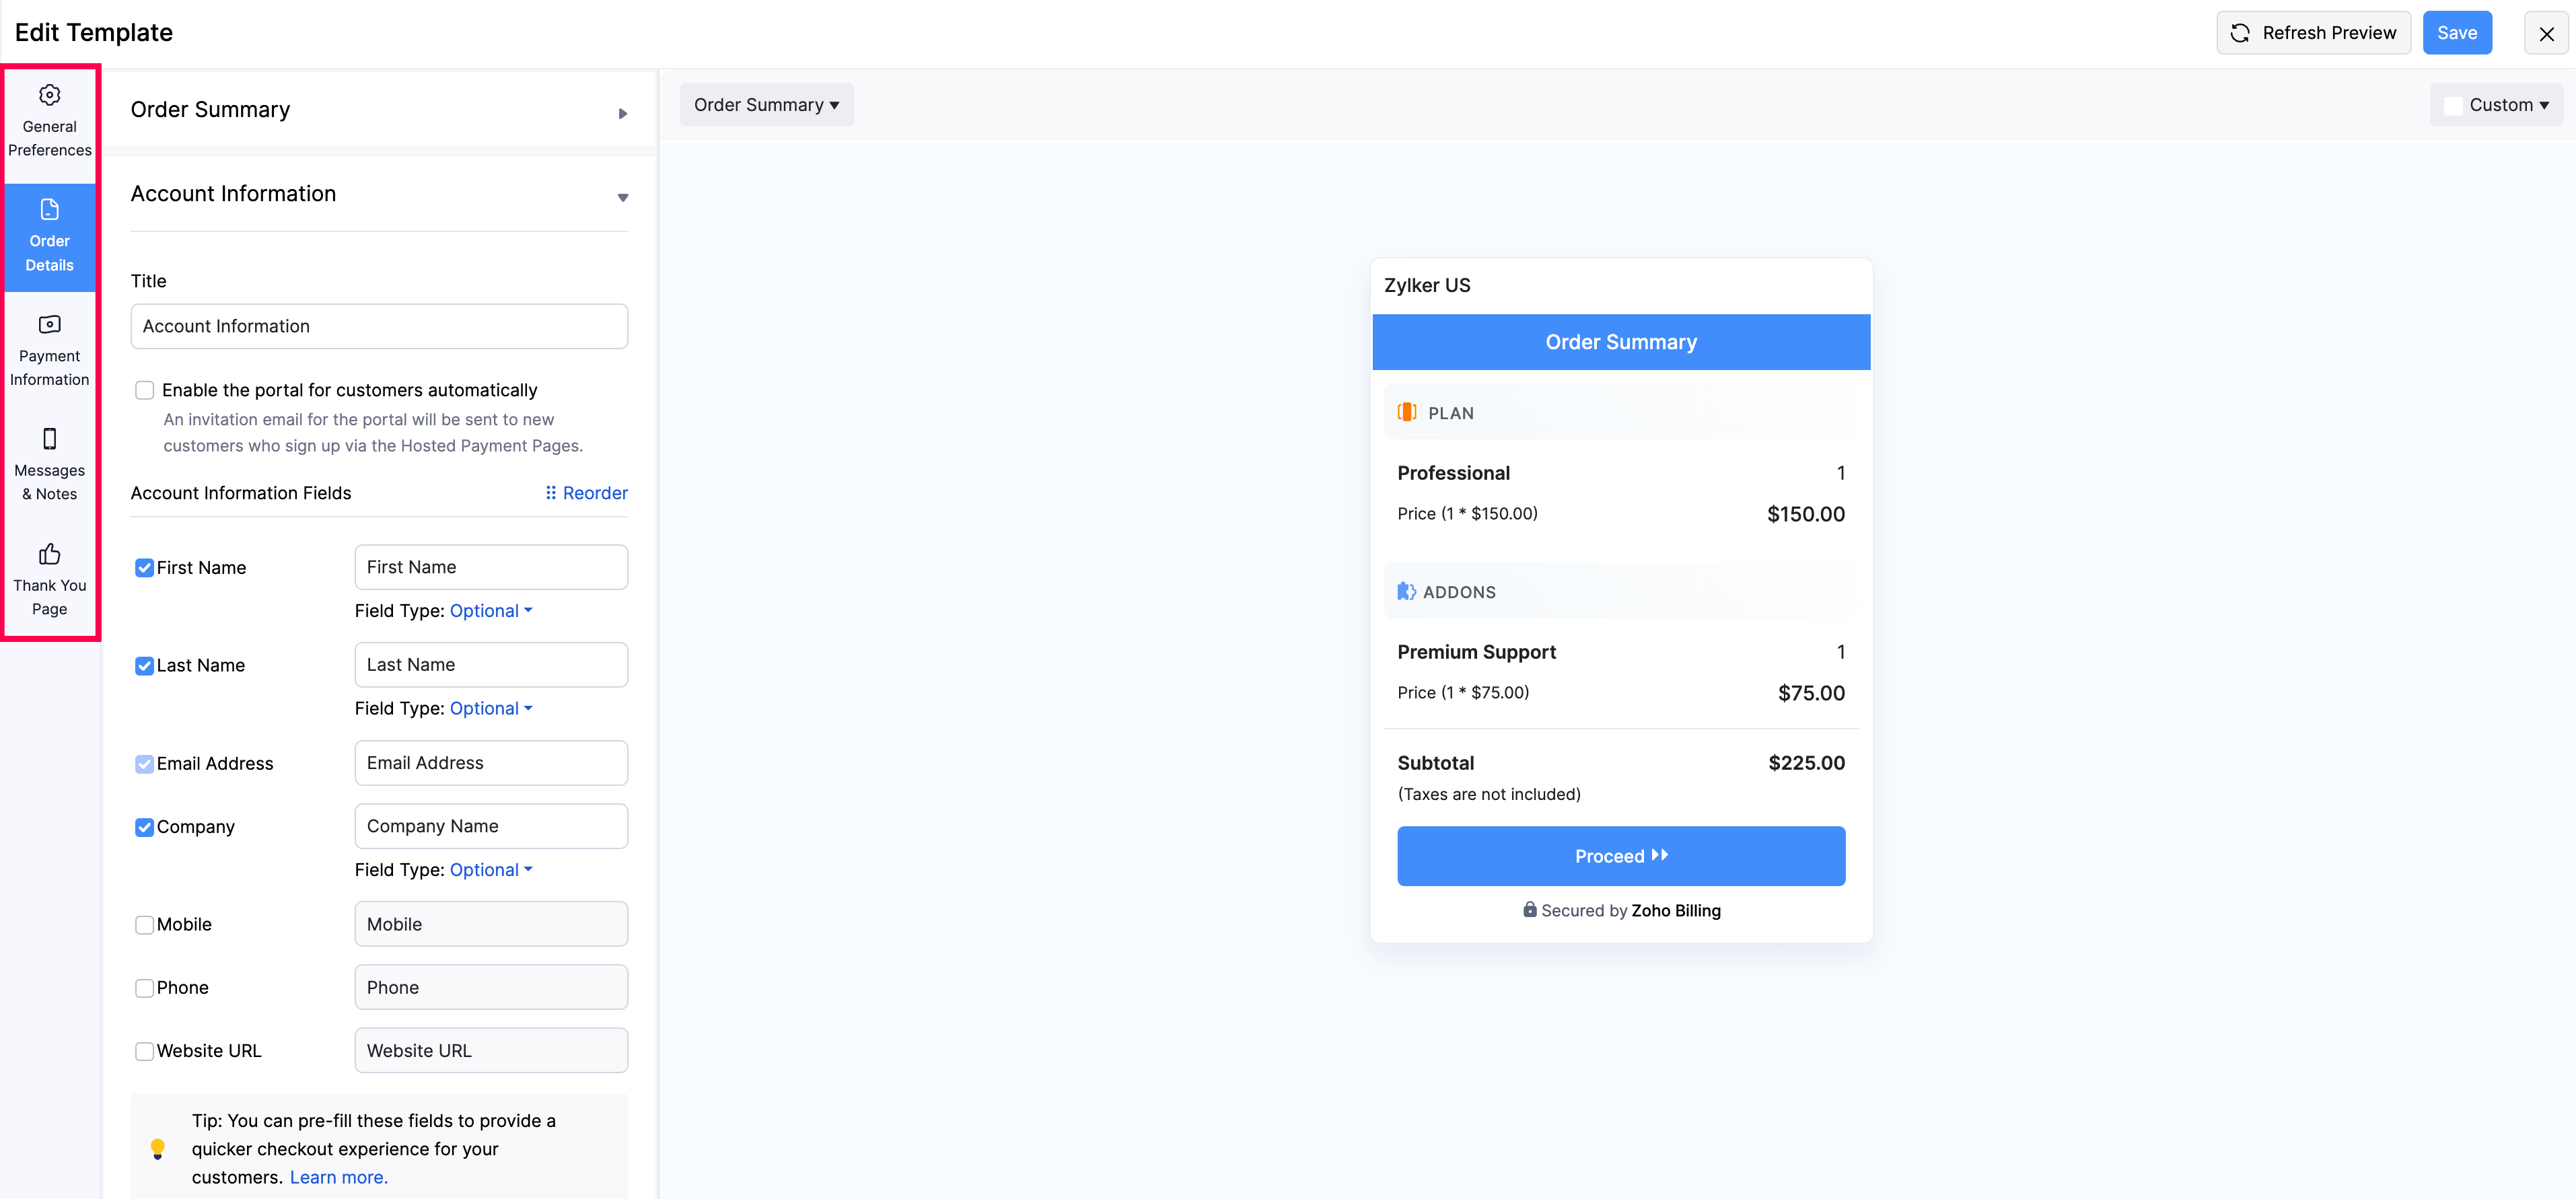
Order Details
The Order Details tab controls what your customers see and fill in during the order and account information steps of checkout. Use this section to configure order summary display, customer fields, address collection, and custom fields.
You can reorder the fields withhin Account Information, Billing Address, and Shipping Address sections by dragging them in the live preview panel.
Order Summary
In this section, you can configure what information is shown in the order summary table and how customers can interact with it.
| Field | Description |
|---|---|
| Show Order Summary | Enable this option to display the order summary section to your customers. |
| Title | The label displayed as the Order Summary section header. |
| Plan | The label for the plan section header. Note: Plans and Addons are shown as separate sections only in the Multi-Page template. In the Single Page template, they are combined under the Item section header. |
| Addon | The label for the addon section header. |
| Quantity | The label for the quantity column. Allow customers to edit quantities: Enable this option to let customers change the quantity of each item or addon. |
| Price Label | The label for the price column. |
| Setup Fee Label | The label for the setup fee line item. |
| Credits Applied Label | The label for the credits applied line item. |
| Subtotal Label | The label for the subtotal line item. |
| Enable Coupons | Enable this option to allow customers to apply coupons during checkout. You can also customize the placeholder text displayed in the coupon input field. |
| Hide Zero-Value Line Items | Check this option if you want to hide the plans and addons that have their price as 0. This configuration will not apply if all the line-items are zero-value. |
| Make Setup Fee Taxable | Enable this option to include the setup fee in tax calculations. Note: Available only in specific editions, based on the taxation policies of the region. |
| Show Billing Frequency | Enable this option to display the billing frequency of the subscription in the order summary. |
| Show Billing Cycle | Enable this option to display the number of billing cycles for the subscription. |
| Show Plan and Addon Descriptions | Enable this option to display the description of plans and addons in the order summary table. |
| Button Label | The label on the button at the bottom of the Order Summary page. Note: Available only in the Multi-Page template. |
For organizations created after 24 July 2026, the Enable Coupons and Total Label fields are available in the Final Summary section. For existing organizations, this update is currently in early access. Contact support@zohobilling.com to enable it for your organization.
To let customers remove addons during checkout, associate the addon with the plan using the Recommended association type. Recommended addons are shown as optional suggestions on the Hosted Payment Page, so customers can add or remove them before completing the purchase.
Tax Registration Information
If taxes are enabled for your organization, additional tax registration fields may be displayed in the hosted payment page based on your edition and region to comply with local tax regulations. These fields are shown in the Order Summary section for Single Page checkout and the Final Summary section for Multi-Page checkout.
GSTIN (India Edition)
For India edition, enabling the GSTIN option displays the GST Identification Number field. Customers can enter their GSTIN during checkout, and you can customize the field label.
VAT Registration Number
For UK edition, if trade outside the EU is enabled for your organization, the VAT Registration Number field is displayed in the Order Summary section. VAT is applied to all items based on the customer’s billing country.
| Billing Country | VAT Behaviour |
|---|---|
| UK | VAT is applied to all items. |
| Non-EU country | No VAT is applied. |
| EU country, VAT registered | Zero VAT (0%) is applied. |
| EU country, Not VAT registered | VAT is applied to all items. |
| EU country, Not VAT registered (digital services) | No VAT is applied. |
Account Information
In this section, you can configure the fields that customers fill in when providing their account details during checkout.
To reorder Account Information fields:
- Click the Reorder button next to Account Information Fields.
- Drag the fields to the desired order.
- Click Save.
| Field | Description |
|---|---|
| Title | The label displayed as the Account Information section header. |
| Enable the portal for customers automatically | When enabled, new customers who sign up via the Hosted Payment Page are automatically sent a Customer Portal invitation email. |
| Account Information Fields | Enable, disable, rename, or set the field type for each standard account field: First Name, Last Name, Email Address (mandatory), Company, Mobile, Phone, and Website URL. |
| Customer Custom Fields | Add customer custom fields to collect additional information during checkout. See Field Types for configuration options. |
| Communication Channels | Select SMS or WhatsApp as the channels through which subscription and payment notifications will be sent to customers who sign up through this page. Note: These options are visible only if you have integrated SMS and WhatsApp with your organization. |
| Button Label | The label on the button at the bottom of the Account Information page. Note: Available only in the Multi-Page template. |
Address Information
In this section, you can configure the billing and shipping address fields that customers fill in during checkout. Go to the Billing Address or Shipping Address tab to configure each separately.
You can reorder address fields within each section by clicking the Reorder icon next to Address Fields, dragging the fields, and clicking Save. Click Reset to restore the original order.
| Field | Description |
|---|---|
| Title | The label for the Address Information section header. |
| Allow customers to choose between saved addresses | Enable this to let existing customers select from their saved addresses. |
| Enable Address Autocomplete | Customers can autocomplete address fields using the Address Typeahead extension. You must have this extension installed, and the API key must be restricted to your organization’s URL. |
| Show Billing / Shipping Address | Enable this option to display the billing or shipping address section respectively. |
| Address Fields | Enable, disable, rename, or set the field type for each address field: Country, State, City, Address, Address Line 2, and ZIP. |
| Copy Billing Address Label | (Shipping Address tab only) The label for the checkbox that copies the billing address to the shipping address fields. |
| Button Label | The label on the button at the bottom of the Address Information page. Clicking this button takes the customer to the Final Summary page. Note: Available only in the Multi-Page template. |
Final Summary
This section is available only in the Multi-Page template.
In this section, you can configure the information shown to customers before they enter their payment details. This is the last step before payment.
If you have selected Verify with Email as the verification mode, customers verify their email address from the Final Summary page. You can also disable the Final Summary section entirely if it is not needed for your checkout flow.
| Field | Description |
|---|---|
| Show Final Summary | Enable this option to display the Final Summary section to customers. If disabled, customers proceed directly from Address Information to Payment. |
| Next Renewal Date Label | The text displayed to inform customers about their next renewal date. Use the %NextInvoiceDate% placeholder to insert the date dynamically. If left empty, the next renewal date is not displayed. Note: Visible only when Show Final Summary is enabled. |
| Invoice Custom Fields | Add invoice custom fields to collect invoice-specific information from customers during checkout. See Field Types for configuration options. |
| Enable Coupons | Enable this option to allow customers to apply coupons during checkout. You can also customize the placeholder text displayed in the coupon input field. |
| Total Label | The label for the total line item. |
| Button Label | The label on the button at the bottom of the Final Summary page. Note: Visible only when Show Final Summary is enabled. |
For organizations created after 24 July 2026, the Enable Coupons and Total Label appear in this section for the Multi-Page template. For existing organizations, reach out to us at support@zohobilling.com.
Additional Information
This section is available only in the Single Page template and is currently in early access, reach out to us at support@zohobilling.com to enable it for your organization.
In this section, you can configure invoice-specific custom fields that appear on the Single Page checkout form.
| Field | Description |
|---|---|
| Invoice Custom Fields | Add invoice custom fields that customers fill in during checkout. See Field Types for configuration options. |
Field Types
The Field Type dropdown is available for Account Information fields, Address fields, and Invoice Custom Fields. It controls how each field behaves during checkout.
| Field Type | Description |
|---|---|
| Optional | The field is shown and customers can fill it in if they want. |
| Mandatory | The field is shown and customers must fill it in to proceed. |
| Hidden | The field is not shown on the page. However, data for this field can be passed as a URL parameter. See Embedding and Sharing for pre-fill options. |
| Read Only | The field is shown but cannot be edited. Used to display pre-filled data passed via URL parameters. |
Including customer and invoice custom fields in Hosted Payment Pages is enabled by default for organizations created after July 1, 2026. For existing organizations, this feature is in early access. Contact support@zohobilling.com to have it enabled.
Payment Information
The Payment Information tab controls how the payment step is presented to your customers. Use this section to configure payment fields, add security measures, and include legal terms and agreements.
Payment Details
In this section, you can customize how the payment information step is presented, configure button labels, and add security measures.
| Field | Description |
|---|---|
| Title | The label displayed as the payment information section header. |
| Skip this section for | Select the conditions under which the payment step is skipped: Trial plans: Customers signing up for a trial plan skip the payment step. Zero-value plans: Customers signing up for a plan with no charge skip the payment step. Customers with credits or coupons that nullify the total bill amount: Customers whose total is reduced to zero by credits or coupons skip the payment step. Note: This applies only to new subscriptions created through the Hosted Payment Page. |
| Cards / Bank Account | Customize the card or bank account input fields from the respective Cards and Bank Account tabs. |
| Label | The label on the main checkout button. |
| Enable CAPTCHA | Enable CAPTCHA to add a security layer that distinguishes humans from automated bots. This helps prevent spam and automated account creation on your checkout page. |
| Zero-Value Checkout Label | The label on the checkout button when the total is zero. |
| Trial Plan Checkout Label | The label on the checkout button when the customer is signing up for a trial plan. |
| Update Payment Information Label | The label on the checkout button when a customer is updating their payment method via the Hosted Payment Page. |
| Asynchronous Payment Gateway Label | The label on the checkout button when the customer is redirected to a third-party payment gateway to complete their payment. Use the %GatewayName% placeholder to display the selected gateway’s name. |
Payment Preferences
You can control the order in which payment modes appear on your Hosted Payment Page. The payment modes available in the respective gateways are displayed in the order you configure here.
To configure payment preferences:
- Log in to your Zoho Billing organization.
- Go to Settings.
- Select Payments Received under Sales.
- Click the Preferences tab.
- Drag and drop the payment modes to reorder them.
- Enter a custom label for each payment mode if needed.
- Click Save.
The following payment gateways enable specific payment modes on your Hosted Payment Page:
| Payment Mode | Payment Gateway Required |
|---|---|
| Express Checkout | Payflow Pro, Payments Pro |
| Bank Account | Forte, GoCardless, Authorize.Net |
| Credit Card | All payment gateways except 2Checkout and PayPal |
Legal Agreements
In this section, you can configure legal agreements and policies that customers must acknowledge before completing their payment. Go to the Cards or Bank Account tab to configure legal terms for each payment method separately.
| Field | Description |
|---|---|
| ACH Agreement | The legal text for ACH (Automated Clearing House) direct debit transactions. Use the %CompanyName% placeholder to insert your company name. Note: Available only in the Bank Account tab. |
| Terms & Conditions Label | The label for the Terms & Conditions link shown in the agreement statement above the checkout button. |
| Privacy Policy Label | The label for the Privacy Policy link shown in the agreement statement above the checkout button. |
| Terms & Conditions URL | The URL to your Terms & Conditions page. Customers are taken to this URL when they click the Terms & Conditions label. |
| Privacy Policy URL | The URL to your Privacy Policy page. Customers are taken to this URL when they click the Privacy Policy label. |
| Display Mandatory Legal Agreement Checkbox | Enable this option to require customers to check a checkbox confirming they have read and accepted your Terms & Conditions and Privacy Policy. Select Yes under Should be checked by default? to pre-check the checkbox when a customer arrives at the payment step. |
| License Agreement | The full licence agreement text shown above the checkout button. Use these placeholders to insert dynamic content:%ButtonText%: Inserts the checkout button label.%TermsURL%: Inserts the Terms & Conditions URL.%PrivacyURL%: Inserts the Privacy Policy URL. |
Messages & Notes
The Messages & Notes tab lets you customize the text displayed to customers during error states, successful signups, and payment updates. Use this section to provide clear, branded guidance at each step of the checkout process.
Error Messages
Enter the message displayed when a customer leaves a mandatory field empty or enters invalid data.
Use the %Label% placeholder in the error message to dynamically display the name of the field that caused the error. For example: “The %Label% field is required.”
Success Messages
Configure the messages displayed to customers after they successfully complete a checkout action.
| Field | Description |
|---|---|
| Success Checkout Message | The message displayed when a customer successfully subscribes to your product. |
| Trial Plan Note | The message displayed when a customer successfully signs up for a trial plan. Use this to inform customers about when their trial ends and what happens next. Use the %TrialEndDate% placeholder to insert the trial end date dynamically. |
| Future Subscription Start Date Information | The message displayed to customers when their subscription has a future start date. Use the %FutureDate% placeholder to insert the subscription’s billing start date dynamically. |
Update Payment Page
Configure the messages shown when a customer updates their payment method through the Hosted Payment Page.
| Field | Description |
|---|---|
| Warning Message | The message displayed to inform customers that the new payment method will replace their existing one. Use the %LastFourDigits% placeholder to include the last four digits of the customer’s current card or bank account. |
| Success Message | The message displayed when a customer successfully updates their payment method. |
Thank You Page
The Thank You Page tab controls the confirmation page customers see immediately after a successful checkout. Use this section to customize the message, image, and redirect behaviour to create a polished post-purchase experience.
Page Configuration
To customize the Thank You page for your template, configure the fields below in the Thank You Page tab.
| Field | Description |
|---|---|
| Browser Tab Name | The text displayed on the browser tab when a customer is on the Thank You page. |
| Image/GIF | Click Upload to upload an image or GIF displayed above the Thank You message. Maximum file size is 1 MB. If no image is uploaded, the default tick animation is used. |
| Title | The headline of the Thank You message shown to customers after a successful checkout. |
| Title Font Size | The font size of the Thank You message title, in pixels. |
| Description | The body text below the title. Click + Insert Placeholders to add dynamic content such as the customer’s name or subscription details. |
| Description Font Size | The font size of the description text, in pixels. |
| Footnote | Additional content displayed at the bottom of the Thank You page. You can use the text editor and insert placeholders. |
Redirect URL
Instead of showing the default Thank You page, you can redirect customers to any page of your choice after a successful checkout, for example, your homepage or a custom confirmation page.
Redirect URLs can be configured at two levels:
- Organization level: Go to Settings, select Products under Preferences, and enter the URL in the Redirection URL field. This URL applies to all products that do not have a product-specific redirect URL.
- Product level: Enter the URL in the Redirection URL field when creating or editing a product. Click + Insert Placeholders to append subscription-related details to the URL. The product-level URL overrides the organization-level URL.
The Redirect URL configured at the product level applies to the product, not individual plans. If no Redirect URL is configured at either level, customers see the default Thank You page.
When a customer is redirected, Zoho Billing appends the hosted page ID to the URL. You can use this to identify which transaction brought the customer to your page.
Add Invoices and Customer Custom Fields
This feature is enabled by default for organizations created after July 1, 2026. For existing organizations, this feature is currently in early access. Reach out to our support at support@zohobilling.com to enable it for your organization.
You can now include customer and invoice custom fields in your Hosted Payment Pages. This allows you to capture additional details such as customer preferences, internal reference values, or invoice-specific information from your customers based on your business requirements.
You can do this from the relevant Order Details sections in your Hosted Payment Page template:
- To add customer custom fields, go to Account Information.
- To add invoice custom fields in the Multi-Page template, go to Final Summary.
- To add invoice custom fields in the Single Page template, go to Additional Information.
Once custom fields are added to your template, you can also prefill their values using URL parameters if required. Learn more about Prefill Customer Custom Fields Using API Field Names.
 Yes
Yes