
Organization Profile
The organization profile lets you manage the core details of your business like the organization name, address, industry, business type, and other such details. When you created the organization, you would have entered some of these details, and they will be auto-populated here. These details automatically appear on your transaction PDFs and email notifications. In this document, you’ll learn how to edit and update them.
Prerequisite: To make any changes to the Organization Profile, you must be the Admin of the organization or your custom role must have access to Update Organization Profile under Settings.
To set up your organization profile:
- Log in to your Zoho Books account.
- Navigate to Settings in the top-right corner and click Profile under Organization.
- In the Organization Profile page, fill out the necessary details. The fields that are marked with an asterisk (*) are mandatory.
- The fields are grouped into the following sections:
- Click Save to update your preferences.
Insight: If this organization is set up in other Zoho Finance applications (Billing, Checkout, Commerce, Expense, Inventory, Invoice, Payroll, Practice, Vikra, and Zakya) altering any information on the Organization Profile page will automatically reflect in those apps as well. For example, if you have the same organization in Zoho Books and Zoho Inventory, updating the organization address in Zoho Books will update the same in Zoho Inventory as well. This ensures consistency across all applications.
Basic Details
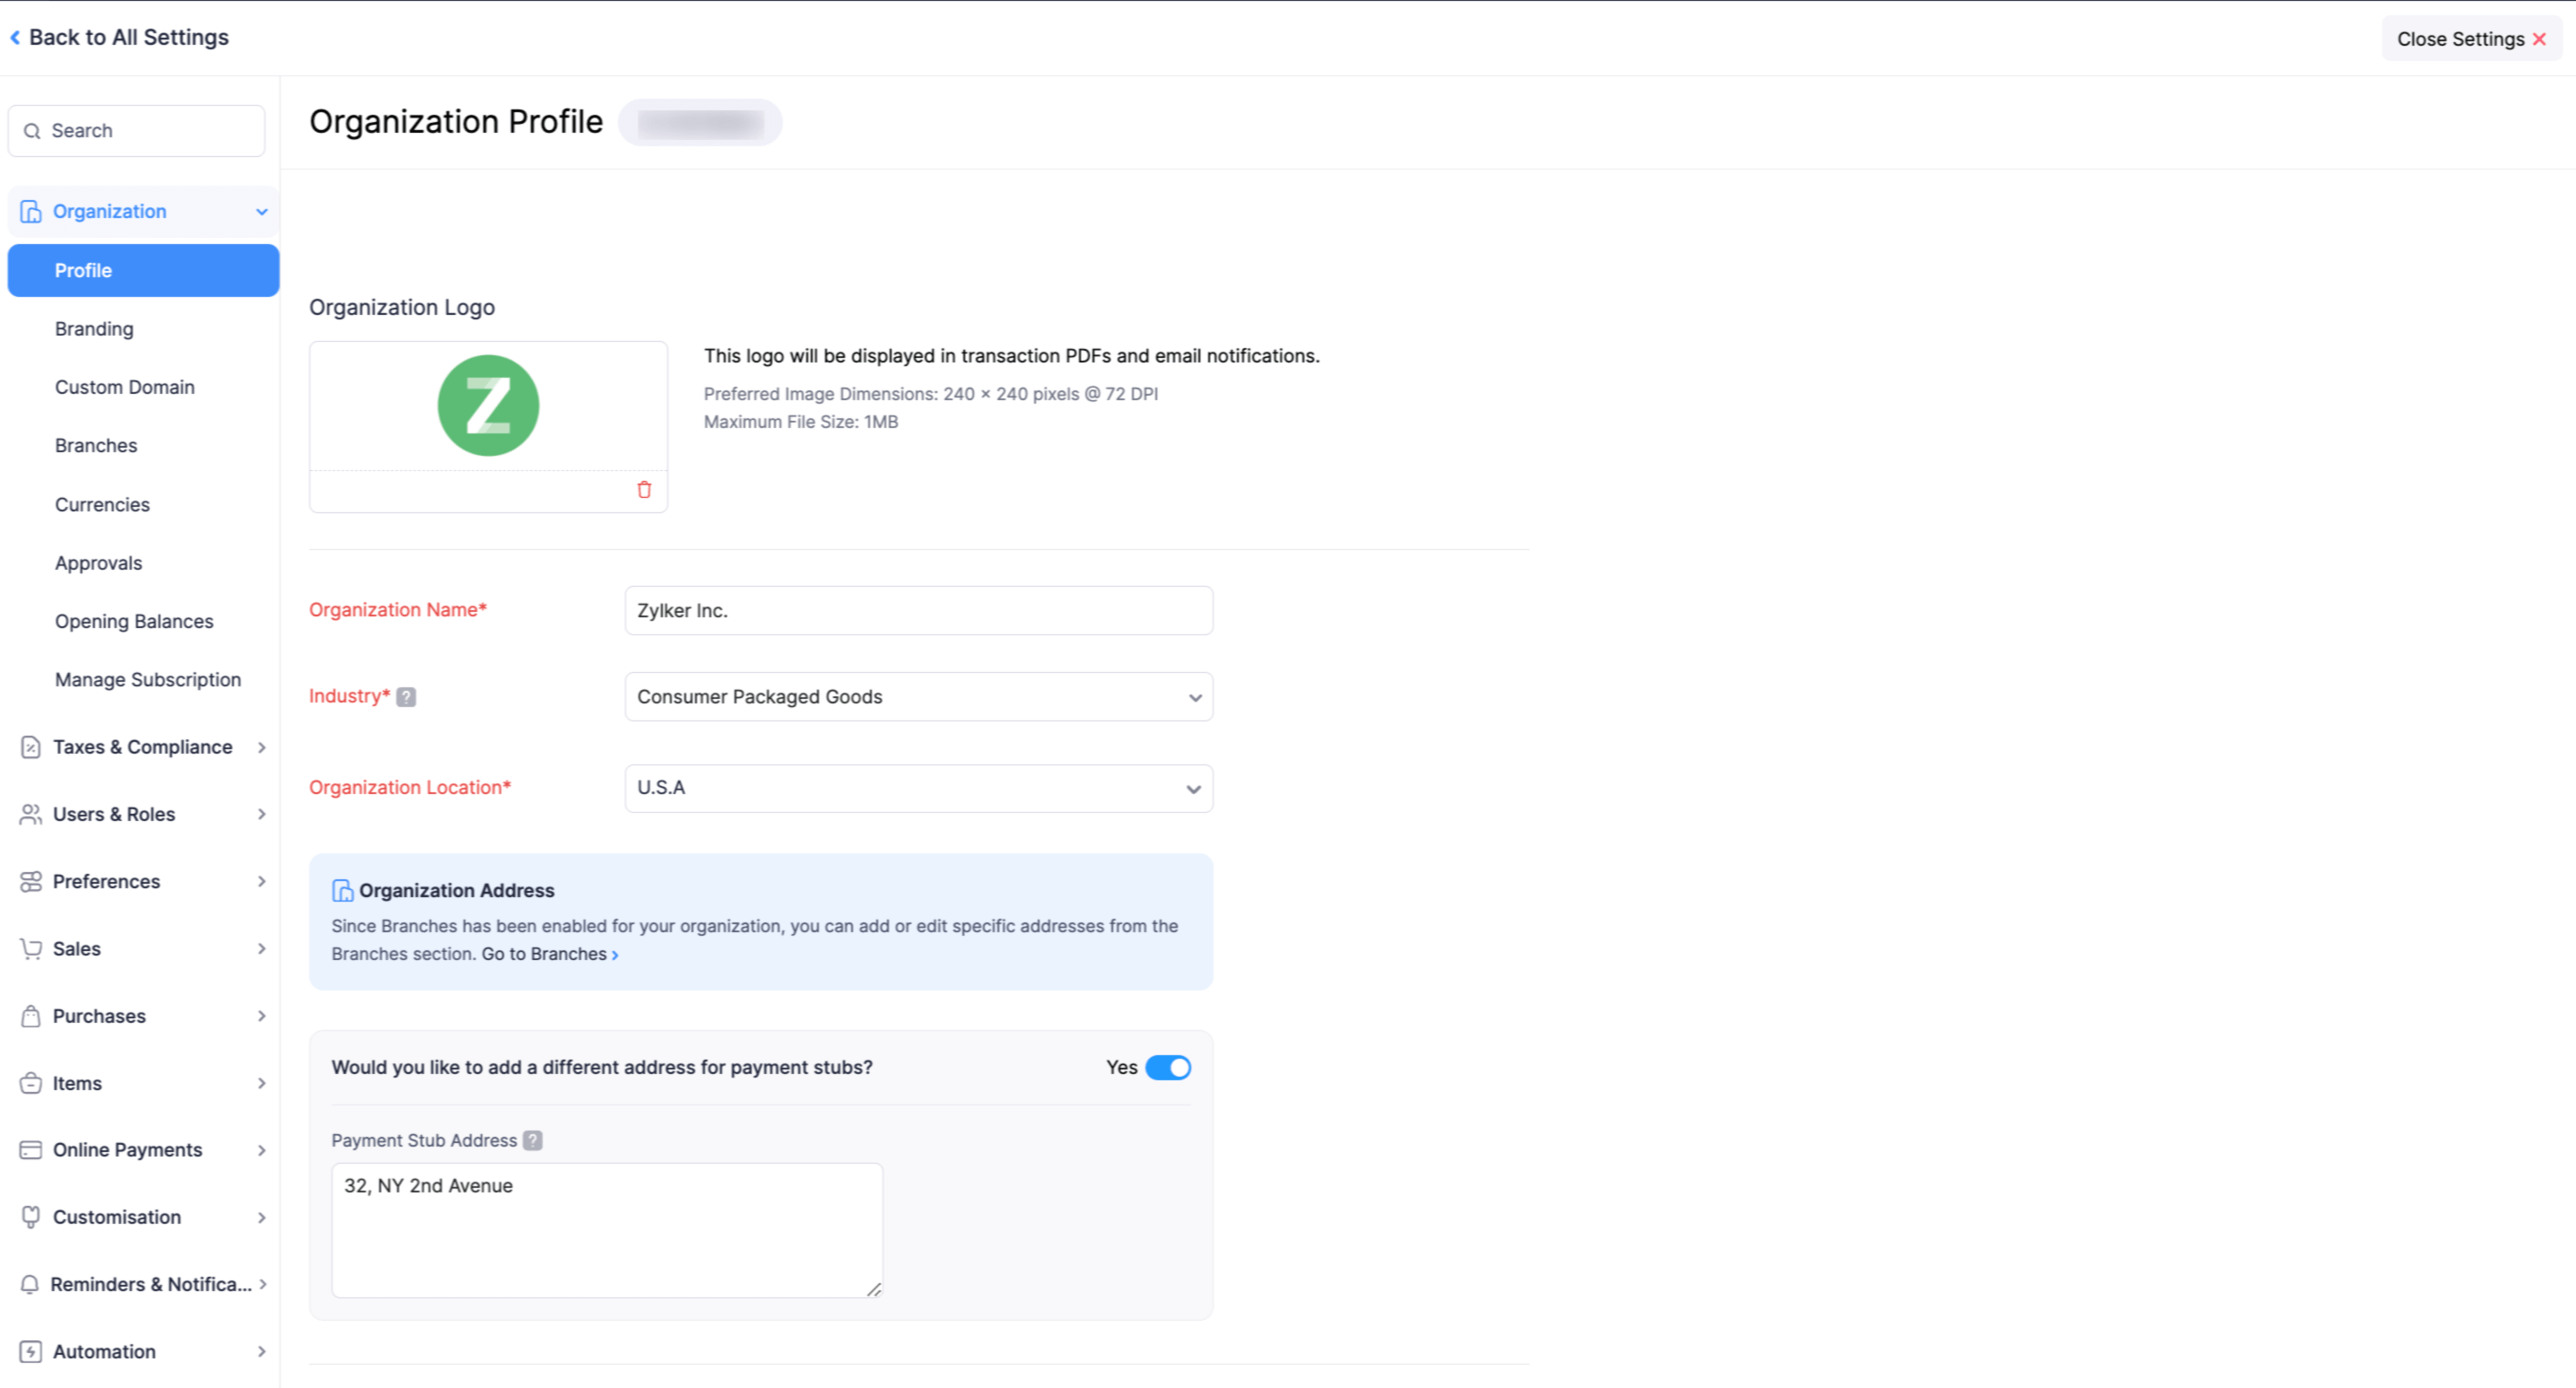
The Basic Details section allows you to define your company’s primary information, including its name, logo, industry, and location.
Edit Organization Name
You can edit the organization name that was entered during the initial setup of your organization.
- Navigate to Settings in the top-right corner and click Profile under Organization.
- Enter the full legal name of your organization in the Organization Name field. The name can contain up to 100 characters.
Upload Organization Logo
You can upload your organization’s logo in Zoho Books to display it in your transaction PDFs and email notifications. This will strengthen your brand identity and improve visibility.
Pro-tip: If you have enabled Locations for your organization, you can upload individual logos for each Business Location. To do this, navigate to Settings > Organization > Locations. Select the business location for which you want to change the logo. On the following page, choose Upload a New Logo from the Logo dropdown. Click the Upload your Location Logo button, select your image file, and click Open.
The Head Office or Primary Location will continue to retain the same logo as your organization logo.
Note:
- Preferred image dimensions for the logo: 240px * 240px at 72 DPI
- Maximum file size: 1 MB
- Supported formats: JPG, JPEG, PNG, BMP, GIF
To upload your organization logo:
- Navigate to Settings in the top-right corner and click Profile under Organization.
- Click the Upload Your Organization Logo button on the Organization Profile page.
- In the popup that follows, select your image file and click Open.
The uploaded logo will automatically appear on your transaction PDFs and all email notifications sent from Zoho Books. This logo will also reflect in the Branding section under Organization.
To delete your organization logo:
- Navigate to Settings in the top-right corner and click Profile under Organization.
- Click the Delete icon located below your logo.
- In the popup that follows, click Delete to confirm.
Once deleted, the logo will be removed from all transactions and email notifications in Zoho Books. However, it will still appear on any PDFs that were previously downloaded or sent.
Industry
- Navigate to Settings in the top-right corner and click Profile under Organization.
- Select or enter the industry sector in which your business operates in the Industry field. For example: Automotive, Construction, Financial Services, and the like.
Business Type
- Navigate to Settings in the top-right corner and click Profile under Organization.
- In the Organization Profile page, locate the Business Type field.
- Click the dropdown,and select the option that best reflects your organization’s legal and structural setup as registered with your government. For example: Sole Proprietorship, Partnership, LLC, or Corporation.
Change Organization Location
The organization location is auto-populated based on the country selected during the initial setup process. Once set, the organization’s location cannot be changed. To use a different country, you’ll need to create a new organization with the desired location.
Address Details
You can edit and manage your organization’s address details, including the primary address and an additional address for payment stubs.
Edit Organization Address
The organization address is pre-filled based on the details provided during the initial setup process. To edit the organization address:
Go to Settings in the top-right corner of the page.
Select Profile under Organization.
Click the Edit icon next to Organization Address.
Enter the new address in the Edit Organization Address pop-up and click Proceed.
Set your preference for how the updated address should apply in the organization:
- Update New Transactions: Applies the new organization address only to transactions created from this point onward.
- Update All Transactions: Applies the new organization address to both existing and future transactions.
Once you’ve selected, click Save Preference.
Note: If you have enabled Locations for your organization, you can add or edit specific addresses from the Locations section under Organization in Settings.
Add a Different Address for Payment Stubs
Enable this option to add a remittance address that appears only in the payment stub section of invoices, separate from your primary business address. This is useful for businesses that have a different address for receiving payments. The address can contain up to 255 characters.
Pro-tip: To view the remittance address on your invoice PDF, enable them by navigating to Settings > Customization > PDF Templates > Invoice. On the Edit Template page, go to General and check the box next to the Include Payment Stub option.
Contact Details
You can manage your organization’s contact details, including the primary contact person and the website URL.
Change Your Primary Contact
The Primary Contact displayed in the Organization Profile is the email address that you had provided while signing up for Zoho Books. It serves two key purposes:
- Communication from Zoho: You’ll receive important updates related to your Zoho Books subscription, usage alerts, and account-related notifications at this address.
- Default Sender Email: This address is also used as the default “From” field when sending invoices, estimates, and other communications from Zoho Books, unless you manually change them.
If you want to use another email address as the primary contact in Zoho Books, you can change it. Here’s how:
- Navigate to Settings in the top-right corner and click Profile under Organization.
- Scroll down to the Primary Contact section.
- Click the Gear icon next to the Email field and you’ll be redirected to the Sender Email Preferences page. Here, you can add a new sender email address, verify it, and mark it as the primary contact in Zoho Books. Once marked, all of your transaction-related communications will be sent from this email by default.
Warning:
Using an email with an unauthenticated domain as your primary contact in Zoho Books may cause your emails to be flagged as spam. In such cases, emails will be sent on your behalf via: message-service@sender.zohobooks.com. To send emails from your primary contact’s address, click Authenticate Now to verify your domain.
Likewise, if the email address belongs to a public domain (For example, Gmail, Yahoo), it will also be replaced with message-service@sender.zohobooks.com. To continue using public domains:
- Click Change Settings in the banner displayed.
- In the following popup, select either the Zoho Books Email Address or the Sender’s Email Address as the preferred sender.
- Click Save to update your sender preferences.
Website URL
- Navigate to Settings in the top-right corner and click Profile under Organization.
- Enter your company’s website in the Website URL field. This information is useful for customers who want to learn more about your business.
Regional Settings
You can configure your organization’s regional preferences such as base currency, fiscal year, report basis, time zone, and date format.
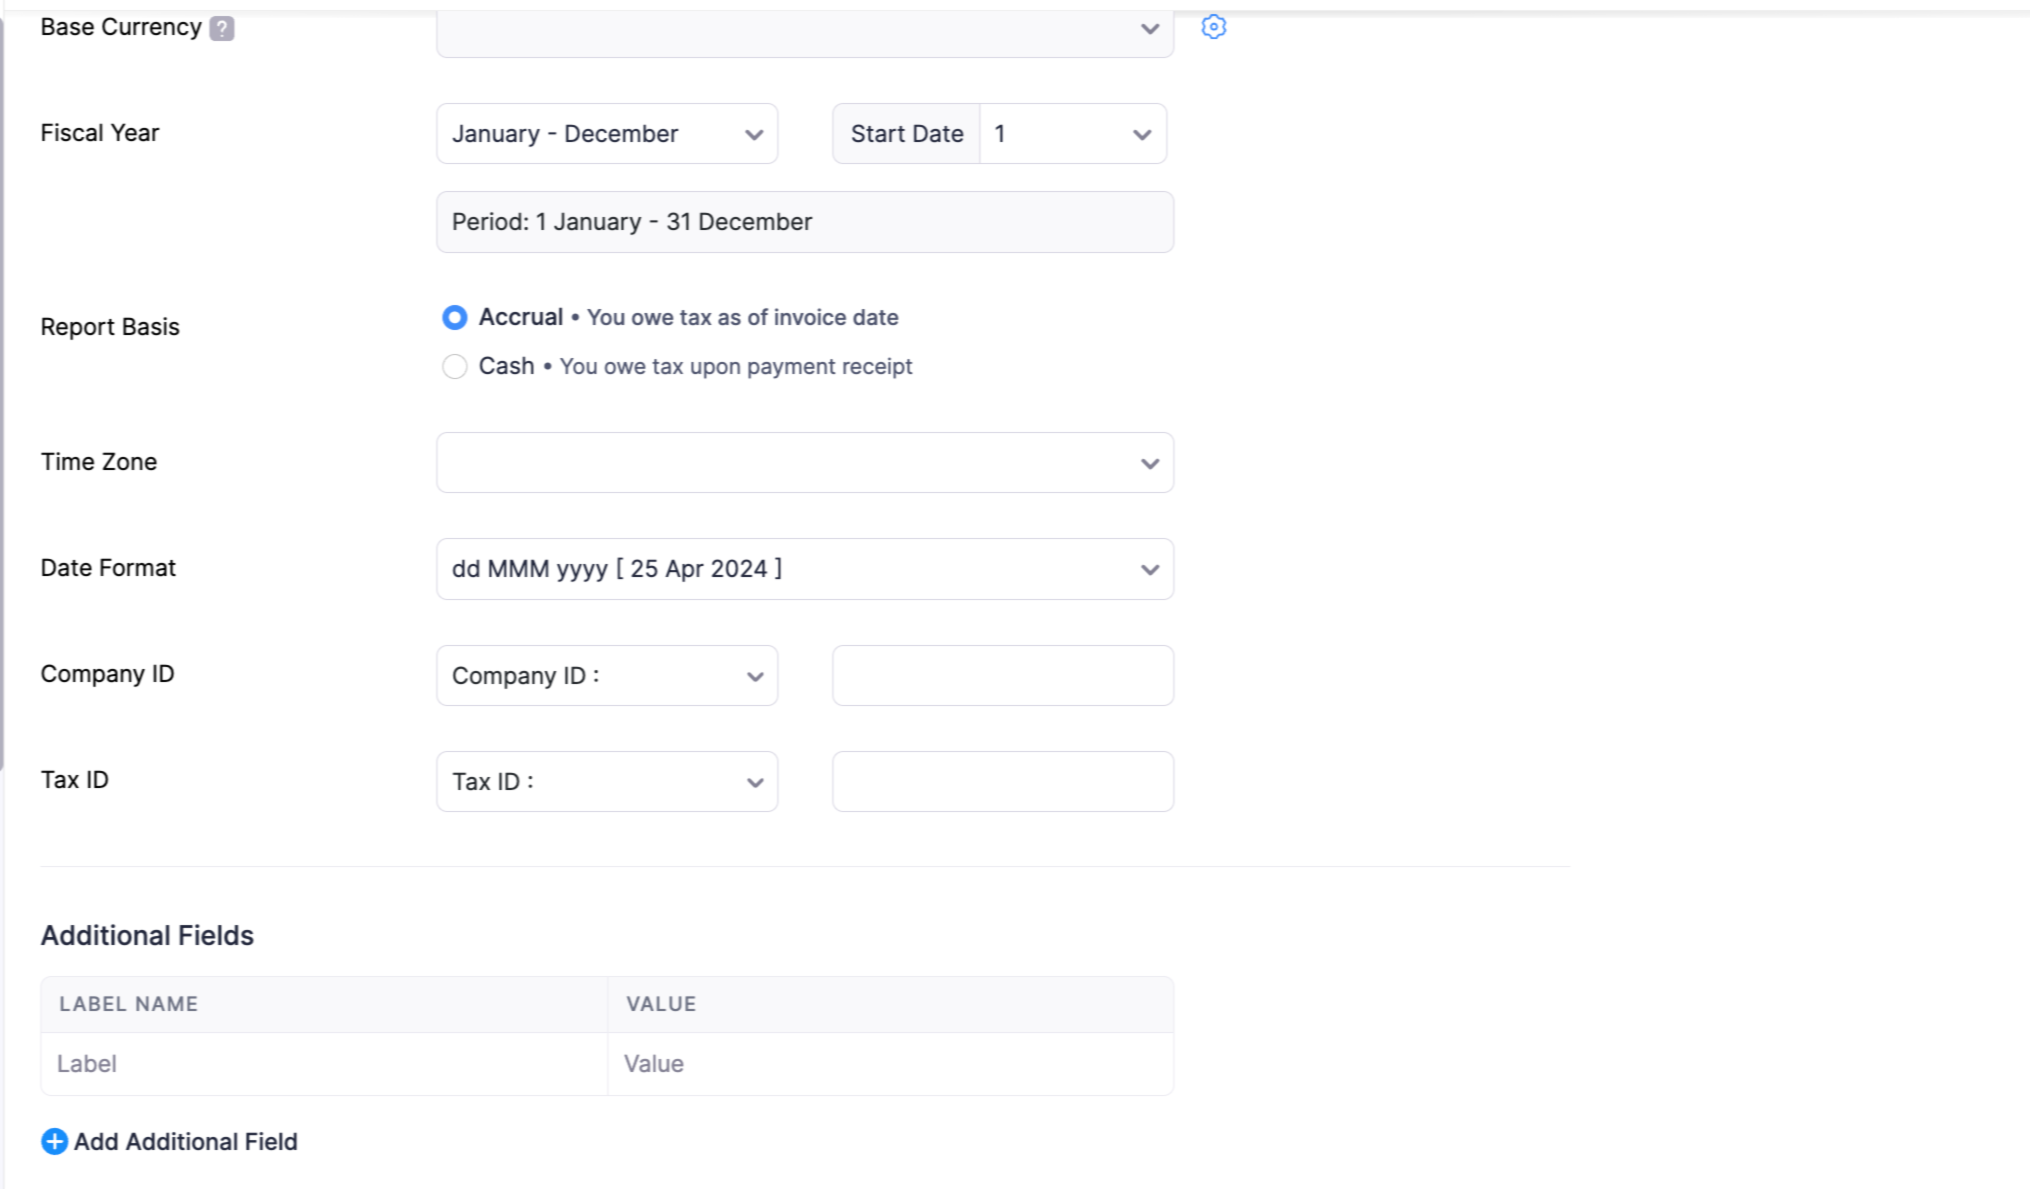
Change Base Currency
The currency you select when you sign up is displayed here. All transactions are recorded, and all financial reports (Profit & Loss, Balance Sheet etc) are generated in this currency. All foreign currency transactions will be converted back to this base currency for reporting.
The table below lists the organization locations and the currency that will be set as the base currency for that location. You cannot change the base currency if you select one of these locations.
| Organization Location | Base Currency |
|---|---|
| India | INR - Indian Rupee |
| USA | USD - United States Dollar |
| UK | GBP - Pound Sterling |
| Canada | CAD - Canadian Dollar |
| Australia | AUD - Australian Dollar |
| Saudi Arabia | SAR - Saudi Riyal |
| United Arab Emirates | AED - UAE Dirham |
| Bahrain | BHD - Bahraini Dinar |
| Kuwait | KWD - Kuwaiti Dinar |
| Oman | OMR - Omani Riyal |
| Qatar | QAR - Qatari Riyal |
| Kenya | KES - Kenyan Shilling |
| Mexico | MXN - Mexican Peso |
| Germany | EUR - Euro |
| South Africa | ZAR - South African Rand |
You can edit your currency settings to customize how your currency appears in transactions, such as the symbol, name, decimal places, format, and rounding method.
Here’s how you can do it:
Click the Gear icon next to the Currency field.
In the following popup, you can update the following:
- Currency Symbol: Edit in this field to customize how your currency appears in transactions. (For example, you can edit ₹ and replace it with Rs)
- Currency Name: Edit the display name of the currency chosen.
- Decimal Places: Select the number of digits that should appear after the decimal point in monetary values from the Decimal Places dropdown. Most currencies use 2 decimal places (For example, 123.45).
- Format: Choose your preferred number grouping format from the Format dropdown (For example, 12,34,567.89).
- Rounding Method: Select how monetary values should be rounded off from the Rounding Method dropdown (For example, Round Half Up).
Click Save to update your currency preferences.
Fiscal Year
The fiscal year is the accounting period for your organization, which may differ from the calendar year. Different companies and businesses follow different fiscal years. Select the one that aligns best with your organization’s accounting practices and regulatory requirements.
To change the fiscal year:
- Navigate to Settings in the top-right corner and click Profile under Organization.
- Click the dropdown next to Fiscal year on the Organization Profile page. Select your desired month range. (For example, April-March)
- Click the Start Date dropdown and choose the starting day of the month.
- Review the updated period in the field below the Fiscal Year dropdown.
Report Basis
The Report Basis you choose in Zoho Books determines when income and expenses are recognized in your accounting reports. Remember that your choice affects how your post-tax financials are calculated. If you’re unsure which basis to use, consult a tax advisor or accountant.
To choose a report basis:
Navigate to Settings in the top-right corner and click Profile under Organization.
Click the dropdown next to Report Basis on the Organization Profile page.
Here, you can choose any one of the following options:
Accrual: In the accrual basis, Income is recorded when it is earned, not when payment is received, and expenses are recorded when they are incurred, not when they are paid. Hence, tax is owed when an invoice is issued. This method provides a more accurate picture of your organization’s financial position by matching revenues with the expenses related to them within the same reporting period. For example, if you issue an invoice in January but receive the payment in February, the income is still recorded in January.
Cash: In the cash basis, income is recorded only when payment is actually received, and expenses are recorded only when they are paid. Hence, tax is owed only when payment is received. This method reflects the actual cash flow of your business, making it simpler to track money in and out, especially for small businesses. For example, if you issue an invoice in January but receive the payment in February, the income will be recorded in February.
Time Zone
Zoho Books sets the time zone automatically based on the location you select during sign-up. You can edit if required. To change your time zone:
- Navigate to Settings in the top-right corner and click Profile under Organization.
- Click the dropdown next to Time Zone on the Organization Profile page.
- Select the appropriate time zone from the list.
Date Format
Select the date format that is most commonly used in your country or specific to your organization from the dropdown. This format will be applied to all transactions you create and their PDFs. Here’s how:
- Navigate to Settings in the top-right corner and click Profile under Organization.
- Click the dropdown next to Date Format on the Organization Profile page.
- Select your preferred format (For example, dd-MM-yyyy 23-06-2025).
- Also, choose the separator from the adjacent dropdown (For example, -, /, or .).
Additional Settings
You can store extra information about your organization.
Company ID
The Company ID is a unique identifier assigned to your business by the government or an official regulatory body. This field is a jurisdictional requirement and varies by country. For example, SIRET in France, ACN in Australia, BN in Canada and the like.
- Navigate to Settings in the top-right corner and click Profile under Organization.
- Click the dropdown next to Company ID on the Organization Profile page.
- From the dropdown, select or enter the label (For example, SEC).
- Enter the company ID number in the adjacent text box.
If you want to include this company ID in your transaction PDFs, you’ll need to include its corresponding placeholder in the Organisation Address format. Now, it will appear along with your organization address.
Tax ID
The Tax ID field is specific to your company’s regulatory requirements. For example, EIN in the US, GSTIN in India, VAT number in the UK and the like.
- Navigate to Settings in the top-right corner and click Profile under Organization.
- Click the dropdown next to Tax ID on the Organization Profile page.
- From the dropdown, select or enter the label (For example, CST).
- Enter the tax ID number in the adjacent text box.
If you want to include the Tax ID in your transaction PDFs, you’ll need to include its corresponding placeholder in the Organisation Address format. Now, it will appear along with your organization address.
Note: Following a recent update, the Tax ID field will only be displayed if it was filled when you created the organization. For new users or those who did not enter it during organization creation, the field is now available under Tax Settings as Tax Registration Number. You can access it by navigating to Settings > Taxes and Compliance > Taxes > Tax Settings > Tax Registration Number.
Add Additional Fields to Organization Address
If you wish to record any extra information to your organization’s profile that isn’t available in the standard fields. These are user-defined label-value pairs. To add additional fields:
- Navigate to Settings in the top-right corner and click Profile under Organization.
- Scroll down to the Additional Fields section on the Organization Profile page.
- Click + New Field.
- In the Label Name field, enter the name for the additional field (For example, Parent Company).
- In the Value field, enter the corresponding information (For example, Zylker Group Ltd).
If you want to include this additional field in your transaction PDFs, you’ll need to include its corresponding placeholder in the Organisation Address format. Now, it will appear along with your organization address.
 Yes
No
Yes
No
Thank you for your feedback!