Inventory
Price Lists
A Price List is a convenient way of customizing item rates in Zoho Inventory. It can be used to mass control/modify your item prices for a specific customer/vendor or transaction.
IN THIS PAGE…
Scenario: Peter wishes to provide a 10% discount to his loyal customers on every purchase. However, it would be unfeasible to edit the prices of the items every time. To overcome this situation, he creates price lists and applies them to his contacts (customer or vendor) or transactions. The item prices will then be altered for those customers or orders automatically.
To sum it all up, a price list can be used to:
- Offer products regularly at a lesser price for a loyal customer.
- Offer products at a higher price for new or one time customers.
- Offer products at a different price to businesses in a particular country.
- Assign to vendors who provide regular or occasional offer on items.
Enable Price List
To enable price lists:
-
Go to Settings > Preferences > Items.
-
Under the Price Lists section, select Enable Price Lists option.
Pro Tip: Enable the Apply price list to each item in a transaction option to assign price list to each item separately in a transaction.
-
Click Save.
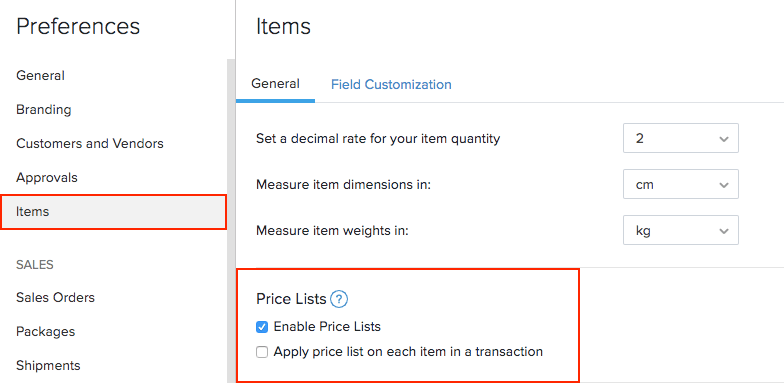
-
You’ll be able to access the Price Lists module under Inventory from the left sidebar.
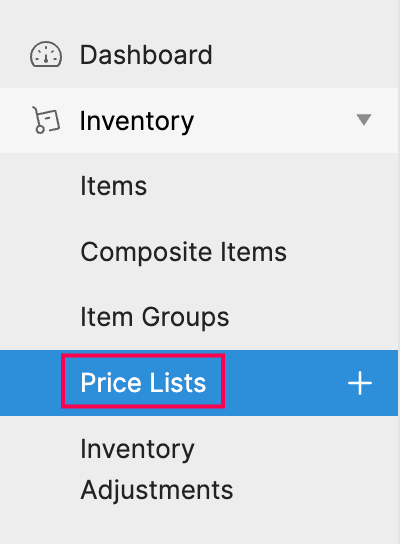
Create Price List
To create a new price list:
-
Go to the Price Lists module under Inventory from the left sidebar.
-
Click the + New Price List button in the top-right corner of the page.

-
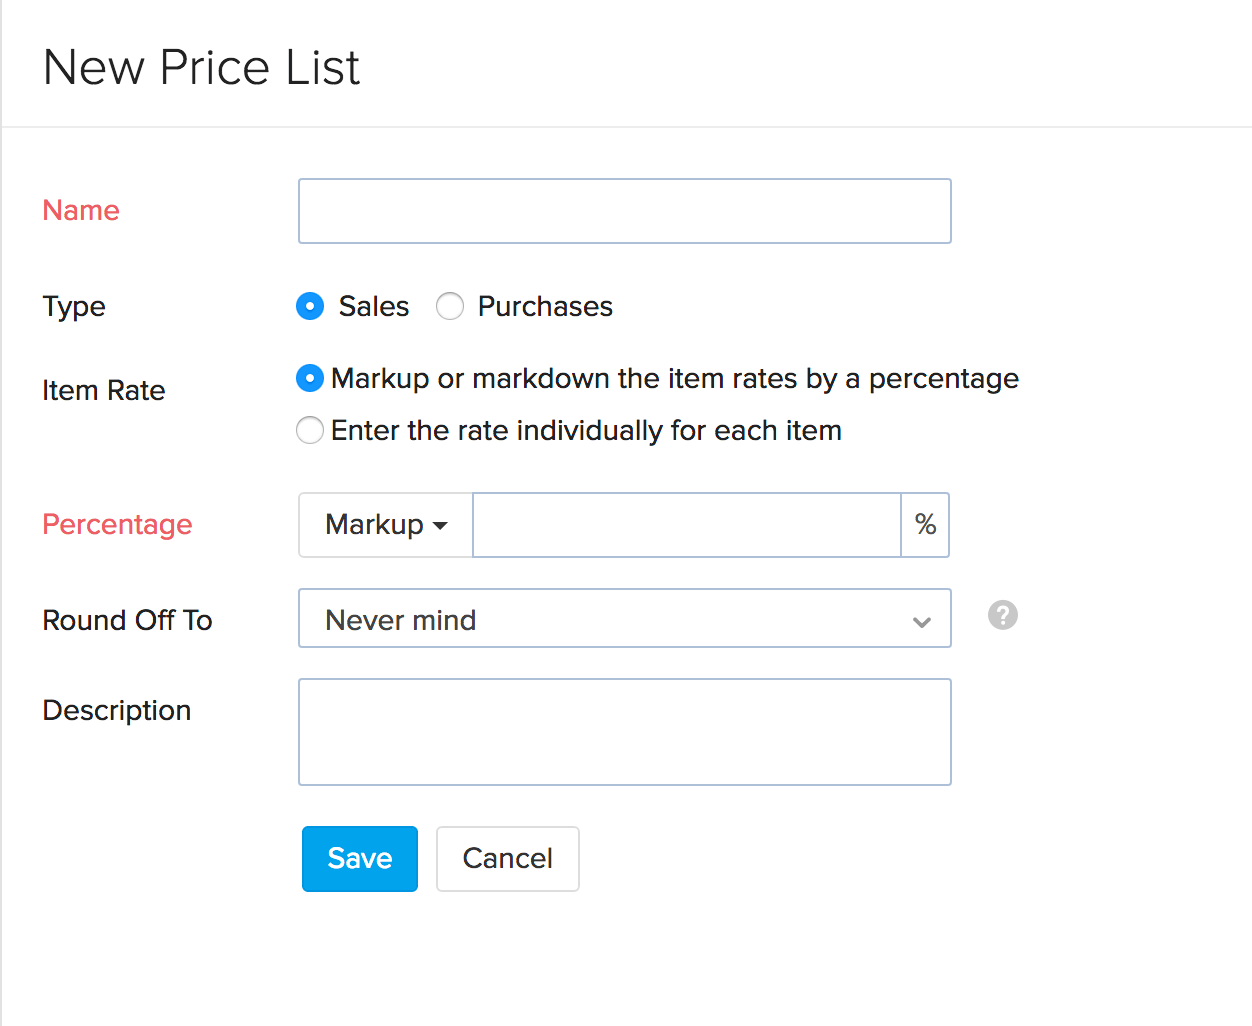
Provide a Name for your price list.
-
Choose the Type of your price list. If you choose Sales, your price list will be available for sales transactions, and if you choose Purchases your price list will be available for purchase transactions.
-
Choose how you want to control the Item rate. You can do so in two ways:
Depending on the choice, the price list creation process will differ significantly.
Markup/Markdown by Percentage
-
Choose whether you wish to markup or markdown the rates.
-
Enter the percentage of the cost that you want to mark up or markdown.
-
Configure how your prices must be rounded off to, by entering the round off value.
-
Add a Description for your price list.
-
Click Save.
Entering Item Rates Individually
-
Choose a currency for the price list.
-
Add new rates/prices for your preferred items one by one.
-
Add a Description for your price list.
-
Click Save.
Volume Pricing
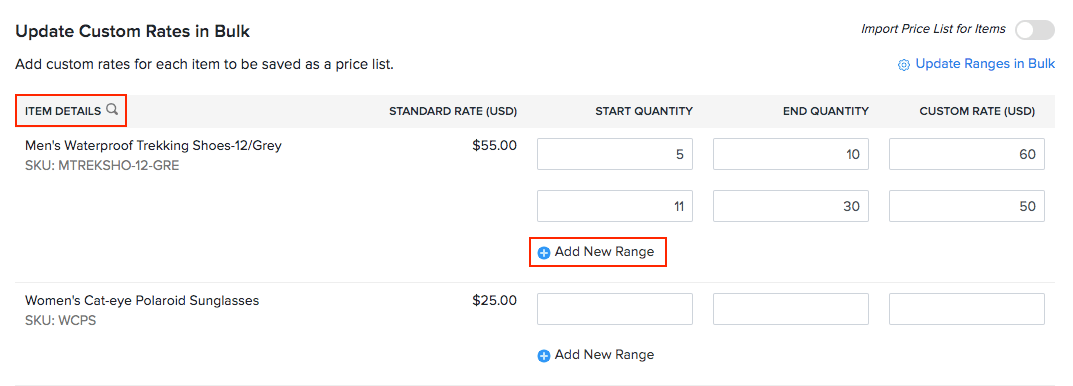
Volume Pricing allows you to define a unit price for an item based on the quantity sold or purchased. That is, you can set price breaks for items depending on their quantity. For example, if a customer purchases only 10 units of product A, each unit will cost $15; but if they purchase over 11 units, then the cost of each unit will drop to $13, and so on. This method helps you sell slow-moving or excess stock quickly.
To set the volume price for an item:
-
Go to the Price Lists module under Inventory from the left sidebar.
-
Click the + New Price List button on the top-right corner.
-
Enter an appropriate name for the price list.
-
Choose the Enter the rate individually for each item option.
-
Under Pricing Scheme, choose Volume Pricing.
-
Enter the Start Quantity, End Quantity, and Custom Rate across the required item. You can also search for an item from the list by clicking the Magnifier icon next to Item Details.
-
Click + Add New Range to add another range. You can only add up to 10 price range per item.
-
Click Save.
Update Volume Pricing in Bulk
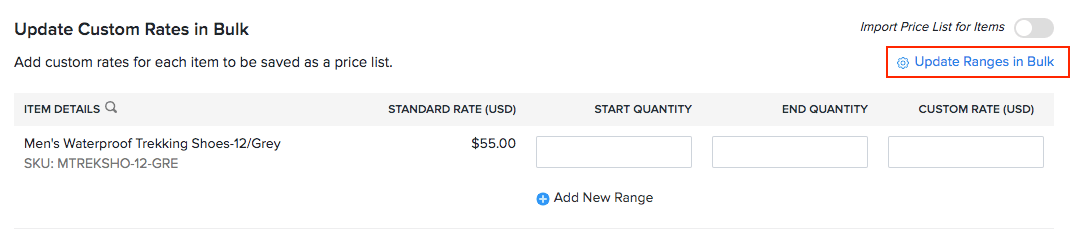
Alternatively, you can also enter the price range for several items simultaneously using the bulk update option. To do so:
-
Click the Update Ranges in Bulk option on the top right side of the items table.
-
Mark the checkbox near the items to select them.
-
Click the Update Ranges in Bulk button at the top of the item table.
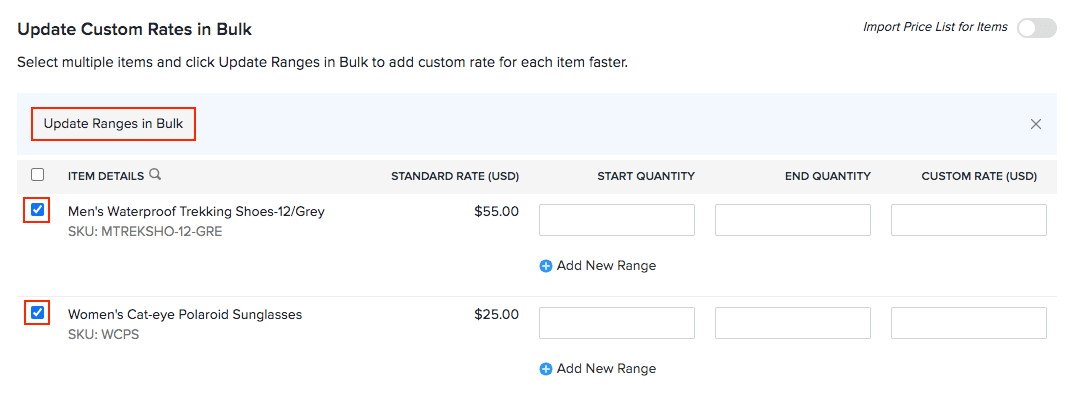
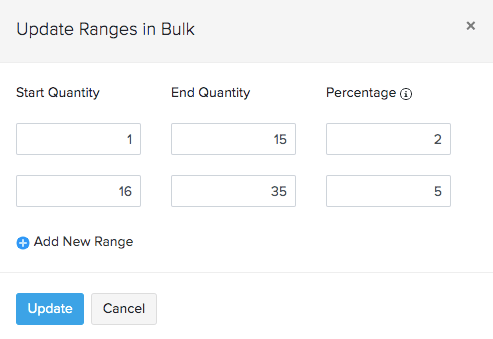
-
Enter the Start Quantity, End Quantity, and the markup or markdown percentage.
-
Click + Add New Range to add another range. You can only add up to 10 price ranges.
-
Click Update, then click Save.
When this price list is applied to a transaction, the item’s rate will be adjusted based on the quantity. If the quantity does not fall under any of the price range, the default price will be applied.
Apply Price List
You can associate a price list to:
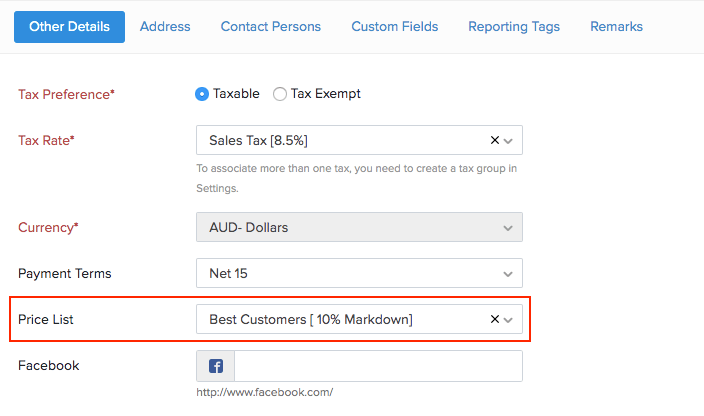
Apply Price List to a Customer or Vendor
To associate a price list to a customer or vendor:
-
Go to the Customers/Vendors module in the sidebar.
-
Create a new contact or edit an existing contact.
-
Go to the Other Details tab.
-
Choose a price list to apply to the customer or vendor.
-
Click Save.
Apply Price List on a Transaction
To apply price list on a transaction:
-
Create or edit a transaction (SO, PO, Invoice, Bill).
-
Click the Price List dropdown located above the Item Details section.
-
Choose a price list to apply to this transaction.
-
Select a price list to apply it to the entire transaction or to each item in a transaction.
-
Click Save
Note: Default rates will be applied for the items that are not present in the price list.
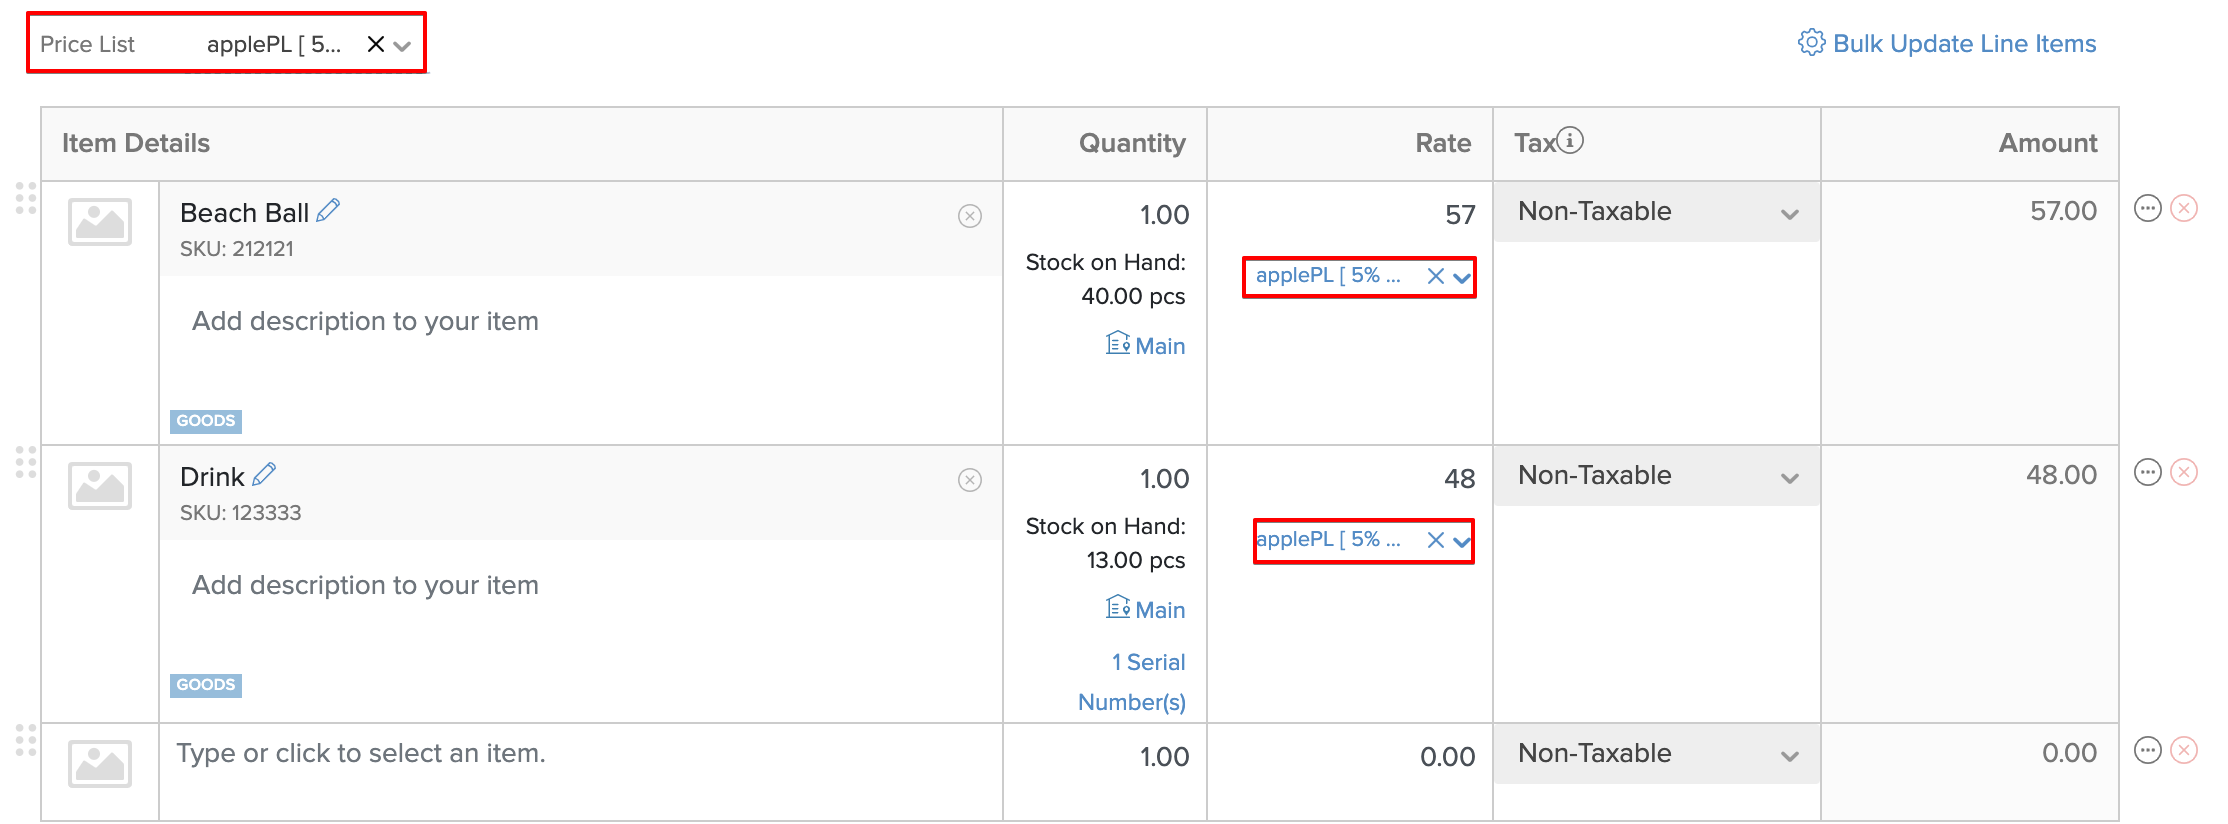
Apply Price List to an Item in a Transaction
To access the option to apply price lists to individual items in a transaction, you must first enable it under Settings > Preferences > Items.
After enabling the option:
- Create or edit a transaction (SO, PO, Invoice, Bill).
- Select an item under the Item Details section.
- Under the Rates column, select the price list you want to apply for the item. This will override the price list you have applied commonly for all the items in the transaction.
Import Price List
Since we support two kinds of price lists- one for sales and one for purchase transactions, we have also provided separate import options for both. To import a price list:
-
Go to the Price Lists module under Inventory from the left sidebar.
-
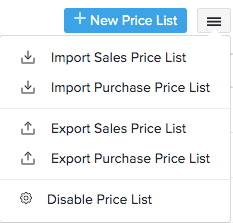
Click the Hamburger icon in the top-right corner of the page.
-
Choose the Import Sales Price List or Import Purchase Price List option from the drop-down.
-
You will be redirected to the price list import page.
-
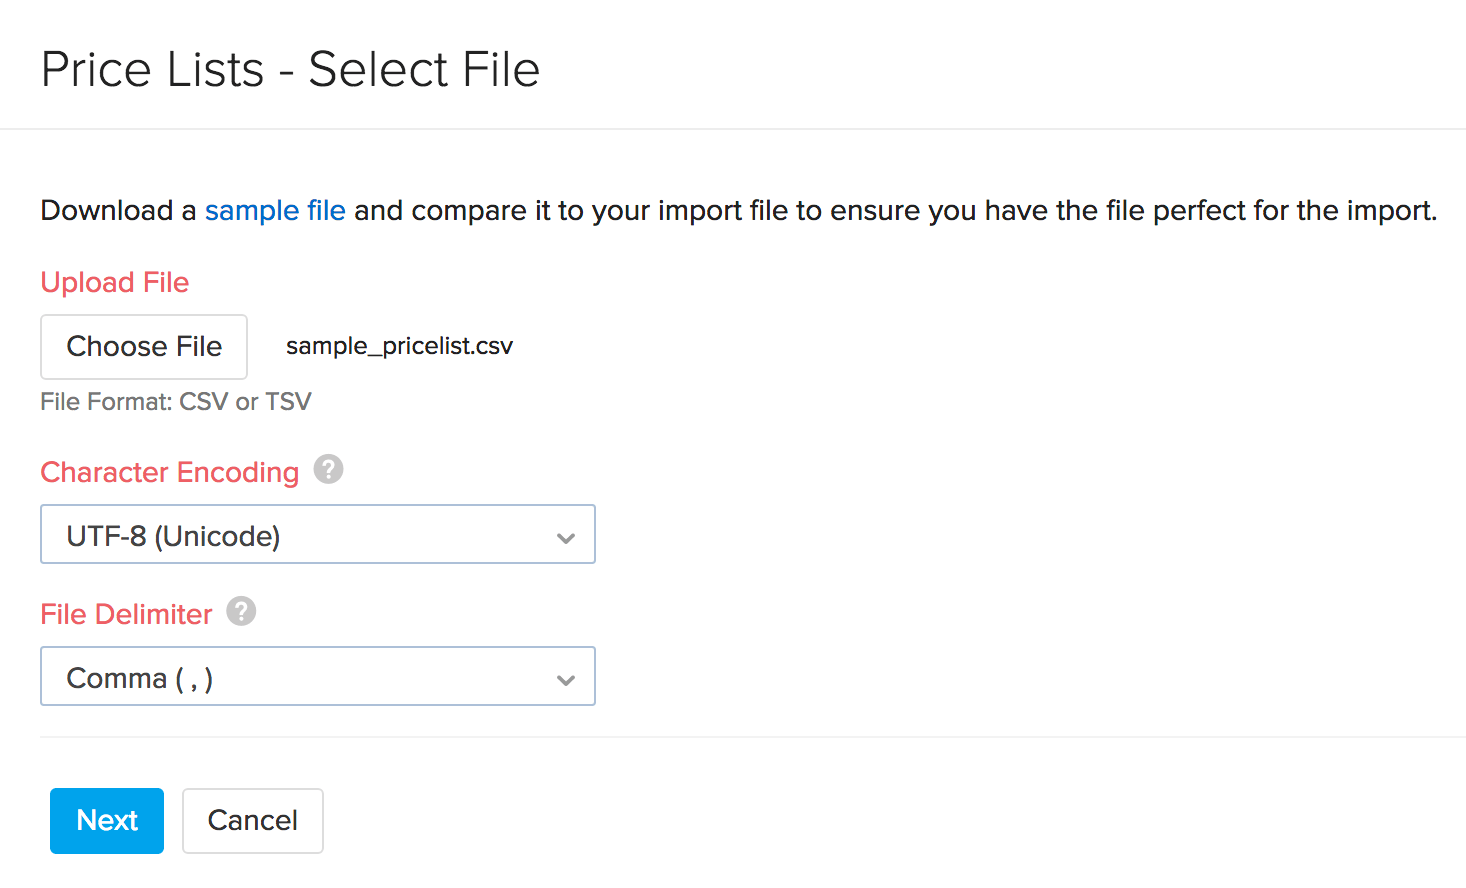
To help you prepare your import file, please download the Sample File from this page and arrange your data according to this file.
-
Click on the Choose File button, browse and upload your .CSV or .TSV import file containing your price lists.
-
Select the Character Encoding as applicable. By default, the UTF-8 (Unicode) will applied.
-
Select the necessary File Delimiter(comma or semicolon).
-
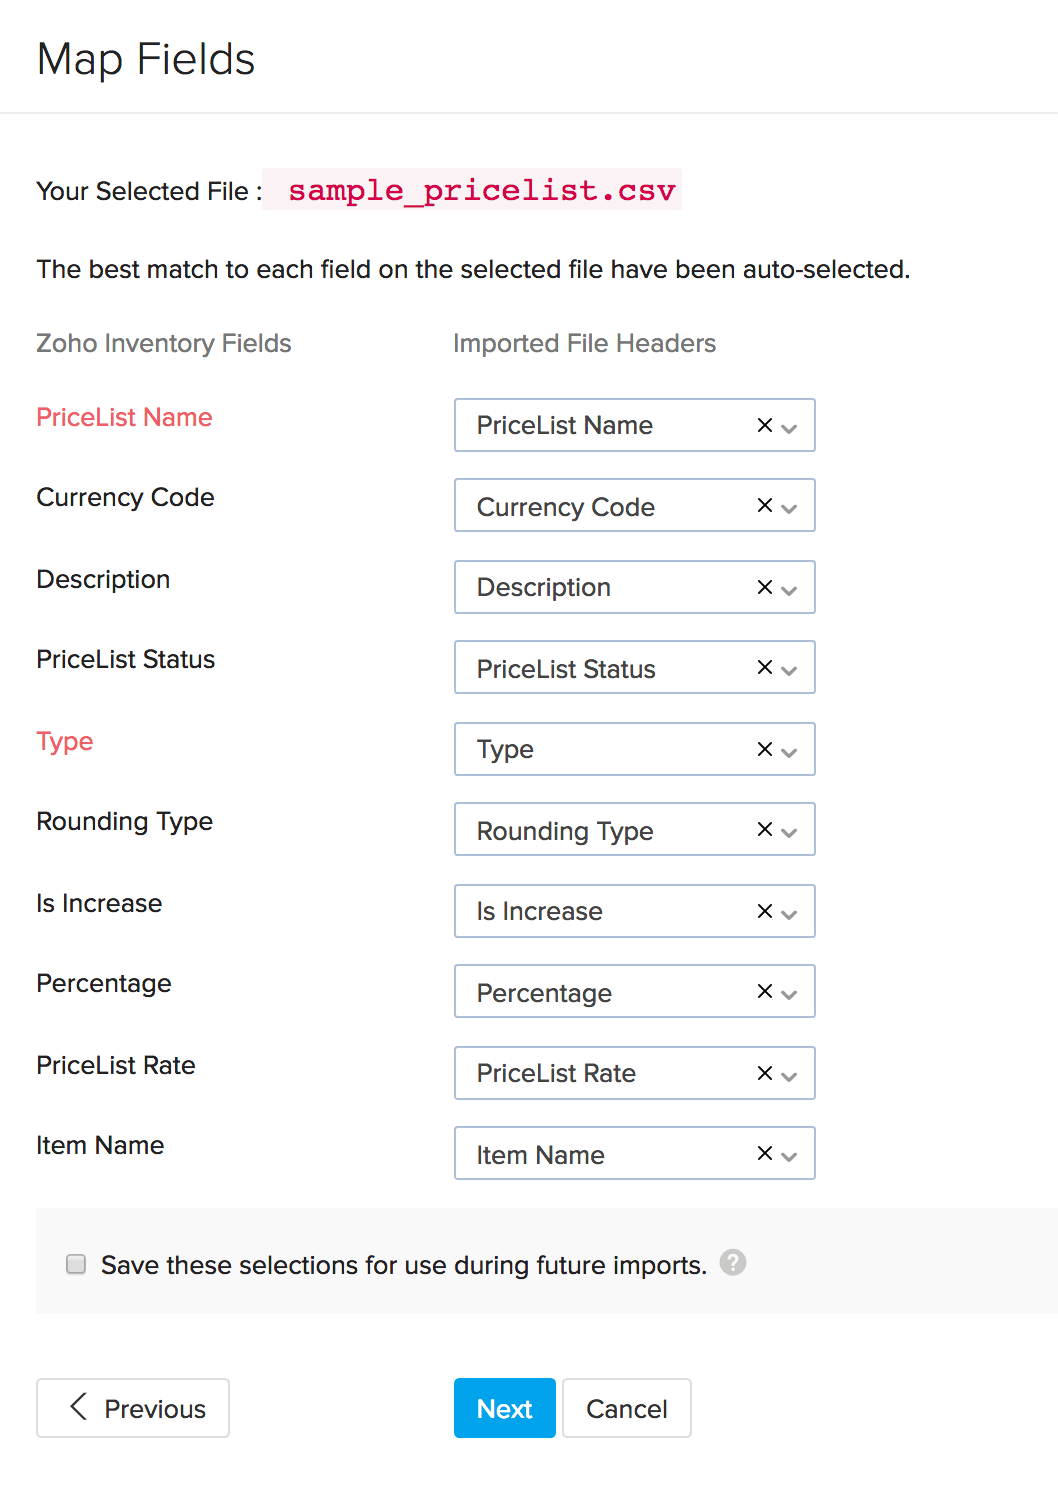
Clicking on Next button will take you to the field mapping interface on a new page.
-
Zoho Inventory automatically matches similar fields between the app and the file.
-
If needed, you can also manually match and map them.
-
Check the option Save these selections for use during future imports to automate future mapping process.
-
Click Next to proceed.
-
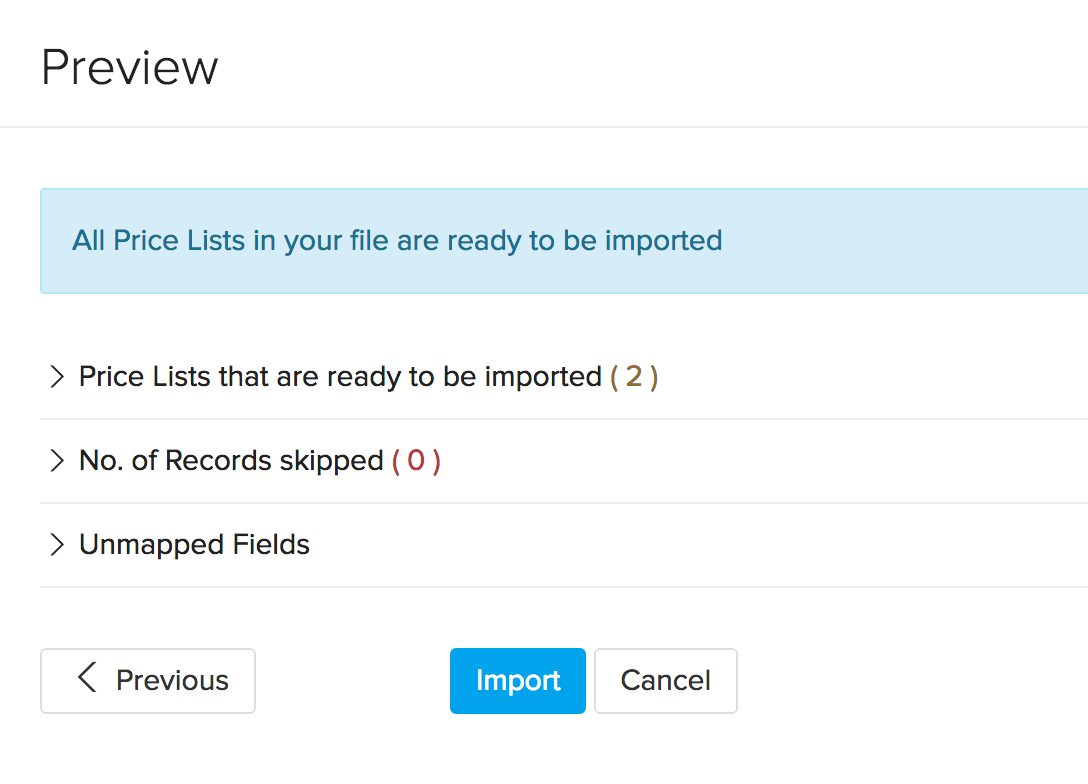
In the preview page, you can view the status of price lists ready for import, no. of skipped records and unmapped fields.
- If you wish to make any changes, click the Previous button.
- To complete the import process, click Import.
Edit Price List
To edit a price list:
-
Go to the Price Lists module under Inventory from the left sidebar.
-
Hover your cursor over the preferred price list.
-
Click the Edit option.

-
Update the necessary information and click the Save button to finish.
Delete Price List
To delete a price list:
-
Go to the Price Lists module under Inventory from the left sidebar.
-
Hover your cursor over the price list that you wish to delete.
-
Click the Trash bin icon. This will be followed by a confirmation pop-up.

-
Click Ok to delete the price list. Please note that this process is irreversible.
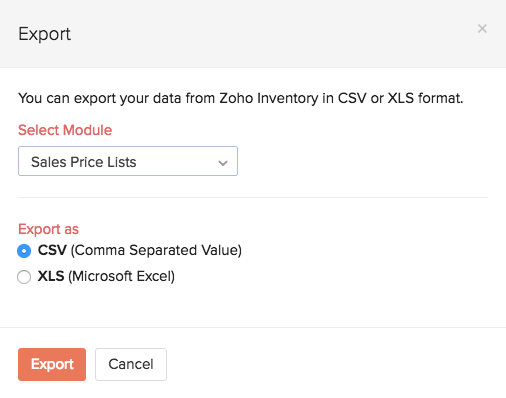
Export Price Lists
To export price lists,
-
Go to the Price Lists module under Inventory from the left sidebar.
-
Click the Hamburger icon in the top-right corner of the page.
-
Choose either the Export Sales Price Lists or Export Purchase Price List option from the drop-down.
-
This will trigger an export price lists pop-up bearing all the necessary fields.
-
The Entity field will by default be Sales Price Lists or Purchase Price List based on your selection.
-
Select the export file format accordingly - as .XLS or .CSV using the Export As field.
-
To finish, click on the Export button.
-
The file will be saved to your default downloads folder.
De-activate Price List
You can make your existing price list active or inactive.
To de-activate a price list:
-
Go to the Price Lists module under Inventory from the left sidebar.
-
Hover your cursor over an active price list that needs to be de-activated.
-
Click on the Mark as Inactive option on the right of your price list.
-
Now this price list becomes inactive.

To re-activate an inactive price list,
- Go to Settings > Preferences > Items.
- Click on Price Lists
- Hover your cursor over the inactive price list.
- Click on the Mark as Active option to the right of the price list.
- Doing this, will reactivate this price list.
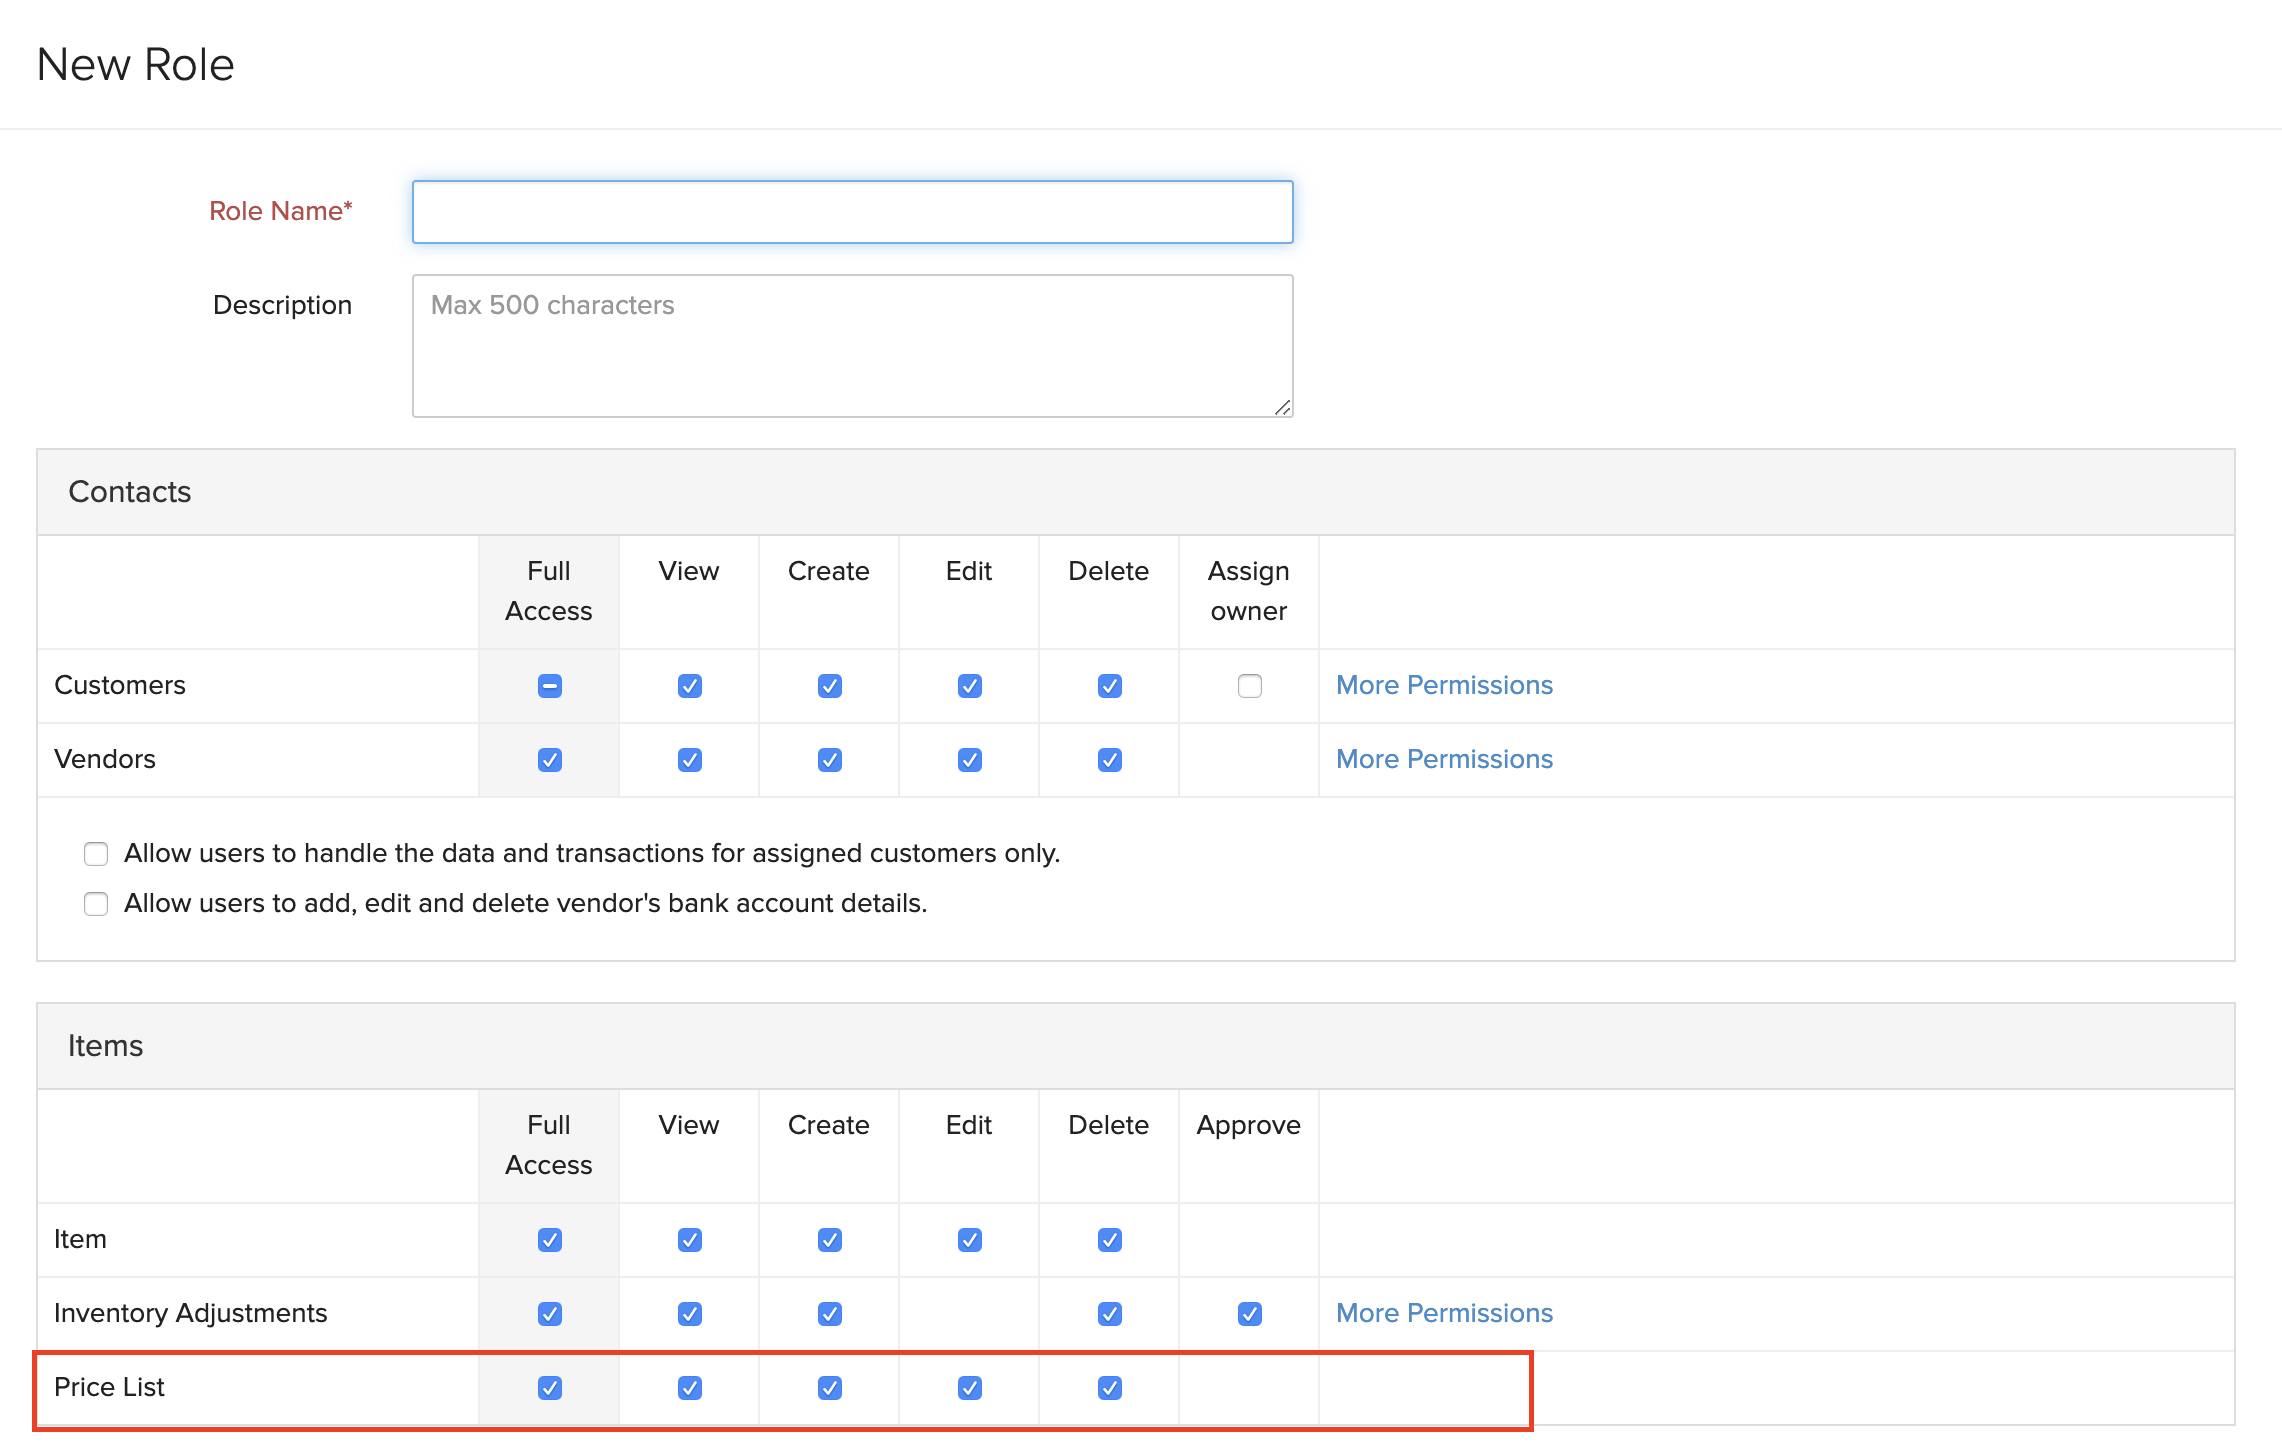
Configure Access Permissions
-
Go to Settings > Users & Roles > Roles.
-
Edit an existing role or create a new role.
-
Go to Items.
-
Next to the Price List label, select the permissions you’d like to provide the users associated with this role.
-
Click Save at the bottom.