

Creating a New Quote
If the Quotes module is not available by default in the left sidebar, you’ll have to enable it in the Preferences. To do this:
- Go to Settings by clicking the Gear icon in the top-right corner.
- Select General Preferences. Under Select the modules you would like to enable., check the box next to Quotes.
- Once done, click Save at the bottom of the page.
Now, there are different ways in which you can create or add a quote in Zoho Invoice. You can create from:
Also, you can add quotes to Zoho Invoice by importing them from your previous invoicing system.
The Quotes Module
- Go to Quotes on the left sidebar or press shift + e to instantly navigate to the Quotes module.
- Click the + New in the top-right corner or press c + e to instantly create a new quote.
- Click the Customer Name dropdown and select a customer. If you’ve not added any customer to Zoho Invoice, click the + New Customer in the dropdown, enter the customer details and click Save.
- Check the auto-generated Quote# or enter a quote number manually. If you want to change the prefix and the numbering of the auto-generated quote number or if you want to enter the quote number manually every time, you can click the Gear icon and choose to manually enter the quote number.
- Enter a reference number in the Reference# field for your internal referencing.
- Quote Date is auto-populated with the present day’s date. Click the date to change it to another date.
- Optional: Click the Expiry Date and select a date, after which the quote will become invalid.
- Select a Salesperson from the dropdown if you want to associate this quote to one of your salespeople who handled this sale.
- Select a project from the Project Name dropdown if you want to associate this quote to an already existing active project. Learn more about Projects.
Next, you can fill in the details about the products or services that you’re quoting for your customer.
- Type or click the Item Details in the item table and select an item from the dropdown. If you haven’t added the item already, click the + Add New Item to add an item on the fly to the quote as well as to the Items module.
- Enter a quantity in the Quantity field. By default, 1 is given as the quantity.
- The rate of the item is auto-populated based on the item rate you’ve saved for the item. Enter a different item rate to change the auto-populated item rate.
- Select the applicable Tax for the item. If you’ve associated a tax with the item in the Items module, this field will be auto-populated. If you’ve not created a tax in Zoho Invoice, you can quickly add the tax by clicking the + New Tax in the dropdown; enter the tax name, its rate and click Save.
- Enter a discount amount or percentage depending on what you’ve chosen from the dropdown. Based on the preference you’ve chosen in the Settings, this field will be a column in the item table or below the item table or not displayed at all.
- Enter the Shipping Charges involved in delivering the items in this quote to your customer, if any.
- Enter any amount that you want to adjust from the total in the Adjustment field. You can use this field to round-off the total amount or make any needed change in the total amount. You can edit and change the field name as well to suit your need.
Finally, you can enter information such as Customer Notes, Terms & Conditions of the quote and attach files etc.
- Enter the Customer Notes that you want to convey to your customer.
- Mention the Terms & Conditions for the quote in its field.
- Click Upload File and select Attach from Desktop to upload a file from your computer or device. You can also upload files from the cloud by clicking the dropdown and selecting Attach from Cloud.
- Click Change next to PDF Template to change the quote template that will be used when the quote is sent as a PDF or printed. Learn more about editing a template.
- Click Save as Draft to only save the quote if you wish to edit it later. Or, click Save and Send if you wish to save and email the quote to your customer immediately.
The Customers Module
You can create a quote for your customer directly from the Customers module.
- Go to Customers on the left sidebar.
- Select the customer for whom you want to create a quote.
- Click the New Transaction dropdown and select Quote.
The Projects Module
Businesses that charge their customers based on the time spent on a work can track their time by creating a project in the Time Tracking module. You can create a quote from within a project and include the tasks from the project to the quote. Read more.
Importing Quotes
If you’ve created Quotes in other systems and want to move them to Zoho Invoice, you can do so easily.
To import quotes:
- Go to Quotes on the left sidebar or press shift + e to instantly navigate to the Quotes module.
- Click the More icon and select Import Quotes or simply press alt + i to import quotes.
- Download the sample file and compare it with your file. Make sure that the format in your file is similar to the sample file.
- Click the Choose File button and select the import file from your device.
- Choose whether to skip or overwrite duplicate quotes.
- Select the Character Encoding based on your import file. By default, UTF-8 (Unicode) is selected.
- Choose the appropriate File Delimiter.
- Check the Auto Generate Quote Number option.
Insight: File Delimiter refers to the character that is used to separate the values in the import file.
- Click Next.
- The field names of Zoho Invoice are listed on the left side and the field names in the import file are listed on the right side.
- Match the field names appropriately.
- Mark Save these selections for use during future imports. if you wish to use the same mapping of fields in future imports.
- Click Next.
- You can see the status of all the Quotes that are ready to be imported, Skipped and the Unmapped Fields. If there are quotes that are being skipped, edit the import file and repeat the steps above.
- Click Import.
Now, the quotes in the import file will be imported into the Quotes module of Zoho Invoice.
Customizing Quotes
A template in Zoho Invoice is a format which determines how the quote information is displayed. There are many specially designed templates that are available in Zoho Invoice. You can customize the templates according to your desire.
To customize a template directly from the Quotes module:
- Select the quote that you want to edit.
- Hover your mouse cursor over the quote and click the Customize dropdown found in the top-right corner of the quote.
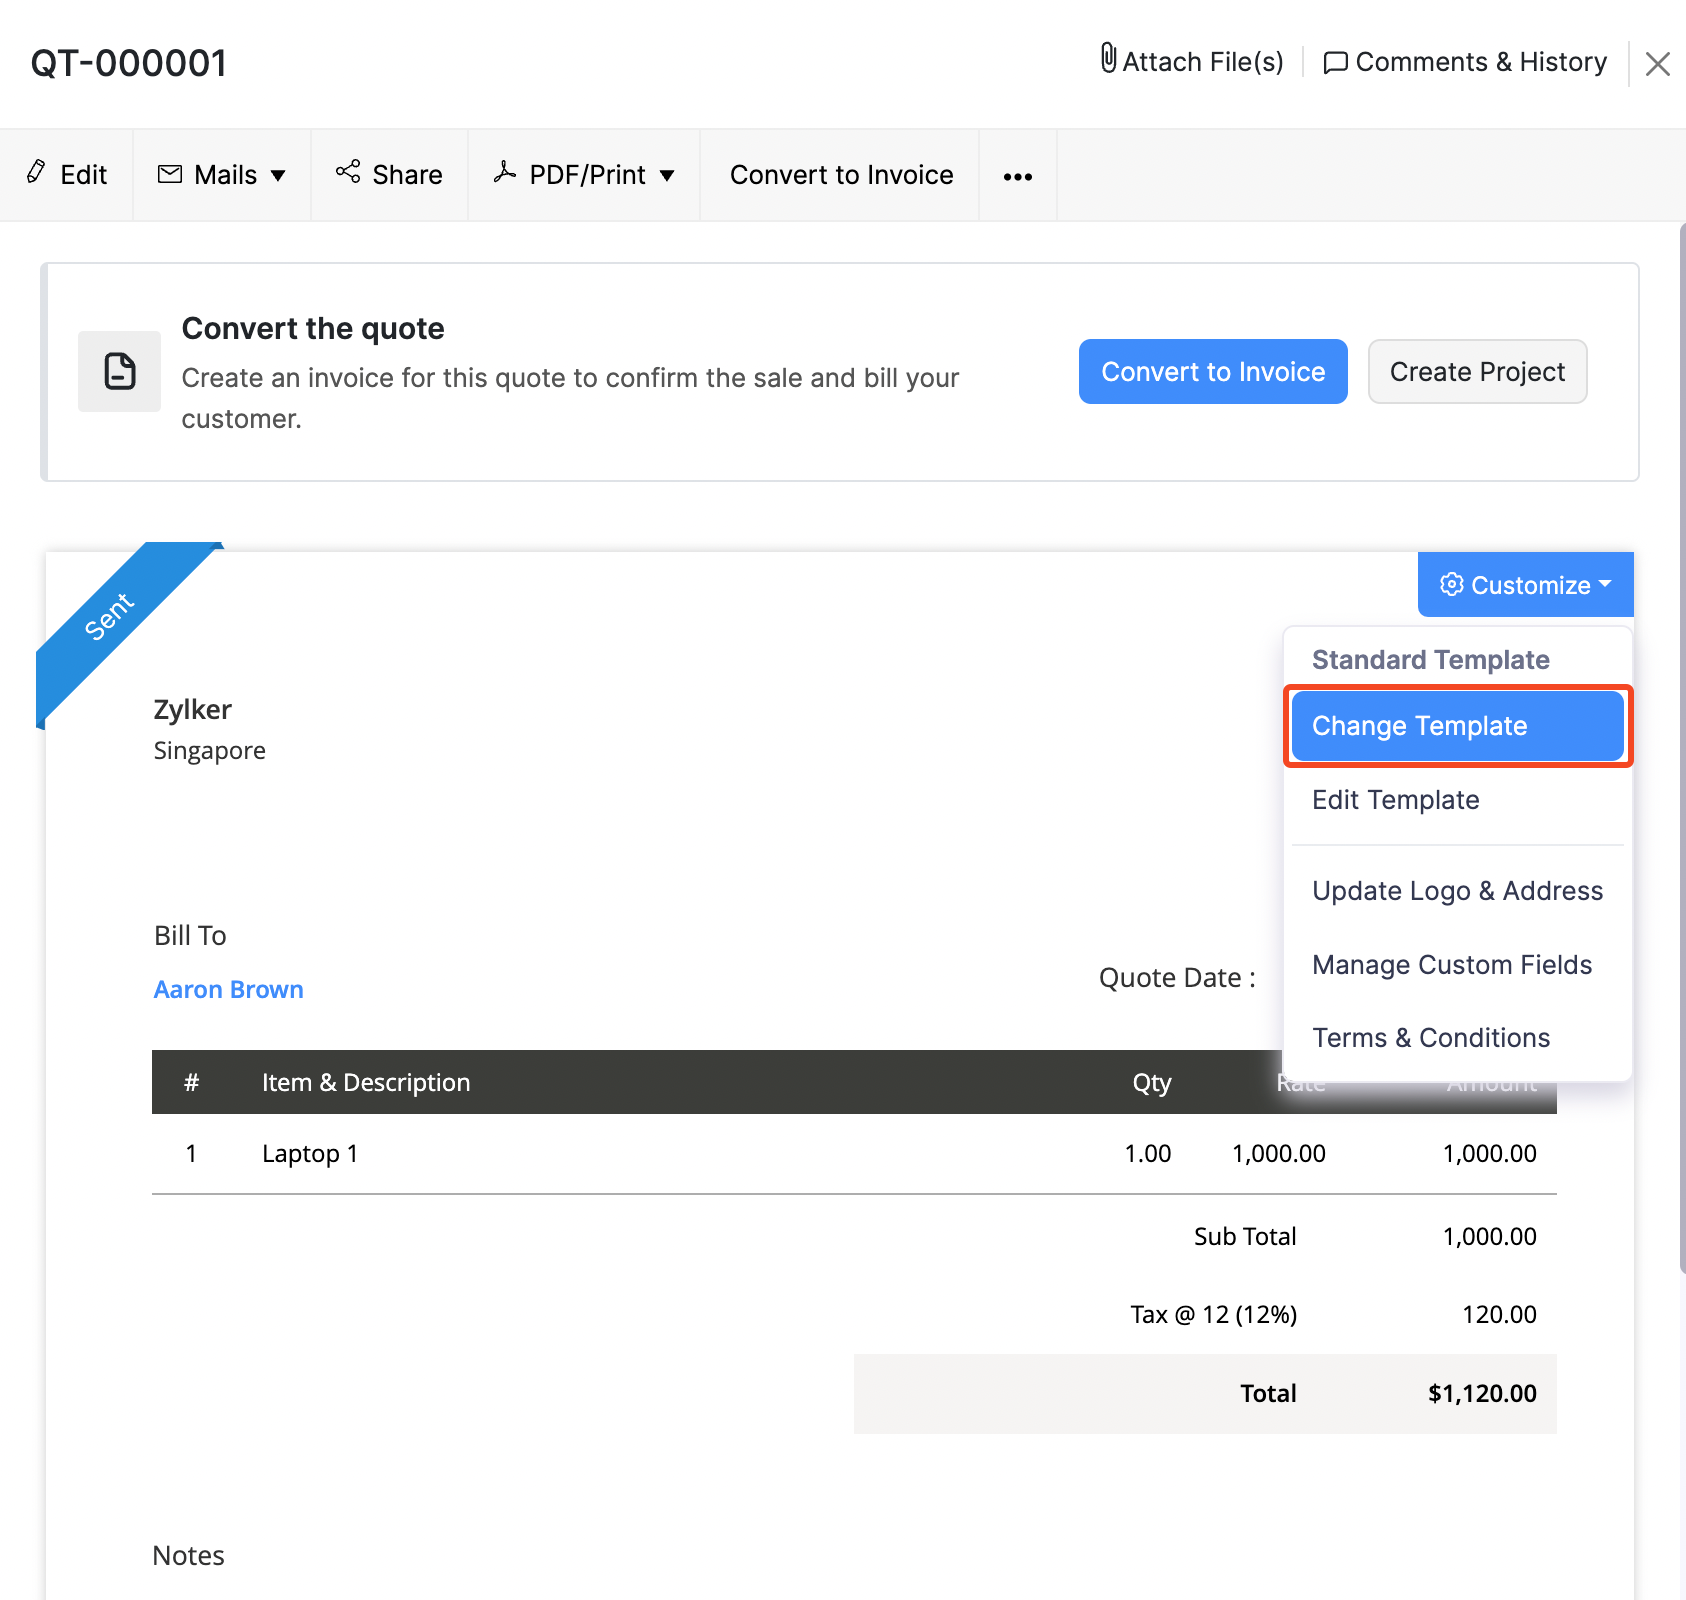
- Select Change Template to select another template from the existing gallery of templates.
- You can create a new template or edit an existing template from Settings > PDF Templates.
- Select Update Logo & Address, upload the logo and enter your address.
- Click Save in the pop-up to quickly update them in the quote.
- Select Manage Custom Fields if you want to add or edit the custom fields. Learn more about Custom Fields.
- Select Terms & Conditions.
- Enter the customer notes and the terms and conditions.
- Check the Use this in future option to use this in all the quotes created in the future. Leave it unchecked if you want it to be displayed only in this quote.
- Click Save to update these changes in the quote.
Editing Quotes
If you’ve saved a quote as draft, you can update it with information by editing it. Also, if you’ve entered some information incorrectly, you can edit and update it.
To edit a quote:
- Go to Quotes on the left sidebar or press shift + e to instantly navigate to the Quotes module.
- Select the quote that you want to edit.
- Click Edit at the top or press e to edit the transaction.
- Make the necessary changes and click Save to save it in the same status or Save and Send to save and send the quote as an email.
- Also, you can click the dropdown icon in Save and Send and choose other options such as Save and Send later to schedule and send a quote or Save and Print.
Pro Tip: If you’re editing a quote that has been:
- Sent to your customer, you would have to resend the updated quote to your customer.
- Converted to an invoice, you would have to update the invoice separately.
 Yes
No
Yes
No
Thank you for your feedback!