
Related Lists
The Related Lists feature allows you to fetch and view data from within the app as well as from other third-party services. This comes in handy when you want to cross-reference data from different entities.
Note: This feature is available only for certain plans of Zoho Books. Visit the pricing page to check if it’s available in your current plan.
You can create related lists for:
- Items
- Customers and Vendors
- Sales - Quotes, Invoices, Sales Orders, Retainer Invoices and Credit Notes
- Purchases - Expenses, Bills, Purchase Orders and Vendor Credits
- Projects
Insight: You can create a maximum of 10 related lists for each module. For example, 10 for Invoices, 10 for Quotes, and so on.
Create a Related List
There are two ways to create a related list:
Using a Lookup Custom Field
The Lookup custom field allows you to pull data from one module and access it inside another module in Zoho Books. When you create a lookup field in one module, its associated details will be available as a related list in the other module.
Scenario 1: Patricia wants to track the efficiency of users in her organisation. So, she decides to track the sales orders the sales team create for a customer. For this, she creates a Lookup custom field in the Sales Orders module and for the module whose data she wants to access (in this case, Users).
Using a Deluge Script
With Deluge Scripts, you can connect Zoho Books with other third-party services to access their data.
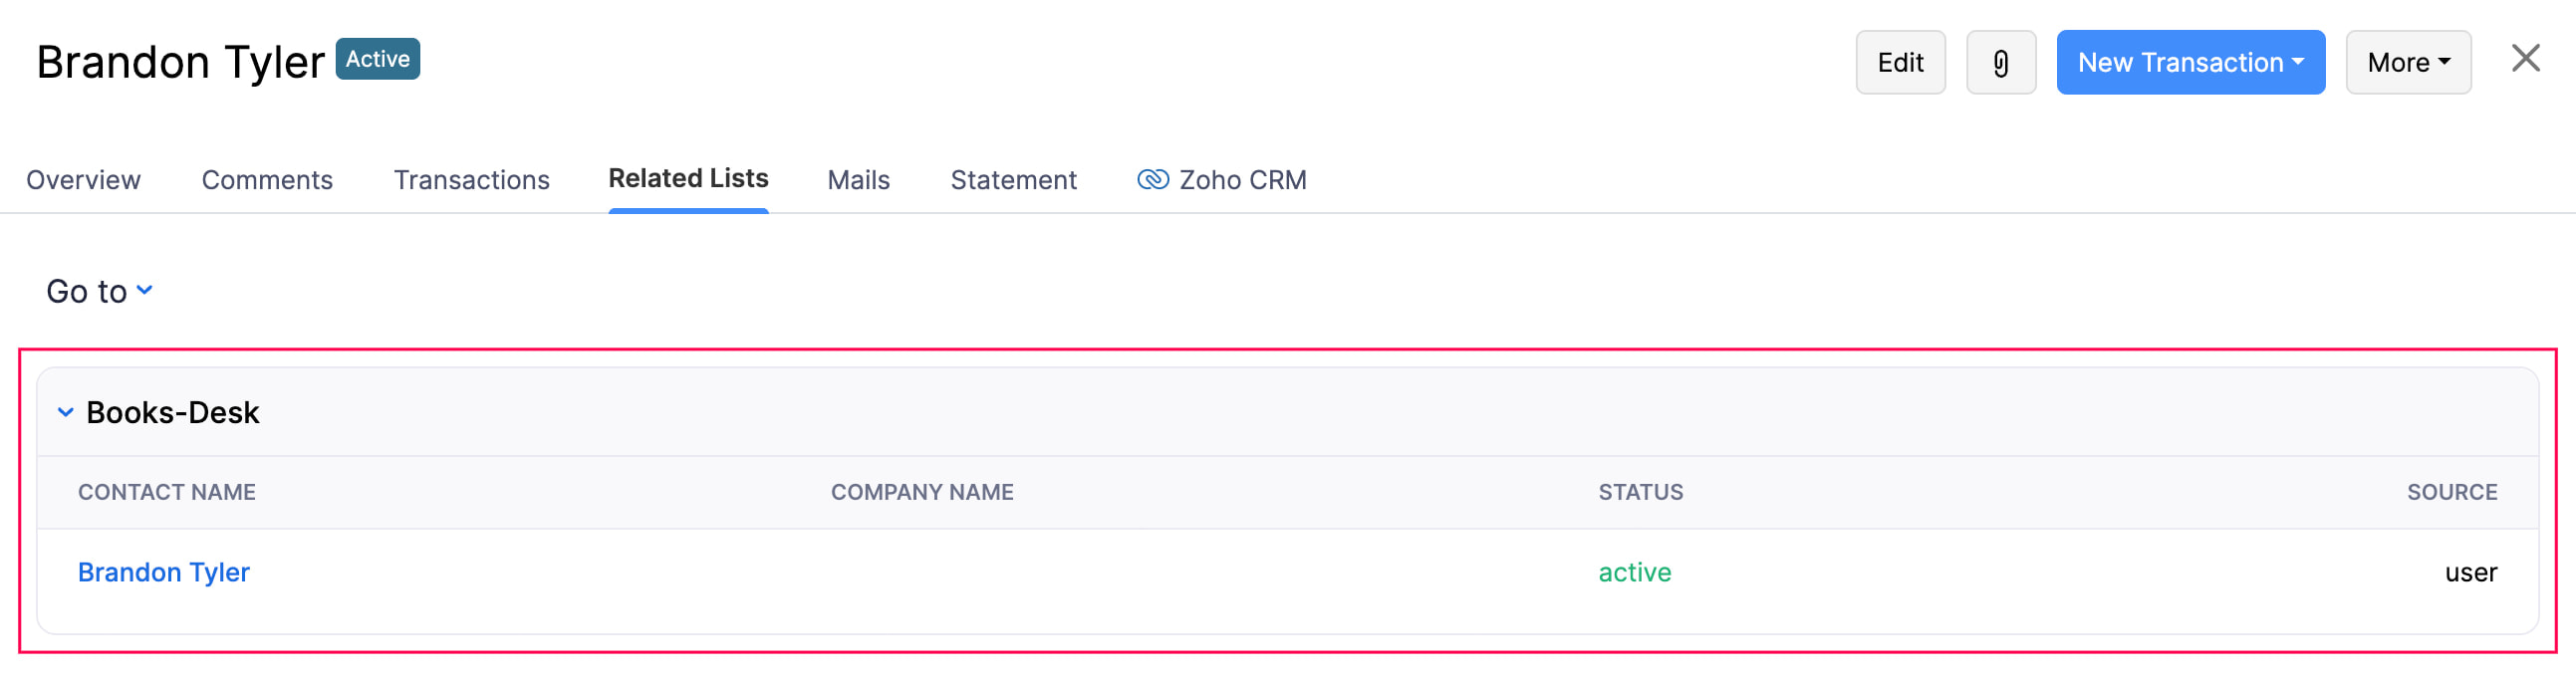
Scenario 2: Zylker uses Zoho Books for their sales and purchases, and Zoho Desk to address their customer queries. Now, the admin can write and execute a deluge script to fetch the customer happiness rating from Zoho Desk, and show the consolidated data in a tabular form under each customer in Zoho Books.
To create a related list using Deluge:
- Go to Settings in the top right corner.
- Go to the module for which you want to create a related list. In this case, Customers and Vendors.
- Navigate to the Related Lists tab.
- Click + New Related List in the top right corner.
- Enter the Related List Name.
- Select Who can view this related list? You can choose from Only Me and Everyone.
- Write a deluge script to fetch data from the connected third-party service. In this case, from Zoho Desk.
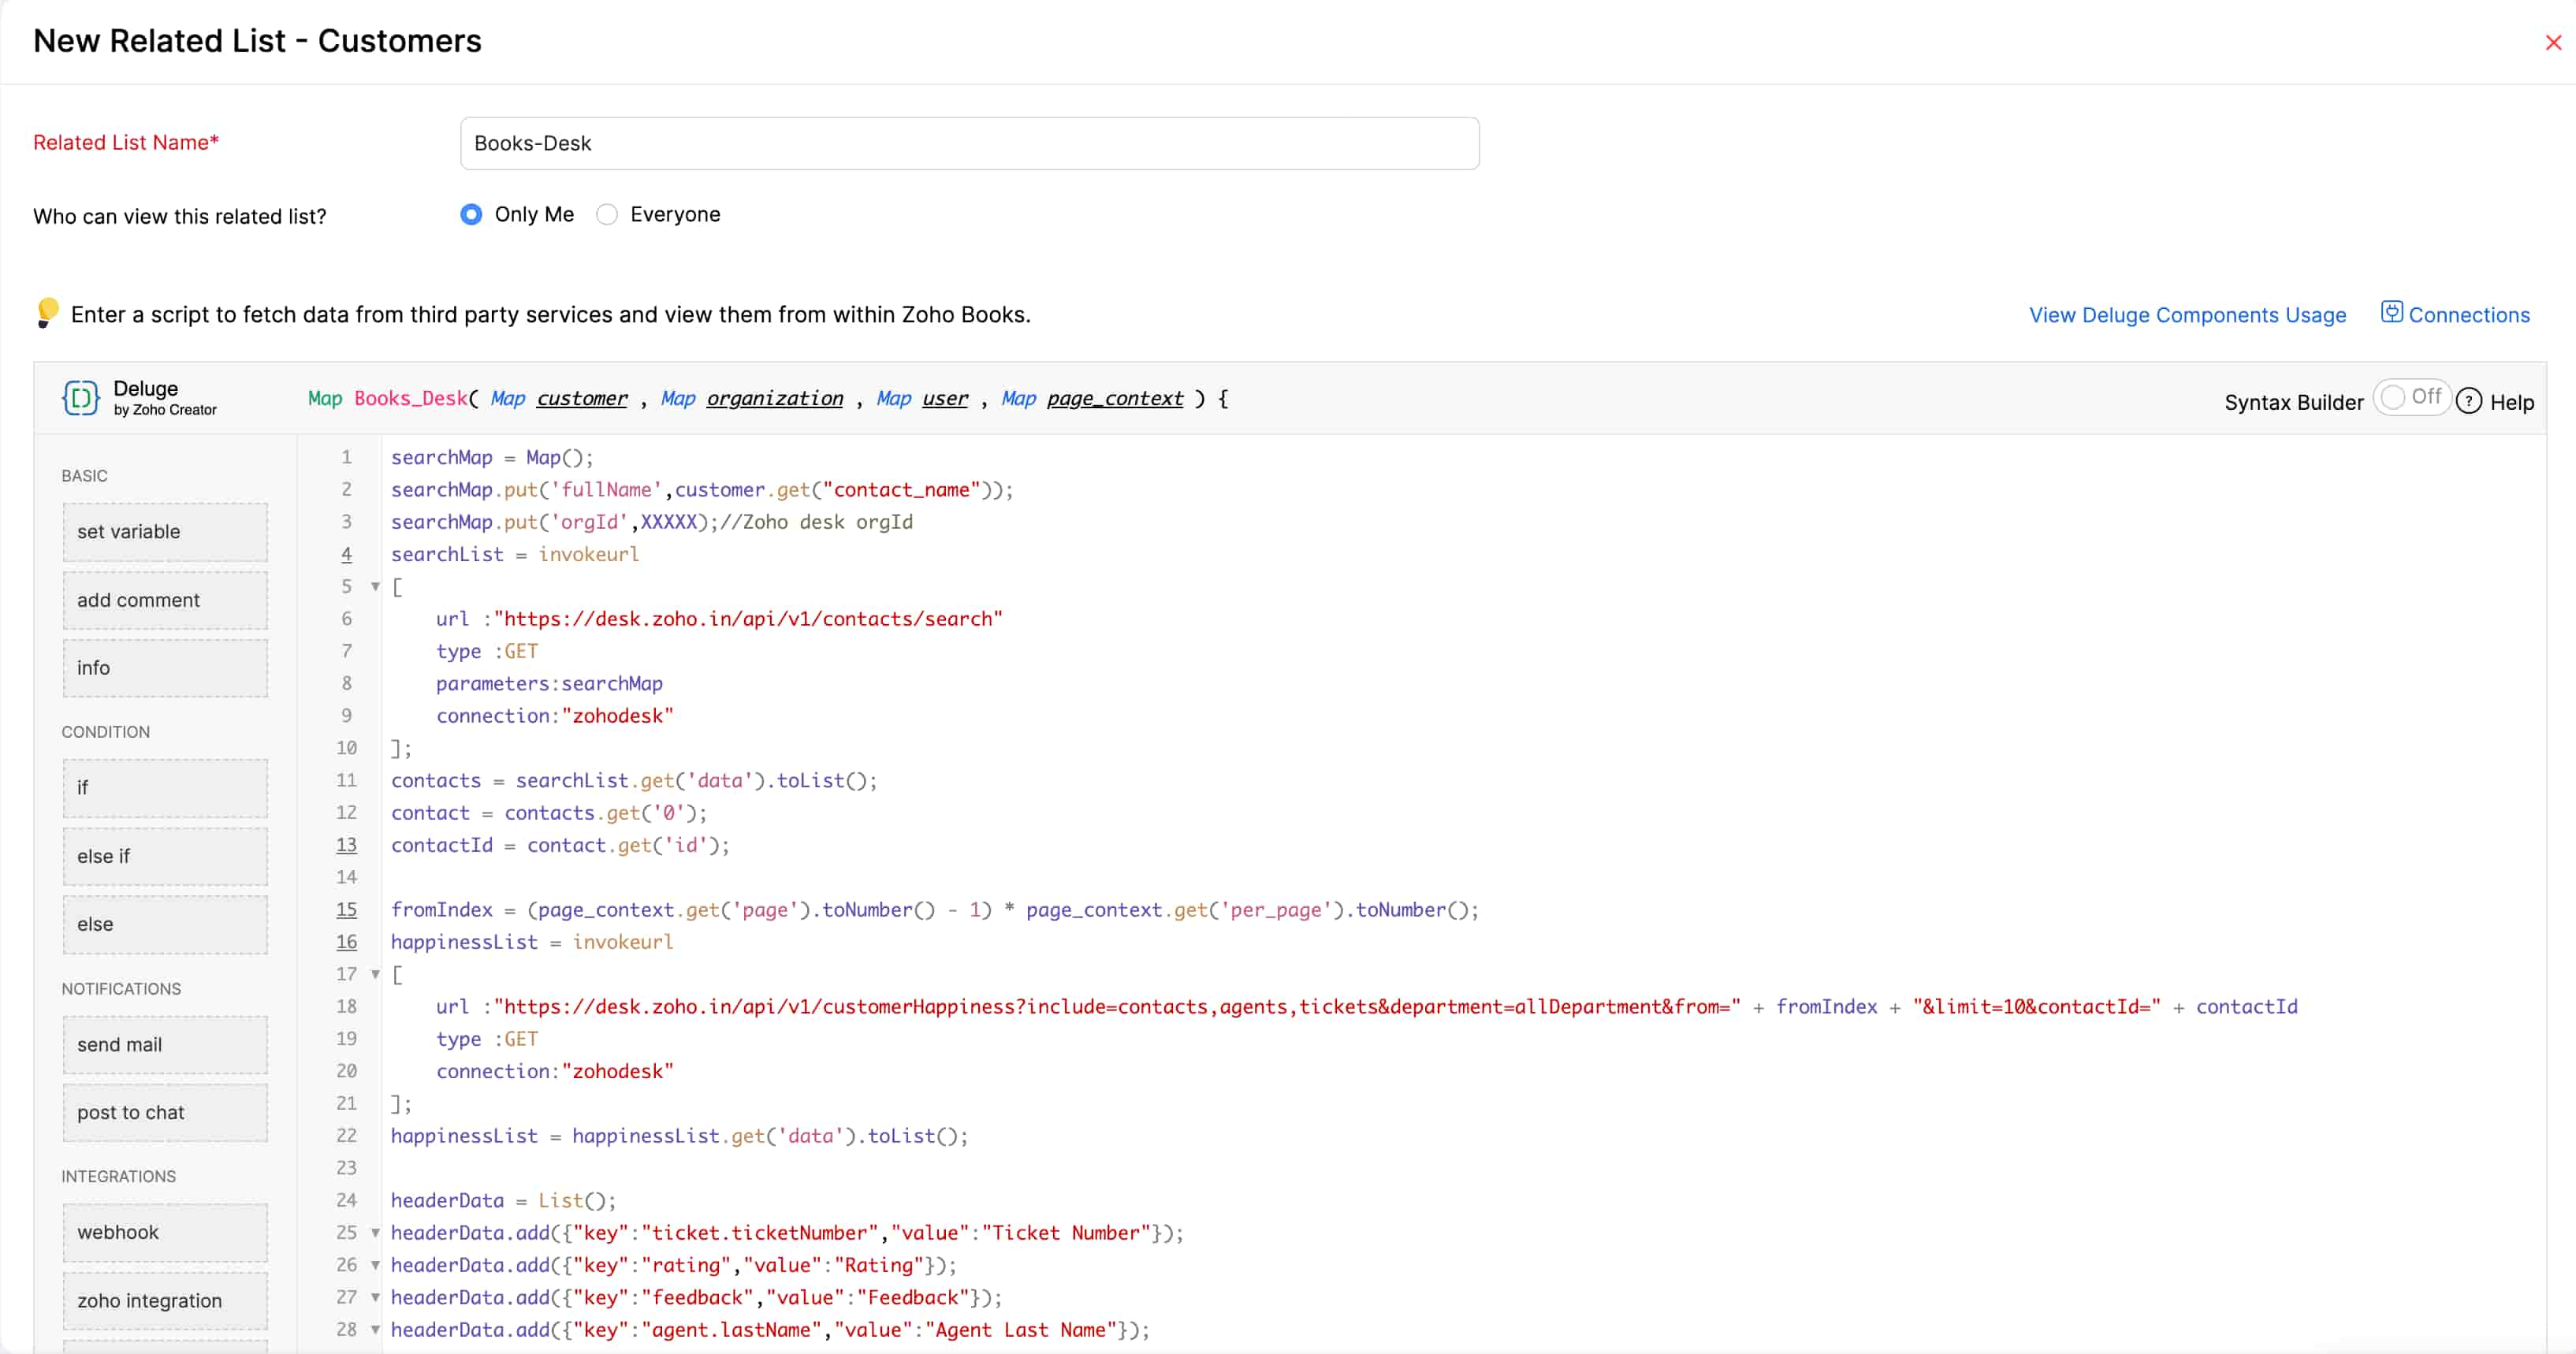
- Click Save, or Save and Execute to run the function.
The lists will be displayed under the Related Lists tab in the respective modules.
Note:
- The deluge script must return a map that contains ‘header_context’ and ‘data’ in the following format:
{ header_context: [ { key: 'customer_name', value: 'Customer Name' }, { key: 'invoice_number', value: 'Invoice Number } ], data: [ { customer_name: <customer_name>, invoice_number: <invoice_number> } ] } - There are two ways to specify the value of the data node:
- Display as a string:
customer_name: <customer_name> - Display as a hyperlink:
customer_name: {
"value": <customer_name>,
"isExternal":true, // To open the link in separate tab.
"link": <web_url_path>
}
- Display as a string:
- The Deluge script will return a map that can also contain ‘page_context’. When you try fetching all the transaction records at once, it may result in a longer page response time. To resolve this issue, the ‘page_context’ can be helpful in splitting the records based on pages and fetching them faster. For example, if you have 50 transaction records for your customers, you can split those records into 10 records per page and fetch the required data faster using page_context.
- If you want to fetch records based on pages using the Deluge script, you will have to add ‘page_context’ in the Deluge script returned value, and it should have the following properties:
- page: string
- per_page: string
- has_more_page: boolean (Should be set as false when you reach the last set of data)
{
header_context: [{...}, {...}],
data: [{...}],
page_context: {
per_page: '10',
page: '1',
has_more_page: true/false
}
}
Edit a Related List
Note: You can only edit related lists created using Deluge scripts. To edit a related list created using a lookup custom field, you need to edit the lookup field.
To edit a related list:
- Go to Settings in the top right corner.
- Select the module which has the related list.
- Click the Related Lists tab.
- Hover over the list that you want to edit.
- Click the Dropdown icon and select Edit.

Mark a Related List as Inactive
You can temporarily disable a related list y marking it as inactive. Here’s how:
- Go to Settings in the top right corner.
- Select the module which has the related list.
- Click the Related Lists tab.
- Hover over the related list that you want to mark as inactive.
- Click the Dropdown icon and select Mark as Inactive.

Mark a Related List as Active
To mark an inactive related list as active:
- Go to Settings in the top right corner.
- Select the module which has the related list.
- Click the Related Lists tab.
- Hover over the inactive related list that you want to mark as active.
- Click the Dropdown icon and select Mark as Active.

Delete a Related List
Note: You can only delete related lists created using Deluge scripts. To delete a related list created using a lookup custom field, you need to delete the lookup field.
To delete a related list:
- Go to Settings in the top right corner.
- Select the module which has the related list.
- Click the Related Lists tab.
- Hover over the list that you want to delete.
- Click the Dropdown icon and select Delete.

- Click OK in the pop-up to confirm your action.
Sample Function
Here’s a sample function for Scenario 2 that allows Zoho Books users to access customer details in Zoho Desk:
 searchMap = Map();
searchMap.put('fullName',customer.get("contact_name"));
searchMap.put('orgId',XXXXX);//Zoho desk orgId
searchList = invokeurl
[
	url :"https://desk.zoho.in/api/v1/contacts/search"
	type :GET
	parameters:searchMap
	connection:"zohodesk"
];
contacts = searchList.get('data').toList();
contact = contacts.get('0');
contactId = contact.get('id');

fromIndex = (page_context.get('page').toNumber() - 1) * page_context.get('per_page').toNumber();
happinessList = invokeurl
[
	url :"https://desk.zoho.in/api/v1/customerHappiness?include=contacts,agents,tickets&department=allDepartment&from=" + fromIndex + "&limit=10&contactId=" + contactId
	type :GET
	connection:"zohodesk"
];
happinessList = happinessList.get('data').toList();

headerData = List();
headerData.add({"key":"ticket.ticketNumber","value":"Ticket Number"});
headerData.add({"key":"rating","value":"Rating"});
headerData.add({"key":"feedback","value":"Feedback"});
headerData.add({"key":"agent.lastName","value":"Agent Last Name"});

happinessCount = invokeurl
[
	url :"https://desk.zoho.in/api/v1/customerHappiness/count?department=allDepartment&contactId=" + contactId
	type :GET
	connection:"zohodesk"
];
happinessCount = happinessCount.get('allDepartment');
totalCount = happinessCount.get('okay') + happinessCount.get('bad') + happinessCount.get('good');

pageContext = Map();
pageContext.put('page',page_context.get('page'));
pageContext.put('per_page',page_context.get('per_page'));
pageContext.put('has_more_page',false);
if(totalCount >= page_context.get('page').toNumber() * page_context.get('per_page').toNumber())
{
	pageContext.put('has_more_page',true);
}

resultMap = Map();
resultMap.put("header_context",headerData);
resultMap.put("data",happinessList);
resultMap.put("page_context",pageContext);
return resultMap;
 Yes
No
Yes
No
Thank you for your feedback!