Customizing White Label Solutions
Zoho Analytics offers various customization options to customize the White Label Solution to suit your needs.
Once the solution is enabled for your account, you can customize it using the following options.
To customize the white label settings,
- Login to your Zoho Analytics account.
- Click the Settings link at the top right corner.
- Select White Label. The White Label Settings page opens as shown in the screenshot below.
The different tabs available in the White Label Settings page are explained in detail in the following sections.
Settings
The Settings tab allows customizing the details of the white label portal that is mapped for rebranding. This section has three sub-tabs providing in-depth customization options at various levels:
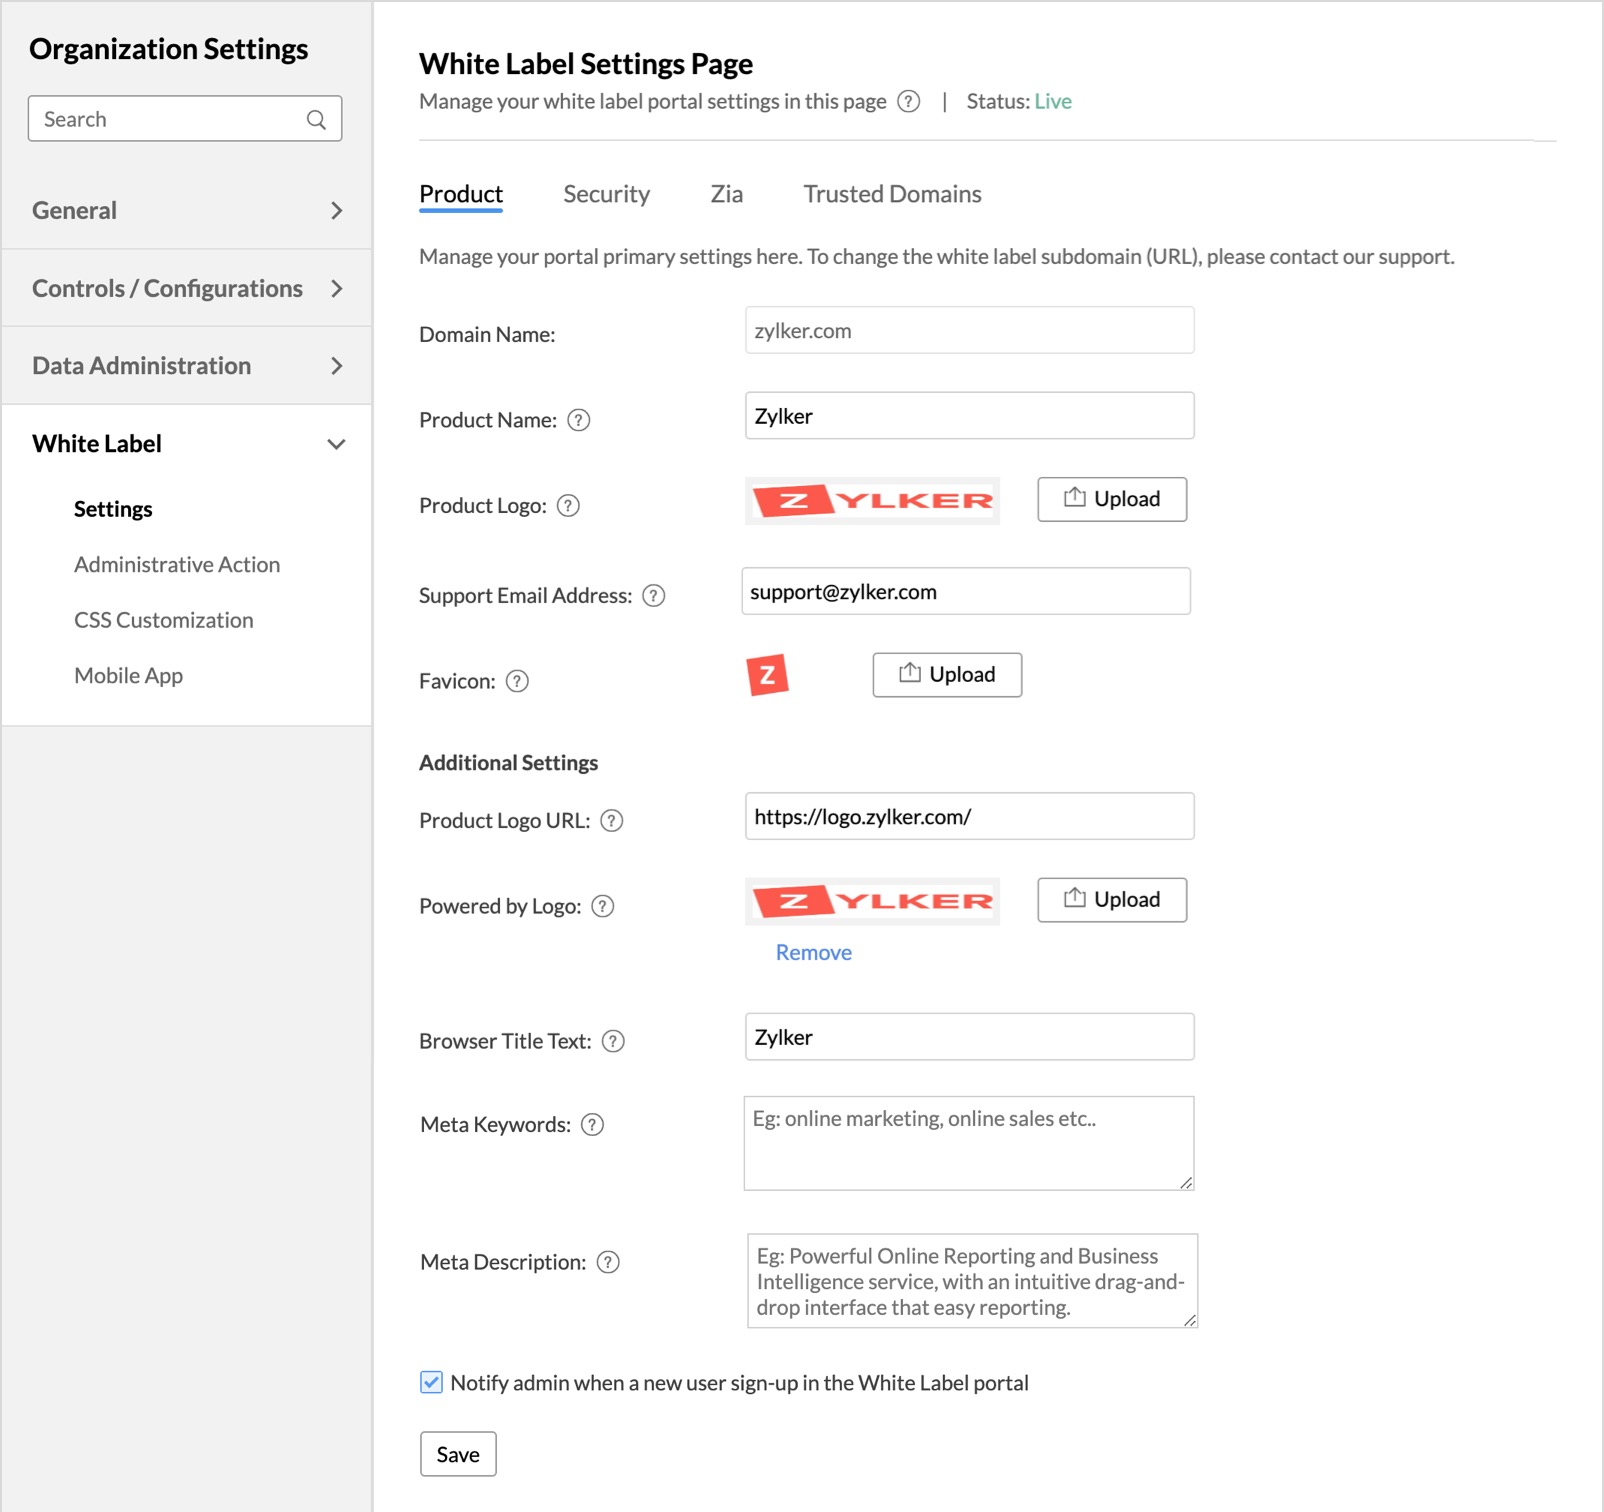
Product
The Product tab allows you to configure the web page and product settings of your rebranded site.

The following options are available inside the Product tab:
Domain Name: The domain name that you have selected upon setting up the White Label solution will be listed here. You will not be allowed to edit this option. If you wish to change your domain name, write to us at support@zohoanalytics.com.
Product Name: Provide the name of your product here. This name will be used in all instances where Zoho Analytics name is currently displayed.
Product Logo: Upload a logo for your White Label application. The supported file formats are .gif, .jpg, .png and .bmp and the recommended size of the image is 170x25px.
Support Email Address: Enter a support email address. This email address will be used in all instances for email communications where the Zoho Analytics support (support@zohoanalytics.com) email address is currently used.
Favicon: Upload an icon that you want to display along with the page title in the browser tab. 
From the Additional Settings section you can customize the following options:
Product Logo URL: Enter the URL to go to when the product logo is clicked.
Powered by Logo: Upload the Logo that needs to be shown when you embed the reports and dashboards. Supported file formats for the logo are .gif, .jpg, .png, .bmp and the recommended size is 170 x 25 px.
Browser Title Text: Enter the text that you wish to display as the page title of your web page that will be available at the top of the rebranded site.
Meta Keywords: Enter the Meta Keywords for the page. Meta keywords are keywords that will help the search engines understand what the page is all about and helps in ranking pages for search engine optimization.
Meta Description: Enter the Meta Description. The meta description summarizes the content of the web page. Search engines show the meta description in search results mostly when searched for the phrases in the description and helps in ranking pages for search engine optimization.
Notify admin when a new user sign-up in the White Label portal: Select this check-box to get notifications whenever a new user signs up from the web page.
Security / SSO Settings / SAML Settings
This section varies based on the white label solution chosen.
Security
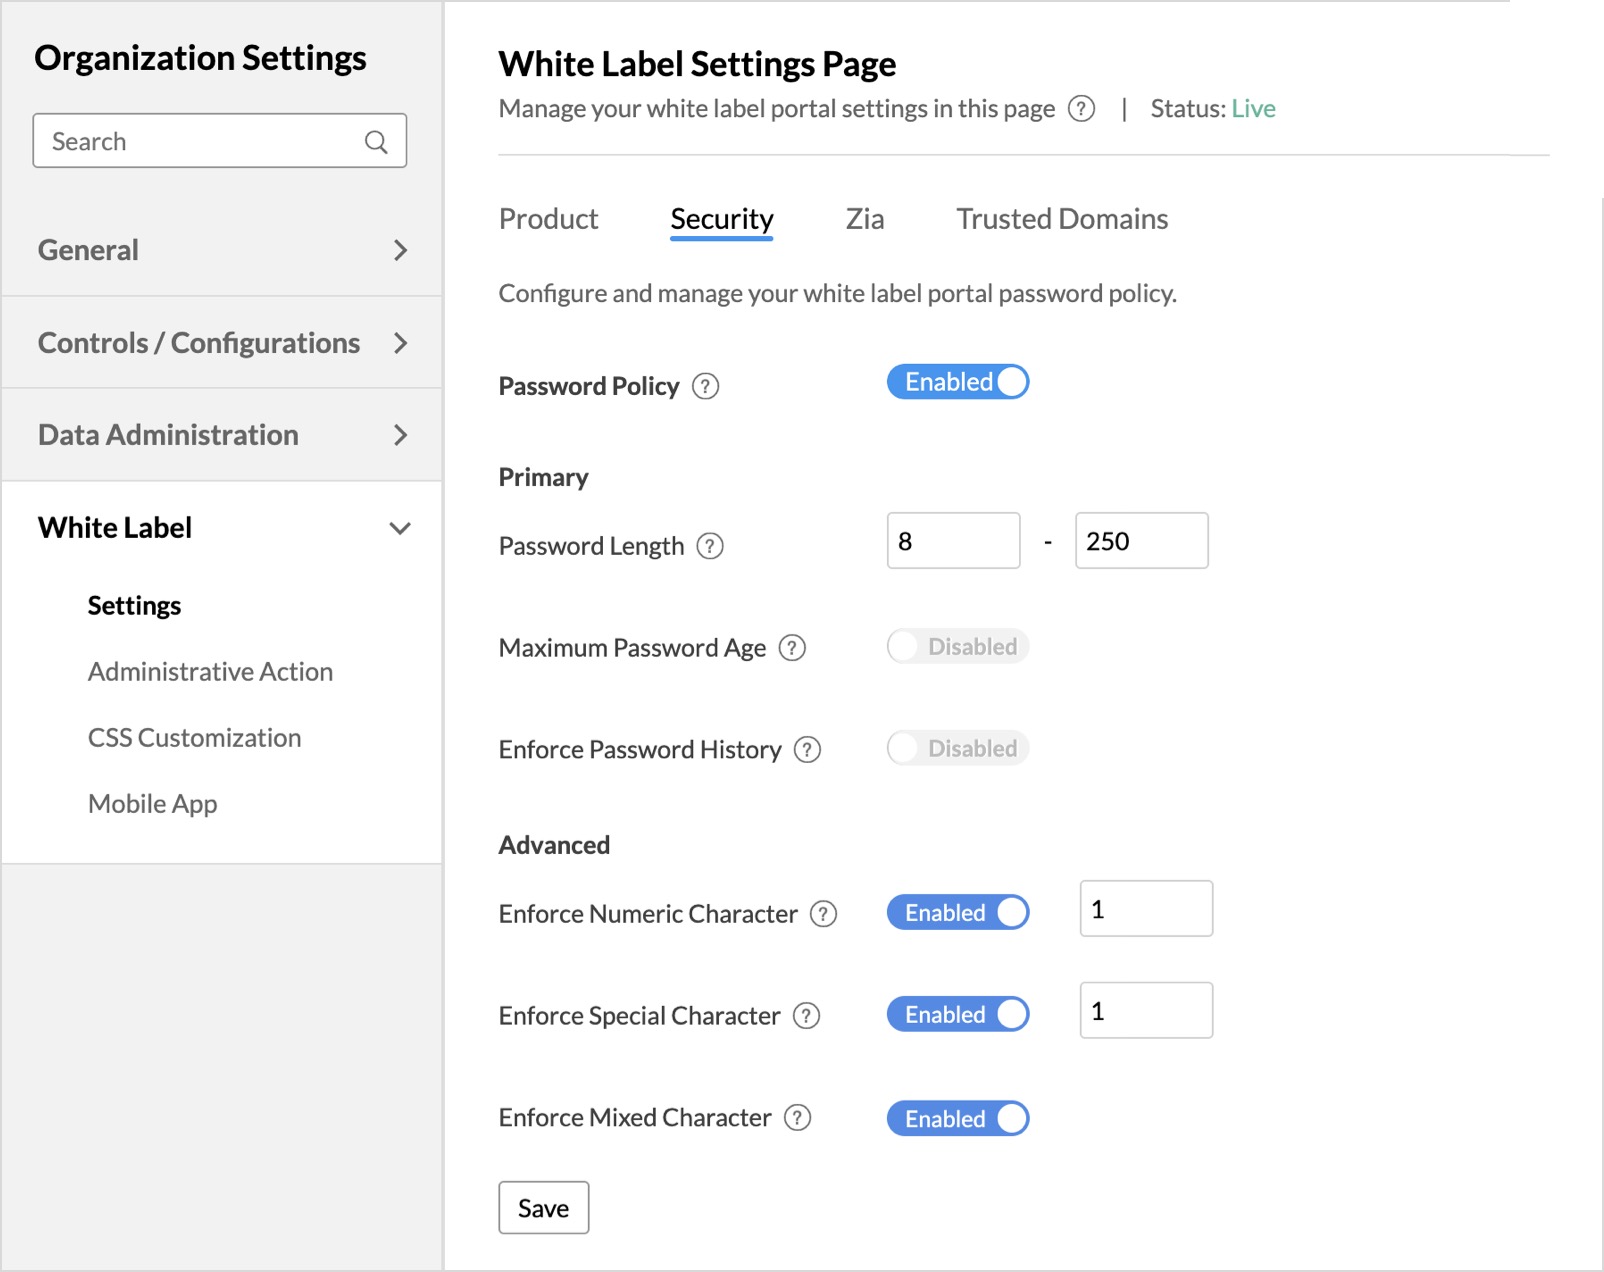
Password Policy: Enable this option to apply password policies such as password length, password age, etc., on your web-page. This tab is sub-divided into Primary and Advanced sections.
The Primary section has the following options:
Password Length: Specify the minimum and maximum length of the password that needs to be used for your white label portal.
Maximum Password Age: Provide a tenure for your password. After the specified tenure, the password expires and the user has to update the password.
Enforce Password History: Enable this option to avoid the repetition of old passwords by your users.
The Advanced section has the following options.
Enforce Numeric Character: Enable this option to enforce your users to use one or more numeric characters in their password. Provide the number of numeric characters to be used in the text box available inline with the option.
Enforce Special Character: Enable this option to enforce your users to use one or more special characters in their password. Provide the number of special characters to be used in the text box available inline with the option.
Enforce Mixed Character: Enable this option to enforce the users to use a combination of uppercase characters, lowercase characters, digits, and special characters.
SSO Settings
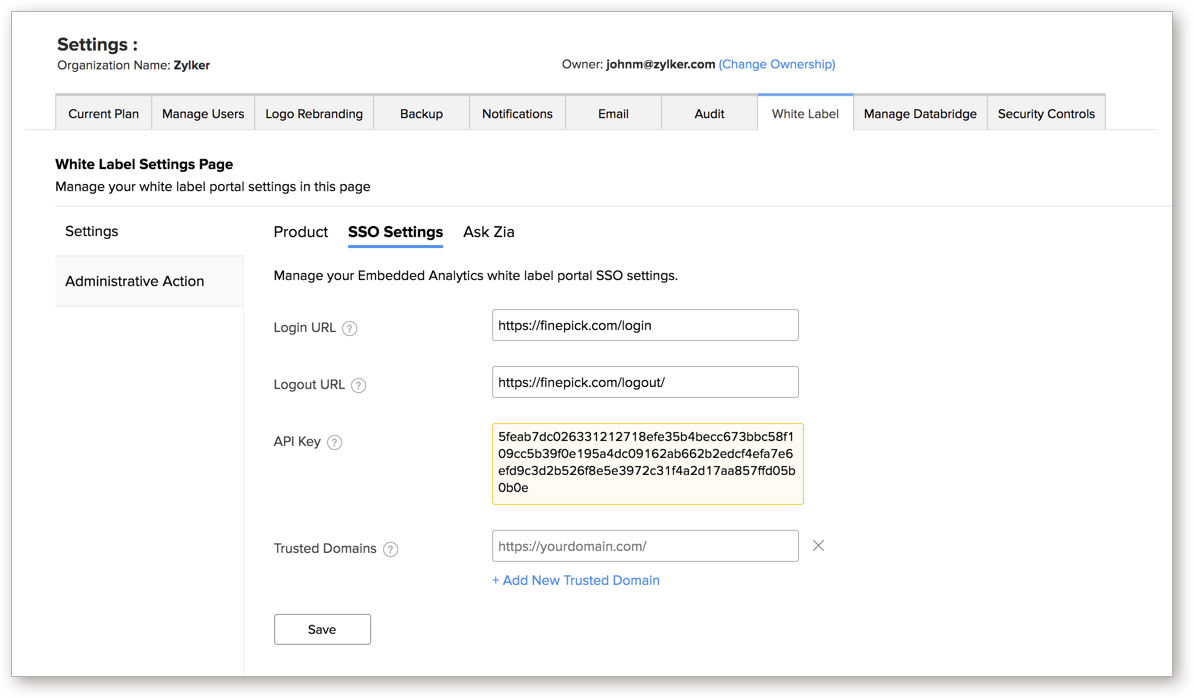
Login URL: Edit the app/site URL where login happens in your application. This will be displayed to your user in case he has not logged in to your product/service that is integrated with Zoho Analytics and accesses the domain URL directly.
Logout URL: Edit the URL to which the user has to be redirected upon logging out of your application.
API Key: Those who have set up the White Label solution with single sign-on can add the users via the Single Sign on API. Alternatively, they can also Sign Up from the interface.
Trusted Domains: Enter your application's domain where the white label portal will be embedded for seamless access.
SAML Settings
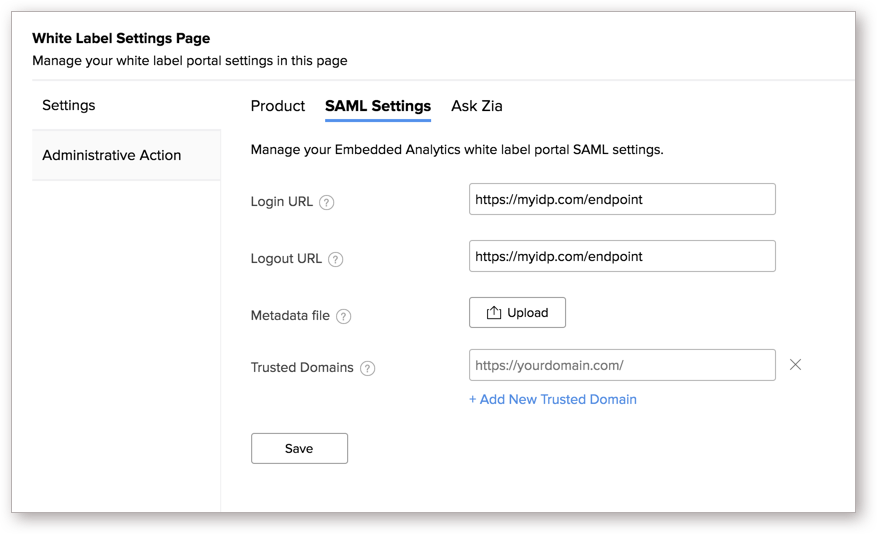
Login URL: Edit the app/site URL where login happens in your application. This will be displayed to your user in case he has not logged in to your product/service that is integrated with Zoho Analytics and accesses the domain URL directly.
Logout URL: Edit the URL to which the user has to be redirected upon logging out of your application.
Metadata file: SAML metadata is an XML document that contains the information necessary for interaction with SAML-enabled identity or service providers. Upload your SAML metadata file here.
Trusted Domains: Enter your application's domain where the white label portal will be embedded for seamless access.
Zia
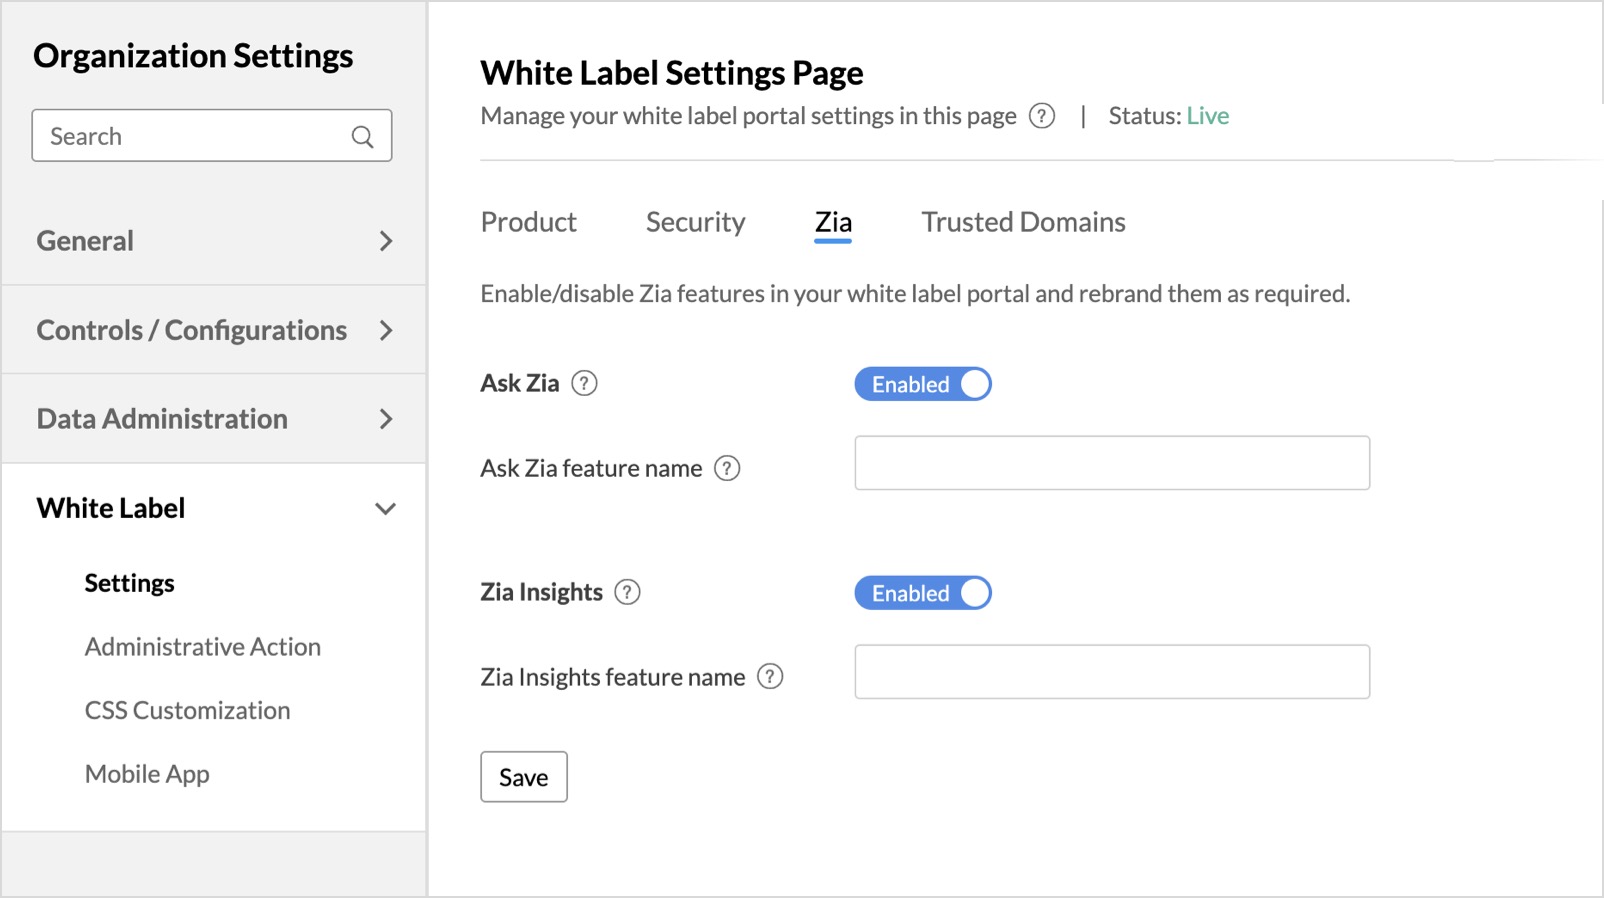
Ask Zia is a search-driven analytical assistant that helps you create reports instantly. You can ask questions in natural language and Ask Zia generates the most relevant reports as answers to you. The Ask Zia tab allows you to enable/disable the AI assistant.
Ask Zia: Enable this option to allow your white label portal users to access the AI assistant.
Personalized Name: Provide a name for your smart assistant. The name provided here will be displayed on your white label portal in place of Zia's name.
Click here to learn more about Ask Zia.
Trusted Domains
The Trusted Domains tab allows you to configure the domains where you can embed the Zoho Analytics reports/views.
In the Embed/Published URL section, set the Allowed Domains toggle button as Enabled and enter the trusted domains in the given field. You can specify upto 100 domains.
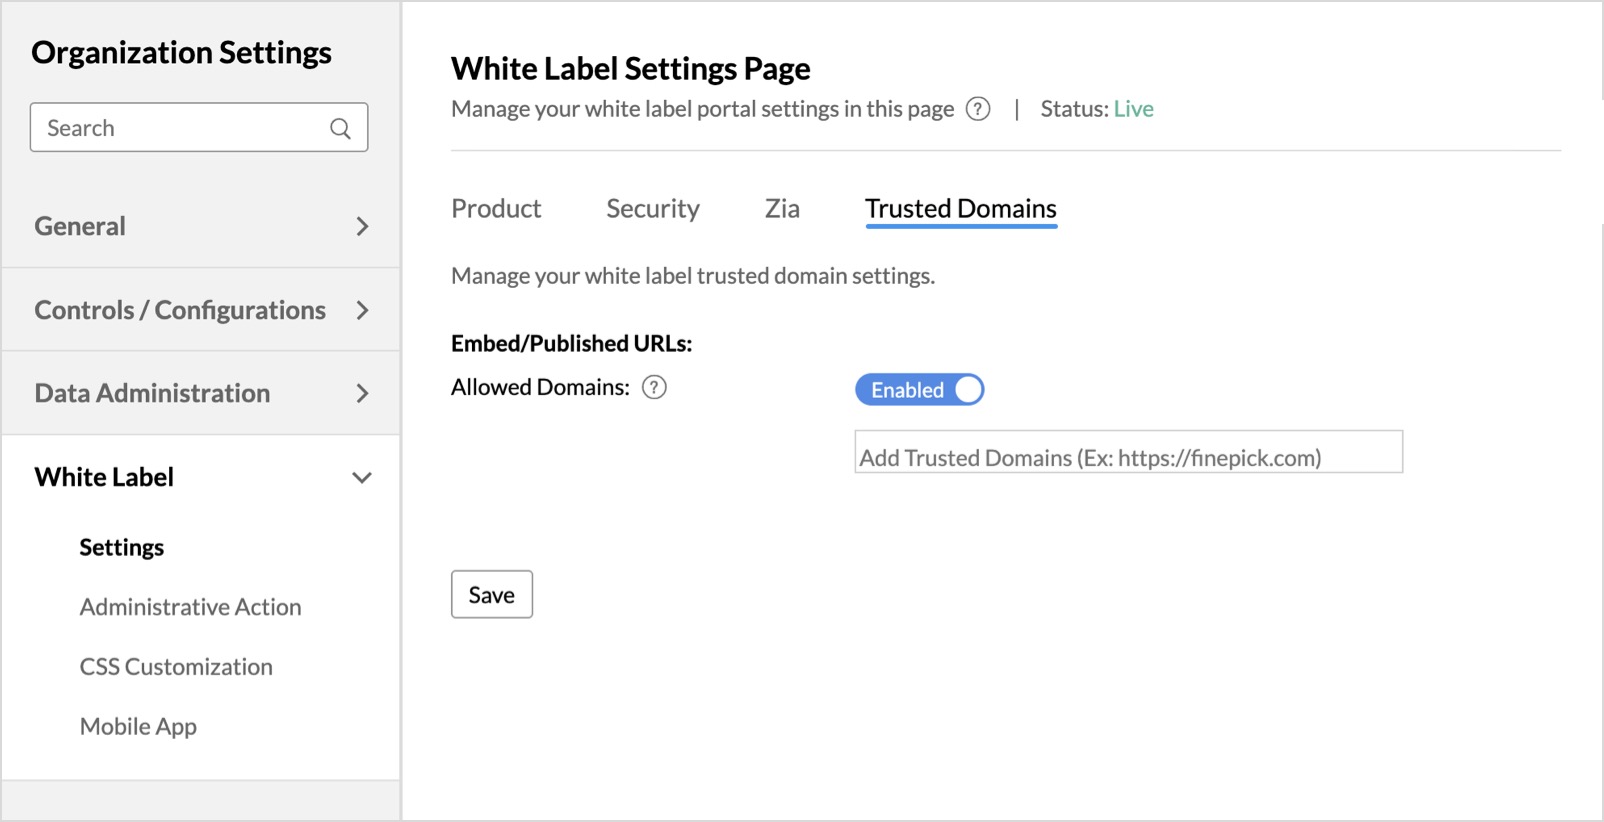
Now you can embed the Zoho Analytics views only in the configured domains.
Administrative Actions
The Administrative Actions tab allows you to handle important administrative options. This section has the following sub-tabs providing in-depth customization options at various levels:
Workspace
The Workspace page allows you to:
- Enable the workspace to make it visible and accessible in the white label portal
- Configure workspace level IP address restriction and allow users to access the workspace from a specific network
Enable the workspace to make it visible and accessible in the white label portal
By default the Workspaces that you create will not be accessible for the white label users, you must explicitly enable the workspaces that you want your users to access. To enable the Workspace to be accessible from the white label solution, enable the slider next to the workspace name.
Configure workspace level IP address restriction and allow users to access the workspace from a specific network
Zoho Analytics allows you to configure IP addresses to access the Workspaces. To configure the IP addresses you first have to enable the workspace. 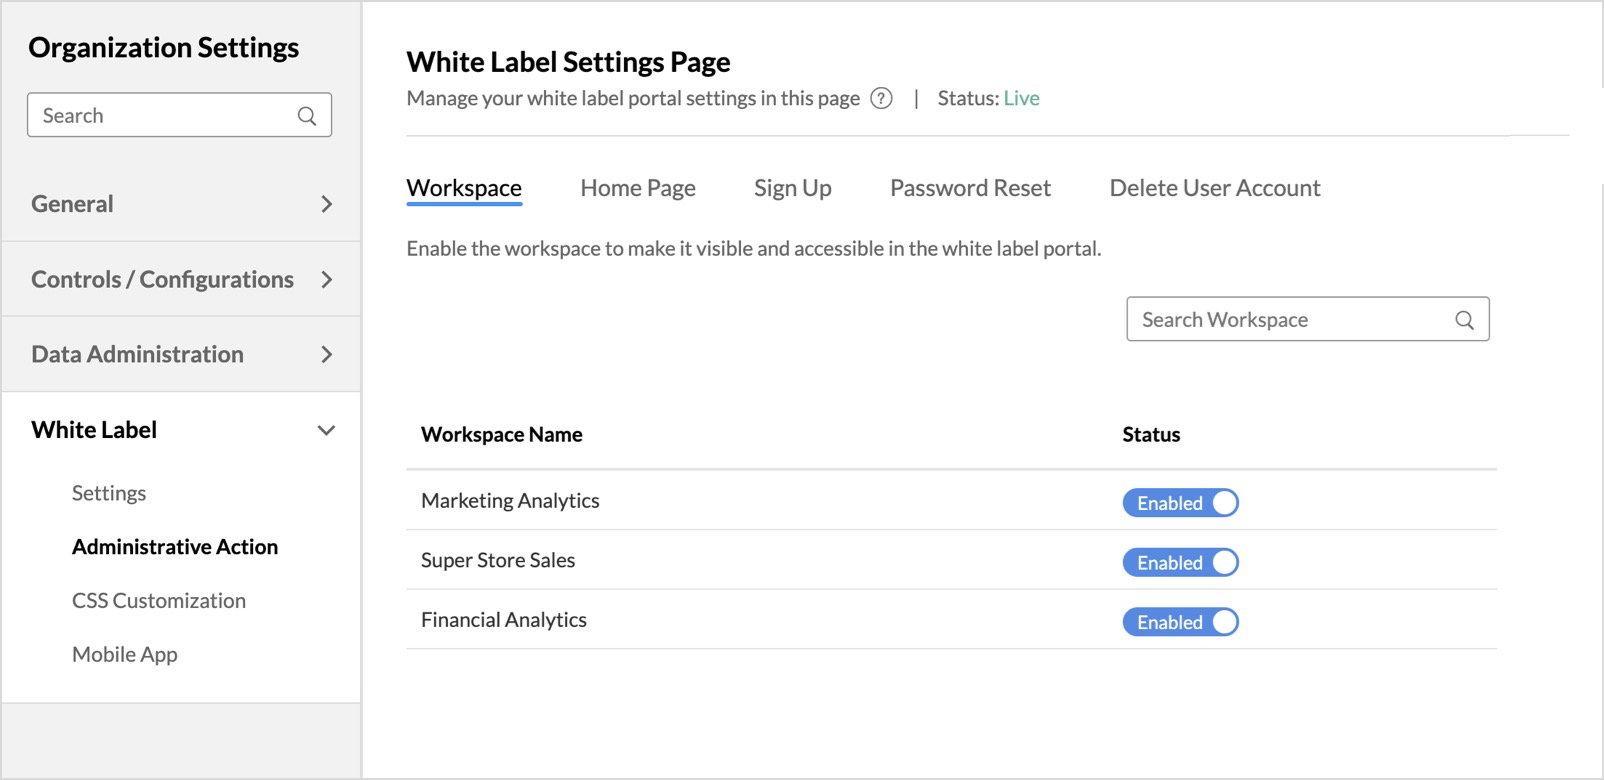
Once you enable the workspace,
- Click the Configure link inline with the workspace name.
- Click the + Add New IP Range link.
- Enter the Start and End IP Address.
- Select the Restrict access to public views check-box to allow public views to be accessed only from the mentioned range.
- Click Apply.
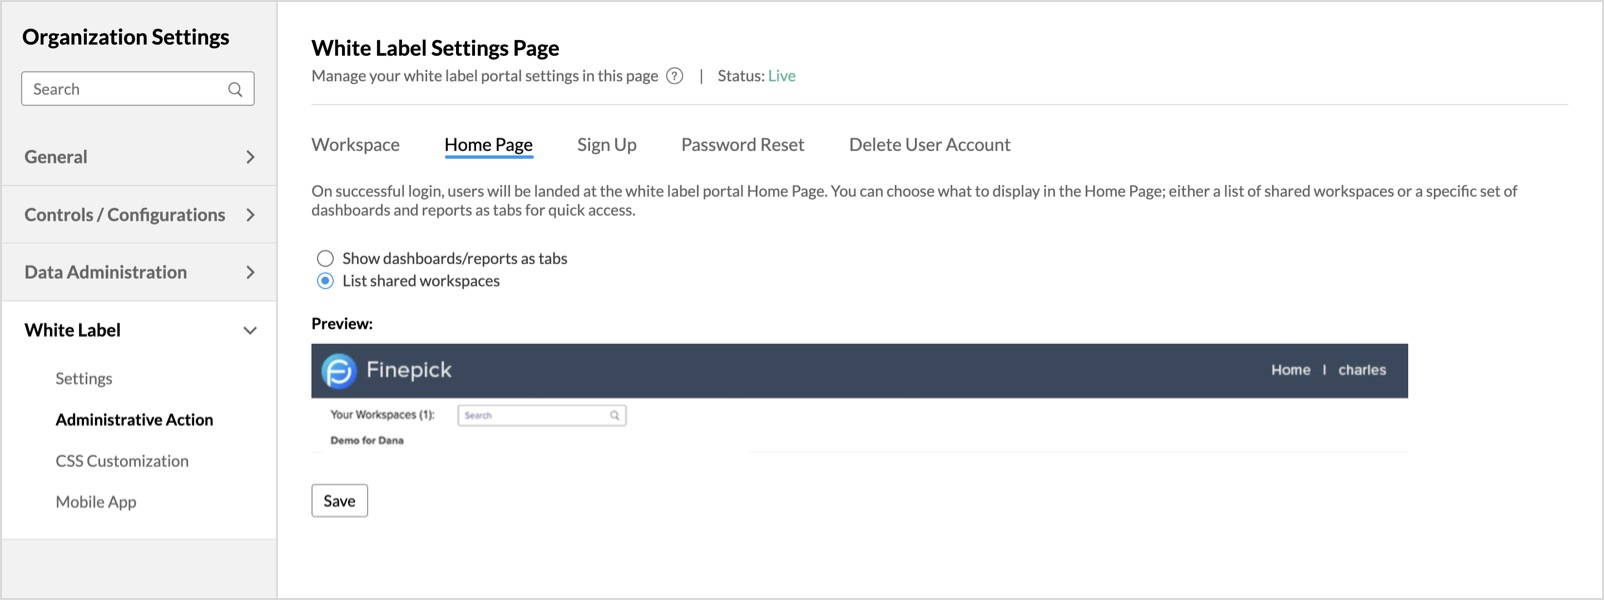
Homepage
Home Page will be displayed on successful login into the white label site/domain. You can choose to list the accessible Workspaces or specific dashboards/reports as tabs for quick navigation.
Zoho Analytics provides two options to customize the way reports and dashboards will be displayed in the Home Page.
Show dashboards/reports as tabs
This option will display all the selected reports and dashboards as tabs in the home page.
Selecting Show dashboards/reports as tabs will allow you to further customize the homepage using the below options.
- Show selected views as tabs: Select this option to choose specific instances of reports and dashboards across all the Workspaces in your account. You can choose any number of reports and dashboards.
- Show matching view names as tabs: Selecting this option will list all the distinct view names that are available across all Workspaces. You can select the view name that needs to be displayed in the home page. This will be useful if you want to display a view with the same name as tabs across a shared workspace.
Let us say you have two workspaces A and B each containing a report with the name "Sales". The User X has access to the workspace A, User Y has access to the workspace B, and User Z has access to both A and B. Now, User X will be able to see the Sales report from workspace A, User Y will be able to see the report from workspace B and User Z will be able to see the report from both the workspaces.
You can select the views and re-order them using the up and down arrows available next to the Selected Views section. Clicking the Remove all link will remove all the selected views.
Show "View all Reports" link in the tabs panel: Check this option to display a "View all reports" link. This option will enable you to view all the reports and dashboards that are shared with you.

Show "Toolbar" for reports/dashboards: Select this option to display the toolbar for individual reports that are displayed on the homepage
List Shared Workspaces
This option will list all the Workspaces that are shared to the user.
Please do note that to have a workspace shared to a user, it must first be enabled. Click to learn more.
Sign Up
The Sign Up tab allows the administrator to add a new user to the account. This will create a user account for the user in the White Label portal.
To add a new user,
- Click the + Add New user link.
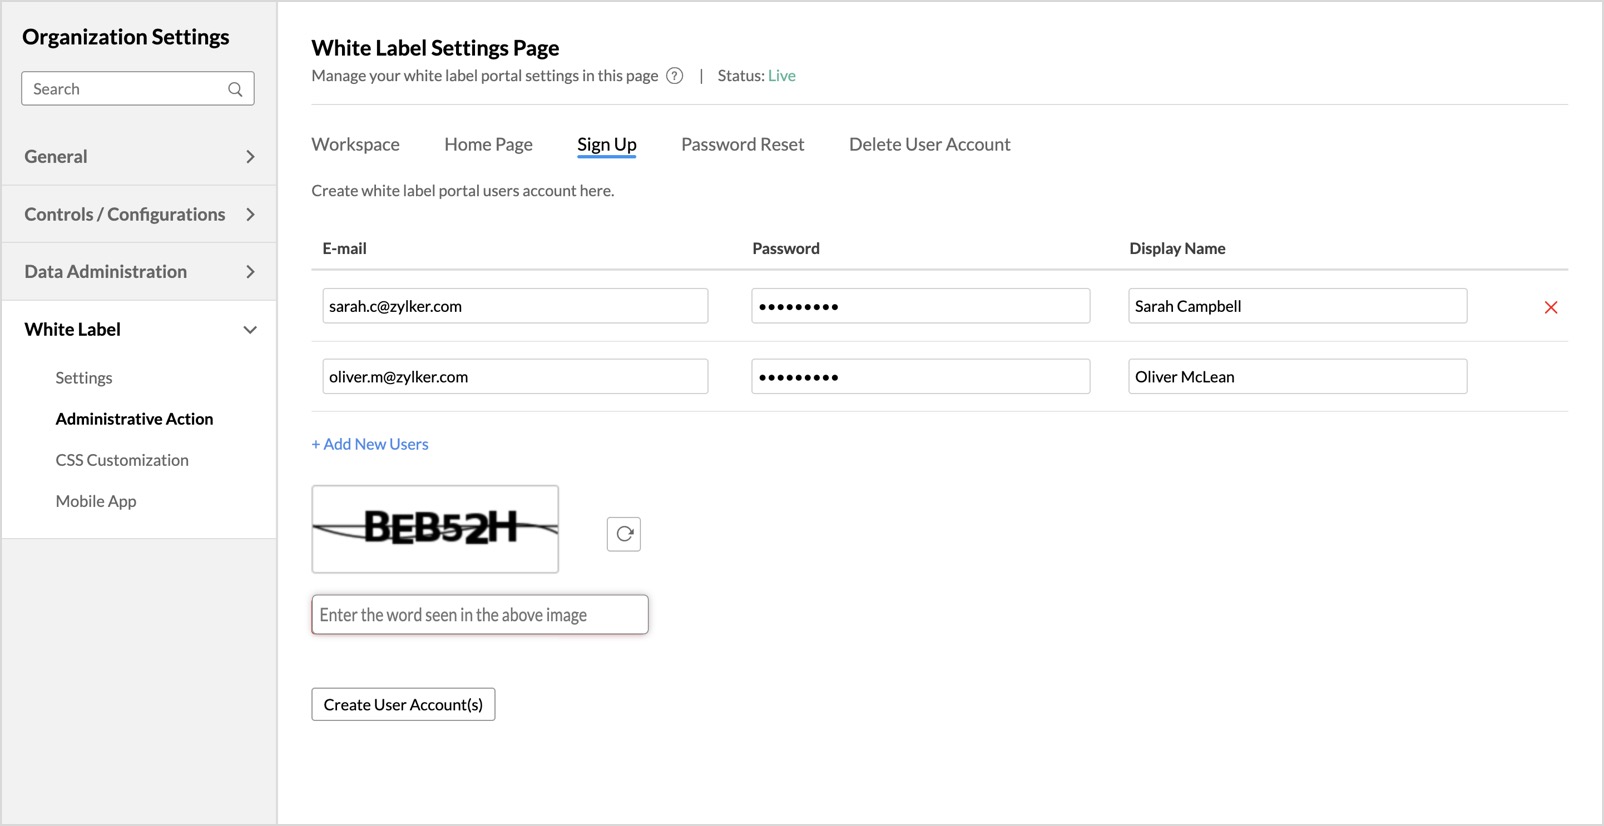
- Specify the E-mail, Password, and Display Name.
- Take the CAPTCHA test by entering the word shown in the image.
- Click Create User Account(s).

Please do note that this option will only add the users into your account but for them to access the Workspace, you must explicitly share the reports to them.
Password Reset
You can reset your user's password from this page. This tab is available only for Non-SSO users.

- Enter the user's mail address in the Enter Email Address text box whose password you wish to change.
- Provide a password in the New Password text box for this user.
- Re-enter the password in the Confirm Password text box to confirm.
- Take the CAPTCHA test by entering the word shown in the image.
- Click the Reset Password button to delete the user account from your white label portal.
Delete User Account
You can delete a user's account from this page.
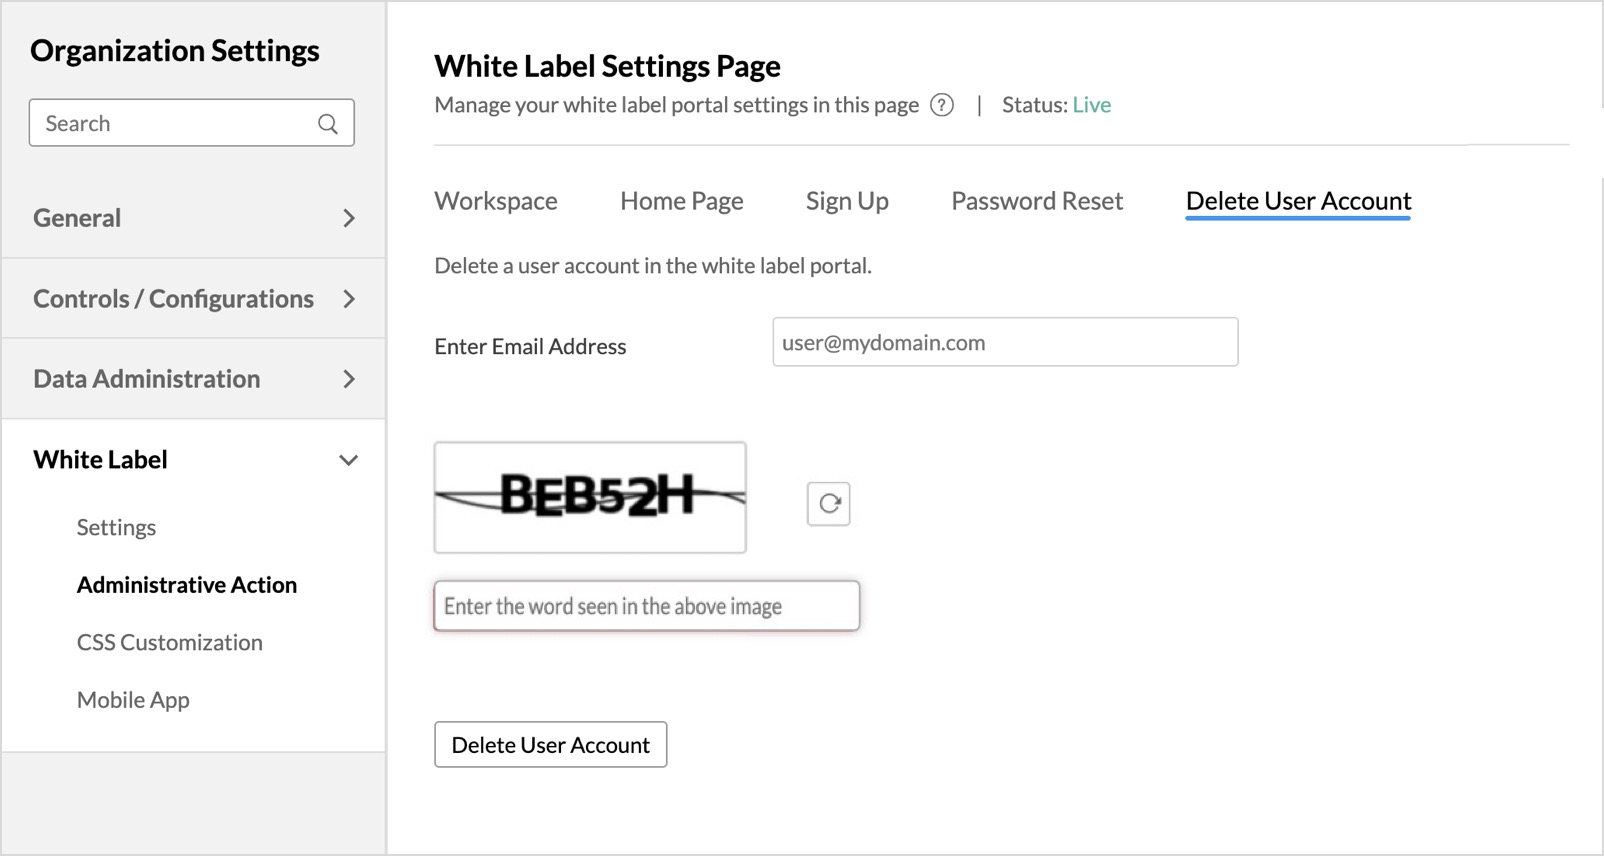
- Enter the user's mail address in the Enter Email Address whose account you wish to delete.
- Take the CAPTCHA test by entering the word shown in the image.
- Click the Delete User Account button to delete the user account from your white label portal.
CSS Customization
The CSS customization options allow you to tailor the appearance and styling of your white label product (version of Zoho Analytics) to align with your brand.
To enable CSS Customization,
- Click the CSS Customization tab from the White Label section on the left side menu.
- Click on the toggle button CSS Customization to enable CSS Customization for your white label product.
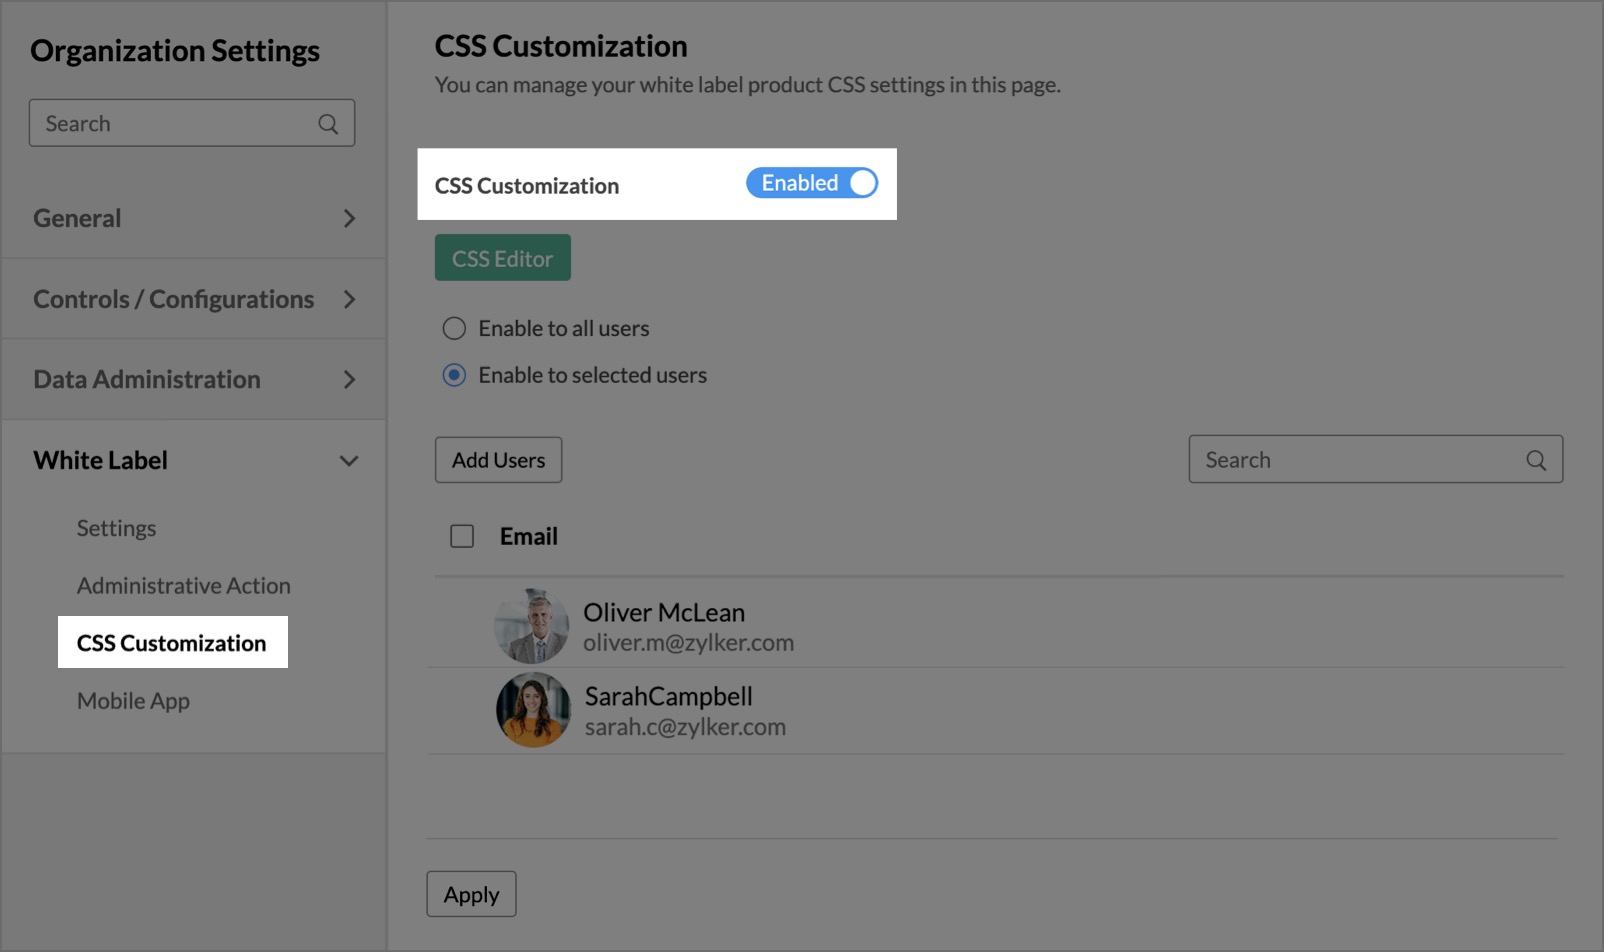
- Click the CSS Editor button to customize the appearance and styling of your white labeled product. The CSS editor allows you to modify visual elements like colors, fonts, and other graphical components to align with your brand.
To learn more about the customization options available for tailoring the look and feel of your product, click here. - You can choose to enable this customization to all the users or limit it to selected users.
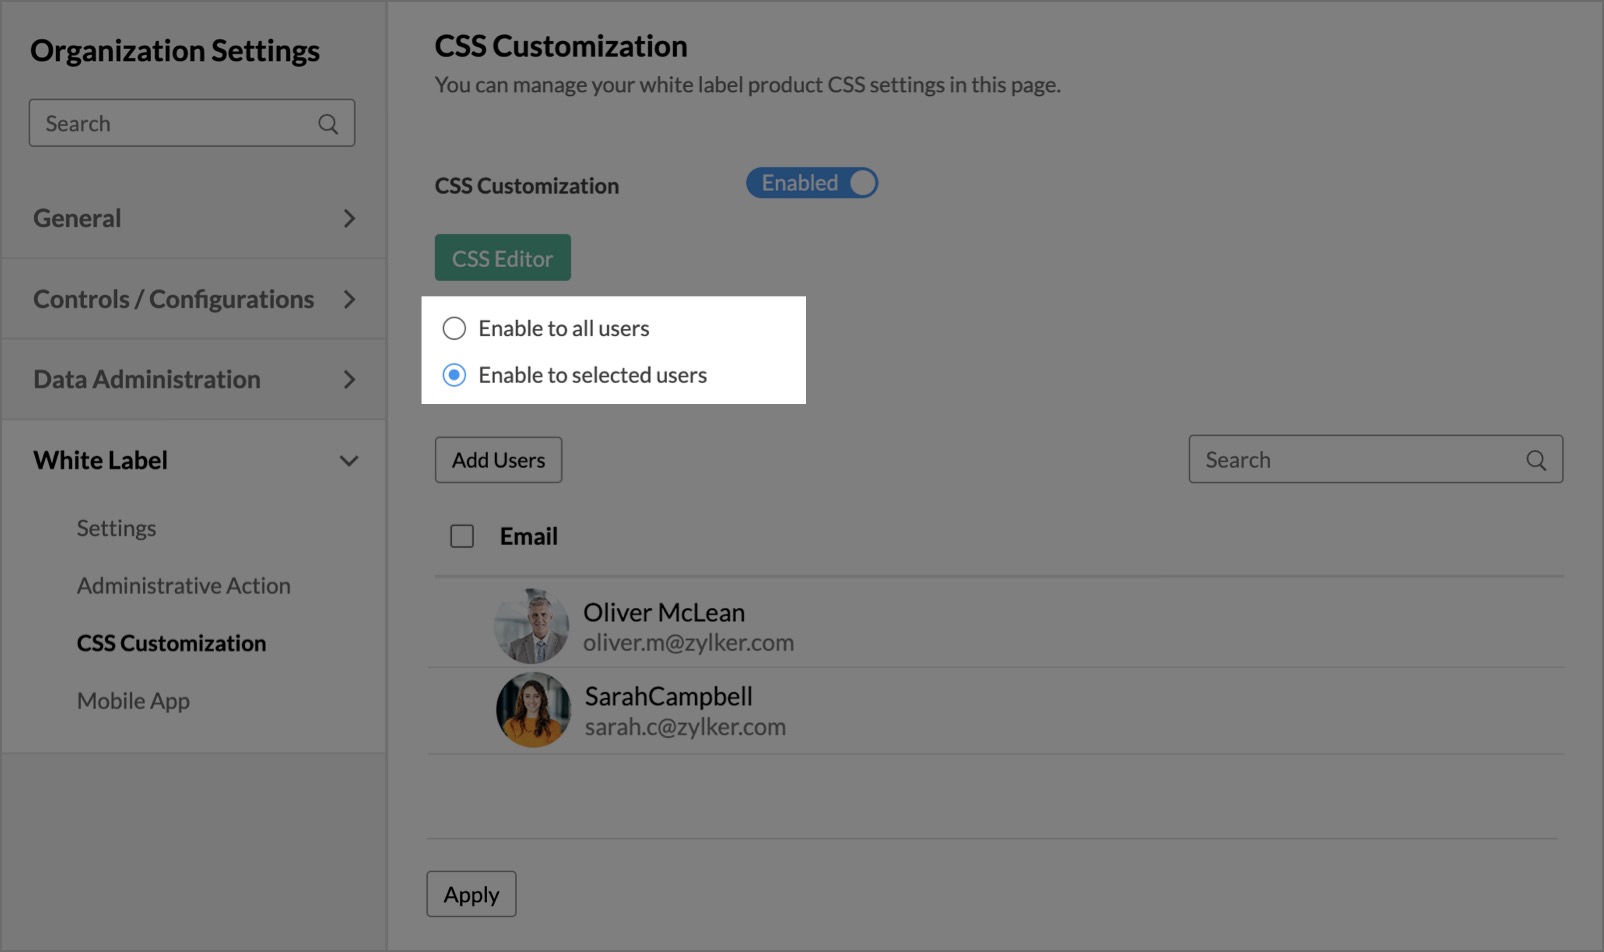
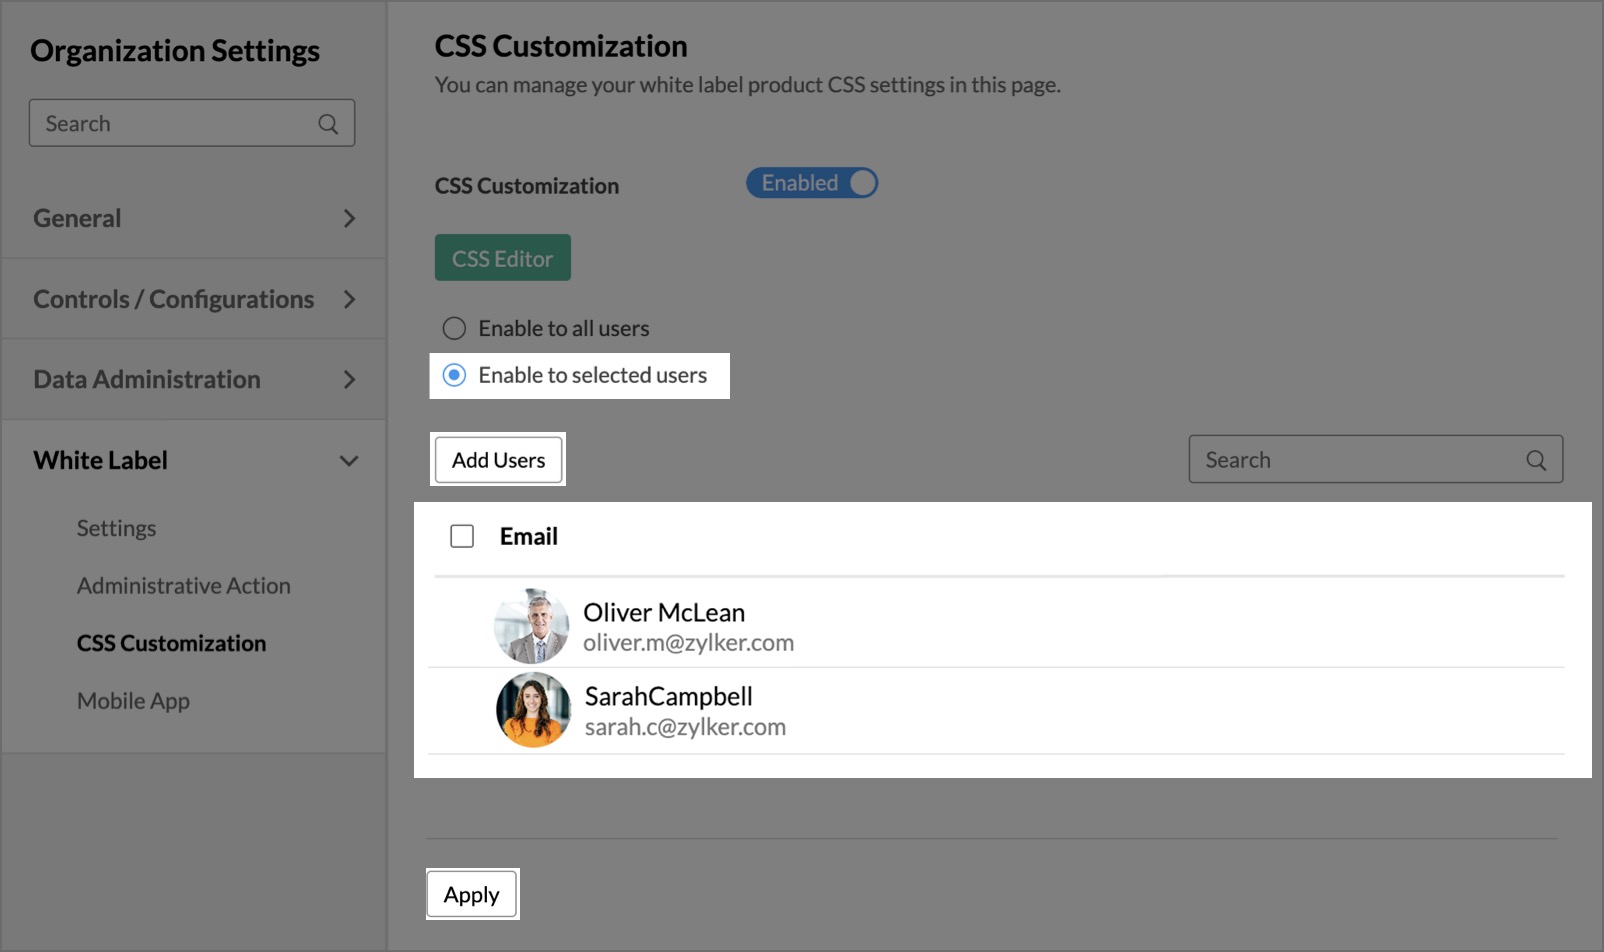
- On selecting Enable to selected users option, the Add Users button and a list of names and email addresses of the selected users will appear.
- Click the Add Users button to add your domain users to the selected users list to whom CSS customization can be enabled.
- Click Apply to save and implement the CSS customizations across the white labeled product, based on your selected styling preferences.


CSS Editor
The CSS Editor allows you to customize the styling across different sections of your product.
To edit the CSS,
- Click the CSS Editor button on the CSS Customization page.

The CSS Editor page will open with the following tabs
Tabs Description Properties Lists the customizable style properties organized by different product sections/pages. This allows targeted selection of elements to customize.
You can select any property of a section to open its CSS and preview in the Editor and Preview tabs respectively.
Editor The CSS code editor where you can directly edit CSS styles to customize visual properties.
You can edit the code and revert the changes done in the Editor section. Click Run to visualize the changes in the preview section.
The editor section includes a toggle button to switch between the following editing options:
- UI - Customize the look and feel of your product directly by selecting colors and fonts without needing to write any code.
- CSS - Perform customization by editing the product's CSS for more advanced and detailed styling.
Preview Displays a live preview which dynamically visualizes all style changes applied in the Editor in real-time to see the direct visual impacts.
It has three tabs - Home, Explorer, and Components. You can switch between the tabs to visualize the customizations applied in real-time.
- You can select any property, customize its CSS, and preview its results in the Editor and Preview tabs, respectively.
- Selecting the </> All section shows the entire CSS of your product.
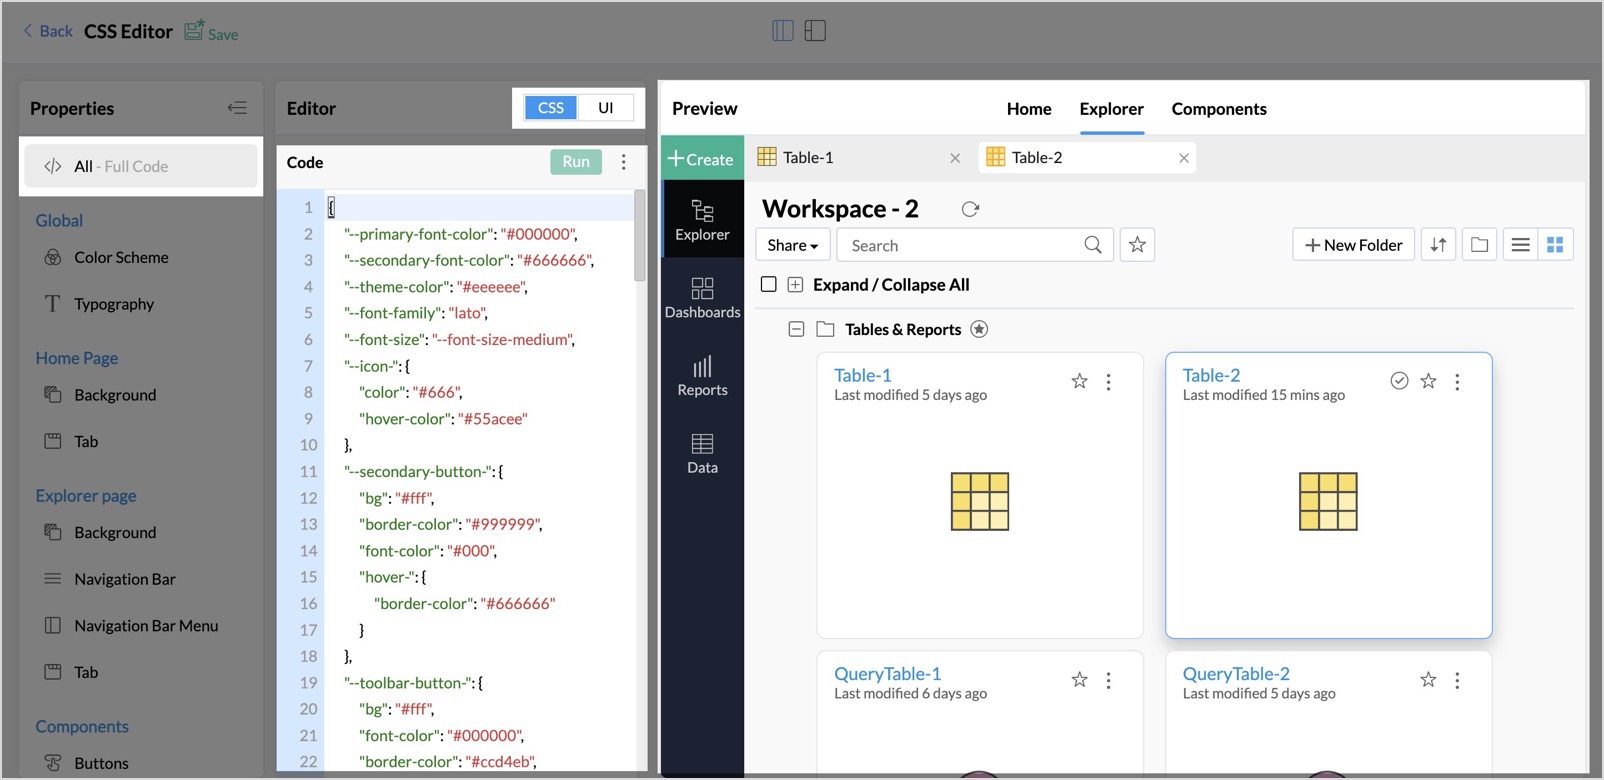
- The Global section includes Color Scheme and Typography properties. Any adjustments made to these properties will be applied across the entire product. By using the UI edit option for the Color Scheme, you can select theme colors from your logo and automatically generate a color palette based on your selection.
- The Home Page section contains properties related to the product's home page. You can customize the Background and Tabs to personalize your home page.
- The Explorer Page section includes properties of the workspace Explorer page in your product. You can customize the Background, Navigation Bar, and Navigation Bar Menu, and Tabs.
- The Components section has properties related to the styling components of the product. You can customize the Buttons, Selections, Menu Dropdown, Card Style, and Tool Bar across the product.
- Click Save to apply and save the CSS customizations to the white labeled product.


