JSON Web Token (JWT)
JWT (JSON Web Token) is a compact, URL-safe way of securely transmitting user identity information between systems. It is a stateless authentication mechanism that lets you generate secure tokens on your server, which are used to authenticate users into the white-labeled Zoho Analytics portal.
Configuring JWT for White Label Instance
Once the White Label solution has been enabled for your account, easily configure it by using the following steps:
- Login to your Zoho Analytics account.
- Click the Settings icon at the top right corner.

- The Settings page will open. Navigate to the White Label section on the left side pane.
- The White Label Settings page will open. Provide the following rebranding details.
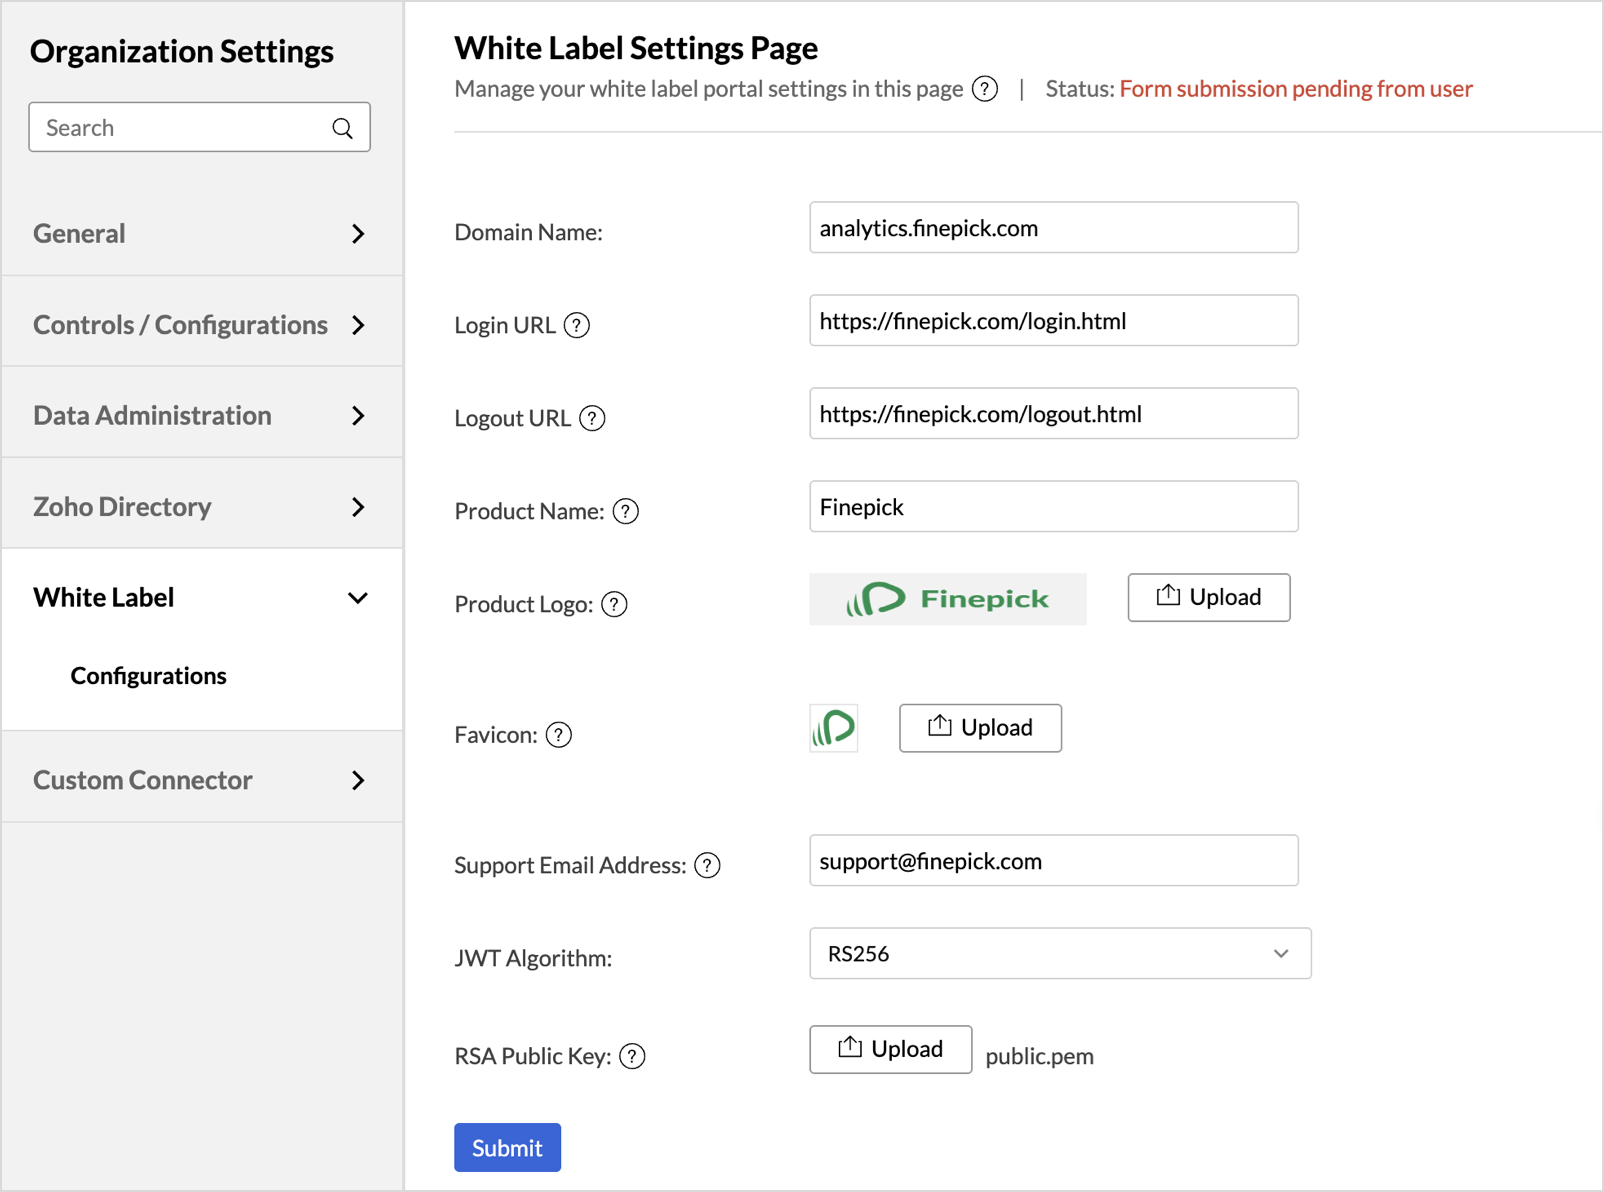


Rebranding Details | Description |
| Domain Name | Specify the custom domain where your White Label solution will be hosted (e.g., analytics.finepick.com). Note: Once the domain is set, it cannot be modified directly by you. To request changes, please contact us at support@zohoanalytics.com. |
| Product Name | Enter the name of your product. This name will replace all instances of “Zoho Analytics” across the user interface and communications. |
| Product Logo | Upload the logo to be used in your White Label application. Supported formats: .gif, .jpg, .png, .bmp Recommended dimensions: 300 x 60 px This logo will replace the Zoho Analytics logo in the portal. |
| Favicon | Upload an icon to be displayed in the browser tab alongside the page title. Recommended dimensions: 30 x 30 px |
| Support Email Address | Provide a support email address that will be shown in all system communications, replacing the default Zoho Analytics support address (support@zohoanalytics.com). |
| JWT Algorithm | Select your preferred JWT algorithm for token generation
|
After completing the configuration, click Submit. You will then be prompted to complete Domain Verification. Click the link below for detailed instructions.
White Label Login Workflow

Logged-In User Scenario
1. User Authentication
- User logs into the main website (finepick.com).
- User clicks a link leading to the white label site (analytics_jwt.finepick.com).
2. Session Validation
- The white label site checks for valid session credentials.
If credentials are not present, Zoho Analytics redirects the user to the registered login URL with a return_to parameter:
https://finepick.com/login?return_to=https://analytics_jwt.finepick.com
3. JWT Token Generation & Redirection
Since the user is already authenticated on finepick.com, the system generates a JWT token and redirects the user to the following URL:
https://<domain_name>/accounts/p/<portal_id>/signin/jwt/auth?jwt=<jwt-token>&return_to=<return_to>
Example:
https://analytics_jwt.finepick.com/accounts/p/123456/signin/jwt/auth?jwt=eyJhbGciOiJIUzI1NiIsInR5cCI6IkpXVCJ9...&return_to=https://analytics_jwt.finepick.com
4. Token Verification & Access
- Zoho Analytics verifies the JWT token using the provided Secret Key (HS256) or RSA Public Key (RS256).
- On successful verification, the user session is established, and access to the white-labeled Zoho Analytics portal is granted.
Unauthorized User Scenario
If the user is not logged in to finepick.com:
1. Redirection for Authentication
- Zoho Analytics redirects the user to the login URL with the return_to parameter.
- The user is prompted to authenticate via finepick.com’s login system.
2. JWT Token Generation Post-Authentication
Once authenticated, finepick.com generates a JWT token and redirects the user to:
https://accounts.zohoportal.{com/.eu/.com.au/.jp/.in}/accounts/p/<portal_id>/signin/jwt/auth?jwt=<jwt-token>&return_to=<return_to>
3. Verification & Access
- JWT is verified, and access is granted upon successful validation.
White Label Logout Workflow
When the user logs out from the white label site, they are redirected to the main site’s logout URL:
https://<domain_name>/ZDBCustomDomainLogin.ma?ZDBACTION=signout
- Zoho Analytics clears all session data and cookies.
JWT Token Structure:
A JWT is composed of three base64-encoded parts separated by dots - Header, Payload, and Signature
<Header>.<Payload>.<Signature>
Header: Contains metadata about the token (type of token and algorithm)
{ "typ": "JWT", "alg": "HS256" or "alg": "HS256" }Payload (claims): Carries user-related data like email, user ID, role, and other metadata. Since it is easy for anyone to access the data, it is not recommended to put secret information in payload or header elements.
{ "nbf": 1643653803, "exp": 1643653923, "iat": 1643653803, "jti": "10387252.73929", "email": "johnm@zylker.com" }- nbf (Not Before): Token not valid before this time.
- exp (Expiration): Token expires after this time.
- iat (Issued At): Time at which the token was created.
- jti (JWT ID): Unique identifier for each token (must be unique).
- email: User’s email ID (required for Zoho Analytics access).
Note: nbf, exp, and iat must be in seconds, and the validity should not exceed 2 minutes.
Signature: A hashed combination of the header and payload, signed using your secret key. This ensures the token is authentic and untampered.
HMACSHA256(base64UrlEncode(header) + "." + base64UrlEncode(payload), secretKey)
Generating JSON Web Token
Option 1: HS256 (HMAC with Secret Key)
- A secret key will be generated in the JWT settings page.
- Use this key to sign the JWT.
- Keep this key confidential.
Option 2: RS256 (RSA with Public/Private Keys)
- Upload your RSA public key (X.509 format) in the White Label settings.
- Sign tokens using your private key.
Sample Token Generation Snippet
Using HS256 algorithm
// Header
JSONObject header = new JSONObject();
header.put("typ", "JWT");
header.put("alg", "HS256");
// Payload
JSONObject payload = new JSONObject();
payload.put("email", "john@example.com");
payload.put("iat", currentTimeInSeconds);
payload.put("exp", currentTimeInSeconds + 120);
payload.put("nbf", currentTimeInSeconds);
payload.put("jti", UUID.randomUUID().toString());
// Signature (HS256 example)
Mac sha256Hmac = Mac.getInstance("HmacSHA256");
SecretKeySpec secretKeySpec = new SecretKeySpec(secretKey.getBytes(), "HmacSHA256");
sha256Hmac.init(secretKeySpec);
String signature = Base64.getUrlEncoder().withoutPadding().encodeToString(
    sha256Hmac.doFinal((headerEncoded + "." + payloadEncoded).getBytes())
);
// Final JWT
String jwtToken = headerEncoded + "." + payloadEncoded + "." + signature;
Using RS256 Algorithm
// Header
JSONObject header = new JSONObject();
header.put("typ", "JWT");
headerJSON.put("alg", "RS256");
// Payload
JSONObject payload = new JSONObject();
payload.put("email", "john@example.com");
payload.put("iat", currentTimeInSeconds);
payload.put("exp", currentTimeInSeconds + 120);
payload.put("nbf", currentTimeInSeconds);
payload.put("jti", UUID.randomUUID().toString());
// Signature (RS256 example)
String filePath = request.getServletContext().getRealPath("/rsa_private.pem");
String privateKey = new String(Files.readAllBytes(Paths.get((new File(filePath)).getPath())));
String privateKeyPEM = privateKey.replace("-----BEGIN PRIVATE KEY-----", "").replaceAll(System.lineSeparator(), "").replace("-----END PRIVATE KEY-----", "");
byte[] encoded = org.apache.tomcat.util.codec.binary.Base64.decodeBase64(privateKeyPEM);
KeyFactory keyFactory = KeyFactory.getInstance("RSA");
PKCS8EncodedKeySpec keySpec = new PKCS8EncodedKeySpec(encoded);
String rsaSecretKey = keyFactory.generatePrivate(keySpec);
Signature privateSignature = Signature.getInstance("SHA256withRSA");
privateSignature.initSign(rsaSecreyKey);
privateSignature.update((header + "." + payload).getBytes("UTF-8"));
String signature = encoder.encodeToString(privateSignature.sign());
// Final JWT
String jwtToken = headerEncoded + "." + payloadEncoded + "." + signature;