Zoho Analytics App for the iPhone
- Prerequisites
- Supported iOS
- Installing Zoho Analytics for iPhone
- Signing Up/In for Zoho Analytics
- Working with Zoho Analytics in iPhone
- Accessing Zoho Analytics from iPhone
- Conversing with Smart Assistant - Ask Zia
- Sharing Views
- Exporting Views
- Adding Comments
- Notifications
- Customizing Themes
- Privacy and Security Settings

With the Zoho Analytics app, you & your users can access the live reports & dashboards that you create in Zoho Analytics service. The app enables you to keep track of your key performance metrics and helps you take informed business decisions, while on-the-move. The Zoho Analytics app allows you to do the following:
- Easily access and traverse across your reports through visual previews, powerful search and a variety of view customization options.
- View the reports and dashboards that you have created.
- Interact and explore reports through an immersive touch experience through actions like drill down, user filters, view underlying data and much more.
- Bookmark important Views as Favorites.
- Collaborate with your colleagues by sharing Views.
- Export Views into various formats.
Prerequisites
Internet connectivity (cellular or Wi-Fi connection)
Supported iOS versions
Devices with iOS 9.0 and above
Installing Zoho Analytics for iPhone
You can install Zoho Analytics application in your iPhone in two ways:
To install Zoho Analytics App from the App Store
- You can access this from the App Store app in iPhone.
- Search for Zoho Analytics in the App Store.
- Tap Zoho Analytics in the product Info screen.
- Tap Get. The application will be automatically installed.
- You will be prompted to sign in/up. Specify your Zoho Analytics' credentials. On successful authentication, your Zoho Analytics Workspaces will be downloaded.
To install Zoho Analytics Mobile BI from iTunes
- Open your iTunes application on your desktop.
- In iTunes, search for Zoho Analytics.
- Download the Zoho Analytics app from iTunes.
- Connect your iPhone to your computer and synchronize.
- You will be prompted to sign in/up. Specify your Zoho Analytics' credentials. On successful authentication, your Zoho Analytics Workspaces will be downloaded.
Signing Up/In for Zoho Analytics
Signing up for Zoho Analytics
In case of a new user, you need to sign up to access Zoho Analytics. Follow the steps below to sign up for Zoho Analytics:
Open the Zoho Analytics mobile app and tap the Sign Up button.
The Sign Up screen will open. Fill in the required details and tap the SIGN UP FOR FREE button.
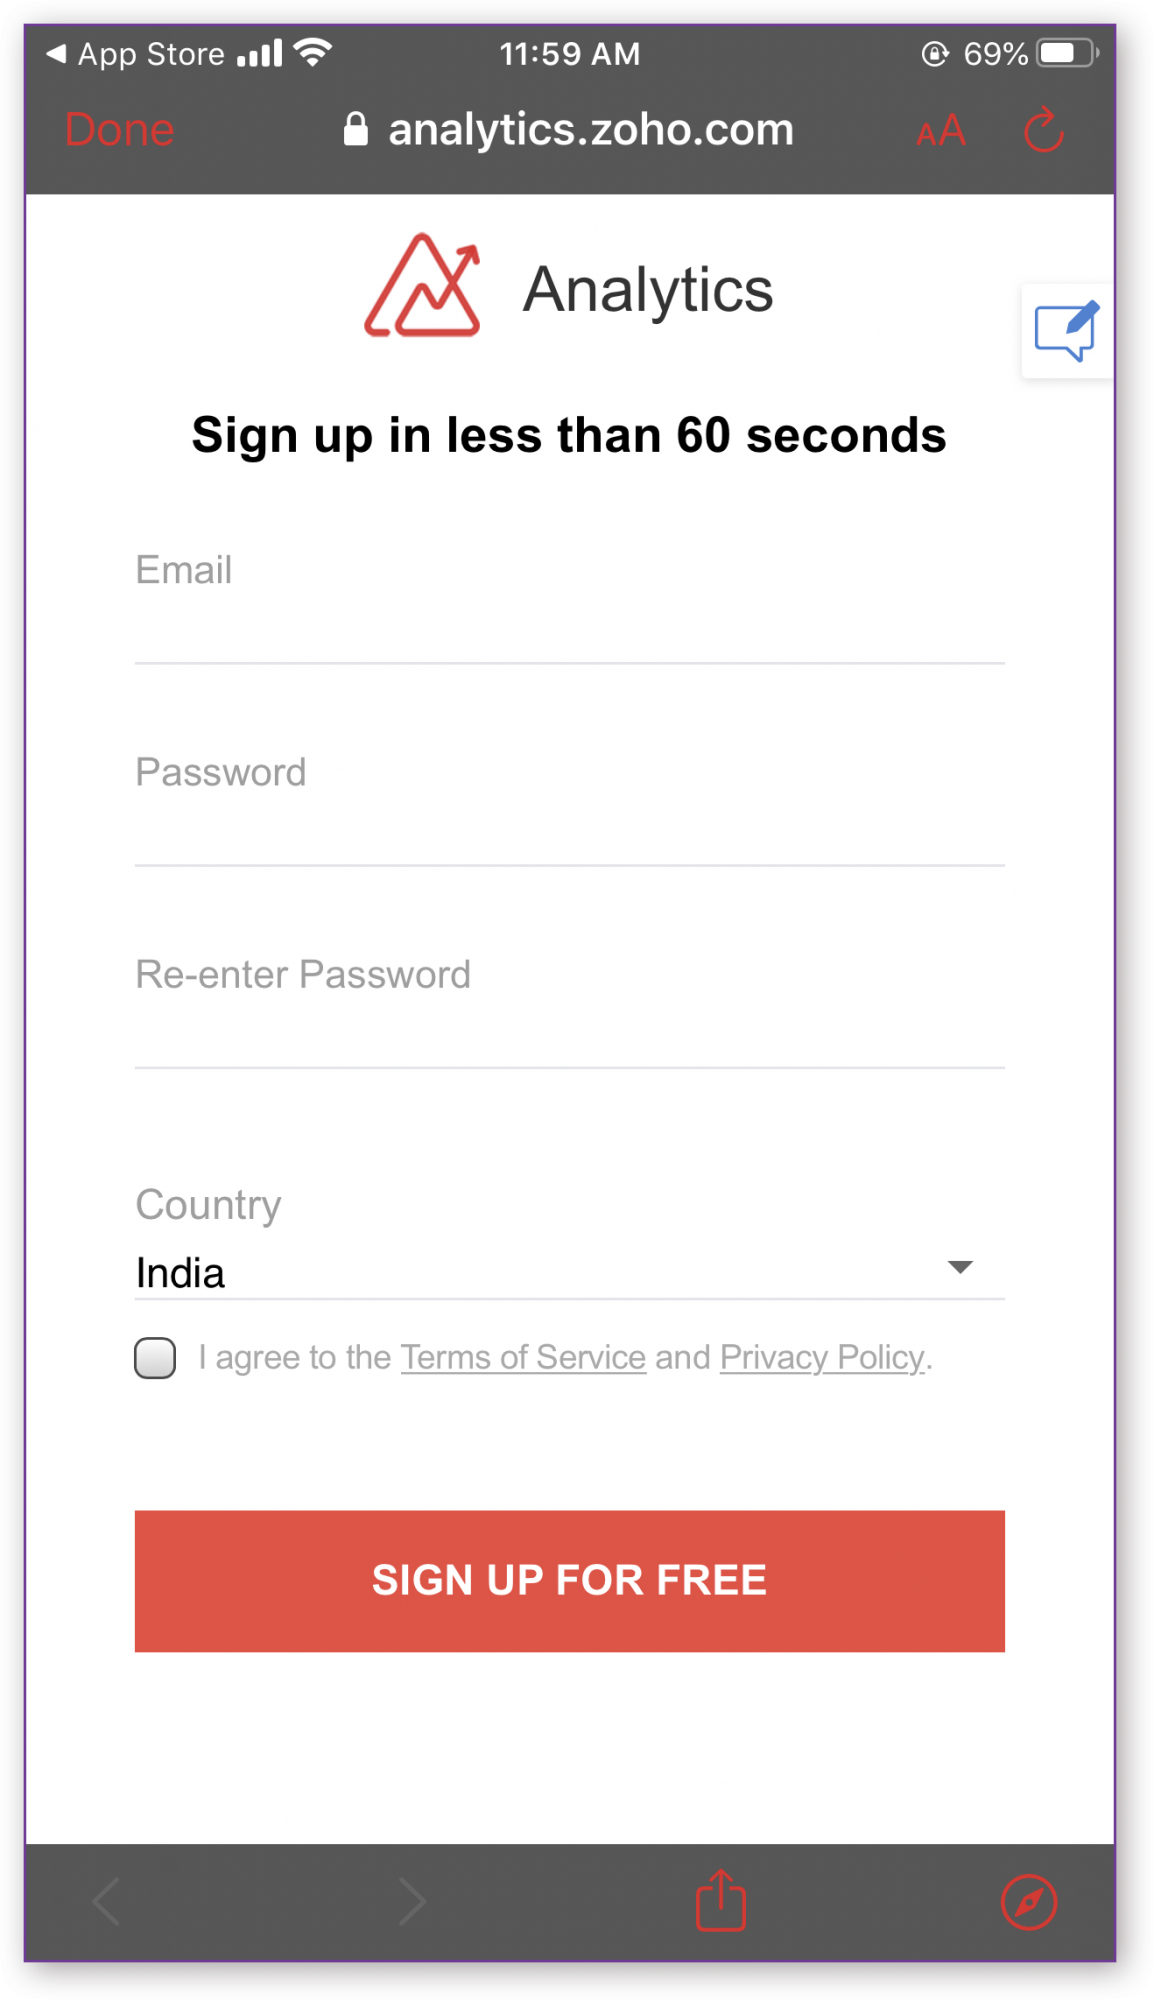


Your Zoho Analytics account will be created and you will be introduced to the getting started screen.
Signing in to Zoho Analytics
For an existing user, you can directly login to your account using the Sign In button. Follow the steps below to sign in from your mobile app:
Open the Zoho Analytics mobile app and tap the Sign In button.
The Sign In screen will open.
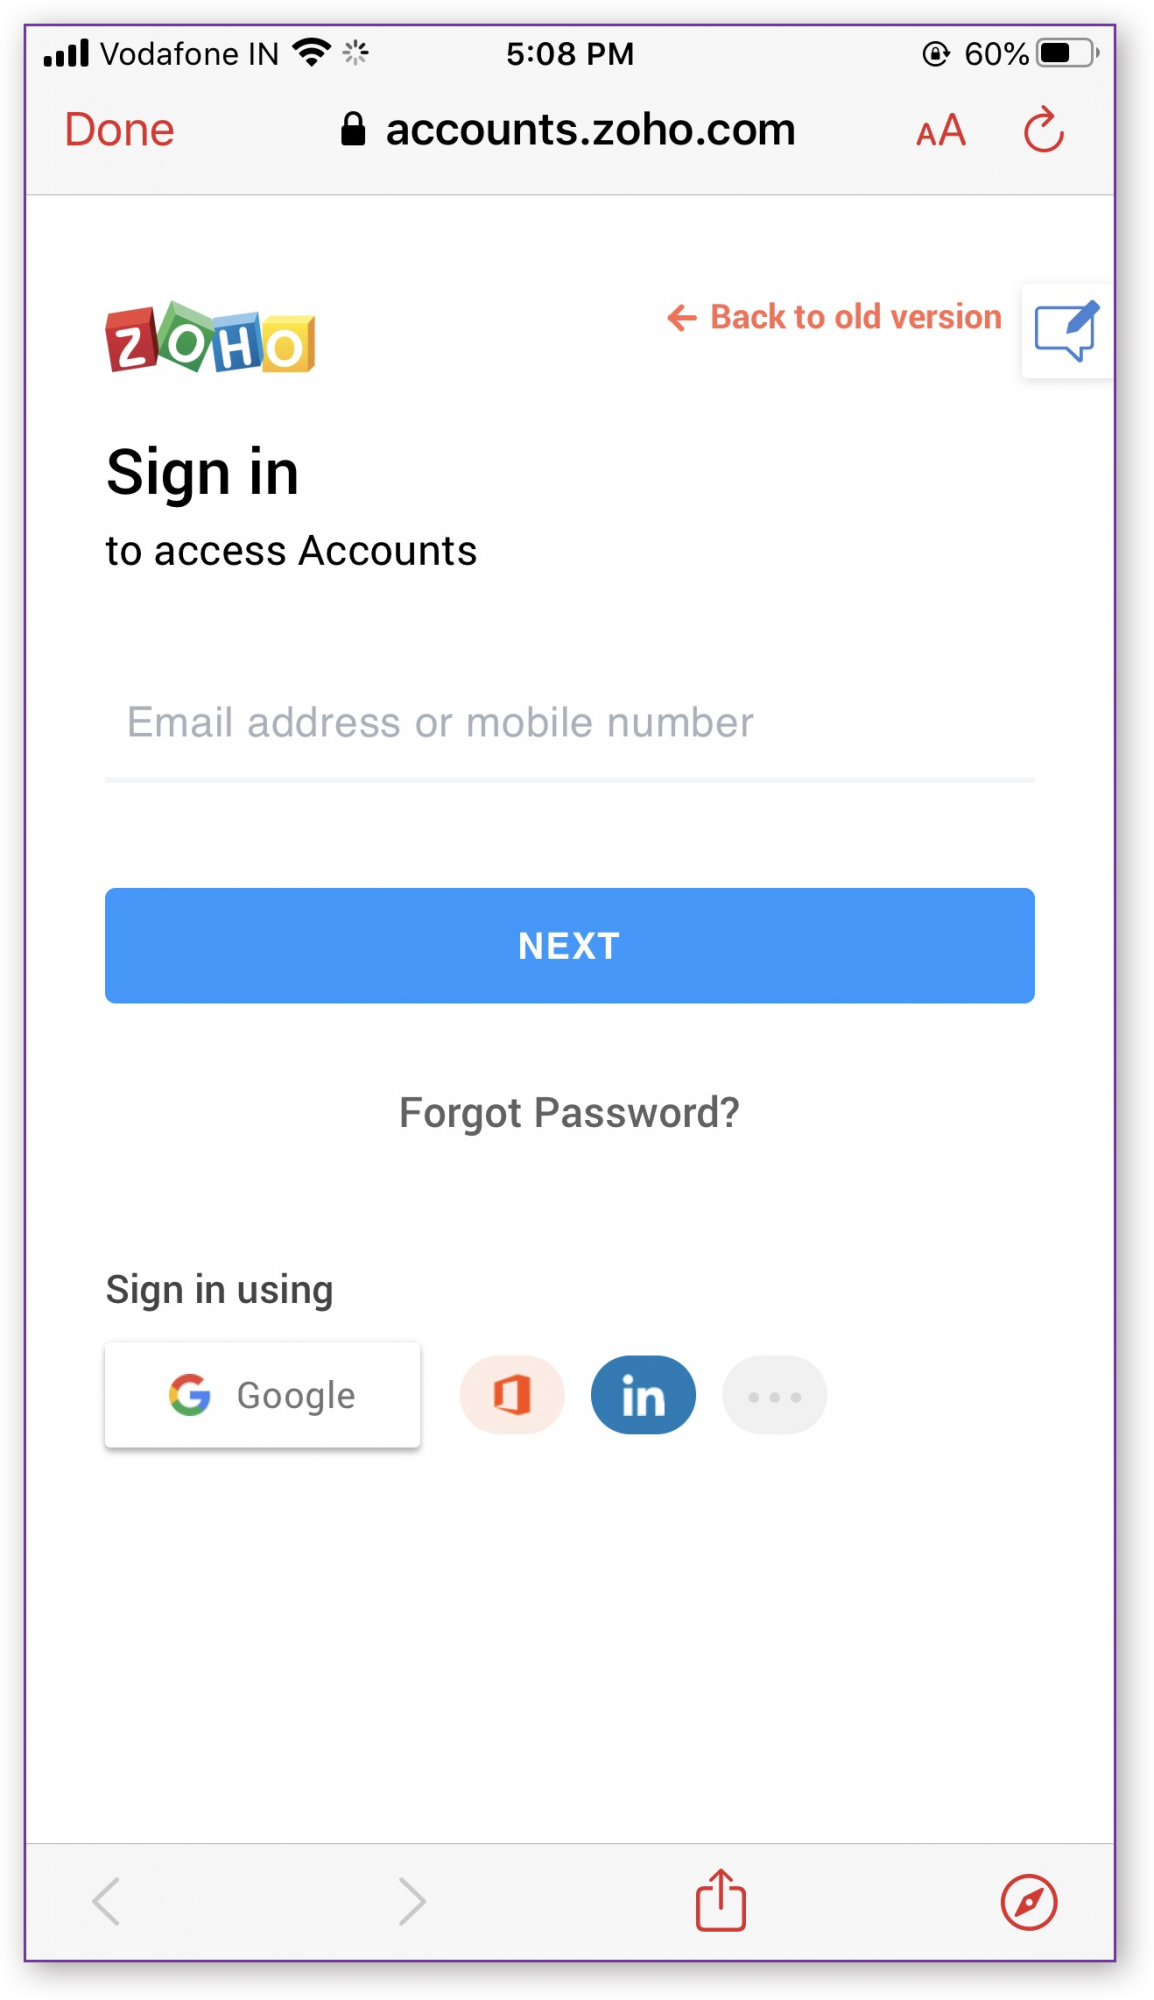
- Enter the Email address or mobile number for the registered account and tap the NEXT button.
- Enter the Password and tap the SIGN IN button.
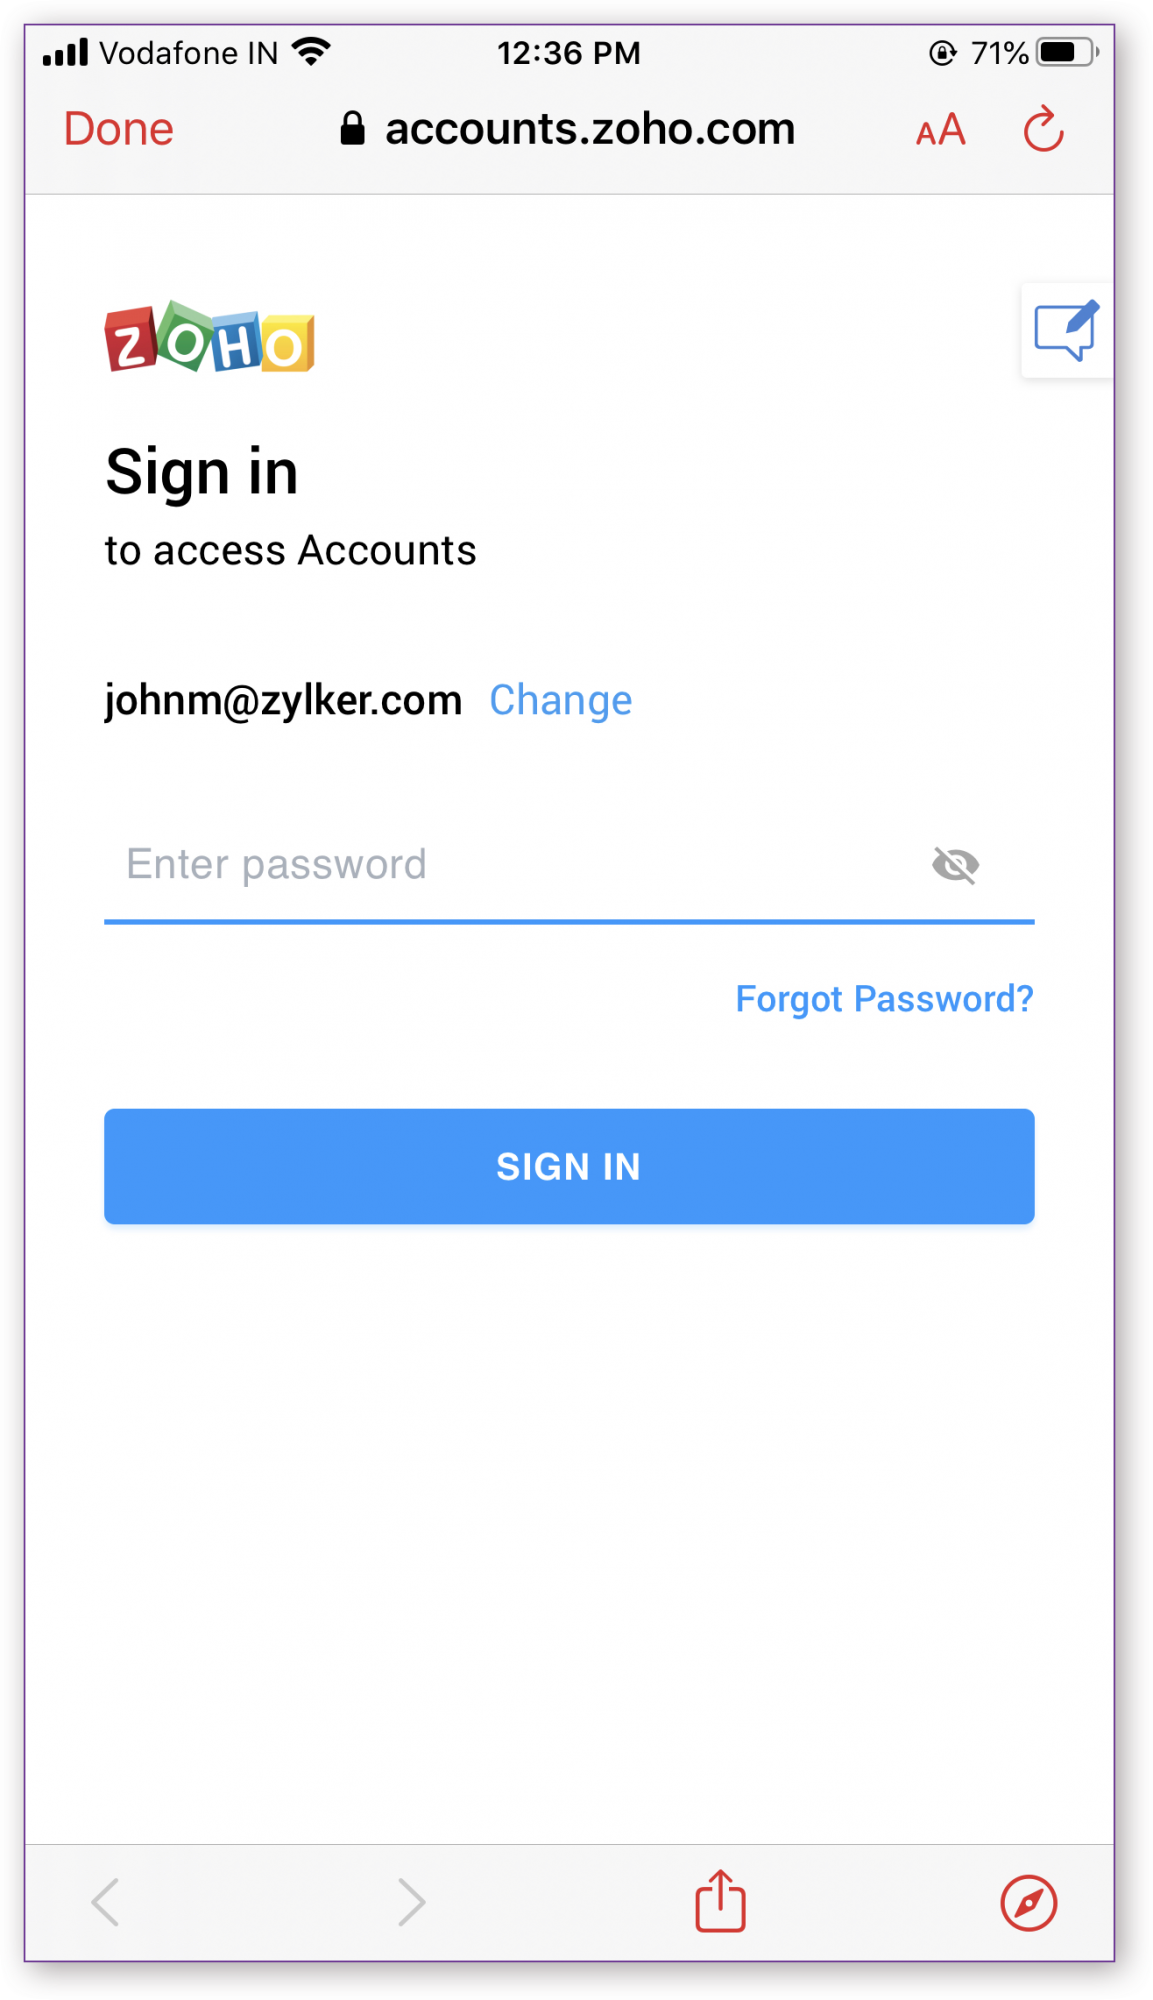


You will be logged into Zoho Analytics from your mobile app.
Similarly, you can also sign in using your Google, Microsoft, Linkedin, Facebook, Twitter, YAHOO!, Slack, and Apple credentials as well.
Working with Zoho Analytics App on iPhone
Using the Zoho Analytics application, you can view, interact and collaborate on your reports and dashboards on-the-go. In this section, we will learn about accessing workspace, reports and dashboards.
Accessing Zoho Analytics from iPhone
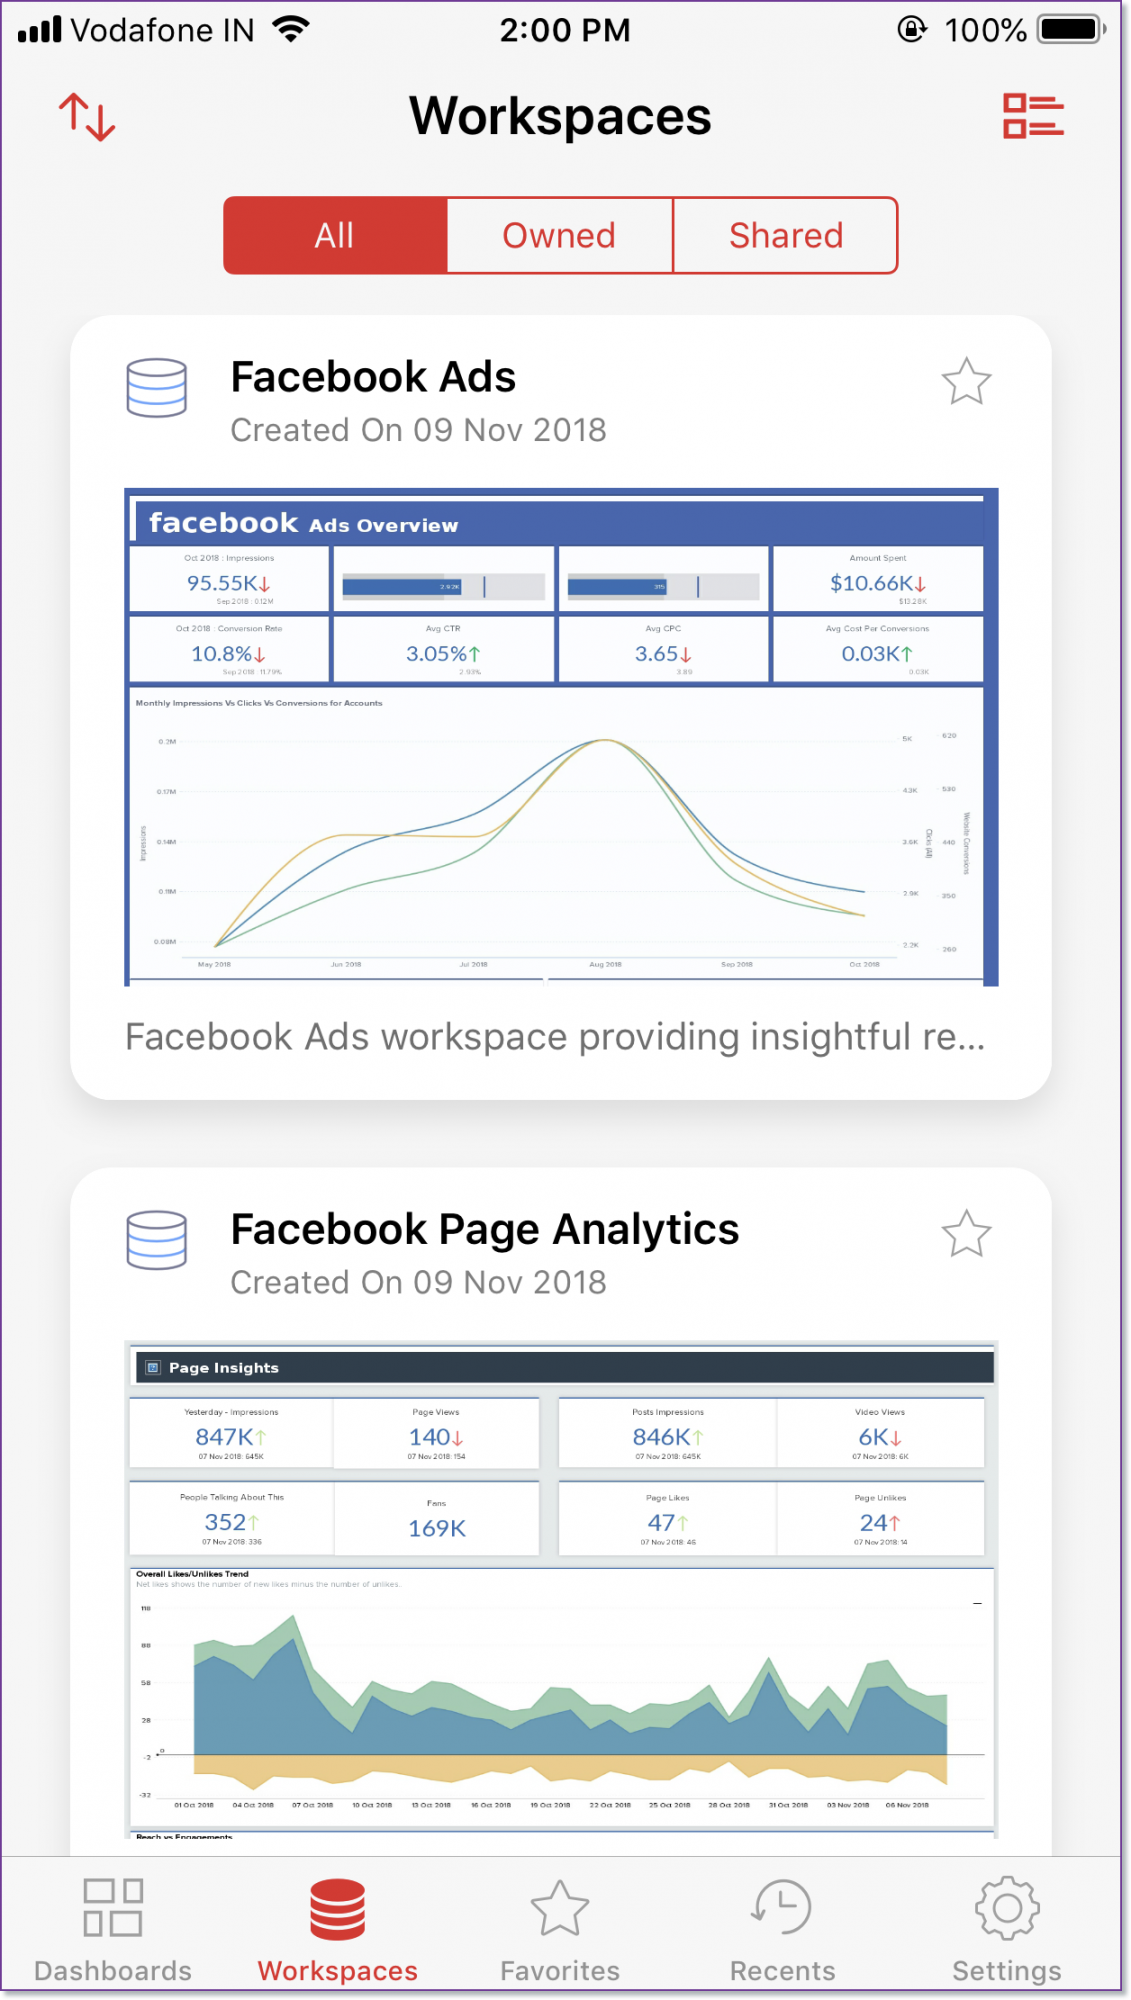
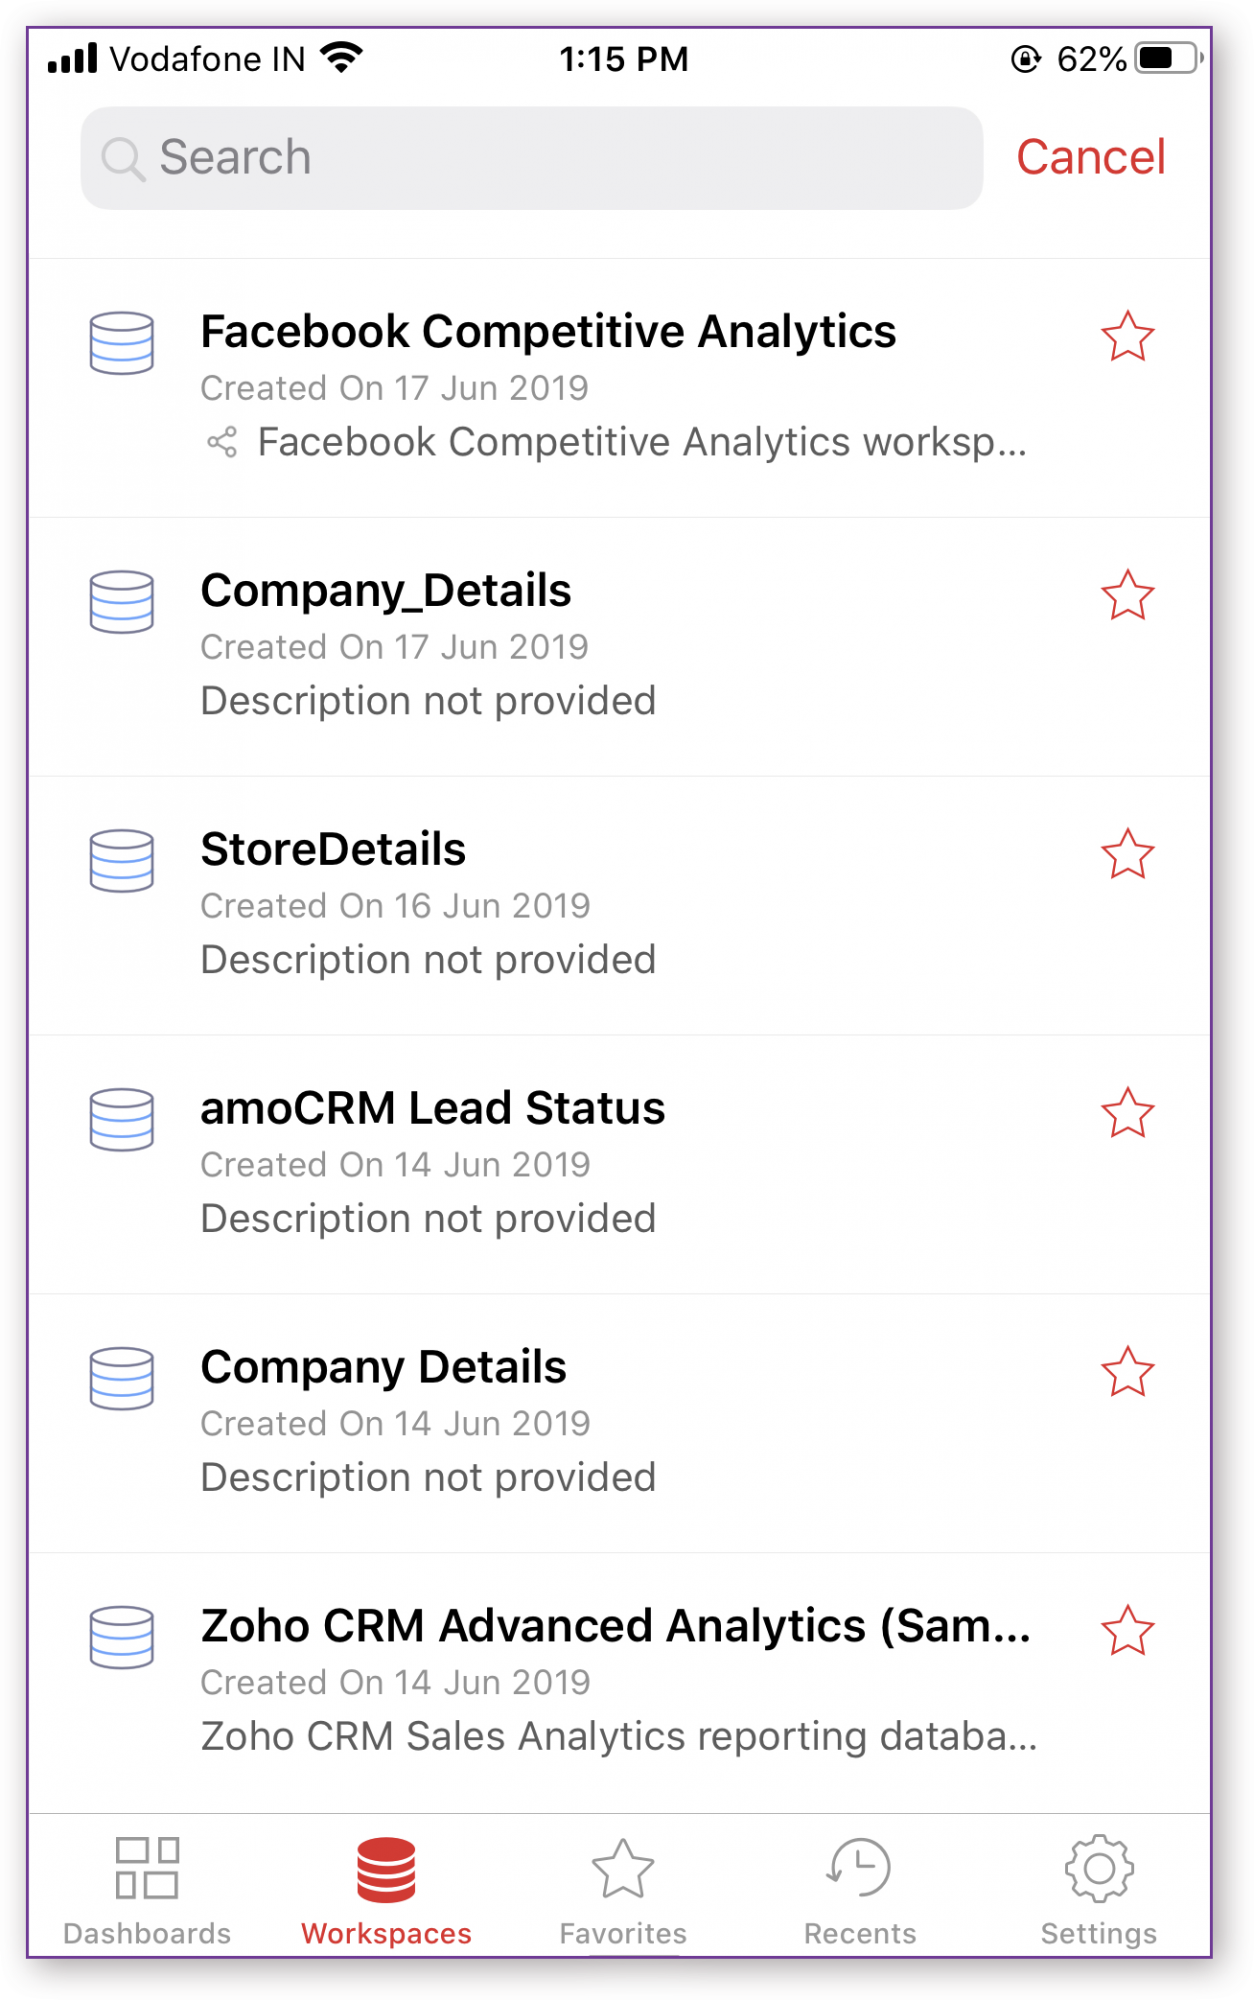
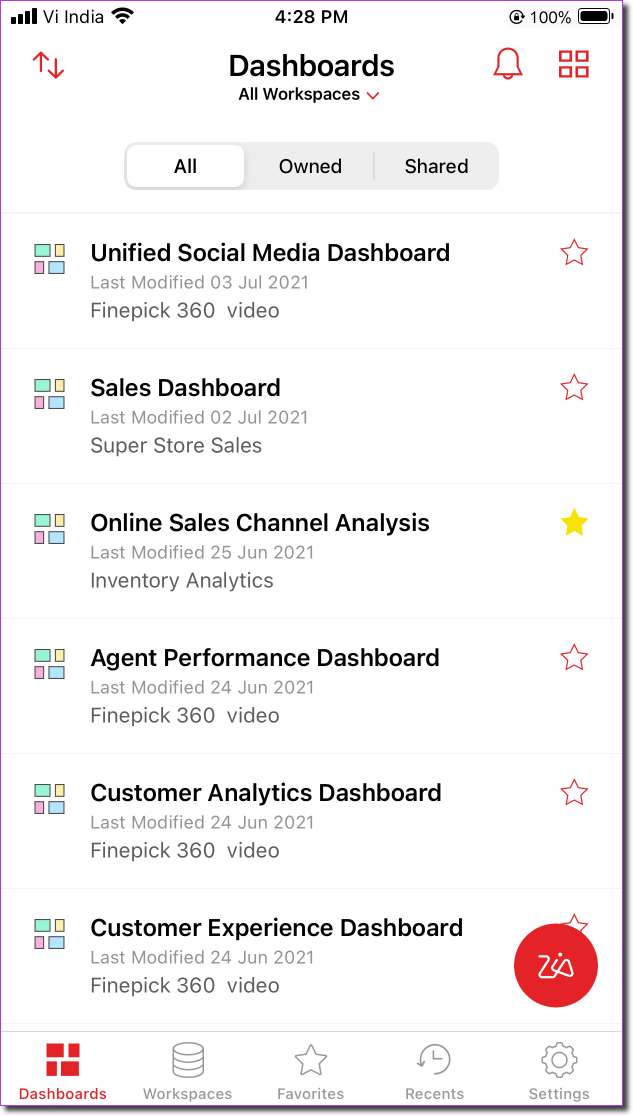
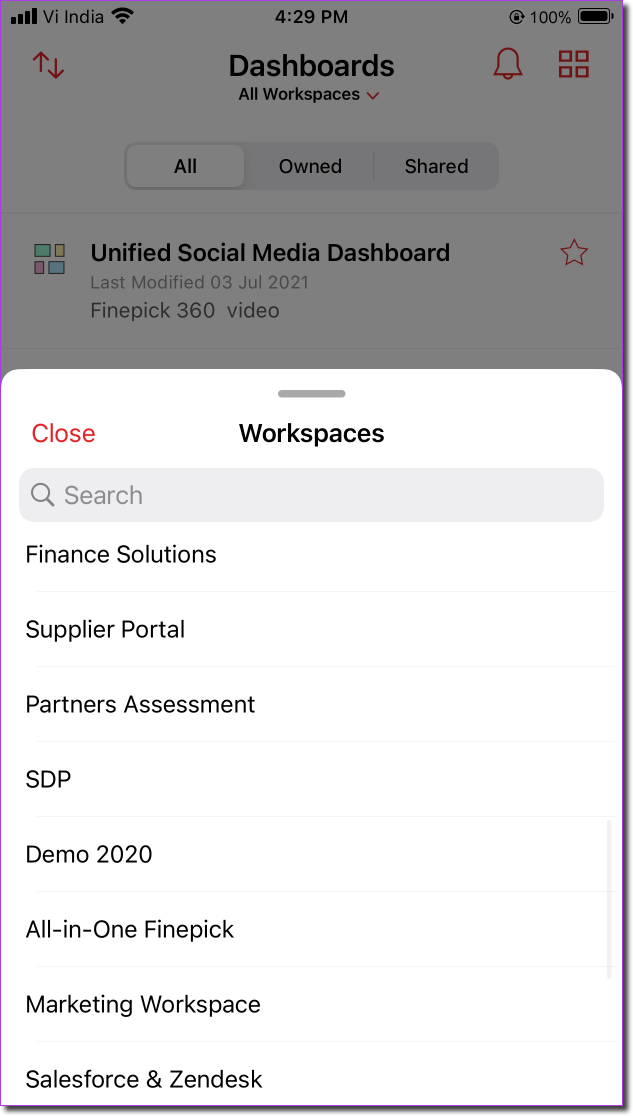
Zoho Analytics App's Home page lists all the Dashboards that you have access to (including the ones shared to you) are listed in the Dashboards tab of the Home page. You can choose to view the Dashboards that are created by you or shared to you, by navigating to the corresponding tabs. You can also choose to list the Dashboards in a specific Workspace by selecting the applicable Workspace from the All Workspaces dropdown.
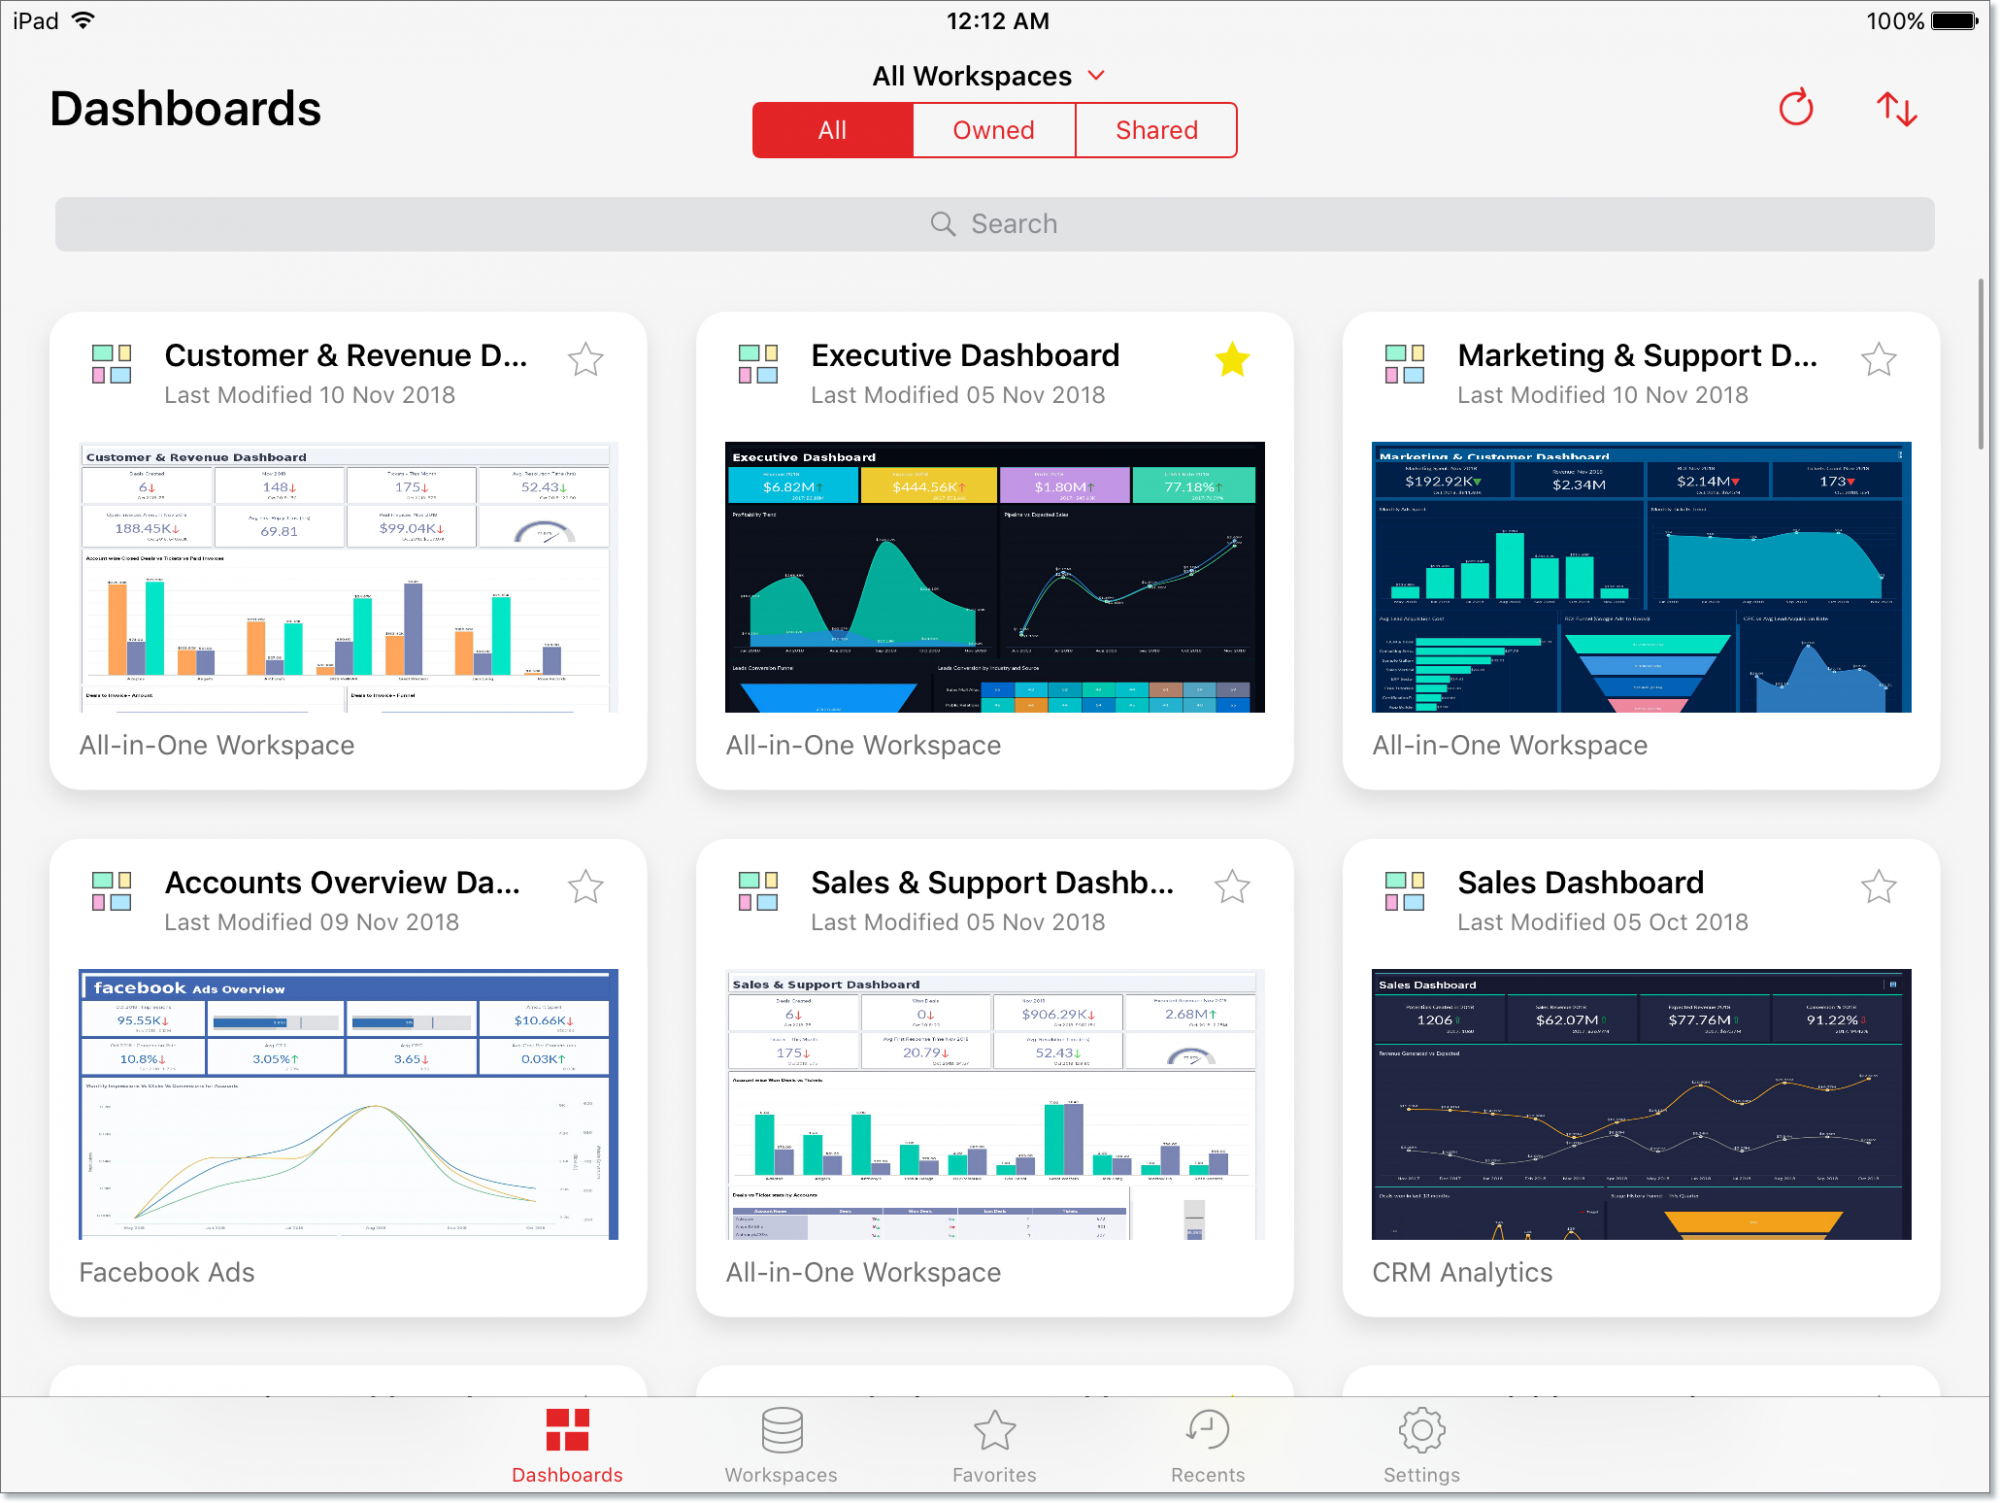
At the bottom of the page, you will find the below option for easily navigating to other views.
- Dashboard - Lists All the Dashboards that you have access to.
- Workspaces - Lists All the Workspaces that you have access to.
- Favorites - Lists the Views that are marked a Favorite.
- Recents - Lists the Views recently viewed items.
- Settings - The Settings page provides options to secure the app. You can also view our privacy policy here.
Zoho Analytics allows you to sort the views based on
- Name - This sorts the Views by name.
- Last Modified - This sorts the Views by last modified time.
- Created On - This sorts the Workspaces by created time.
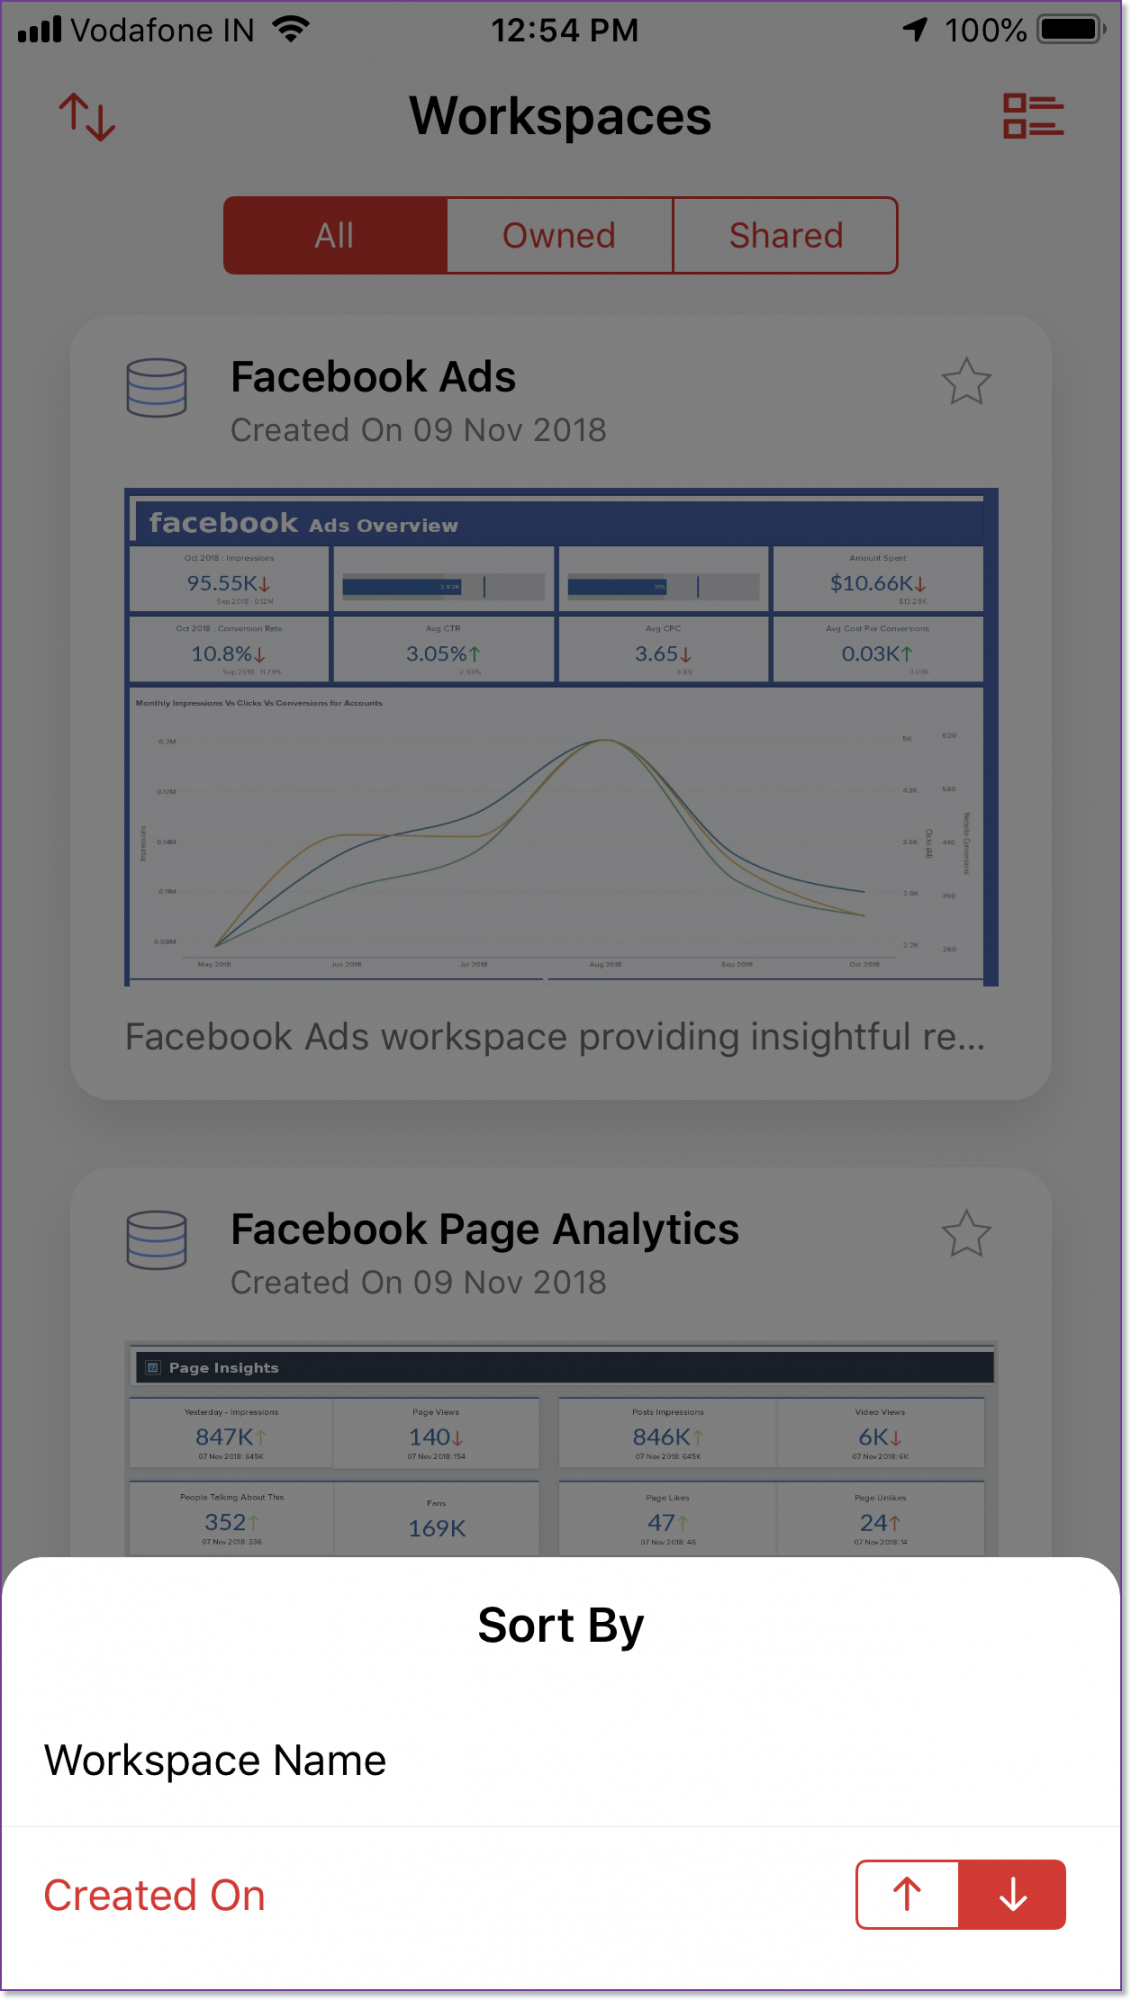
You can choose to list them as grid view and list view as needed.
- Grid View - This displays the view as tiles.
- List View - This displays the views as a text list with Title and Description.

You can also search for a specific view using the Search option.

You can also favorite your most accessed Dashboard/Workspace by tapping the Star icon available in line with the Dashboard/Workspace name. The favorites marked in the mobile app will be synchronized in the web as well and vice-versa.
Accessing a Workspace
Tap the Workspace that you want to open. All the Views in the Workspace will be listed in the Explorer page. Zoho Analytics allows you to specify how to organize the views in the following order.
- Folders - The views will be organized by folders they are saved.
- Types - The views will be organized by type i.e., Chart, Pivot etc.,
- Related - All views related to a table will be organized together.
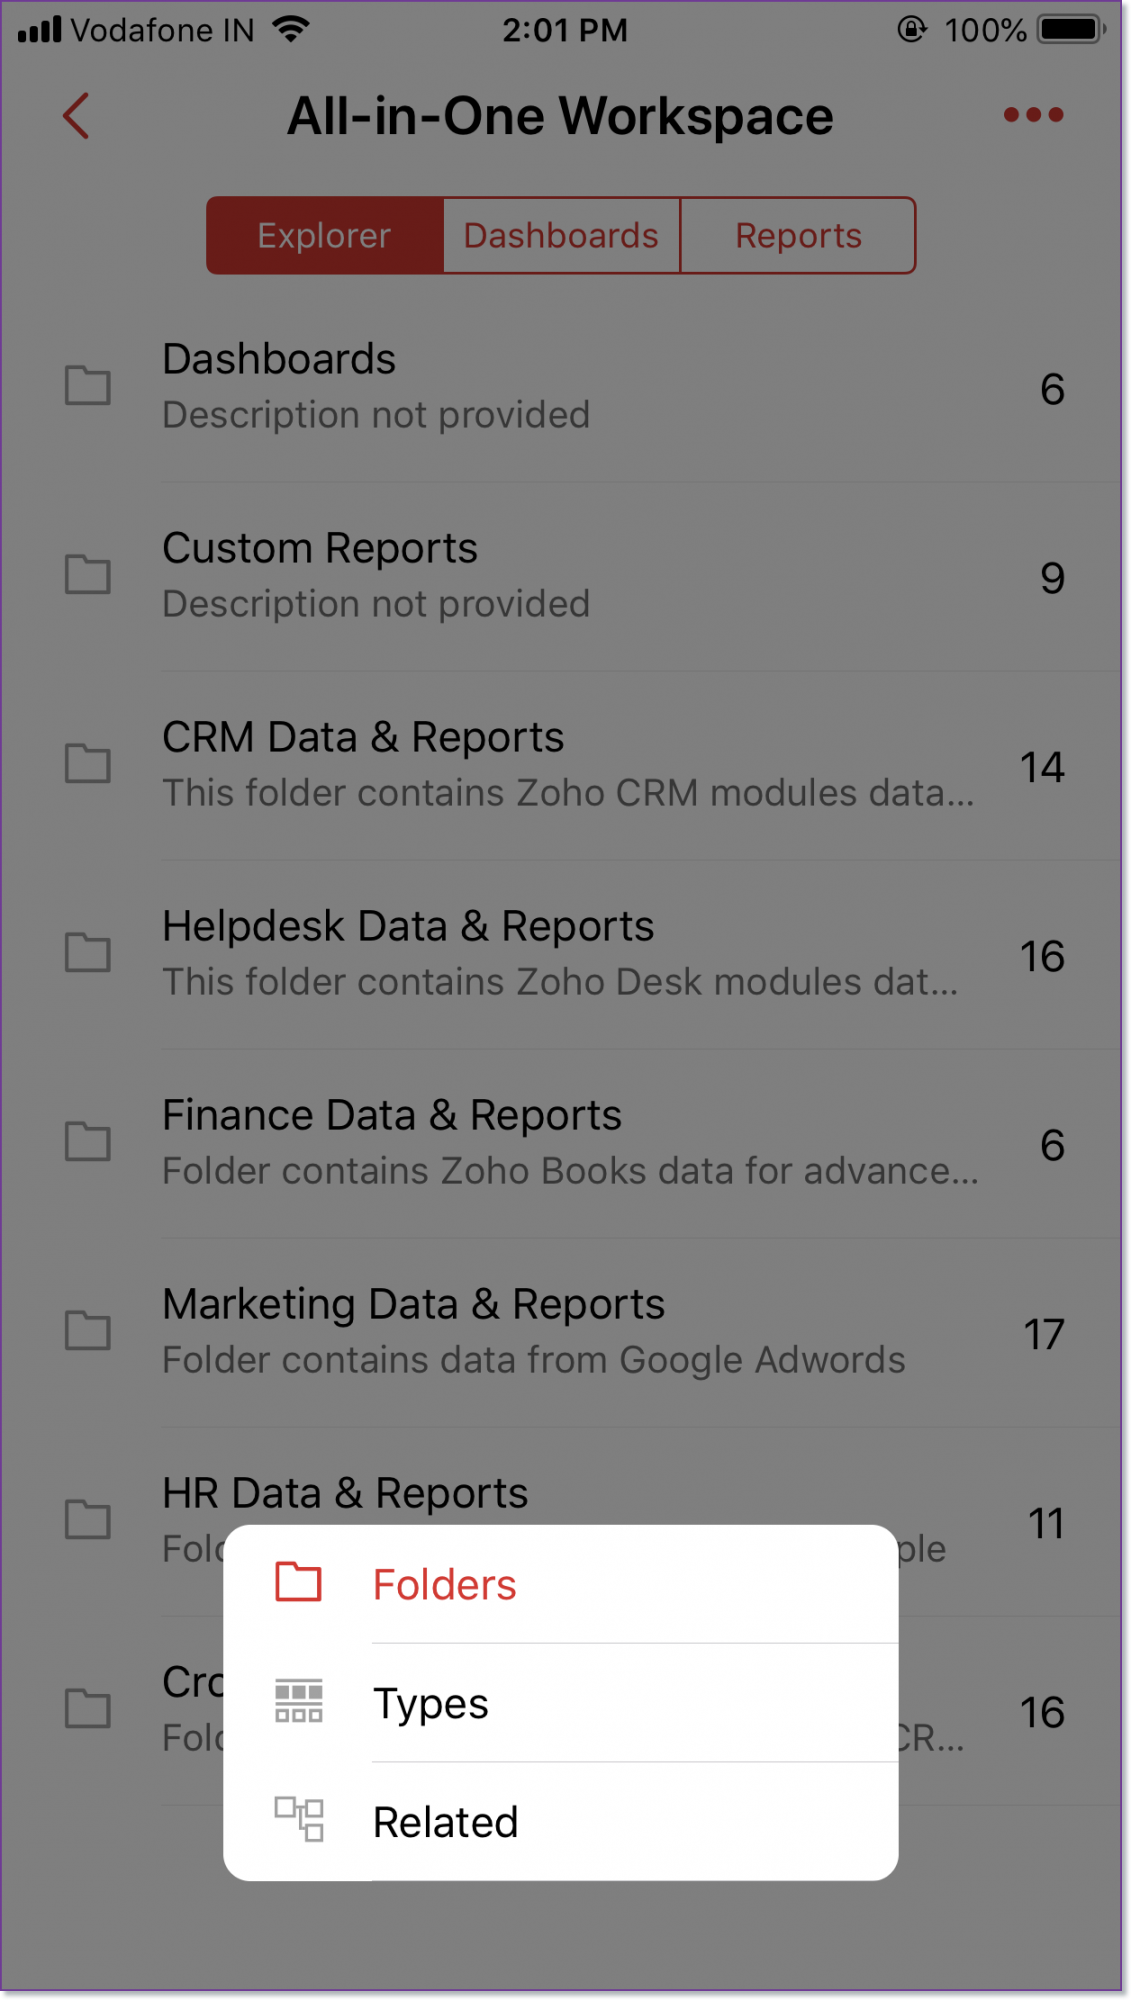
Further, for easy accessibility, the analytics elements are organized into two more tabs: Dashboards and Reports.
Accessing Featured Samples
You can view and copy the featured samples available in Zoho Analytics.
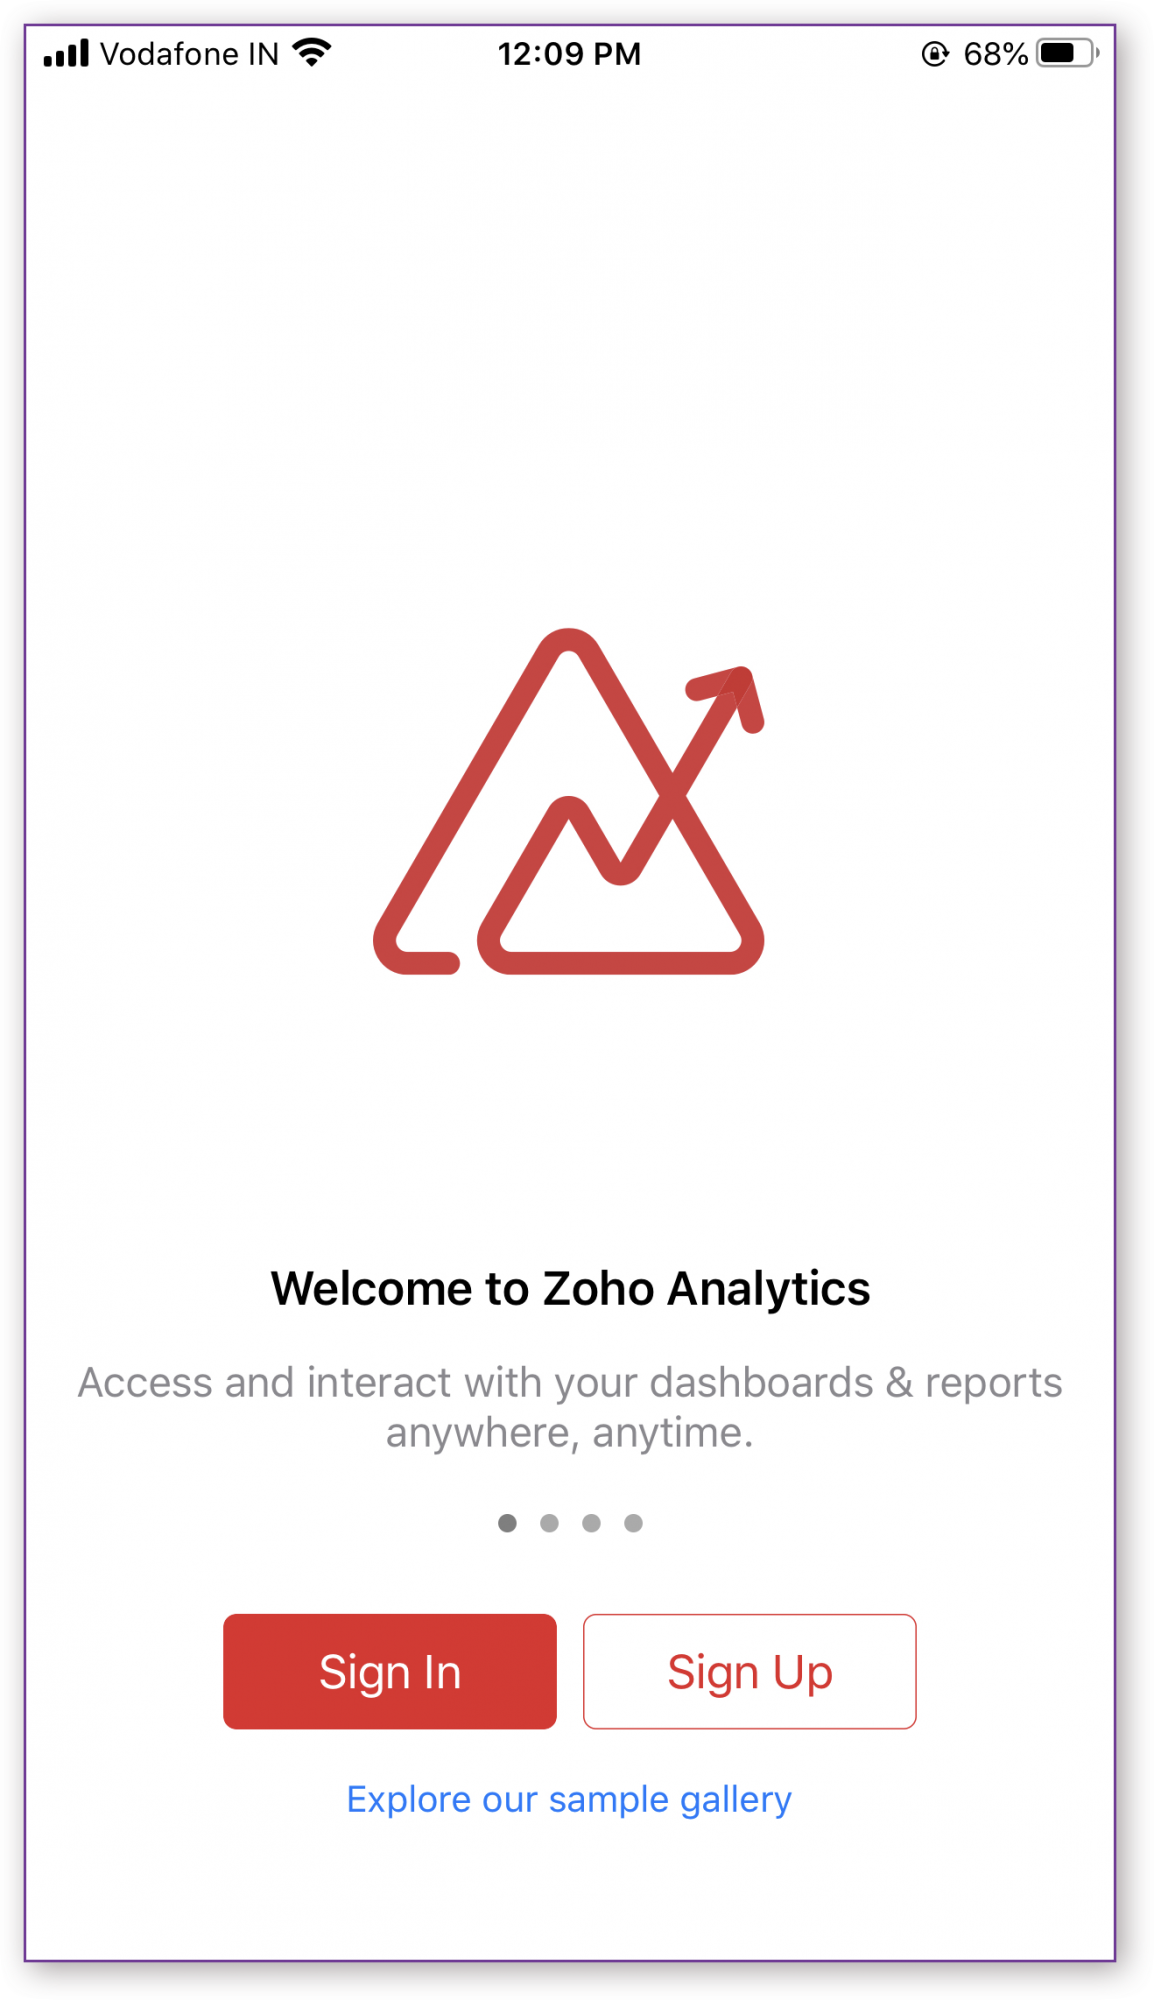
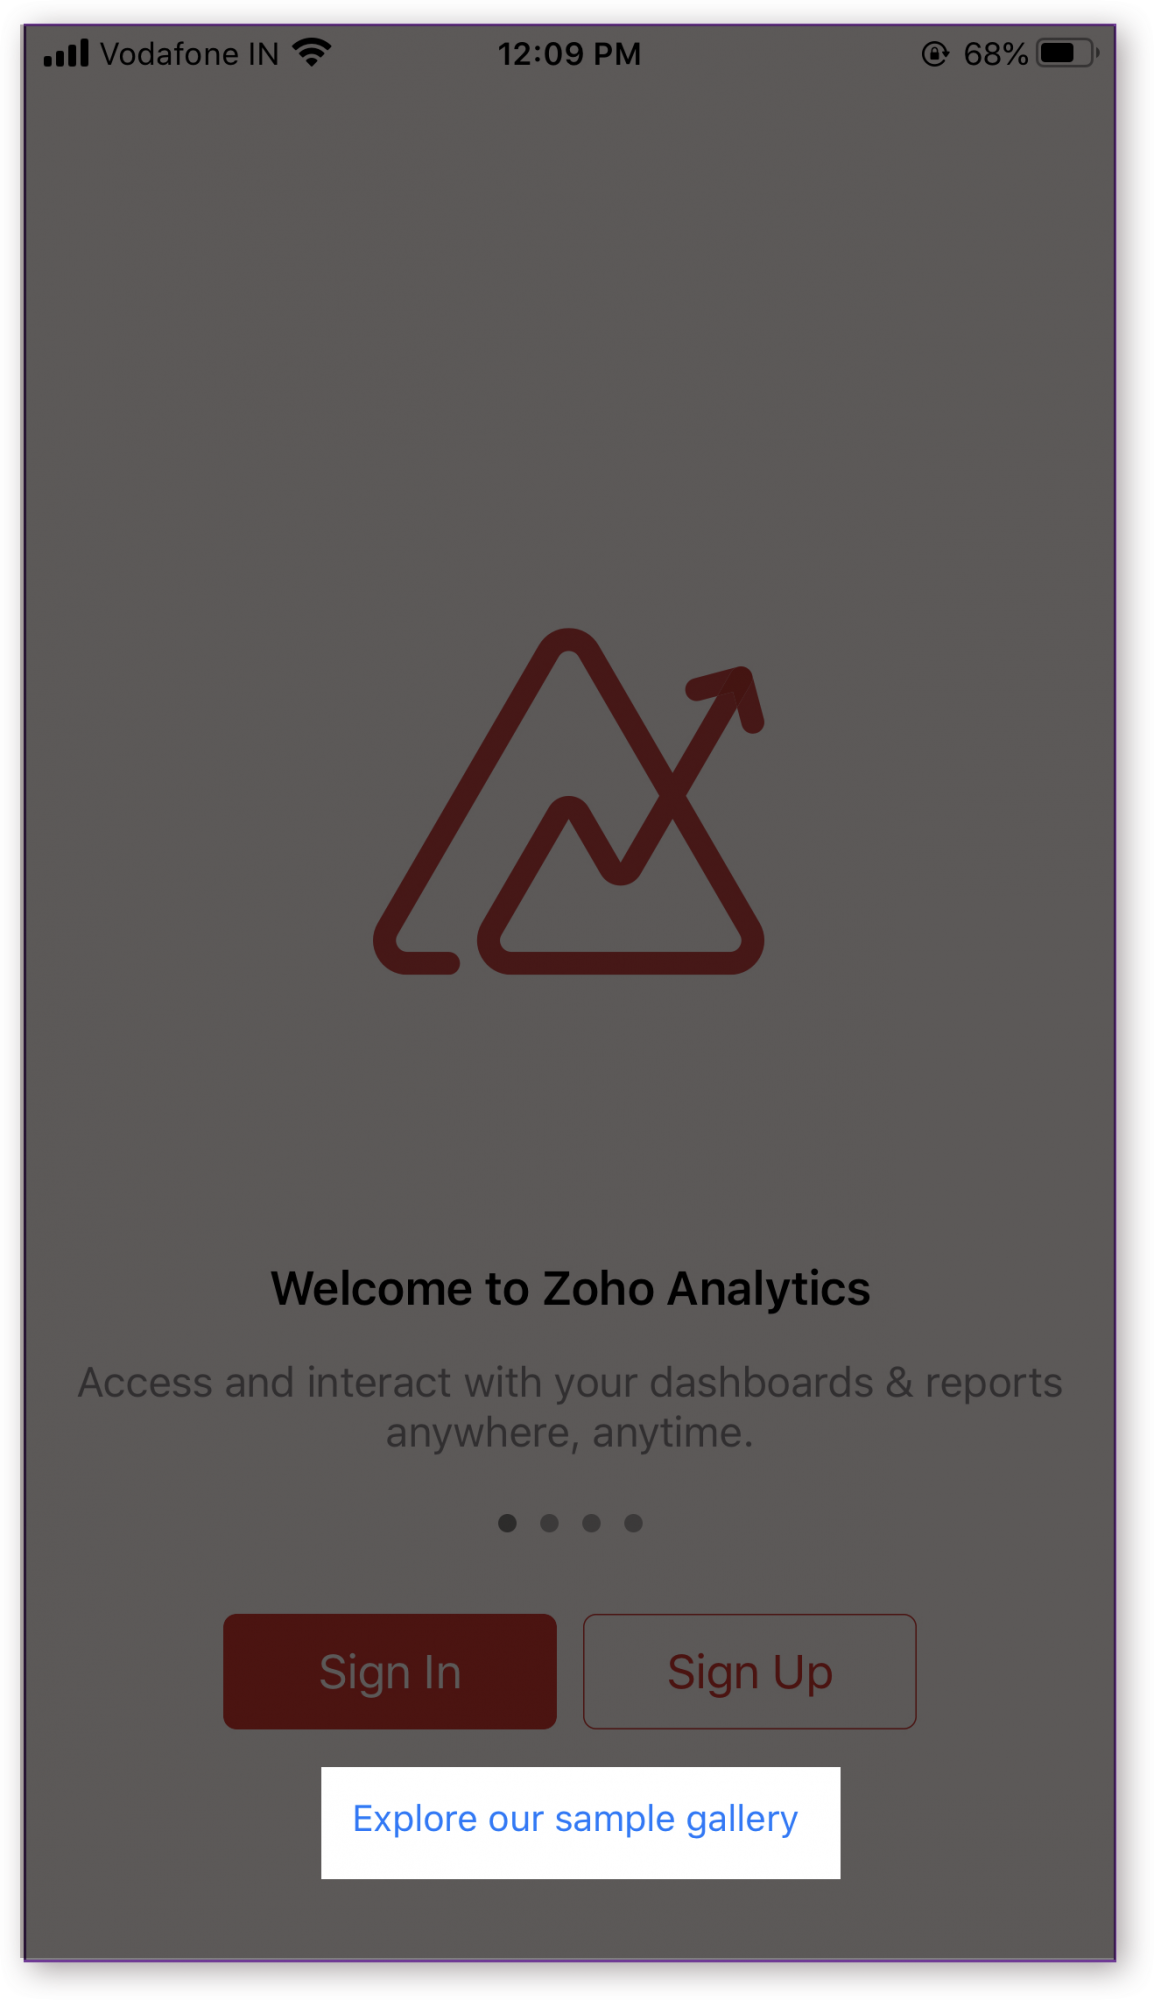
From Sign Up/In Screen:
You can view the sample gallery from the Sign Up/In screen by tapping the Explore sample gallery link.
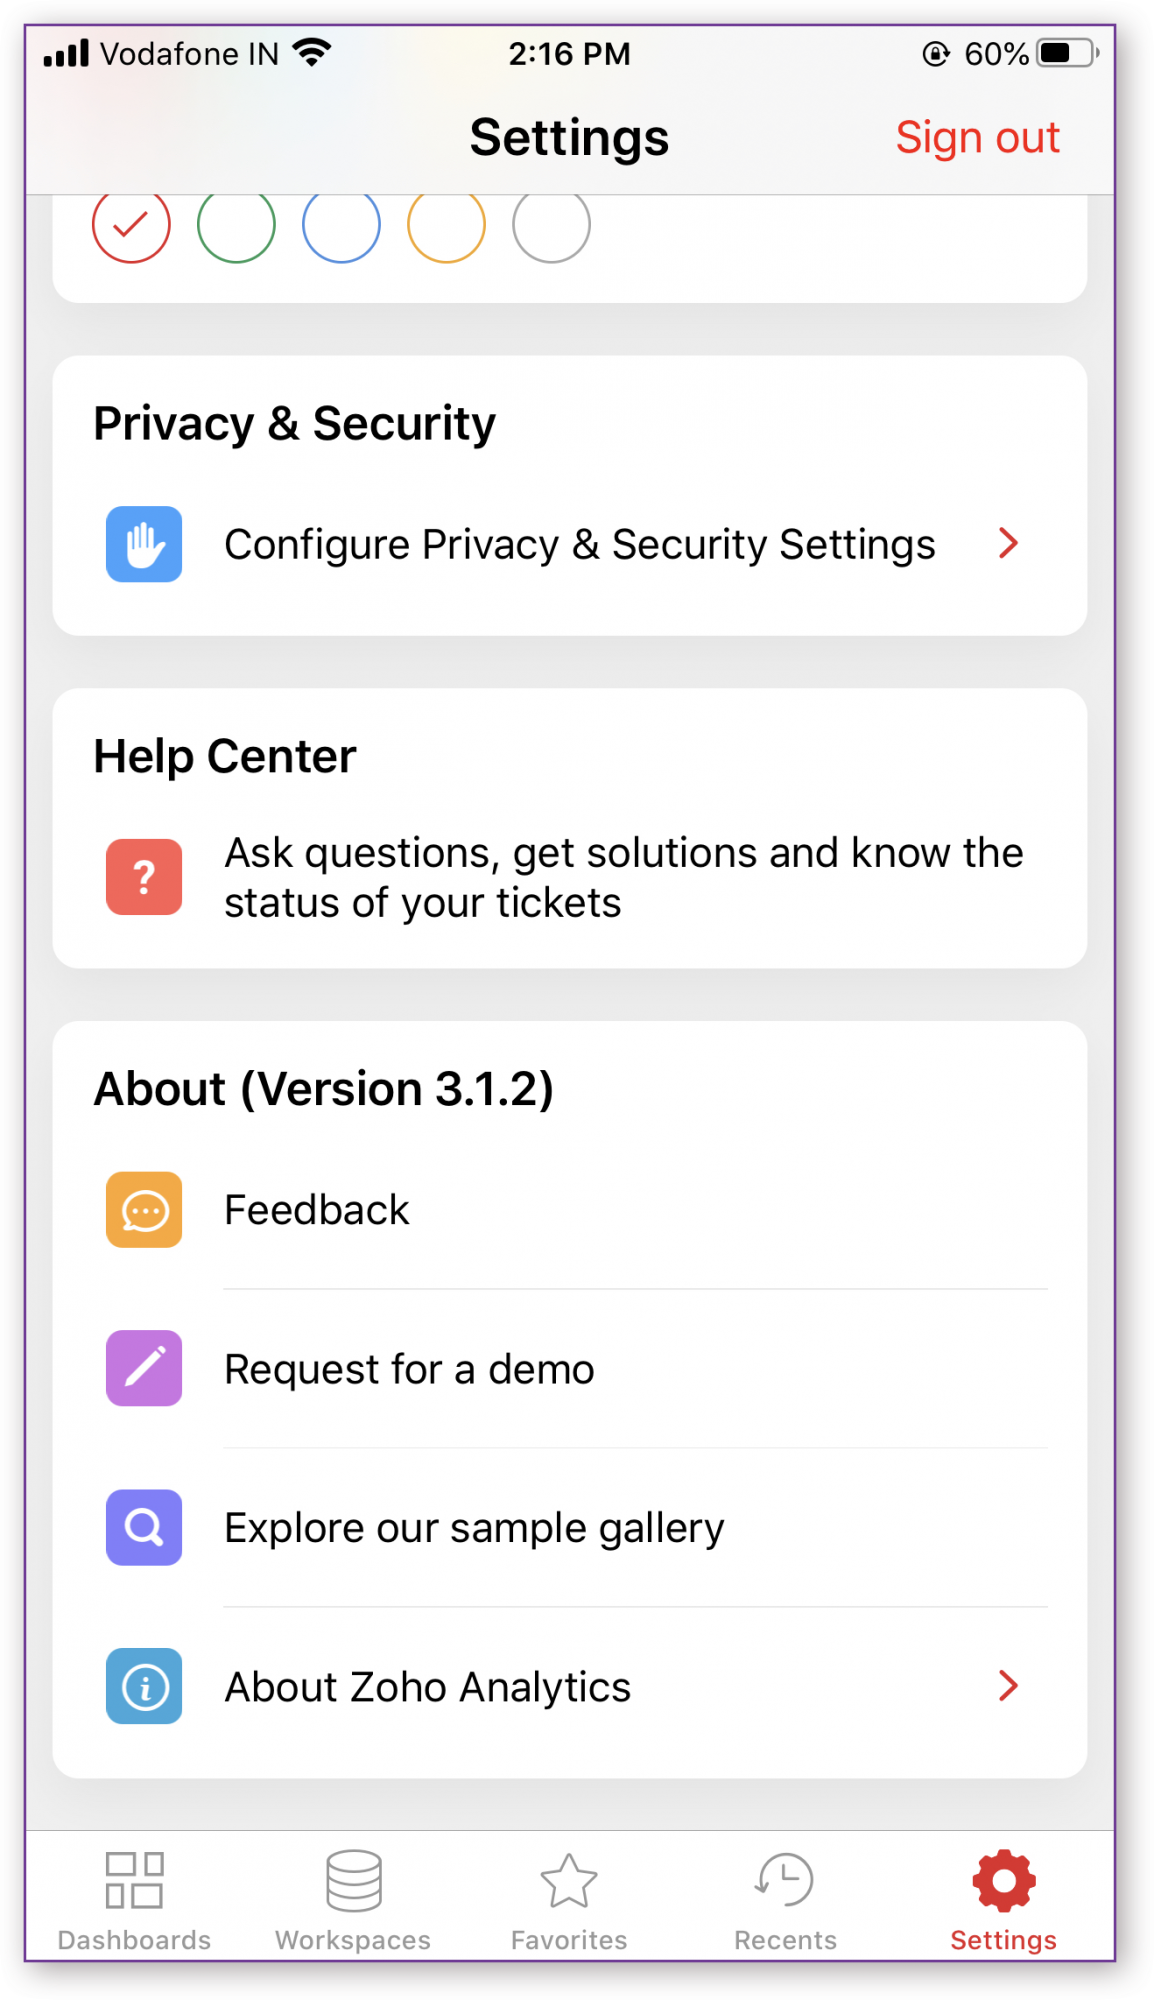
From Settings Screen:
Follow the below steps to access the featured samples from your Settings screen:
- Open the Zoho Analytics App.
- Tap the Settings icon. The Settings page will open.
From the About section, tap Explore our sample gallery.
The Sample gallery screen will open. Tap on the app whose sample Workspace you wish to see.
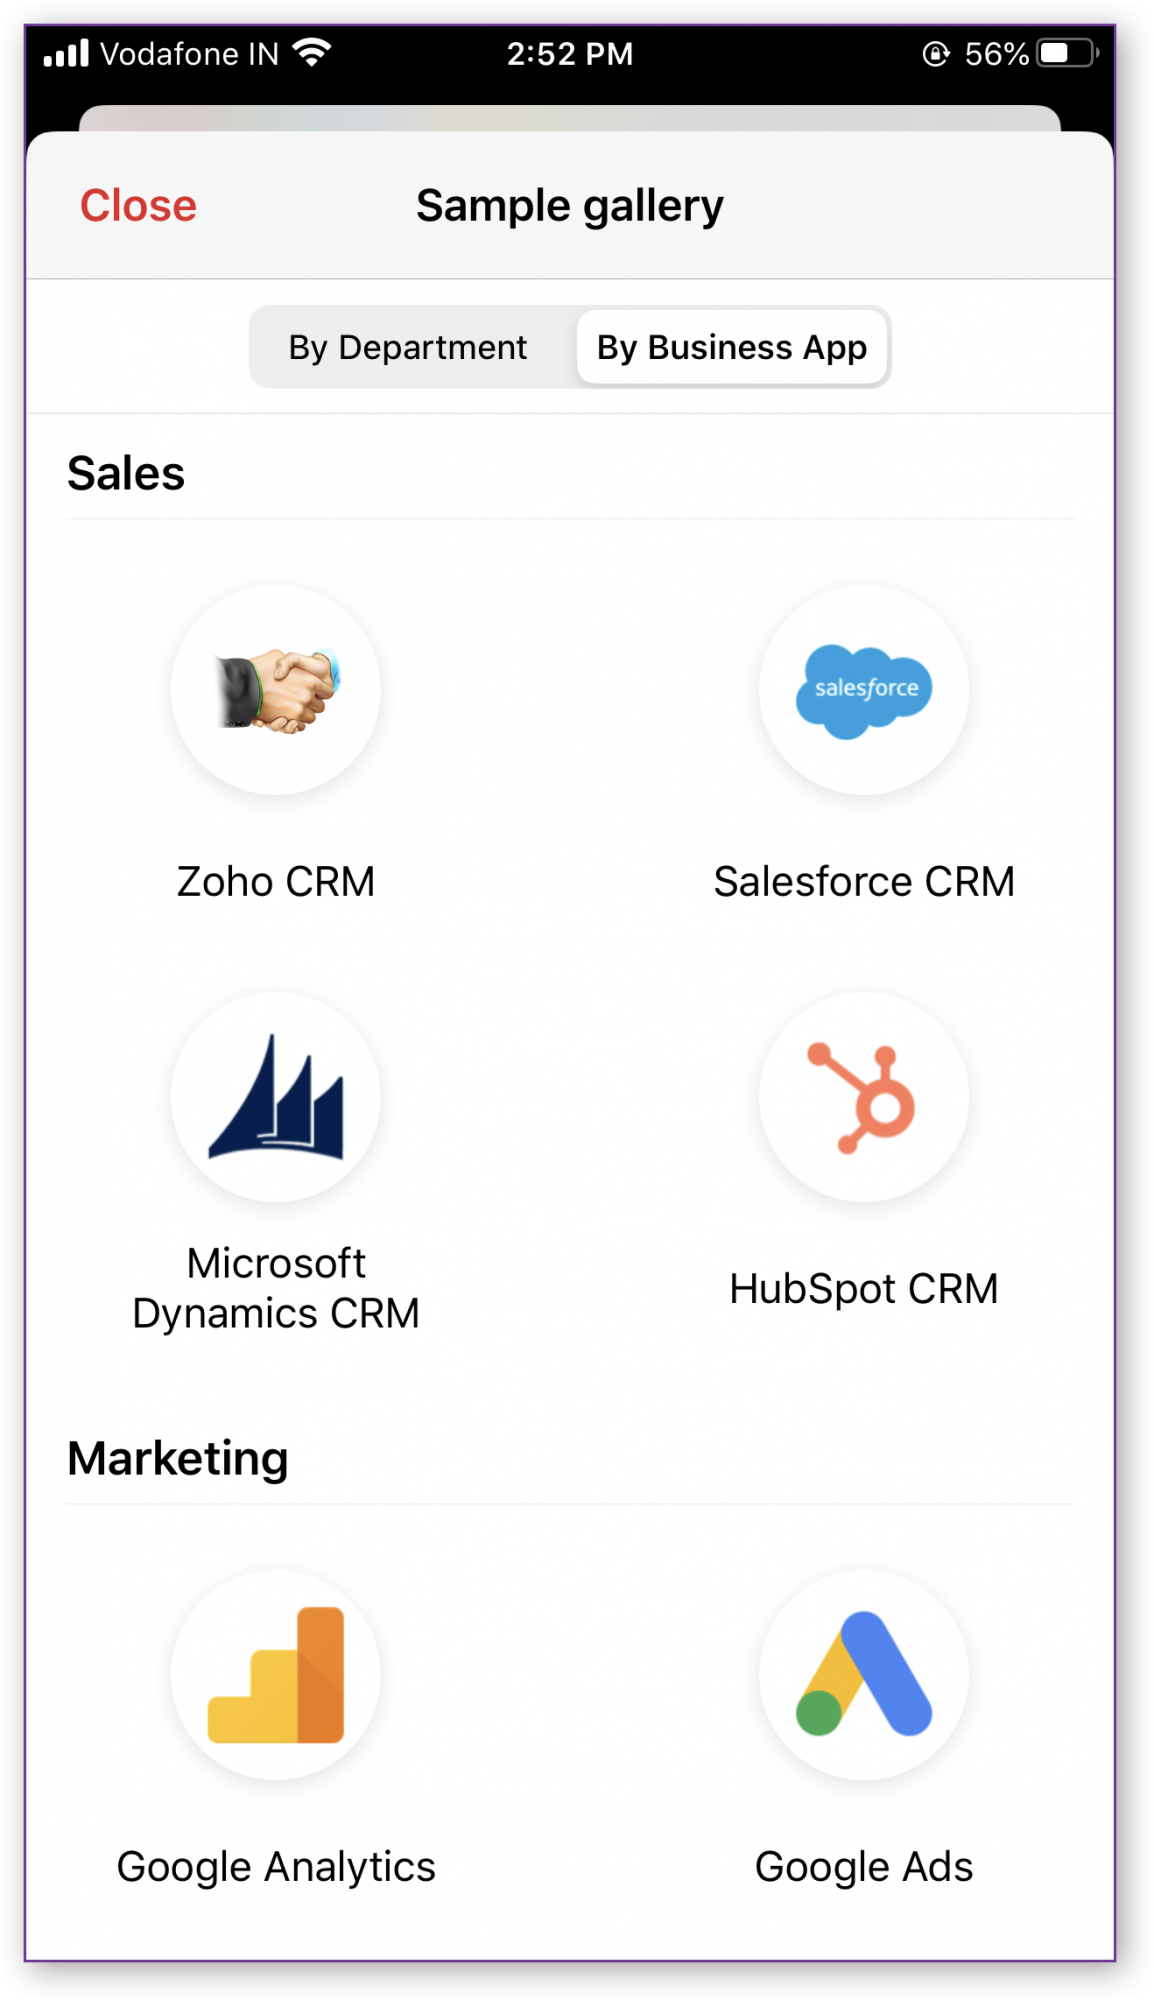 Note: For easy accessibility, the Sample gallery is organized into two tabs: By Department and By Business App.
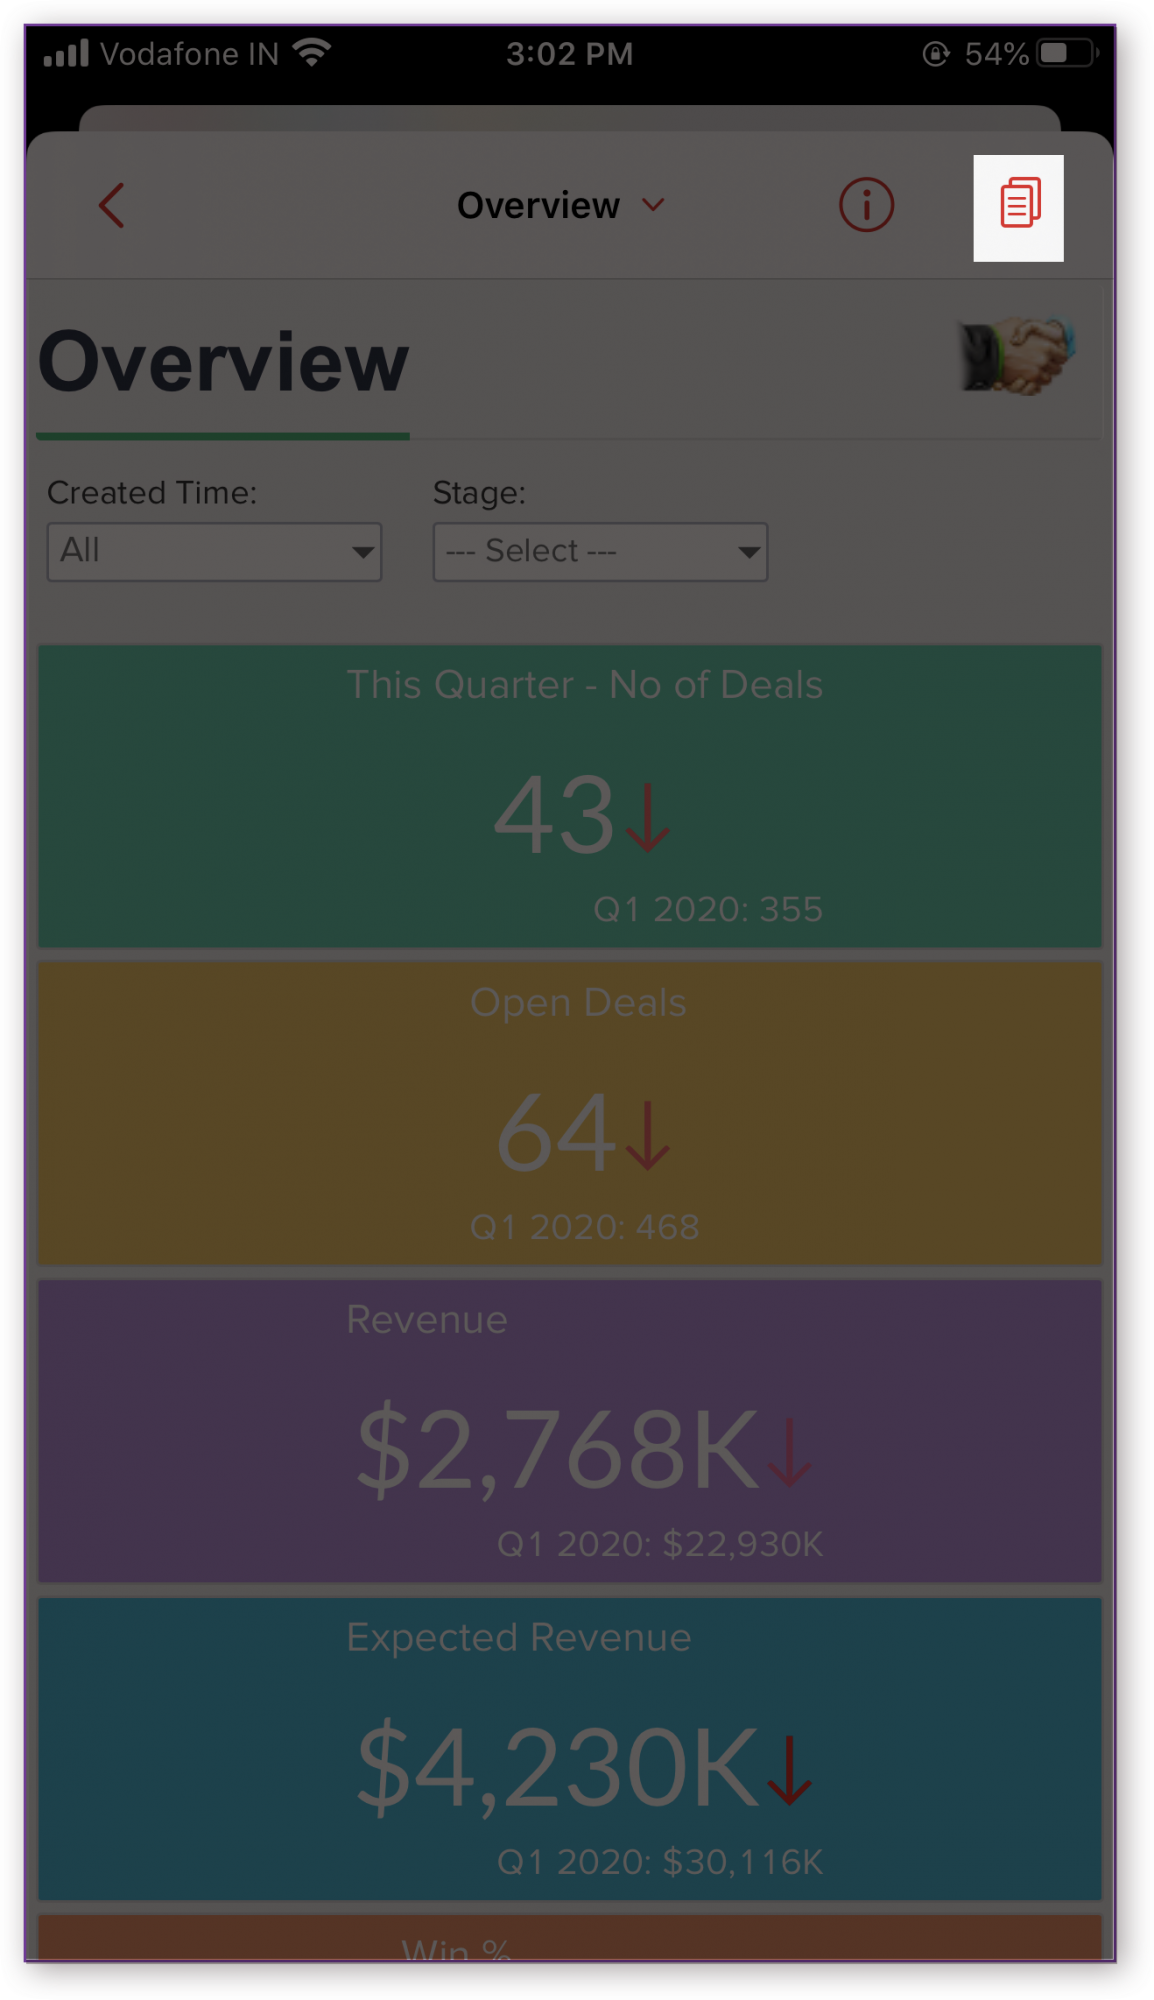
A View of the selected Workspace will open. You can navigate and interact with the Workspace.
- You can also make a copy of the Workspace by tapping the Copy icon at the top right corner.
In the Copy workspace pop-up, provide a Name and Description for the Workspace and tap Copy.
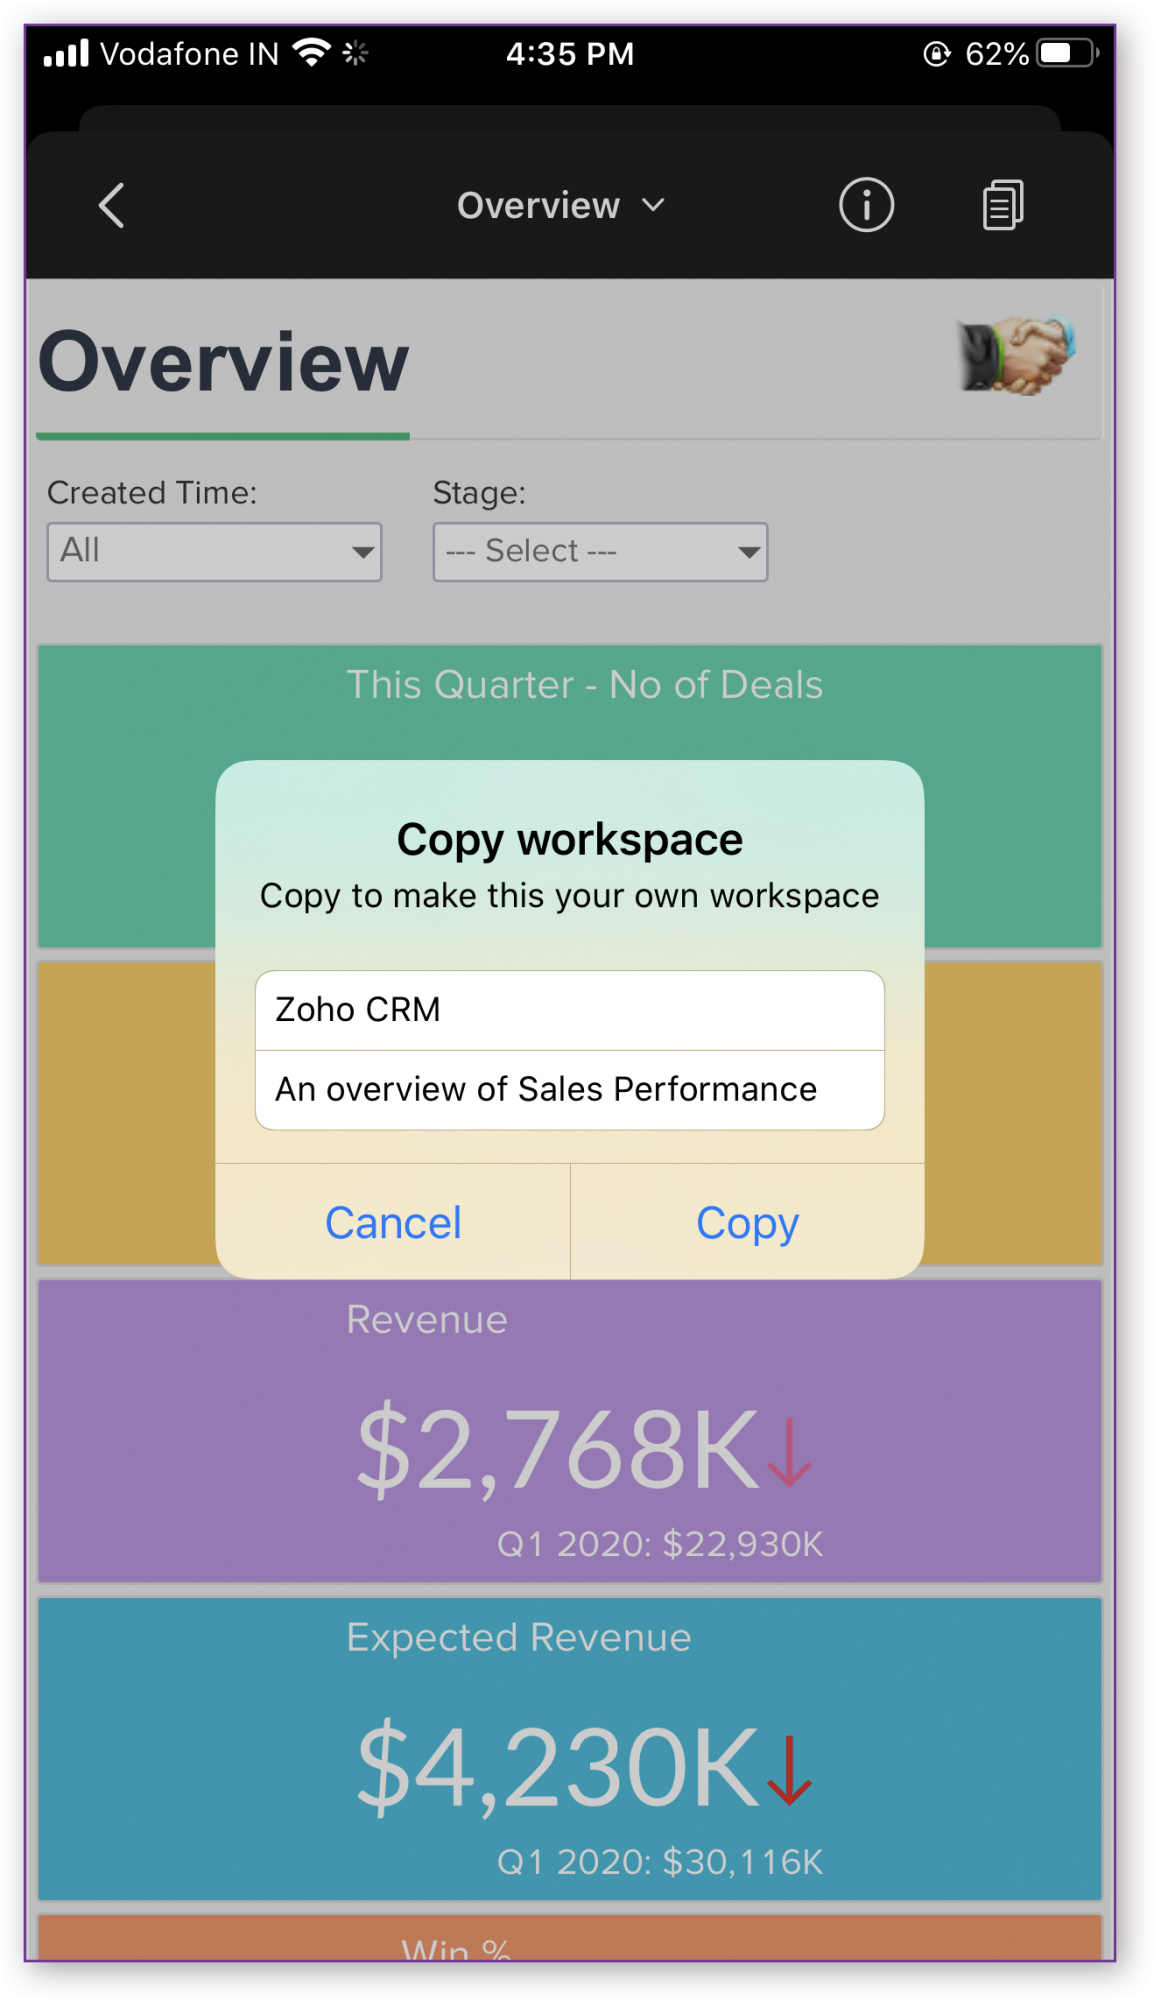


A copy of the sample Workspace will be created. You will now be able to edit and play around with the Workspace.
Accessing a View
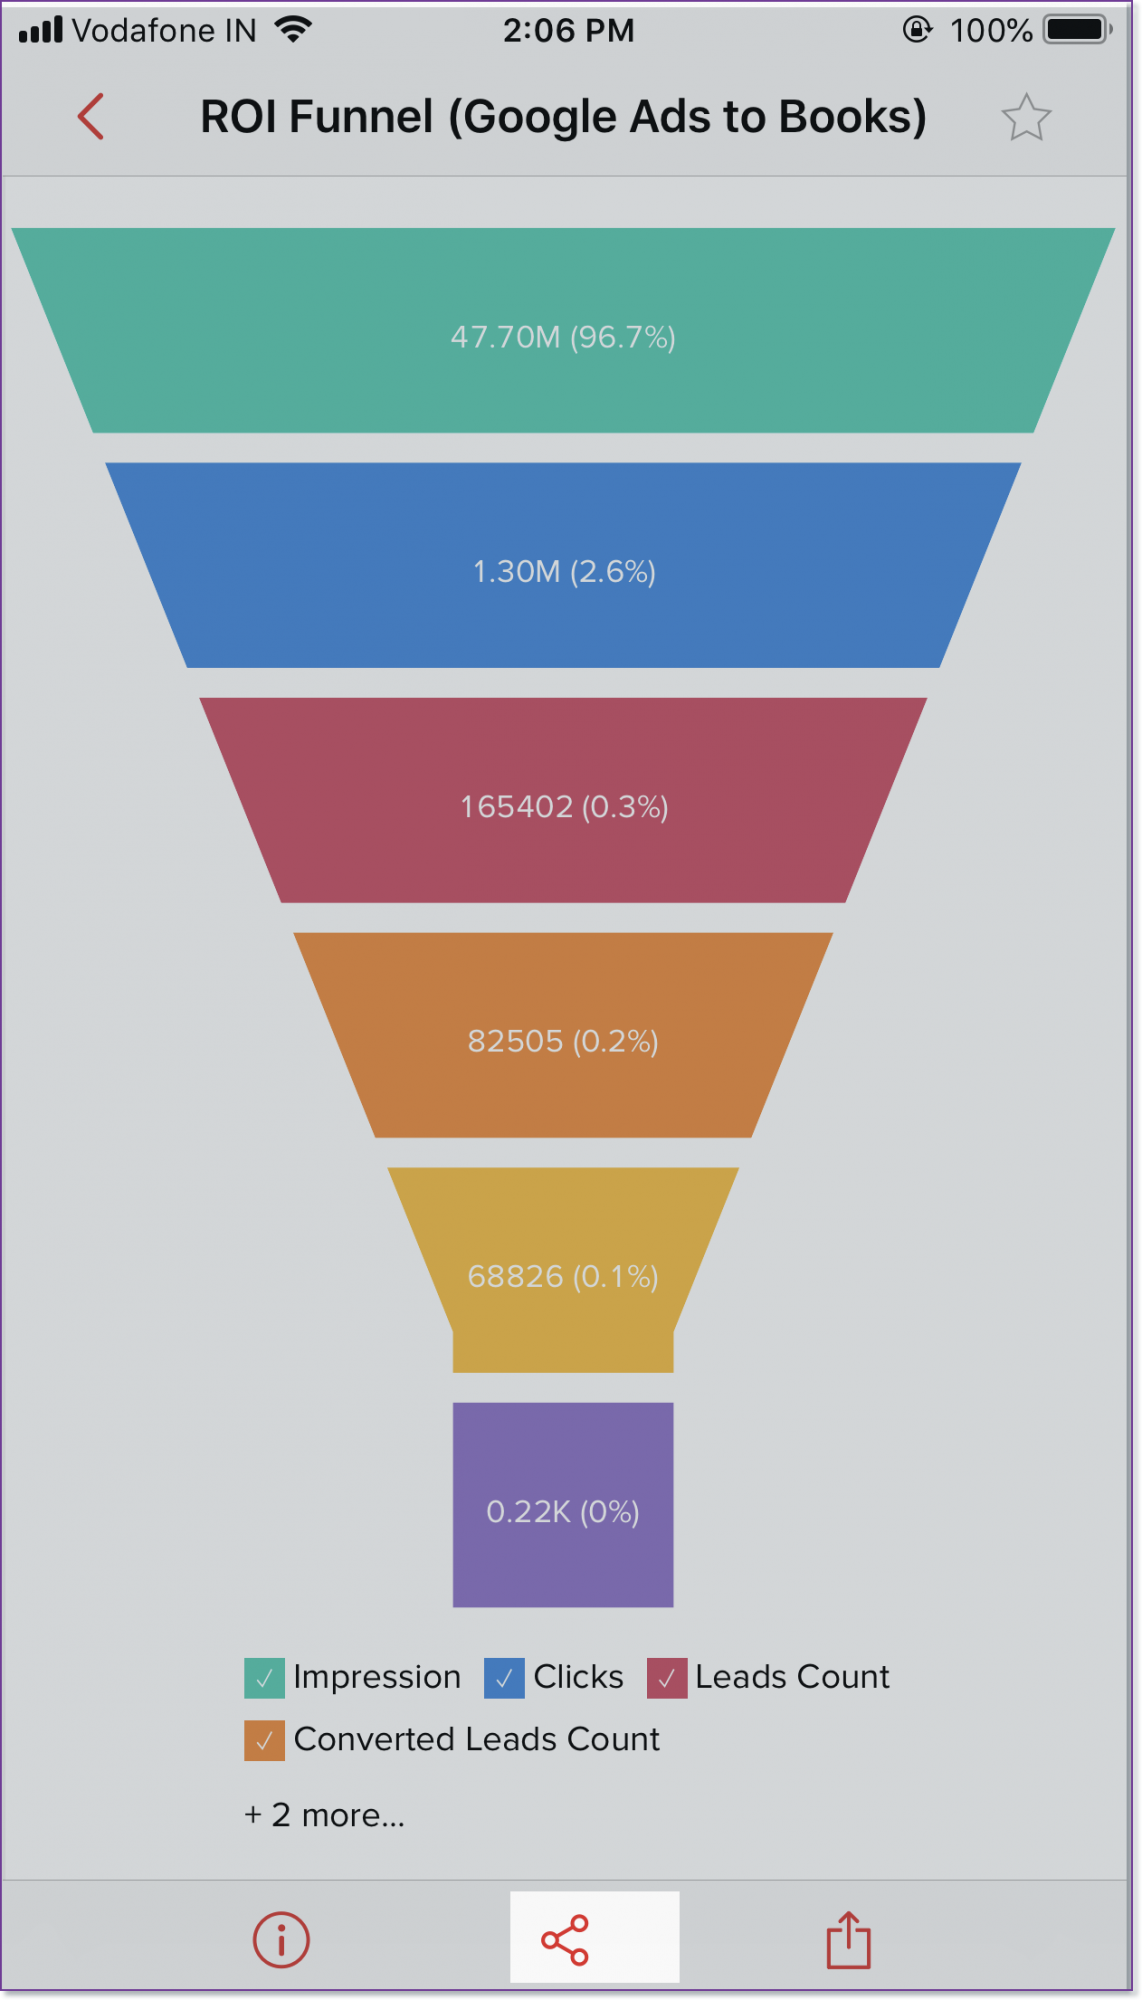
Zoho Analytics allows you to access the views in read-only mode by tapping on this. You will find a wide range of mobile-optimized options to interact with your views, including accessing tooltips, drill down, view underlying data, legend filtering, sorting and applying user filters.
Accessing Charts
You can access the chart in read-only mode with the following interactive options.
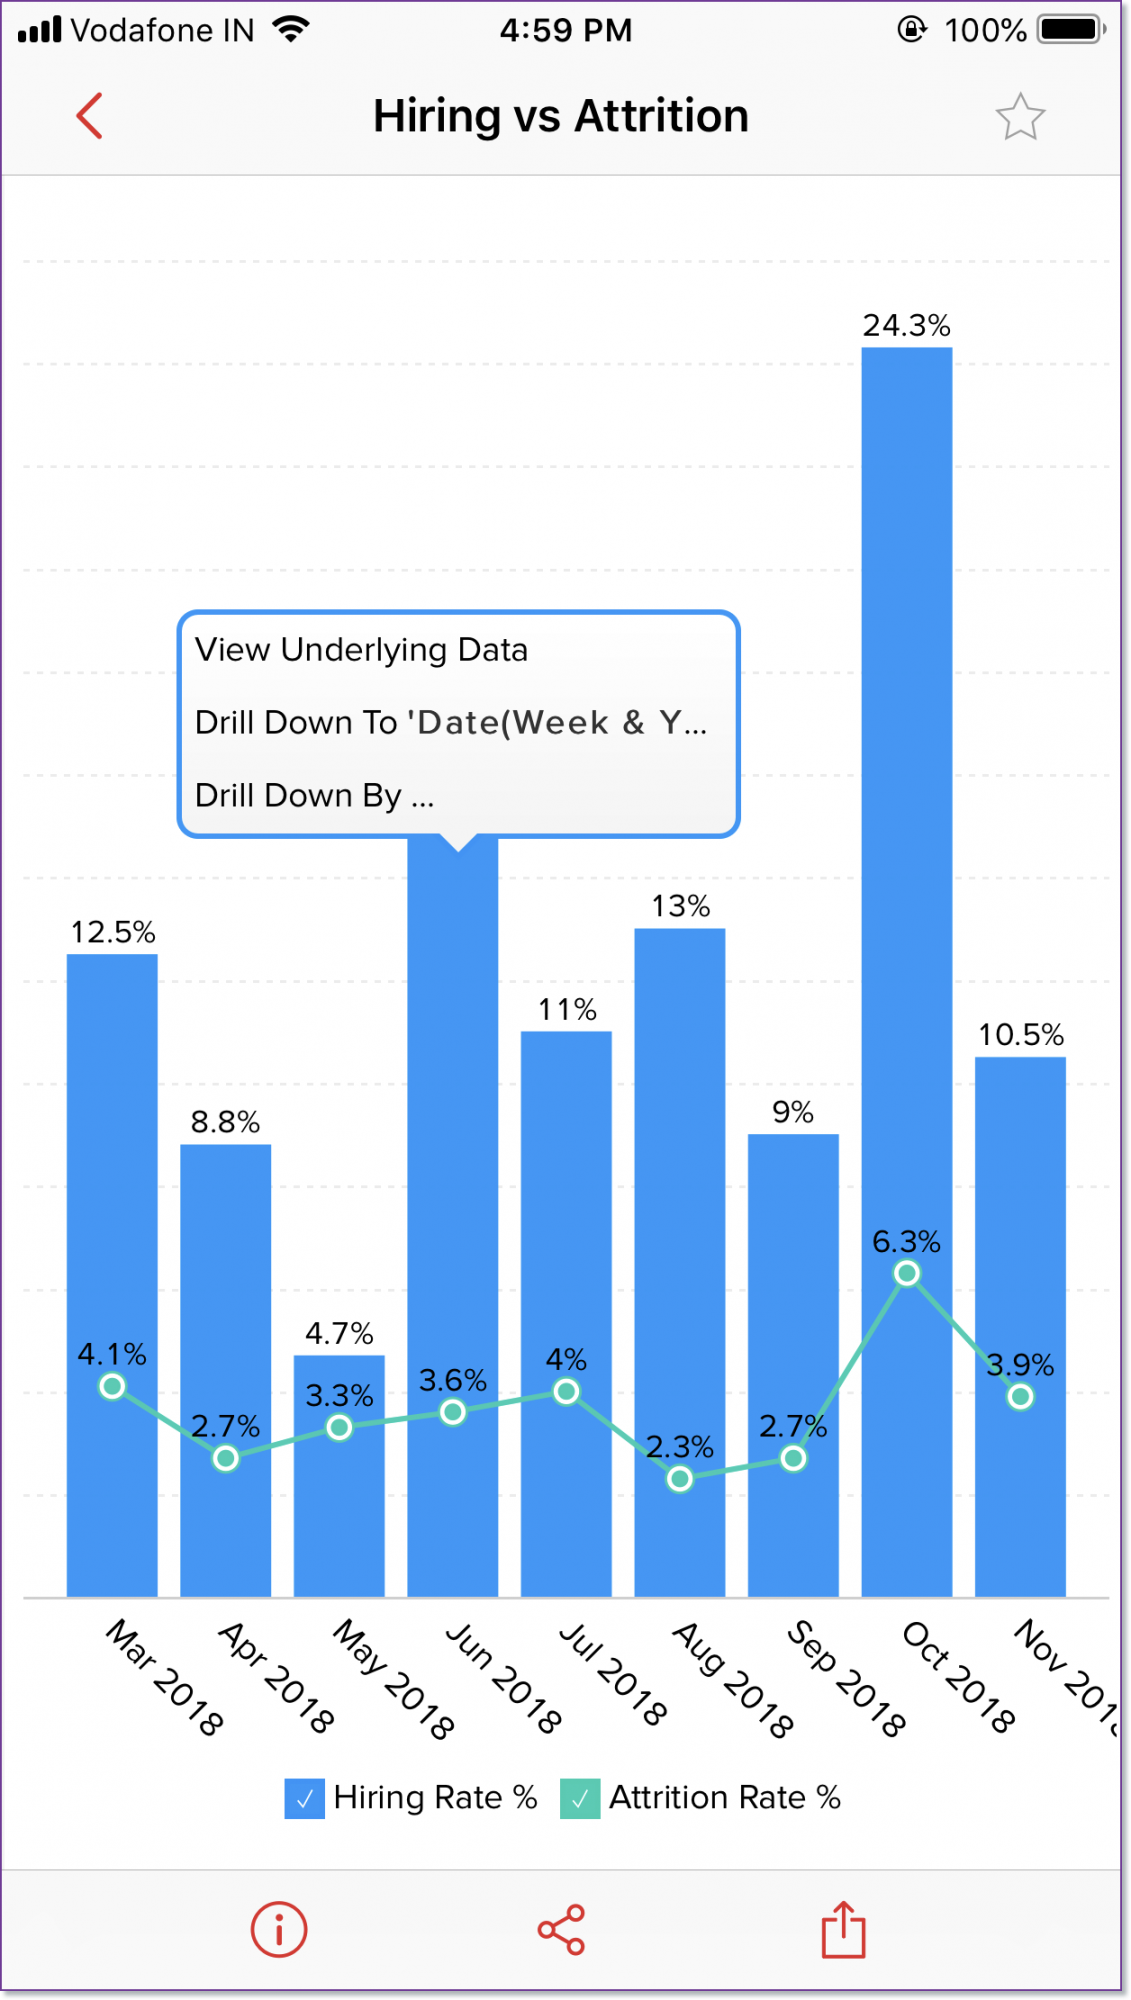
- Tooltip - You can view the chart tooltip by tapping the corresponding data point.
- View Underlying Data - You can view the underlying data of a data point by double tapping on the data point and then by selecting View Underlying Data.
- Drill Down - You can drill-down at any data point by double tapping it. Select the drill down option. You can navigate across the drill down path that has already been set for the chart or search the columns by which you wish to drill down the data. The drill down path will be displayed as a breadcrumb at the top the chart.
- Legend - Using the Legend option you can dynamically filter the data series in a chart by selecting/deselecting the corresponding legend item.
- Dynamic User Filters - You can dynamically filter the reports using the User Filters created in the report.
Accessing Tables, Query Tables, Pivots, Tabular and Summary Views
You can access the tabular views in read-only mode with the following interactive options.
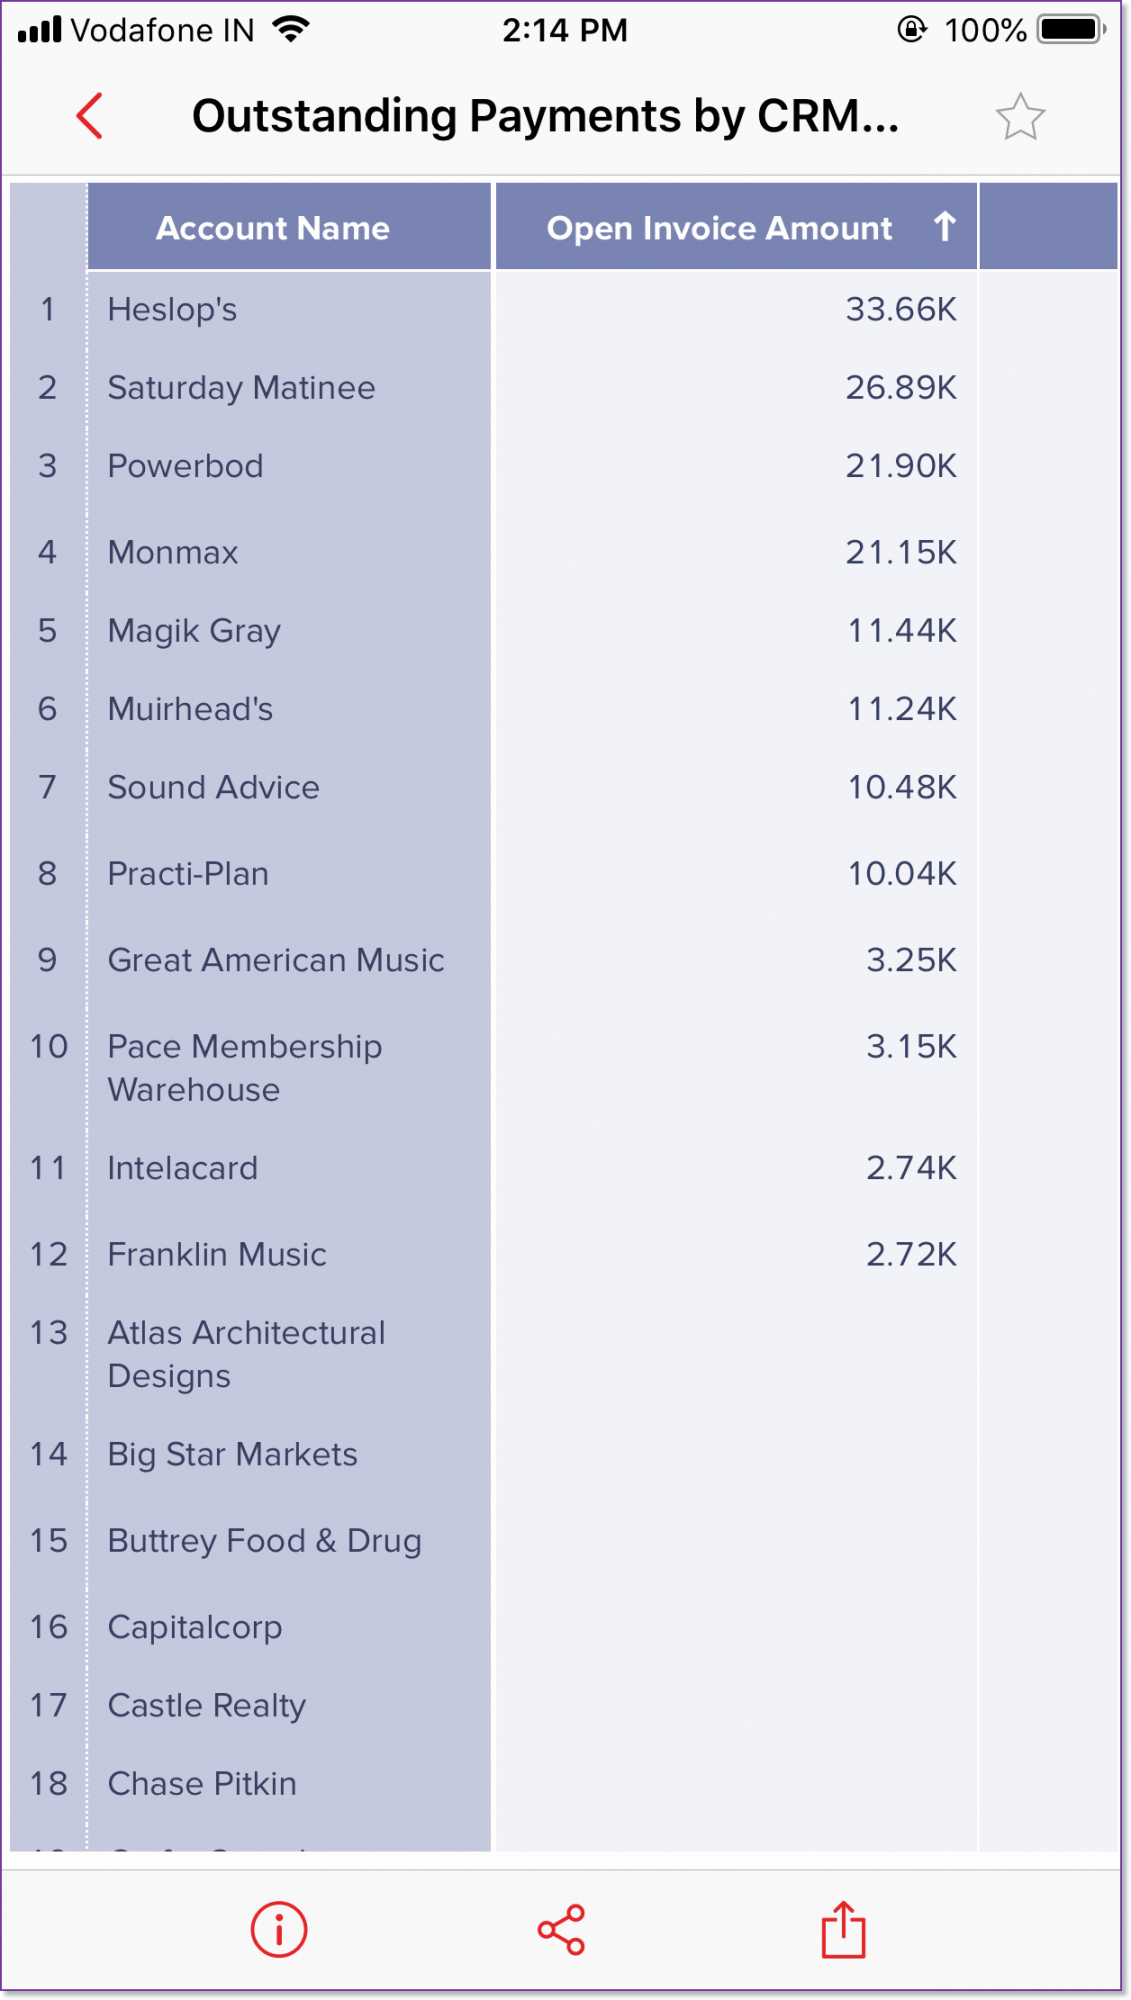
- View Underlying Data - You can view the underlying data of a data point by double tapping on the data point and then by selecting View Underlying Data. The drill down path will be displayed as a breadcrumb at the top the view.
- Sorting - On tapping the header you will see a sorting icon which can be used to sort the column in the desired order. The up arrow indicates sorting in descending order and the down arrow indicates sorting in ascending order.
- Navigation - You can navigate across the table by swiping through the rows. You can also navigate to the top and bottom of the table using the navigation bar displayed at the bottom right.
- Dynamic User Filters - You can dynamically filter the reports using the User Filters created in the report.
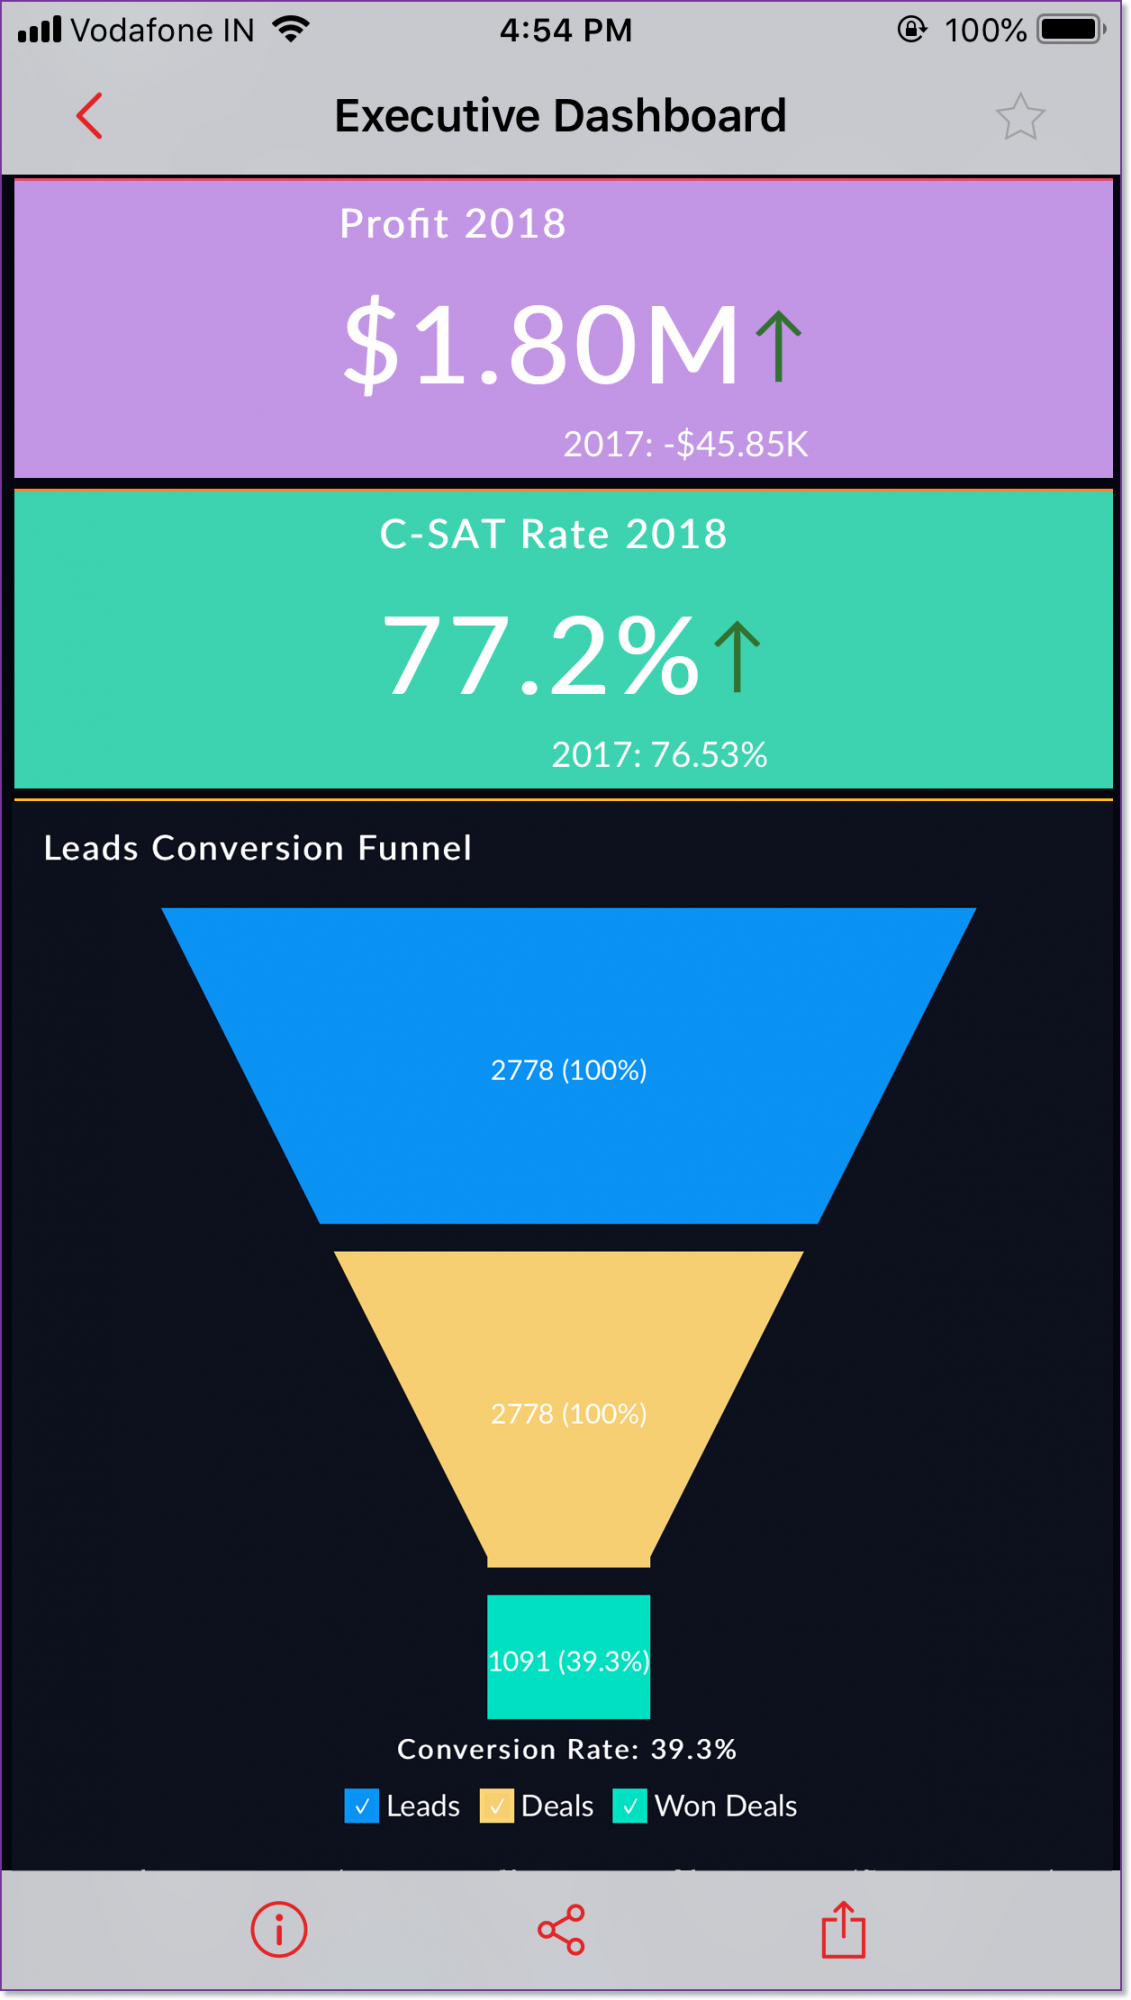
Accessing Dashboard
The Dashboard will list each view in a row. You can access the dashboard with all the supported interaction of the embedded views.
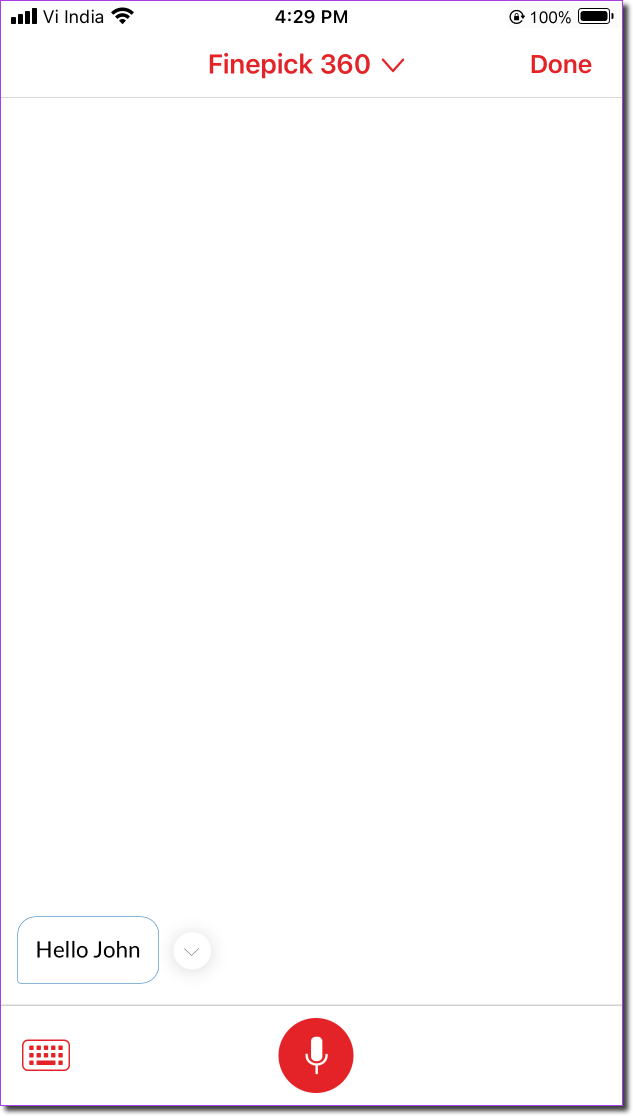
Conversing with Smart Assistant - Ask Zia
Zoho Analytics mobile app is accompanied by a virtual assistant - Ask Zia. Zia will understand your questions in natural language (both voice and text), and provide the best possible answers as reports. Talking to Zia is as easy as talking to a person. You can converse with Zia in natural language and Zia will respond in the form of an appropriate report as the answer.
Accessing Zia
You can access Ask Zia from your Zoho Analytics mobile app home page or from the corresponding workspace.
From Home Page
- Click the Zia icon available on your home page.
- You will be prompted to choose a workspace. Select the required workspace.


You will be navigated to the Ask Zia Conversions page.
From Workspaces
Clicking the Zia icon available in your workspace will automatically take you to the Zia Conversion page.
On the Zia Conversation page, you can either type your questions using the keyboard at the left or ask your questions as voice notes using the mike icon.
To make the conversation easier, Zia auto-suggests a few questions based on your data. Zia will also suggest columns that match your current conversation, as you type your question.
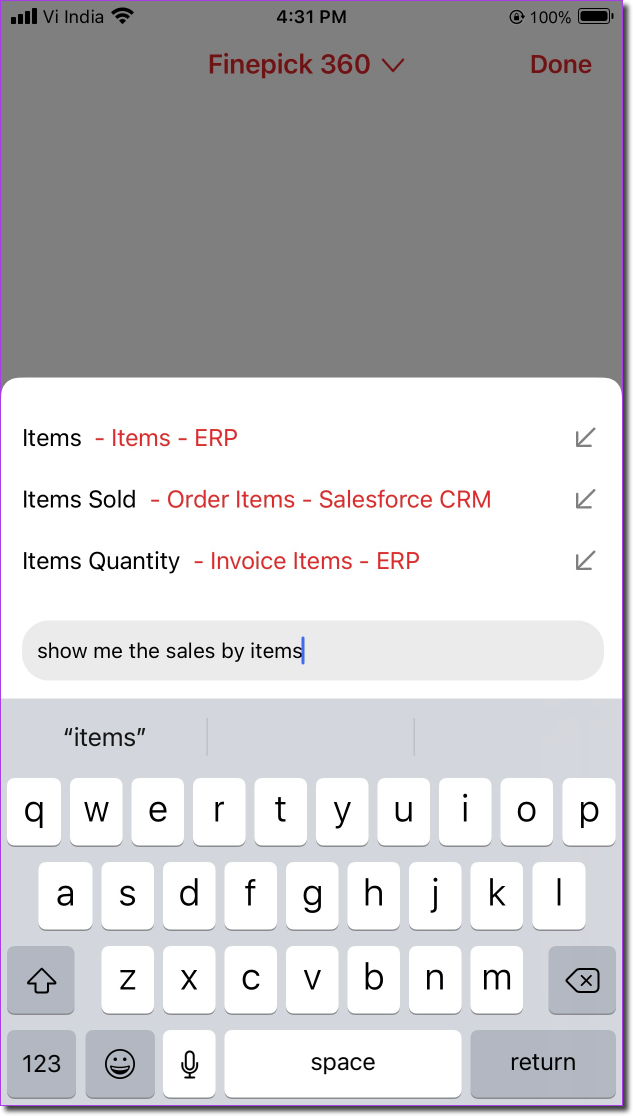
As you ask for more details, Zia will append it to the existing query constructed for your question.
Sharing Views
You can collaborate with your users or colleagues by sharing your reports and dashboards as required from your iPhone.
Follow the steps below to share a view :
- Open the required view.
- Tap the Share icon.
- The Sharing screen will open.
- Specify the email address of the users with whom you wish to share in the Email addresses field.
- Set the necessary permissions to be granted for the view. For more details on the granting permissions, refer to the Granting Permission section.
- You can customize the email to be sent by tapping the Edit mail option.
- Select the Send me a copy to send a copy of invite mail to you.
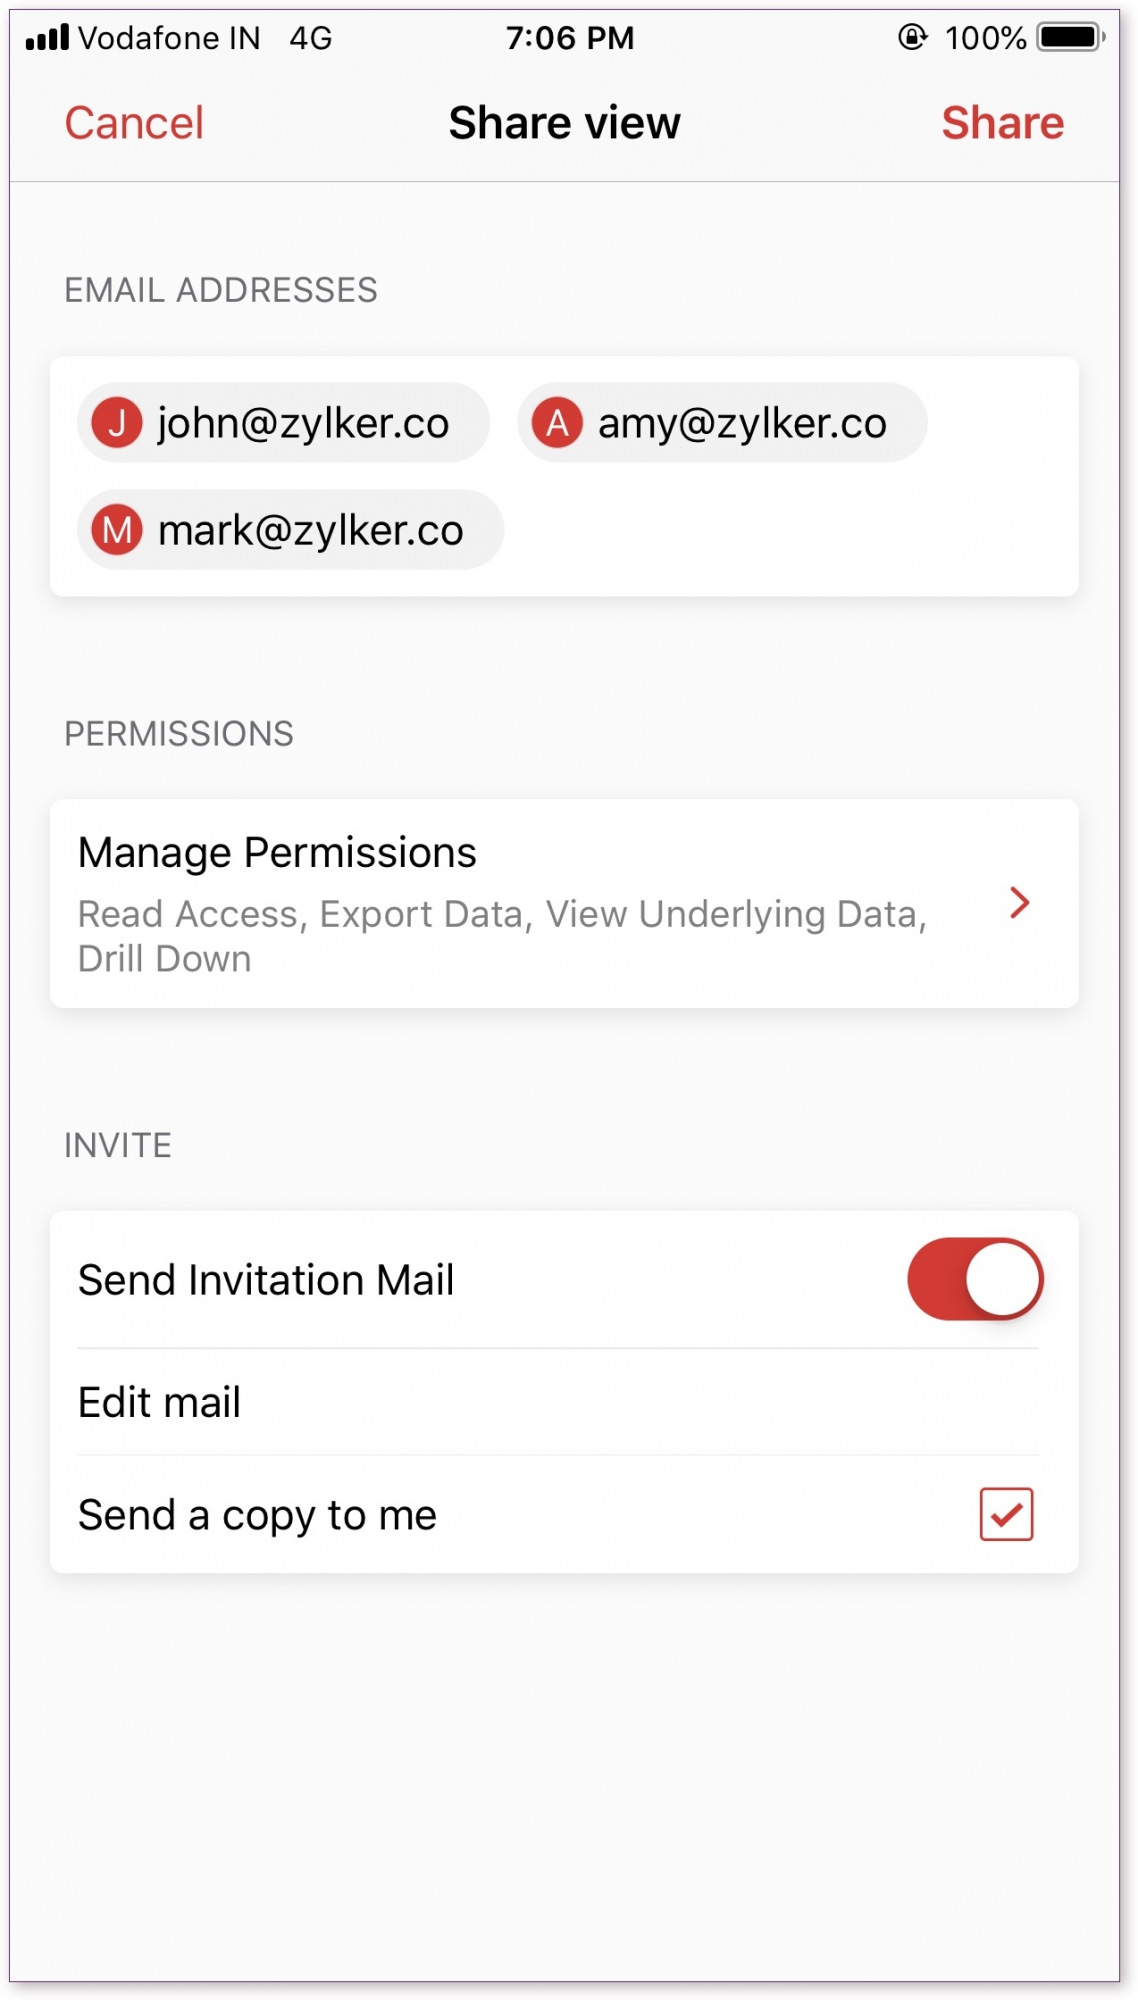
- Tap Share. The view will be shared to your user.
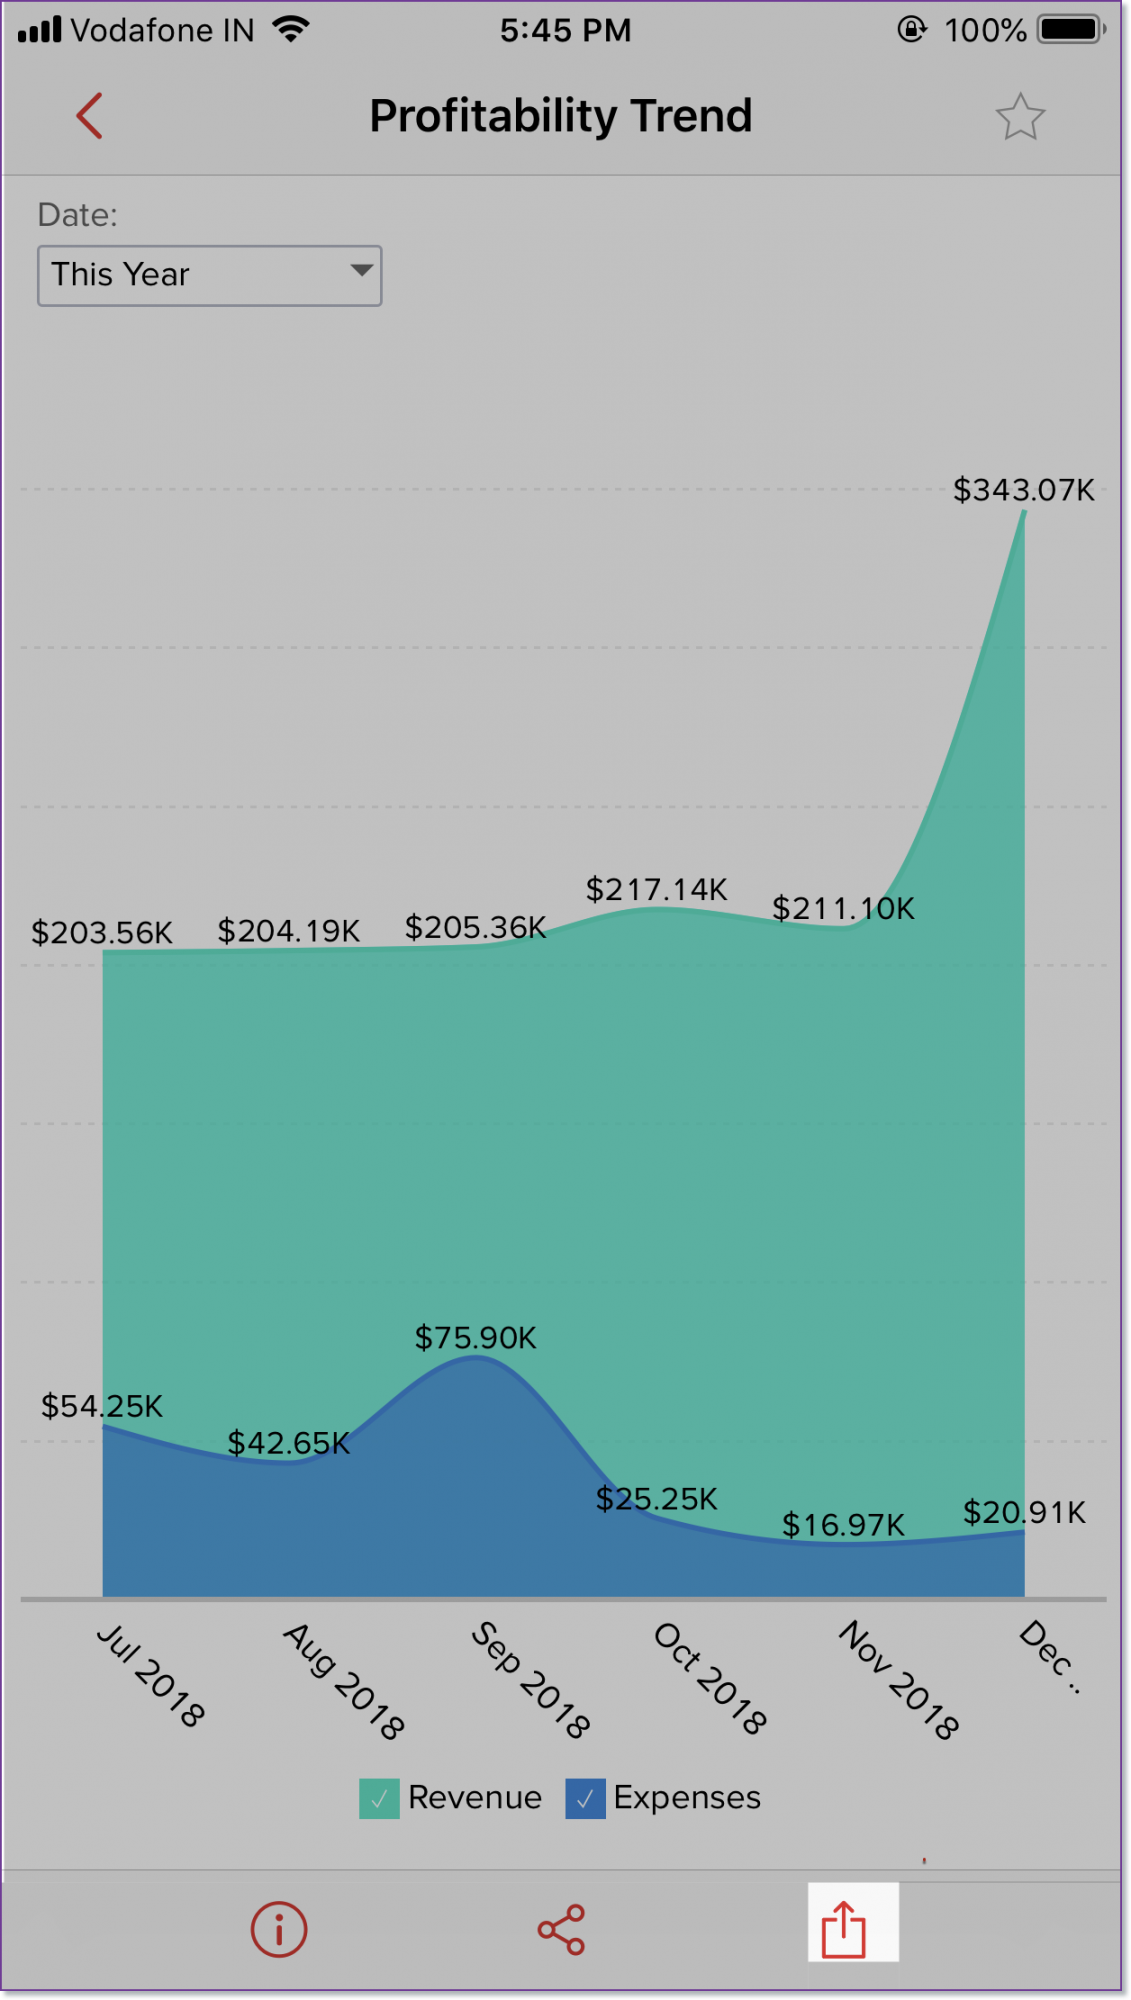
Exporting Views
You can export a copy of the view to access them offline or share it with non-Zoho Analytics user.
Follow the steps below to share a view:
- Open the required view.
- Tap the Export icon.
- The supported formats will be listed.
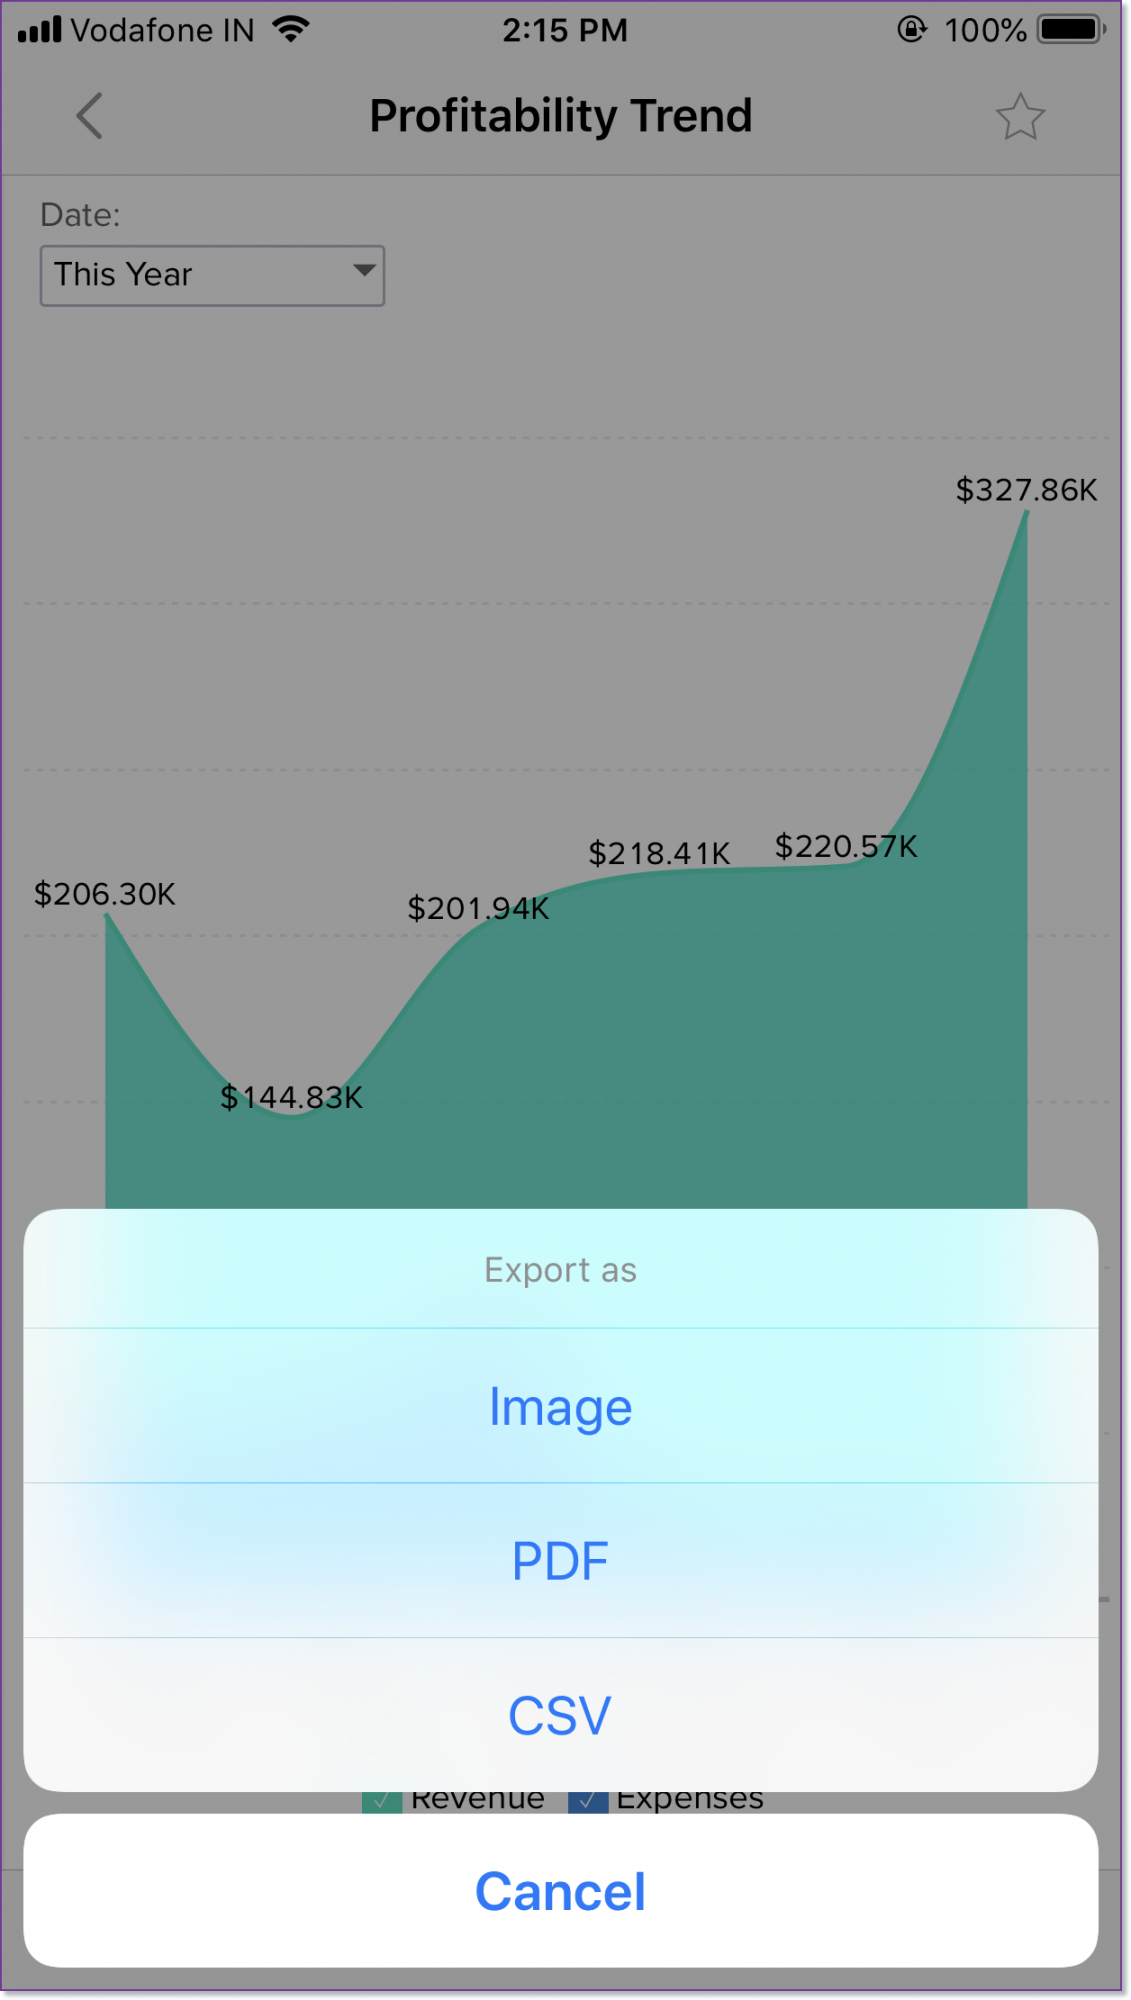
- Tap on the required format.
- Options to store the exported view will open. You can either choose to save it in your device using Upload to Photos, Save to Drive etc., or share it with other using Whatup, messaging or Gmail.


Supported Export formats for all View Types
The following are the supported export formats.
Charts, Pivot, Summary
- Image
- CSV
- Zip
Table
- CSV
Dashboards
- Zip
Adding Comments
You can now instantly collaborate with your colleagues and clients by adding comments to your shared views.
Follow the steps below to add comments to a view:
- Open the required view.
- Tap the Comments icon available at the bottom right.
- The Comments screen will be displayed.
- You can collaborate with your participants by adding reports or providing comments using the Add Report / Add Comment options. You can also add new participants to your comment conversation using the Users icon at the top-right corner.
Add Comment
You can convey your opinion about views to the shared participants using the Add Comment option. To add comments, tap the Add Comment option.
In the Comment screen that opens, type the required comments. You can perform the following actions in the Comment screen:
- Format Text
- Attach a file from the Local Drive
- Capture the current view screen and annotate it
- @mention the collaborators
Add Report
You can refer to other views available on your workspace in the comment thread. To add the views available in your workspace as comments, tap the Add Report option. All the reports available in the workspace will be displayed, you can choose to Filter or Search for a particular report and add the same.
Add Participants
To add participants:
- Click the Participants icon at the top-right corner.
- The list of shared users of the workspace will be listed in the Participants dialog. From here, click the Add Participant icon.
- You will be navigated to the Share view page. Provide the following details,
- EMAIL ADDRESS of the user to whom you want to share
- Provide the required access permission for the workspace from the Manage Permissions page:
- Read Options (mandatory to share a view)
- Export Data
- View Underlying Data
- Drill Down
- Share Options
- Share View / Child Reports
- Allow commenting
- Once you set the required permissions, navigate Back.
- From the INVITE section, you can Send Invitation Mail to the shared user, Edit the standard mail, and also self-send a copy of the mail.
- After making the required selections, click Share.
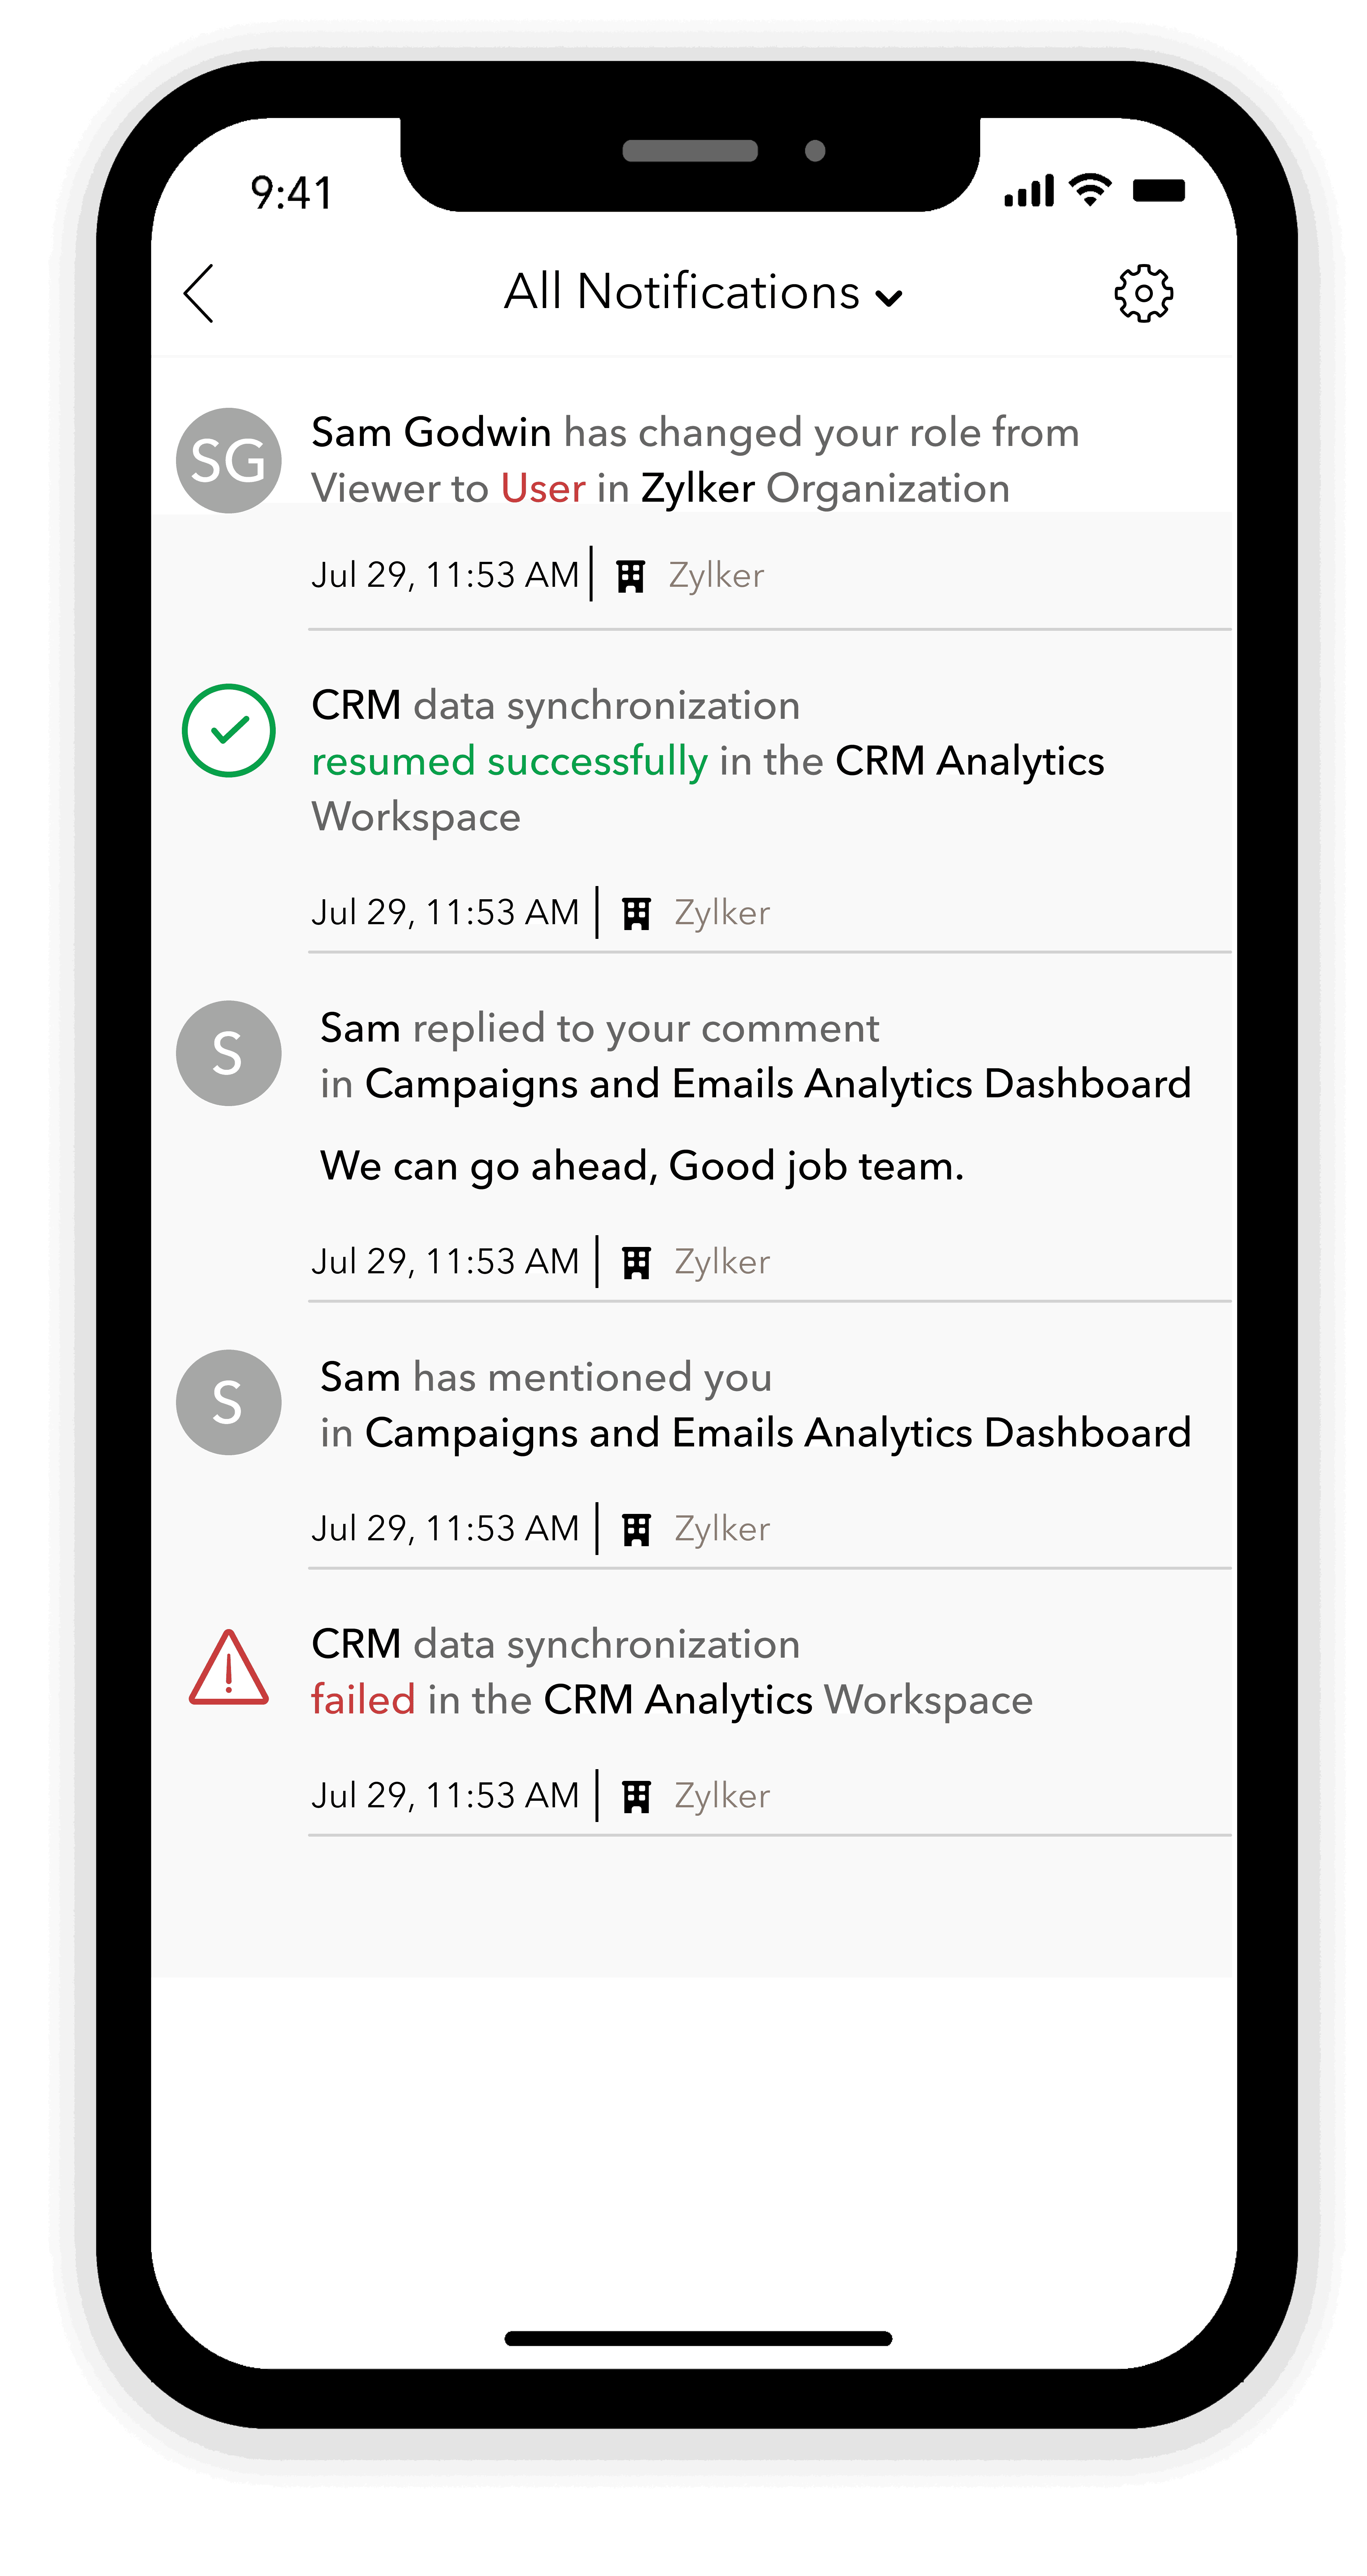
Notifications
In Zoho Analytics - Mobile BI app, notifications will be delivered whenever,
- A view or dashboard is shared with you.
- A user is added or removed from a group.
- A user is added or removed as a workspace admin.
- A new comment, reply, like or attachment is added to a shared view.
- A scheduled import fails.
- There is an update/change on the status of data integration.
- There is a request to gain view access requests and directly grant permissions seamlessly.
- An alert is triggered.

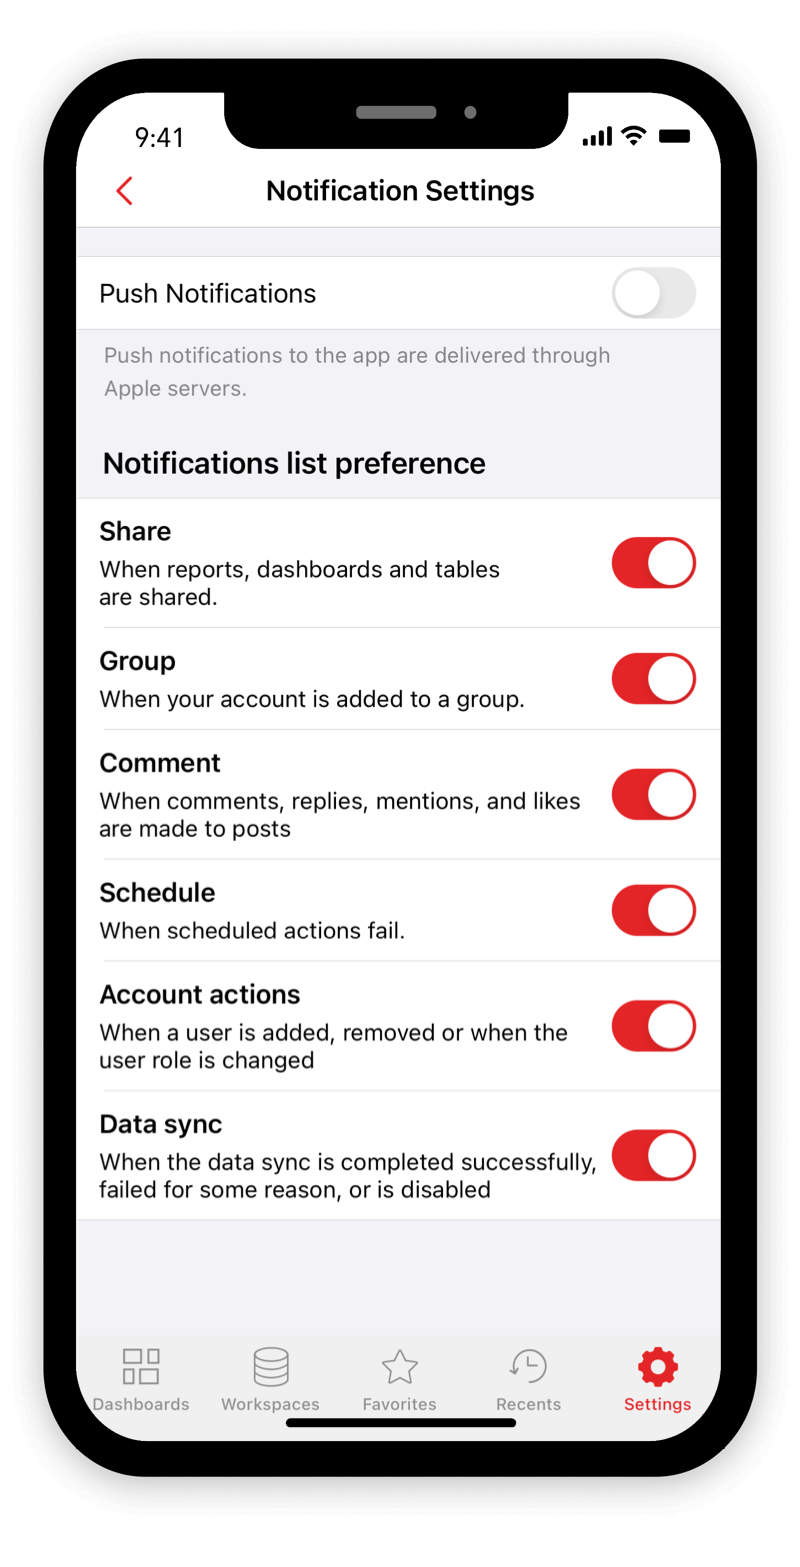
To enable/disable notification:
- Open the Zoho Analytics app.
- Tap the Settings icon. The Settings page will open.
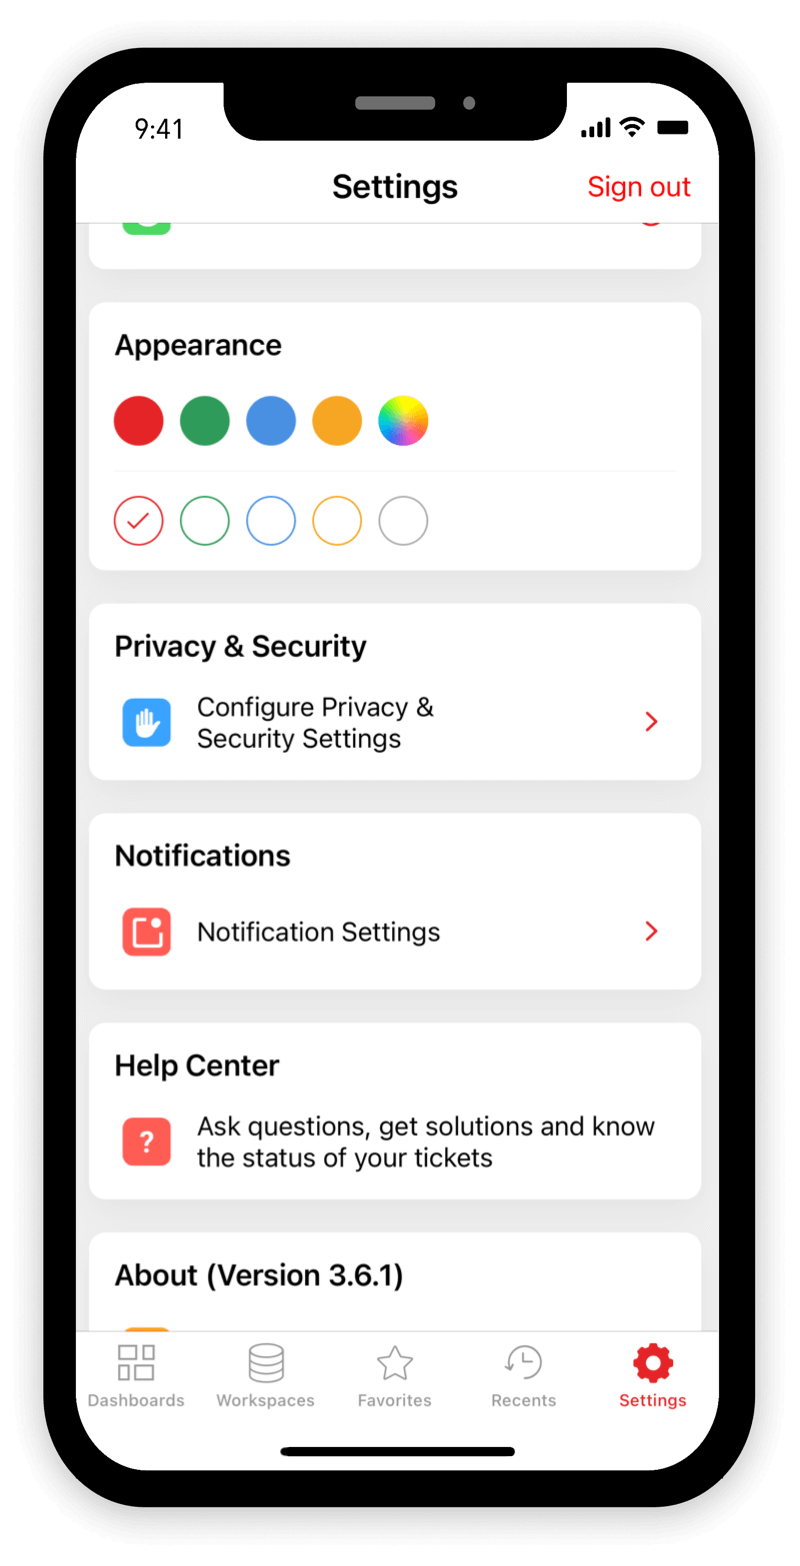
- From the Notifications section, tap Notifications Settings. The Notification Settings page will open.
- Tap Push Notifications toggle button to enable/disable push notifications for the Zoho Analytics - Mobile BI app.
- From the Notifications list preference section, tap the appropriate toggle button to enable/disable the following:
- Share: Get notified each time a view, table or dashboard is shared or when an user is added as a workspace admin.
- Group: Get notified each time a user is added to a group.
- Commenting: Get notified each time a new comment, replies, mentions, and likes are added to a shared view/ dashboard.
- Schedule: Get notified each time, when a scheduled import action fails.
- Account Actions: Stay updated on account related activities like adding or removing a user, and changing the user role.
- Data Sync: Get notified about the status of data integration in the workspaces.


Customizing Themes
Zoho Analytics allows you to customize the theme of your mobile app.
Follow the below steps to customize your mobile app appearance:
- Open the Zoho Analytics app.
Tap the Settings icon. The Settings page will open.
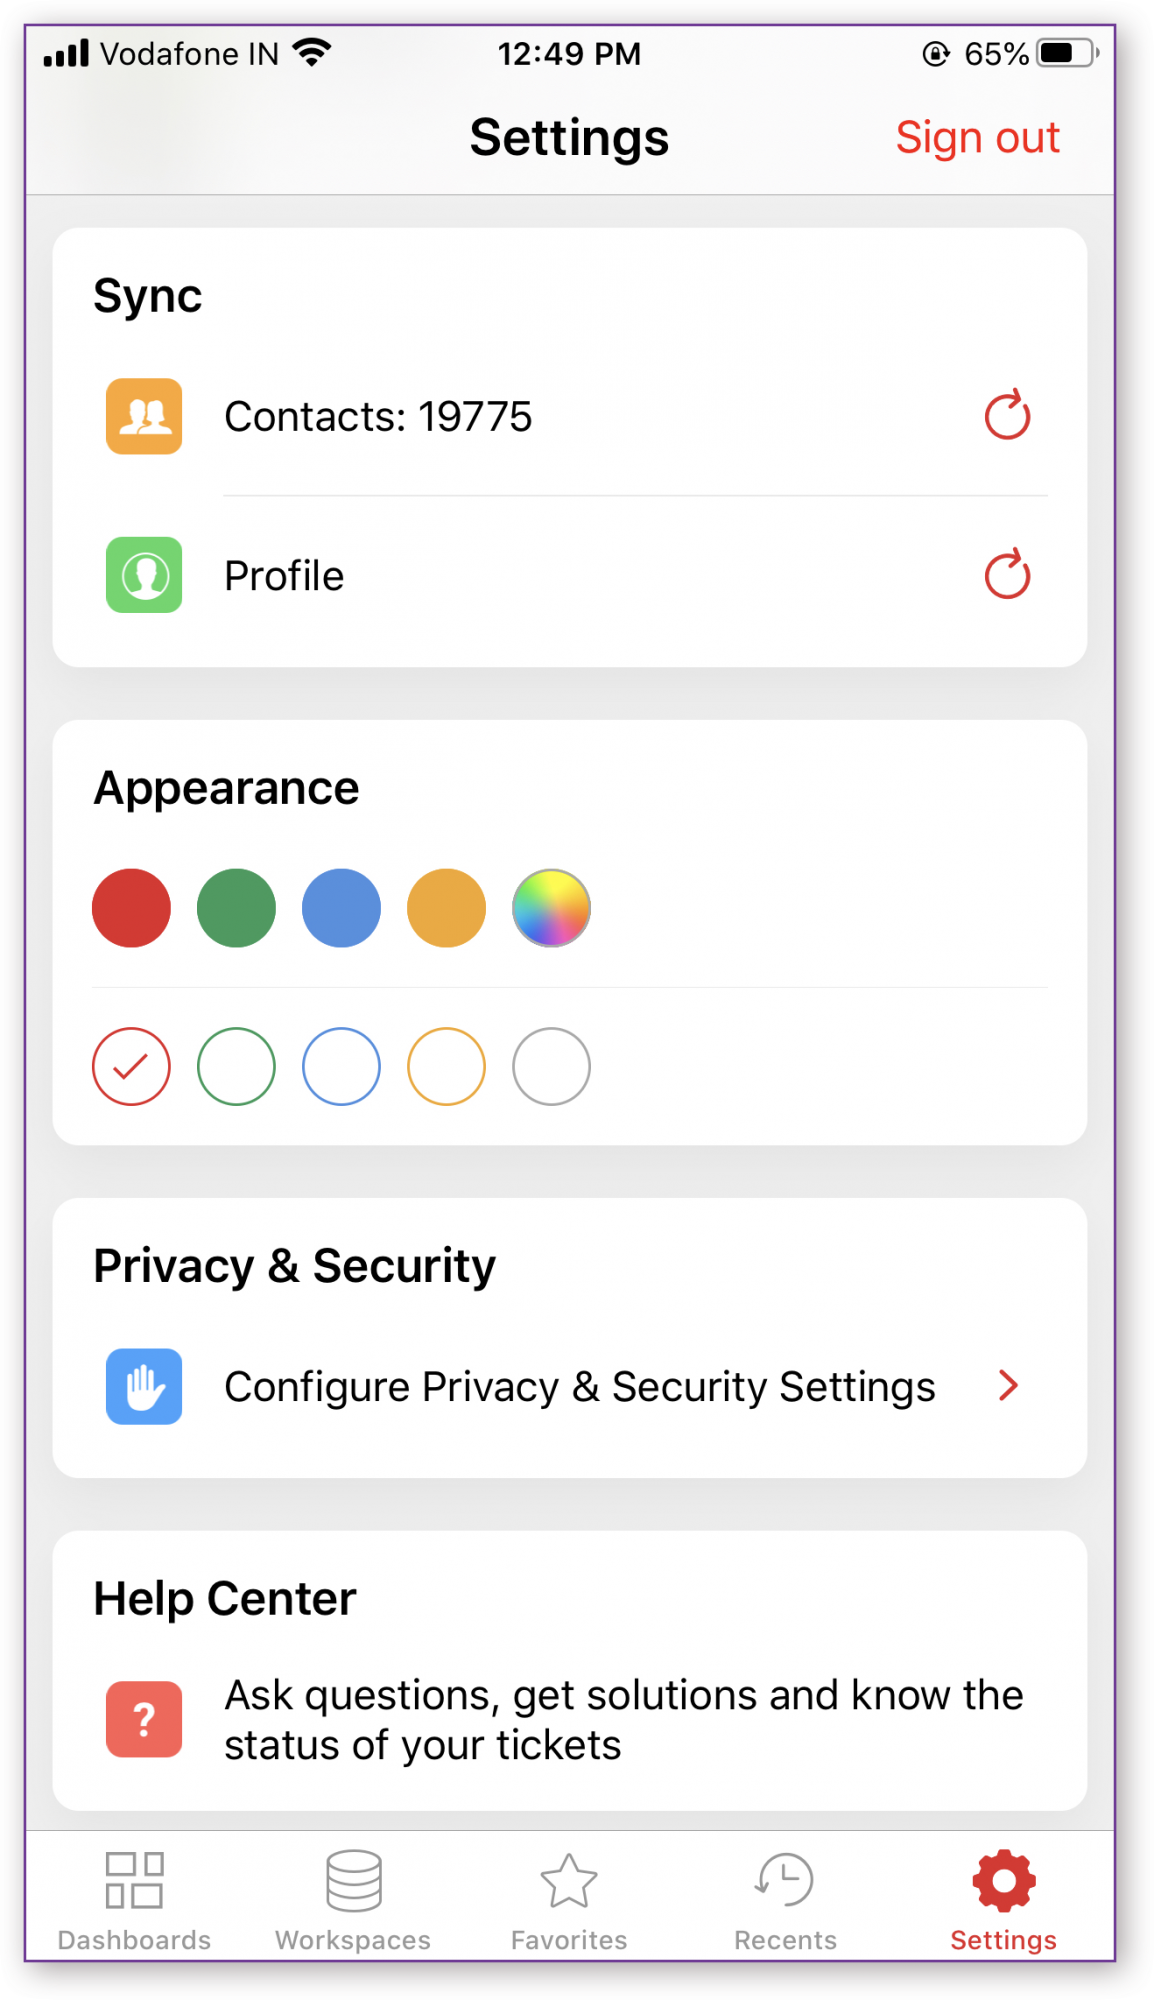
From the Appearance section, you can choose from the preset 8 themes or create your own using the color palette.
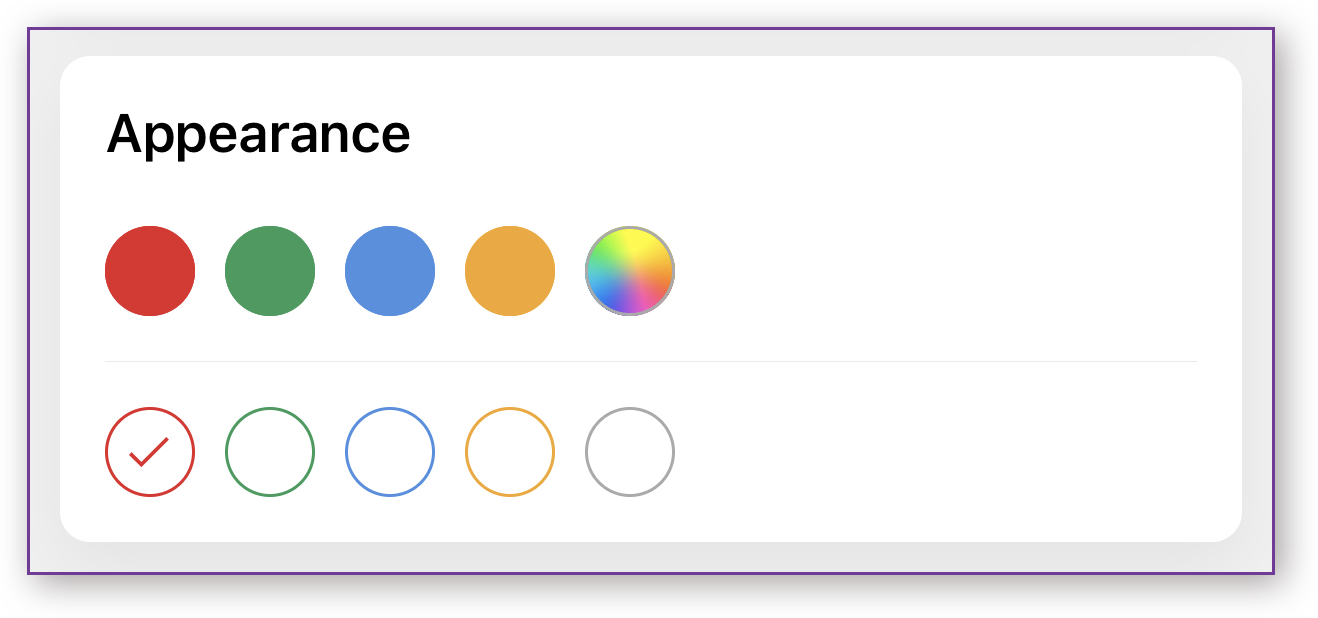


Your mobile app theme will be set to the selected color.
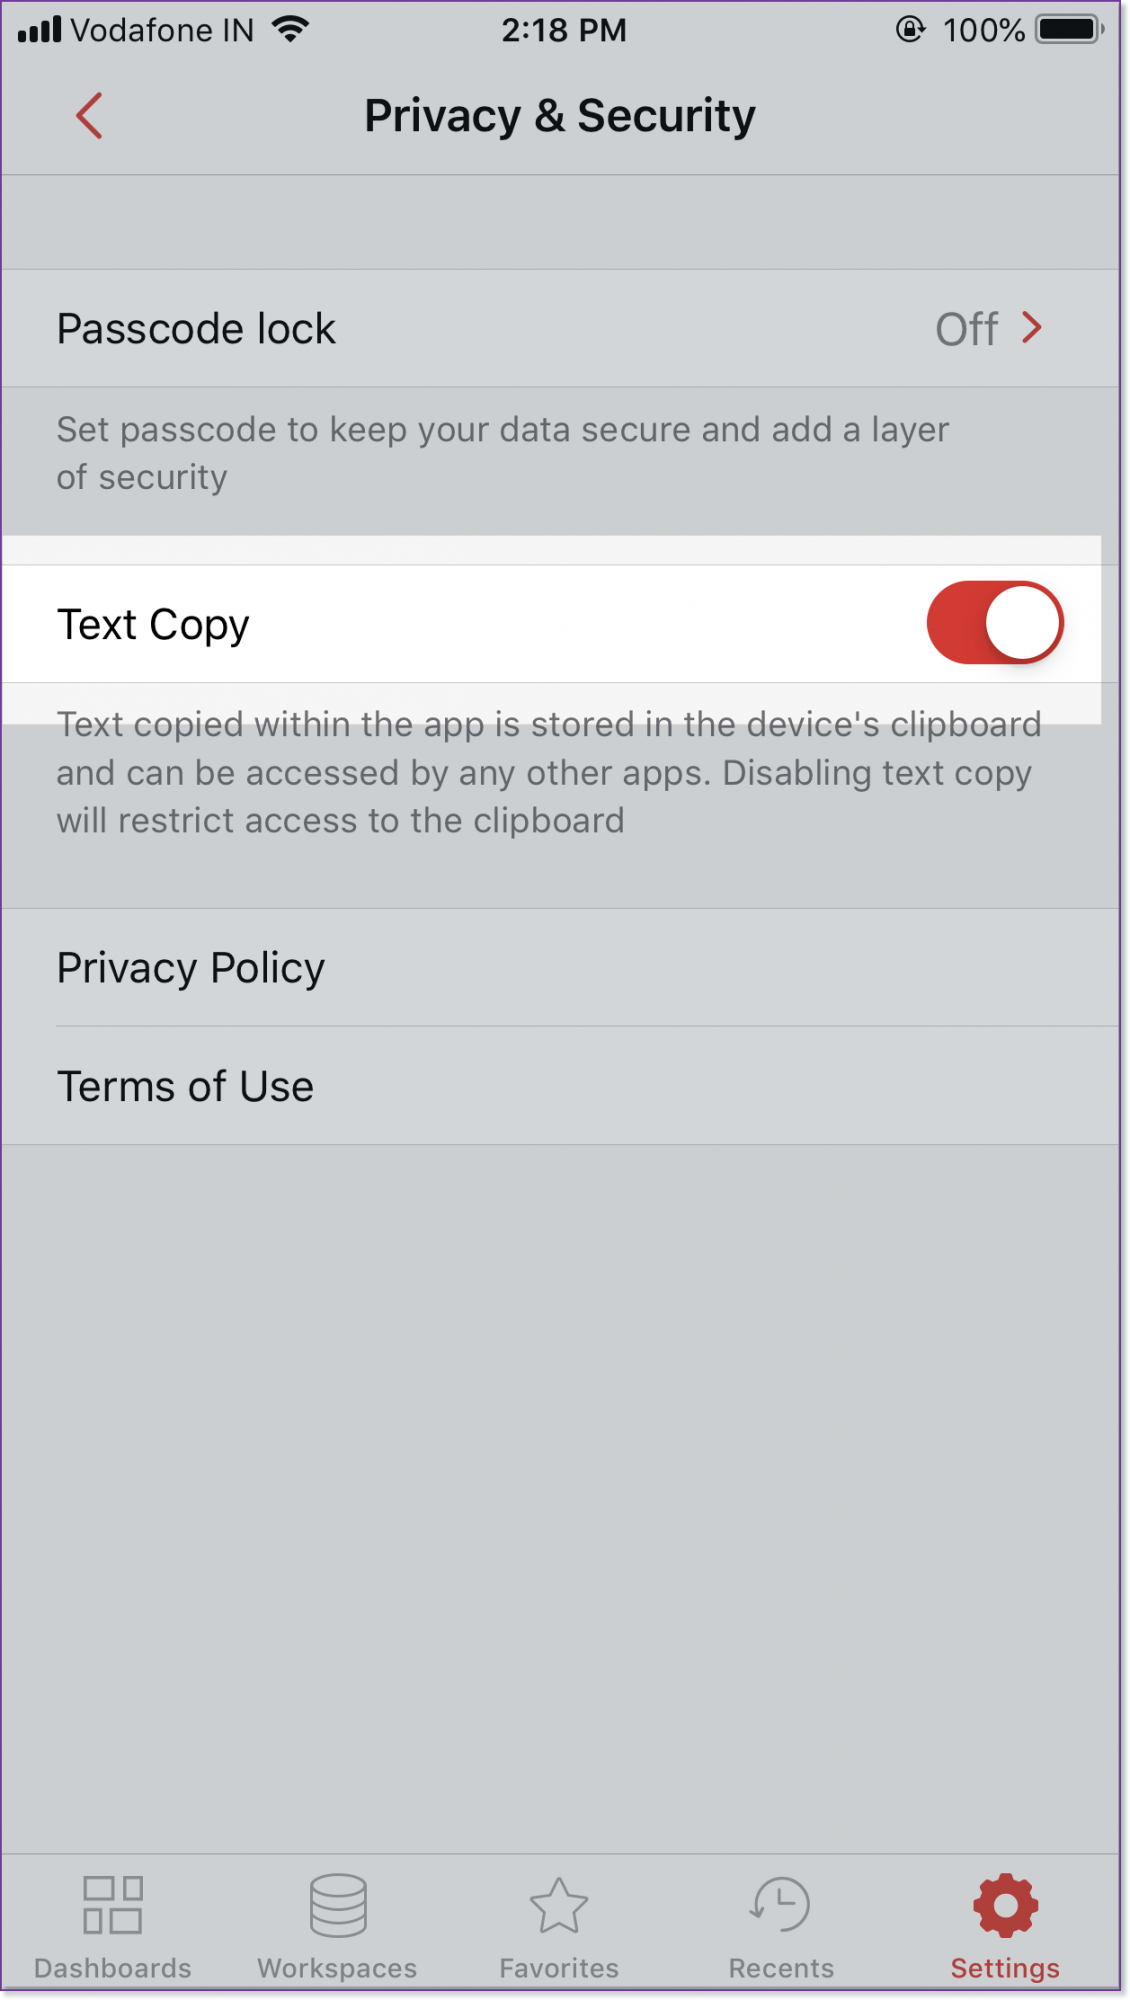
Privacy and Security Settings
Zoho Analytics always values your privacy and data security. Hence, we provide the following security options.
Create an App Lock
Zoho Analytics allows you to lock the app. This restricts anyone who has access to your mobile access to your data in Zoho Analytics.
Follow the below steps to lock the app with a PIN.
- Open the Zoho Analytics App.
- Tap the Settings icon. The Settings page will open.
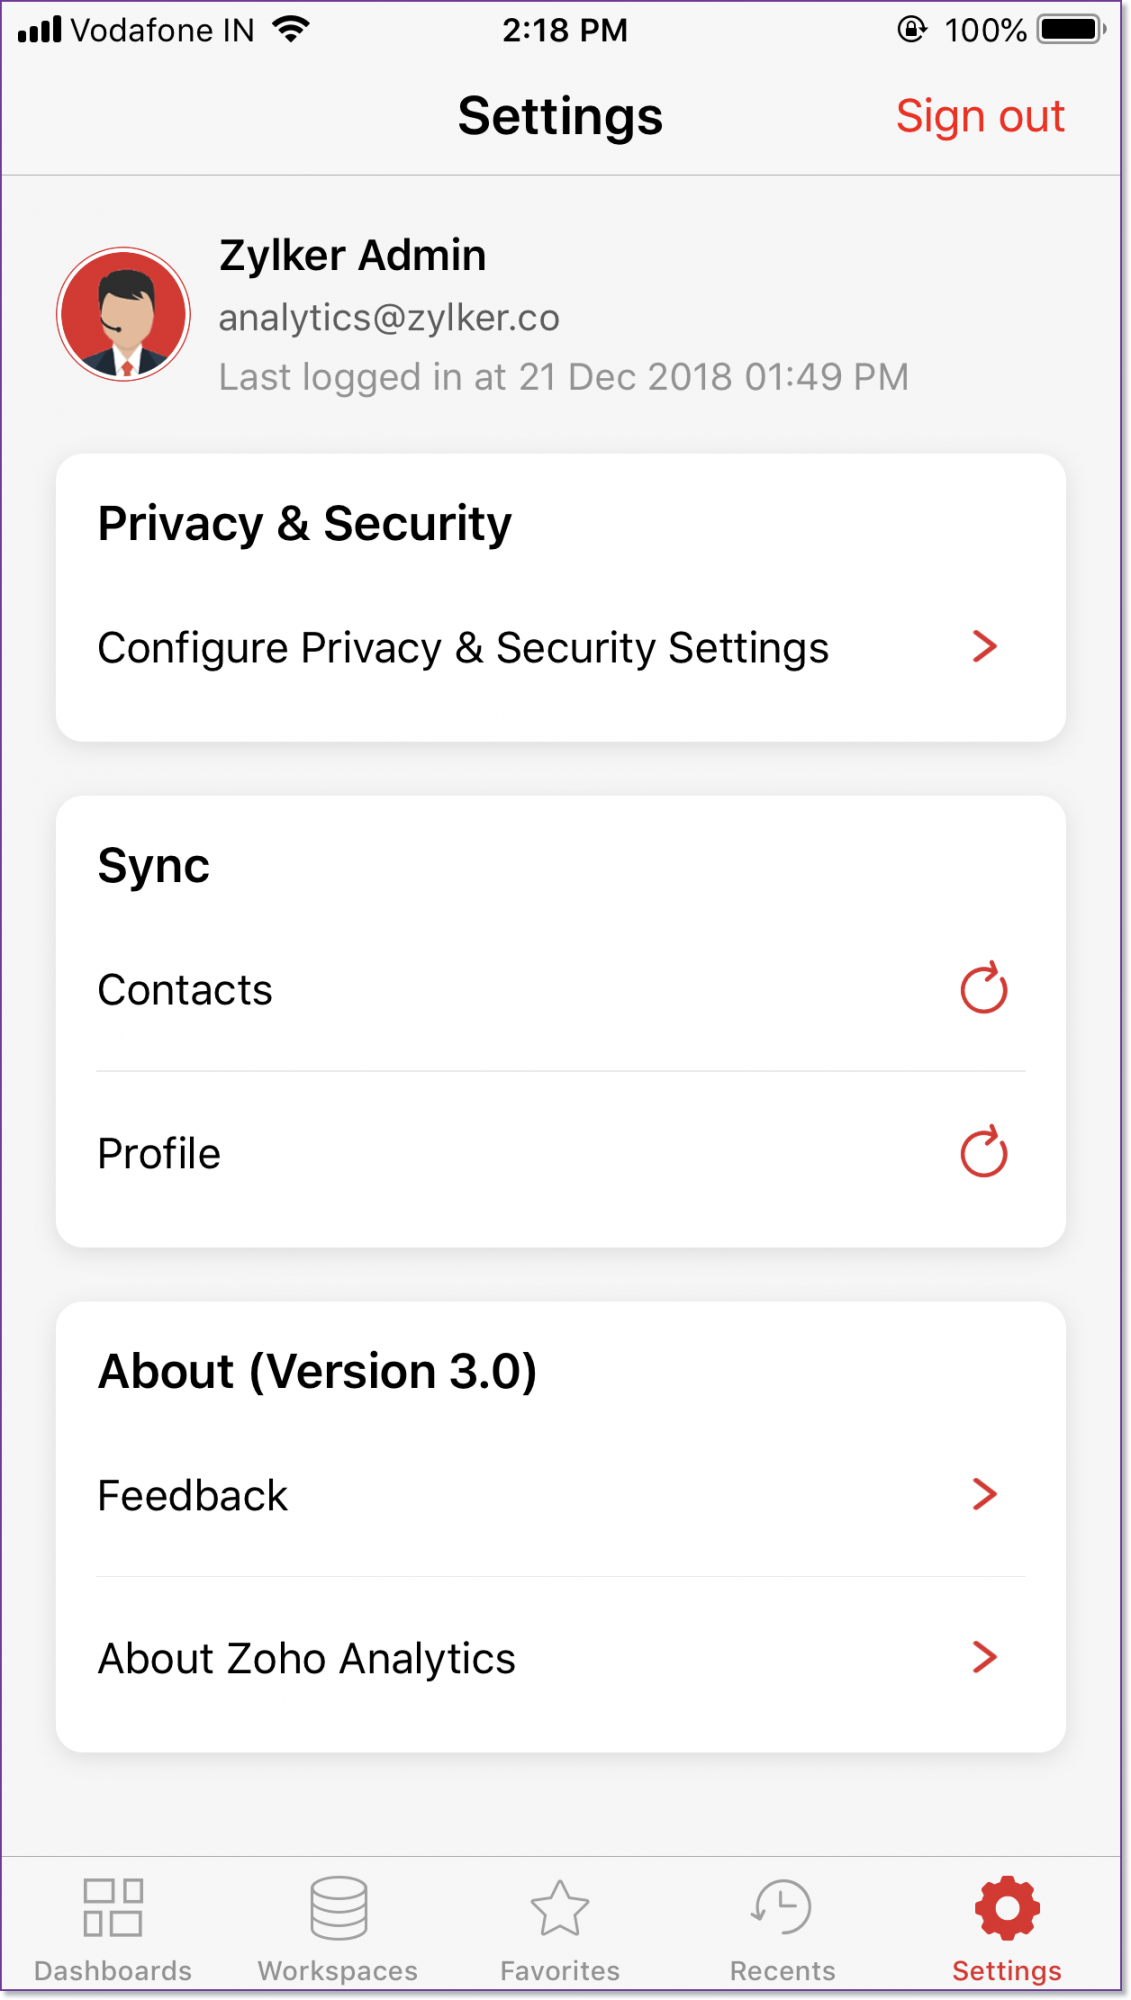
- Tap the Privacy and Security Setting.
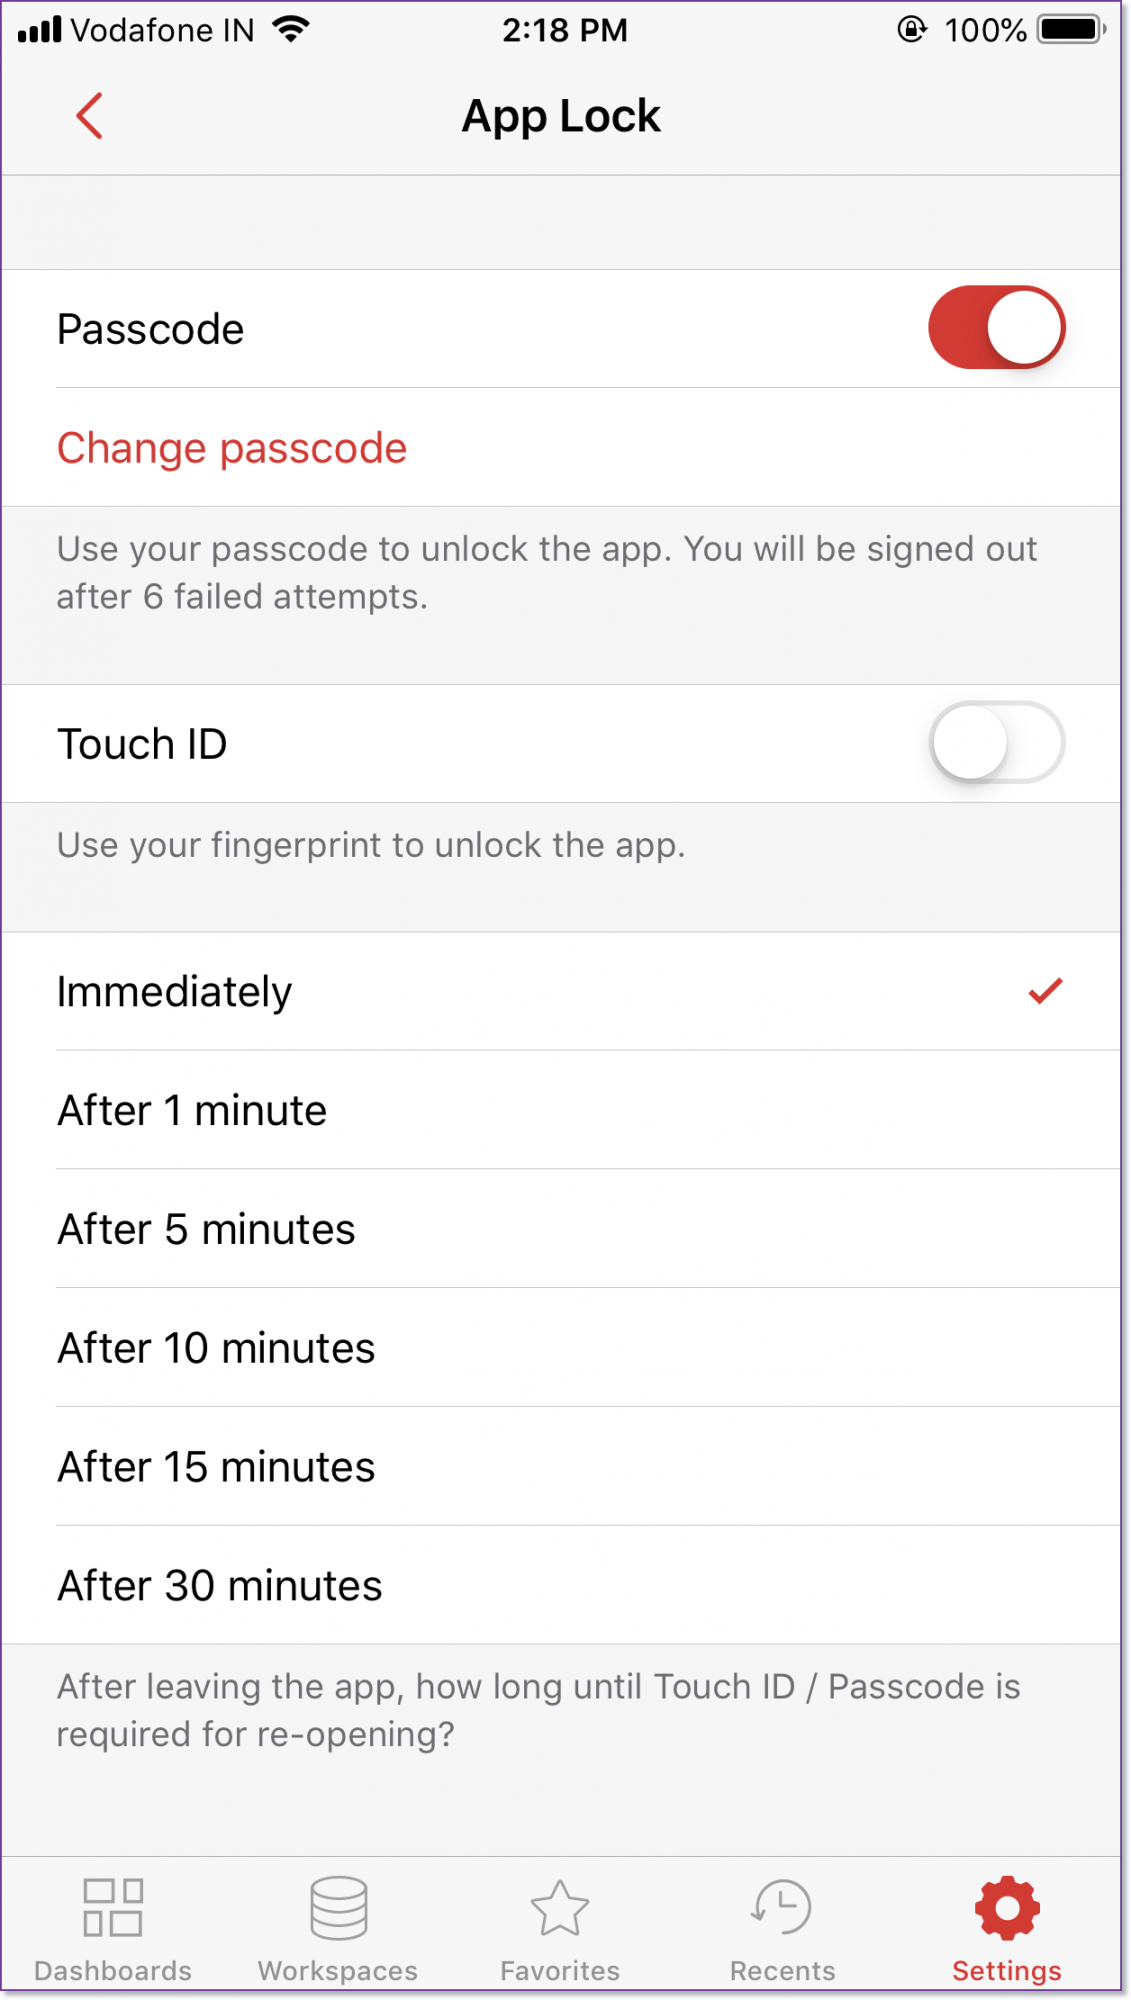
- Tap Passcode Lock. The App Lock page will open.
- Tap Turn App Lock On. Enter the PIN.
- The PIN to open the App will be set. You can set when to prompt enter PIN in the Ask for Pin section. Available options are.
- Immediately
- After 1 Minute
- After 5 Minutes
- After 10 Minutes
Now the Zoho Analytics App is secured. You can Turn Passcode off or Change Passcode anytime.
Restrict Copying content
Text copied in from Zoho Analytics app will be stored in the device's clipboard. These copied content can be accessed by other applications in your device. Zoho Analytic allows you to disable this behavior.
Follow the below steps to restrict access to clipboard data.
- Open the Security page of the App.
- Turn off the Copy Text toggle button.