
Schedules
Zoho Books lets you create and run predefined tasks at the specified time intervals using schedules. You can create your tasks using a deluge script and schedule this task to be executed at a particular time or on a recurring basis.
Note: This feature is available only for certain plans of Zoho Books. Visit the pricing page to check if it’s available in your current plan.
Scenarios
Here are a few scenarios where schedules can be created to execute custom actions. However, you can create custom schedules based on your firm’s requirements.
Scenario 1: Peter runs a supermarket. At the end of every month, he wants to give a 10% off on the Next Purchase to customers whose total purchase for the month exceeds a certain amount, let’s say 1000. Peter creates a schedule to email this to selective customers on the last day of the month.
Scenario 2: Peter uses a third-party application for maintaining customer and employee database internally. He would like to sync all data from Zoho Books to the other application periodically. To do so, he creates a custom schedule to sync the data at 6 pm every day.
Scenario 3: Peter sets a quarterly sales target for his territorial managers. Every four months, he has to send them their Profit and Loss reports and a congratulatory email when they have achieved their target or a motivating email for them to perform better. He writes a function and schedules it to be sent to his staff once every four months.
Creating New Schedules
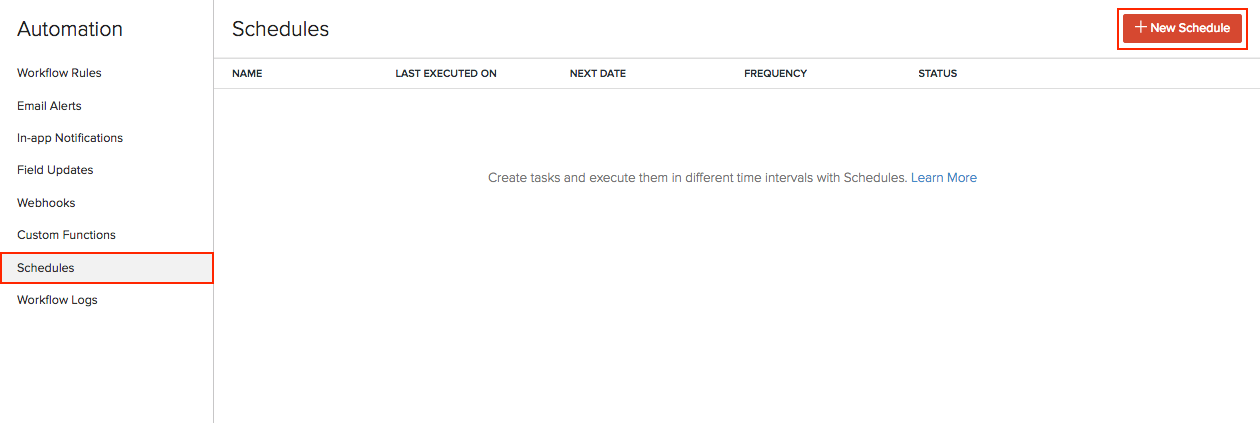
To create a custom schedule:
- Go to Settings in the top right corner of the page.
- Select Workflow Actions under Automation.
- In the Workflow Actions pane, select Schedules.
- Click + New Schedule in the top right corner.
- On the New Schedule page:
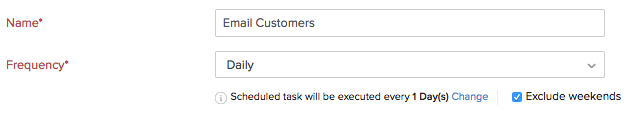
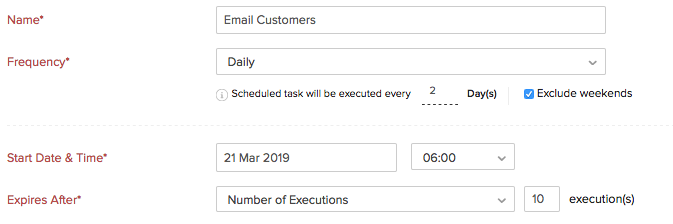
- Enter a Name for your schedule.
- Set the Frequency and recurrence pattern for the schedule to be executed. This can be daily, weekly, monthly, or yearly.
Insight: The recurrence pattern lets you decide when the custom schedule should be executed. You can choose to execute it on the set frequency.
- Select how frequently the task should be executed.
- Daily: The task will be executed every day (or based on your recurrence pattern). You can choose to exclude the weekends.
- Weekly: The task will be executed once a week. Select the day of the week on which the task should be executed.

- Monthly: Task will be executed once a month. This can be a specific date or a day in a month. For example, you can choose to execute it on the 5th of every month or the Second Saturday of every month.

- Yearly: Task will be executed once a year. You can select the month and specify the date of execution or specify the day. For example, the task can be executed on the first Sunday in January or on January 5.

- Set the Start Date and Time.
Warning: The start date of a schedule cannot be more than one year from the creation date.
- Select when the schedule should expire. It can expire after a number of executions or on a set date or not expire at all.
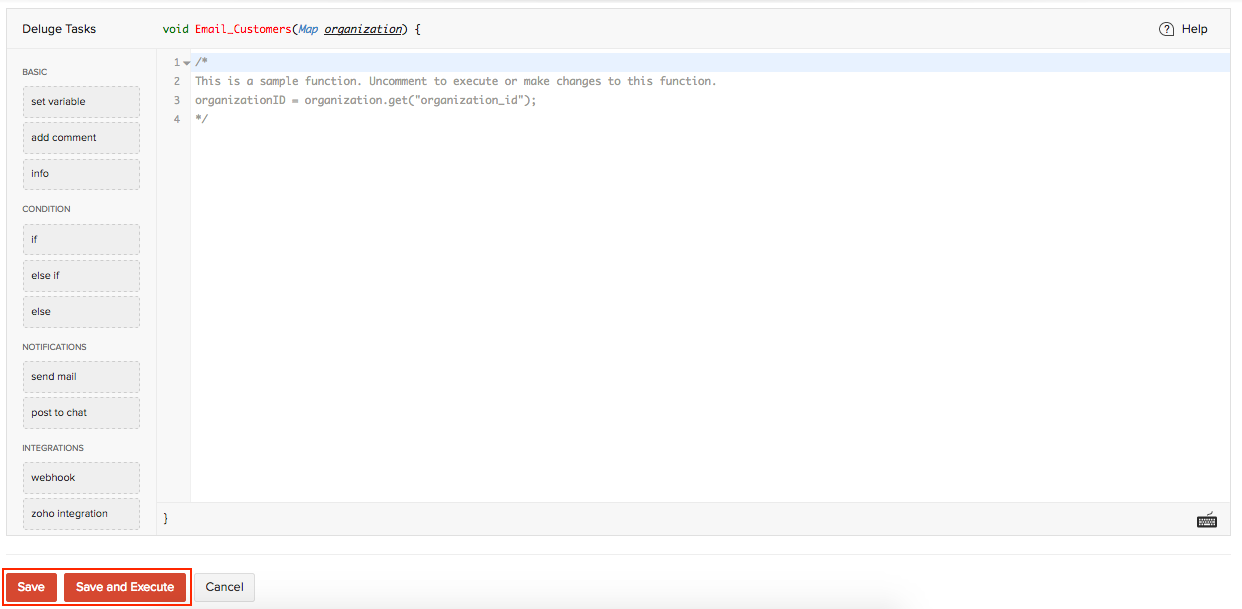
- Drag and drop options to build the Deluge function that the schedule will run.
Insight: Deluge (Data Enriched Language for the Universal Grid Environment) is an online scripting language integrated with Zoho Services. It enables you to write your own functions that lets you modify the application to suit your needs, incrementally, making it more powerful and robust.
- Click Save or Save and Execute to run it.
Insight: You can create a maximum of 20 custom schedules.
Sample Function
Here’s a sample function for Scenario 1:
organisationID = organisation.get("organisation_id");
name = organisation.get("name");
orgEmail = organisation.get("email");
salesResponse = invokeUrl
[
url: "https://books.zoho.com/api/v3/reports/salesbycustomer?organisation_id=" + organisationID + "&from_date=" + toStartOfMonth(today).toString("YYYY-MM-dd") + "&to_date=" + eomonth(today,0).toString("YYYY-MM-dd")
type: GET
connection: "books_api_connection"
];
salesDetails = salesResponse.get("sales").toList();
for each sales in salesDetails
{
amount = sales.get("sales_with_tax");
if(amount > "<ENTER AMOUNT>")
{
customerName = sales.get("customer_name");
customerResponse = invokeUrl
[
url: "https://books.zoho.com/api/v3/contacts/" + sales.get("customer_id") + "?organisation_id=" + organisationID
type: GET
connection: "books_api_connection"
];
customerDetails = customerResponse.get("contact");
customerEmail = customerDetails.get("email");
sendmail
[
from :zoho.adminuserid
to :customerEmail
subject :"Thank you for shopping! Here's a 10% discount!"
message :"<div>Dear " + customerName + ",<br></div><div><br></div><div>We just wanted to take a moment of our time to thank you for your continuous support.<br></div><div><br></div><div> Based on your recent purchases, we'd like to offer you a 10% off on your next purchase with us. <br></div><div><br></div><div>Please show this email during billing to avail this discount!<br></div><div><br></div><div>Regards,<br></div><div>" + name + "<br></div><div><br></div><div><br></div><div><br></div><div><br></div>"
]
}
}
View Logs
Note: Zoho Books displays only the logs of the last three months.
You can view logs of the schedules that were triggered in your organisation. Here’s how:
- Go to Settings in the top right corner of the page.
- Select Workflow Actions under Automation.
- In the Workflow Actions pane, select Schedules.
- Hover over the schedule whose logs you want to view, click the dropdown to the right, and select View Logs. The list of all the schedules that were executed, the time of execution, and their log IDs will be displayed.
Edit Schedules
You can update the details of a schedule by editing it. Here’s how:
- Go to Settings in the top right corner of the page.
- Select Workflow Actions under Automation.
- In the Workflow Actions pane, select Schedules.
- Hover over the schedule you want to edit, click the dropdown to the right, and select Edit.
- Make the necessary changes and click Save.
Mark Schedules as Inactive
If you want to disable a schedule temporarily, you can mark it as inactive. Here’s how:
- Go to Settings in the top right corner of the page.
- Select Workflow Actions under Automation.
- In the Workflow Actions pane, select Schedules.
- Hover over the schedule you want to mark as inactive, click the dropdown to the right, and select Mark as Inactive.
Mark Schedules as Active
If you require a schedule that was previously marked as inactive, you can enable it again. Here’s how:
- Go to Settings in the top right corner of the page.
- Select Workflow Actions under Automation.
- In the Workflow Actions pane, select Schedules.
- Hover over the inactive schedule, click the dropdown to the right, and select Mark as Active.
Delete Schedules
If you no longer require certain schedules, you can delete them. Here’s how:
- Go to Settings in the top right corner of the page.
- Select Workflow Actions under Automation.
- In the Workflow Actions pane, select Schedules.
- Hover over the schedule you want to delete, click the dropdown to the right, and select Delete.
- In the pop-up, click Yes to confirm your action.
Workflow Scenarios
Workflows help you automate tasks in Zoho Books. Read more to explore some common scenarios in detail.
Learn more from the Connections help document.
Related Topics
Automate your business workflow with Zoho Books’ accounting automation.
 Yes
No
Yes
No
Thank you for your feedback!