Zoho Analytics App for Zapier
Zapier is a Web Automation app that helps you connect with other complementary apps side by side. The Zoho Analytics app for Zapier enables you to connect and extract data from over 500+ other online applications.
With this, you can get the data from various platform into Zoho Analytics and create insightful reports over them.

Getting Started with Zapier
To import data into Zoho Analytics from other applications, you will first have to create an account with Zapier (Click to sign up for Zapier).

Common Terms
To import data using Zapier, you need to be familiar with certain terms in Zapier.
- A Zap is nothing but a link between two apps.
- A Trigger is an event that starts a Zap. e.g, if you want to automate importing data each time a Deal is added to your CRM, then "New Deal" is the Trigger.
- An Action is an event that completes a Zap. In our case the Action will define how the data needs to be imported in Zoho Analytics i.e., add as a new row or update an existing row.
Note
- You can refer to this Zapier Help Documentation to know about the various terms used by Zapier.
- As of now, you cannot use Zoho Analytics as a Trigger. You can only use it as an Action.
Setting up a Zap to import data into Zoho Analytics
Using Zapier, you can add a row or update an existing row in Zoho Analytics table. Follow the below steps to set up a Zap to import data.
Make a Zap
To start importing you need to make a Zap. Follow the below steps to do this.
- Login to Zapier.
- Choose a Trigger app (e.g., Pipedrive CRM) in the Connect this app... field.
- Choose Zoho Analytics in the with this one! field.
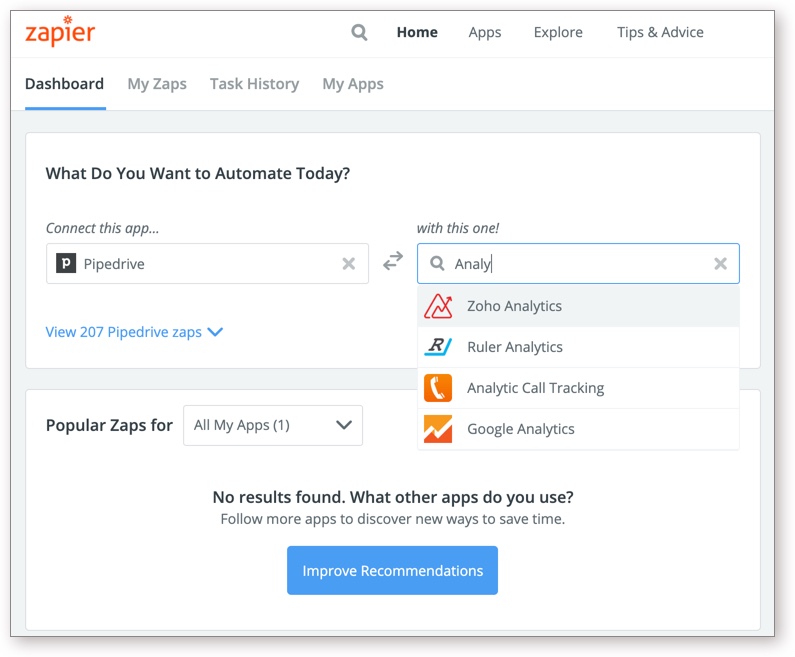
- Choose a trigger case for the app from which you want to import.
- In this example, we've set New Deal as trigger case. Now a trigger will be executed each time a new deal is added in Pipedrive CRM and Zapier will fetch the corresponding deal data.
- Choose an Action for Zoho Analytics. Zoho Analytics supports two Actions:
- Add Row - This appends the received data into a new row in the Zoho Analytics table.
- Update Row. This updates the received data into an existing row in Zoho Analytics table.
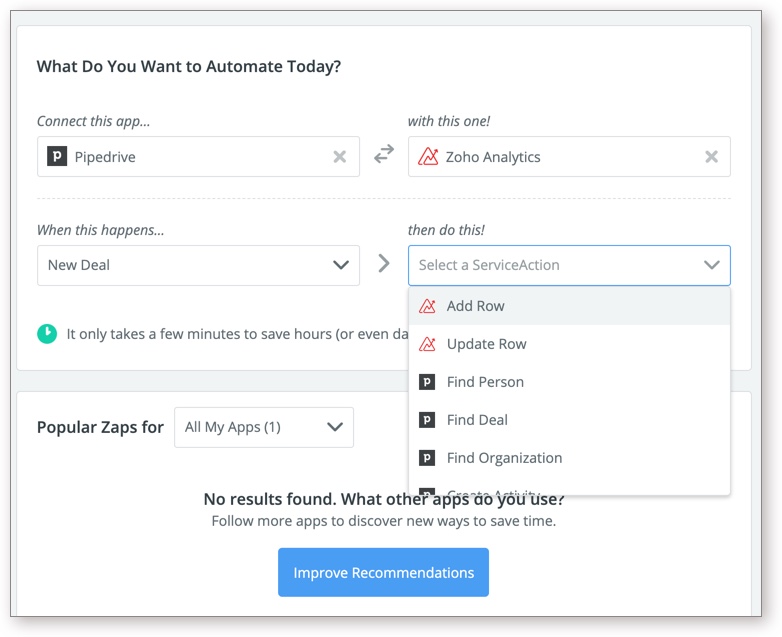
- Click Make a Zap. A Zap will be created connecting these two apps. You can use this Zap for various Actions.


Authenticate Apps
You need to authenticate these apps to allow Zapier to transfer data between them.
Follow the below steps to authenticate Apps:
- Once you create a Zap, the Select App Account page will be open. Click Connect an Account.
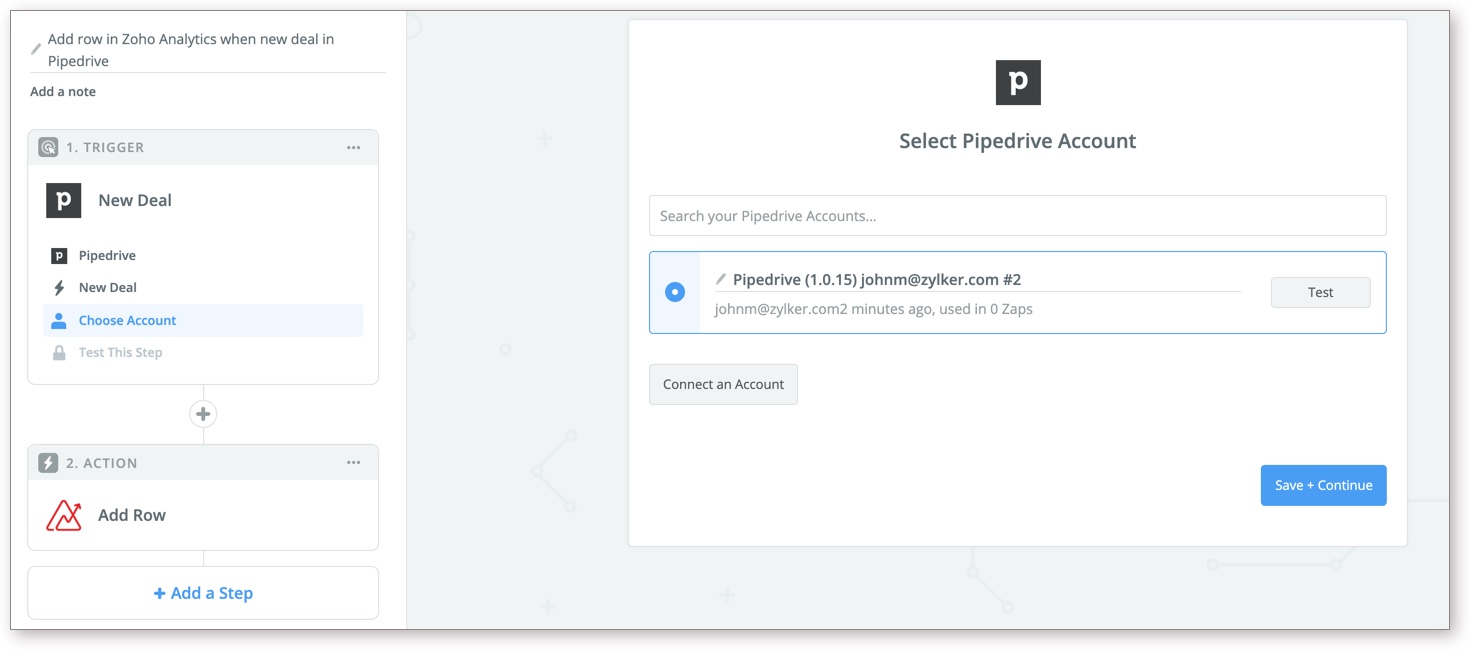
- Provide the necessary authentication details for the app you are connecting with.
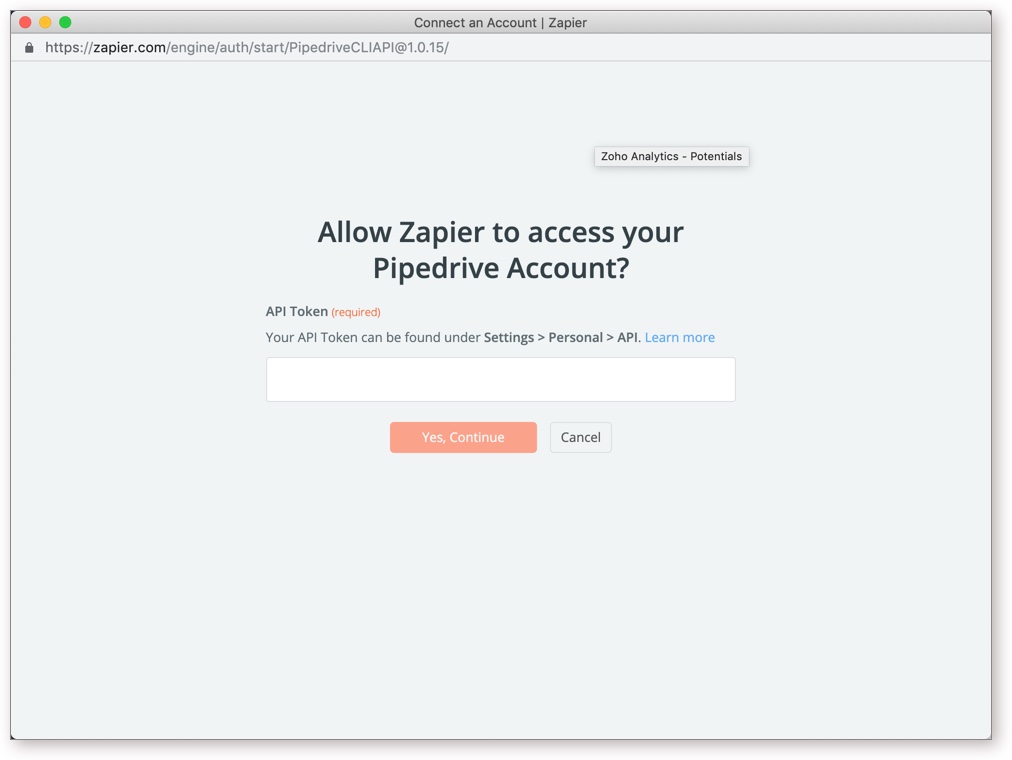
- Once you have authenticated, click Test to ensure that Zapier can access the app.
- The status will be displayed as Success. Click Save + Continue.
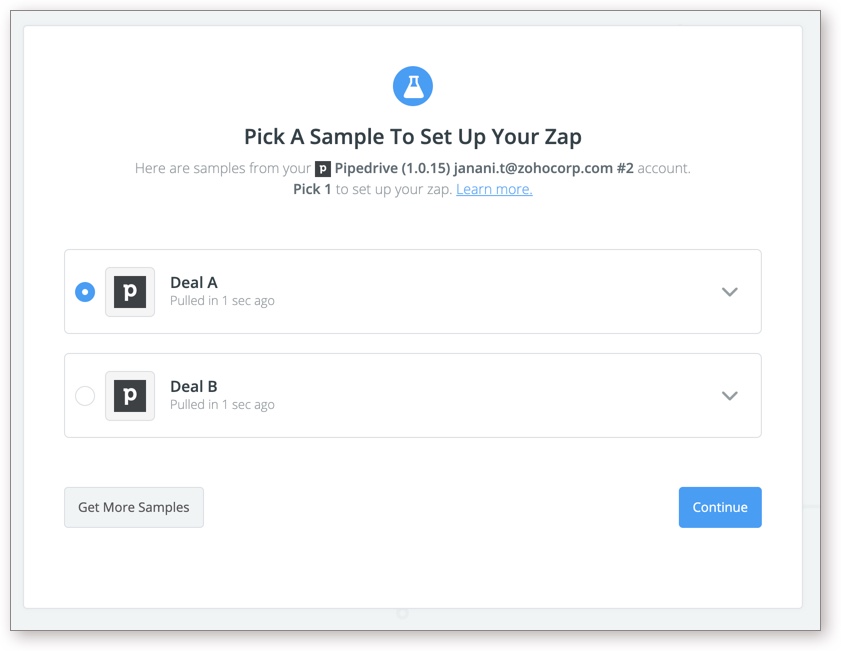
- Zapier will fetch sample data from the app you are connecting to test the connection. Choose a sample and click Continue.
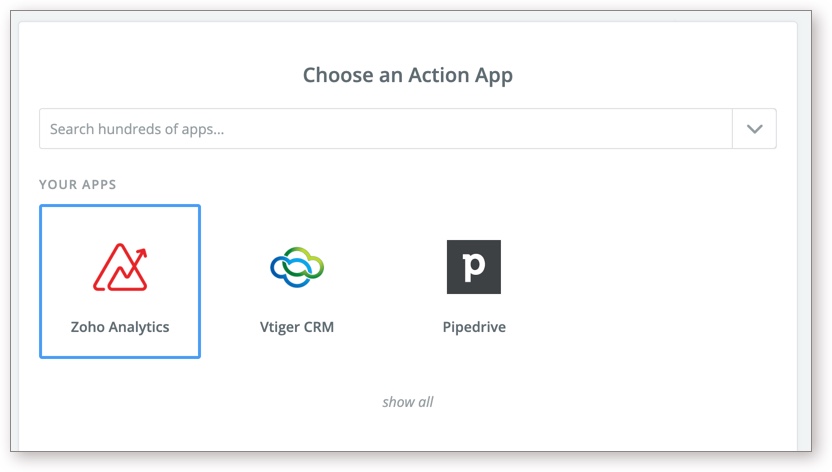
- The Choose an Action App section will open. Select Zoho Analytics.
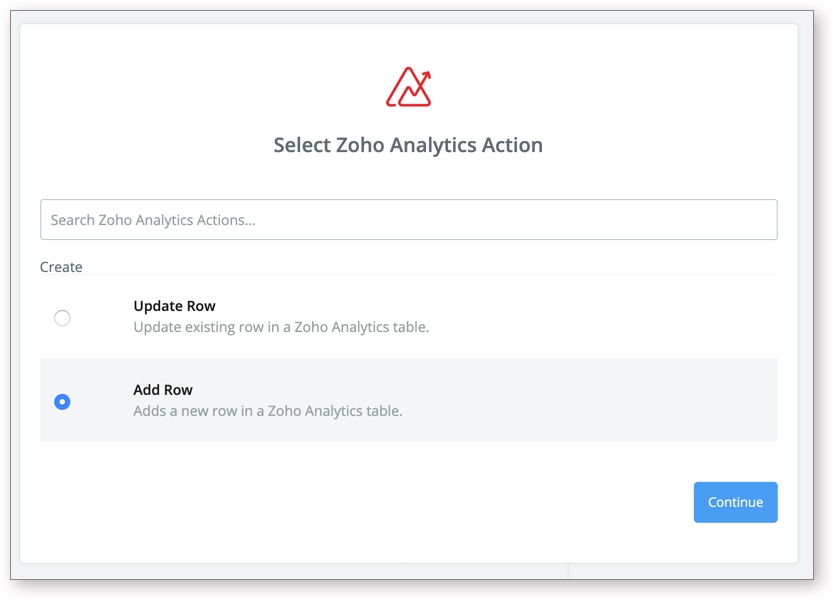
- The Select Zoho Analytics Action section will open. Choose an Action and click Continue.
- Now you need to authenticate into Zoho Analytics to allow importing data. Select Domain in which your account is and then specify the E-mail.
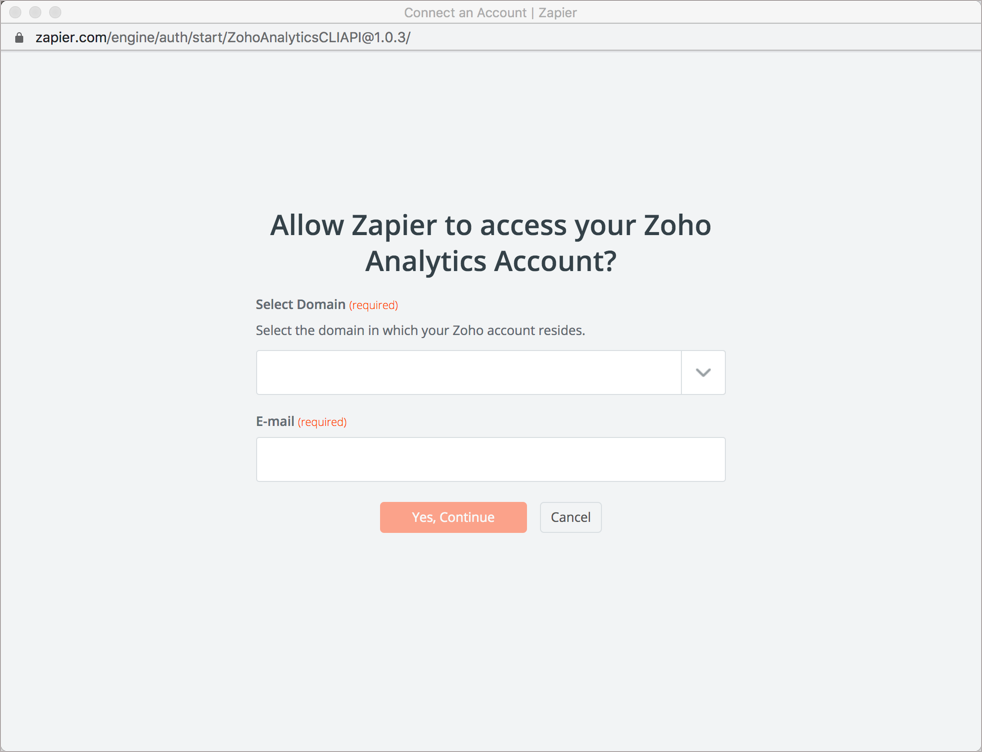
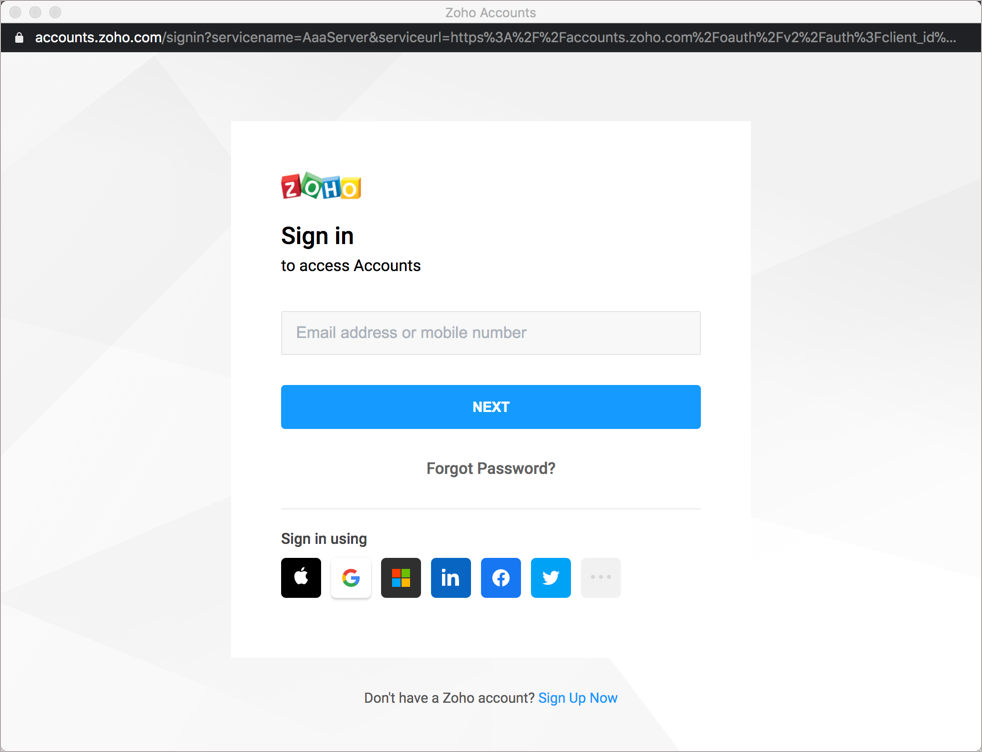
- The login page will open. Login to your Zoho Analytics account to allow importing data.
- Once you have authenticated, click Test to ensure that Zapier can access the Zoho Analytics.
- The status will be displayed as Success. Click Save + Continue.


Both the apps were authenticated. You can now import data from the trigger app to Zoho Analytics.
Note: Only Account Admin and Workspace Admin can import data using Zapier. To know more on the user roles, click here.
Set Action
Once you have created a Zap and authenticated the app, you can execute the set Action of the Zap. Zoho Analytics supports the following two Actions.
- Add Row - This action adds the received data as a new row in the Zoho Analytics table.
- Update Row - This action modifies the existing row in the Zoho Analytics table with the received data.
Note:
- It is mandatory to create the workspace and table to import data using Zapier. You cannot create a workspace or table from here.
- All your date columns should have the same date format.
- Only the data added after setting up the Zap will be imported into Zoho Analytics.
Add Row
Add Row will append the received data from Zapier into a new row in Zoho Analytics table.
This section explains how to add a row in Zoho Analytics table using the example of adding a new row in the Zoho Analytics Deals table each time a new deal is added in Pipedrive CRM.
Follow the below step to do so:
- Create a Zap as instructed above with New Deal as the trigger case for Pipedrive CRM and Add Row as the Action for Zoho Analytics.
- Authenticate the apps. The Set up Zoho Analytics Row section will open.
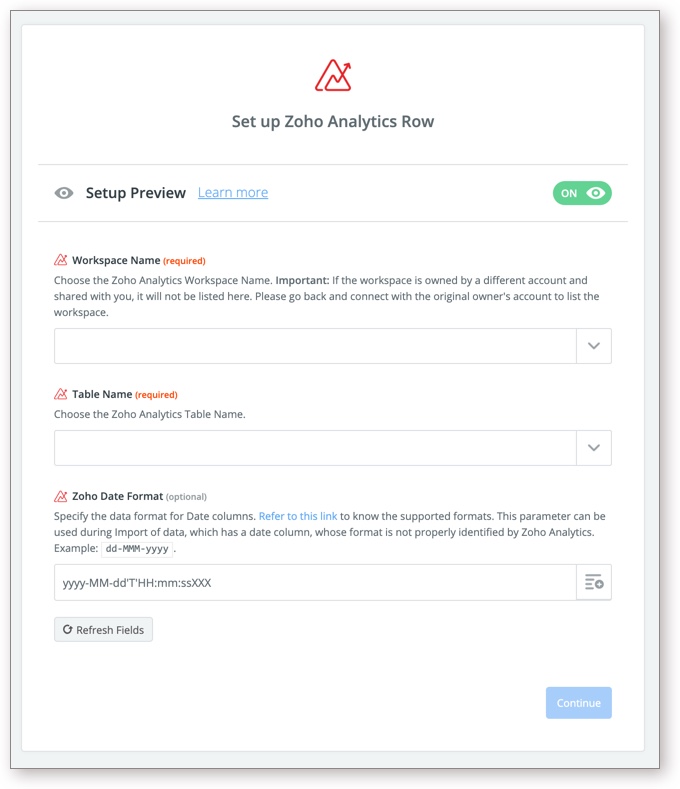
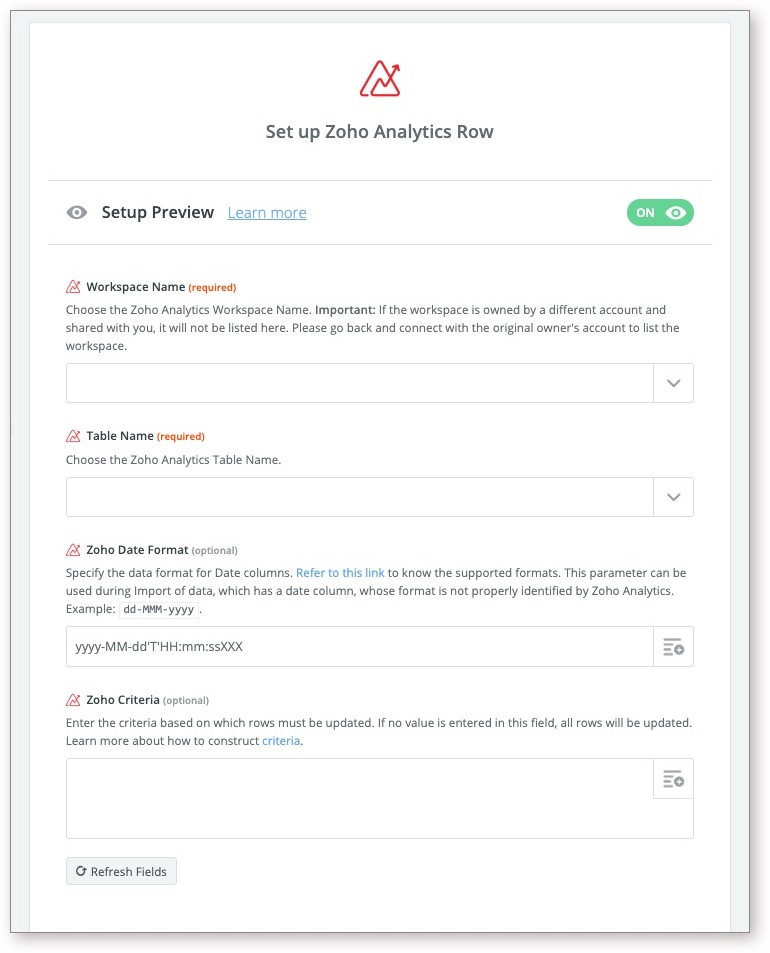
- All the workspace in your account and for which you have Workspace Admin privilege will be listed in the Workspace Name drop-down. Select the workspace into which you want to import data.
- All the tables in the selected workspace will be listed in the Table Name drop-down. Select the table into which you want to import data.
- In case your data has a date column, it is mandatory to specify the date format in the Zoho Date Format (optional) field (click to know the supported formats).
- All the columns in the selected table will be listed. Click the + icon at the right of each columns field. The Pipedrive CRM fields will be listed.
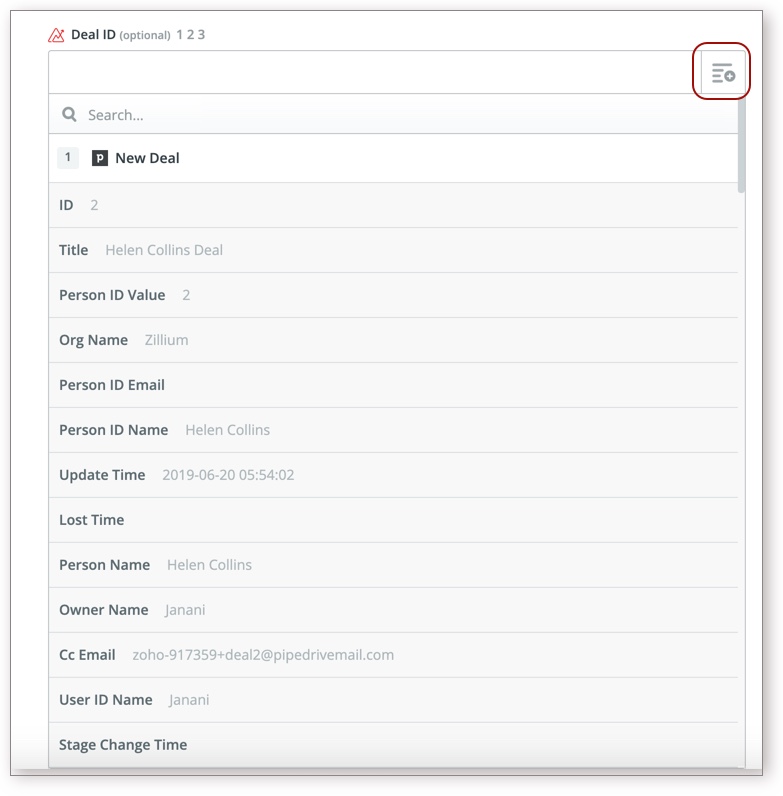
- Select the corresponding field to be imported into the column.
- Once you have mapped all required columns in Zoho Analytics table with the corresponding value in Pipedrive CRM, click Continue.
- A page opens displaying the data fetched for Pipedrive CRM to test the Action. Verify the data and then click Send Test to Zoho Analytics.
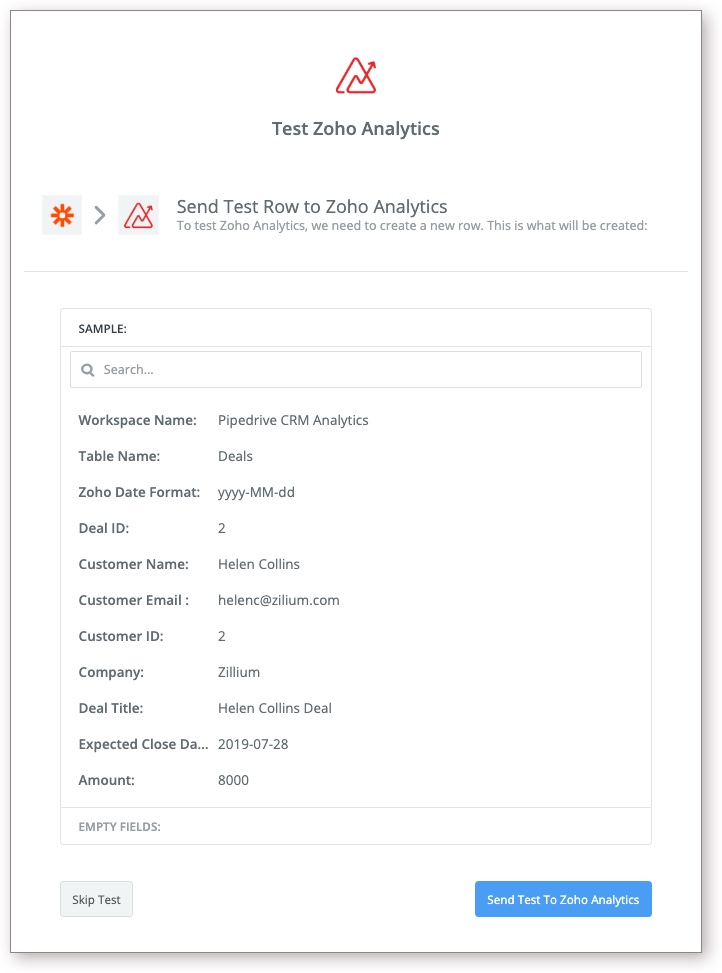
- Data will be imported into Zoho Analytics. And the success message will be displayed.
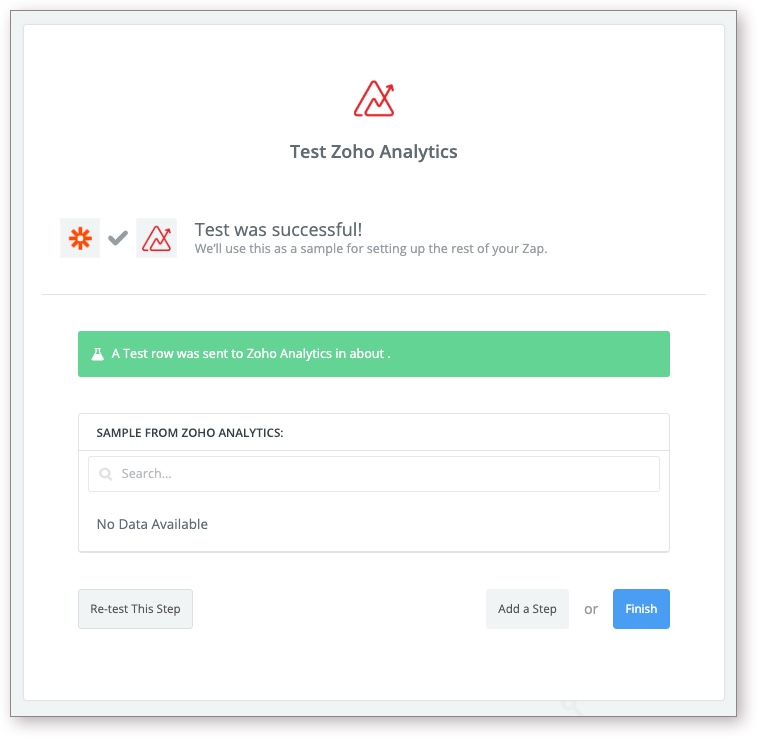
- Click Finish to complete the process. Now all new deals added in Pipedrive CRM will be imported into Zoho Analytics once you turn on the Zap.


Update Row
Update Row will modify the existing rows in the Zoho Analytics table with the data received from Zapier.
This section explains how to update a row in Zoho Analytics table using the example of modifying the row in the Deals table each time the corresponding deal record is updated in Pipedrive CRM.
Follow the below step to do so.
- Create a Zap as instructed above with Update Deal as the trigger case for Pipedrive CRM and Update Row as the Action for Zoho Analytics.
- Authenticate the apps. The Set up Zoho Analytics Row section will open.
- All the workspace in your account and for which you have Workspace Admin privilege will be listed in the Workspace Name drop-down. Select the workspace into which you want to import data.
- All the tables in the selected workspace will be listed in the Table Name drop-down. Select the table into which you want to import data.
- In case your data has a date column, it is mandatory to specify the date format in the Zoho Date Format (optional) field (click to know the supported formats).
- The Zoho Criteria (Optional) allows you to specify which row in the Zoho Analytics table need to be updated. Rows matching with the criteria will be updated with the received data. In this example, we are specifying the Deal ID as matching column to identify the corresponding deals row.
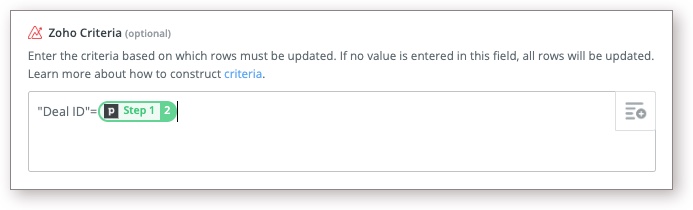 Note: In case Zoho Criteria is not specified all the rows in the table will be updated with the received data.


- All the columns in the selected table will be listed. Click the + icon at the right of each columns field. The Pipedrive CRM fields will be listed.
- Select the corresponding field to be imported into the column.
- Once you have mapped all required columns in Zoho Analytics table with the corresponding value in Pipedrive CRM, click Continue.
- A page opens displaying the data fetched for Pipedrive CRM to test the Action. Verify the data and then click Send Test to Zoho Analytics.
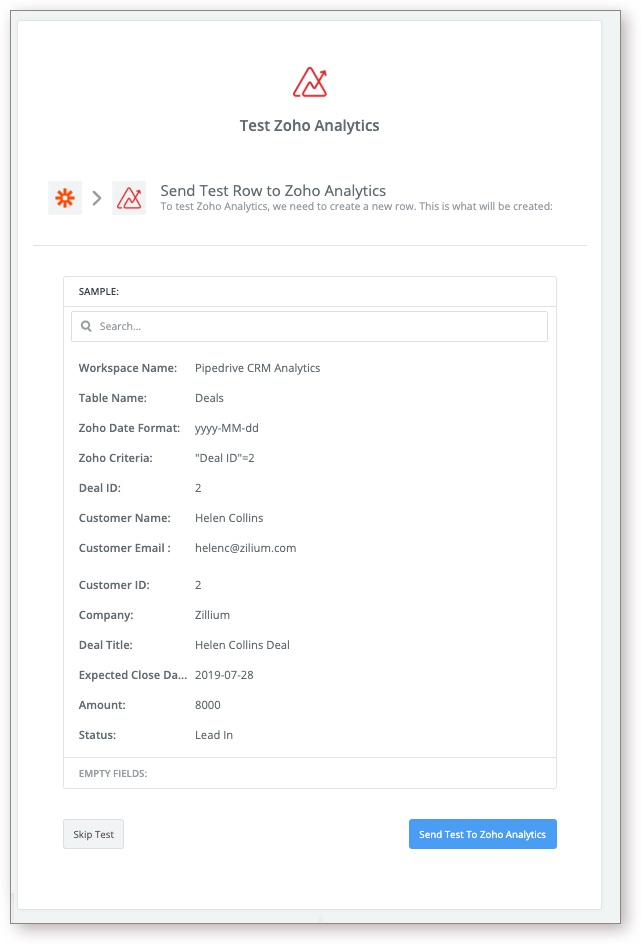
- Data will be imported into Zoho Analytics. And the success message will be displayed.
- Click Finish to complete the process. Once you turn on the Zap, as you modify the deals in Pipedrive CRM it will be updated into Zoho Analytics.

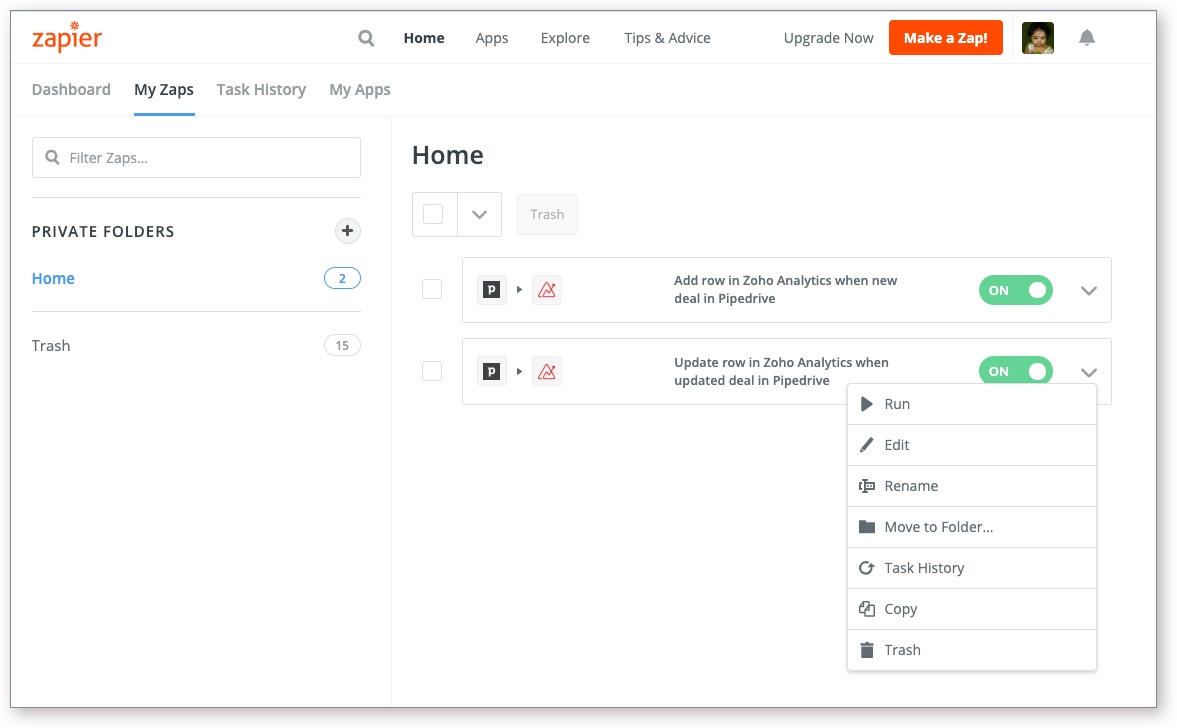
Turn Zap On
You need to turn on the Zap to start the import. To turn the Zap on, open the My Zap tab. All the Zaps in your account will be listed. Turn on the Zap using the toggle button.
You can also instantly sync data by clicking the drop-down icon and then click Run.