Usecases
Automation
- New Joinee Onboarding Process
- Training Date and Time Reminder
- Birthday Reminder
- Work Anniversary Reminder
- Disable Login for Employees on Long Leave
- Team Change Update
- Record Template Attachment
Approvals
Automation
New joinee onboarding process
- Purpose
- Workflow process
Purpose
To know about the complete automation procedure of the new joinee onboarding process. When a new employee joins an organization, the basic things that an HR must do is to create login access for the employee(s), provide ID card, allocate a place, provide work computer, phone, configure a system, enroll employees in the benefit plans, etc. Given below is the step by step procedure to achieve this using workflows.
Workflow process
a. To create a Welcome Letter Template:
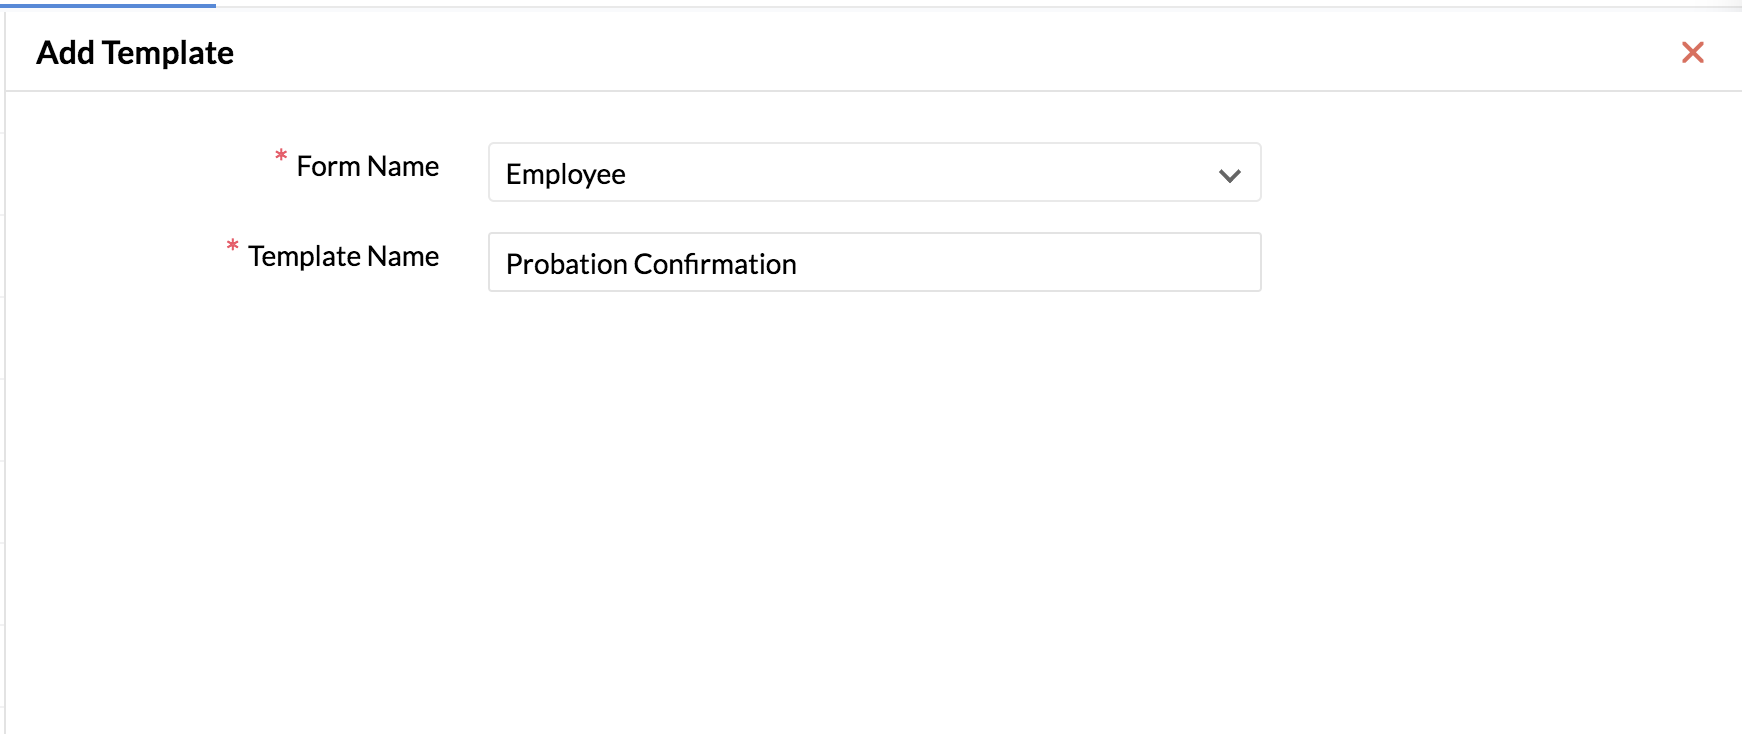
- From your home page, go to Settings (gear icon) > Customization > Templates > Record Template > Add Template.
- Select Employee from the Form Name drop-down list.
- Provide Template Name as Welcome letter.
- Select Record Template as Template Type.
- Select the required fields from the available merge fields.
- Select System Fields from the drop down if you would like to insert fields like Company Logo, Company Name, Company First Address etc. as required.
- Click Save
![]() You can Edit, Clone or Delete the template if required. Click here to know how
You can Edit, Clone or Delete the template if required. Click here to know how
You can create an offer letter template with Mail Merge as well. Follow the steps given below to do it.
Mail Merge is useful when you have some standard letters like Employment Contract, Probation Confirmation Letter etc to be sent across to many people at one go. A template can be created and the dynamic fields can be changed as per the need.
Zoho People is integrated with Zoho Writer and this gives enhanced editing options for standard letters.
Consider an example of sending Probation Confirmation Letters to a set of employees.
Follow the steps given below to use Mail Merge to get this done.
- From your home page, go to Settings > Customization > Templates > Mail Merge Template.
- Click on Add Template.
- Select a form - for eg. If you would like to use Mail Merge for Probation Confirmation Letters, then select the Employee Form.
- Give a Template Name - Eg - Probation Confirmation template.
- Click Save
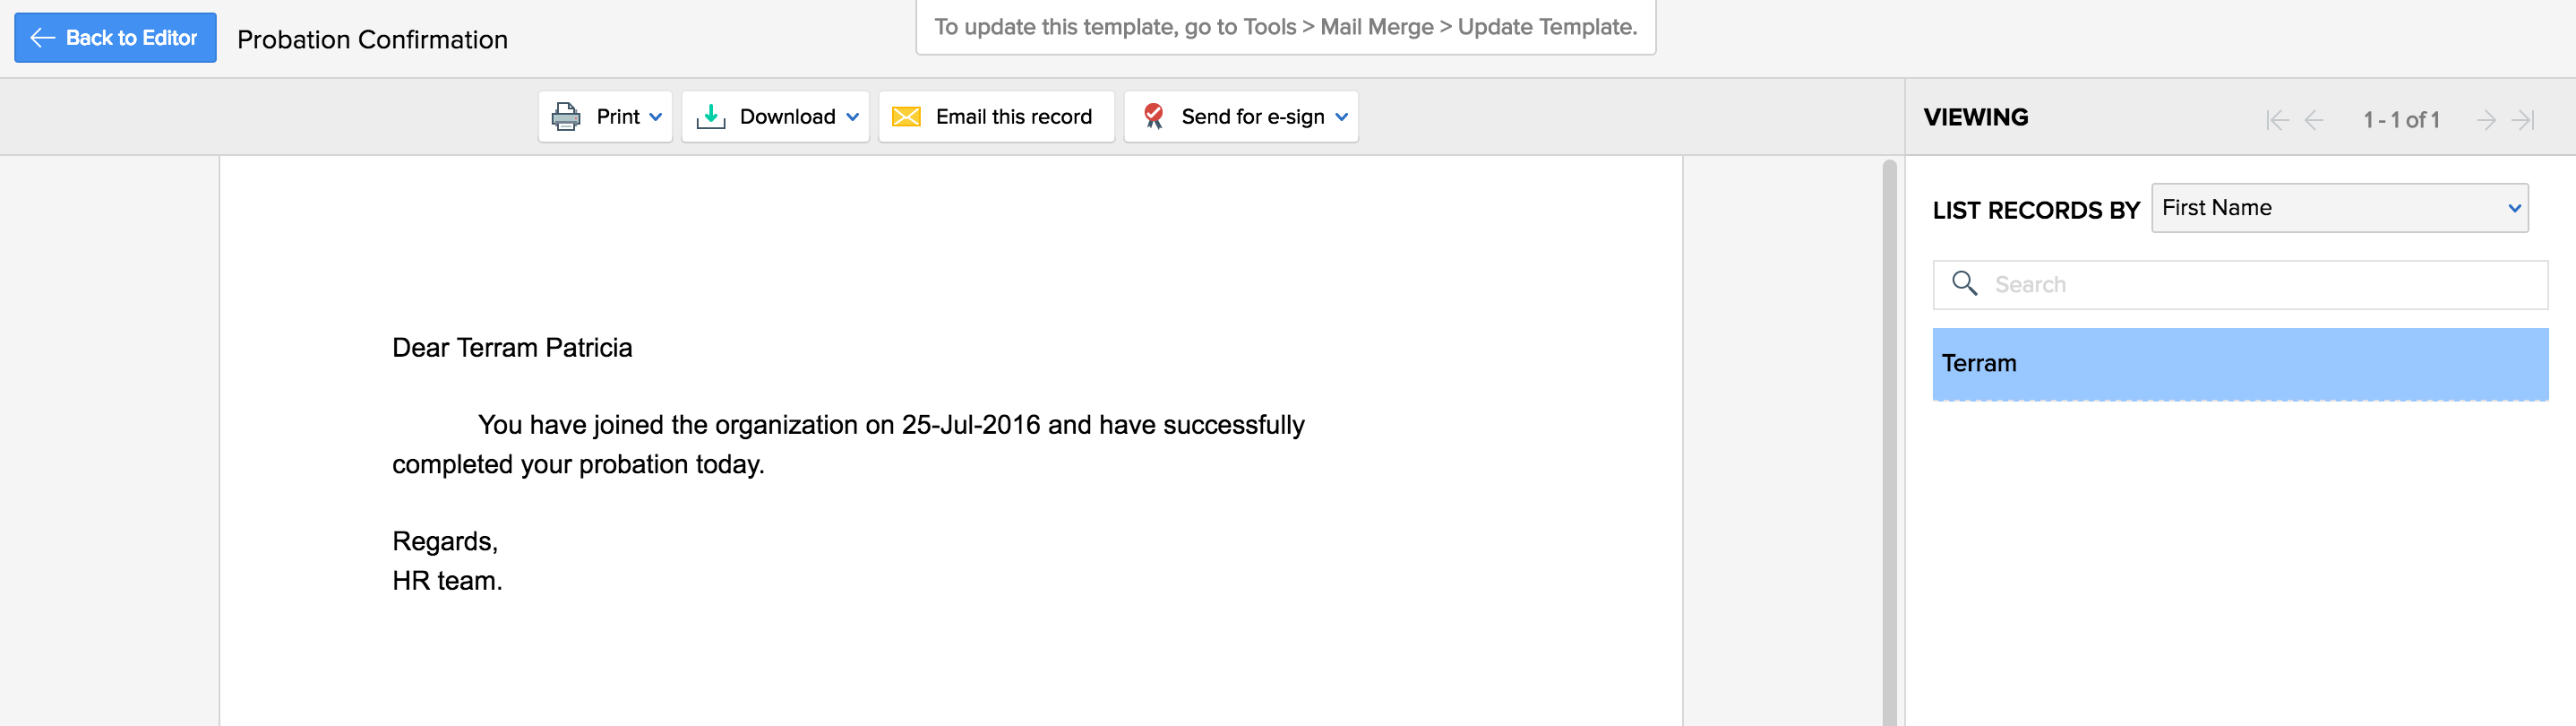
You will be taken to the Zoho Writer page where you can create your template as shown in the below image
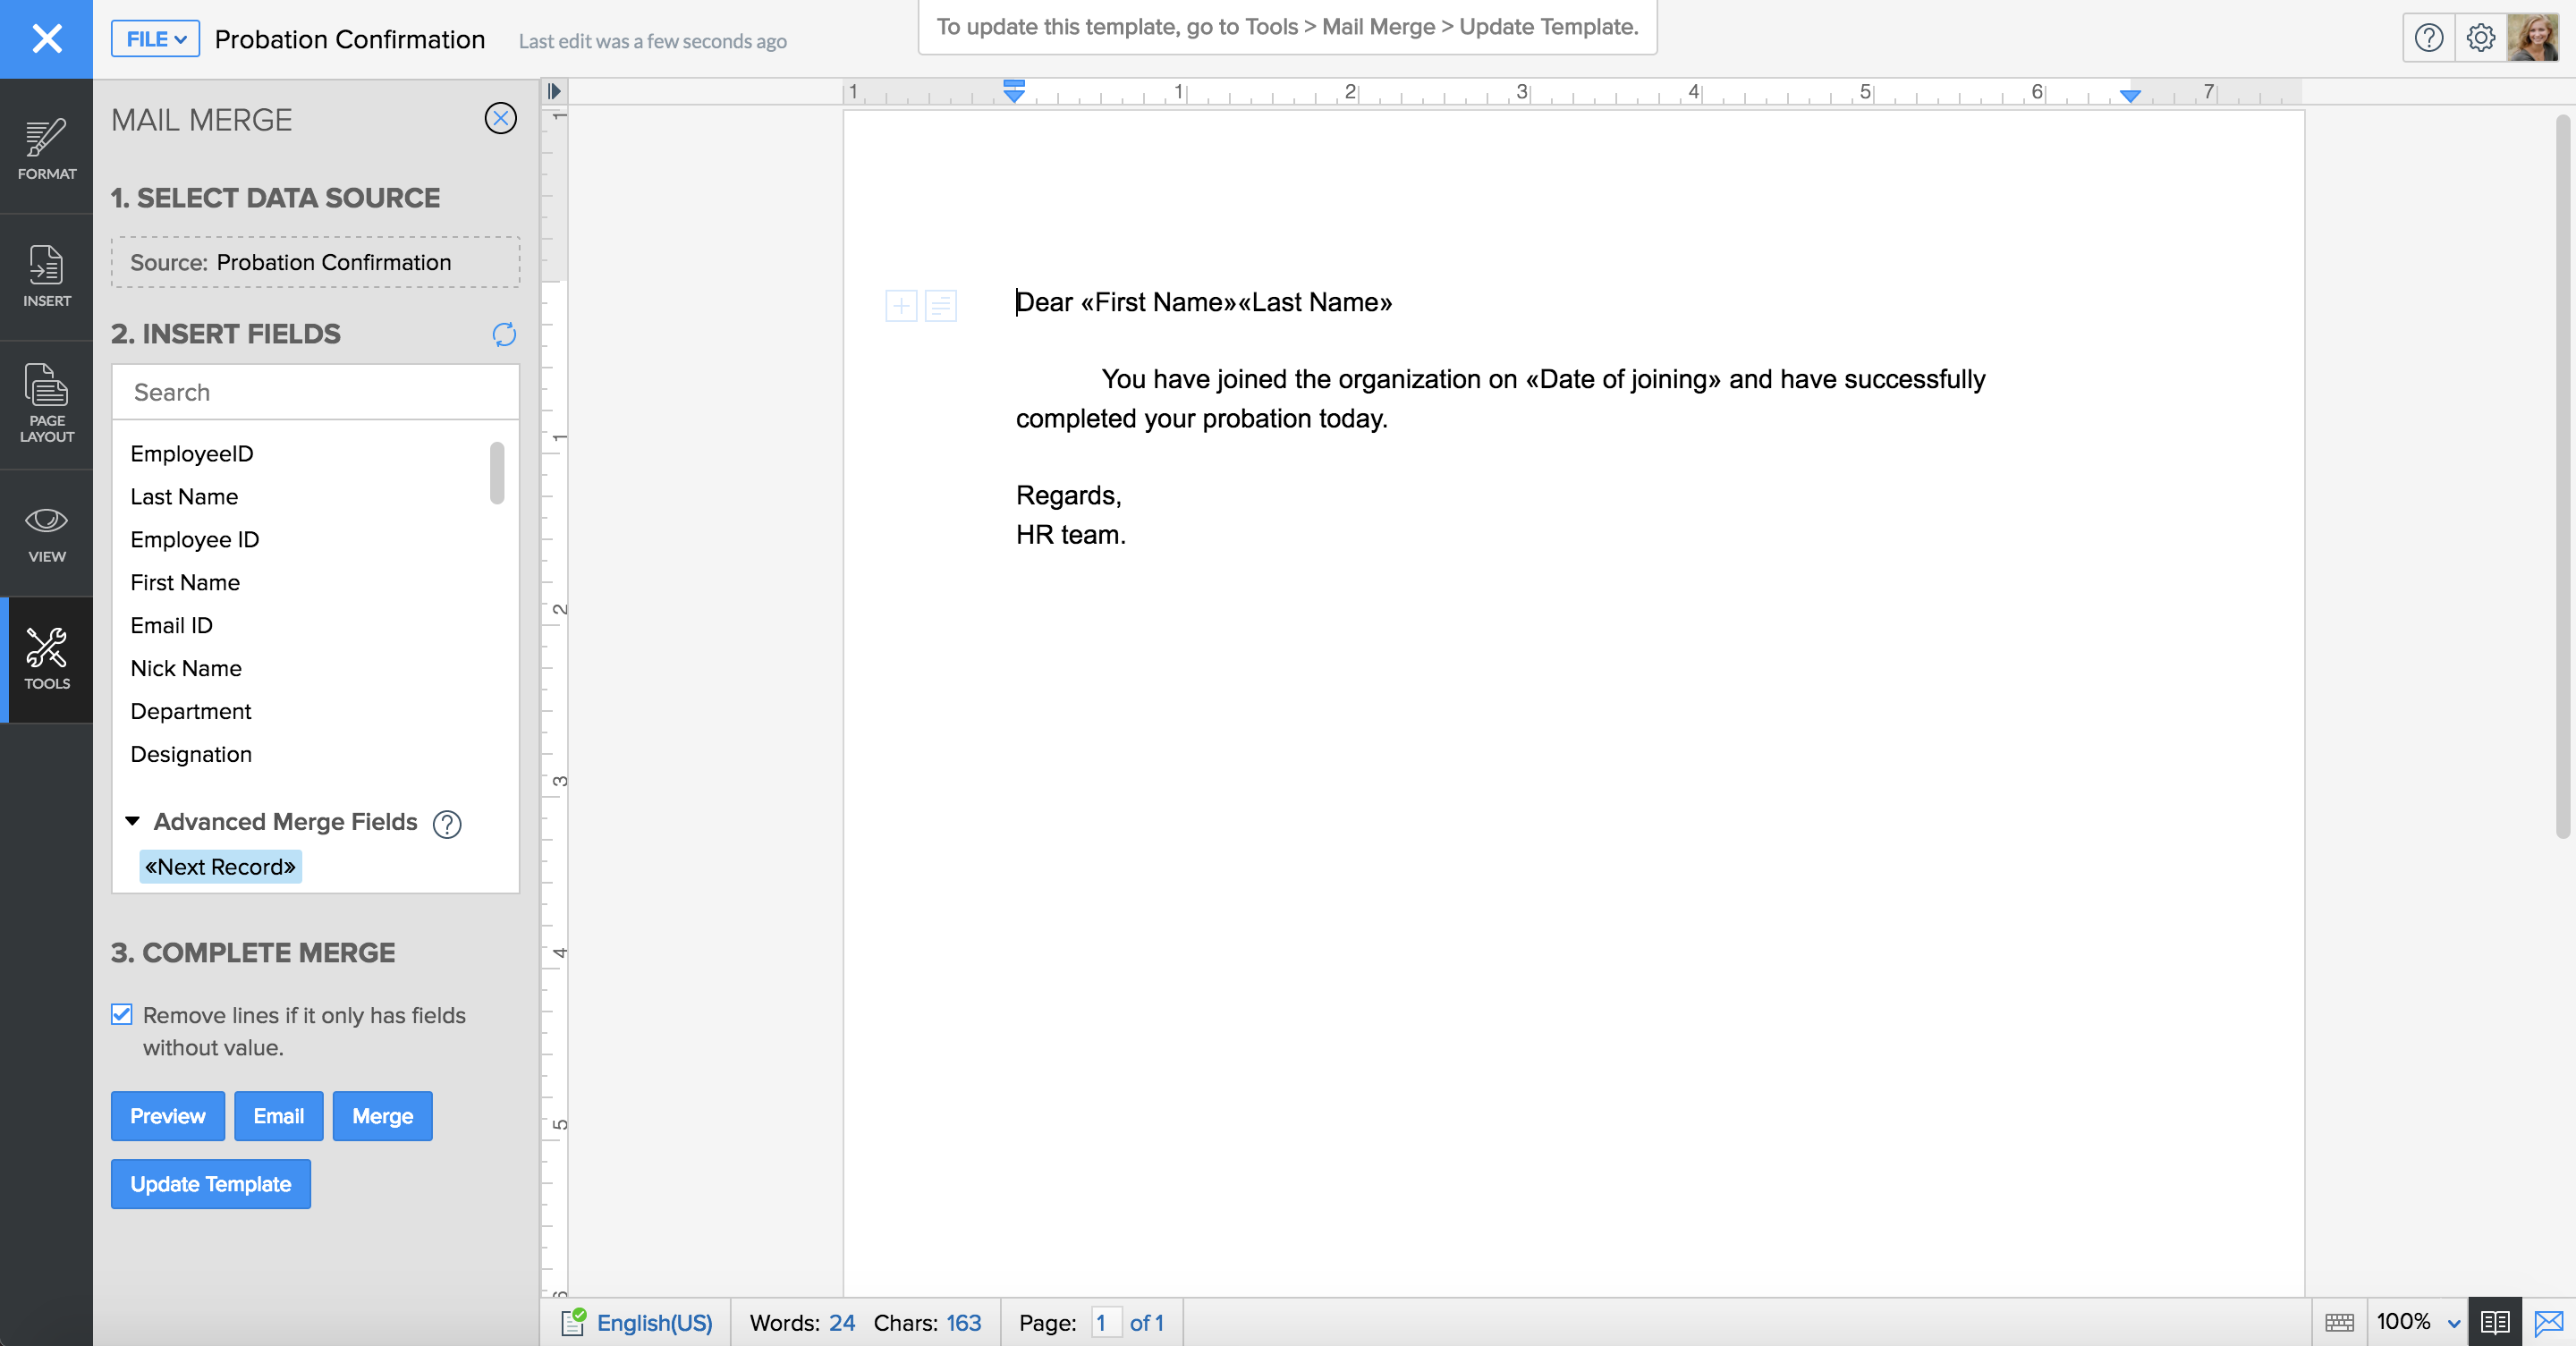
For eg -
"Dear (Insert First Name, Last Name by clicking on the fields from the left-hand side)
You joined the organization on (Insert 'Date Of Joining' from the left-hand side) and have successfully completed your probation period today.
Regards
HR Team"
Now you have created a mail merge template. Click on 'Update Template' if you make any changes to the template.
b. To send the Welcome Letter to the employee:
Using Record Template:
- From your home page, go to Organization > Employee.
- Click on the desired employee name and the Employee form appears.
- Click on the ellipsis icon and click Download as PDF.
- Select Welcome letter from the Select Template drop-down list.
- Select Portrait View or Landscape View.
- Click Download.
- Attach the file and send it to the new joiner.
Using Mail Merge:
You can also do it using Mail Merge by following the steps given below.
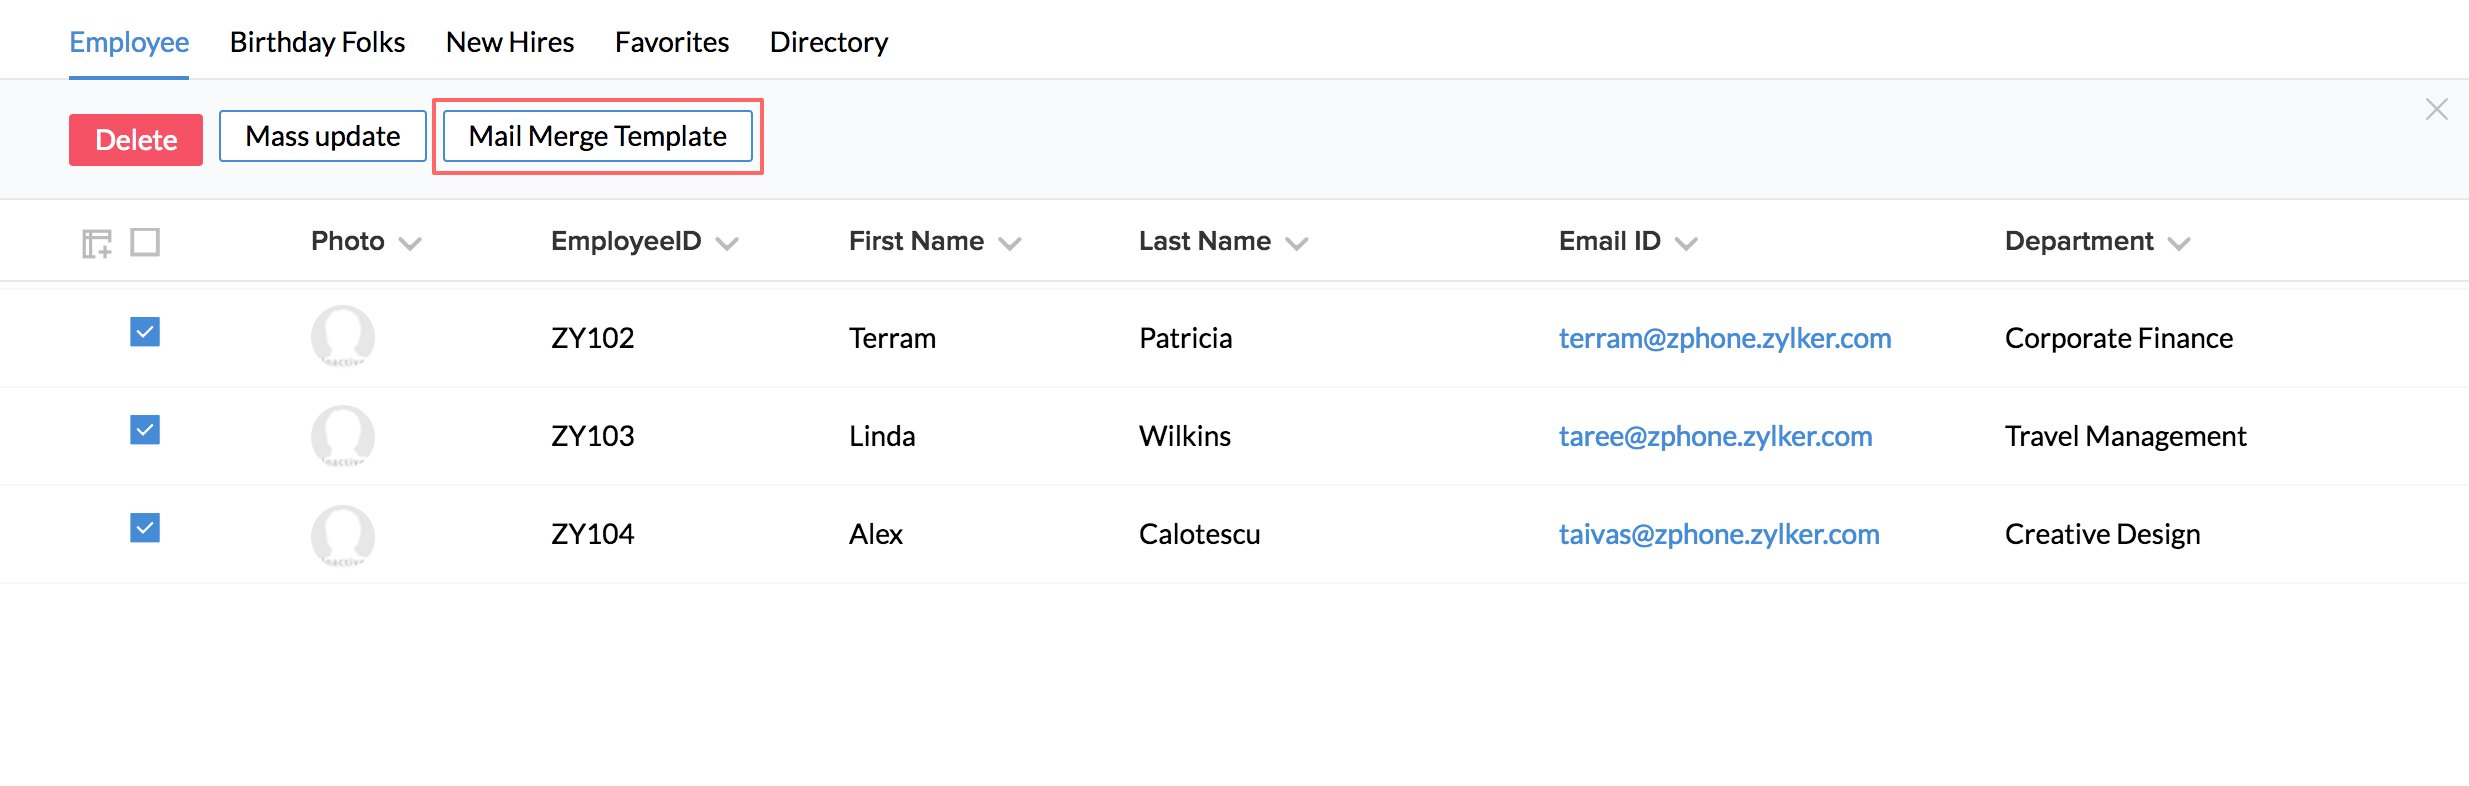
- From your home page, go to Organization > Employee.
- Select the employees for whom you would like to send the Probation Confirmation letter.
Click Mail Merge Template.
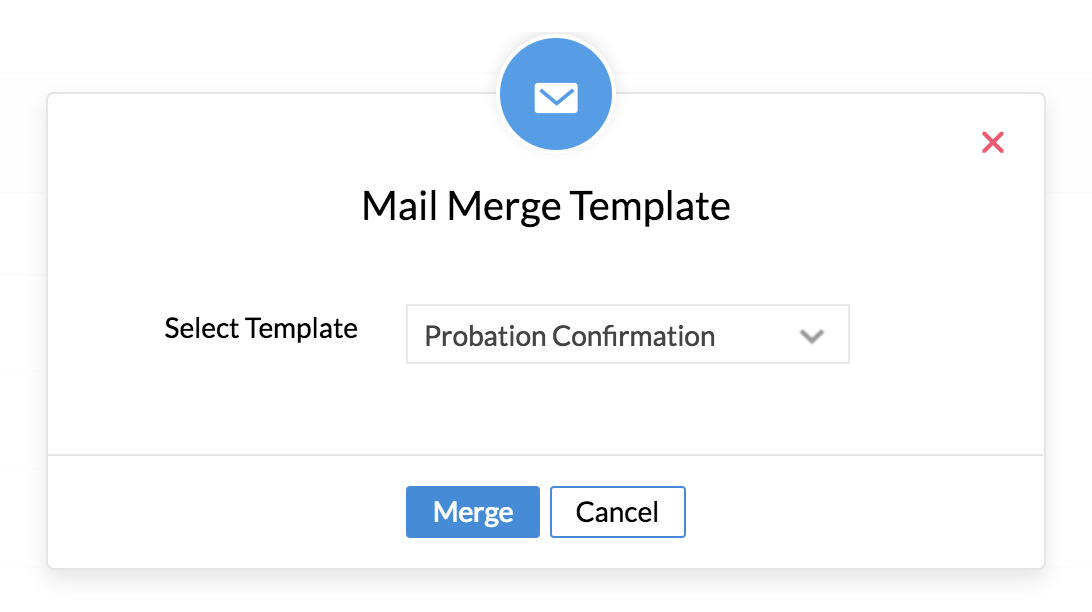
- Select the template from the drop-down - in this case, the Probation Confirmation Template and click Merge.
By default, you will be able to see the dynamic fields of the Template replaced with appropriate values of the first record.
- Click on the respective record from the right-hand side list and click on 'Email this record' to have the Probation Confirmation template emailed.
Note: Please ensure you select the correct email id field in the drop down in case of more than one email id field in the form.
c. To configure a checklist for the new joiner onboarding process using Checklists:
- Click Settings (Gear icon) > Automation >Actions.
- Go to the Checklists & Tasks tab.
- Click Add Checklist.
- Select Employee form from the drop-down list.
- Provide Checklist name as New Joinee.
- Click Save.
- Provide Allocate workplace for an employee in Task name.
- Provide a Description and Priority if needed.
- Click on the individual drop-down list to Assign Task Owner for this task. You can choose from options like Teams, Roles, Form Field(The values listed in the Form Field are the lookup fields that were added while you created the form) etc. You can also directly add employee email addresses here. Click Submit.
- Under Actions after checklist completion , select Mail Alerts.
- Enter a Mail Alert Name.
- Select 'Person performing this action; under 'From'
- Select the task owner from the To drop-down list.
- Enter 'Allocate workspace for new joiner' as Subject.
- Provide the required message and click Save.
- Click Add New Task and follow the same procedure as above to add all the tasks as listed below
- Enroll Benefit Plans for Employee(s): Assign this task to the Finance Department
- Conduct Induction Program for New Joinees: Assign this task to the HR Department
- Provide Laptop for New Employee(s): Assign this task to the System Admin Department
- Setup System Configuration: Assign this task to the System Admin Department
- Provide Phone to Employee(s): Assign this task to the Admin Department
- Create login access and provide ID Card: Assign this task to the HR Department.
Note: The task 'Provide Laptop for New Employees' is a parent task assigned to System Admin Department and the tasks Setup System Configuration and Provide Phone to Employees are the sub-tasks of this main task. System Admin Department should first provide laptops to new joiners and mark the status as completed. Once done, the task notification mail will be sent to the Admin Department for the corresponding sub-tasks. If there are five tasks in a checklist, all the five tasks will get triggered automatically. Similarly, if there are 3 subtasks for a particular task, the subtasks will get triggered simultaneously after the completion of the parent task.
![]() Tip: To re-order tasks and sub-tasks, you can drag the task/sub-task and drop them under the desired parent item.
Tip: To re-order tasks and sub-tasks, you can drag the task/sub-task and drop them under the desired parent item.
The same can be done by assigning each of the items (like providing phone, arranging for a work desk etc) as individual tasks. Click here to know more.
To trigger the new joiner onboarding workflow process:
- From your home page, go to Settings (gear icon) > Automation > Workflows> Add Workflow.
- Select the Employee form from the drop-down list for which the workflow is to be configured.
- Provide Workflow Name as New Joiner Workflow.
- Select the status checkbox for the rule to be Active and provide a description.
- Select Execute based on Action.
- Select Create.
- Under Action, go to Checklist, click on the folder icon to select the pre-defined checklists task - New joinee .
- Click Save.
Now the entire new joinee onboarding process is configured. Whenever a new record is created in the Employee form, this checklist will be triggered as per the workflow configured.
Training date and time reminder
- Purpose
- Workflow process
Purpose
To know about the in-depth automation process of reminding the employees of their training date and time. This help page gives you step by step procedure of setting a reminder to notify your employees to register for a training programme. The same procedure applies for any reminder(Contract expiry date, Birthday, Visa expiry date etc.,) you wish to configure in automation. This particular scenario can be done using both date based action and time-based action and both of these are explained in this page.
Workflow process
Using Date Based Action.
- From your home page, go to Settings (Gear icon) > Automation > Workflow > Add Workflow.
- Select Training in Form Name.
- Enter Workflow Name. For eg - Training Reminder.
- Select the status checkbox for the rule to be Active and provide a description.
- Choose Trigger Process as Execute based on Date.
- Select Training date in the Field Name drop-down list.
- In Date of Execution drop-down list, select Until.
- Select 'Before' from the Start Date drop-down list and provide value 15 in the number of days box.
- Select 09.00 AM as Time of Execution.
- Under Actions click the folder icon to map an appropriate mail alert.
Note: You can also create a new email alert by clicking on the + icon.
To configure a new mail alert:
- Click on the + icon in the workflow page.
- Under Form name, select the Registration form and give a name for the mail alert. For eg - Training Reminder email alert.
- Under From, enter the email id if any (for eg - training@orgname.com)by clicking on the + symbol and under To, select 'Employee ID' from 'Form Fields'.
- Give a suitable subject. For eg - Training Reminder for ${TID.TRAINING_ID} (you can pick this by selecting this option from the list icon).
- You can create a new message using the available merge fields.
For eg -
"Dear (employee first name and Last name) (Select 'Employee ID' from the Available Merge Fields, select First Name and Last Name from 'Select Field' and click on Insert).
This is a reminder of your training of ${TID} which begins on ${Start_Date} and ends on ${End_Date}
Regards
HR Team"
You can also choose a suitable message by clicking on 'Choose from existing template' if you have a template ready.
![]() Tip: Click here to know how to create an email template.
Tip: Click here to know how to create an email template.
- Click Save
You have now configured a workflow which will get triggered based on your Trigger process. In this case, the workflow will get triggered and an email alert will be sent to the employee(s) every day for five days until the start of the training programme.
Using Time Based Action.
The same workflow can be done as a Time based one. Follow the steps given below to do this.
- From your home page, go to Settings (gear icon)> Automation > Workflows > Add Workflow.
- Select Registration in the Form name.
- Provide Workflow Name. Eg - Training Reminder.
- Select the status checkbox for the rule to be Active and provide a description.
- Choose Trigger Process as Execute based on Action.
- Select Create or Edit under Action.
- Click Add Time Based Action.
- Provide a Name and provide Execution Time as 1 Hour before date and time of training.
- Click folder icon in Mail Alert and select the name of the mail alert or click + to configure a new email alert.
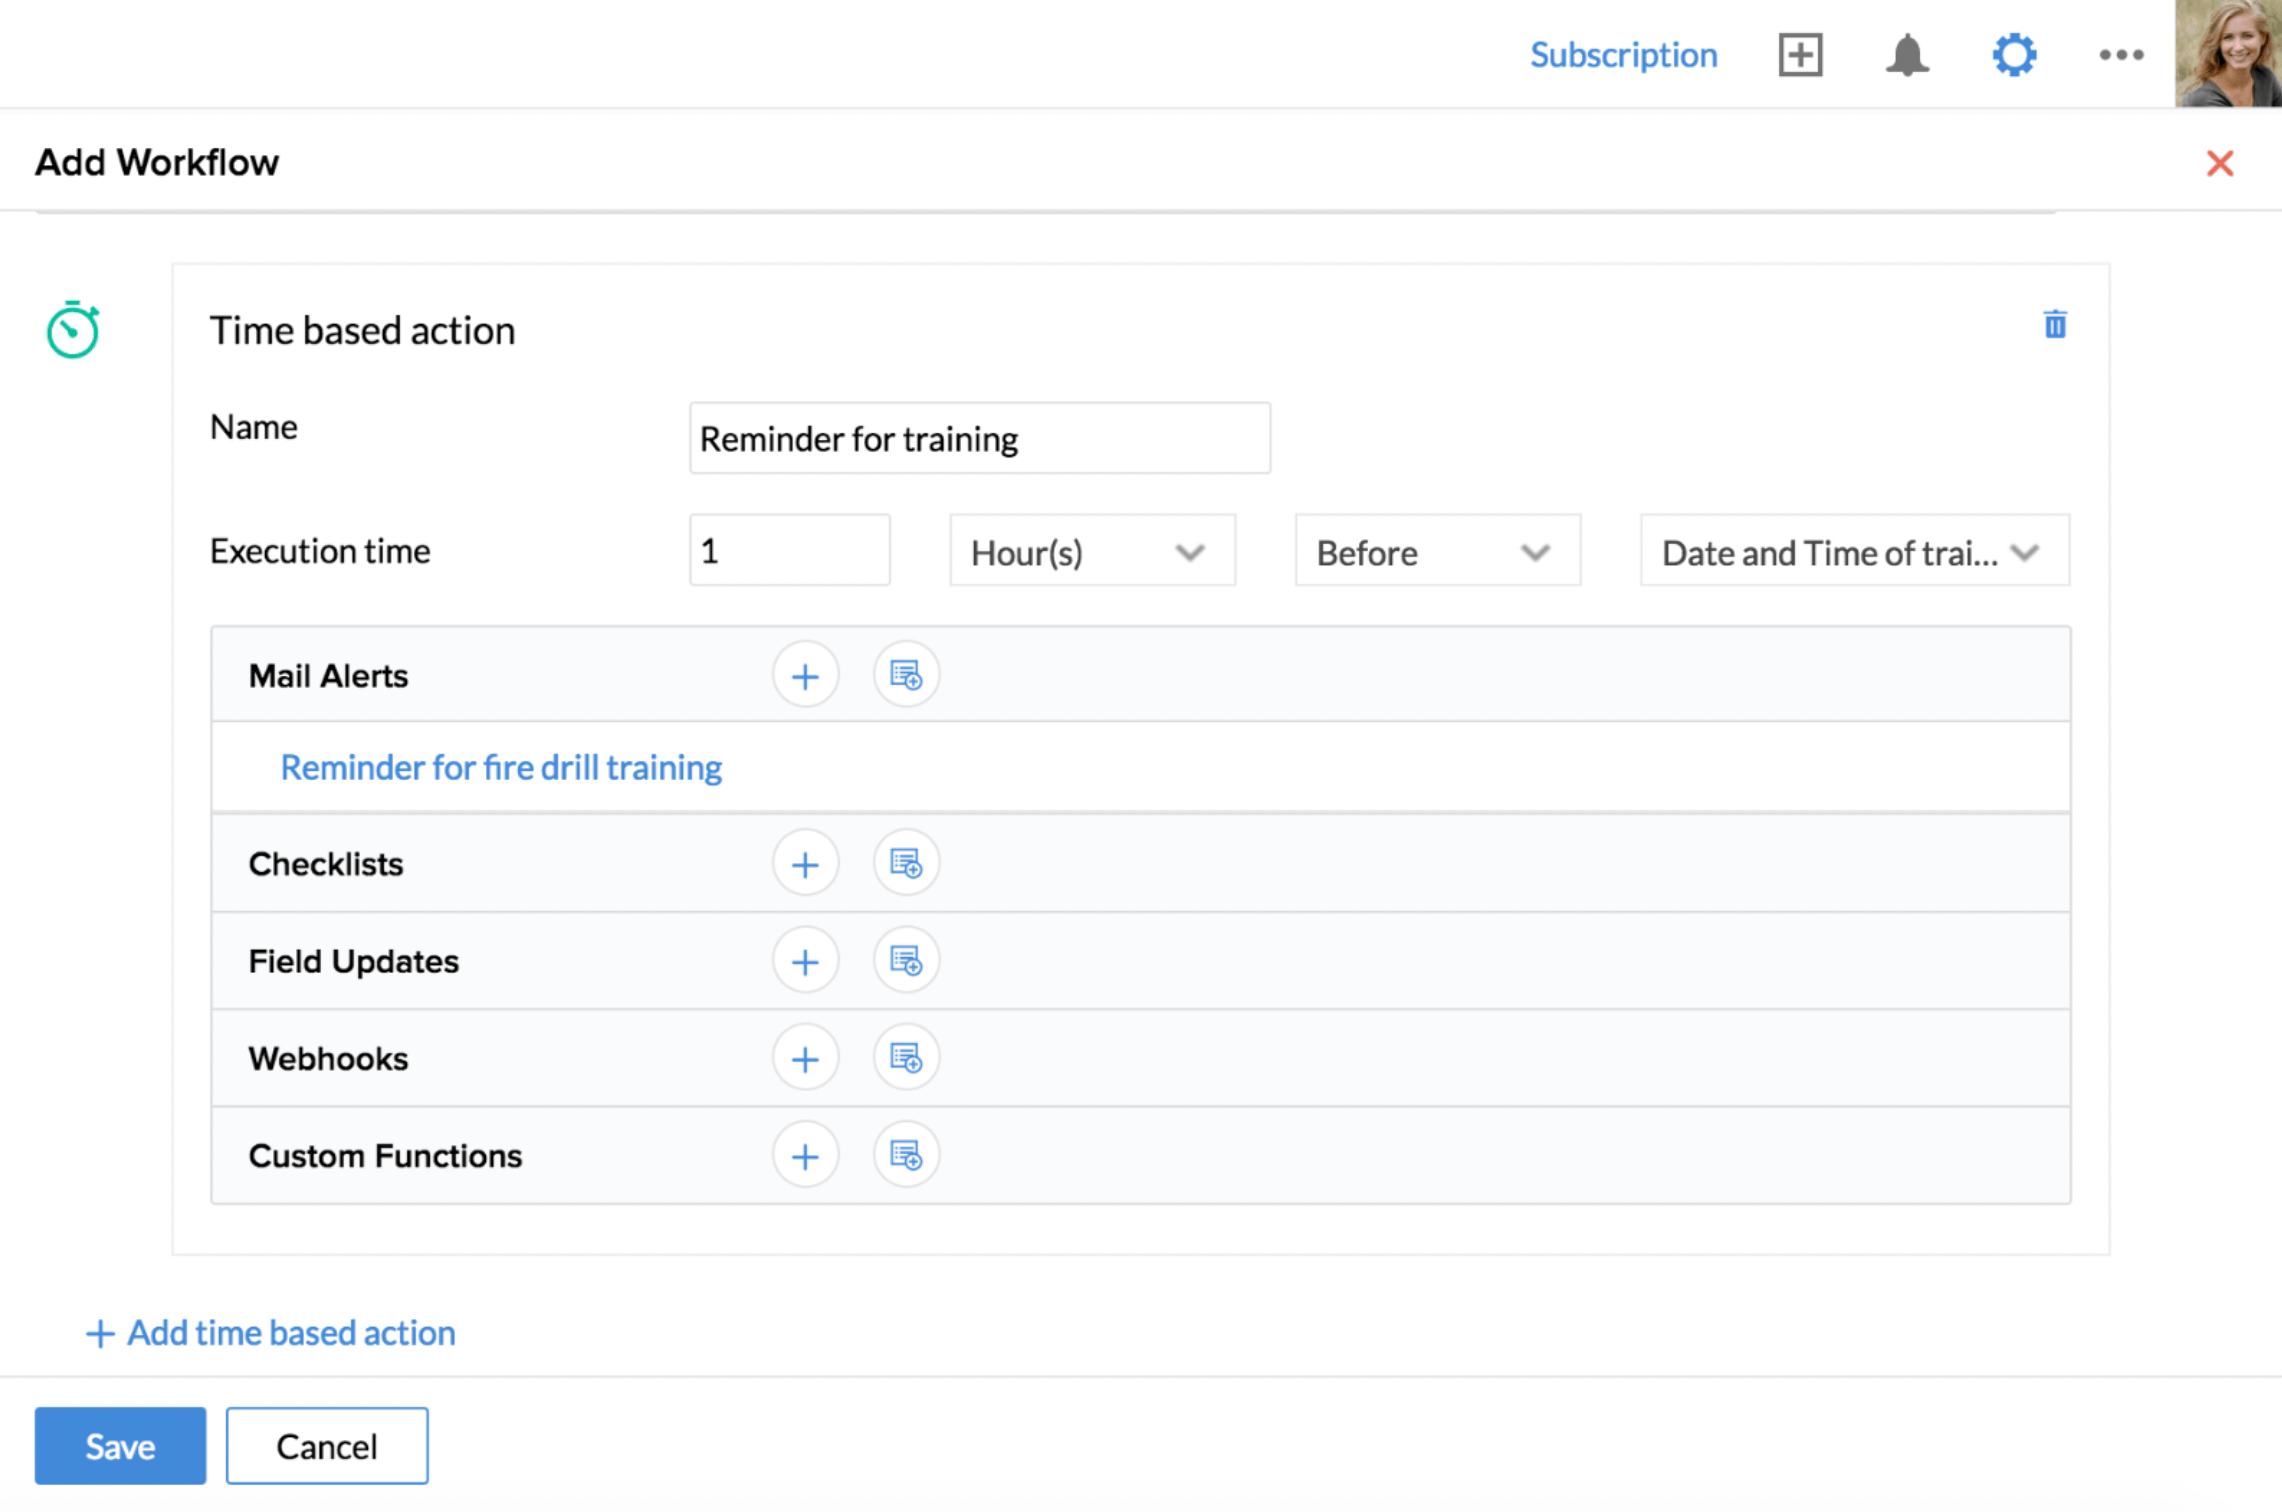
- Click Save
As a result of this workflow, whenever a record is added or edited in the training form, an email alert will be triggered five days before the start date of the Training date. The difference between Date based and time-based action is that, when you select Date based action, the workflow gets triggered on/before/after a specific date. However, when you use Time based action, you can also define a specific time (number of minutes) after/before which the workflow should be triggered.
Birthday Reminder
- Purpose
- Workflow process
Purpose
To create a workflow to send a birthday wish to employees on their birthday automatically.
Workflow process
You can configure a workflow which will automatically trigger an email to employee(s) wishing them on their birthday.
Follow the steps given below.
- From your home page, go to Settings (Gear icon) > Automation > Workflows > Add Workflow.
- Select the Employee form in the 'Form Name' drop down.
- Give a name for the workflow and give a description if needed.
- Keep the status as 'Active'.
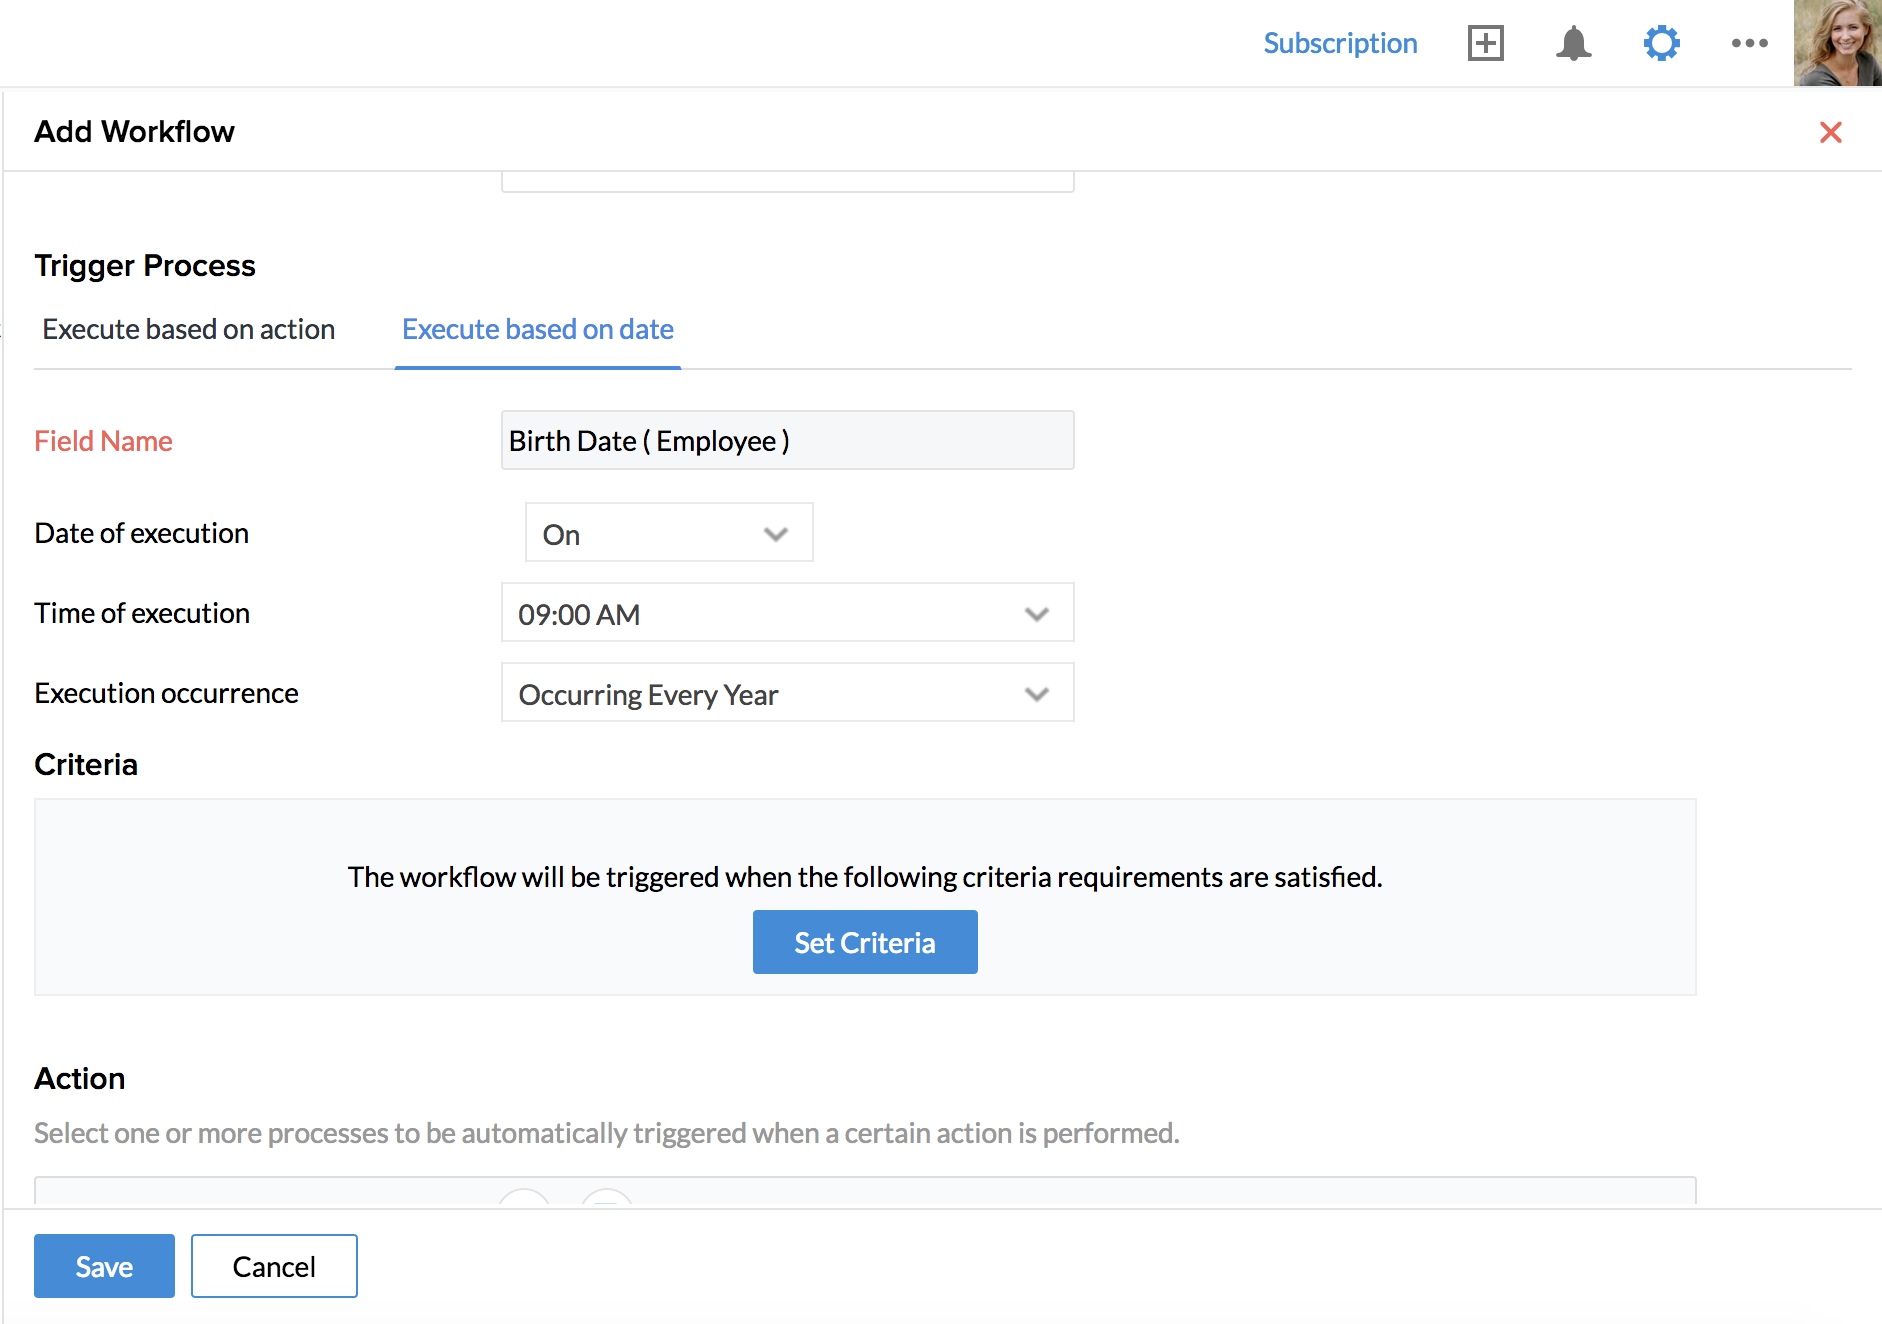
- Under 'Trigger Process', select 'Execute based on the date'.
- Under 'Field Name', select Birth Date.
- Under 'Date of Execution', select 'On'.
- Under 'Time of Execution', select the Time of your choice.
- Under ' Execution occurrence', select 'Occurring Every Year'.
- Under 'Action', go to Mail Alerts.
- Click the + symbol to configure a new email alert or click on the listing icon to see the list of existing email alerts.
For a new email alert:
- Give form name, Mail Alert Name.
- Under Message, select From and under 'To', select 'Email ID' from 'Form Fields' by clicking on the list icon.
- Give a subject.
- Under Message, you can either create a new message by selecting Create New template or Choose from an existing template.
- If you have selected 'Create New message' option, create a suitable birthday wish using the available merge fields.
- If you have selected 'Choose from existing template', select the desired message template.
- Click Save.
To map an existing mail alert:
- Select the desired mail alert from the list
- Click Save
The workflow is configured now. The employee will receive a birthday wish email every year to their email id.
Work Anniversary Reminder
- Purpose
- Workflow process
Purpose
To send emails automatically to employees wishing them on their work anniversary.
Workflow process
You can configure a workflow which will automatically trigger email alerts to employees as and when they complete one or more years of service at work.
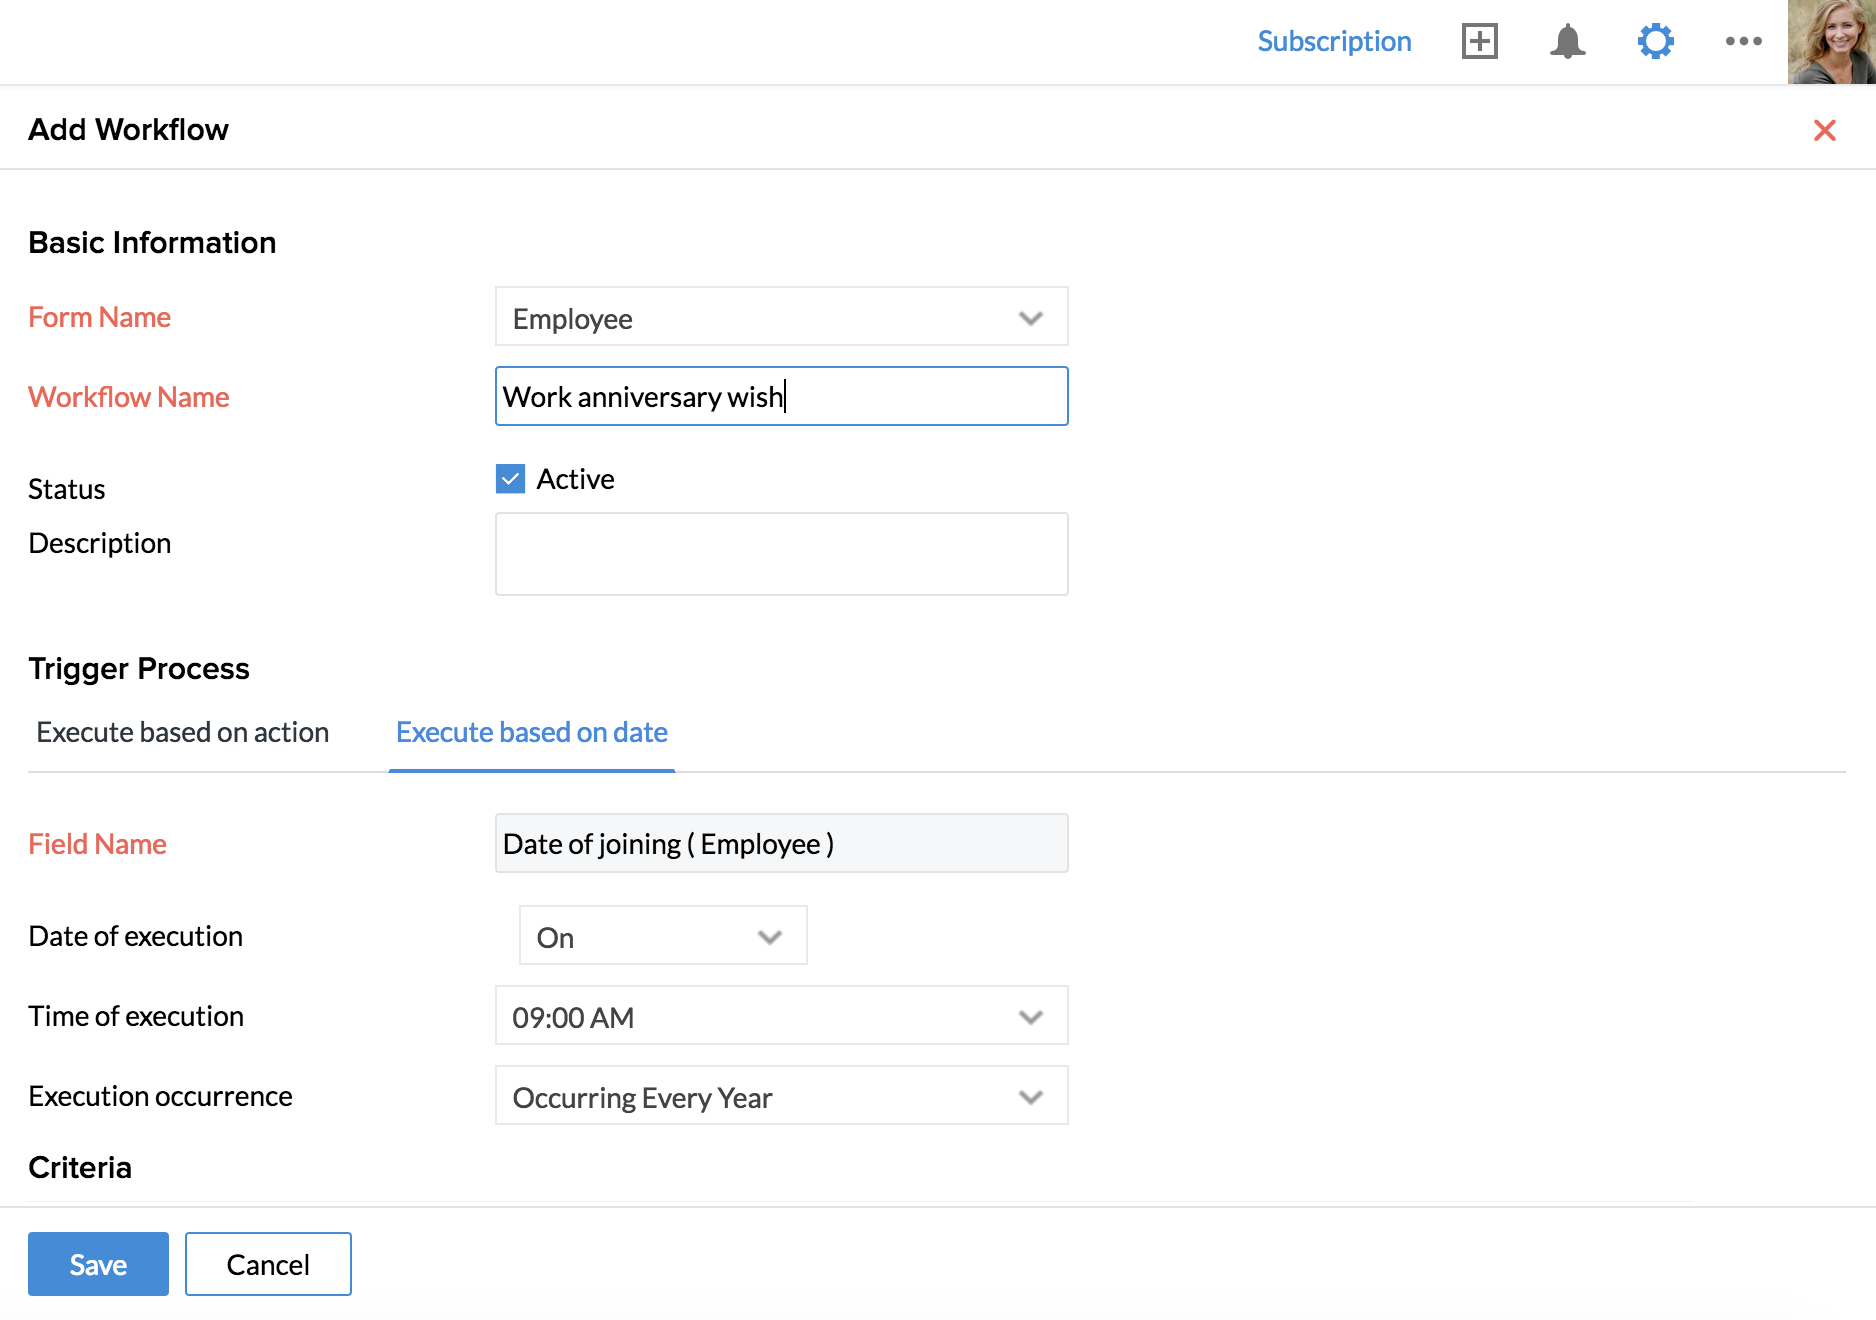
From your home page, go to Settings (Gear icon) > Automation > Workflows > Add Workflow.
- Select the Employee form in the 'Form Name' drop down.
- Give a name for the workflow and give a description if needed.
- Keep the status as 'Active'.
- Under 'Trigger Process', select 'Execute based on date'.
- Under 'Field Name', select Date of Joining.
- Under 'Date of Execution', select 'On'.
- Under 'Time of Execution', select the Time of your choice.
- Under ' Execution occurrence', select 'Occurring Every Year'.
- Under 'Action', go to Mail Alerts.
- Click the + symbol to configure a new email alert or click on the listing icon to see the list of existing email alerts.
For a new email alert:
- Give form name, Mail Alert Name.
- Under Message, select From and under 'To', select Person performing this action.
Note: In case of reminders, 'Person Performing this action' refers to the record owner.
- Give a subject.
- Under Message, you can either create a new message by selecting Create New template or Choose from an existing template.
If you have selected 'Create New message' option, create a suitable anniversary wish using the available merge fields - For eg, "Dear Employee Name (Select Employee from Available merge fields and select First Name and Last Name from Select Field) Congratulations on completing _(Select Employee from Available merge fields and select 'Work Experience' or the field name that you have given for the work experience field in the employee form from the Select field) years of service in this organization. "
- If you have selected 'Choose from existing template', select the desired message template
- Click Save.
The workflow is configured now and employees will receive an email to their email id wishing them on their work anniversary day.
Disable login for employees on long leave
- Purpose
- Workflow process
Purpose
To automatically disable login for the long leave employees and enable login once they are back to work. For example, when the employee has taken one year leave due to health or maternity reasons etc., we can configure a workflow to disable their login during their leave period and automatically enable login once they back to work.
Workflow process
The first step is to configure a leave type called long leave.
![]() Tip: Click here to know how to create a new leave type.
Tip: Click here to know how to create a new leave type.
When an employee applies for leave under the 'Long leave' category, a workflow can be configured to change the status of the employee to 'Disabled'. The workflow should also include another condition to change the status to 'Active' from the day the leave ends.
Given below are steps to configure this workflow.
- From your home page, go to Settings (gear icon) > Automation > Workflows > Add Workflow
- Select the leave form under Form Name and give a name
- Keep the status as Active and give a description if needed
- Under Trigger Process, select Execute based on action and choose Create
- Under Criteria, in the first field, select 'Leave Type', in the second one, select value as 'Contains' and in the third field, select the value as 'Long Leave'
- Click + to add a new row
- Once a new row has been added, select the 'And' option
- In the following fields, select the value 'Leave Count' from Leave, select the value 'Greater than' in the second field and enter 365 in the last field
This way, we are creating a condition which says that the workflow will get triggered when these conditions are satisfied.
- Under Action, select Time-Based Action
- Give a name
- Under Execution time enter '0' in the first field, 'days' in the second field, select the value 'After' from the third field and the value 'From' in the last field
This means that the workflow will be triggered from the day the long leave starts. I.e the employee login status will be changed to inactive from the day on which the long leave starts.
- Select Field update and click on the + icon to configure a new field update
- Give a name for the new field update Eg- Disable login
- Go to edit field and under Field to be updated, go to Employee and select Employee Status
- Under Select Field, select the status as Disabled
- Click Save.
- Go back to the Workflow, and under Field Update, link the new field update that you have created to the workflow
- Click Save.
Now, the first part of the workflow is done. I.e - when an employee applies for leave under leave type 'Long leave', his/her status will be changed to login disabled from the day their leave starts.
The next part of the workflow configuration is to enable login for the employee when he/she joins work again.
- Click on Add Time Based action
- Give the name as Enable Login
- Under Execution time, enter the value '1' in the first field, select 'day' in the second field, 'before' in the third field and 'To' in the last field
Now, this part of the workflow will get triggered from the date on which the leave ends. I.e - the employee's login status will be changed to active again from the next day of the end of the long leave of the employee.
- Under Field update, click the + icon to add a Field update
- Give the field update name as Enable Login
- Go to Edit field, and under Field to be updated, select Employee ID and choose Employee Status from the drop down
- Under Select field, select Active
- Click Save
- Go back to the workflow and link this field update to the workflow by clicking on the icon
- Click Save
The workflow is configured now. As a result, when an employee applies for leave under the 'Long leave' category, his/her login will be disabled form the day their leave begins. The login status will again become active on the day after the long leave ends.
Team change update
Purpose
The team update change automation process is a very useful scenario for any organization. All you need to do is a single time workflow configuration by following the steps explained in this help page. As a pre-requisite to this workflow, you need to create a form called 'Team Change' form, with the fields of your choice like the Current Team name, New Team name etc. Using this process, whenever you update the department name in the team change form, department name in the respective employee form gets updated and a mail alert will be triggered. There is no need to manually go and update the employee form and send a mail alert every time whenever there is a team change.
Workflow process
- Click Settings (gear icon) > Automation > Workflows > Add Workflow
- Select Team Change in Form Name.
- Provide 'Team Change Update' as Workflow Name
- Select the status checkbox for the rule to be Active and provide a description
- Choose Trigger Process as Execute based on Action and click Create
- Click + icon to create a new mail alert
- Provide the details and the template message
![]() Tip: Click here to learn more about creating email alerts.
Tip: Click here to learn more about creating email alerts.
- Click Save.
- Go to your workflow page and click Webhook list and click + icon to create a new webhook.
- Provide Update team change as Name.
- Provide https://people.zoho.com/people/api/forms/xml/employee/updateRecord in URL to Notify.
- Click Post in Method.
- Select Team Change in Form Name drop-down list.
- Under Parameters in Standard Format, Provide recordId as Parameter Name and select ID (Zoho ID) and Employee Details (Employee) as Parameter Value.
- Under Parameters in the User Defined Format, provide inputData in Parameter Name and ${Department_To.ID}${Reporting_To.ID} in Value Description and select Team Change from the drop-down list.
- Under Append Custom Parameters, provide authtoken as Parameter Value and 0d843f01bd2486e33a0cdd2aa6f4b425 in Parameter Value.
- Click Refresh URL and Save.
- Go to your workflow page and click the folder icon in the mail alert.
- Select Team Change mail alert.
- Select Update team change webhook.
- Click Save.
Record Template Attachment
- Purpose
- Record template attachment
Purpose
To automatically send salary slips to employees every month.
Workflow process
You can use workflow for an email to be sent every month with a copy of the salary slip. To set up this workflow, you need to have the salary slip template ready with you.
Given below are steps to get the template ready.
- From your home page, go to Settings (gear icon) > Templates > Record Template > Add Template
- Under Form Name, select Salary Slip form
- Give a name for the Template
- Under Template type, select Record Template
- In the Message, use the merge fields and type the message.
Tip: You can have a spreadsheet included in the message to show details like salary break up.
- Click Save
Once the Record template is ready, you can follow the steps given below to get the workflow configured to have the Salary slip emailed to employees when there is a value added to the Salary Slip form.
- From your home page, go to Settings (gear icon) > Automation > Workflows > Add Workflow
- Select the Salary Slip form under Form name
- Give a name for the workflow - Eg: Monthly Salary slip generation
- Keep the status as active and give a description if needed
- Under Trigger Process, select Create
- Under Action, select Mail Alerts
- Click the + icon to create a new Mail alert or choose from existing template. Follow the steps given below to create a new mail alert
- Select the Salary Certificate form under Form Name
- Give a name for the mail alert
- Select From and other fields as required
Note: Under To, click the icon (image) go to Form Fields and select Employee ID. When you select the Emp ID, the email alert will be sent to the employees for whom there is a record added in the Salary Slip form.
- Under Message, you can either Create a new template or Choose from existing template.
- If you would like to create a new template, type the message by inserting the fields from the Available merge fields.
- Under Attachments, select the Template from the list of record templates that you have already created
- Click Save.
Once this workflow is configured, employees will receive an email alert whenever a record(or value) is added in the Salary Slip form.
Note: This is one scenario where Record Template attachment can be used. This option can be used to cater to various requirements like Address Change request, No objection certificate request etc.
Approvals
Travel approval (Related field criteria)
- Purpose
- Workflow process
Purpose
The related field criteria are the one which helps to relate one form to another form through the lookup field. For example, if the travel request form and the employee form are related to each other through an employee id lookup field in the travel request form, all the fields in the employee form will be listed and matched in the travel request form criteria. You can create an approval to define that employees will be qualified to travel only after a specific period of time. Follow the steps given below to do this.
Workflow process
- Click Setup (Gear icon) > Approval > Add Approval
- Select Travel Request in Form Name
 Tip: Click here to know how to add a new form.
 - Give a Name for Approval - For eg. Travel Approval
- Click Set Criteria and select Date of Joining {Work}(Under Employee ID (Employee)), 'Before' from the drop-down list and provide 365 in the Days (you may give the number of days as per your need)
Now, there is a Criteria set, going by which, employee(s)' joining date should be before 365 days of the date on which Travel request is raised. I.e - employees should have completed one year of service for them to be eligible for travel.
- Click Configure Approver
- You can either manually configure approvers to approve/reject the form or enable the system to auto approve/auto reject the form based on your requirement
To configure approvers manually, you can choose from various options like Reporting To(up to 10 levels), Department Lead of Login User, Approver based on Role, Department Head, Department Members, Employee, Form Field etc. You can also enable the employee to choose the approver while logging request.
- To add multi-level approvers, click the add (+) icon and select the Approver type
- Click Enable follow-up option for this approval, if you want a follow-up e-mail either One-time or Repeat after the number of days from the approval trigger date
- Click Configure email template
- Select From, To etc depending on your need
- Give a suitable subject
- You can either create a new template using available merge fields or select from existing ones
- Click Save.
Now, you have created an Approval using which the travel requests of employees who have completed one year of service in the organization can be approved.