Workflows
Zoho People offers a great online workflow tools that automate all your HR processes, by eliminating most of the manual administrative work. You can preset and customize the workflow processes and full access control to the administrative processes will be given. Workflows in Zoho People consists of a set of trigger processes such as Create, Edit, Create or Edit, Field Update, Approve, Reject, Delete and Date Based Action. A rule is executed based on a trigger process and criteria set, and a set of automated processes get triggered, such as Mail Alerts, Checklists, Custom Functions, Field Updates and Webhooks.
- Workflow components
- Steps Involved
- Trigger Process
- Trigger Process for Cases
- Criteria
- Actions
- Configuration of Workflow
- Example scenario for Workflow process
- Example scenario for Field Update
- Date Based Action
- Example scenario for Date Based Action - Contract Expiry Date
- Example scenario for Date Based Action - Training date and time
- Example scenario for Date Based Action - Confirmation of new employees after six months
- Example scenario for Date Based Action - Work Anniversary
- Time-Based Action
- Example scenario for Time Based Action - Visa Expiry Date
- Example scenario for Time Based Action - Training date and time
Components of a Workflow
- Criteria - It helps to define the Workflow. You can also configure multiple criteria for every Workflow according to the need.
- Trigger Process - It helps to trigger the Workflow based on the Criteria and Execute based on Action such as Create, Edit, Create or Edit, Field Update, Approve, Reject, Delete and Execute based on Date. The whole process is executed through actions such as Mail Alerts, Checklist, Webhook list, and Custom Functions.
- Date Based Action - Reminders now are replaced with this feature. Using date based execution option, you can pick a date field from a record and define the day and time for the rule to gets triggered.
- Time Based Action - It helps to execute the Workflow when given a specific execution time. Alerts, tasks and updates using Webhooks will be scheduled and triggered based on a specified time.
Steps Involved in Creating a Workflow
Workflows are used to automate your HR Processes. There are four steps involved in creating workflows.
Step 1 : Give basic information.
Note: Workflows are triggered for the forms you select. So it is important to select the appropriate form.
Step 2 : Trigger Process. There are two triggers
Execute based on action - workflow gets executed based on actions like create, edit, Field update, Approve, Reject or delete
Execute based on date - workflow gets executed based on a selected date field.
Step 3: Setting Criteria
Workflow gets triggered provided the criteria is satisfied.
Step 4: Action
The Action could be in the form of mail alerts or checklists or field updates or webhooks or custom functions.
Time-based action: These are workflows which are triggered based on a specified time.
Trigger Process
A workflow will be executed based on an Action. There are different actions which needs to be configured in order for the workflow to be triggered. Default workflow action will be Create.
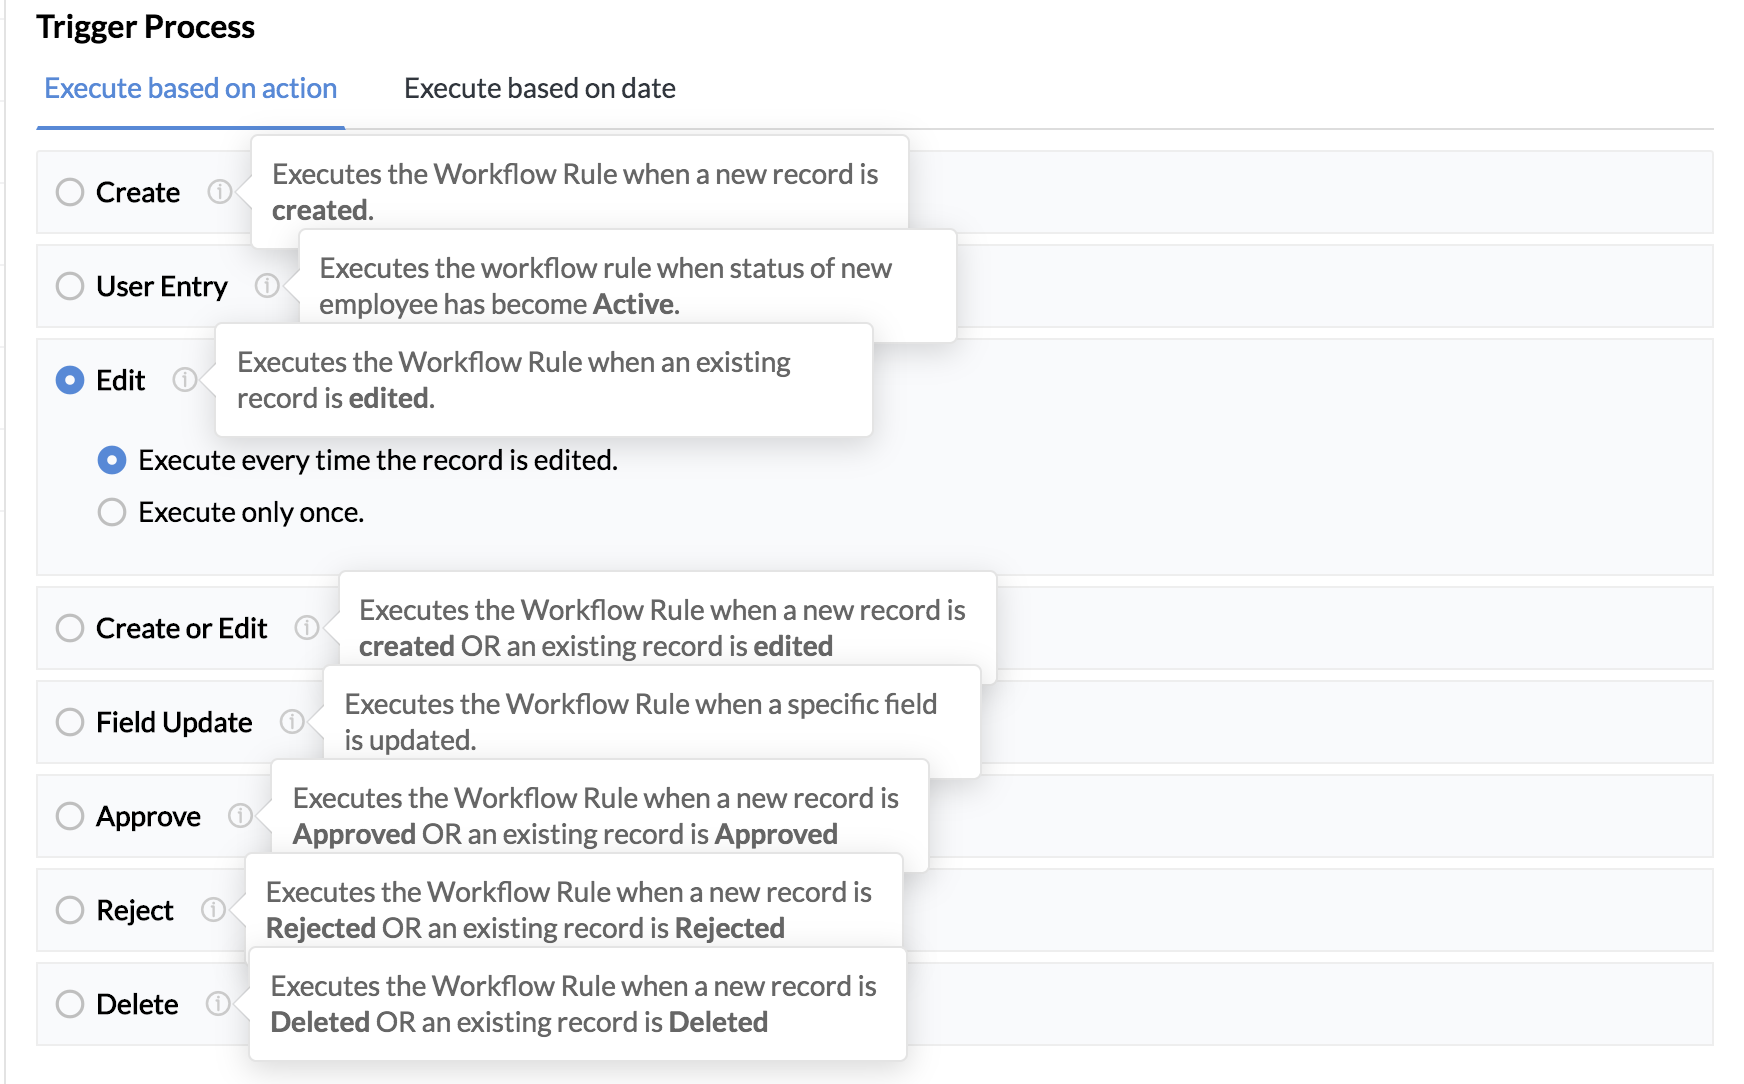
For example, if you select the Action as Create and the form as Employee, the configured workflow process (Mail Alert, Checklist and Webhook) will be triggered whenever a new record is added in the Employee form.
Create: Workflow process will be executed when a new record is created.
User Entry : Workflow will be executed when the status of a new employee becomes Active.
Edit: Workflow process will be executed when an existing record is edited. You can additionally select if you want it to be executed only one time , or every time the record is edited.
Create or Edit: Workflow process will be executed when a record is either created or edited.
Field Update: Executes the workflow when a specific field or more than one field gets updated. You can additionally select if the rule is to be executed when all the selected fields are updated or when any one of the fields are updated.
Approve: Workflow process will be executed when a record is approved.
Reject: Workflow process will be executed when a record is rejected.
Delete: Workflow process will be executed when a record is deleted.
Trigger Process for Cases
When the selected form is Case, the following actions can be triggered:
Close: Workflow process will be executed when a case is closed.
Re-open : Workflow process will be executed when a case is reopened.
Category Change : Workflow process will be executed when the category a case is changed.
Criteria
- Defining criteria helps control the workflow process. You can set one or more criteria to meet the required conditions to trigger a workflow.
- You can configure multiple criteria for each workflow process within a specific form.
- Additionally, using simple AND or OR operators, a pattern can be specified. The criteria will be evaluated based on the specified criteria pattern.
- Using a criteria pattern can help in reducing the number of required approval workflows.
The following four use cases would help in clearly understanding how criteria can be set, and how a criteria pattern can be utilized in workflows.
Use Case 1: Employee transfer request can only be requested by permanent employees. (Single criteria - approval)
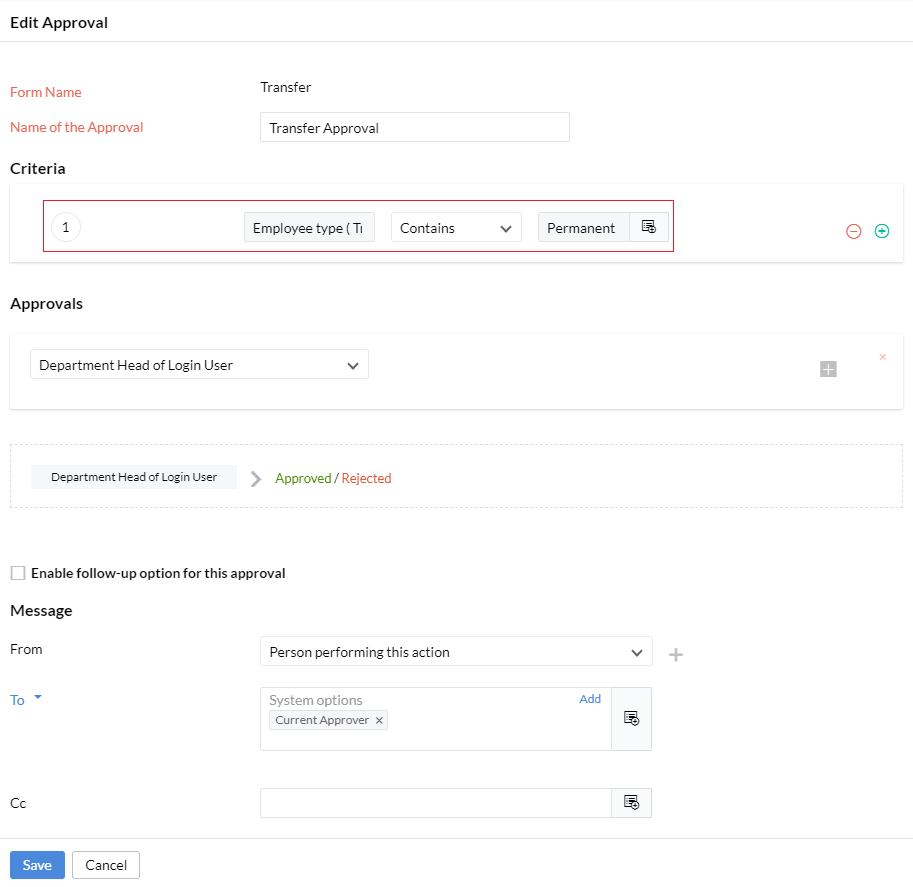
Here, the employee transfer form has a criteria for checking employee type. Only permanent employees are allowed to raise transfer requests. The approval request goes to the Department Head of the employee.
Use Case 2: Leave request needs approval from Reporting Manager when sick leave exceeds two per week or when work from home leave exceeds 3 per week. (Criteria pattern - approval)
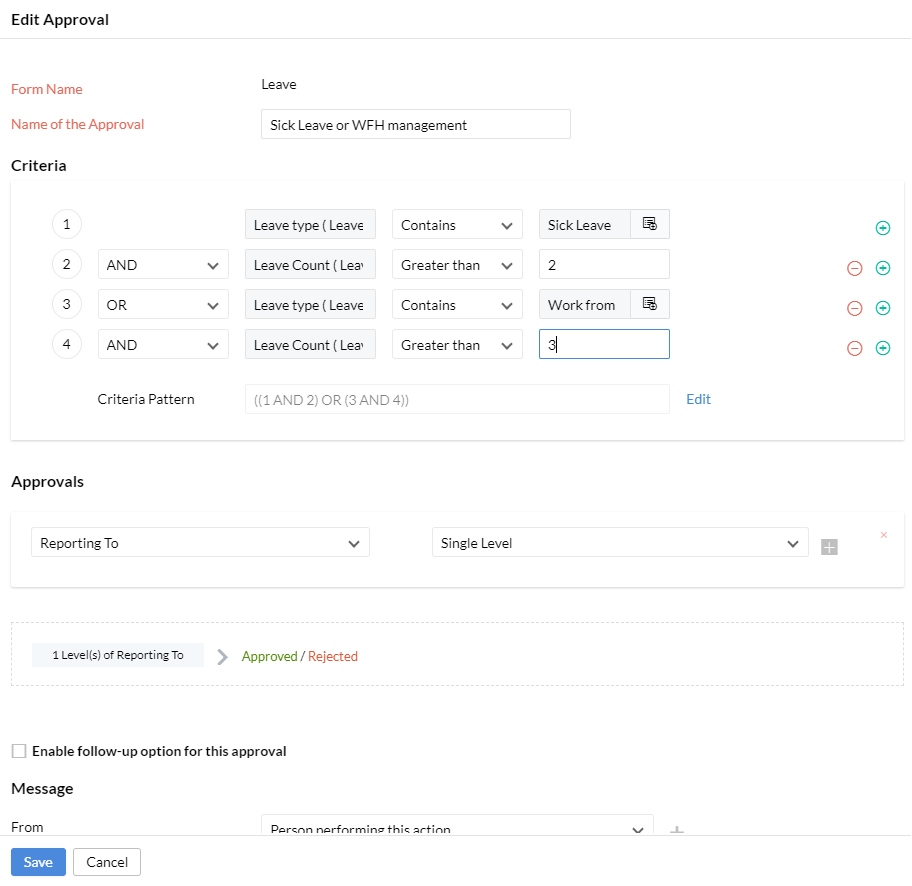
Here, the criteria verification follows the specified criteria pattern ((1 AND 2) OR (3 AND 4)).
Conditions are evaluated in the following sequence:
Leave type must be Sick Leave AND Leave Count must be greater than 2.
OR
Leave type must be Work From Home AND Leave Count must be greater than 3.
Therefore, when the employee applies for leave, if criteria 1 and 2 is true or if criteria 3 and 4 is fulfilled, a leave approval request will be raised.
This also eliminates the need of configuring two different approvals for sick leave type and work from home leave type.
Use Case 3: Travel request approvals requires approval from Department Lead for employees of different role and location (Criteria pattern - approval)
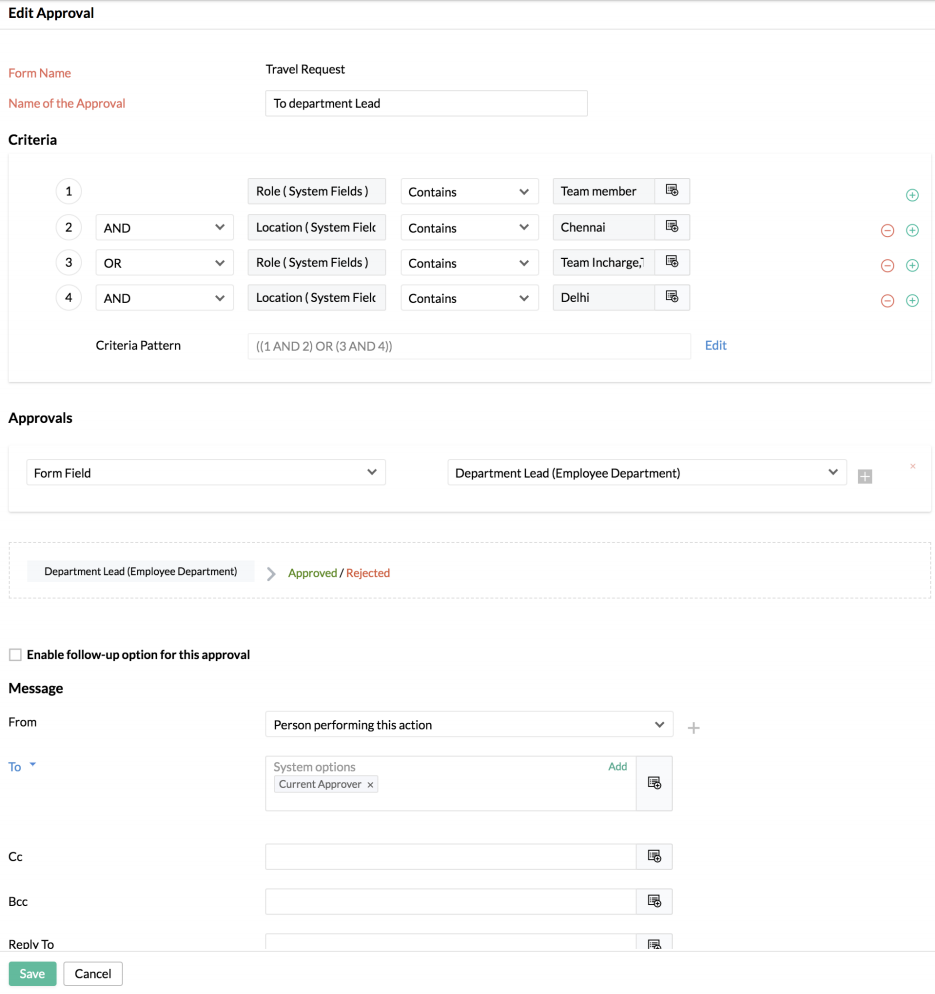
Here, the criteria verification follows the specified criteria pattern ((1 AND 2) OR (3 AND 4)).
Conditions are evaluated in the following sequence:
Role must be Team Member AND Location must be Chennai.
OR
Role must be Team In-charge AND Location must be Delhi.
Therefore, when a travel request is raised, based on the location and role an approval will be necessary from the Department Lead.
Use Case 4: Sending an annual special greeting to the Directors or Managers with over 10 years of experience. (Criteria pattern - greeting)
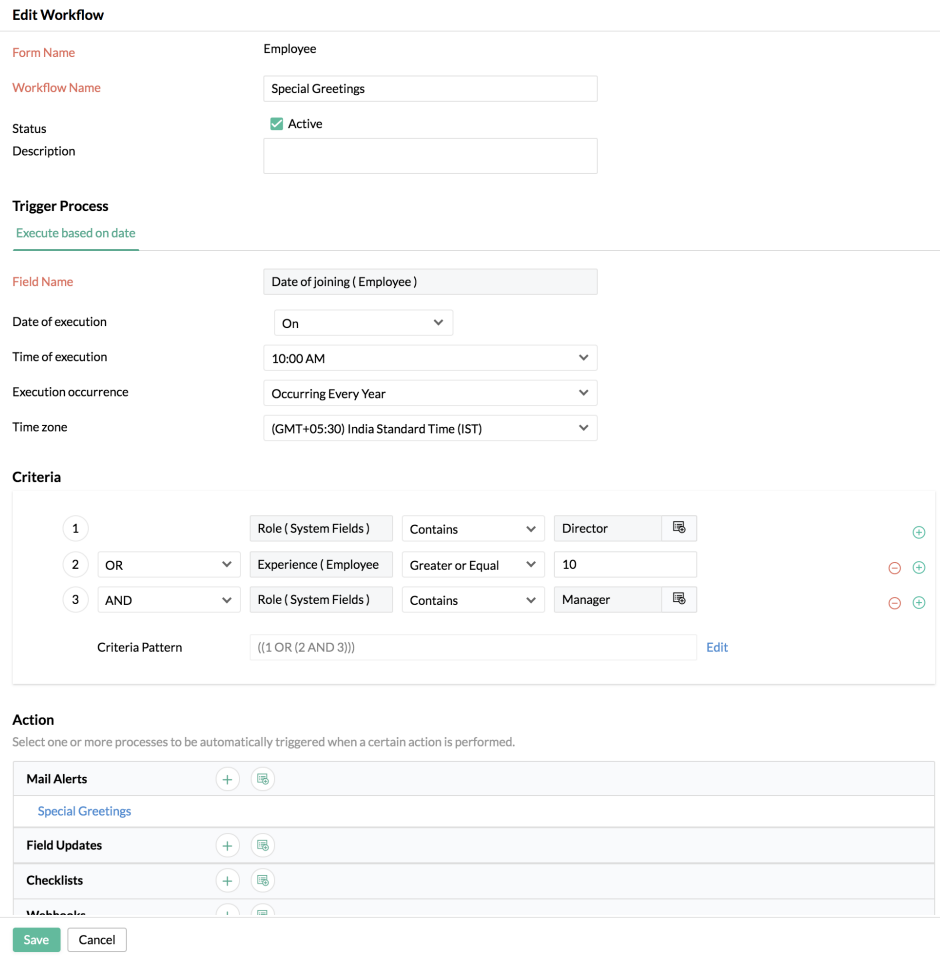
Here, the criteria verification follows the specified criteria pattern ((1 OR(2 AND 3))).
Conditions are evaluated in the following sequence:
Role must be Director
OR
Role must be Manager AND Experience must be greater than or equal to 10 years.
Therefore, All company directors get a special greeting annually. Additionally, Managers with experience of 10 years or above also get an annual special greeting.
Note: When specifying or editing the criteria pattern, note that the code must only contain numbers (0-9) Brackets () and operators OR, AND. Ensure that all open brackets are closed.
Actions
The workflow includes different individual processes to be executed when an action is triggered. Based on the action and the configuration setup, the selected processes will be triggered simultaneously. The different processes are Mail Alerts, Checklist, Field Updates, Custom Functions and Webhooks. You need to configure each process individually. i.e. for Mail Alerts, you need to configure the template; for Checklists, you need to configure the tasks; for the Webhooks, you need to configure the API and parameters individually and then you have to associate each process to the workflow rule.
Configuration of Workflow
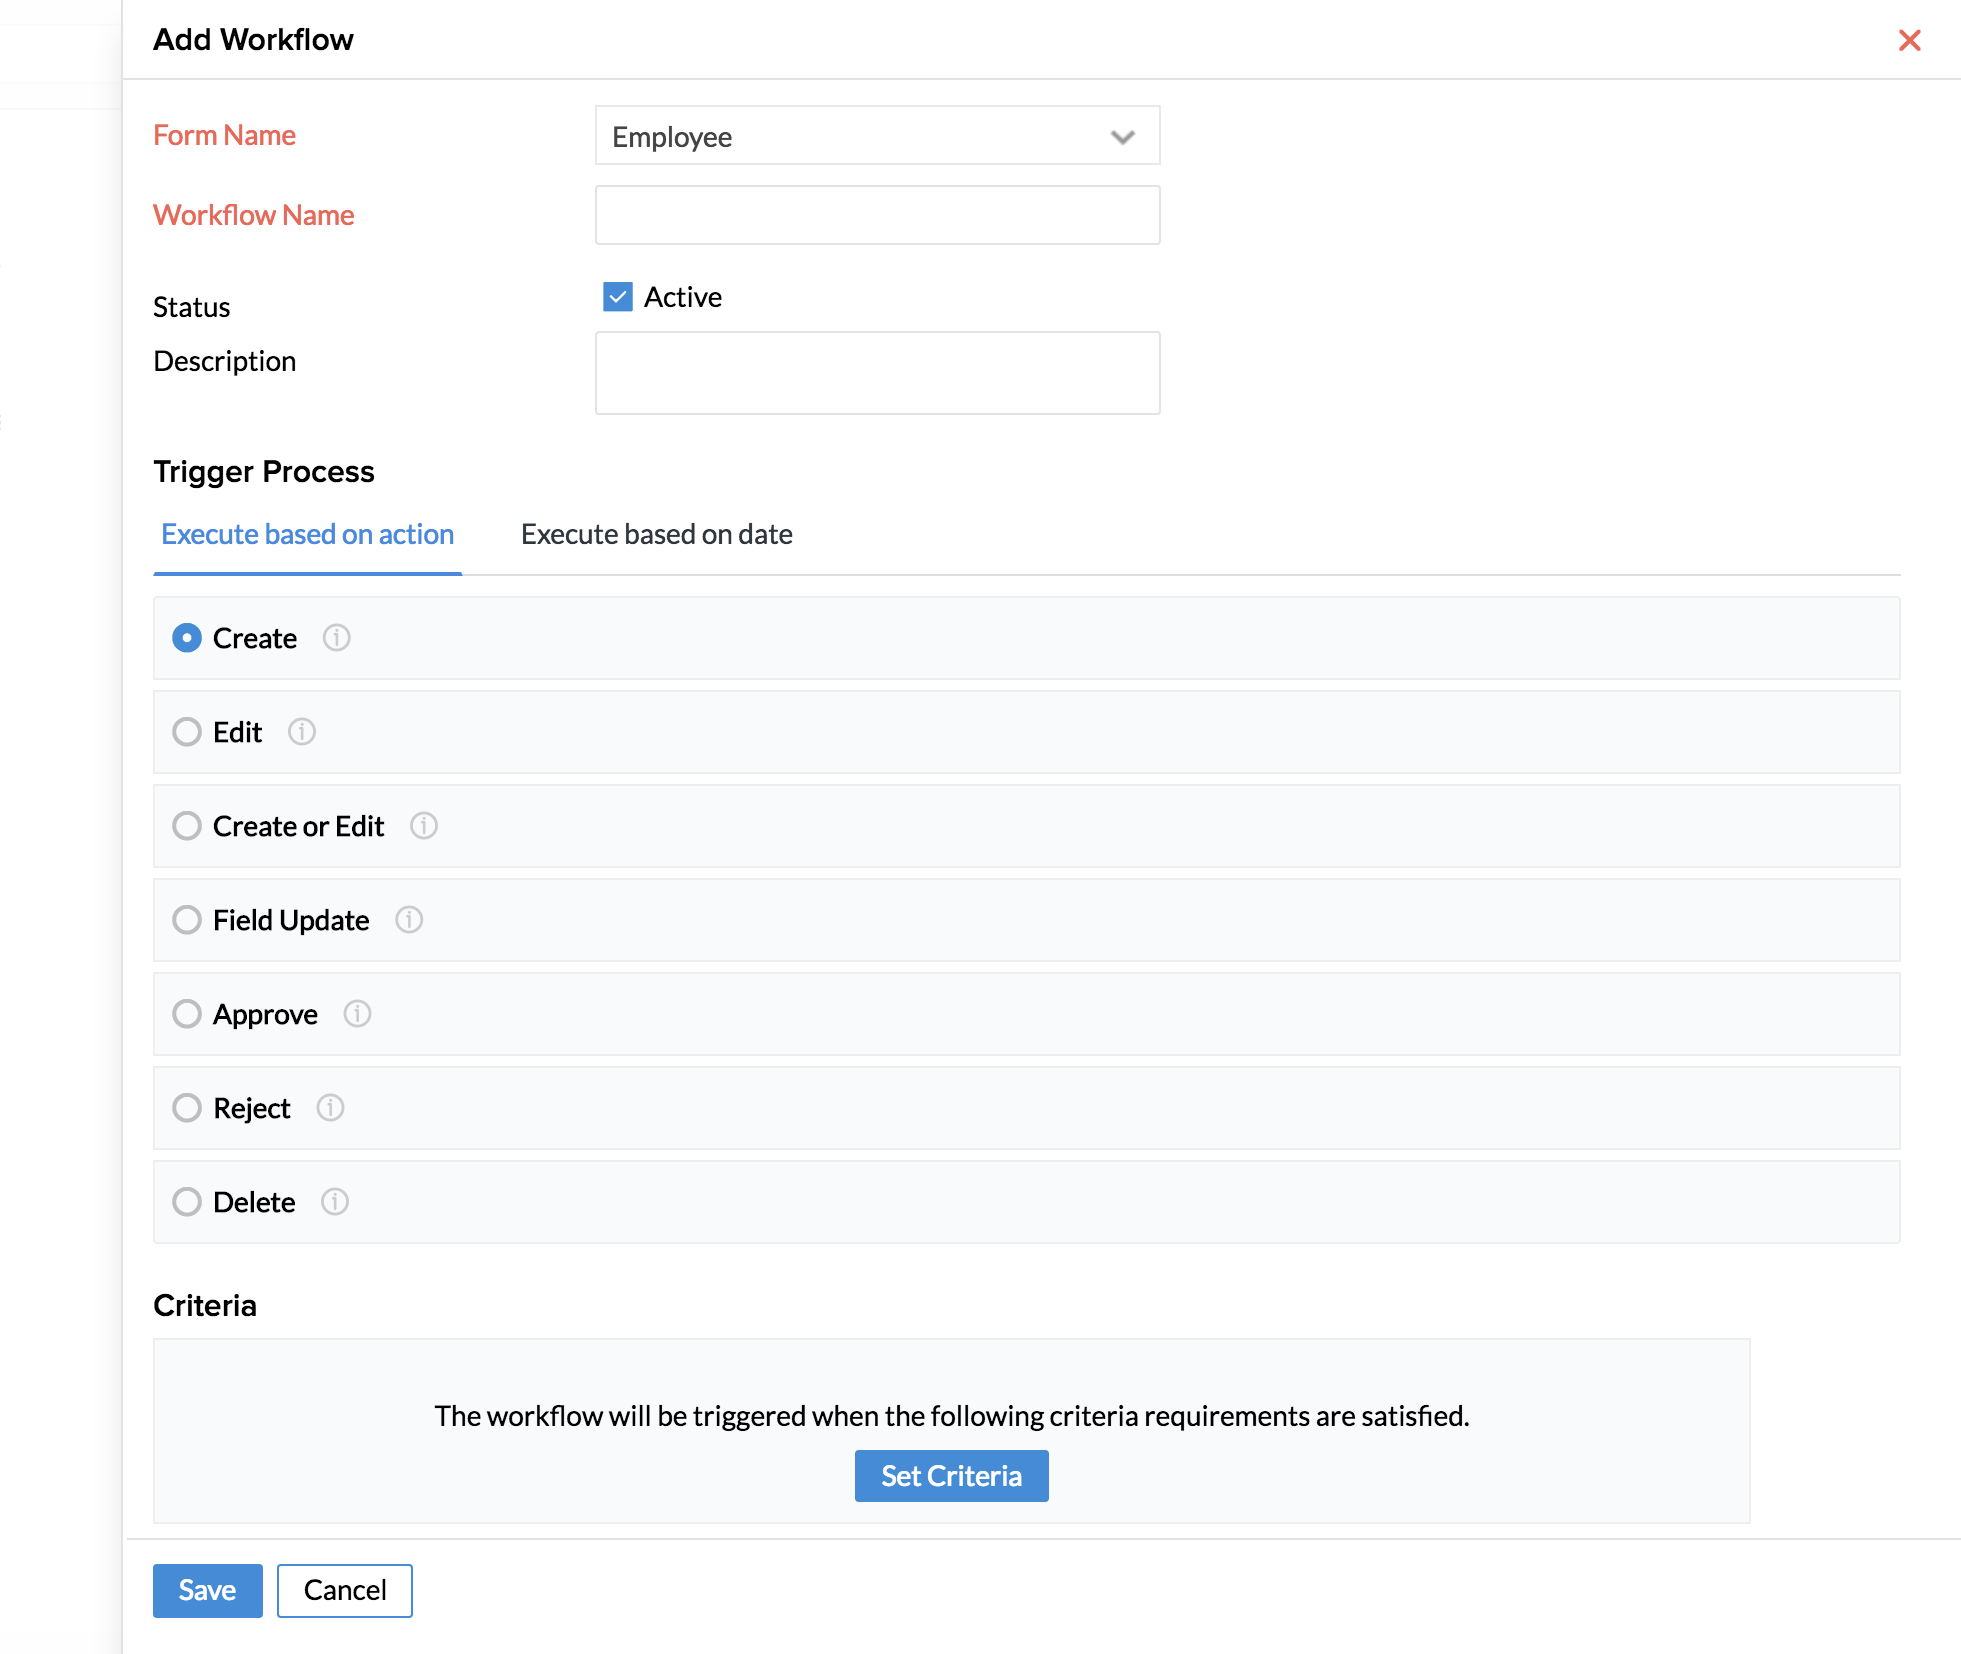
The workflow system is fully automated and all it needs is just a one-time configuration setup. Please follow the steps below to configure a Workflow process.
- From your home page, go to Settings > Automation > Workflow > Add Workflow.
- Select the respective form from the drop-down list for which the workflow is to be configured.
- Name the Rule.
- Select the status checkbox for the rule to be Active and provide a description.
- Select the Trigger process - Here you have options like Create, Edit, Create or Edit, Approve, Reject etc. Here, if you select Field Update, the workflow will be executed when a specific field or more than one field is updated. Further, there are two options in Field Updates - 1.Execute the rule when any one of the selected fields is updated. 2.Execute the rule when all of the selected fields are updated.
- Set criteria if needed. Here there are options like System Fields and Form Fields. System Fields (Role, Department, Designation and Location) is default for all forms whereas Form Fields will list all the fields belonging to the selected form and these fields will differ based on the form selection.
- Under Action, you have options like Mail Alerts, Checklists, Field Updates, Webhooks, Custom Functions etc. from which you can choose.
- Click the Folder icon to list the predefined templates that has been configured for the particular form
- To create a new template, click the + icon.
- Select one or more templates.
- Click Save.
Example Scenario for Workflow process
A new employee is joining your organization. The New Employee process includes different tasks that have to be assigned to individuals or group of members by an HR executive. Below are few example tasks.
- Sending a welcome email to all organization members.
- Notifying the admin department to provide laptops, desk phone etc,.
- Informing the IT Department to configure system and the desk phone for the new employee
- Communicating to the manager of the employee to allocate a place.
- Informing the Finance Team to enroll benefit plans for the new employee.
All these can be done with the help of workflows. Click here to know how you can automate your entire onboarding process with the help of workflows.
Example scenario for Field Update
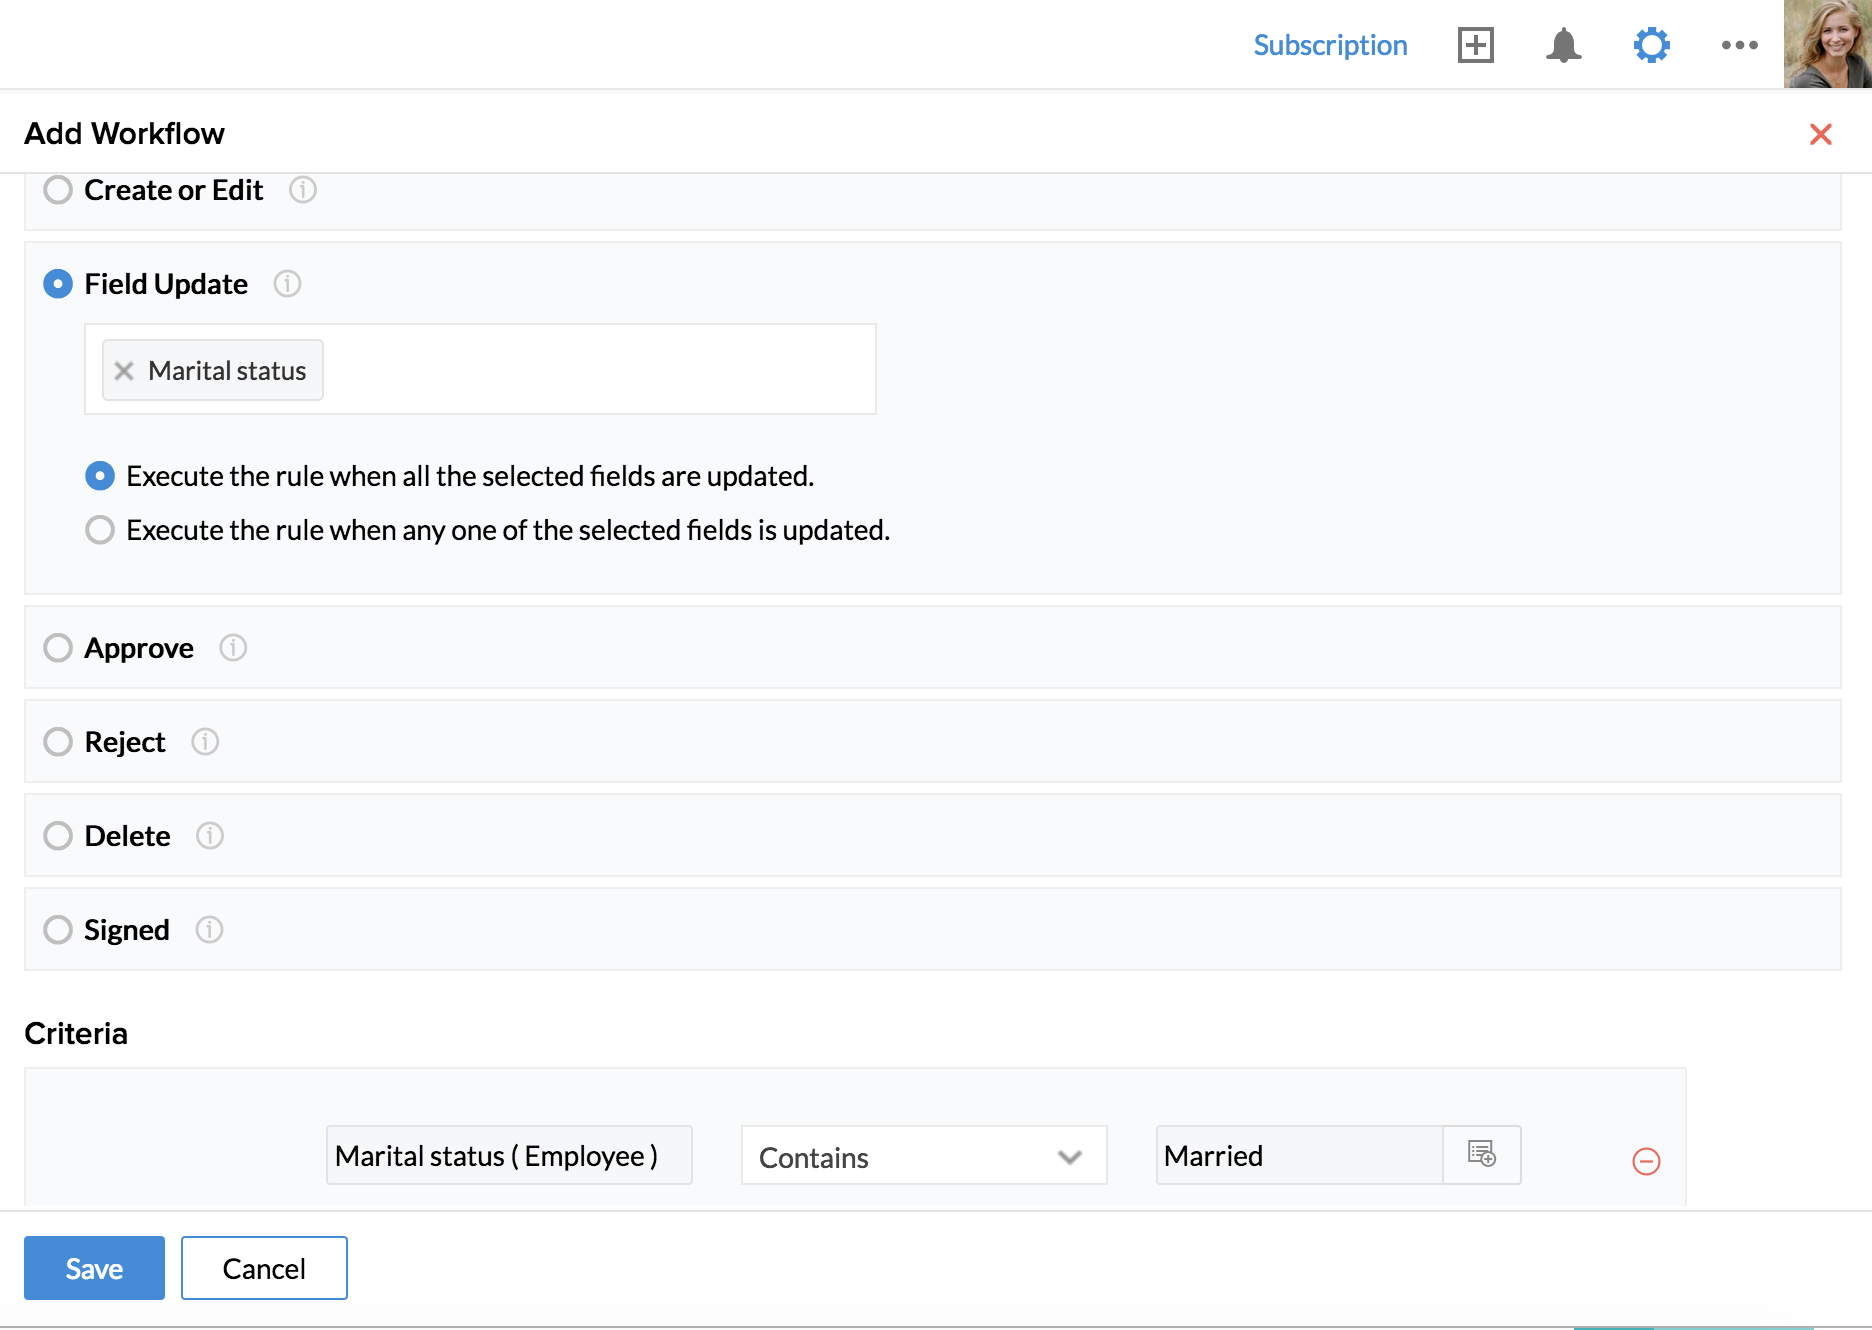
As soon as an employee changes the Marital status as Married in the employee form, you can have an email sent automatically to wish them. A workflow can be configured for this purpose.
To configure the Field Update:
- From your home page, go to Settings > Automation > Workflow
- Click Add Workflow.
- Select Employee in the Form name.
- Select Field Update under Action.
- Click Execute the rule when any one of the selected fields is updated.
- Select the Marital Status option from the drop-down list .
- Click Set Criteria.
- Select the criteria as Marital Status, Contains (under the second tab) Married (under the third tab).
- Under Mail Alerts, select an existing email template or click on the + icon to create a new one.
- Click Save.
Date Based Action
Reminders can be created using the Date Based Action option. This date based execution option lets you pick a date field from a record in the form and allows you to define the day and time for the rule to be triggered.
- From your home page, go to Settings > Automation > Workflow > Add Workflow.
- Select Form Name.The form you select should contain the respective date field for the workflow to get triggered.
- Provide the Workflow Name.
- Select the status checkbox for the rule to be Active and provide a description.
- Choose Action as Execute based on Date.
- Select respective Field Name. All of the date fields in the form for which the rule is being created will be listed.
- Choose On, Before or After or Until from the drop-down list to set the Date of Execution.
- Select the appropriate Time of Execution in which the email has to be sent.
- Select the Execution Occurrence as One Time or Occurring Every Month or Occurring Every Year.
- Under Actions click the folder icon to map a mail alert .
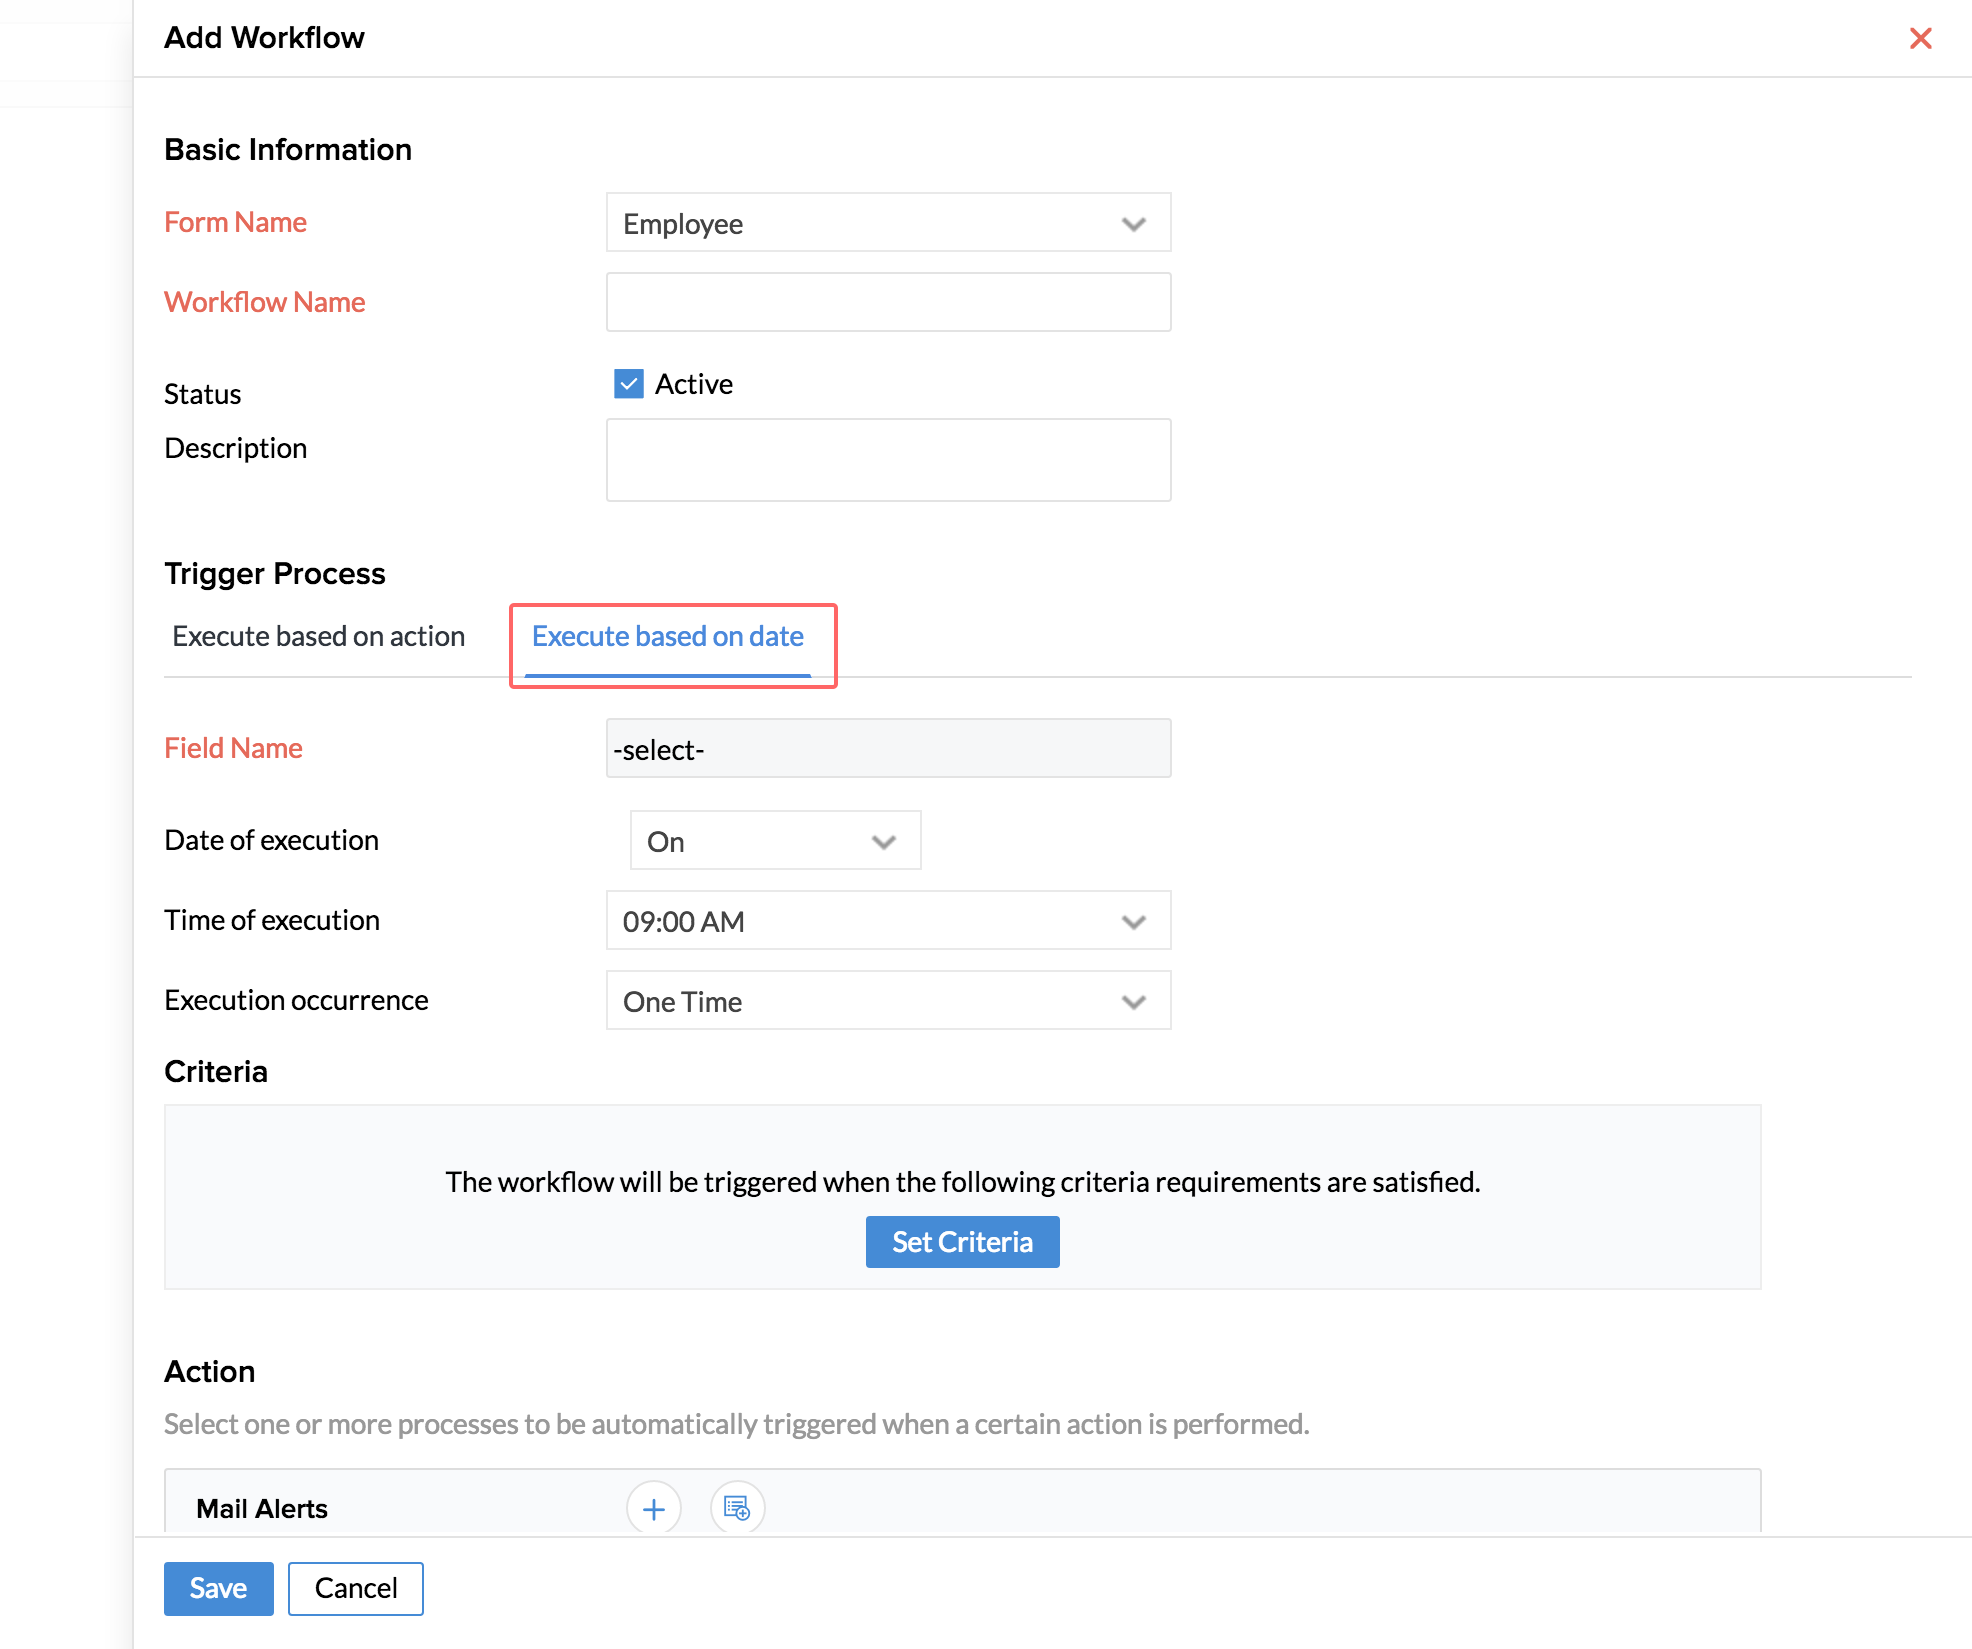
- Click Save.
Date of Execution terms explained:
- On - Workflow gets executed on that particular date and time.
- After - Workflow gets executed after the selected date and time.
- Before - Workflow gets executed before the selected date and time.
- Until - Workflow gets executed based on the start date until the end date.The start date drop-down list has four options:On,Before,After and Today. The options in the end date drop-down list will vary based on the option selected in the start date drop-down. For the Before and After options, you will need to enter the number of days. The Today option refers to the day on which the workflow is configured while On refers to the selected field's date.
Example scenario for Date Based Action - Contract Expiry Date
Reminding your employees on their contract expiry date before a month through email.
To configure a Date Based Action:
- From your home page, go to Settings > Automation > Workflow > Add Workflow.
- Select Employee in the Form Name.
- Provide Workflow Name as 'Reminding employees on their contract expiry date'.
- Select the status checkbox for the rule to be Active and provide a description
- Choose Action as Execute based on Date.
- In Date of Execution drop-down list, select Before and type number one in Month.
- Select 09.00 AM as Time of Execution.
- Select Execution Cycle as One Time.
- Under Actions click the folder icon to map a mail alert.
- Click Save.
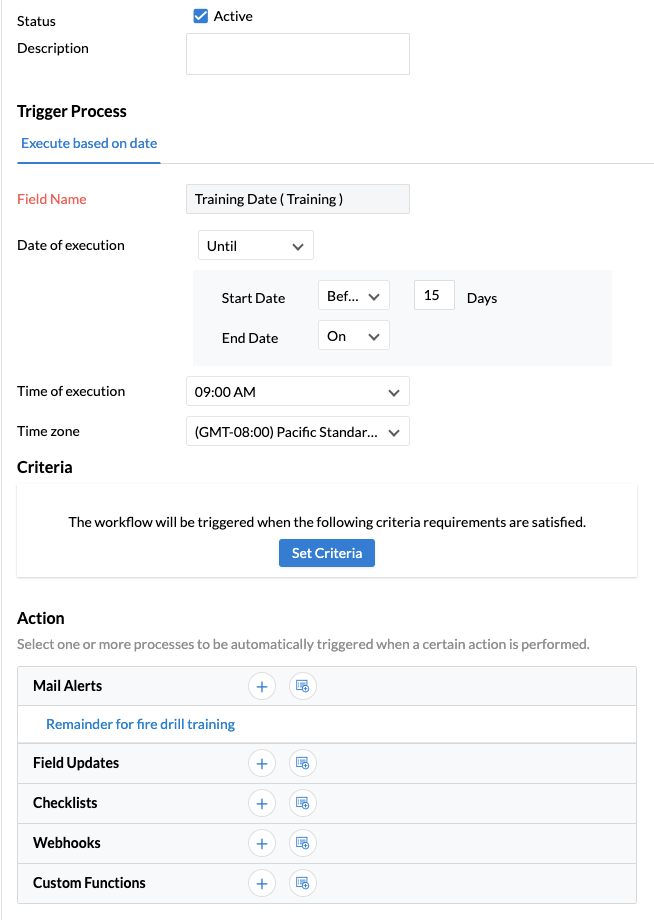
Example scenario for Date Based Action - Training date and time
Reminding your employees until their training date and time through Email.
- From your home page, go to Settings > Automation > Workflow.
- Select Training in Form Name.
- Provide 'Reminding employees on their training date and time' as Workflow Name.
- Select the status checkbox for the rule to be Active and provide description.
- Choose Trigger Process as Execute based on Date.
- Select Start date in the Field Name drop-down list.
- In Date of Execution drop-down list, select Until.
- Select Before from the Start Date drop-down list and provide value fifteen in the number of days box.
- Select On from the End Date drop-down list.
- Select 09.00 AM as Time of Execution.
- Under Actions click folder icon to map a mail alert(Training date and time).
- Click Save.

Example scenario for Date Based Action - Confirmation of new employees after six months along with the confirmation letter
Sending a confirmation letter to employees after six months of their joining in the organization. You can configure a workflow by setting a email notification to be sent along with the confirmation letter as attachment to all employees after six months of their joining date.
- From your home page, go to Settings > Automation > Workflow > Add Workflow.
- Select Employee form in Form Name.
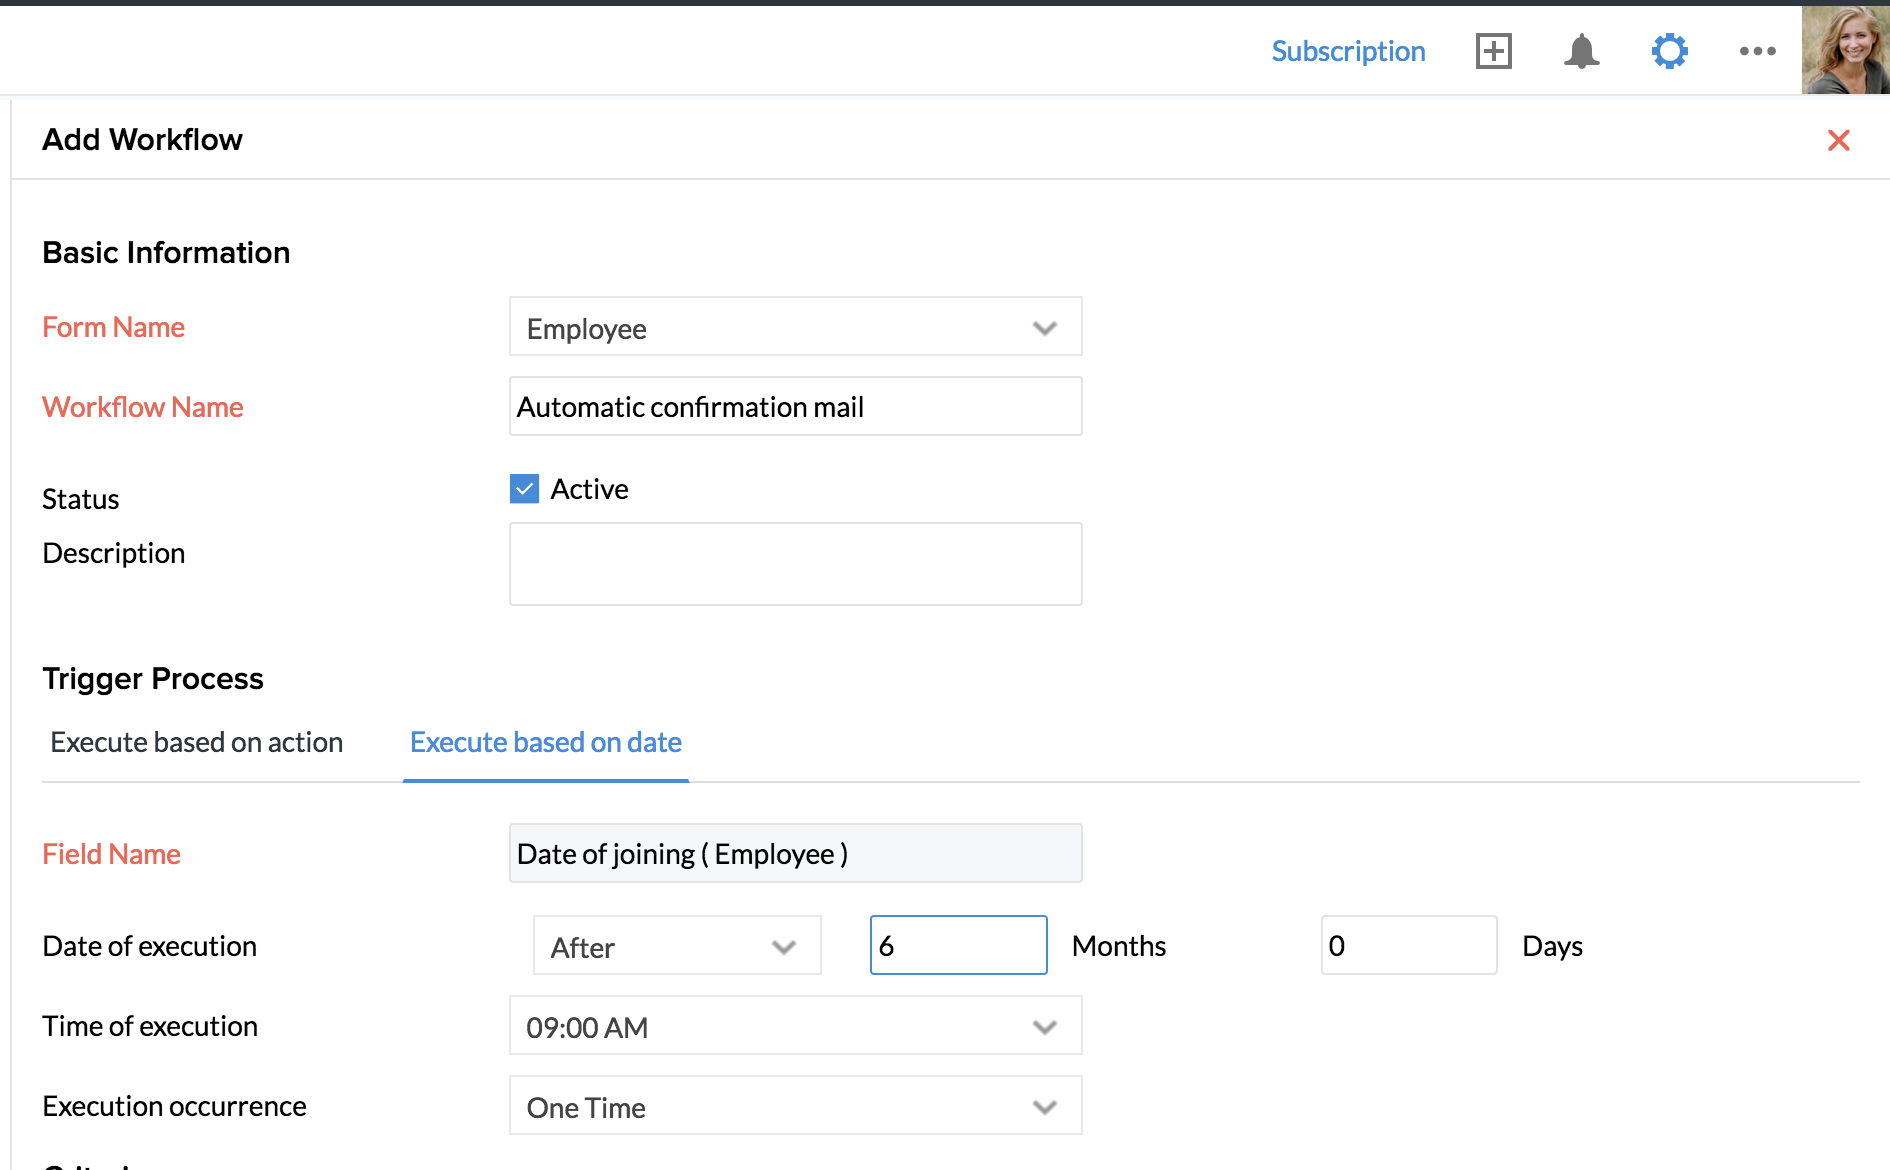
- Provide 'Automatic confirmation mail' as Workflow Name.
- Select the status checkbox for the rule to be Active and provide description as Automatic confirmation mail after 6 months service in the company.
- Choose Trigger Process as Execute based on Date.
- Select 'Date of Joining' under 'Field Name' .
- Provide Date of Execution as After 6 Months 0 Days.
- Select 09.00 AM as Time of Execution.
- Select One-Time from Execution Occurrence drop-down list.
- Under Actions, click + icon to create a new mail alert.
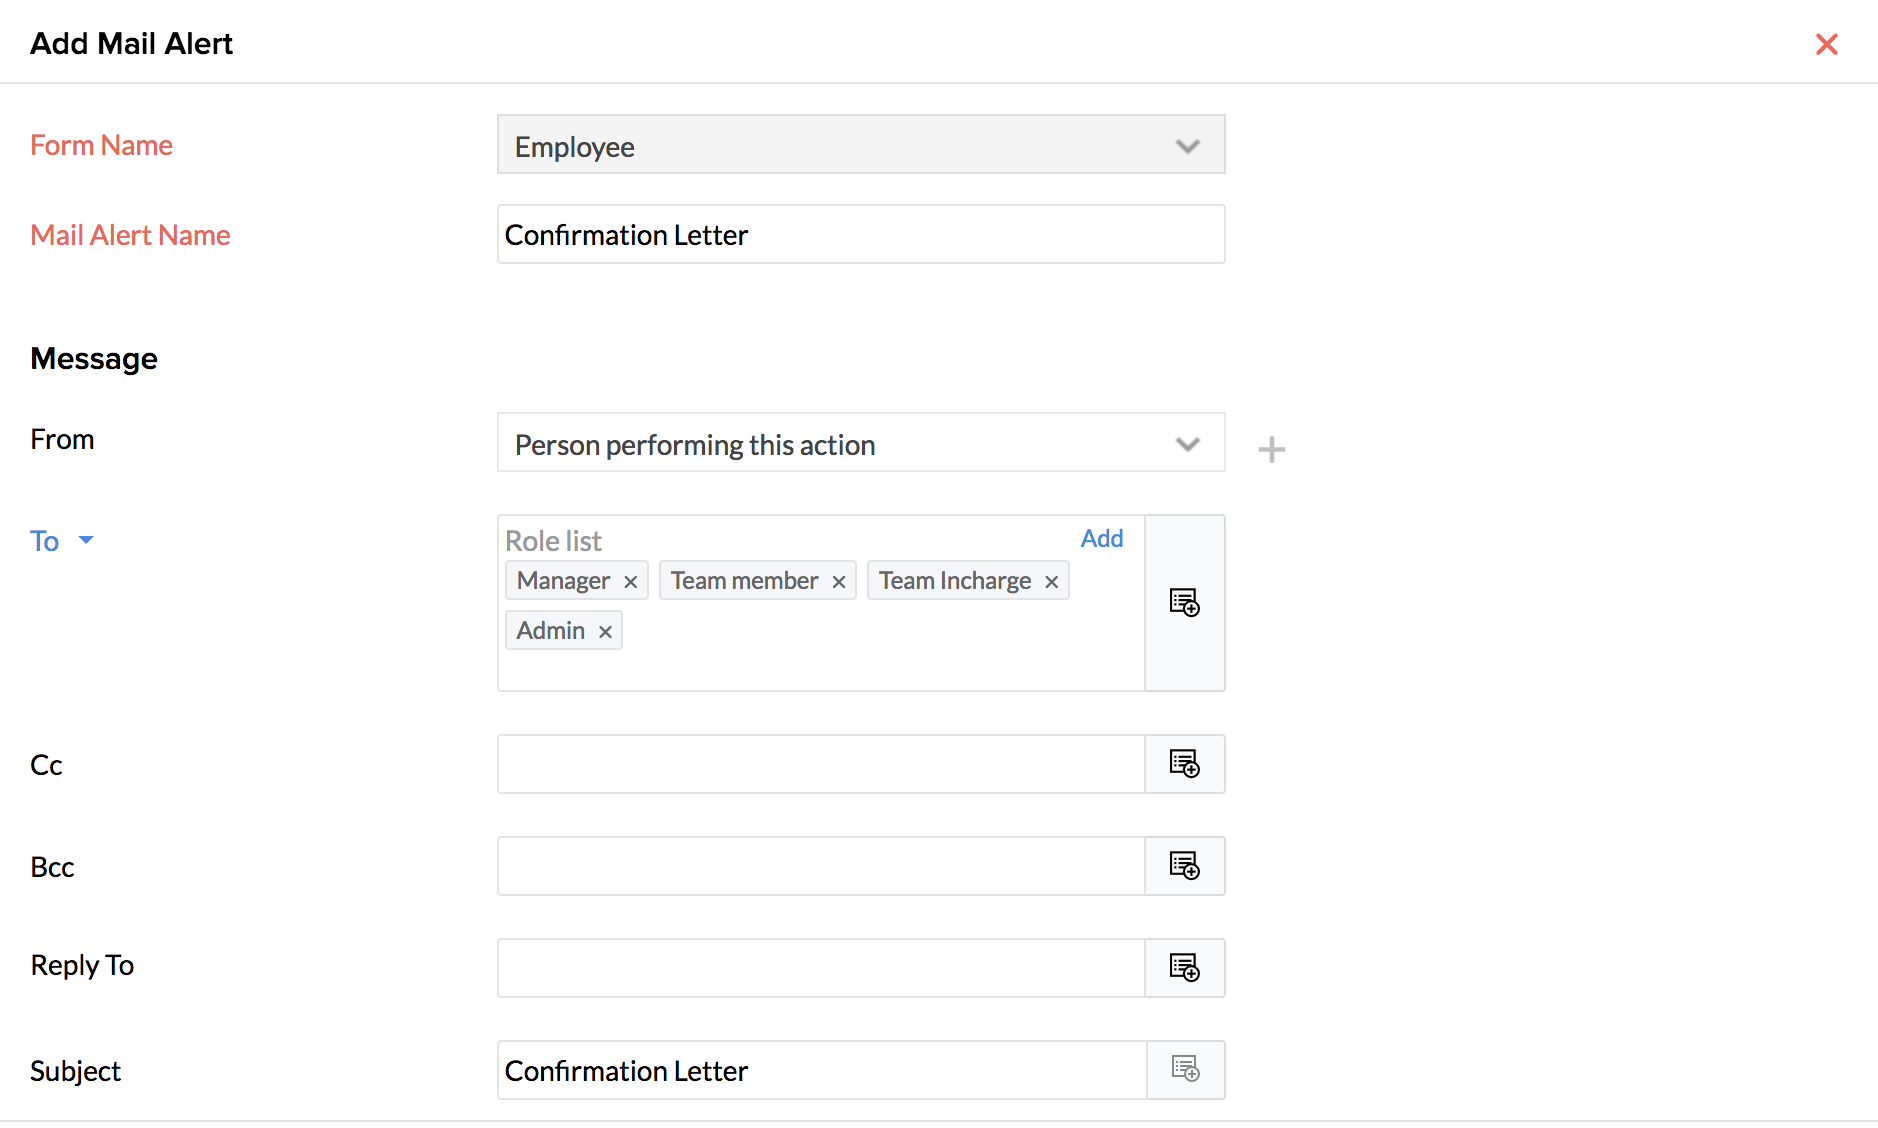
 Tip : Click here to know more about creating Record templates and here to know about Mail Merge templates
 - Give a name for the mail alert - for Eg- Confirmation of Employees.
- Give 'From' and 'To' - for 'To' you can select all the Roles under the 'Roles' option if you would the email to be sent to all employees.
- Give CC, BCC and Reply to if needed.
- Enter a Subject - For eg - 'Confirmation Letter'.
- Under 'Message', click on 'Create New template'.
- With the help of available merge fields, type a message.
For eg - Dear ${FirstName} ${LastName}
Attached is your confirmation letter. We congratulate you for getting confirmed in your job and wish you all success.
Regards
HR Team
- Under 'Attachments', you have two options - a. To select a template from 'Record Templates' and b. To select a template from 'Mail Merge Templates'
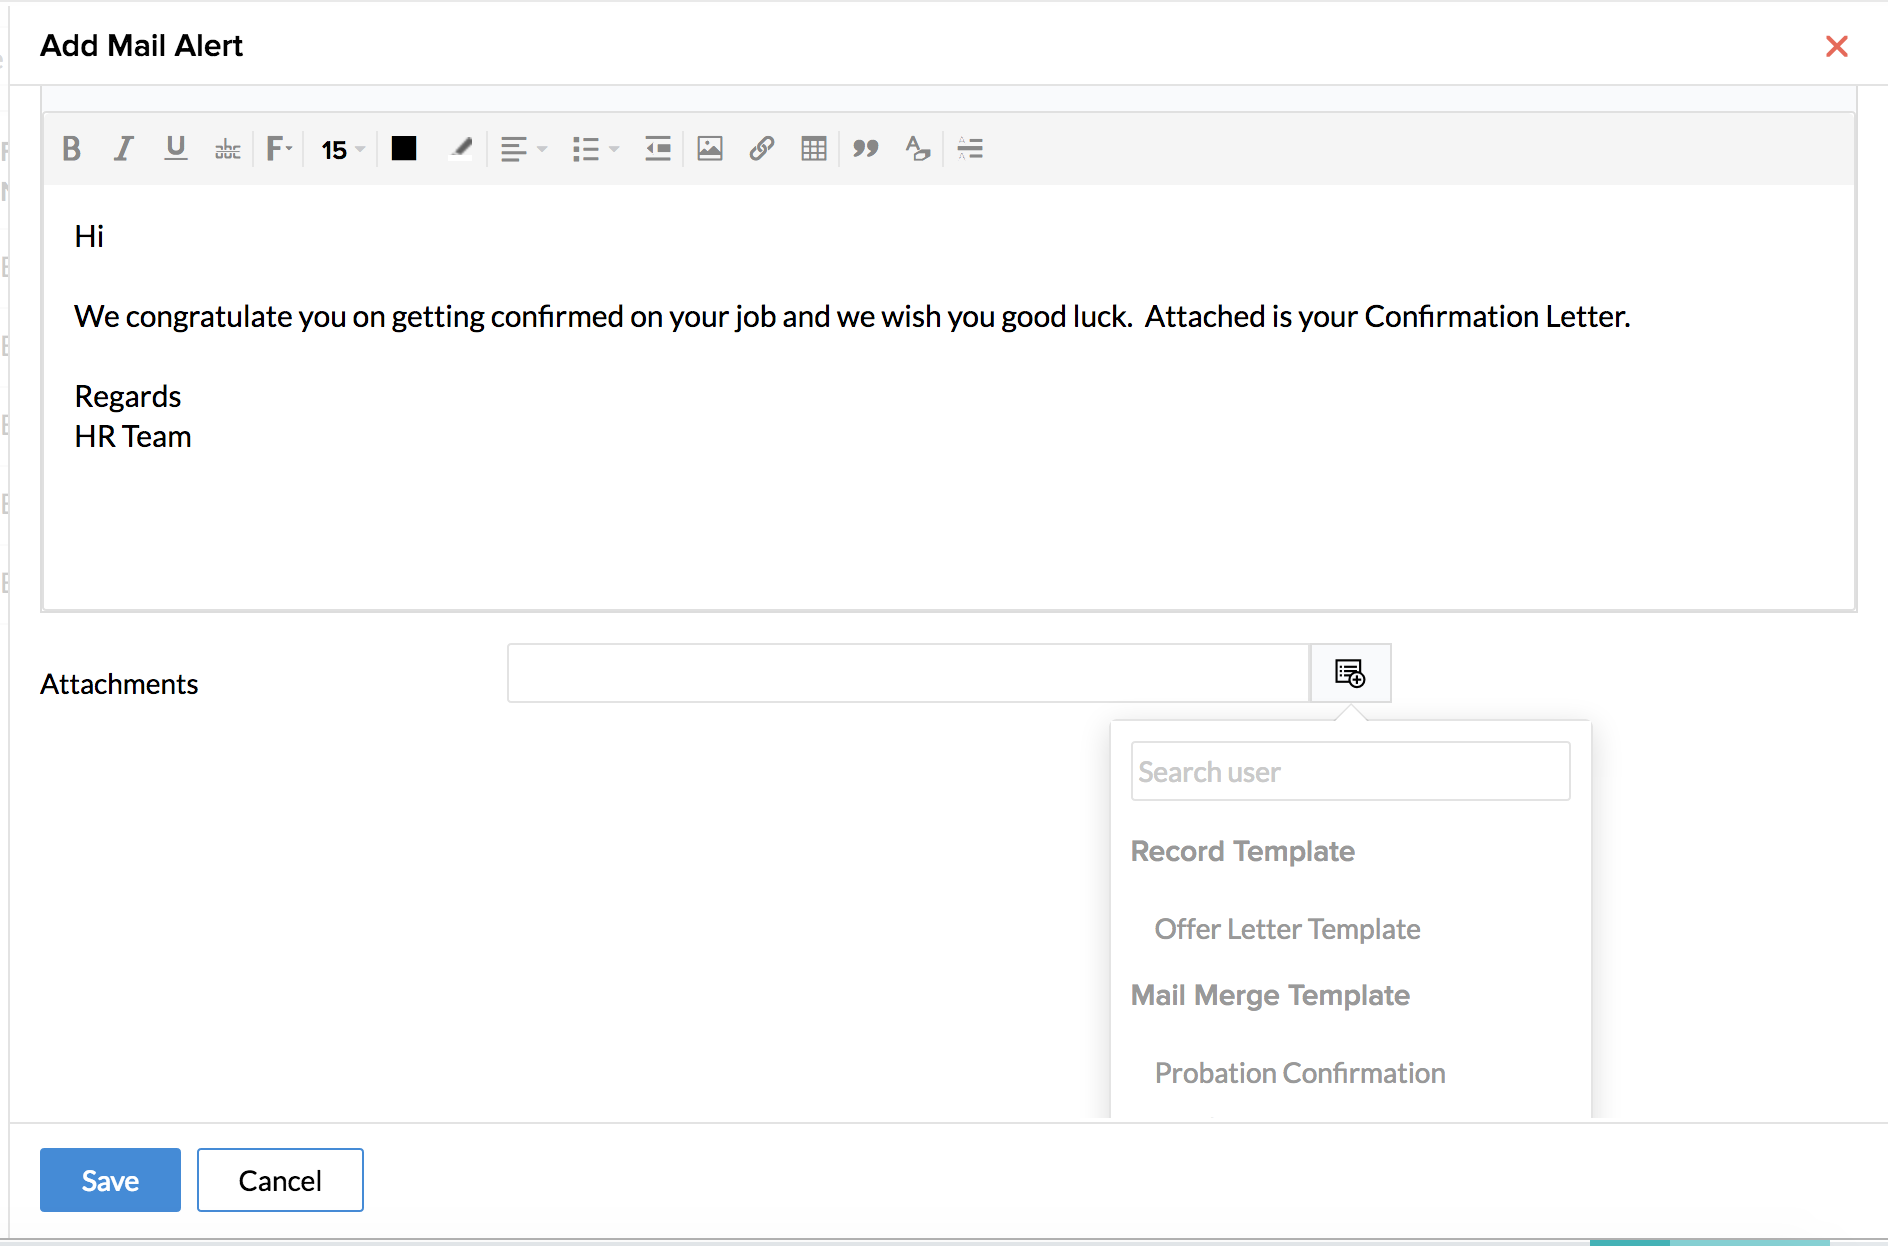
- Make the selection appropriately and click Save.
- In the workflow, click Save.
Now a workflow has been created. After completion of six months from the Date of Joining, an email will be sent to employees with the confirmation letter as an attachment.
Example Scenario for Date Based Action - Work Anniversary
Sending an email to wish employees on their work anniversary.
- From your home page, go to Settings > Automation > Workflow > Add Workflow.
- Select Employee form in Form Name.
- Click +Add Workflow.
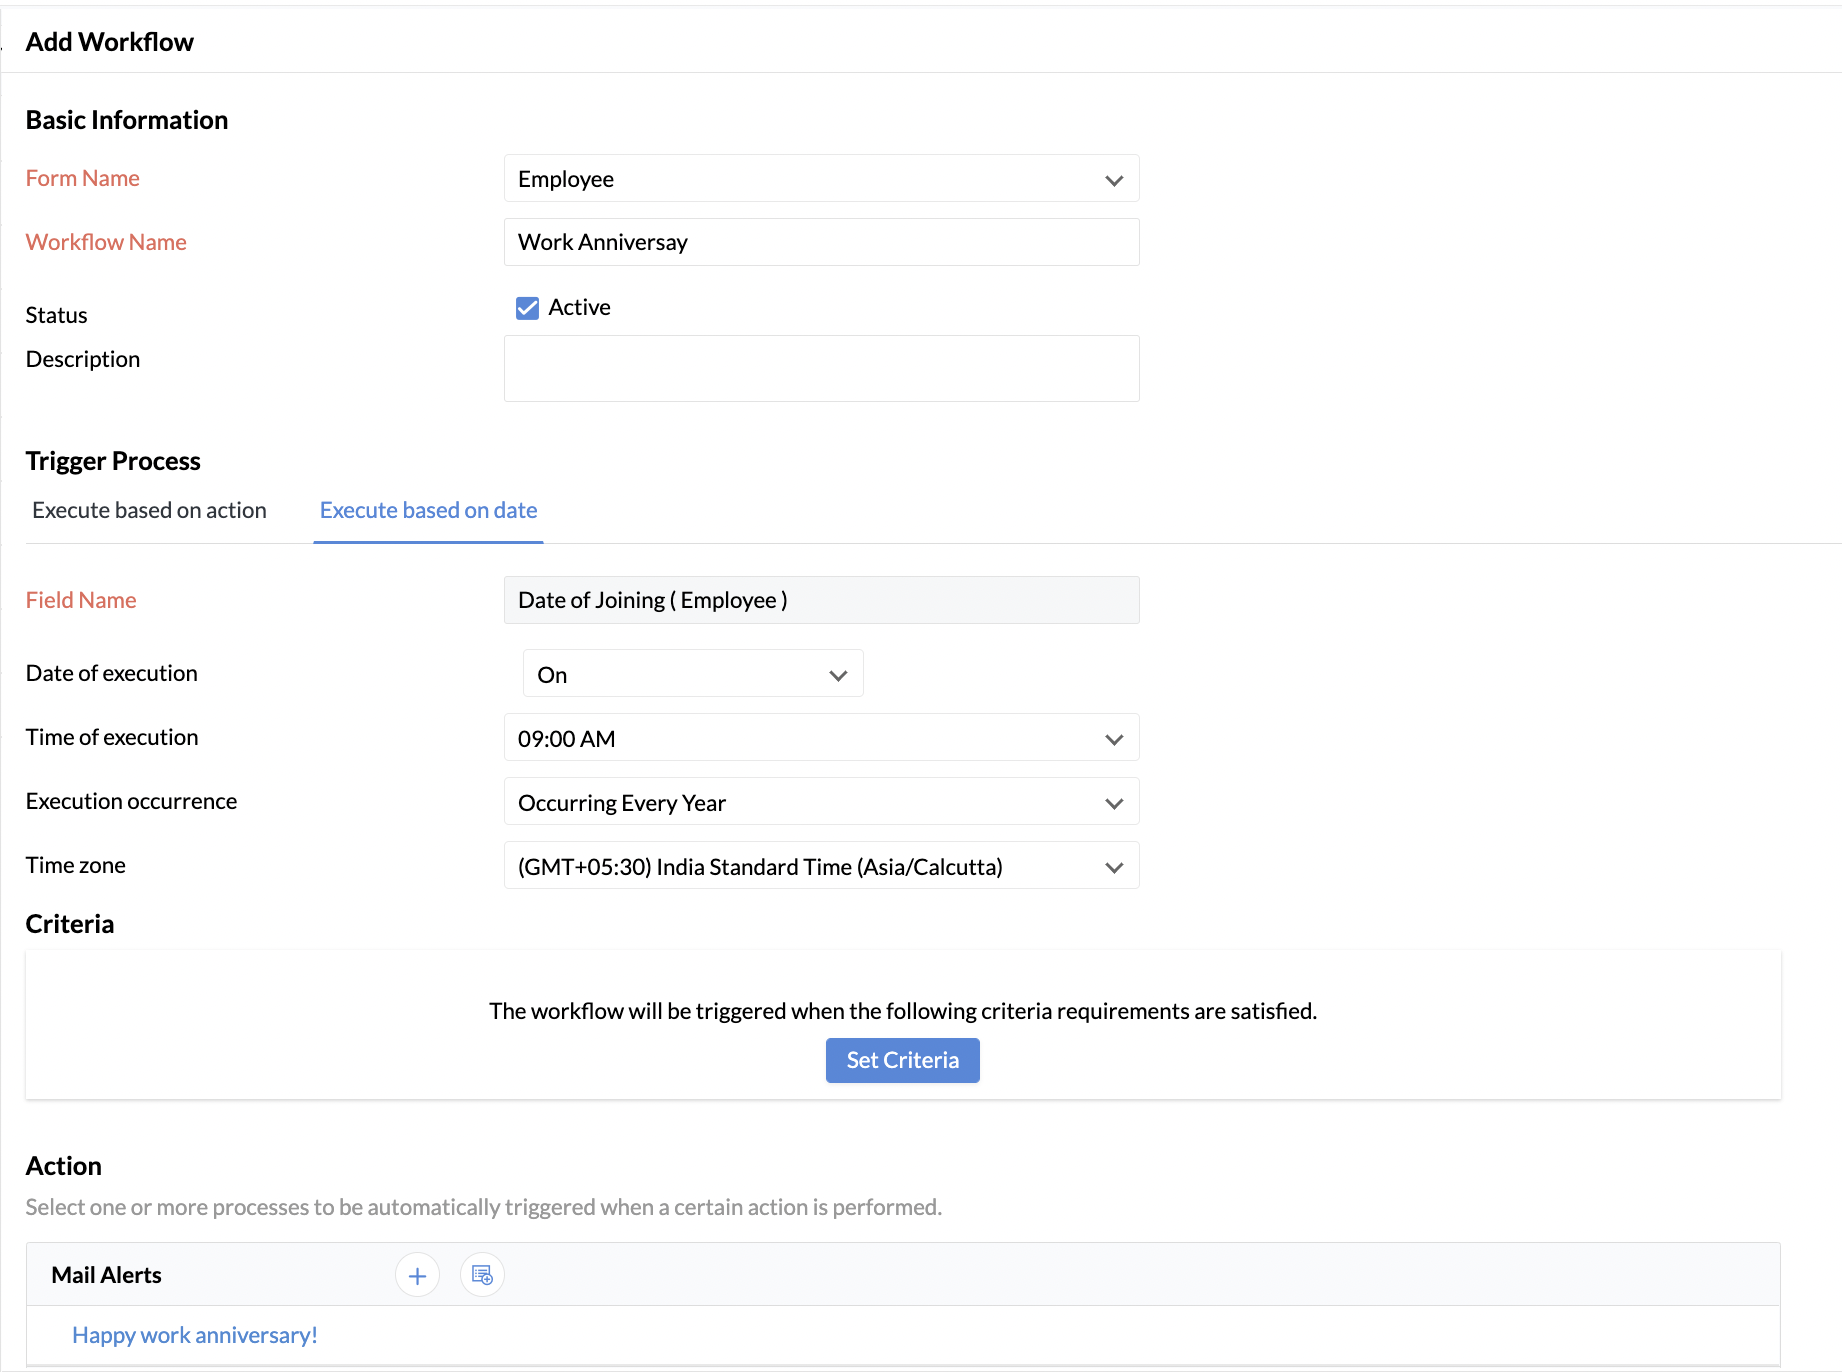
- Enter Work Anniversary as the workflow name.
- Under Trigger Process, select Execute based on date tab.
- Select Date of Joining under Field Name.
- Select On under Date of execution.
- Select Occurring Every Year under Execution occurrence.
- Under Action, select the email alert to send for wishing employees on their work anniversary.
- Click Save.

Time-Based Action
Time-Based Action: Executes the workflow when given a specific execution time. This is useful when you need to configure email alerts to be sent even minutes before an event.
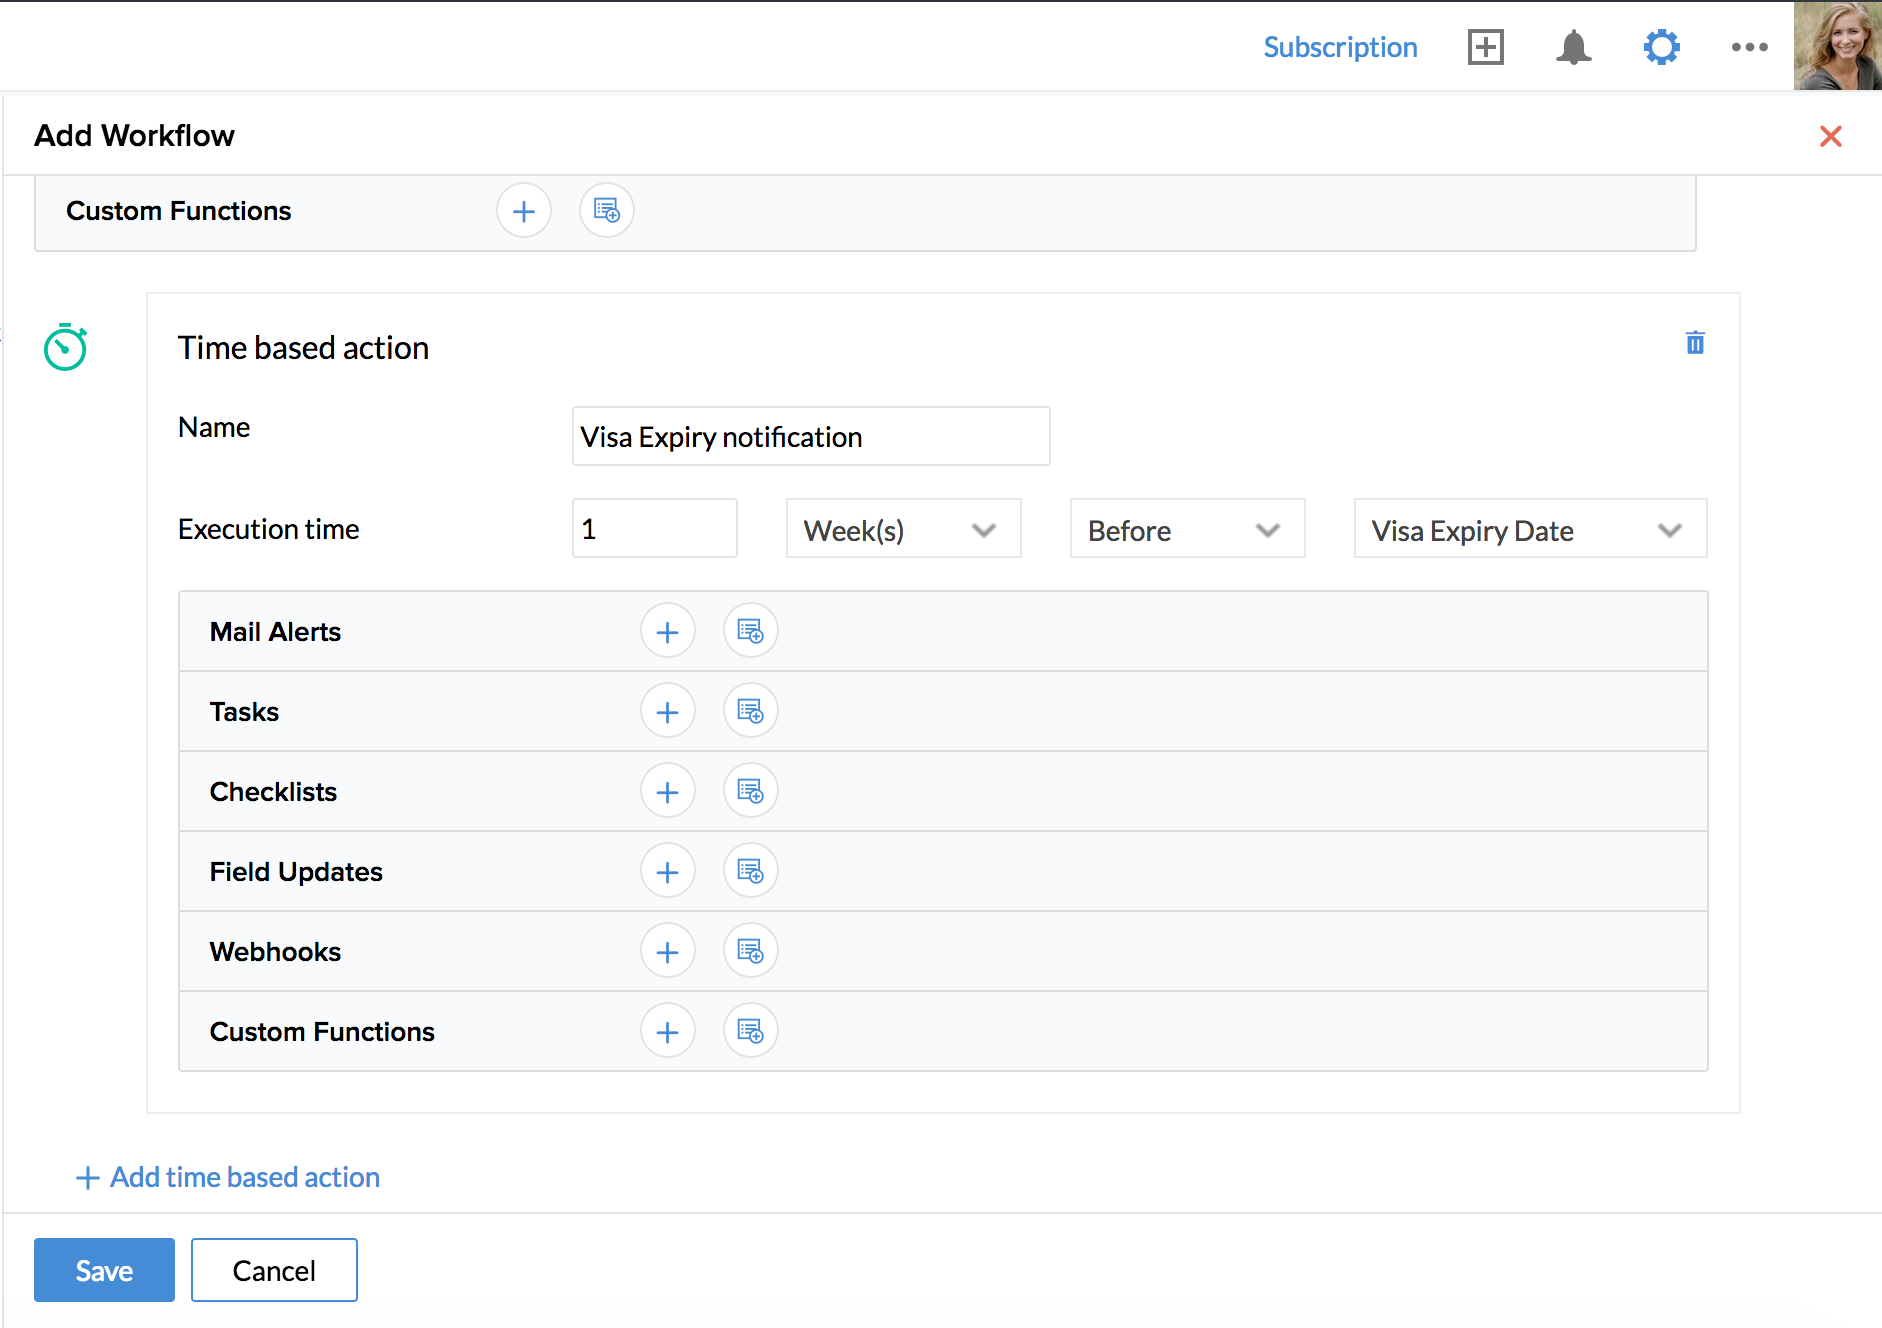
Example scenario for Time-Based Action - Visa Expiry Date
Reminding your employees on their visa expiry date. When you provide specific execution time in the Time-Based Action, a one-time alert email will be sent to the employee.
To configure a Time-Based Action:
- From your home page, go to Settings > Automation > Workflow.
- Click Add Workflow.
- Select Employee in the Form name.
- Select Create or edit under Action.
- Click Add Time-Based Action.
- Select the required Visa Expiry Date option in Execution Time.
- Click on the 'Mail Alert' to map an existing email template or click on the + icon to create a new template.
- Click Save.
Note:
- Execution Time contains four options. Type the required number in the first box, choose any one option in the second drop-down list for Minutes, Hours, Days, Months and Years, select any one option in the third drop-down list for After and Before and then choose the required option in the fourth drop-down list.
- Rule Trigger Date is possible only after the rule is triggered. Thereby, the After option is only available for Rule Trigger Date.
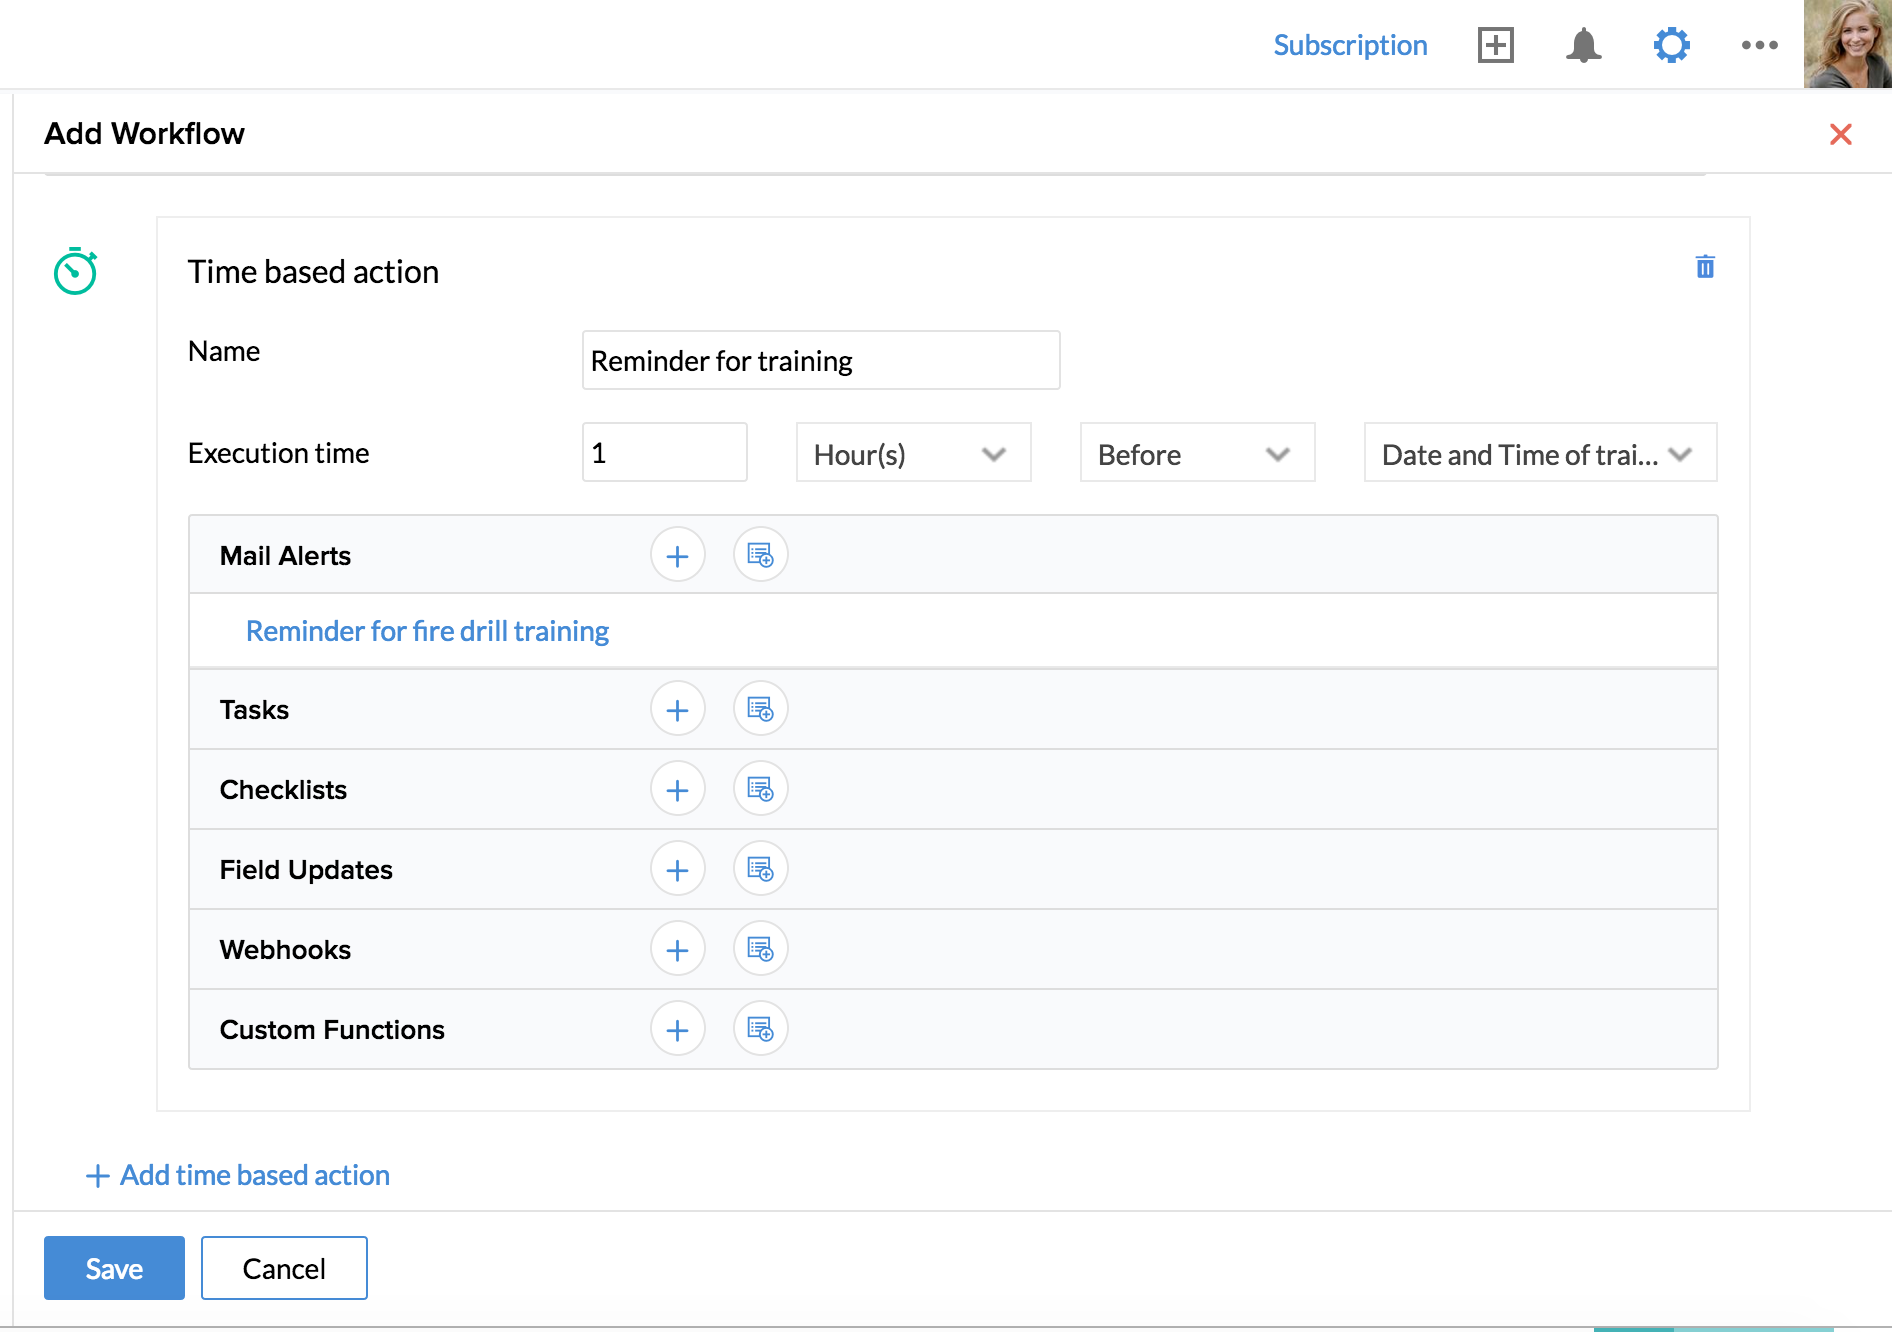
Example scenario for Time-Based Action - Training date and time
Reminding your employees on their training date and time. When you provide execution training time and date in Time Based Action, an email can be sent to the employees.
To configure Time-Based Action:
- From your home page, go to Settings (gear icon)> Automation > Workflows > Add Workflow.
- Select Registration in the Form name.
- Provide Workflow Name. Eg - Reminder for Training.
- Select the status checkbox for the rule to be Active and provide description.
- Choose Trigger Process as Execute based on Action.
- Select Create or Edit under Action.
- Click Add Time Based Action.
- Provide a Name and provide Execution Time as 1 Hour Before Date and Time of Training.
- Click folder icon in Mail Alert and select the name of the mail alert or click + to configure a new email alert.
- Click Save.
Note: In the fourth drop-down list of Execution Time, only the date fields of the specific form will be listed. If you want to add more date fields, please add it manually in the Form Customization page after selecting the specific form.