Table of Contents
- Purpose
- Configuration of checklist
- Use case I - Employee Onboarding Checklist
- Use case 2: Travel Request checklist
- Use case 3: Laptop request checklist
- Triggering Checklists
- Actions after Checklist Completion
- Editing and Deleting Checklists
- Adding Serial Tasks
- Viewing Status of Checklist Tasks
- Changing Status of Checklist Tasks
- Checklists Associated with a Record
Purpose
Checklists are a series of tasks of HR processes like recruitment, performance review, induction process, new joinee process, employee exit process etc., In other words, it's a simple to-do list used to define your HR workflow actions. The corresponding checklist will be triggered whenever a record is created, edited, either created or edited, approved or rejected and the respective task owner(s) will be notified automatically through an email about the task(s) assigned.
Checklists function is used when you would like to assign some tasks based on some trigger. When an employee joins your organization, you will have the need to create a checklist with things to be done before the employees join - like arranging for the desk, phone, laptop etc.
There are other scenarios too like the Exit process of an employee. Before the employee leaves the organization, you will need a checklist to list the things to be collected from the employee, forms to be filled etc. Checklists can be used here.
Configuration of checklist
Administrators can create and assign checklist tasks to co-workers, individuals, departments, and roles. Checklists are created based on the forms that are available in your organizational account. You can create multiple checklists for each individual form.
Creating a New Checklist
- Click Settings > Automation > Actions > Checklists & Tasks
- Click on 'Add Checklist'
If you have task templates already created, you can simply map the existing tasks to the checklist. If you would like to add new tasks for this checklists, follow the steps given below.
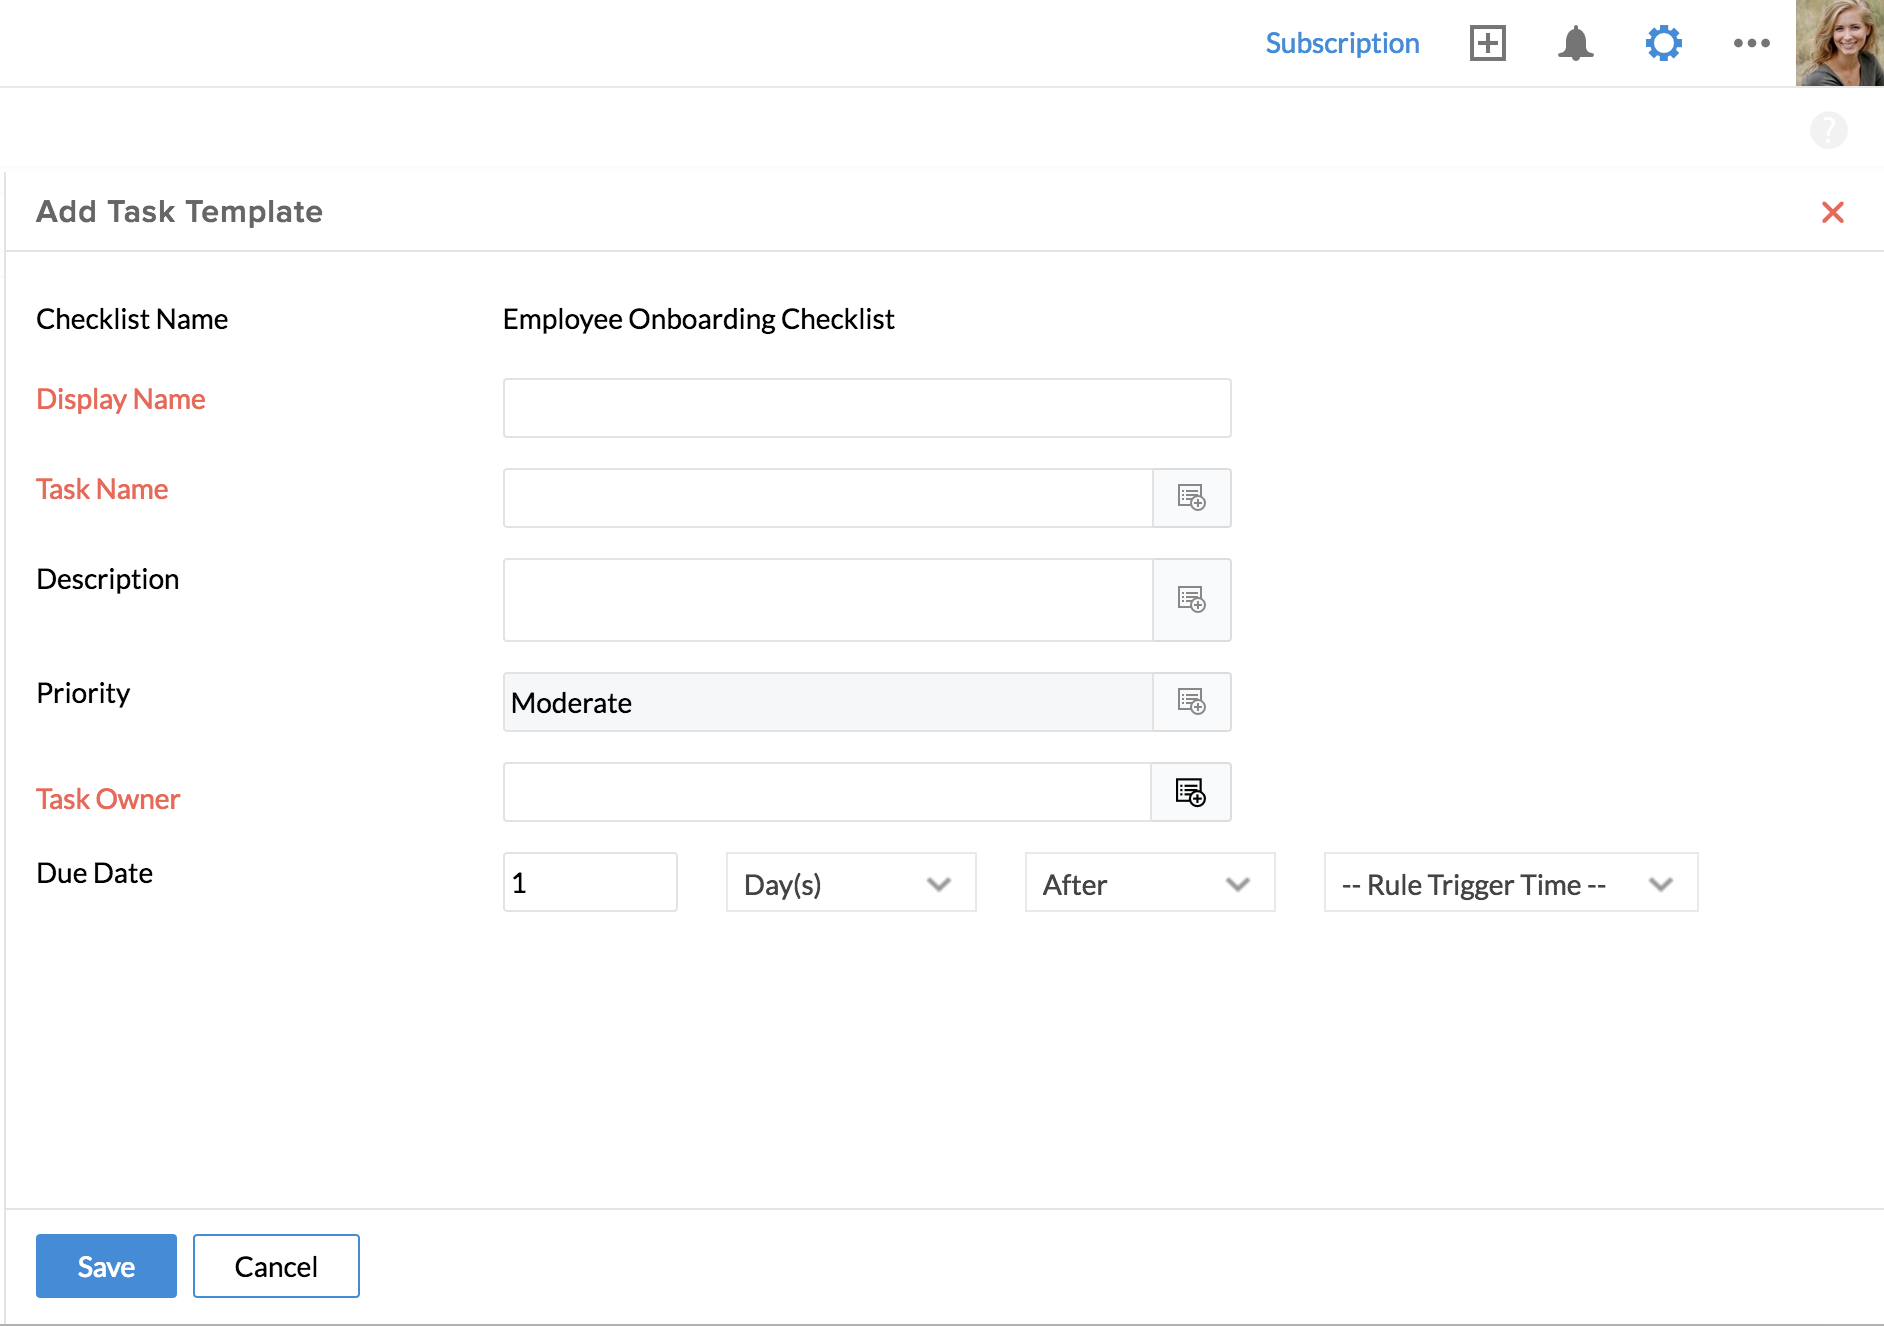
- Click on 'Add New Task'
- Give a 'Display Name' and 'Task Name' - for the 'Task Name', you can make use of the list icon and pick fields, the values of which will get changed dynamically based on the record
- Give a description if needed
- Set Priority
- Under 'Task Owner', make a selection from options like Employee, Role, Team, Groups etc.
'Form Field' will display the lookup fields of the form for which the checklist is created. Under 'System Options', you will be able to see options like 'Department Head of record owner' etc. These options will be listed irrespective of whether they are available as one of the fields in the form chosen.
- Under 'Due Date', select the number of Day(s)/Month(s)/Week(s)/Year(s) as required
Here, in the drop-down, you will be able to see the Date fields of the form listed
- Click Save
You can create more task templates similarly for the checklist created.
Useacase 1: Employee Onboarding Checklist
Here is a basic and a simple scenario of how checklists can be used in an organization. Let us consider the new joiner onboarding process: When a new employee joins an organization, the basic things that the HR must do is to create login access for the employees, provide ID card, allocate a place, provide work computer, phone, configure system, enroll employees in the benefit plans, etc., You can eliminate this tiresome process by creating automated checklists.
Configuring checklists for new joiners
This is a two-step process.
Step 1: To create a checklist with a set of tasks
Step 2: To create a workflow and map the checklist
Step 1: To create a checklist:
A checklist can contain a number of parallel tasks and serial tasks. Parallel tasks can be completed simultaneously whereas serial tasks are triggered one after the other. I.e - On completion of one task, the other gets triggered. In this example of Employee Onboarding, there could be parallel tasks like Procuring Laptop, Allocating a desk, Enrolling the employee in welfare policy etc. To the task 'Procuring Laptop', there could be serial tasks like 'Installation of OS', 'Connecting the desk phone to the laptop' etc. This means, the task 'Procuring Laptop' should be completed first for the serial tasks, 'Installation of OS' and 'Connecting the desk phone to the laptop' to be triggered next. However, the other tasks like Allocating a desk, Enrolling the employee in welfare policy etc are parallel tasks which can be triggered simultaneously. Once each all the tasks are marked as complete, the checklist will show as Completed.
Follow the steps to add this checklist.
- Click Settings > Checklists & Tasks under Automation > Add Checklist
- Provide Form name and a name for the Checklist
- Click on 'Add New Task'
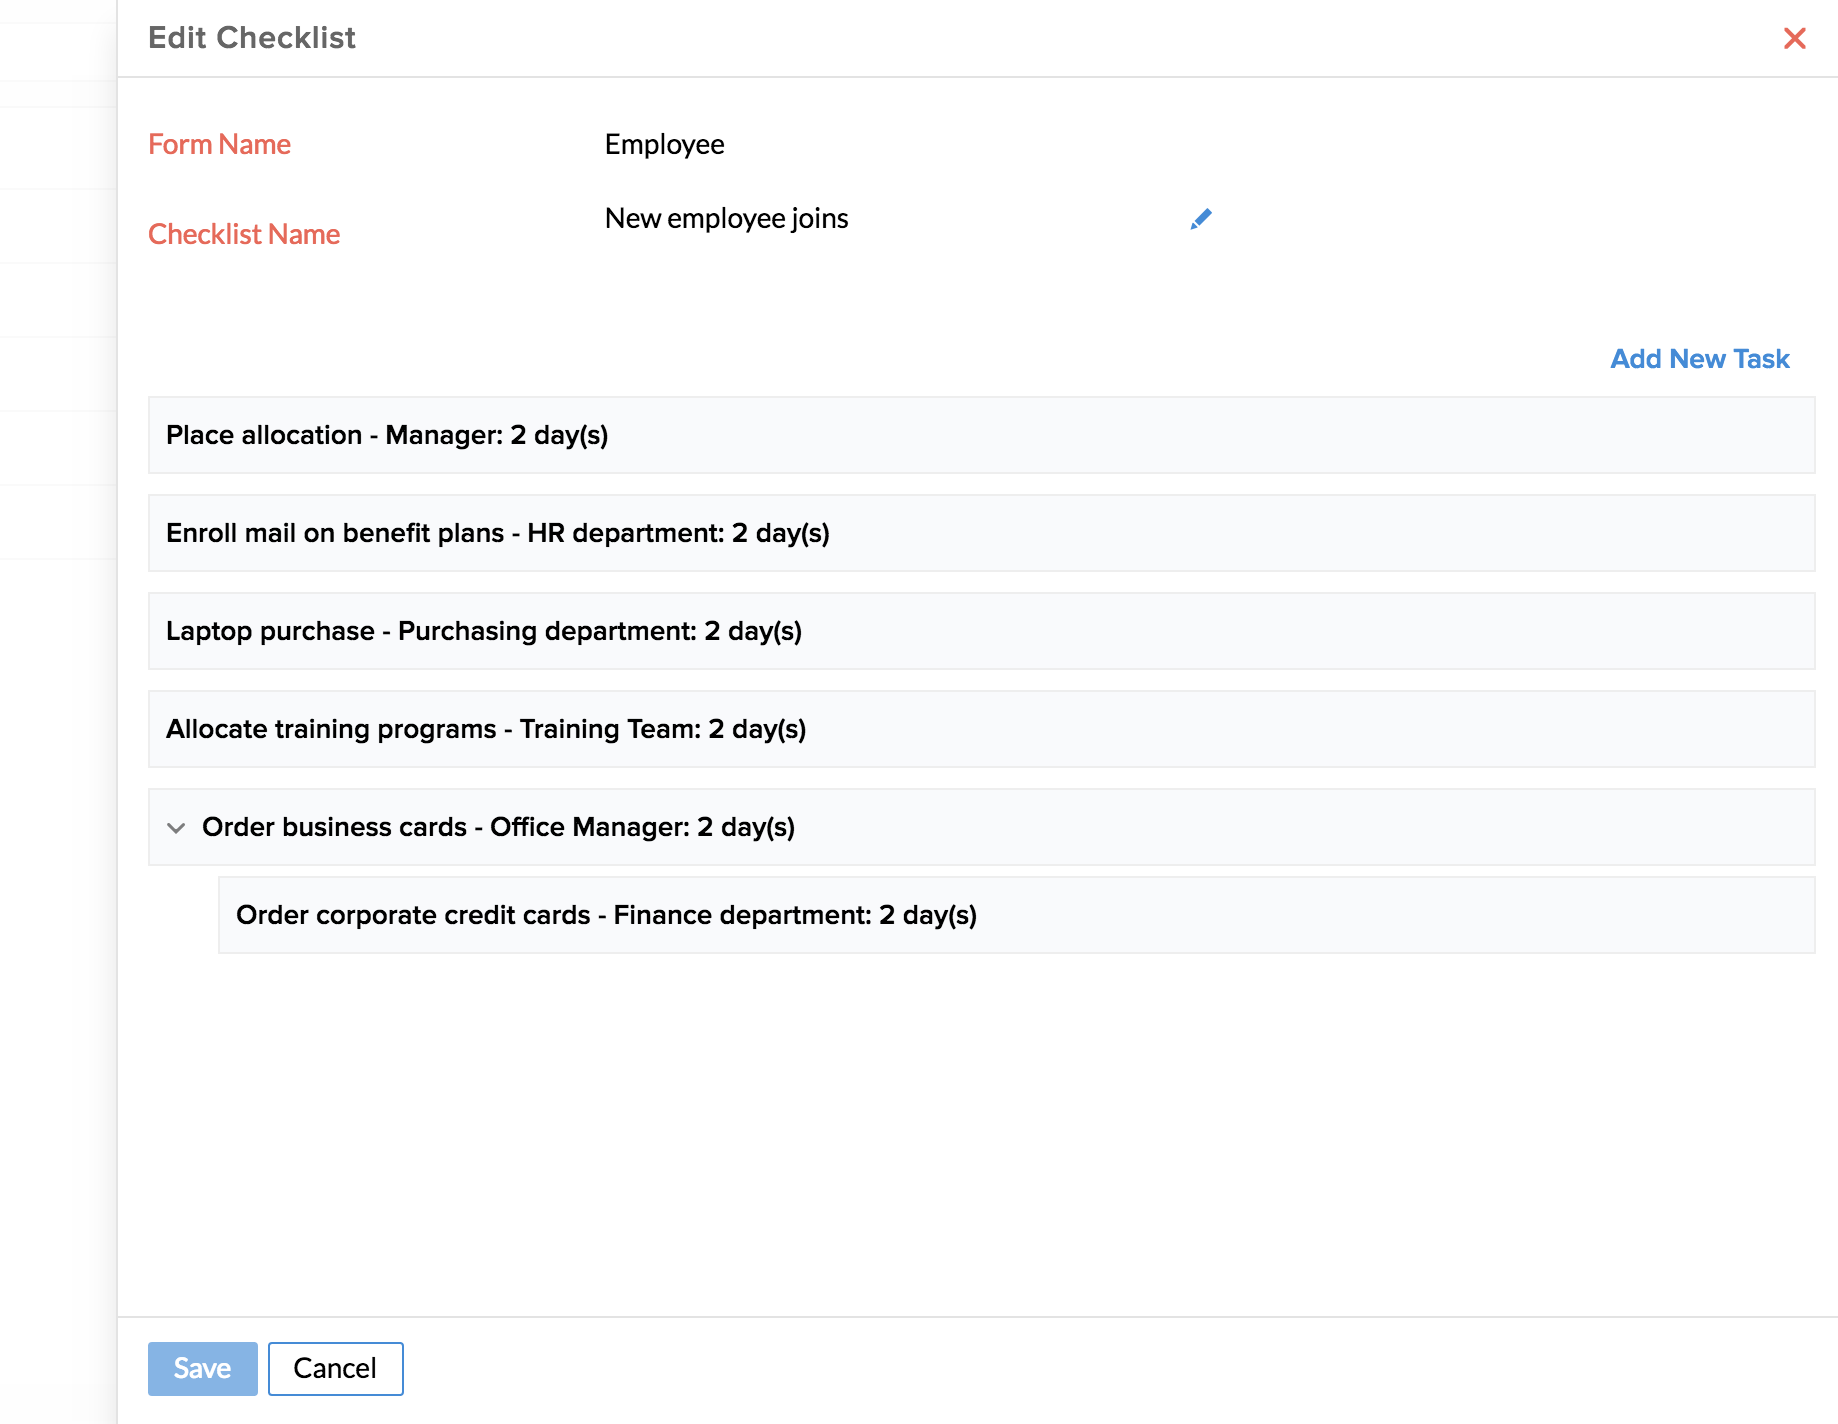
Below is the list of tasks that you need to add and assign to the new joiner onboarding process
- Allocate place for employee(s): Assign this task to the reporting manager of the employee with due date as 1 day before Date of Joining
- Enroll employee in benefit plans: Assign this task to the finance department with due date as 1 day after Date of joining
- Conduct induction program for new joiners: Assign this task to the HR department and give due date as 0 days before/after Rule Trigger Time
- Provide laptop for the new employee(s): Assign this task to the system administrator department. You can also create a group with members like System Administrator, Reporting Manager etc and assign this task to the group.
- Setup system configuration: Assign this task to the IT department.
- Provide phone to employees: Assign this task to the system administrator department.
- Create login access and provide ID card: Assign this task to the HR department.
- Add tasks
- Assign individual, group, team, role or even based on form fields.
- Give a due date for the tasks

- Click Save if you have finished adding a task or click Save & New to add more tasks to the same checklist.
Drag and drop a task under another one to make it a serial task.
Step 2: Creating a workflow for on boarding process
You have created a checklist for the onboarding process. You can create a workflow and have the checklist mapped to it.
- From your home page, go to Settings > Automation > Workflows
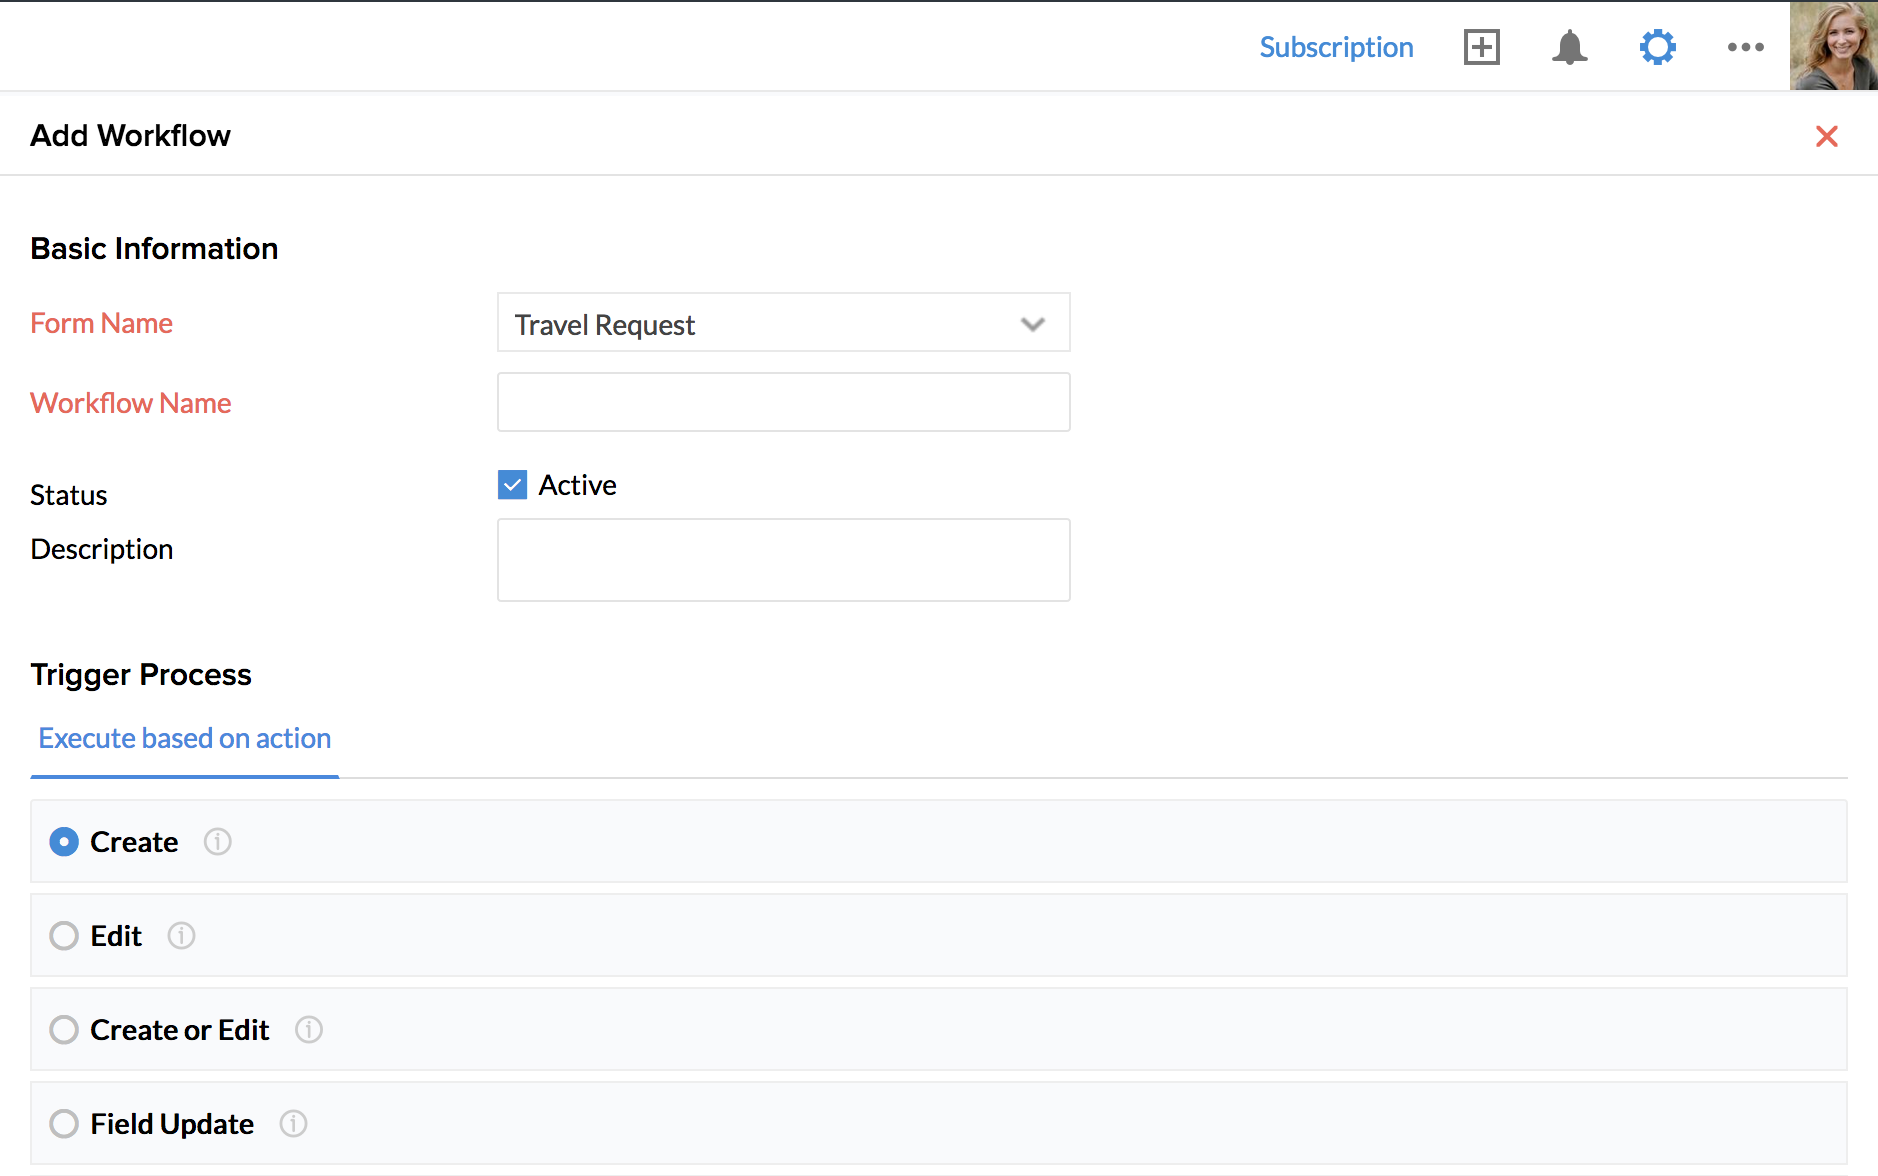
- Click on 'Add Workflow'
- Select the form name - in this case, it can be the Employee Form
- Give a name for the workflow - eg - Onboarding Checklist
- Keep the status as Active and give a description if needed
- Under 'Trigger Process', select 'Create'
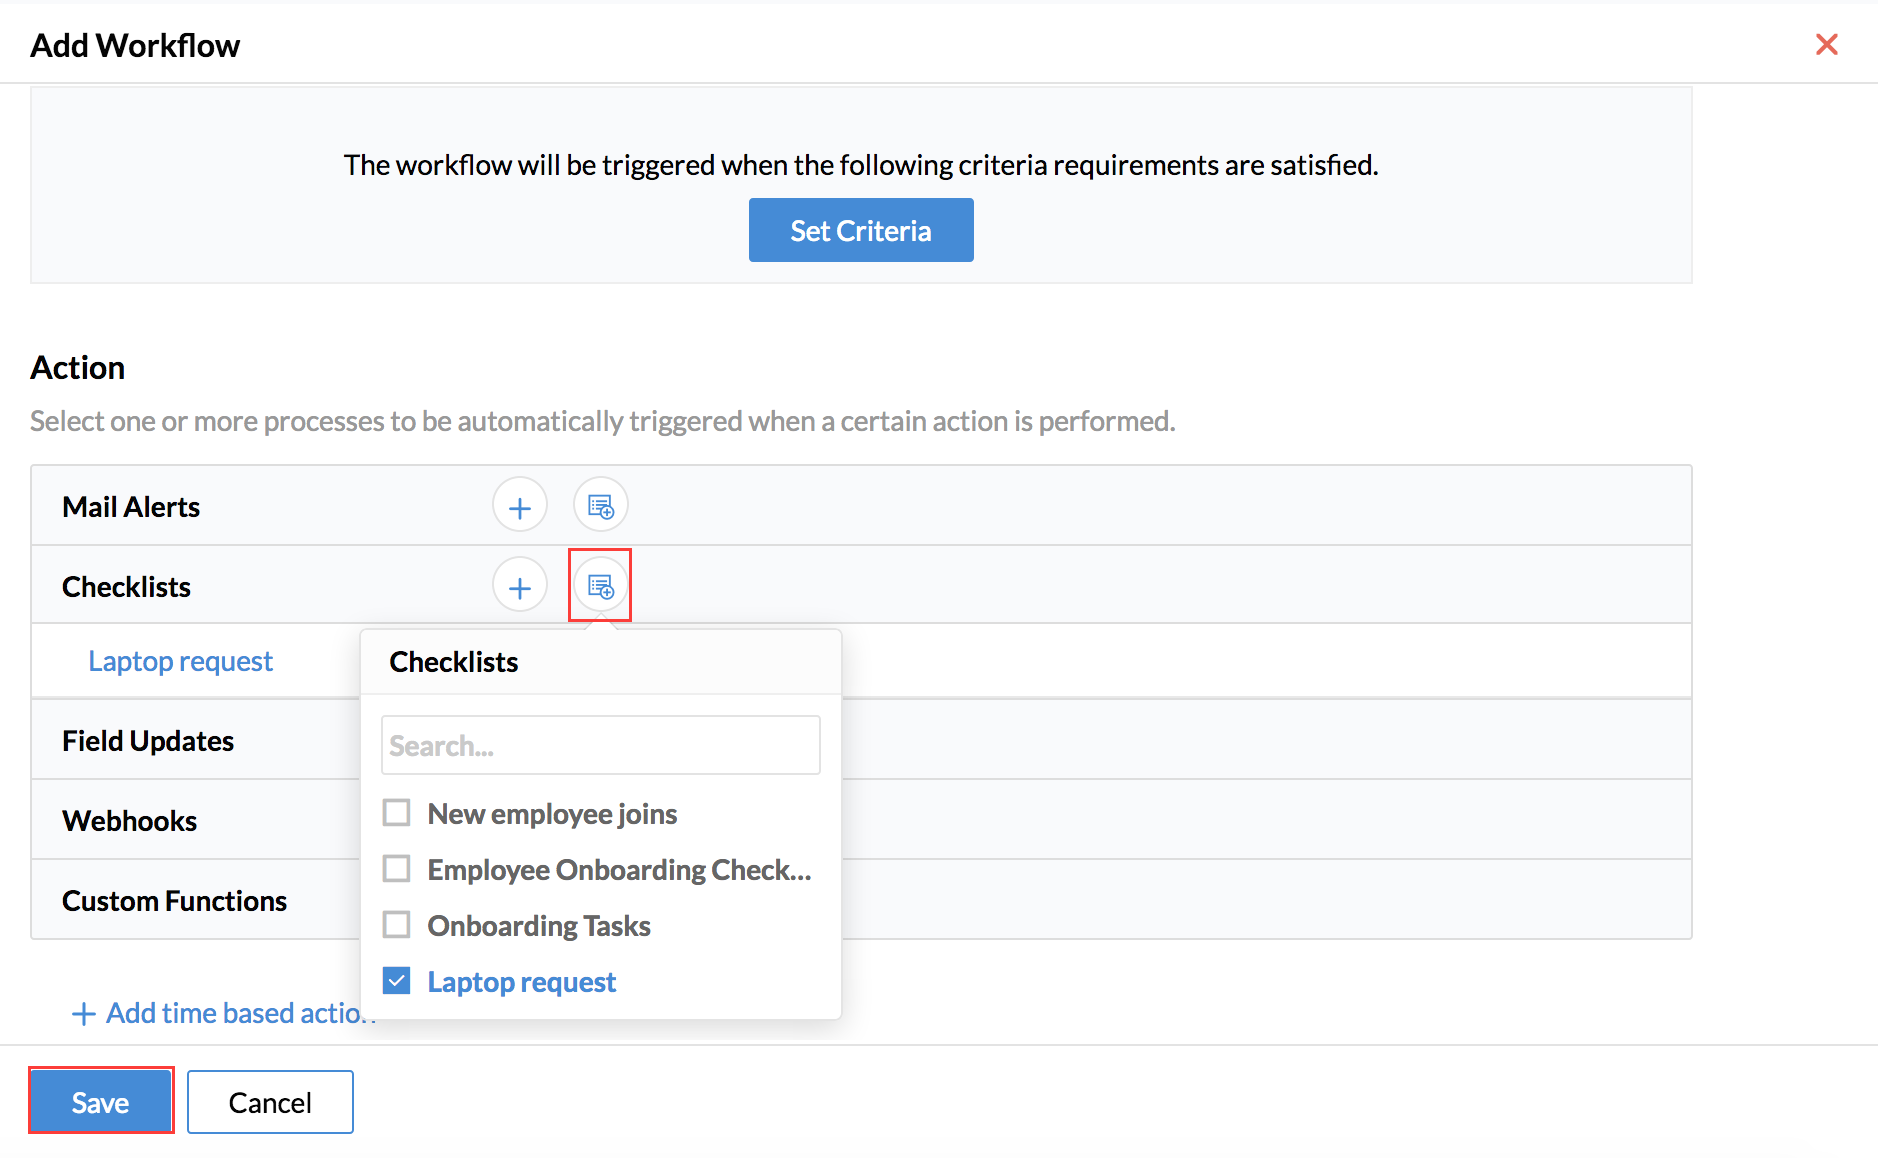
- Under 'Action', go to Checklists and select the checklist that you have created now


- Click Save
Now, a workflow has been created. When a record is added to the Employee form, an email and a checklist will be triggered to the respective teams/individuals.
Use case 2: Travel Request checklist
Consider a scenario where a request added in the travel form should trigger a checklist.
This is a two-step process:
Step 1: Configuring a checklist with the following tasks
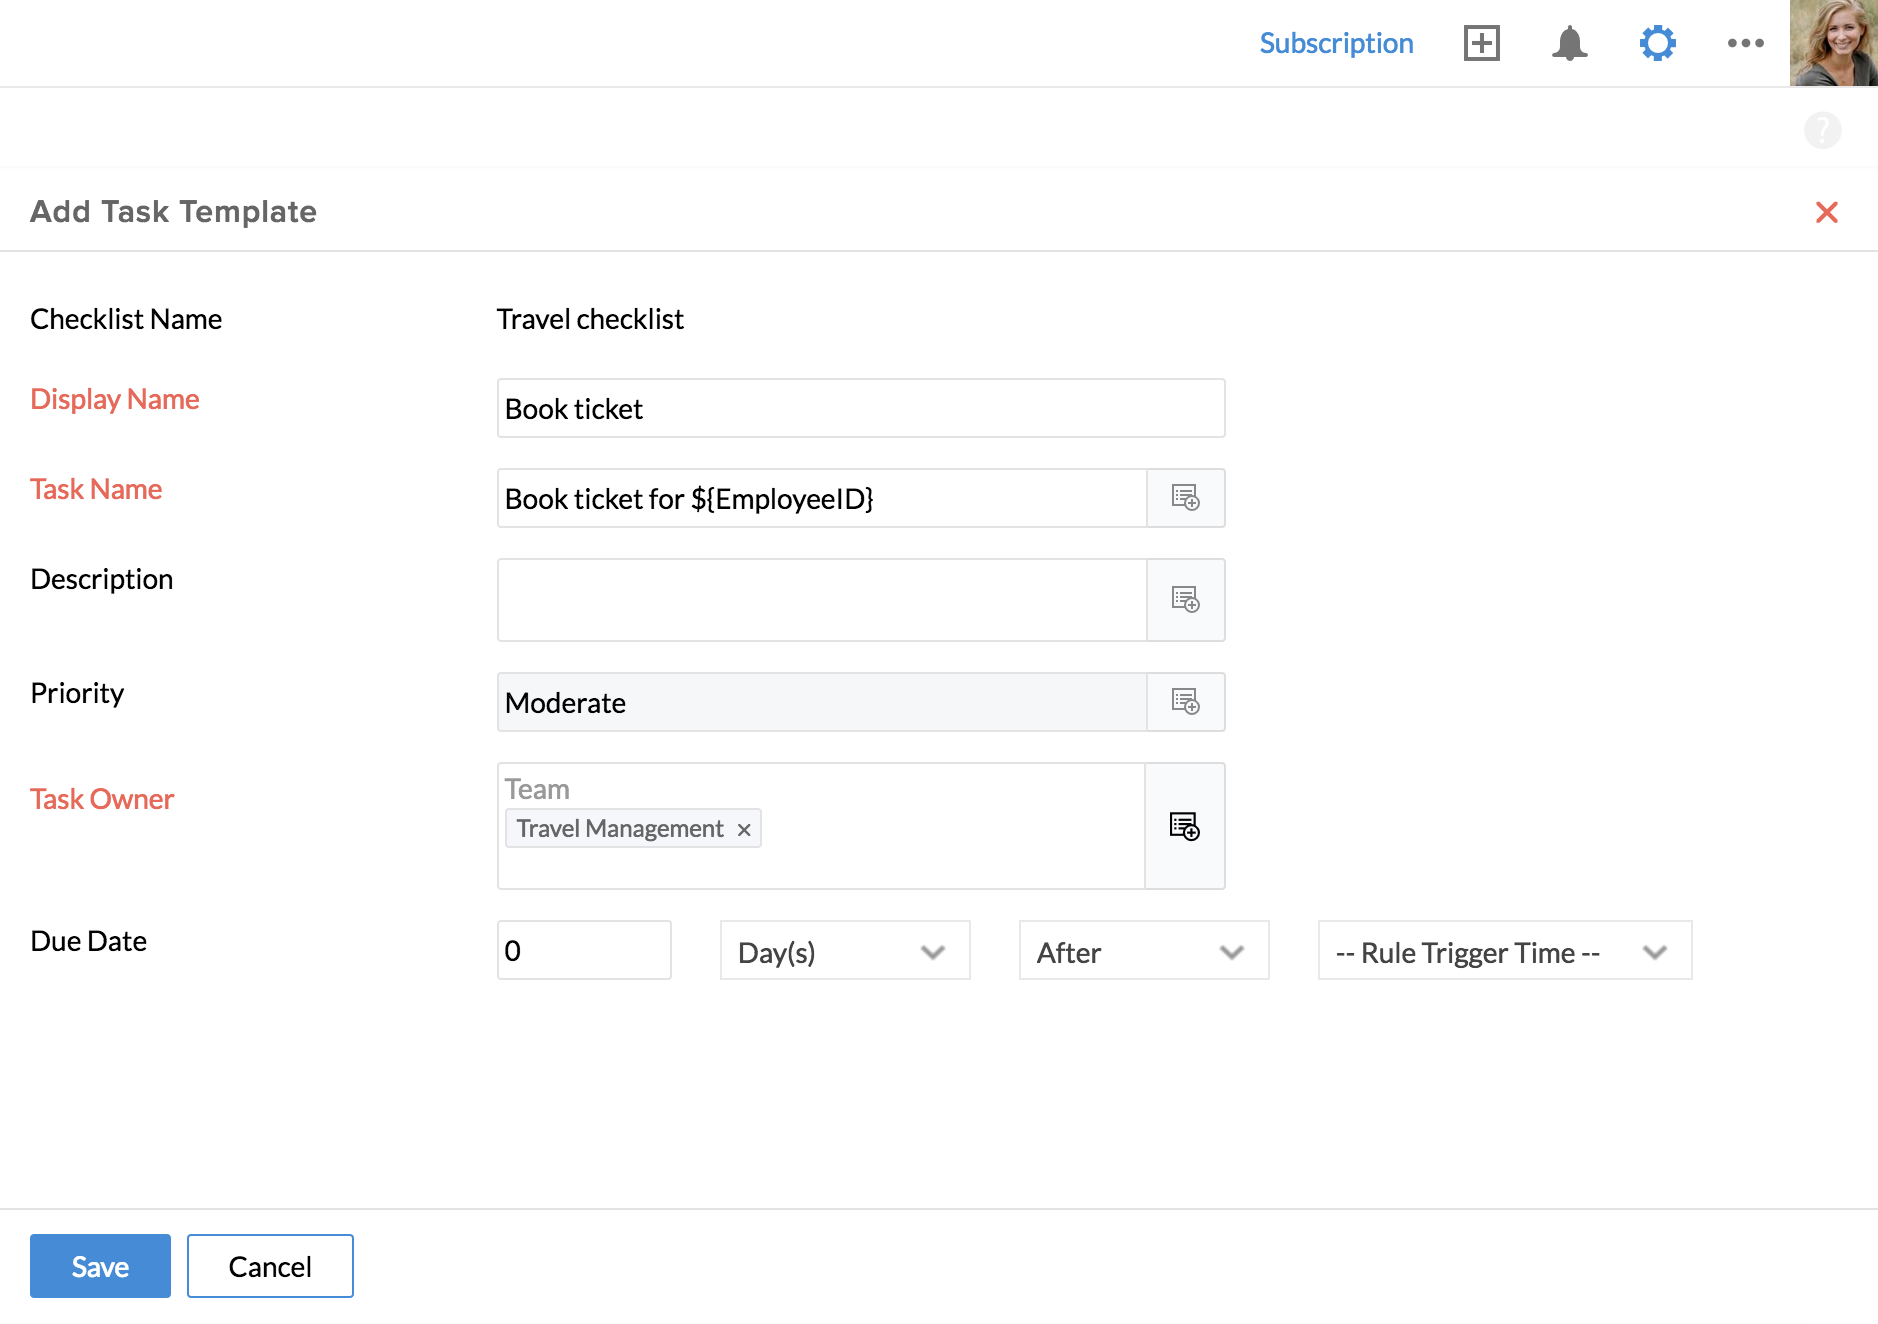
Task 1 : Book ticket
Task 2: Make arrangements for stay and commute
Step 2: Creating a workflow and mapping the checklist to it
Step 1: Configuring a checklist
- From your home page, go to Settings > Automation > Checklists & Tasks
- Click on 'Add Checklist'
- Select the 'Travel Request' under Form Name
- Give a name for the checklist. For eg - Travel Checklist
- Click on 'Add New Task'
- Under Display name, give a name - for eg - 'Book Ticket'. Under Task Name, give an elaborate name indicating the task
You can click on the list icon to see the list of options available. For eg - you can type Book Ticket and then choose from options like Employee/Location etc. Here, you can give the Task Name as Book Ticket for Employee (Employee id)
- Under Description, you can add text with the help of options given while clicking on the list icon
- Set priority if needed
- Select the Task Owner from options like Employee, group, Team, Role, System Fields etc
Note 1: The Task Owner can be an employee or a group or a department.
Note 2: Under 'System Options', you have options like 'Department Head of Record Owner' and 'Reporting Manager of Record Owner'. These options will be listed under 'System Options' even if these fields are not part of the form.
![]() Tip : Click here to know more about groups.
Tip : Click here to know more about groups.
Note: The option called 'Form Fields', will list the dynamic fields in the selected form. You can also make a selection form here. For example if you have a field called the 'Travel Desk Staff', then you can select this option to make that person the task owner.
Only look up fields of the particular form (In this case, the Travel Request form )will get listed under Form Fields
- Under 'Due Date', set the due date as required. For example - Assume that you have given the due date of the task 'Handover laptop' as 2 days before the 'Joining Date' and the Due date as 2 days before. Here, if the Joining Date is 5 Feb, then the due date of the task is 3 Feb.
- Click Save
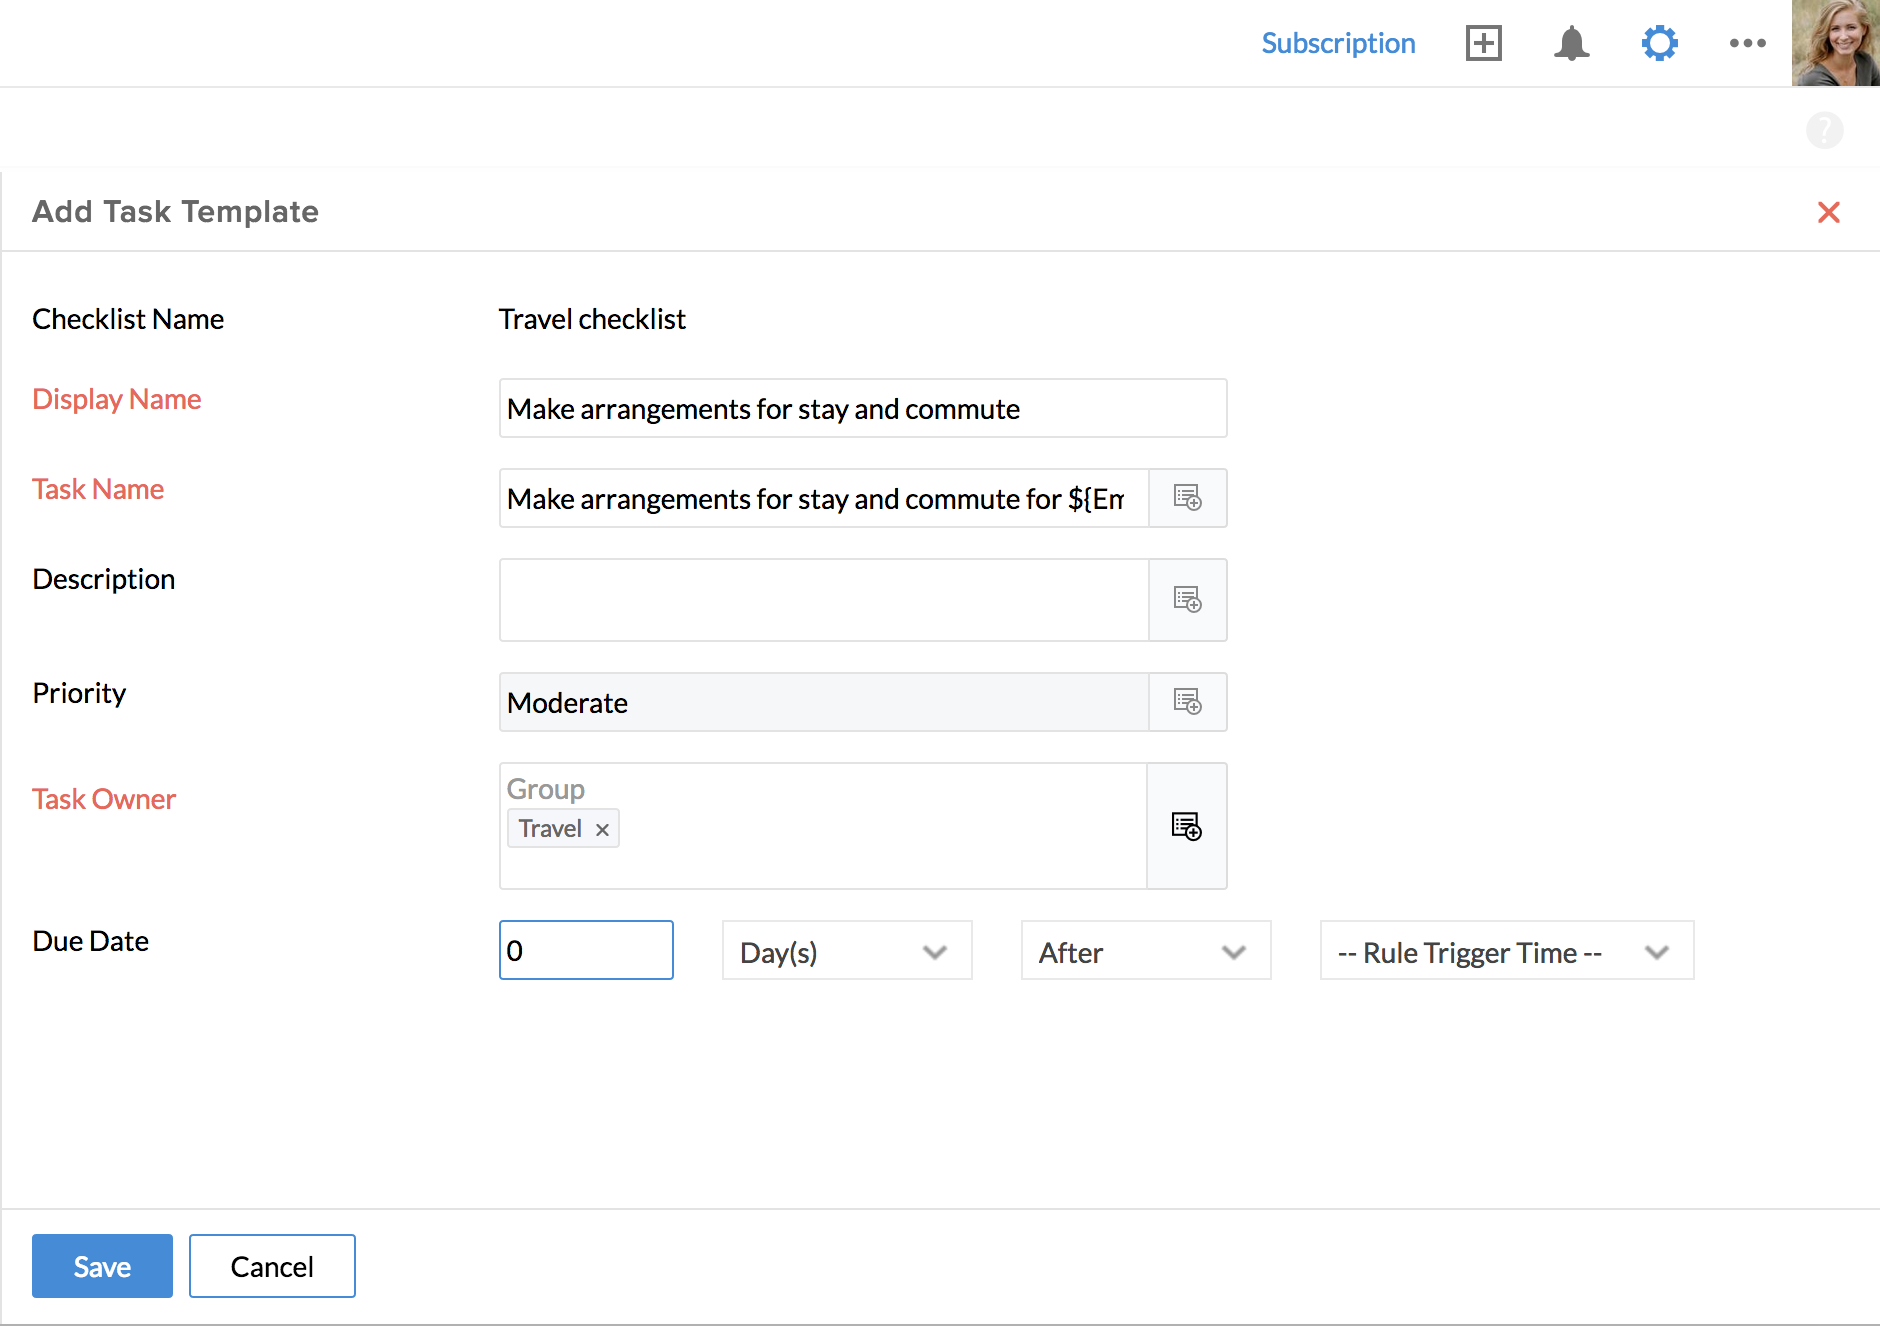
Task 2: Make arrangements for stay and commute
- Click on 'Add New Task'
- Under Display name, give a name - for eg - 'Make arrangements for stay and commute'
- Under Task Name, give an elaborate name indicating the task and under description, make use of dynamic fields to give a description
- Give a description and set a priority if needed
- Under 'Task Owner', select from options like Group, Team, Role etc
- Give a due date for the task. For eg - 0 days 'After' the 'Rule trigger date'
- Click Save
Now you have created the second task and your checklist is ready.
Step 2: Creating a workflow and mapping the checklist to it
- From your home page, go to Settings > Automation > Workflow
- Click on 'Add workflow'
- Select 'Travel Request' under form name
- Give a name for the workflow - for eg - Travel Checklist
- Keep the status active and give a description if needed
- Under 'Trigger', select Create
- Under 'Action', go to 'Checklists & Tasks' and map the Checklist that you have created
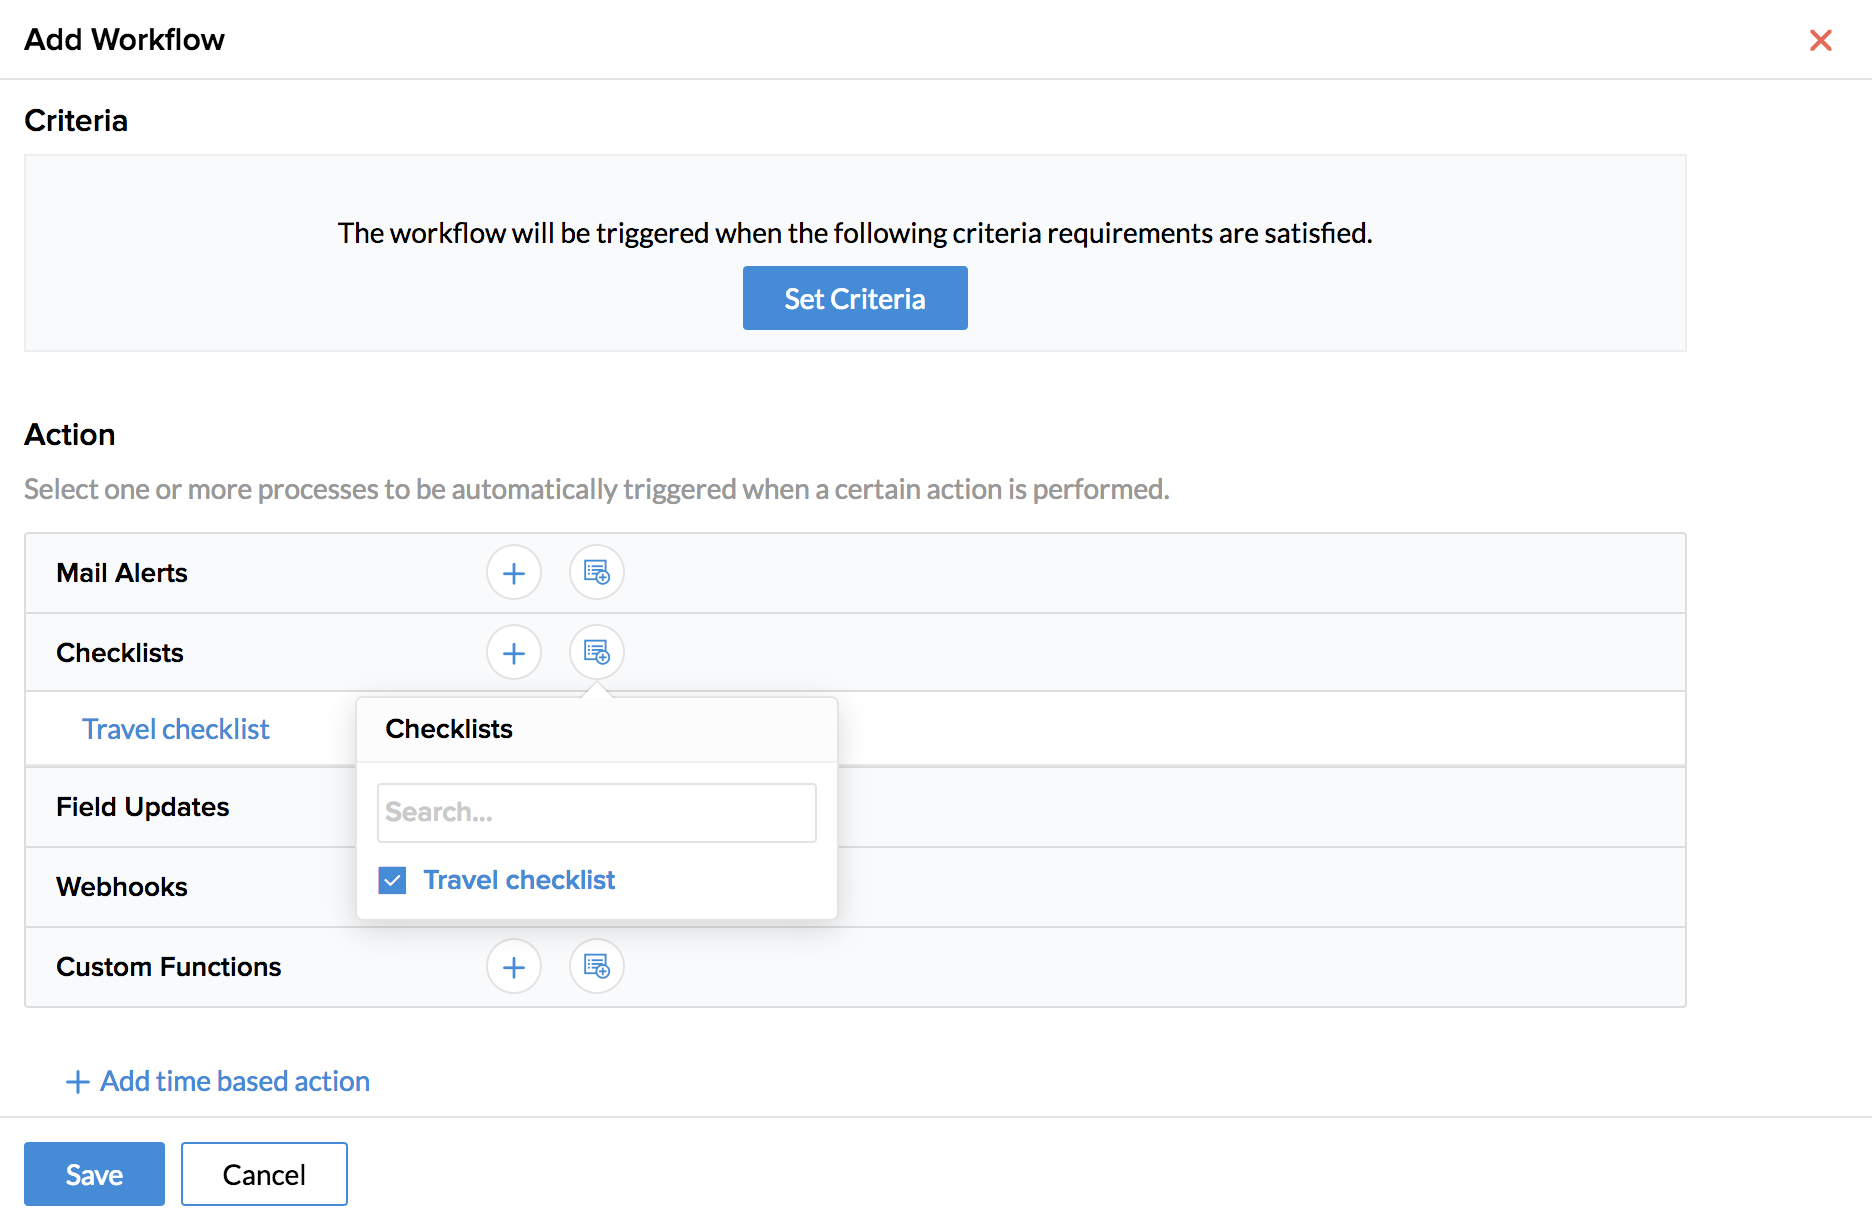
- Click Save
Now, when a record is added to the Travel Request form, the checklist with the two tasks will be triggered.
Usecase 3: Laptop request checklist
Consider another scenario, where you would like to have a checklist triggered as a result of a laptop request added in an asset form:
There are two steps involved.
Step 1 : Create a checklist mapping these two tasks.
Task 1 - To procure and provide laptop
Task 2 - To complete installation
Step 2: Create a workflow and map the checklist created to the workflow
Step 1: Creating a checklist
- From your home page, go to Settings > Automation > Checklists & Tasks
- Click on 'Add Checklist'
- Select the form - Eg Asset Form
- Give a name for the checklist
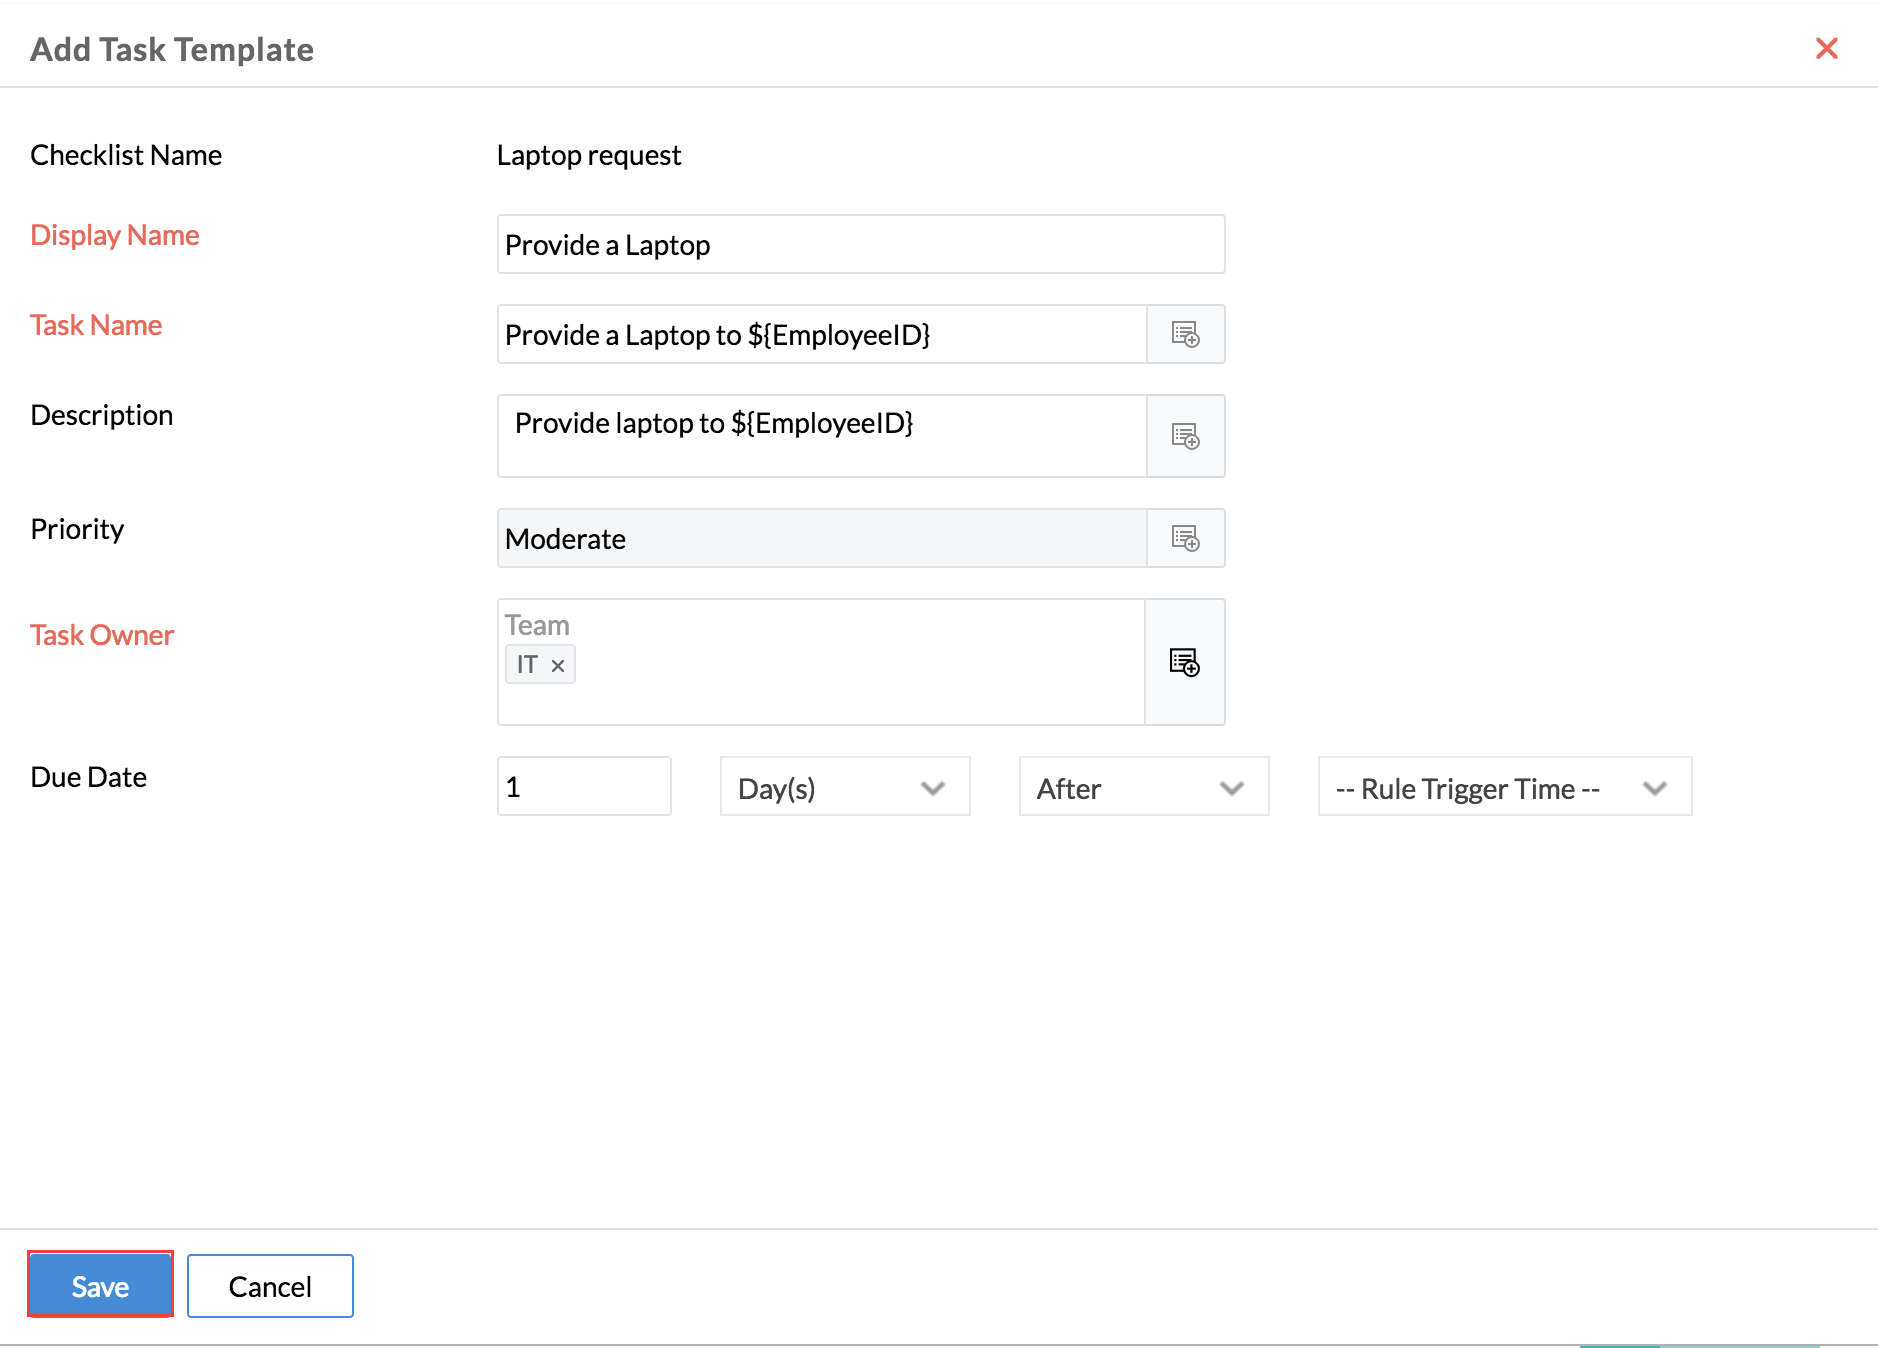
- Click on 'Add New Task'
- Give a name for the task - For eg- Provide a laptop
- Give a display name
- Give a detailed task name using the options listed when you click on the list icon
- Give a description and set a priority if needed
- Under 'Task Owner', make a selection from options like Employee, Team, Role, Form Fields etc
- Under Due date select the Day(s)/Week(s)/Month(s) before/after the required date (all date fields will be listed in the drop down)
- Click Save
Now you have added a task to the checklist. Follow the same steps to add task 2.
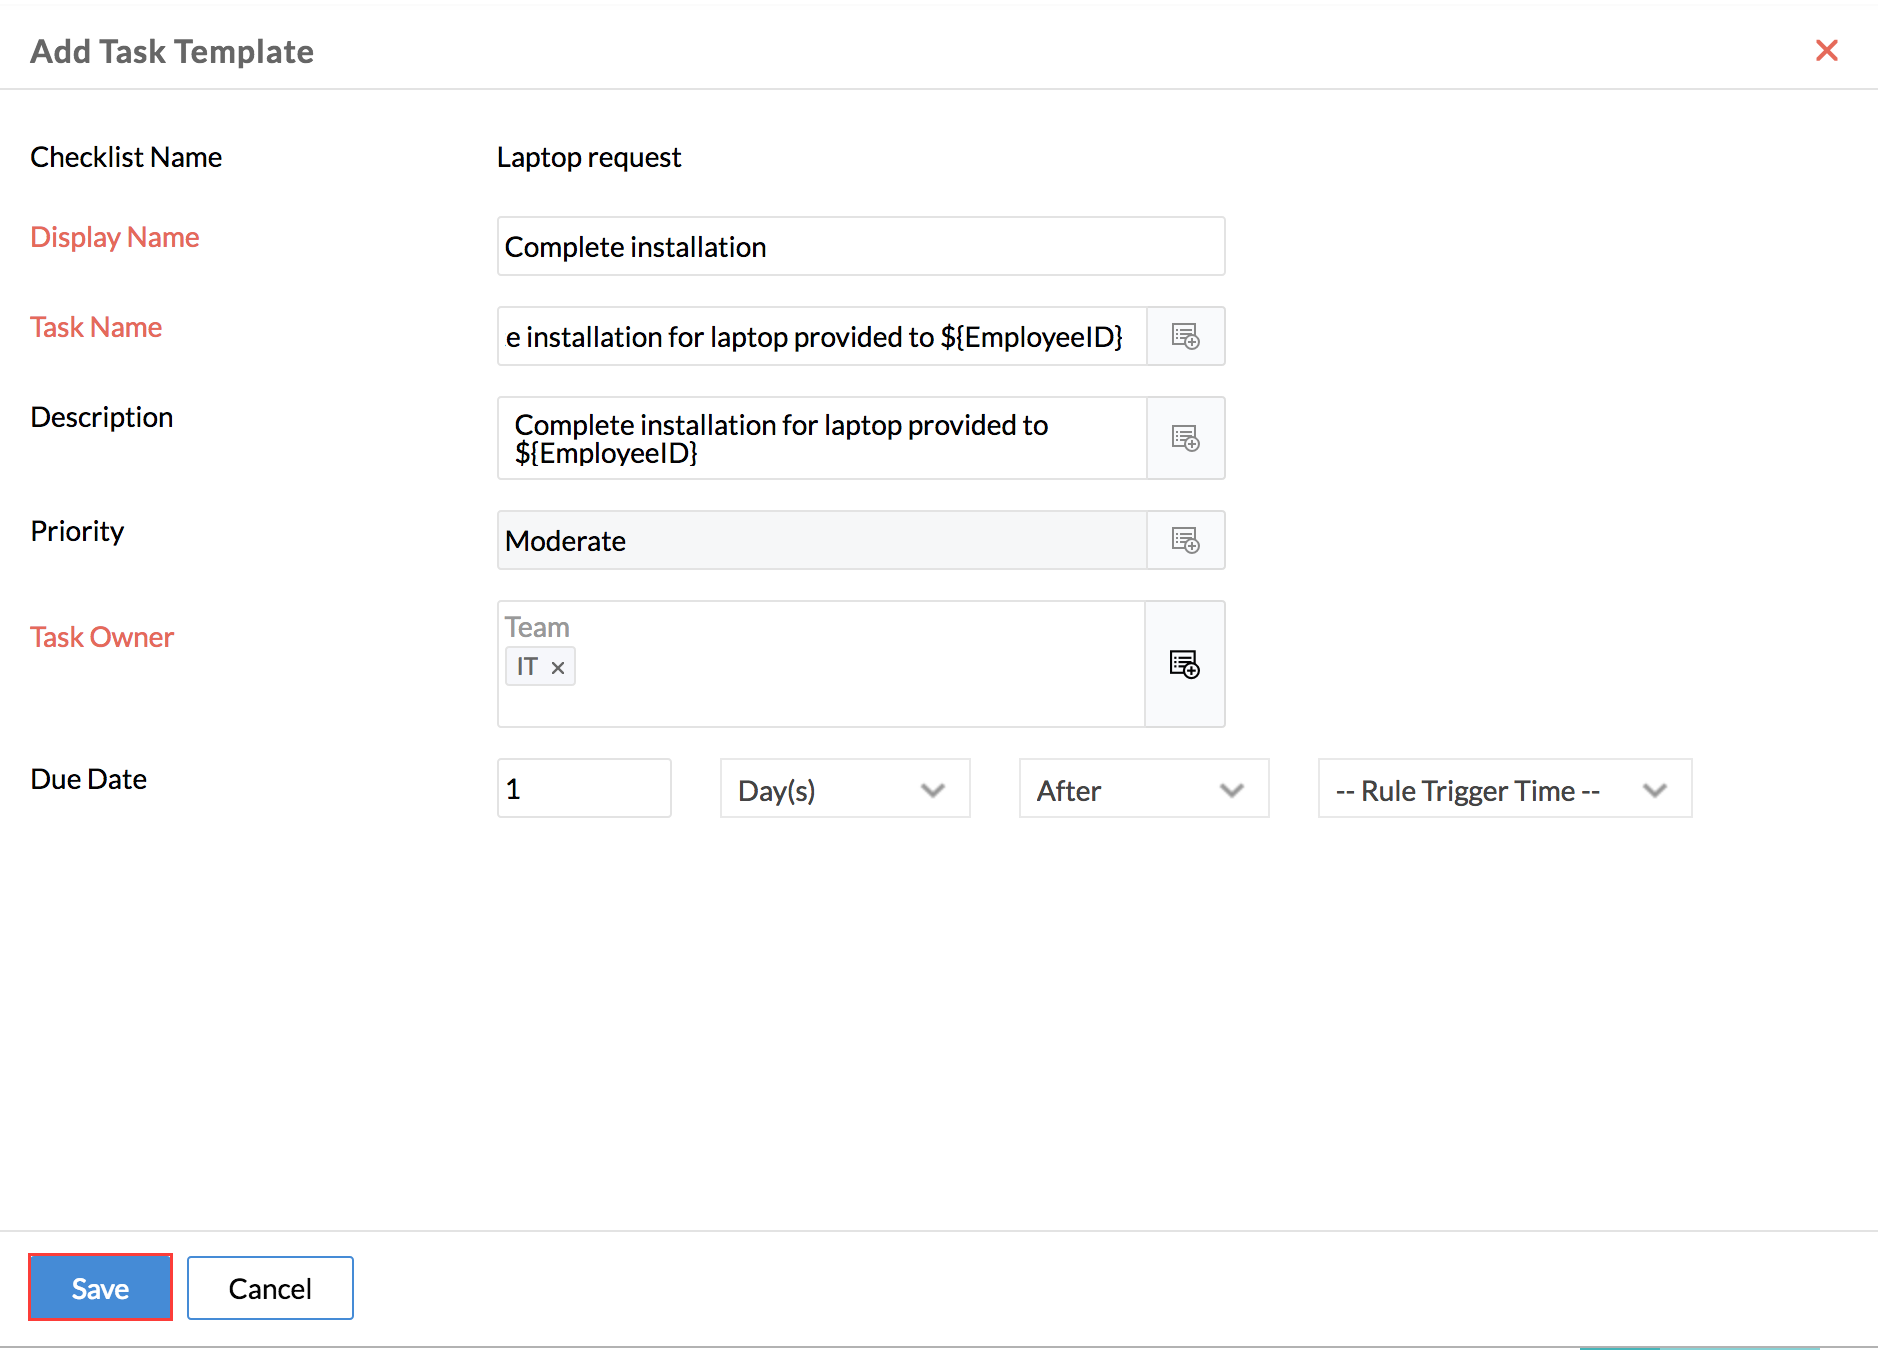
- Click on 'Add New Task'
- Give a name - For eg - To complete installation
- Give a display name, detailed task name
- Give description and set priority if needed
- Under 'Task Owner', make a selection from options like Employee, Team, Role, Form Fields etc
- Under Due date select the Day(s)/Week(s)/Month(s) before/after the required date (all date fields will be listed in the drop down)
- Click Save
Now both the tasks have been created.
Step 2: To create a workflow
- Go to Settings > Automation > Workflow
- Click on 'Add Workflow'
- Select the 'Asset form' under form name
- Give a name for the workflow - for eg - New laptop checklist
- Keep the status active and give a description if needed
- Under 'Trigger Process', select 'Create'
- Under 'Action', go to Checklists and click on the list icon to select the checklist that you have just created
- Click Save
Now you have created a workflow. When a record is added, the checklist with the two tasks will be triggered automatically.
Note: You can also add task 2 as a serial task. Once you have added the task 2, drag and drop it under Task 1. This makes it a serial task. Once task 1 gets completed, task 2 gets triggered automatically.
Triggering Checklists
The checklist tasks will be triggered based on the below form actions. The form actions should be configured in the workflow.
- When a record is created.
- When a record is edited.
- When a record is created/edited.
- When a record is approved.
- When a record is rejected.
For example, whenever a new record is added in the employee form, checklists that are associated with the Employee form will be triggered automatically and an email notification will be sent to the respective owner(s) of the task based on the task workflow.
Actions after Checklist Completion
Generally, we employ checklists to complete a series of tasks in an HR process. Once an HR process has been completed, if you want to create related actions to the process, these actions can be used.
Therefore, once a checklist has been completed, you can directly configure any of the following actions right from the same page:
1. Mail Alerts - you can trigger mail alerts corresponding to the completed checklist.
2. Field Updates - you can update a field in a specific form once the checklist has been completed.
3. Custom Functions - you can configure specialized functions related to the completed checklist.
Editing and Deleting Checklists
Editing a checklist.
- Click Settings > Tasks & Checklists under Automation
- All checklists will be listed
- Click Edit under Actions
- Modify the checklist
- Click Save
Note:
Since the status of the checklist, mail alert, and webhooks are associated with the workflow, disabling/enabling a workflow process will trigger/deactivate all the processes that are associated with the workflow. However, you have the option to remove only a particular process, for example, the checklist from the workflow by deleting the actions.
Deleting a checklist
- Click Settings > Tasks & Checklists under Automation
- Click Delete under Actions
- Click Ok
Adding Serial Tasks
Few HR processes will have multiple sets of tasks. Such tasks can be split up into serial tasks and can be handled separately by a different team or individual. Follow the steps below to add serial tasks.
The newly added task becomes the serial task. This means that once the first task is completed, this task will be triggered. You can add more serial tasks too.
- From your home page, go to Settings > Automation > Tasks & Checklists
- Click the checklist that you have created
- All the tasks (parent tasks) will be listed
- Just drag a task and move it under any task. Make sure to place the task slightly down to the right side of the parent task
Viewing Status of Checklist Taks
- From your home page, go to Checklists & Tasks > Checklists

You will be able to see the status of all the checklists. You can select the employee from the search bar to view the checklists initiated by that particular employee.
Changing Status of Checklist Tasks
- From your home page, go to Checklists & Tasks > Tasks > List View
- Click on the status icon to change the status of the checklist
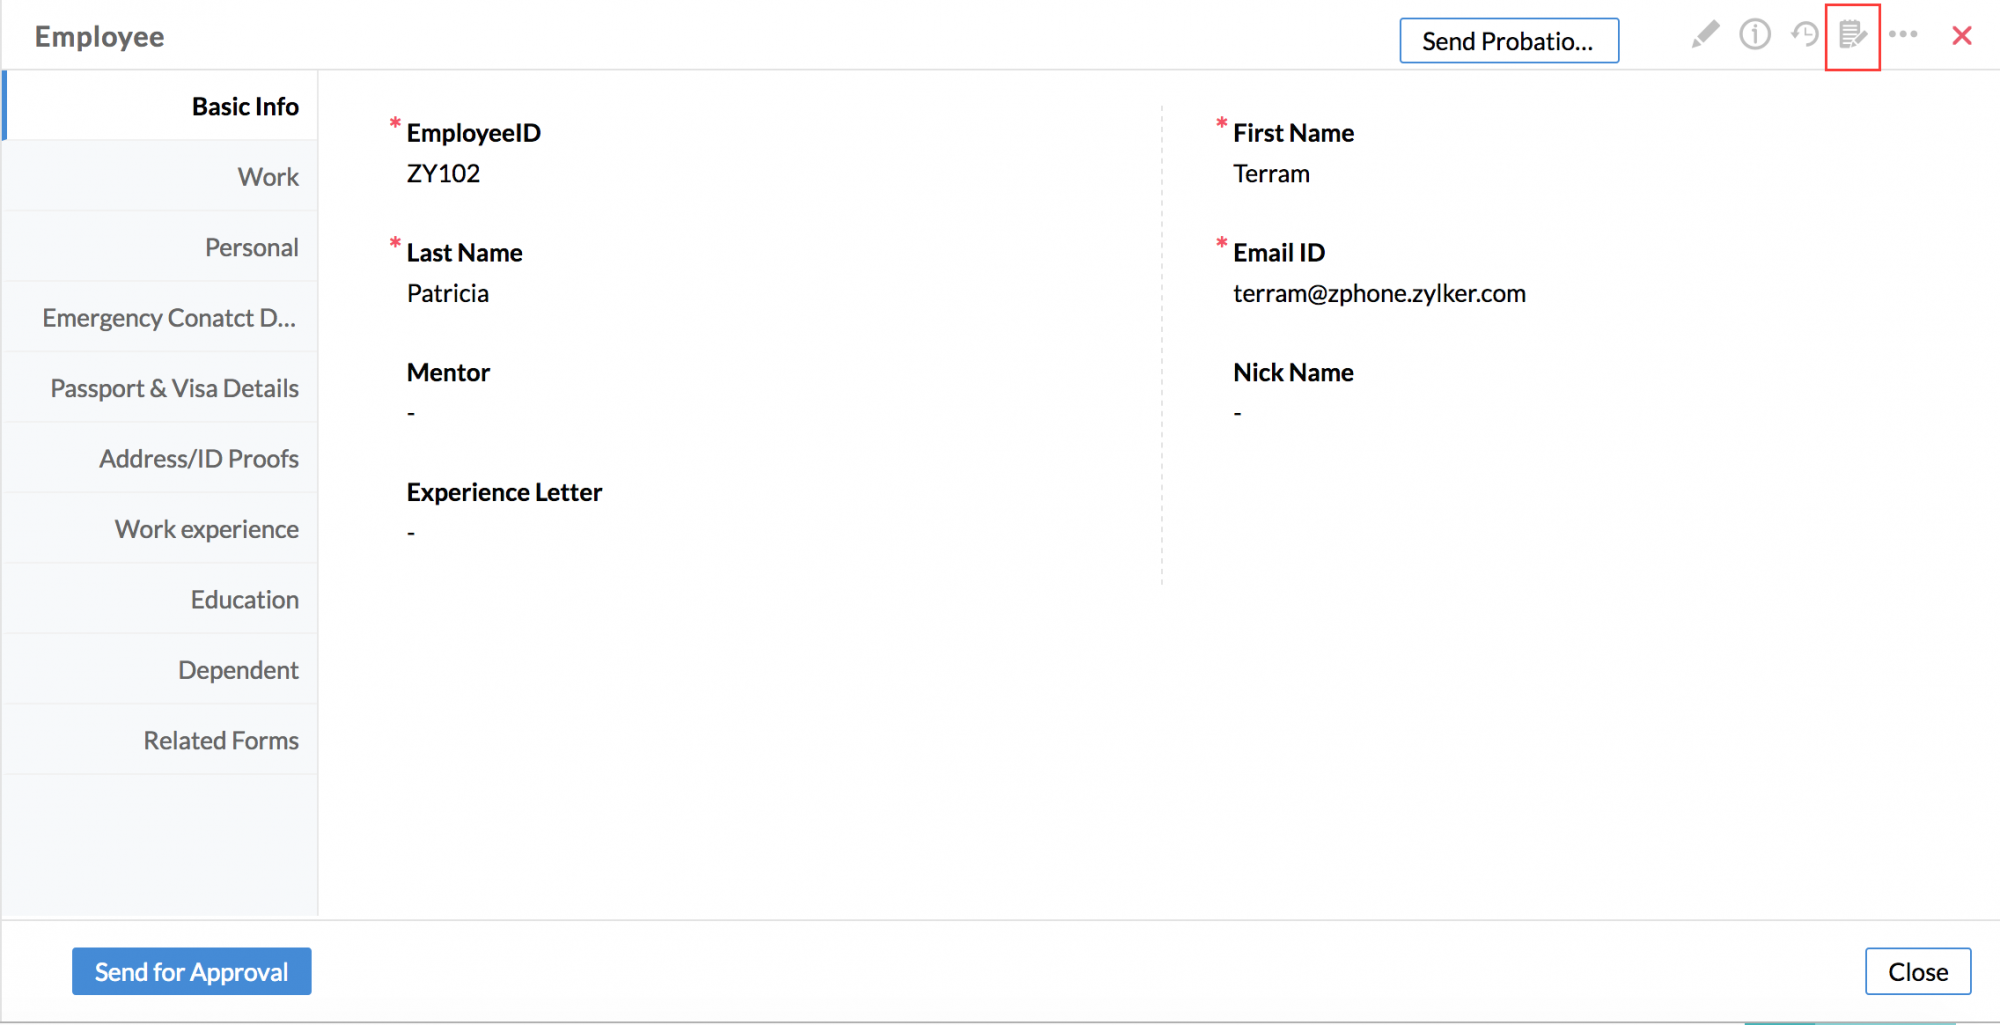
Checklists Associated with a Record
- Go to the respective record
- Click on the 'Checklist' icon at the top right corner to view the checklists associated with that record