Roster Management
What is Roster Management?
Roster or Shift Management refers to managing employees in an organization who have different working hours based on the shift they are in.
Why is it useful?
In organizations that provide services in different time zones, a shift management system helps assign employees to multiple shifts, automates shift rotations and sends out timely communication to the employees and managers regarding their shifts.
- Adding Shifts
- Shift Margin
- Mapping employees
- Shift Rotation
- Editing an employee's shift mapping
- Shift Settings and Notifications
- Shift Views
- Configure Breaks
- Importing Shifts
- Shift Change & Shift Change Approval
Adding Shifts:
- From your home page, go to Attendance > Shift Schedule > Shift(s) > Add Shift.
- Set the start and end time of the shift under From and To.
- Enable Shift Margin if required. This will help you set boundaries for shifts. Employees' work done within the set boundary will only be counted as payable hours. Click here to know more.
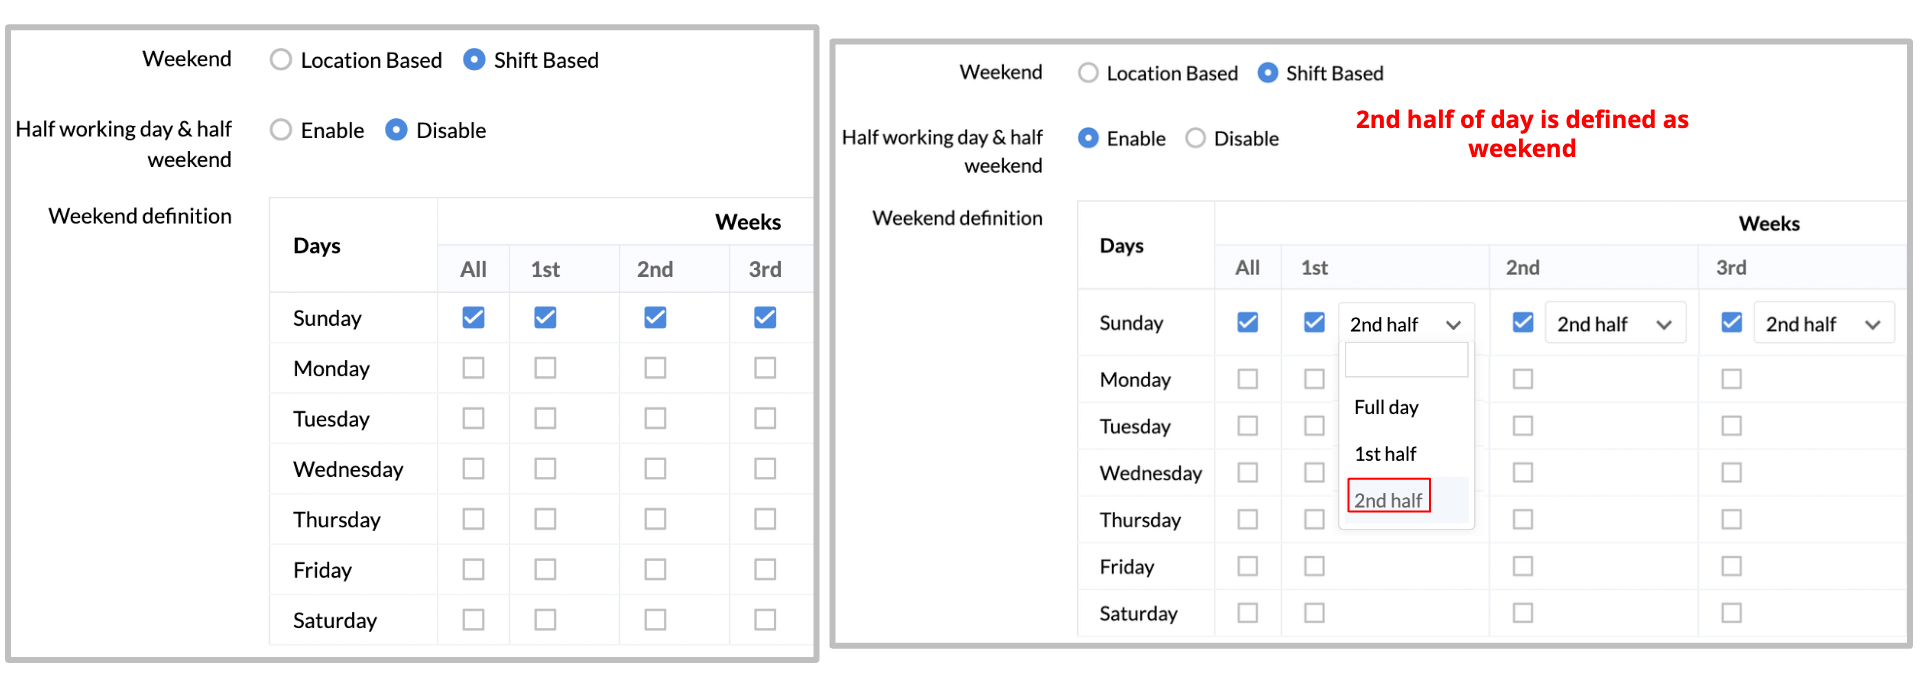
- Set weekends for the created shift. If weekends have to be set based on locations, select Location based. Weekends set for locations under Calendar Settings will be applicable here.
- To define new weekends for the created shift, click Shift based and mark weekends for the shift. If you wish to have half weekends (half day is working day, half day is weekend) you can enable the Half working day & half weekend feature.
- Under Shift Allowance, check Enable to set a shift allowance if required and enter the Rate per day for the shift. The allowance set here will be applicable when an employee covers the eligible working hours set under Attendance > General Settings > Eligibility for Shift Allowance.
- Select the applicability of the shift. You can choose among departments, locations and divisions based on organization structure.
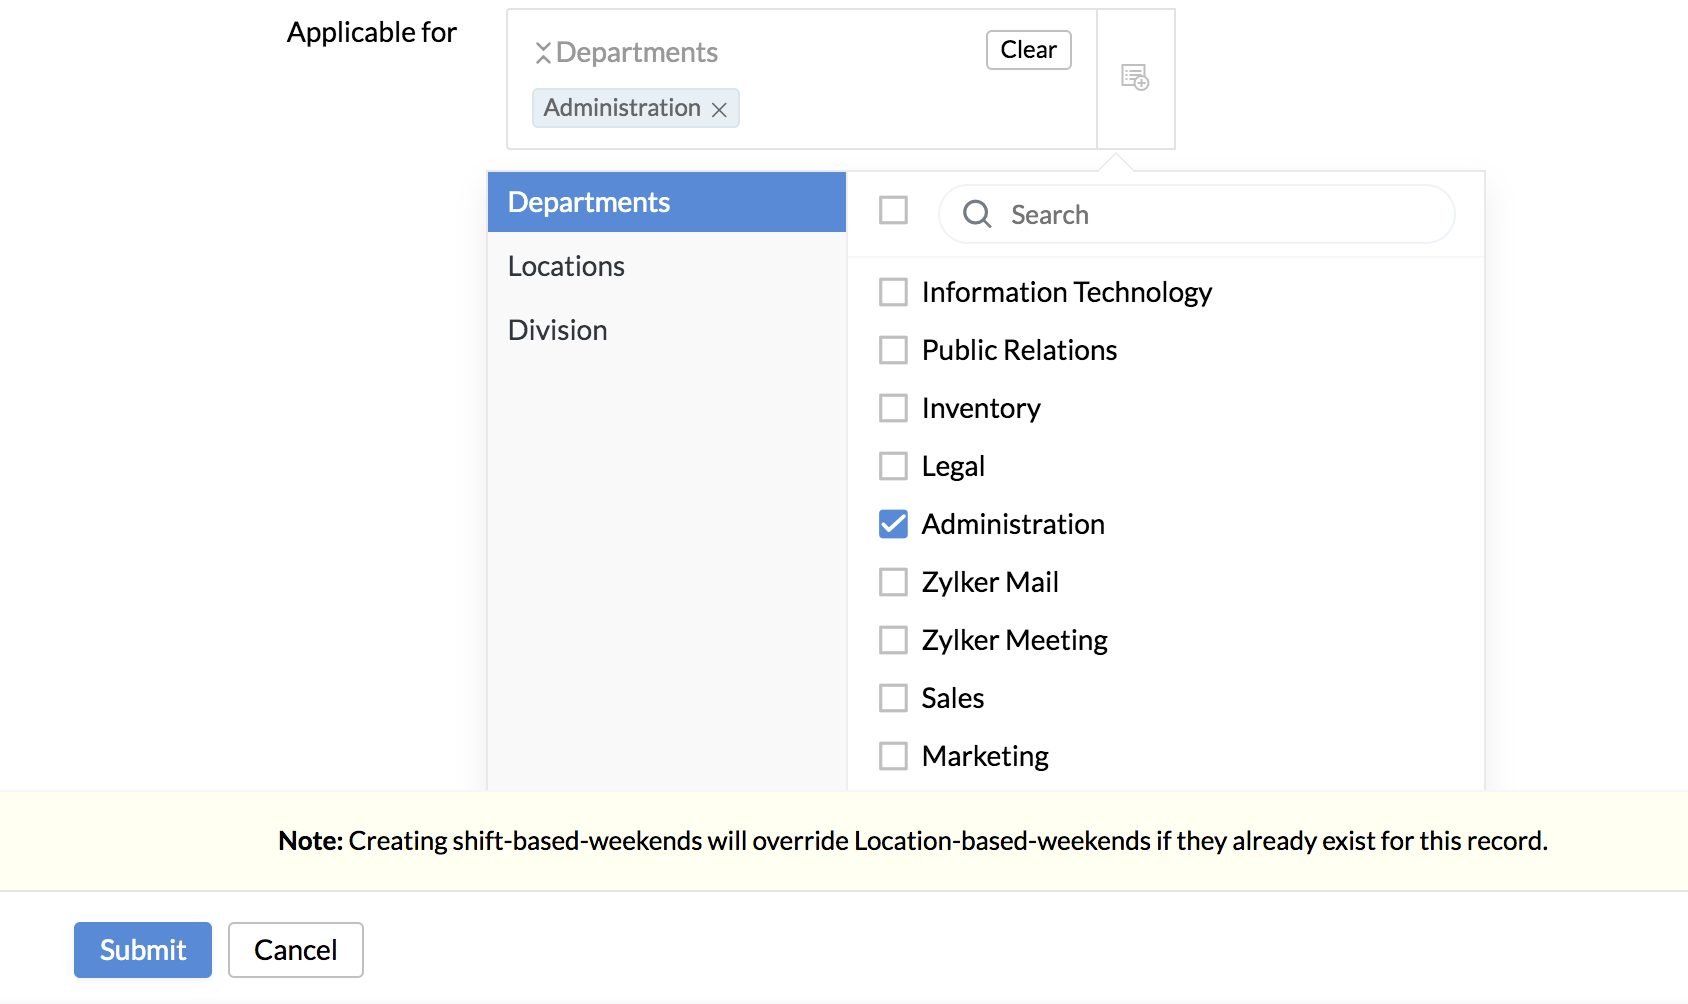
Click here to know more about divisions in organization structure.
Note:
- If you select Location based Weekend & Holidays then it will be based on the settings configured under Settings > Organization > Holiday Calendar.
- While creating shifts and shift-based weekends/holidays, it overrides the weekend/holiday definition for the location-based ones if they already exist for the account.For example, an organization serves clients in the US time zones and Australian ones. Its holidays are configured as per the respective shifts. In this case local (location-based) holidays are overridden, as shift-based weekends/holidays has its effect, even though it's the same work location.
Shift Margin
This setting allows you to define boundaries within which payable hours will be calculated. When enabled, the start and end time of the shift will be considered as the default boundaries. You can set additional time limits before or after the shift that provides a bigger interval to calculate the payable hours.
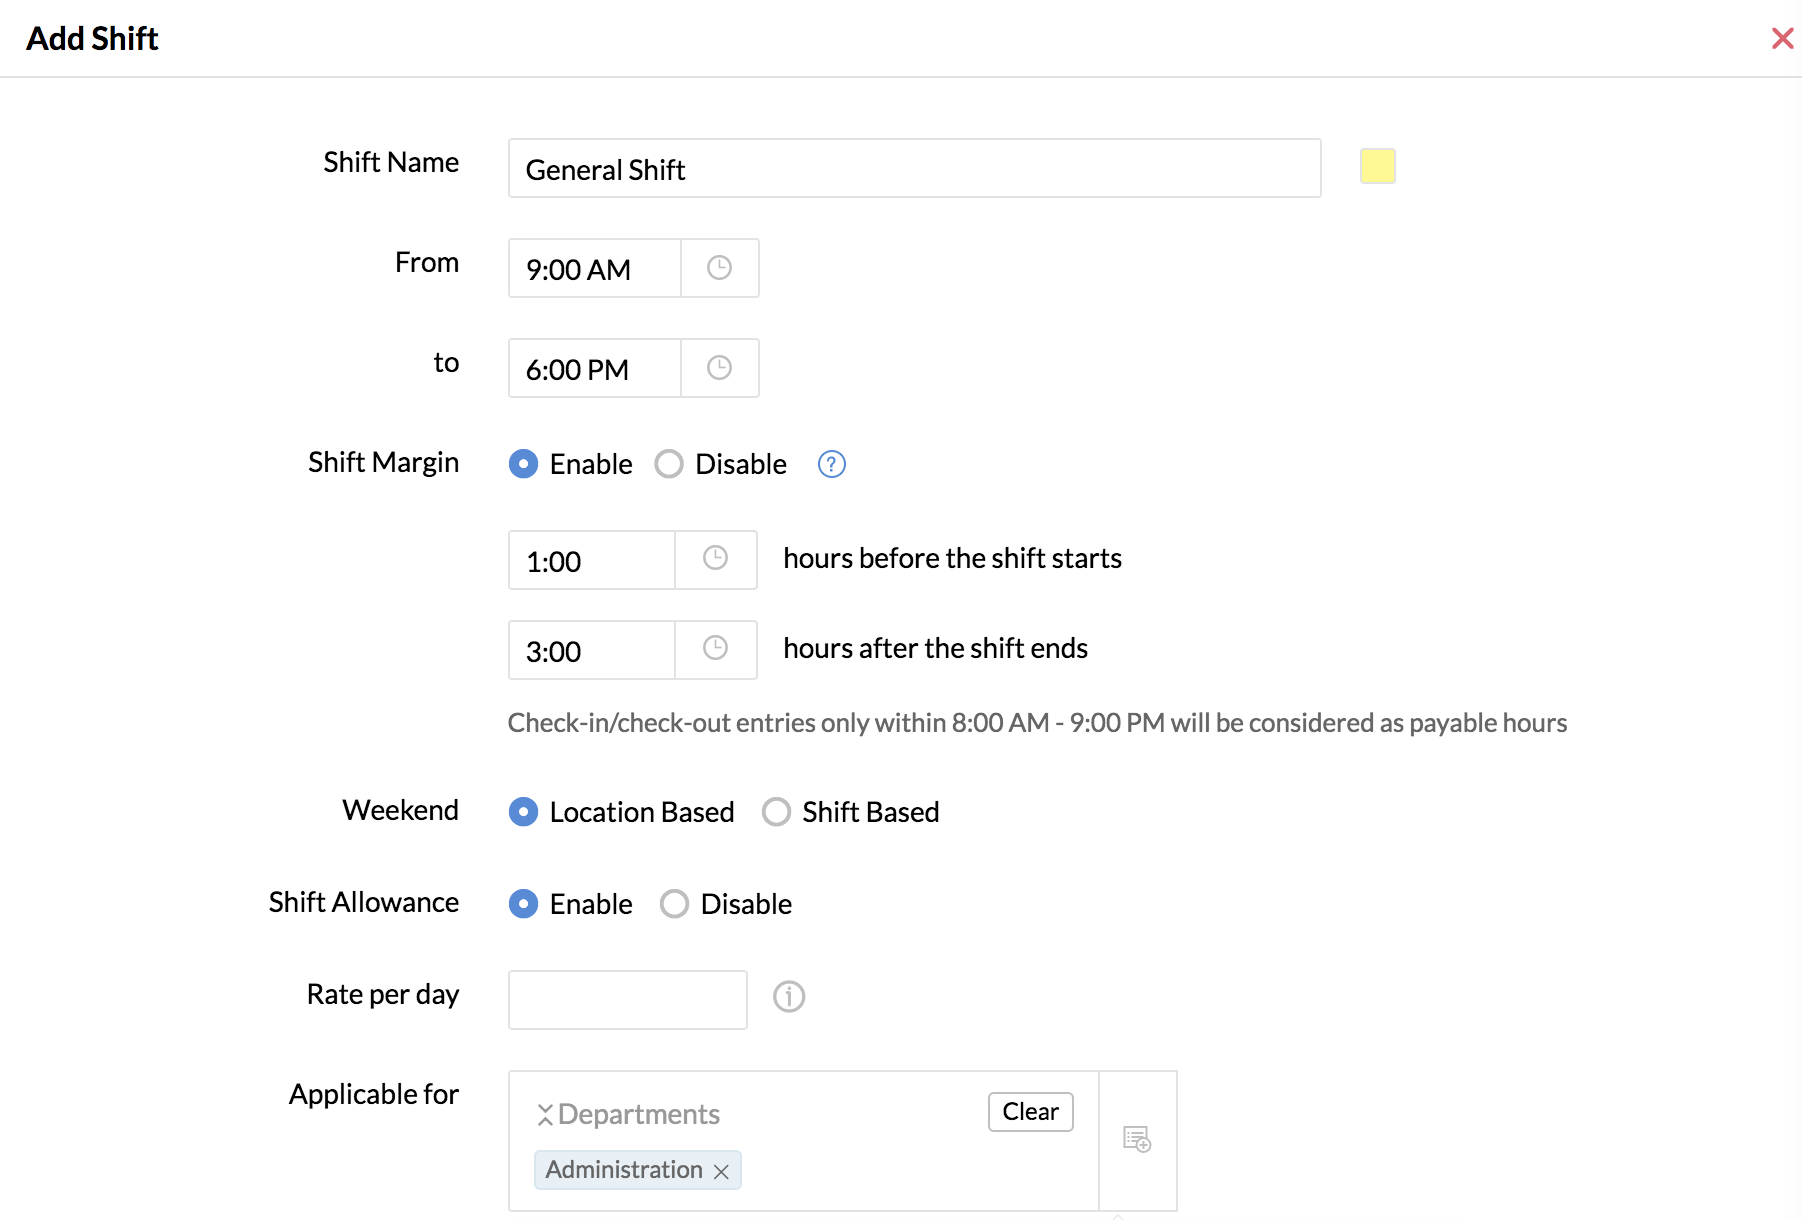
Scenario 1
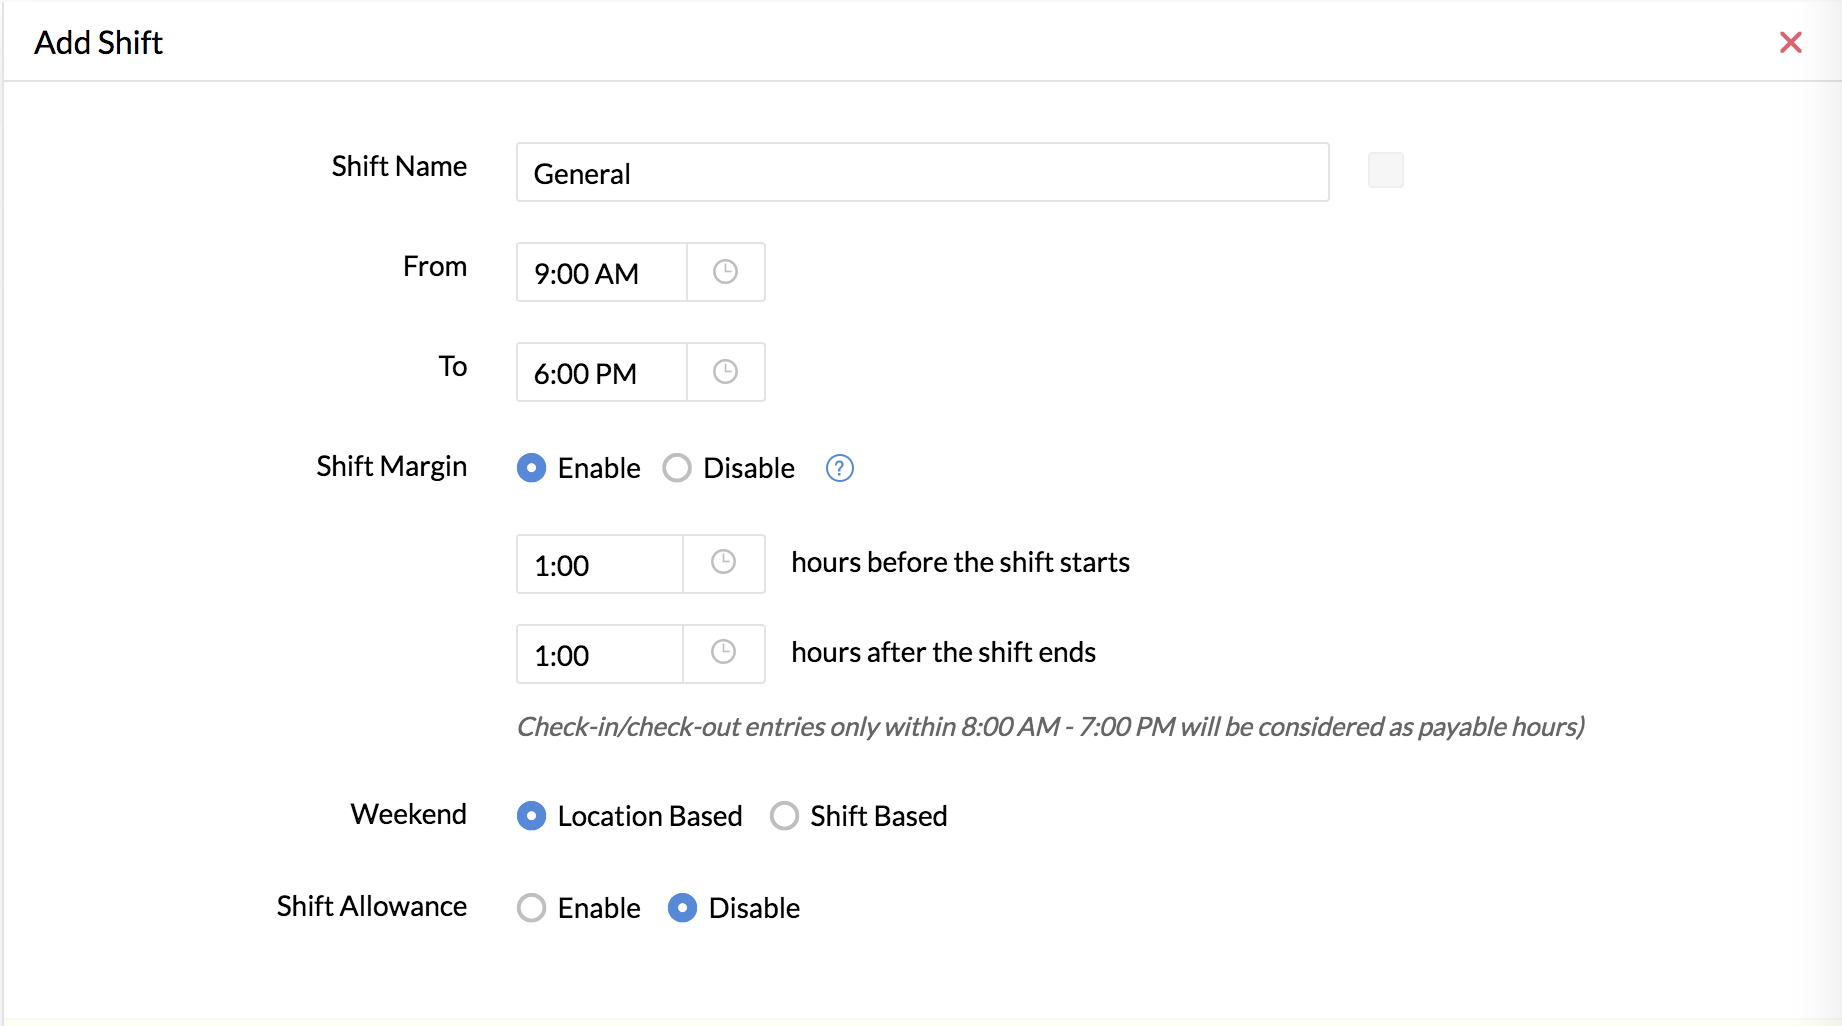
In the above scenario, the general shift start time is 9:00 am and the end time is 6:00 pm. The shift margin setting has been enabled with 1 hour added before the shift starts and 1 hour after the shift ends.
So, check-in and check-out entries only within 8:00 am and 7:00 pm will be considered as payable hours. If any employee checks-in before 8:00 am or after 7:00 pm, attendance entries before/after the allowed boundaries will be recorded but not considered as payable hours.
Usecase 1
- General shift time: 9: 00 am - 6:00 pm
- Shift margin: 1 hour before the shift starts
1 hour after the shift ends
- Required hours to be marked as present: 9 hours
An employee checks in at 11:00 am and checks out at 10:00 pm. So, the attendance entries after 7:00 pm (up to 10:00 pm) will be recorded, but 11:00 am - 7:00 pm will be considered as payable hours. Although the employee worked hours is 11 hours, the payable hours would be 8. This employee will, therefore, be marked as 1/2 day absent as it falls short of the required hours.
Scenario 2
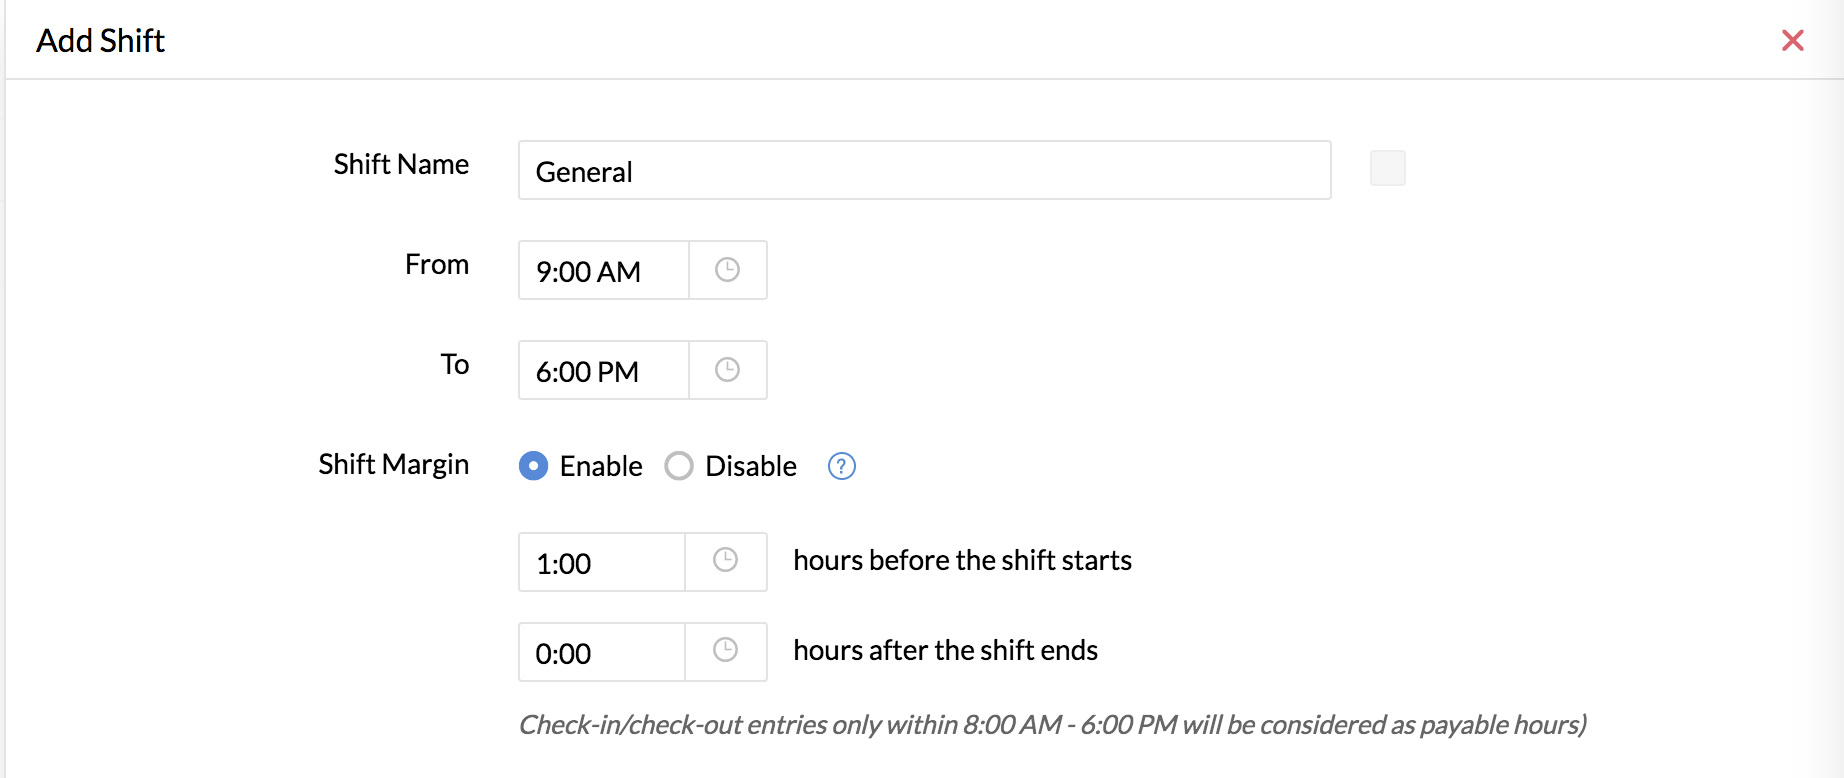
In the above scenario, the general shift start time is 9:00 am and the end time is 6:00 pm. The shift margin setting has been enabled with 1 hour added before the shift starts.
So, check-in and check-out entries only within 8:00 am and 6:00 pm will be considered as payable hours. If any employee checks-in before 8:00 am or after 6:00 pm, those will not be considered as payable hours.
Usecase 2
General shift time - 9: 00 am - 6:00 pm
Shift margin: 1 hour before the shift starts
1 hour after the shift ends
Required hours to be marked as present: 9 hours
An employee checks in at 5:00 am and checks out at 3:00 pm. So the attendance entries before 8:00 am (5:00 - 8:00 am) will be recorded, but only 8:00 am - 3:00 pm will be considered as payable hours. Although the employee worked hours is 10 hours, the payable hours would be 7. This employee will therefore be marked as 1/2 day absent as it falls short of the required hours.
Overtime calculation when shift margin is enabled
Overtime will be considered only if the required payable hours are met.
General shift time: 9:00 am to 6:00 pm
Shift Margin: 1 hour before the shift starts
0 hours before the shift ends
Required hours to be marked present: 9 hours
Example 1: If an employee checks-in at 4:00 pm and checks-out at 11:00 pm, the payable hours will only be 2 (4:00 - 6:00 pm) and the remaining time will not be considered overtime as the employee has not completed the required 9 hours of working within the set shift margin.
Example 2: If an employee checks-in at 8:00 am and checks-out at 8:00 pm, they will have 2 hours of overtime as they have completed the 9 hours of working requirement within the set shift margin.
Mapping employees:
An employee can be assigned to a shift by the following options:
From the 'Employee Shift Mapping' tab:
- Go to Attendance > Shift Schedule > Employee Shift Mapping
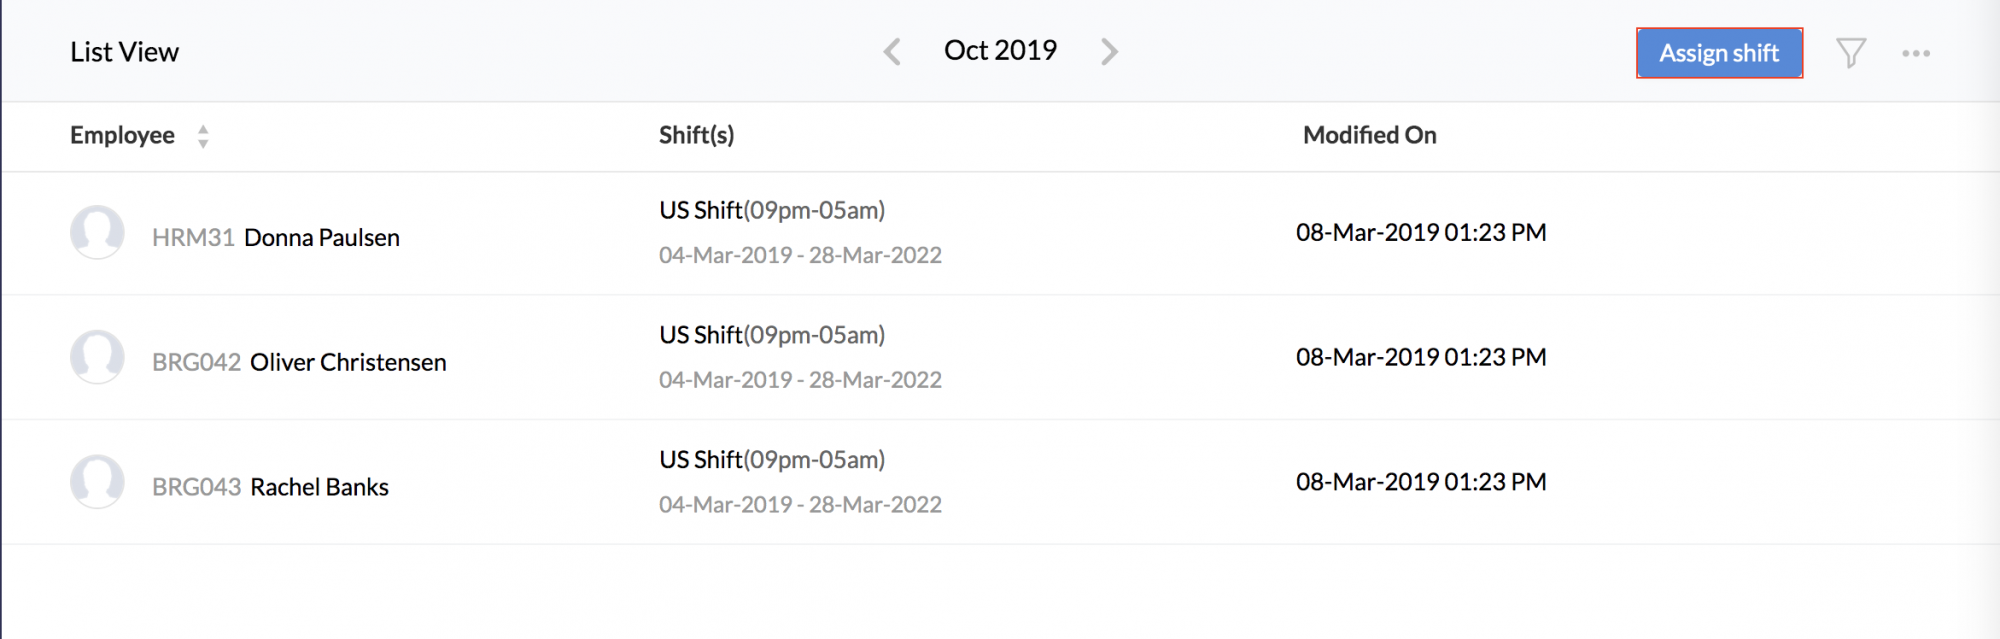
- Click Assign Shift.
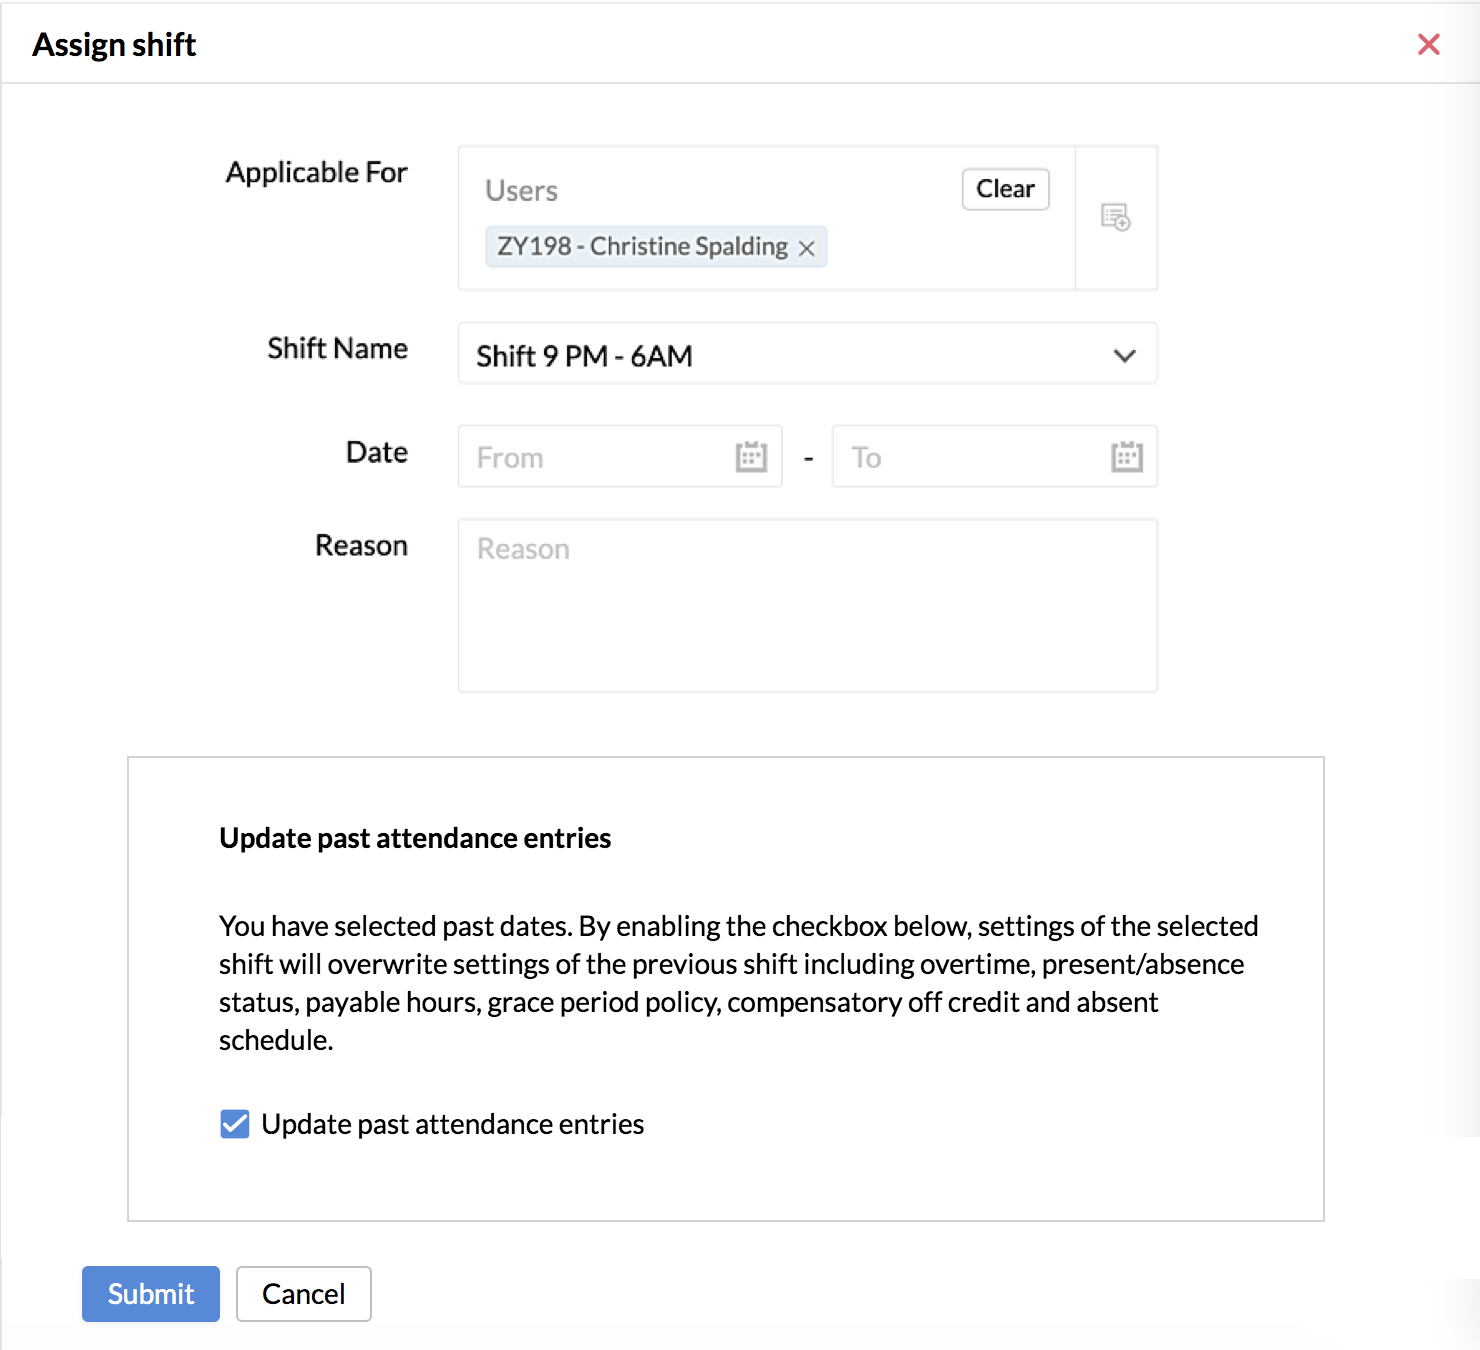
- Under Applicable For, select the employees.
You may also select Location and make employees of that location be included in the Shift.
Note: The employees who belong to the location at the point of time when you assign the shift, will only be part of the shift. For eg. If you have selected 'California', then the employees who join in 'California' at the time that you assign the shift will be included as part of the shift. The ones who join after you have completed this association, will not be part of the Shift. To include them as part of the shift, you will have to either assign the employees by selecting 'Users' or click on 'Assign shift' and select 'California' from 'Location' again, to make the new employees part of the shift.
- Select the Shift name from the drop-down.
- Select From and To date.
- Enter Reason for shift change.
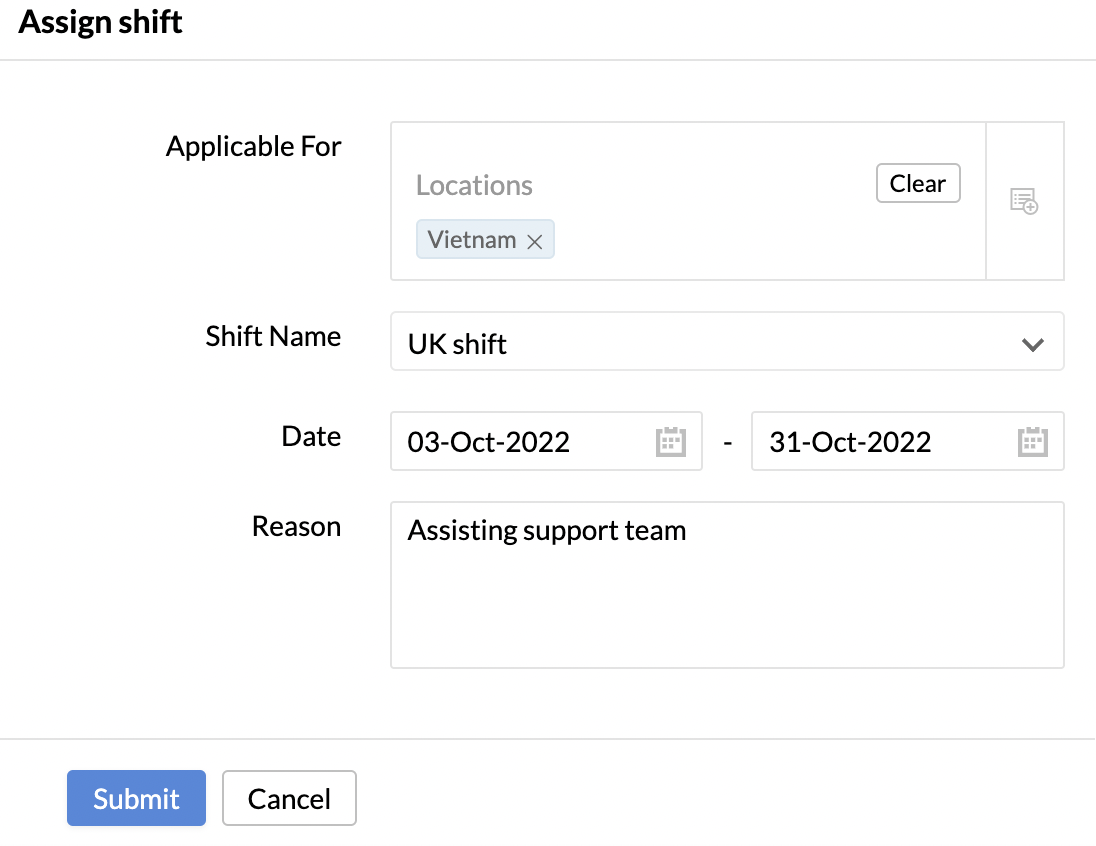
- Click Submit.
Updating past attendance entries while assigning shifts
When shifts are assigned for past dates, all corresponding attendance settings can also be updated. To update past entries, check Update past attendance entries. If you do not want to update the past attendance entries, this option can remain unchecked.
Note 1: This option is available while assigning and importing shifts under Employee shift mapping or Shift calendar.
Note 2: When Update past attendance entries option is enabled, the shift entries are updated up to a maximum of 40 past days.
From the Shift Calendar tab:
- Go to Attendance > Shift Schedule > Shift calendar.
- Click Assign shift.
- Enter the details and click Submit.
Shift Rotation
The main function of the scheduler is to have the shifts changed automatically for selected employees, based on the frequency that is set. Follow the steps given below to add a scheduler.
- From your home page, go to Attendance > Shift Schedule > Shift Rotation > Add Shift Rotation.
- Give a name for the schedule.
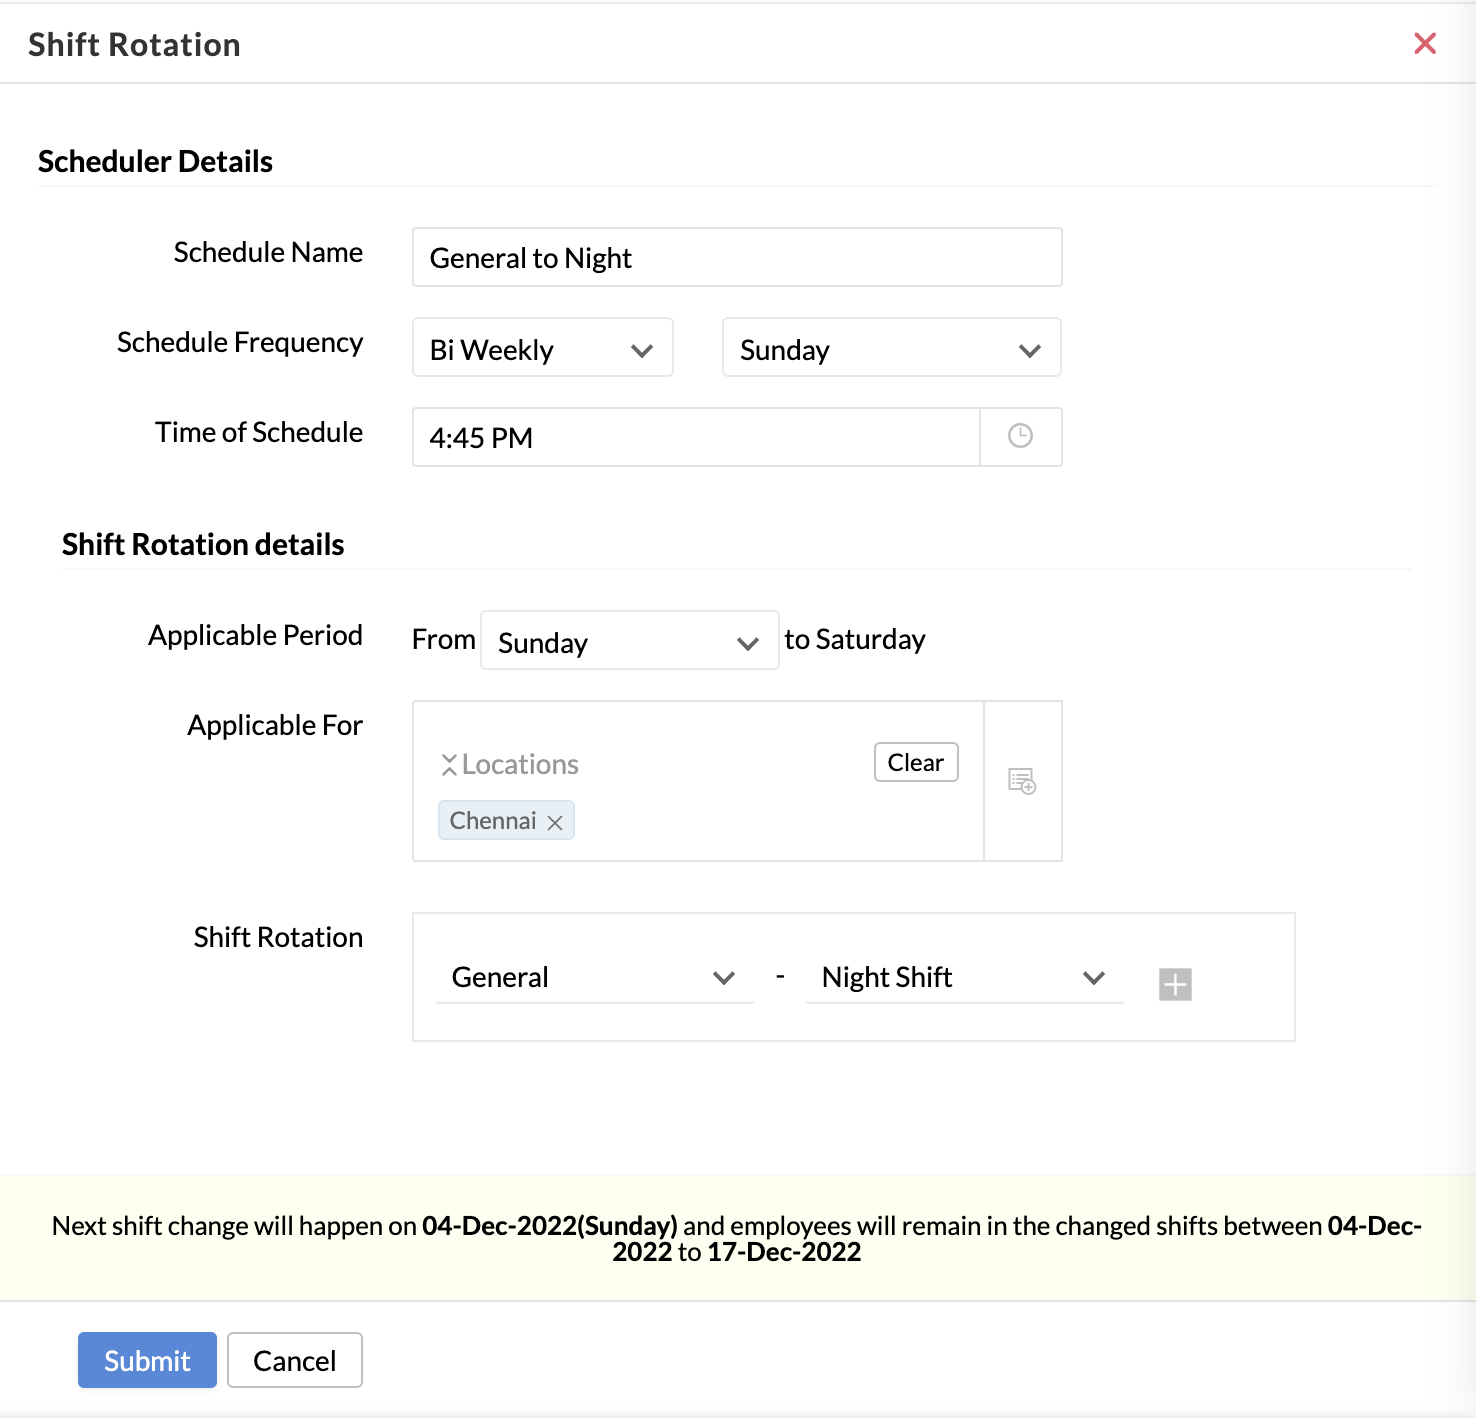
- Set a frequency for the schedule. It can be daily, weekly, bi-weekly, or monthly. for eg, if you select monthly, and give a date, then the shift scheduler will run every month on the given date.
- Enter the time at which the scheduler is to be triggered.
- Under Shift Span, define the span of the shift - i.e, the period for which the Shift is applicable.
- Under Applicable For select the required option from the list of Roles, Departments, Designations, Location, User etc.
- Under Shift Rotation, select the shifts appropriately.
- Use the + icon to map more shifts.
- Click Submit.

Note: An email notification will be sent to the employees whenever there is a change made to their shift.
Usecase 1:
- The Support Team need to be assigned to US Shift.
- The US Shift Team members need to be assigned to Australian shift on the 1st day of every month.
- The schedule is to be triggered on 27th of every month for the following month.
In this case, you can follow the steps as given below:
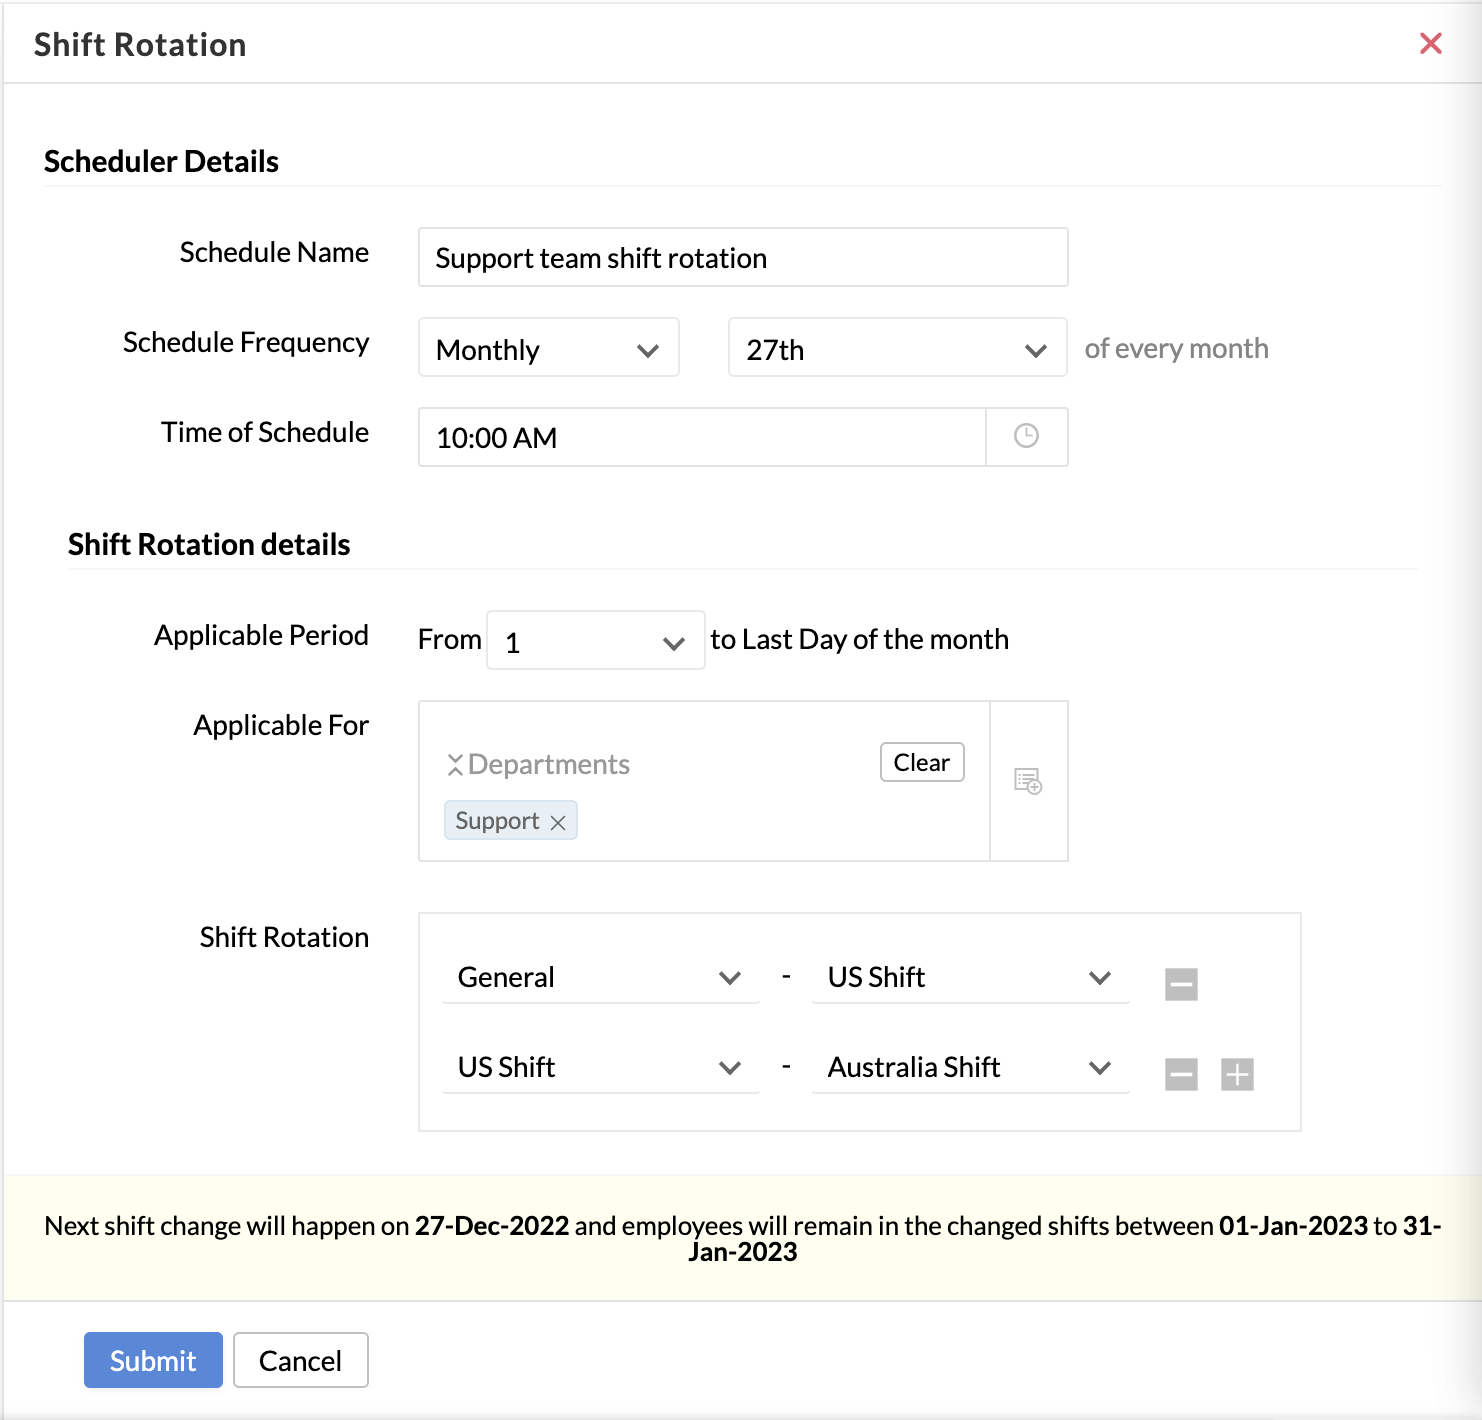
- Enter a schedule name.
- Set the schedule frequency to Monthly, 27th.
- Enter the time of schedule.
- Under Applicable Period, select 1.
- Select the Support team under Applicable For.
- Under Shift Rotation, select General, US Shift in the first row, and US Shift, Australia shift in the second row.
Note: The schedule will be run on the 27th of every month. The shift mapping configured will be carried out based on the shift that is existing on the day when the scheduler runs. I.e - If an employee is in the General shift as on the 27th of the month, then this employee will be changed to the US shift and the ones who are in US shift as on 27th will be changed to Australian shift with effect from the 1st of the month. An email notification will be sent individually, to each member of the Support team indicating the change of shift along with the date on which the Shift change is applicable.
Usecase 2:
An organization works full days all weekdays and half days on Saturdays, with Sunday off as a weekend.They want all employees to be mapped to the full and half day schedule automatically.
To achieve this, two shifts must be created to follow this pattern:
| Monday | Tuesday | Wednesday | Thursday | Friday | Saturday | Sunday |
| Shift 1 | Shift 1 | Shift 1 | Shift 1 | Shift 1 | Shift 2 | Weekend |
The first step is to create the shifts.
To create the shifts,
- Go to Attendance > Shift Schedule > Shift(s).
- Click Add Shift.
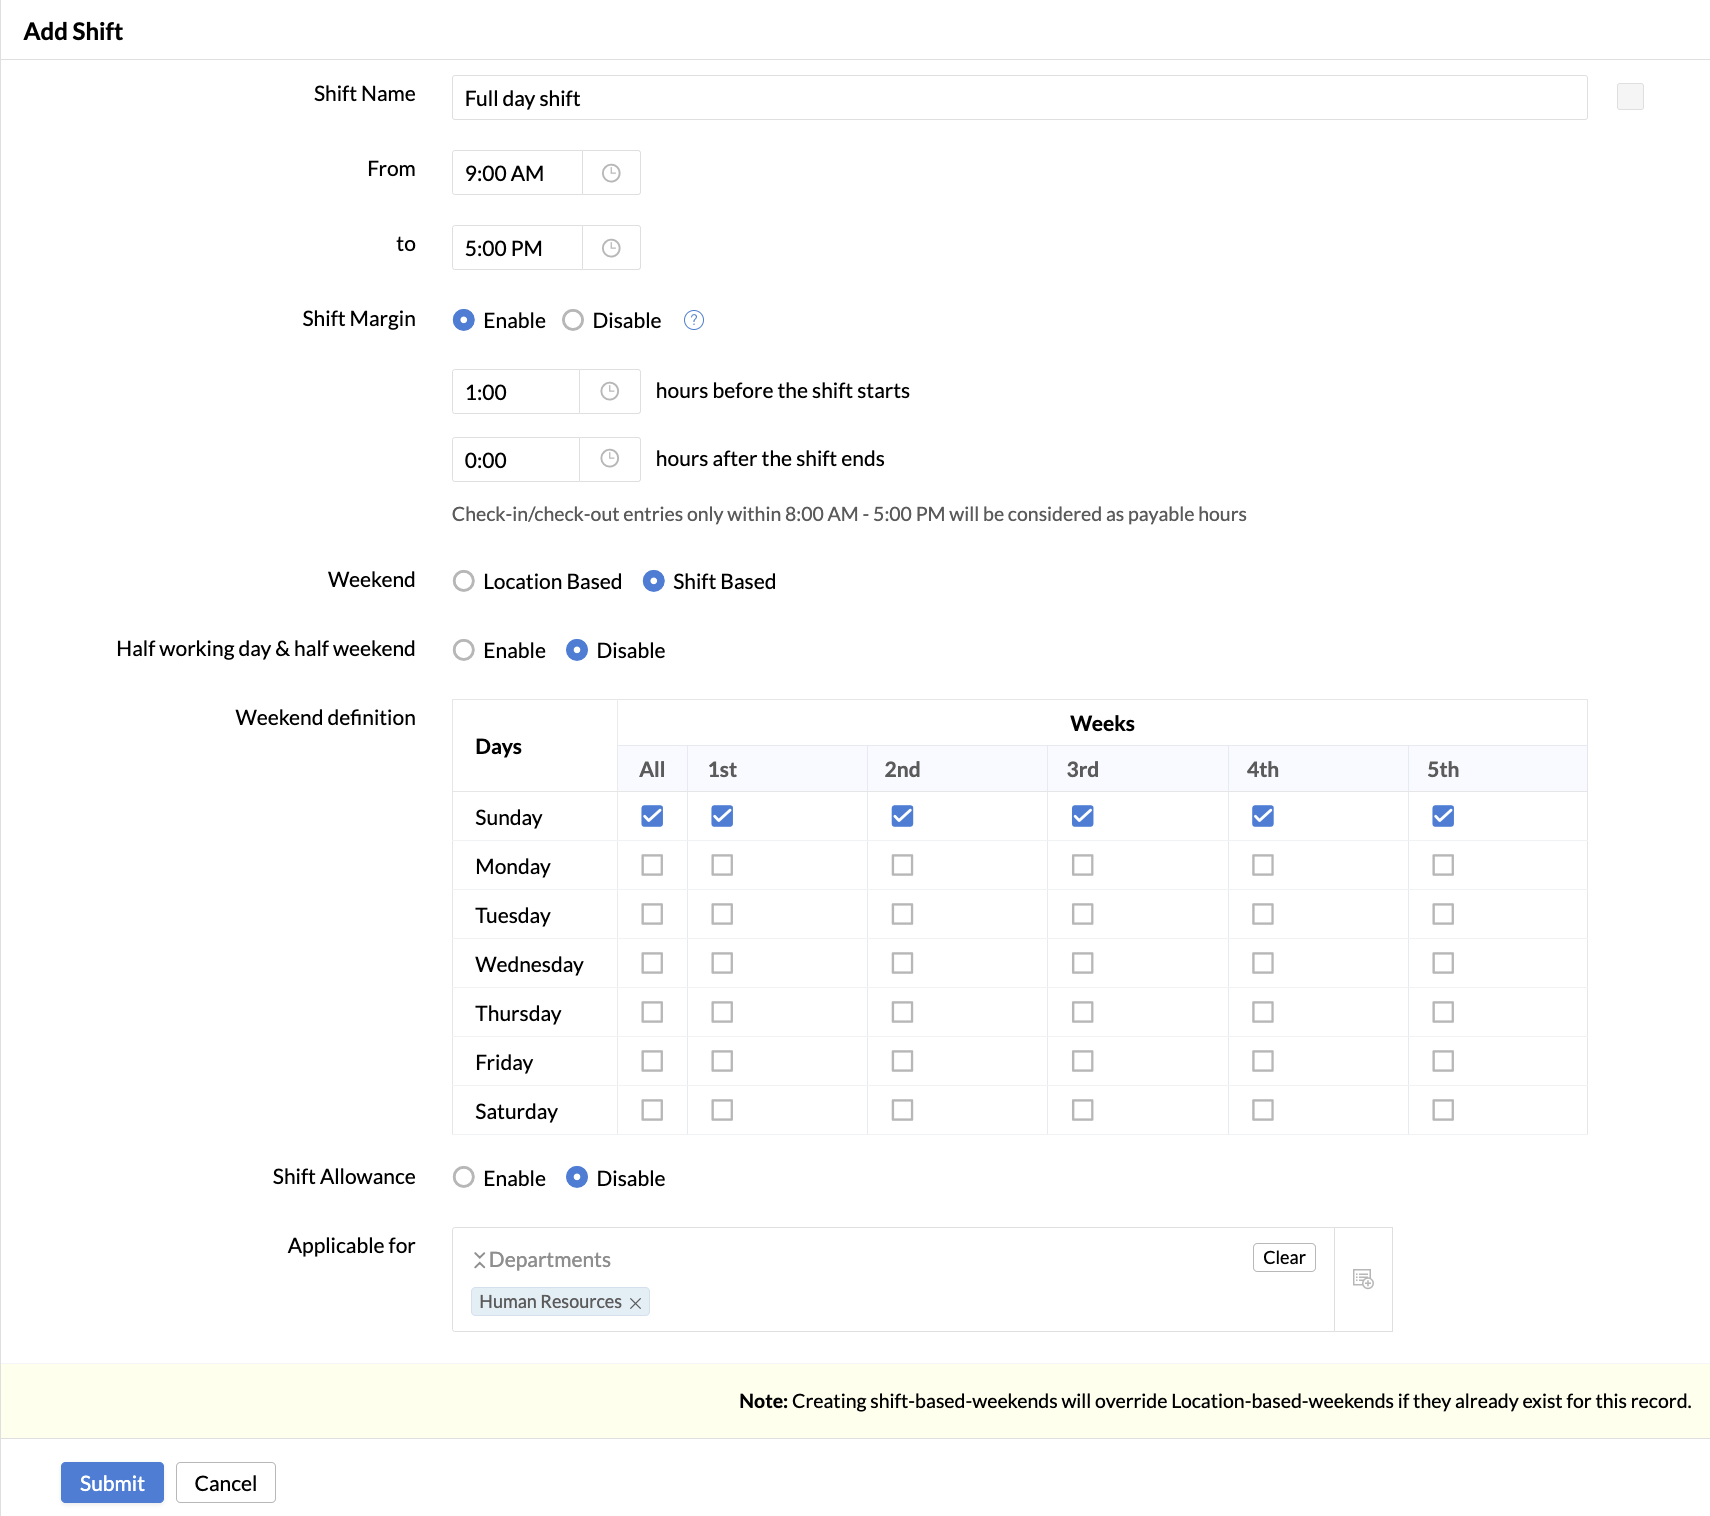
- Enter a name for the shift.
- Enter the full day start and end time.
- Select Shift Based under Weekend.
- Define your weekend - all days can be disabled except Sunday.
- Select for whom this shift is applicable under Applicable for.
- Click Submit.
- Configure a shift for half day in the same fashion.
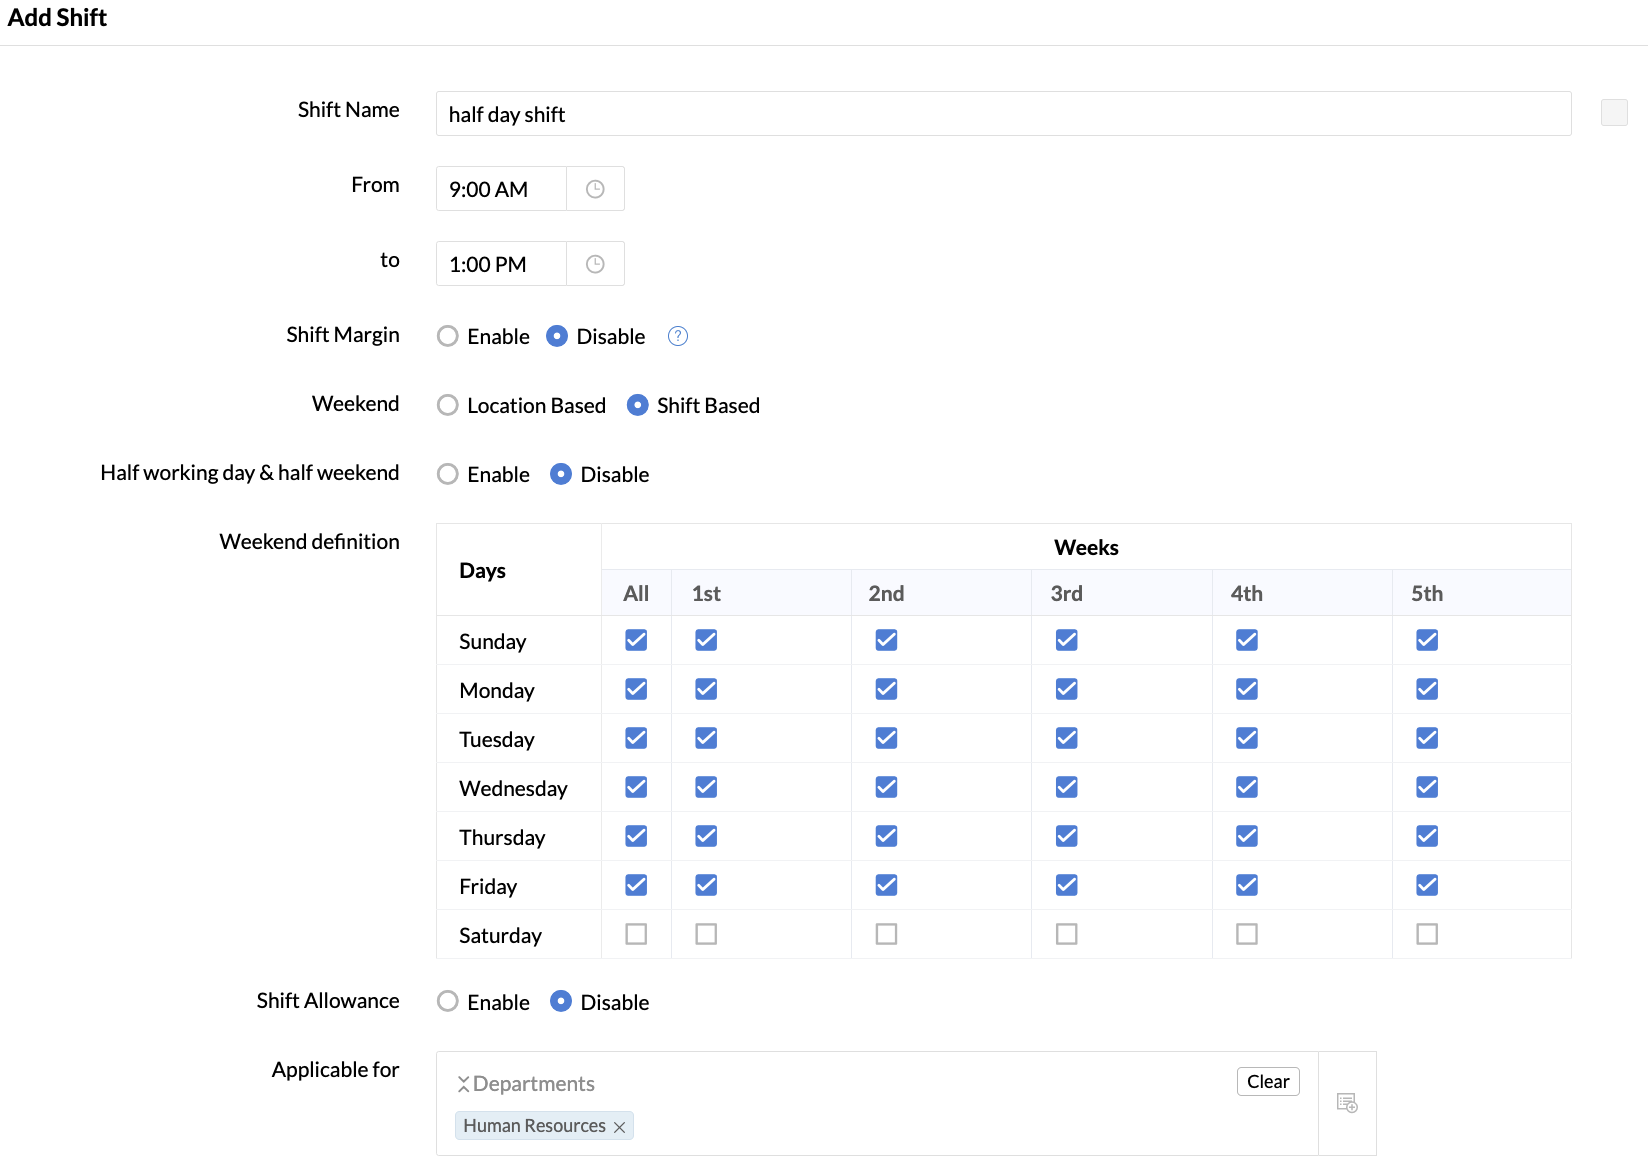
- Enter a name for the shift.
- Enter the half day start and end time.
- Select Shift Based under Weekend.
- Define all days as weekends except Saturday.
- Select for whom this shift is applicable under Applicable for.
- Click Submit.
The next step is to add two shift rotations.
- To add a shift rotation,
- Go to Attendance > Shift Schedule > Shift Rotation.
- Click Add Shift Rotation.
- And one shift rotation that changes from Full day shift to Half day shift every Saturday.
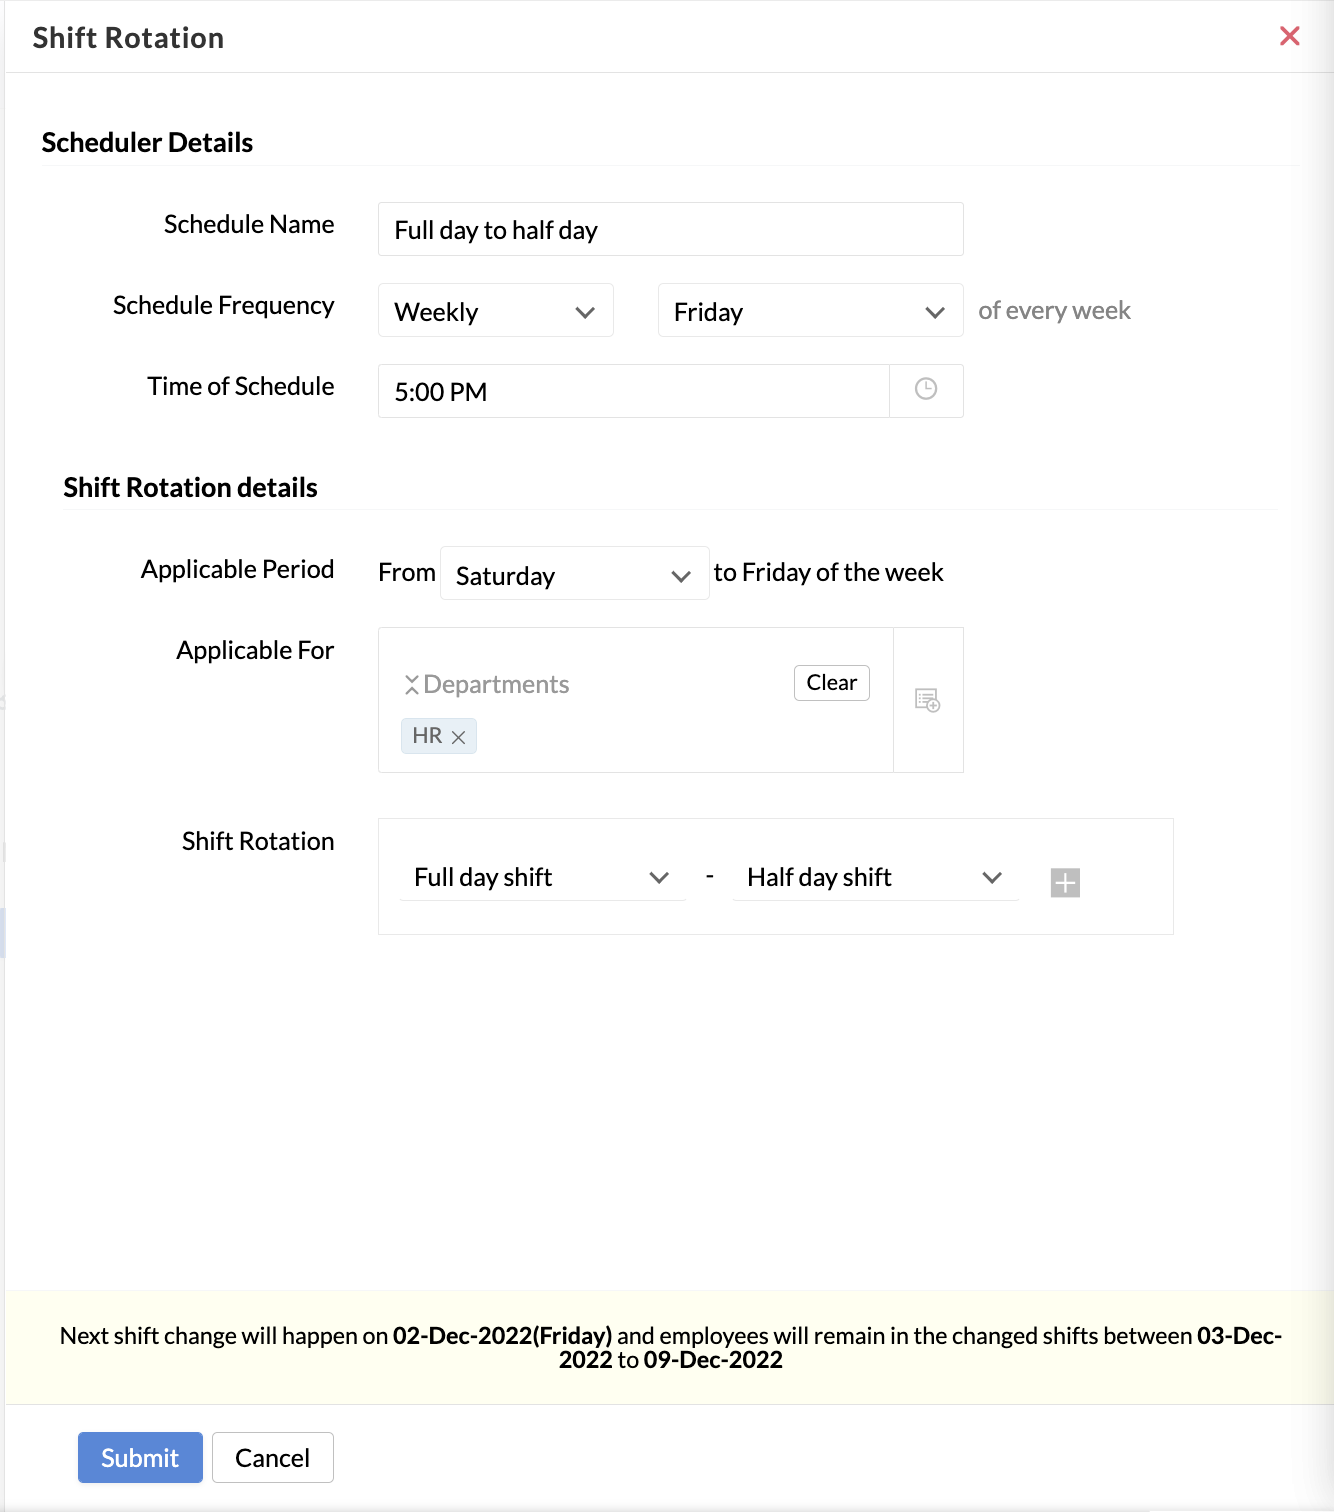
- Enter a name for the rotation.
- Under Schedule Frequency, set it to Weekly, Friday.
- Enter the time when the schedule is to run.
- Under Applicable Period, select Saturday.
- Select whom this rotation is to apply for.
- Under Shift Rotation, select Full day shift, Half day shift.
- Click Submit.
- Add another rotation that changes from Half day shift back to Full day shift, every Sunday.

- Enter a name for the rotation.
- Under Schedule Frequency, set it to Weekly, Sunday.
- Enter the time when the schedule is to run.
- Under Applicable Period, select Monday.
- Select whom this rotation is to apply for.
- Under Shift Rotation, select Half day shift, Full day shift.
- Click Submit.
Based on the above configuration:
- All applicable employees will be on a full day shift from Monday to Friday, and on Friday evening, they will move to half day shift on Saturday.
- On Saturday, they will be in half day shift, and on Saturday evening, they will move back to full day shift.
- Since Sunday is denoted as a weekend, it will remain so.
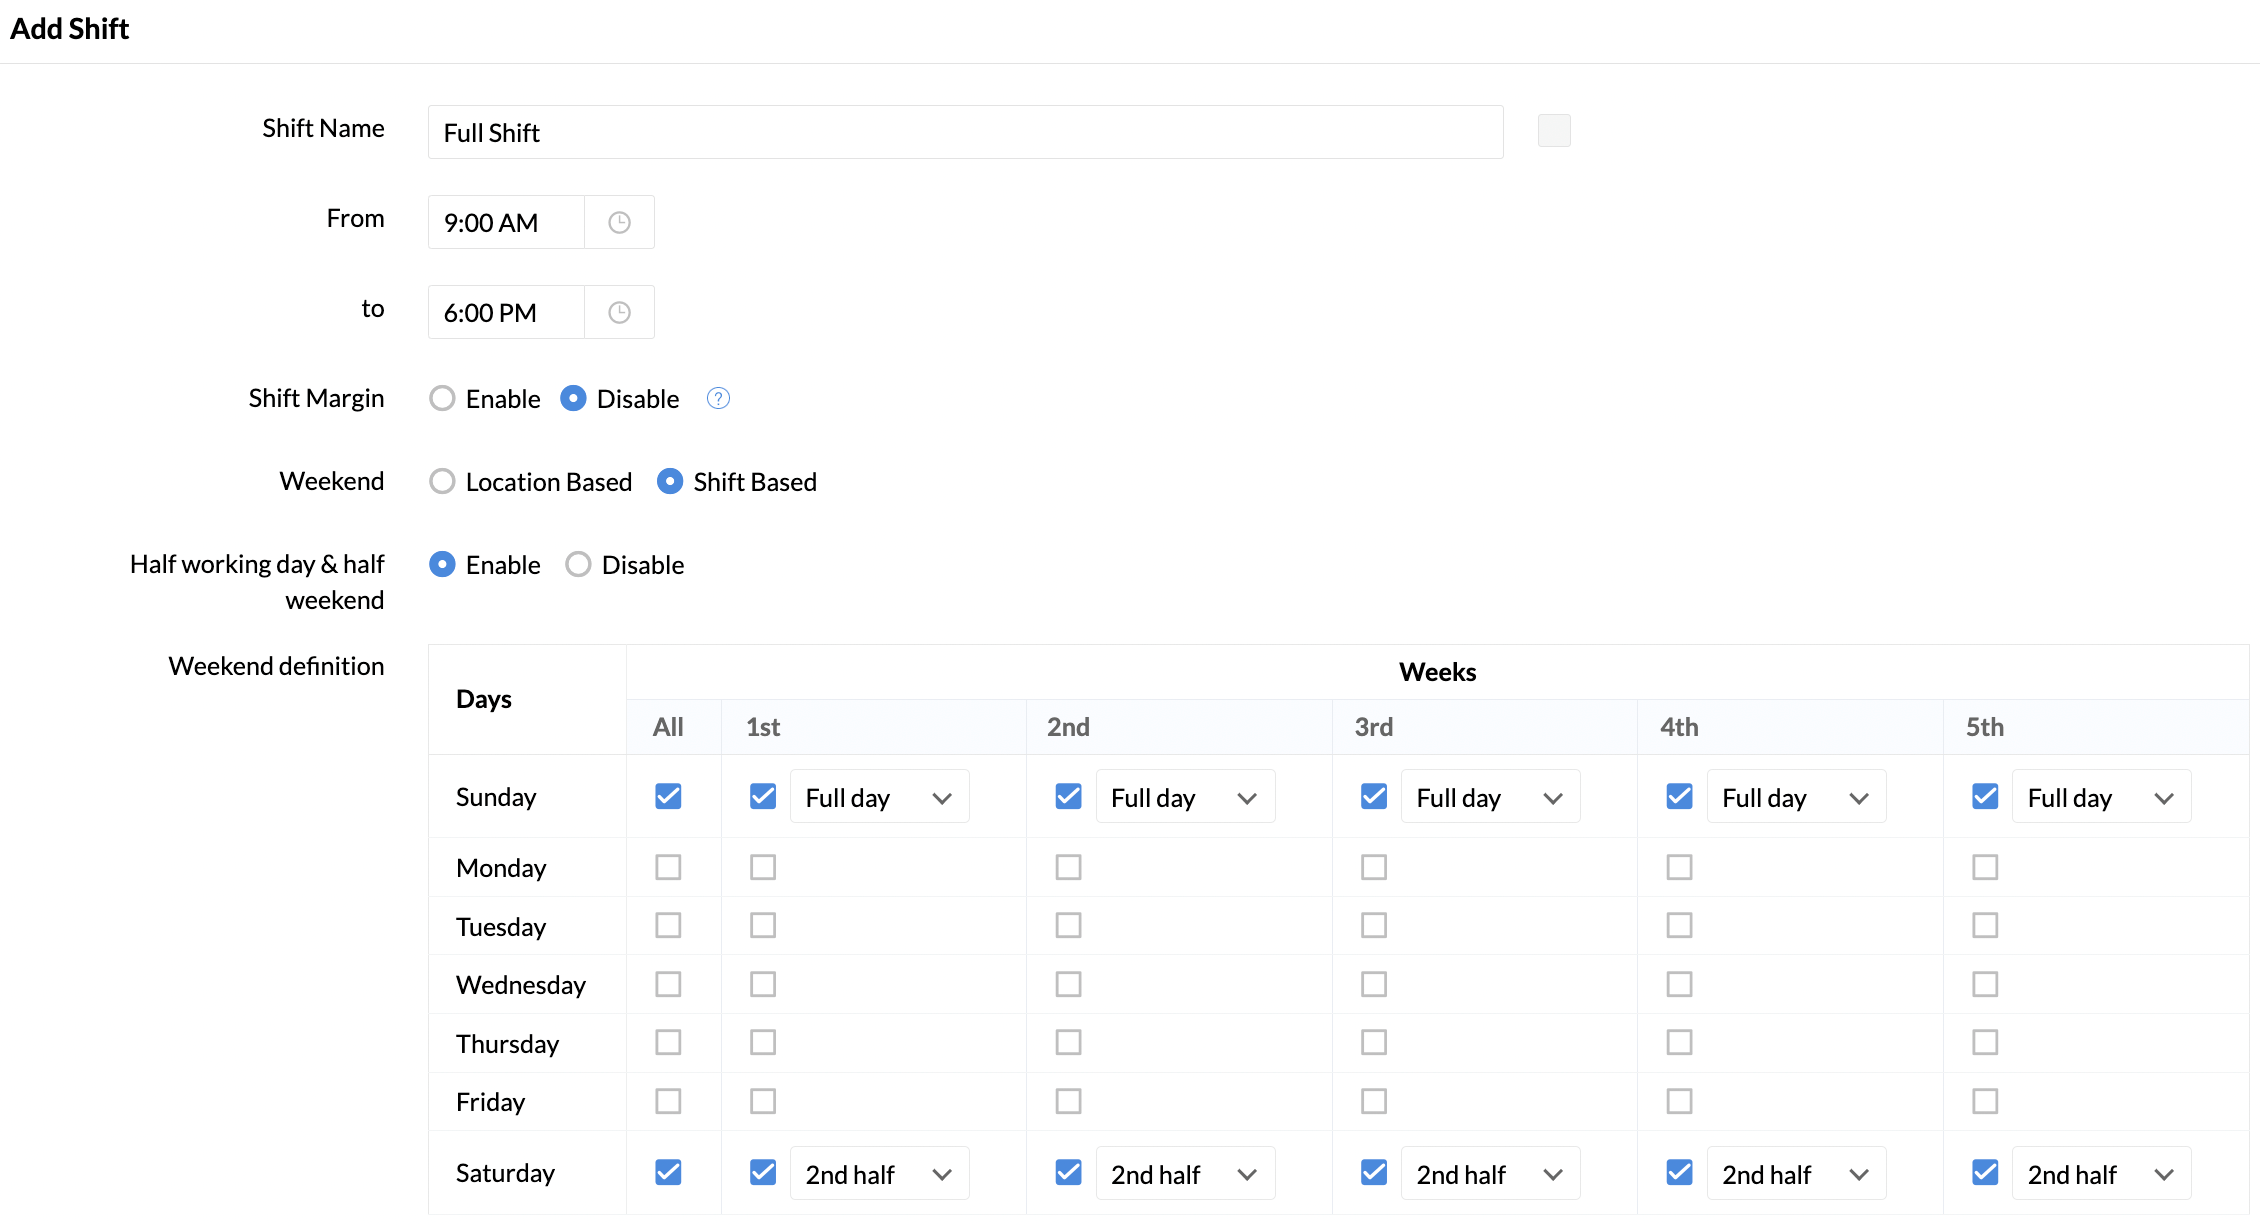
Let us take an organization with full-day shifts between Monday - Friday from 9 AM - 6 PM. This organization has enabled Half working day & half weekend feature. Sunday is included as a full day weekend and Saturday is a half day weekend (half working day). The shift is configured as shown below:
Let us look at the attendance view of an employee, when they are present for all days of the week including half day on Saturday:
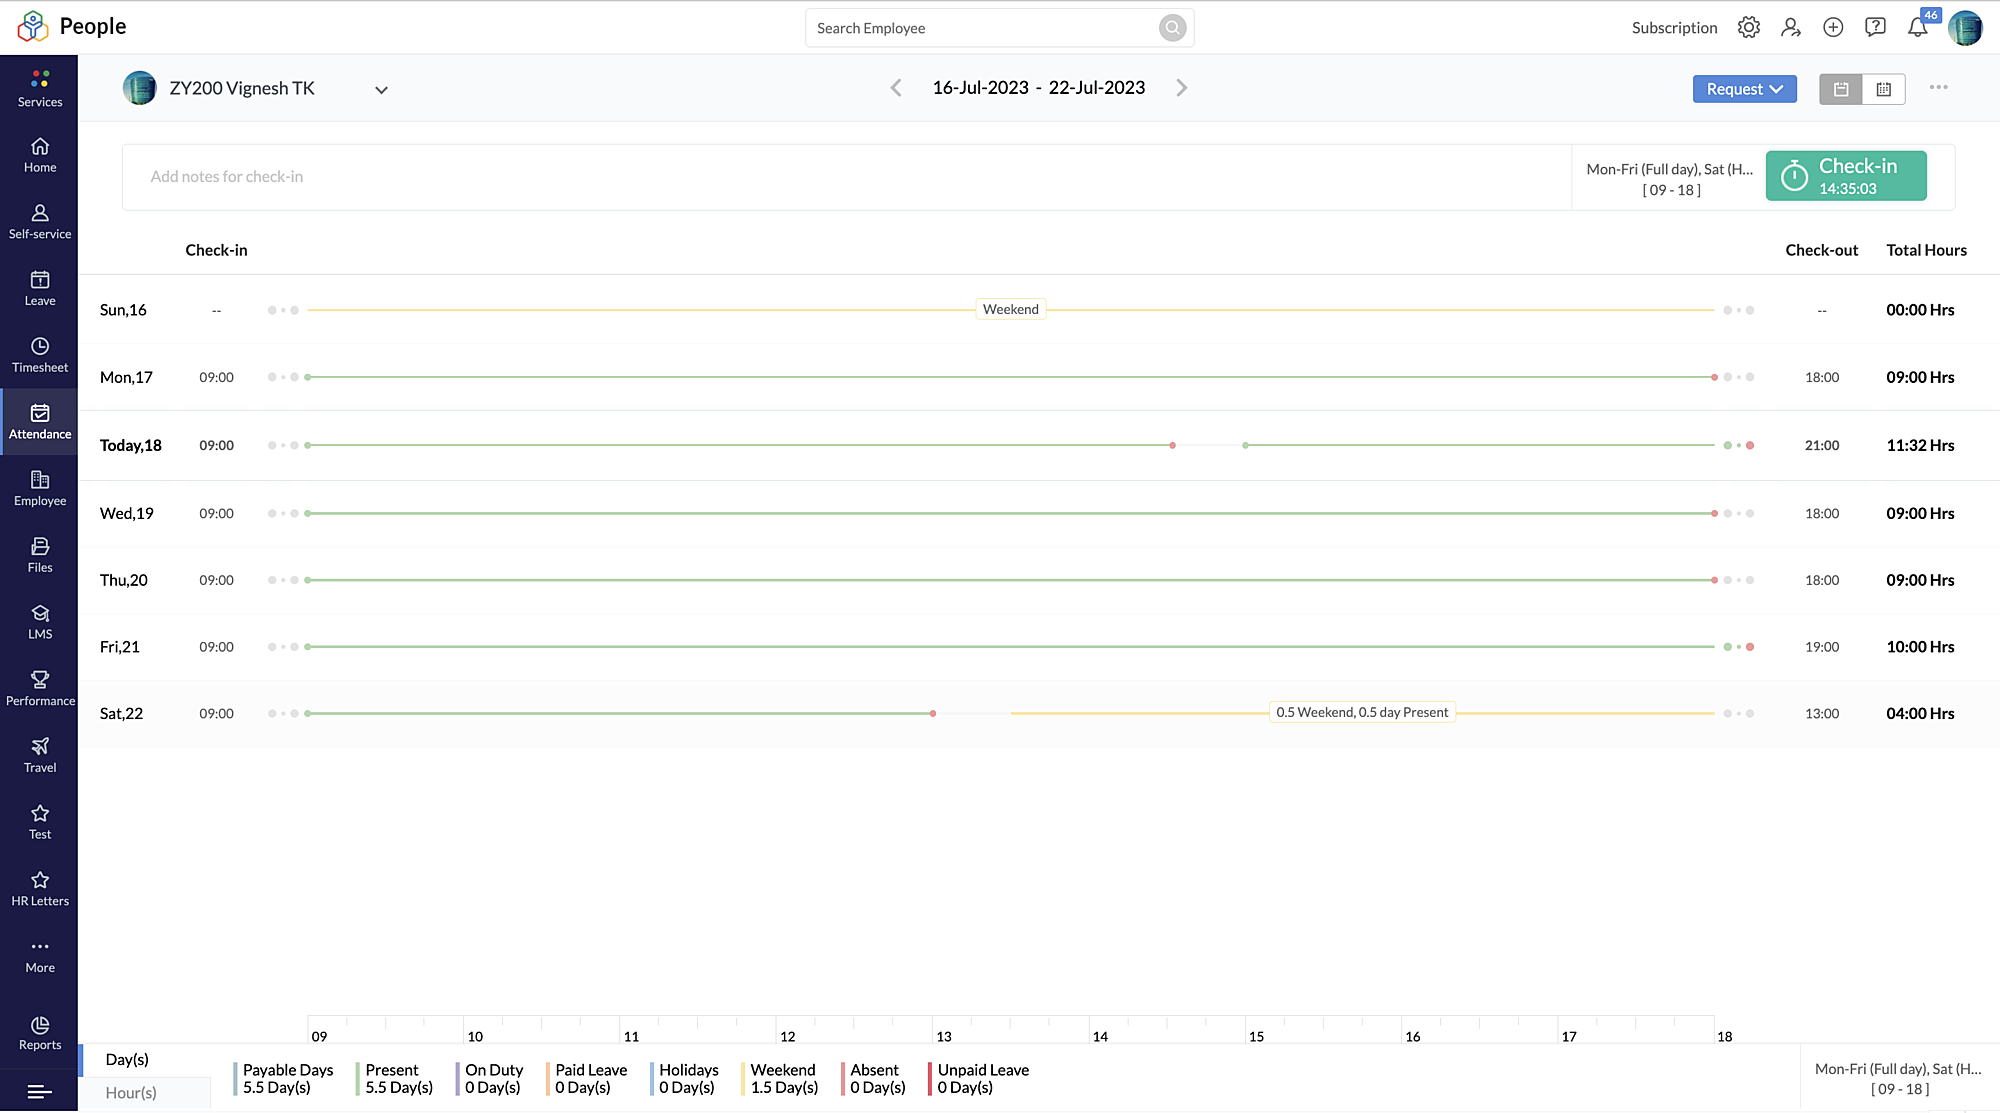
In this case, 5.5 days are payable days (Monday - Friday), and 1.5 days are considered as weekend days (Sunday + half of Saturday). Now if the employee "Vignesh" was trying to apply for leave on Saturday, observe that only 0.5 days leave balance will be deducted as indicated in the screenshot below.

Editing an employee's shift mapping
This can be done through two options.
Directly on popup option
- Go to Attendance > Shift schedule > Shift calendar
- Under Calendar View, employees' shift details will be displayed as per respective days
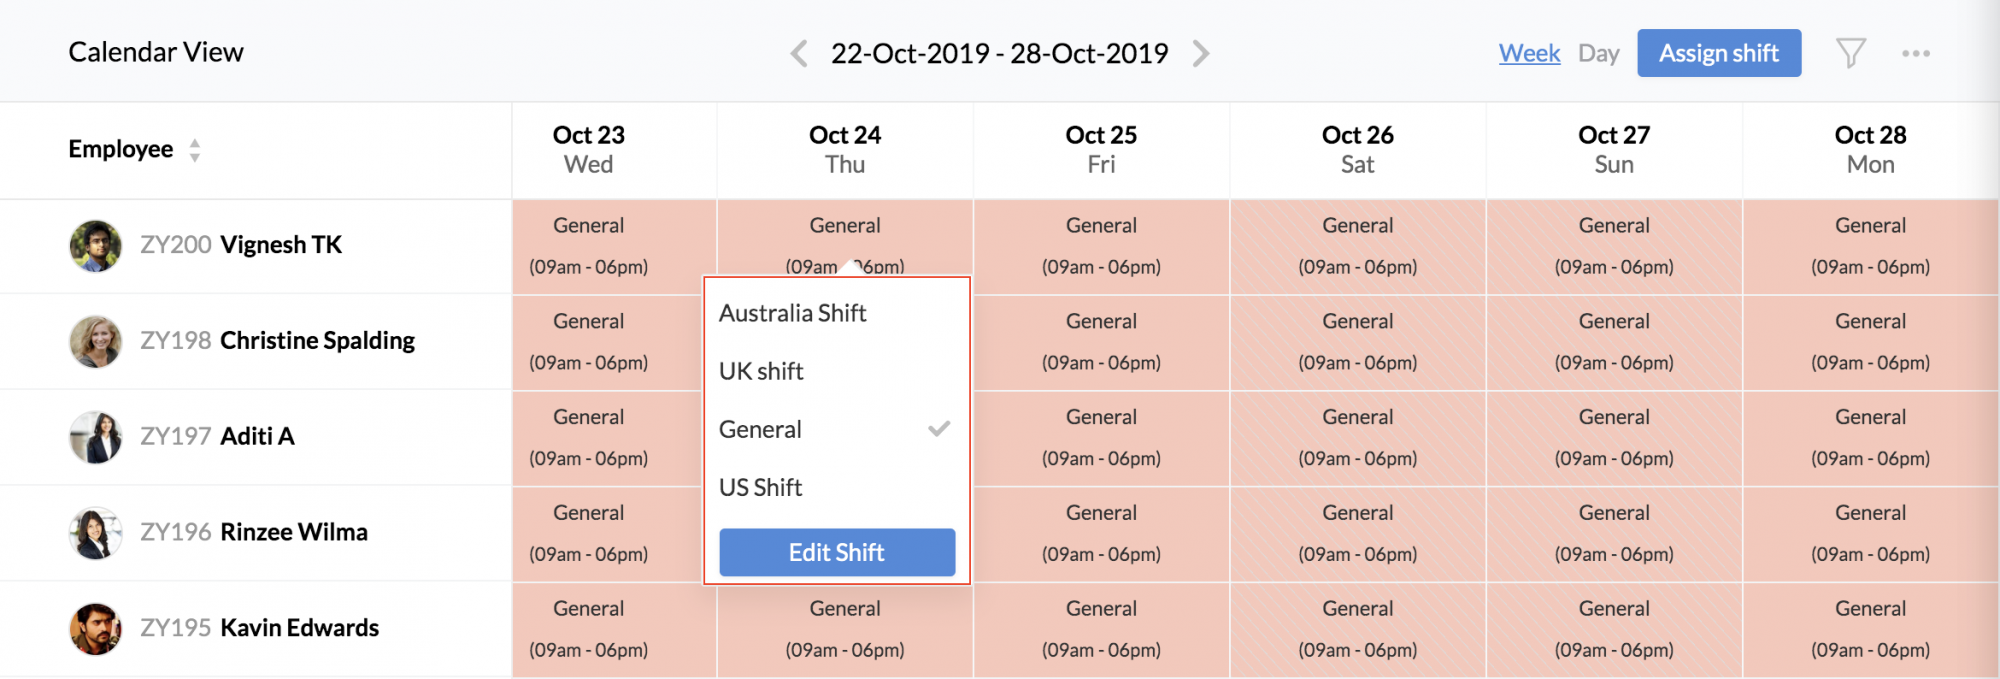
- Select the day, and click on the shift name to see a box with existing shift details
- Select the shift to which you need to map the particular day
Now the shift for that day will change.
Edit button
When you click the Edit button, the following screen will appear:
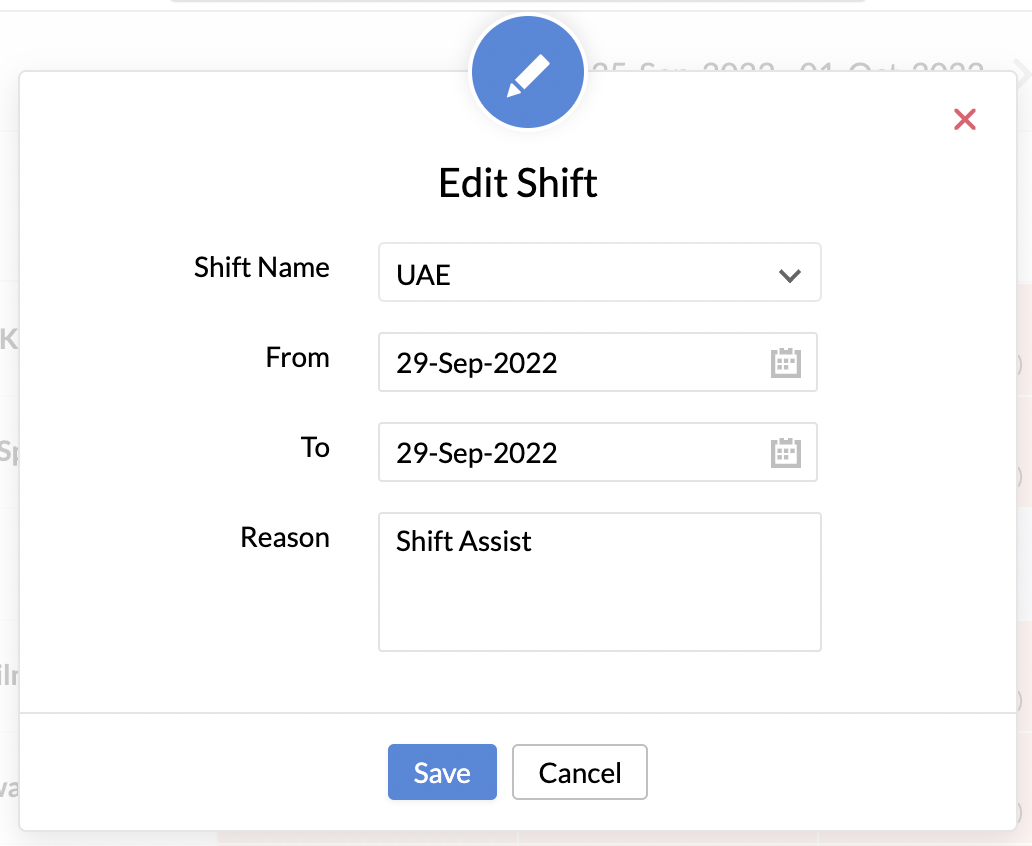
Here you can change the shift for that day alone.
Shift Settings and Notifications
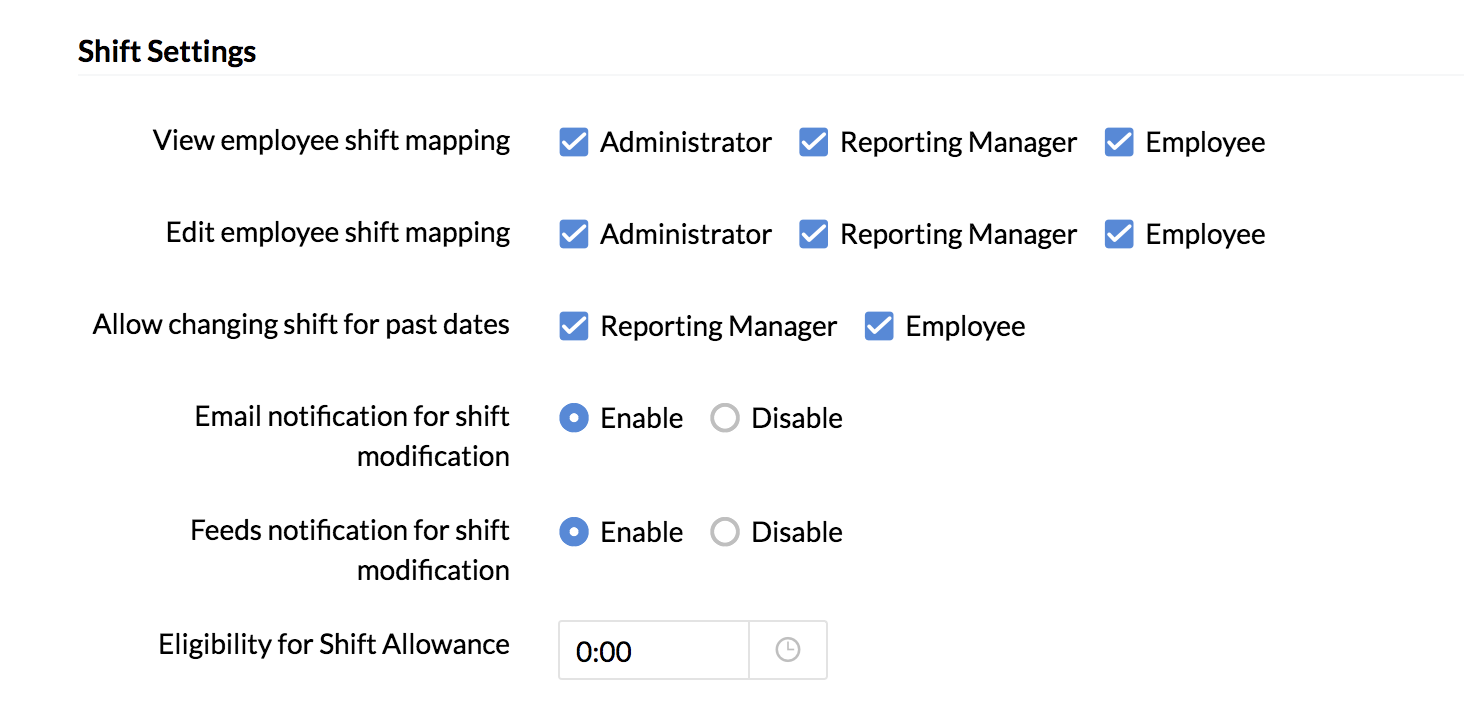
- View employee Shift mapping: Here you can set as to who needs to view employee shift mapping.
- Edit employee Shift Mapping: Permissions to edit employee shift mapping can be set here.
- Allow changing shift for past dates: You can define who can change the shifts for past dates.
- Email notification for shift modification: You can decide whether to enable or disable the email notification that will be sent to employees.
- Feeds notification for shift modification: Here, you can set whether to enable or disable feeds notification sent to employees about any modifications to their shifts.
- Eligibility for Shift Allowance: Here, you can specify the minimum hours that an employee should have clocked-in for the day to be eligible for shift allowance.
Shift Views
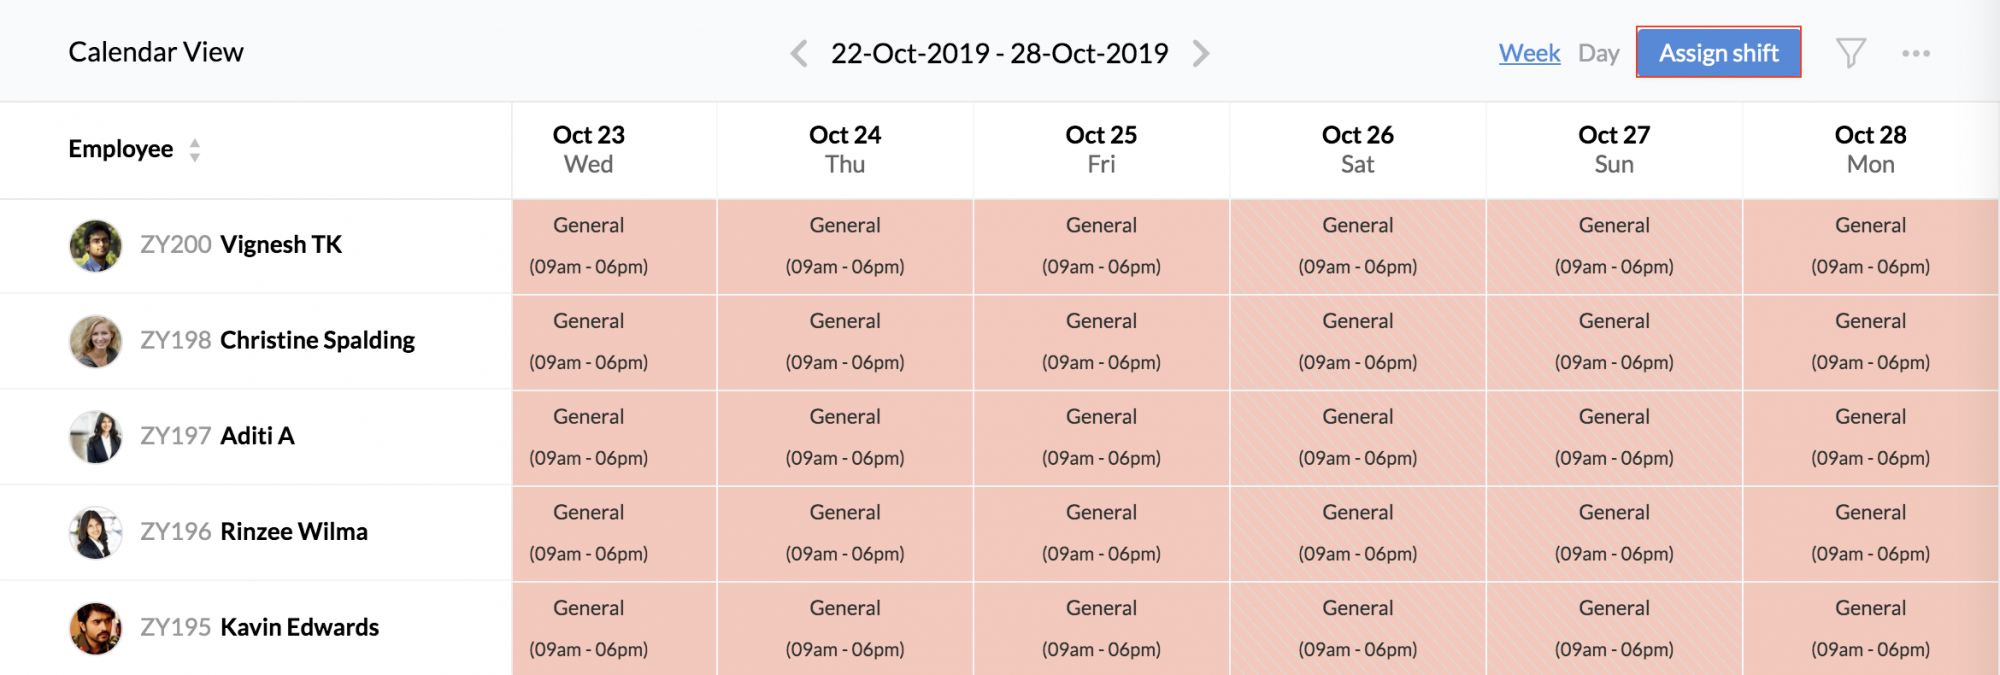
Calendar View
You can have a calendar view of the shift details based on locations, departments, employees etc.
- Go to Attendance > Shift Schedule > Shift Calendar.
- Click on the filter on the right-hand side.
- Select the Location/Department/Employee etc from the drop-down.
- You can select a From and To date to define the period for which you would like to see the shift details.
- Click Search.
You can see the Shift details based on your selection.
To Export or Download, select the appropriate option by clicking on the ellipsis icon
Note: Export can be done only in .xls or .csv format.
Importing Shift Details: Instead of mapping employees one by one to shifts, you can do an import.
- Click on the ellipsis icon and select Import.
- Import the file (of shift details)in the format that is mentioned.
- Map the fields and click Next.
Note: Import can be done only in .xls or .csv formats.
Apart from the Calendar view, you can also take a look at the shift hours in the Shift Hours View tab.
- Go to Shift Hours View.
- Click on the filter to make a selection based on Department/Employee/Shifts/From and to Date etc and click Search.
You can Export/Download/Print this data (based on the filter options used) by clicking on the ellipsis icon. Shift Details can also be imported by clicking on the 'Import' option.
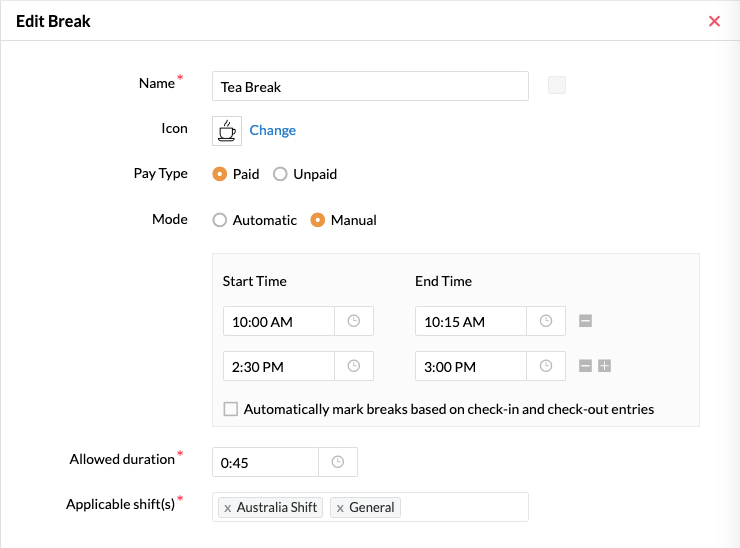
Configure Breaks
Based on the needs of your organization, breaks can be configured in Zoho People. You can choose between an automatic or manual mode, choose if the break is paid or unpaid, configure applicability, set start and end time, and the maximum allowed duration for breaks.
To configure Breaks:
- Go to Attendance > Shift Schedule > Break.
- Click on Add Break.
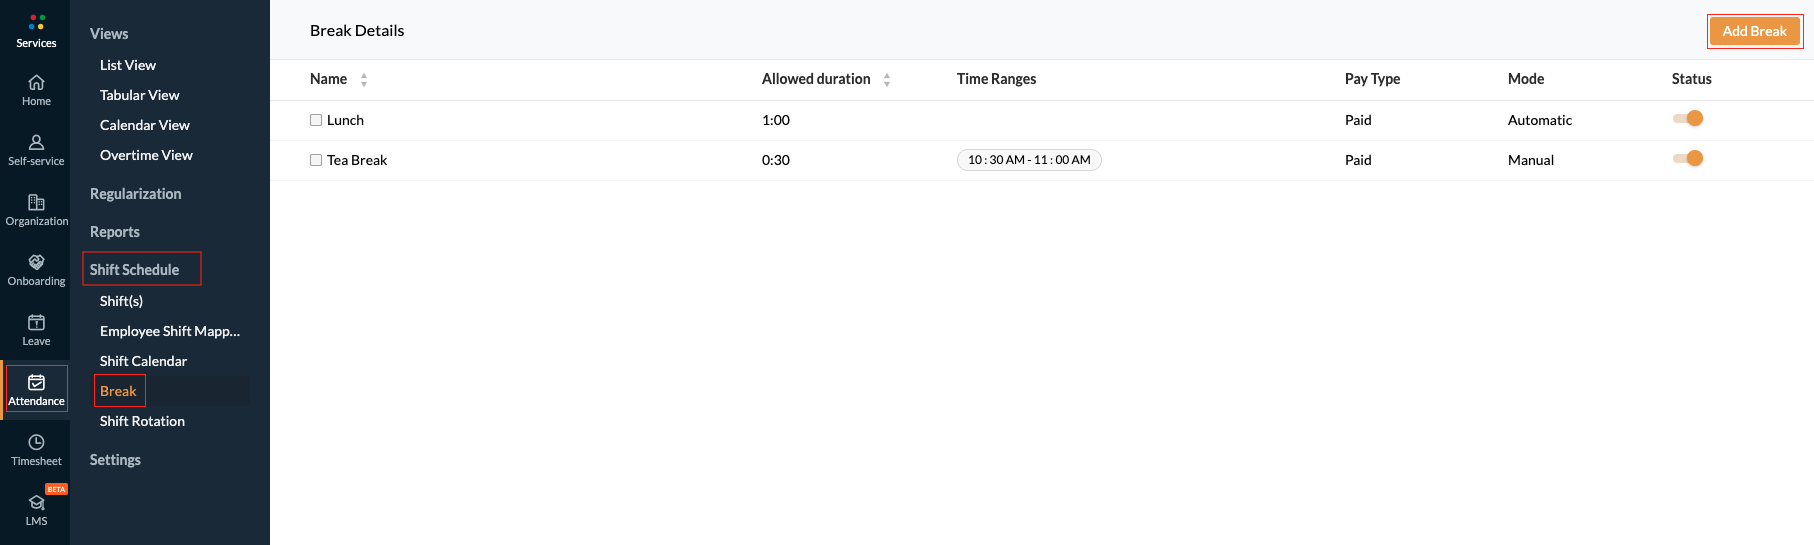
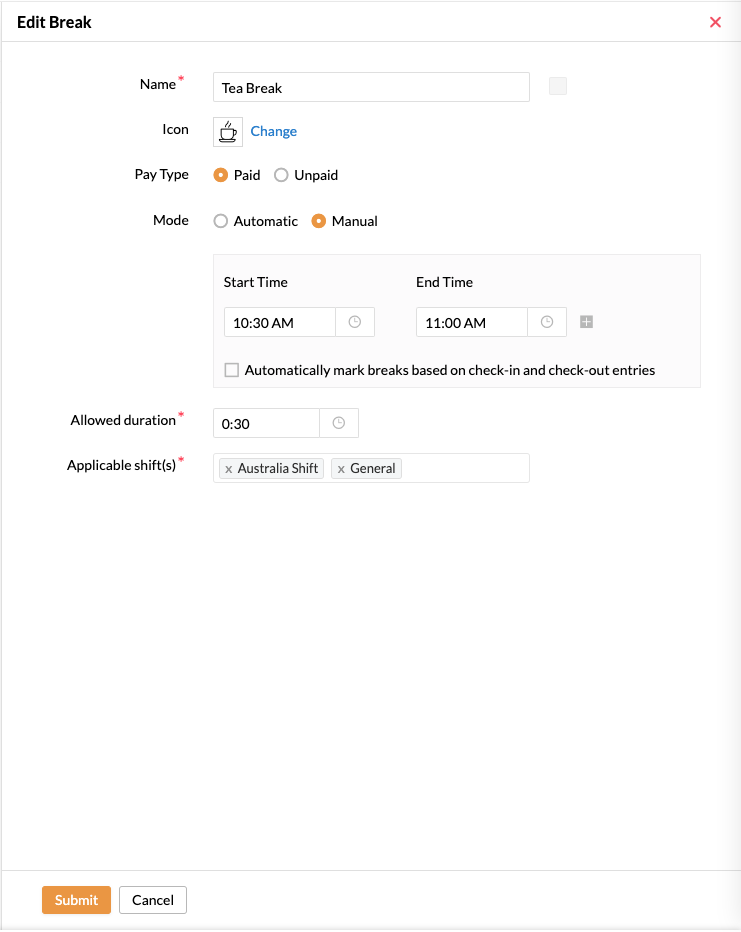
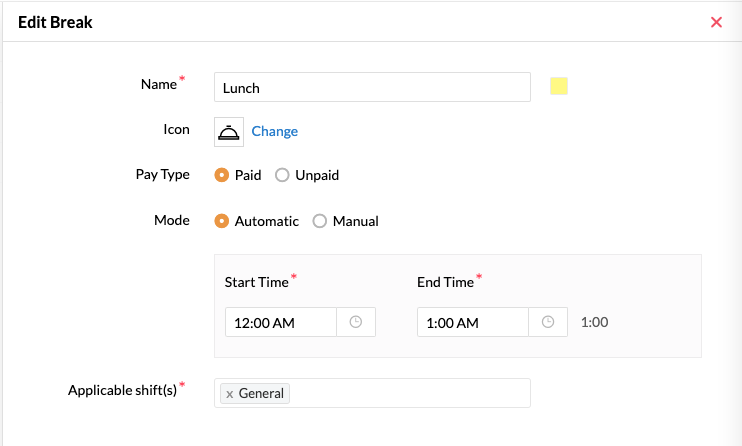
- Specify the name of the break.
- Choose Pay Type. Choosing Paid would mean that breaks are included as payable hours along with paid work hours.
Specify a Mode:
Automatic: Breaks are credited when a user has a check-in before the break period and a check out after the break time. For automatic mode ensure that at least one-time interval is configured.
Manual: In manual mode, when intervals are not specified a user can opt to go for a break whenever they want. However, when intervals are specified a user can only opt to take breaks within the specified intervals.
When "Automatically mark breaks based on check-in check-out entries option" is enabled in manual mode, breaks are credited when user has at least one check-in and check-out before and after each break interval.
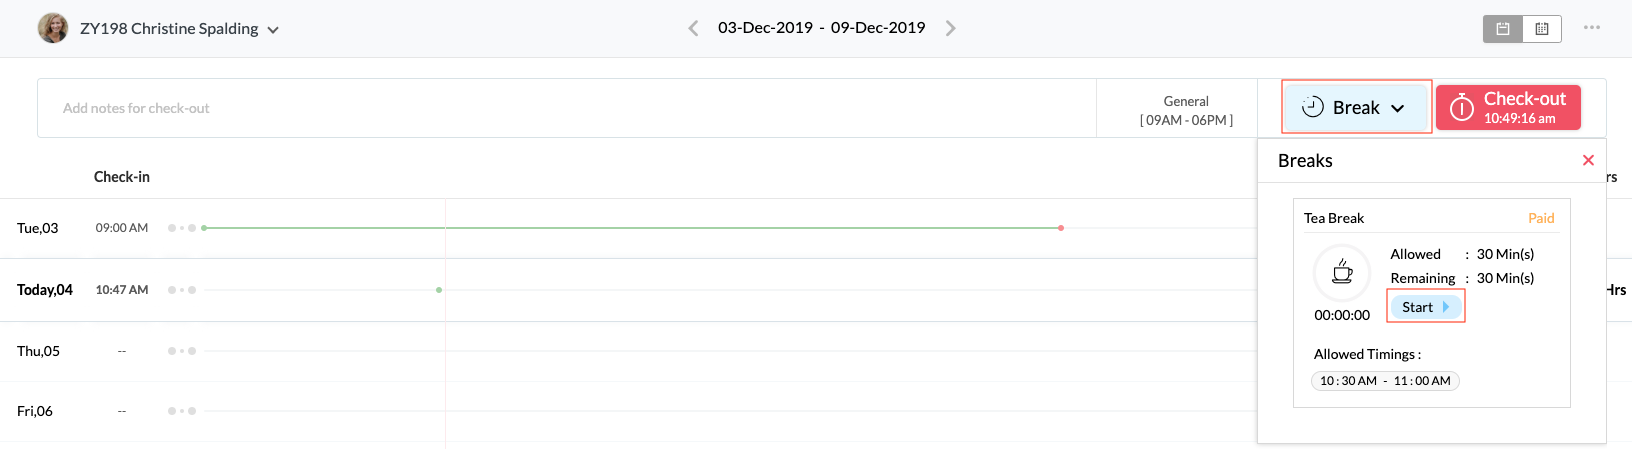
To avail manual break go to Attendance>List View>Break>Start
Manual mode can be configured either with or without intervals. Multiple time intervals can be configured for a manual break.
Note: Intervals are time splits within a certain break.
- Set Duration: Duration is the maximum amount of time a user can be on break
For Automatic break: Duration is automatically calculated from the start time and end time
For Manual break: Duration is manually set
Note: Duration can be less than or equal to the summed up duration of all intervals.
- Configure applicable shifts. Choose the shifts that are eligible for this particular break.
Usecase 1
Let us consider an organization that requires employees to clock 8 hours to be marked as full-day present. Now this organization has 1 break configured as:
Now let us take into account the check-in / check-out entries of a particular employee:
| Check-in | Check-out | System credited break | Inference |
| 9:00 AM | 12:00 PM | ||
1-hour break credited | 12:00 PM - 1:00 PM is considered as paid break | ||
| 12:50 PM | 5:00 PM | 12:50 PM - 1: 00 PM is not considered as worked time as it part of break time |
The employee has clocked 7 hours of work and has 1 hour of paid break.
Total payable time of 8 hours. Thus, the employee is marked as full day present.
Usecase 2
Let us consider an organization that requires employees to clock 8 hours to mark full day present and 4 hours for half day present (strict mode is used under general settings). Now this organization has 1 break with 3 intervals and has a maximum duration of 45 minutes.
Since the option to automatically mark breaks based on check-in and check-out entries option is enabled, system credits breaks automatically as the user below adheres to the requirement of check-in and check-out before and after allotted break time.

Now let us take into account the check-in / check-out times of a particular employee:
| Check-in | Check-out | System credited break | Inference |
| 9:00 AM | 10:00 AM | ||
| 15 minutes break credited (10:00 AM - 10:15 AM) | 10:00 AM - 10:15 AM is considered as paid break | ||
| 10:15 AM | 12:30 AM | ||
| 30 minutes break credited (12:30 PM - 1:00 PM) | 12:30 PM - 1:00 PM is considered as paid break. (User has already used all 45 minutes of paid break at this point) | ||
| 1:00 PM | 2:15 PM | ||
| No break credited | 2:15 - 2:30 is non-payable time as break was not credited. | ||
| 2:30 PM | 5:00 PM |
The employee has only clocked 7:00 hours of work and has 45 minutes of paid break
Total payable time of 7:45 hours while the organization requires 8 hours. Thus, the employee is marked as half-day present only (Strict mode is used in attendance).
Usecase 3
Let us consider an organization that requires employees to clock 9 hours to mark as full-day present. Now this organization has 1 break with 2 intervals configured.
Here manual mode is being used, so the user needs to avail breaks manually within the allotted time.
Now let us take into account the check-in / check-out times of a particular employee:
| Check-in | Check-out | Employee takes manual break | Inference |
| 9:00 AM | 10:00 AM | ||
| 15 minutes (10:00 AM -10:15 AM) | 10:00 AM - 10:15 AM is considered as paid break time. | ||
| 10:15 AM | 2:30 PM | ||
| 40 minutes (2:30 PM - 3:10 PM) | 2:30 PM - 3:00 PM is considered as paid break time. 3:00 PM - 3:10 PM will not be considered for payment. | ||
| 3:10 PM | 6:10 PM |
The employee has clocked 8 hours 15 minutes of work time and 45 minutes of paid break.
Total payable time of 9 hours. Thus, Employee is marked present.
To generate reports:
You can go to Attendance > Views > Tabular View
Click on the Ellipsis icon > select Export
Select the format in which you would like the report to be in (xsl or csv) and select 'Include all check-in / check-out entries' if you would like this to be a part of your report.
A report will be generated (based on the view that is chosen currently - weekly or monthly). The report will contain information on the check-in and check-out time, date, and location. It will also contain information on the break type, the paid break and unpaid break time, total payable hours, overtime, deviation time, etc.
When an employee has utilized the Break, it can also be viewed under Attendance > Reports > Daily Reports
For monthly reports, you can go to Attendance > Reports and select the Summary or User reports.
Importing Shifts
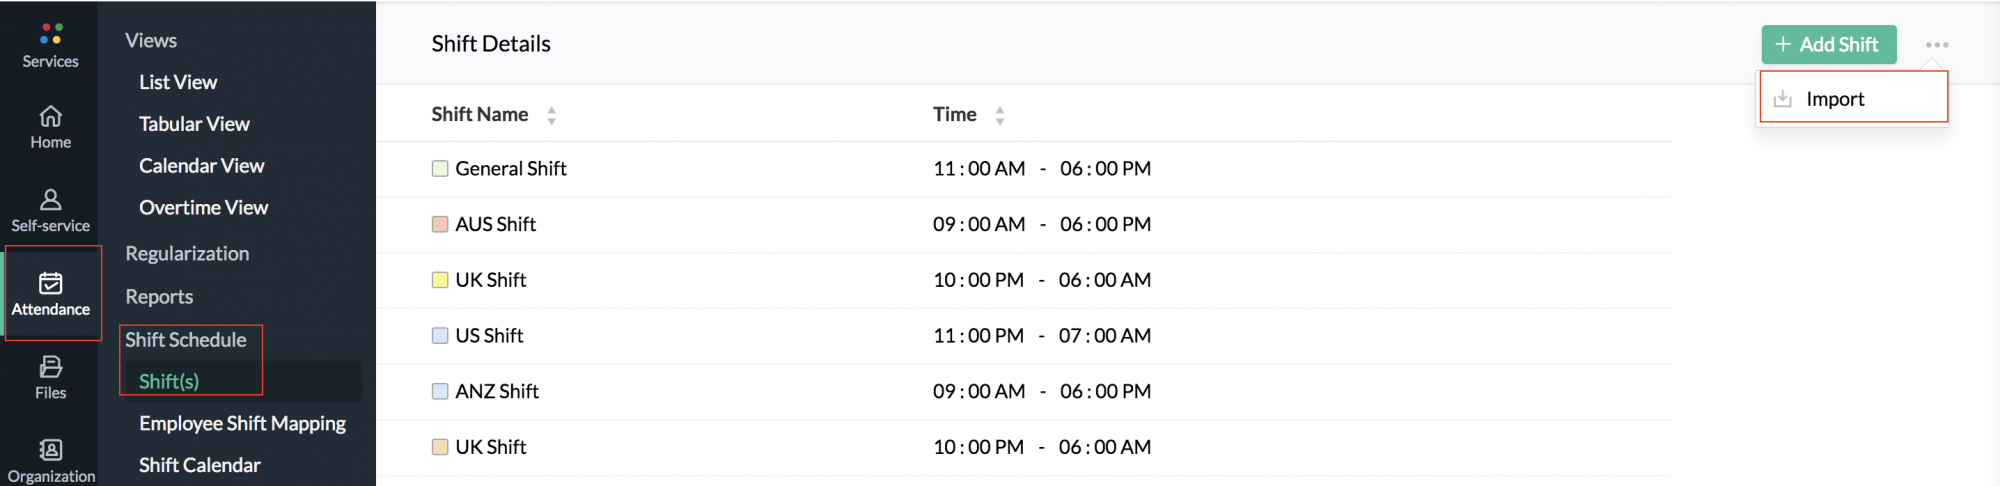
When a large number of employees' shift details need to entered into the system, this can be done using the import settings in Shifts. To navigate to this option:
- Go to Attendance > Shift Schedule > Shift(s)
- Click the ellipsis icon next to 'Add Shift'
- Click Import
- Import the file in either xls or csv format based on the sample format provided
The format shows the mandatory and optional fields for the file import.
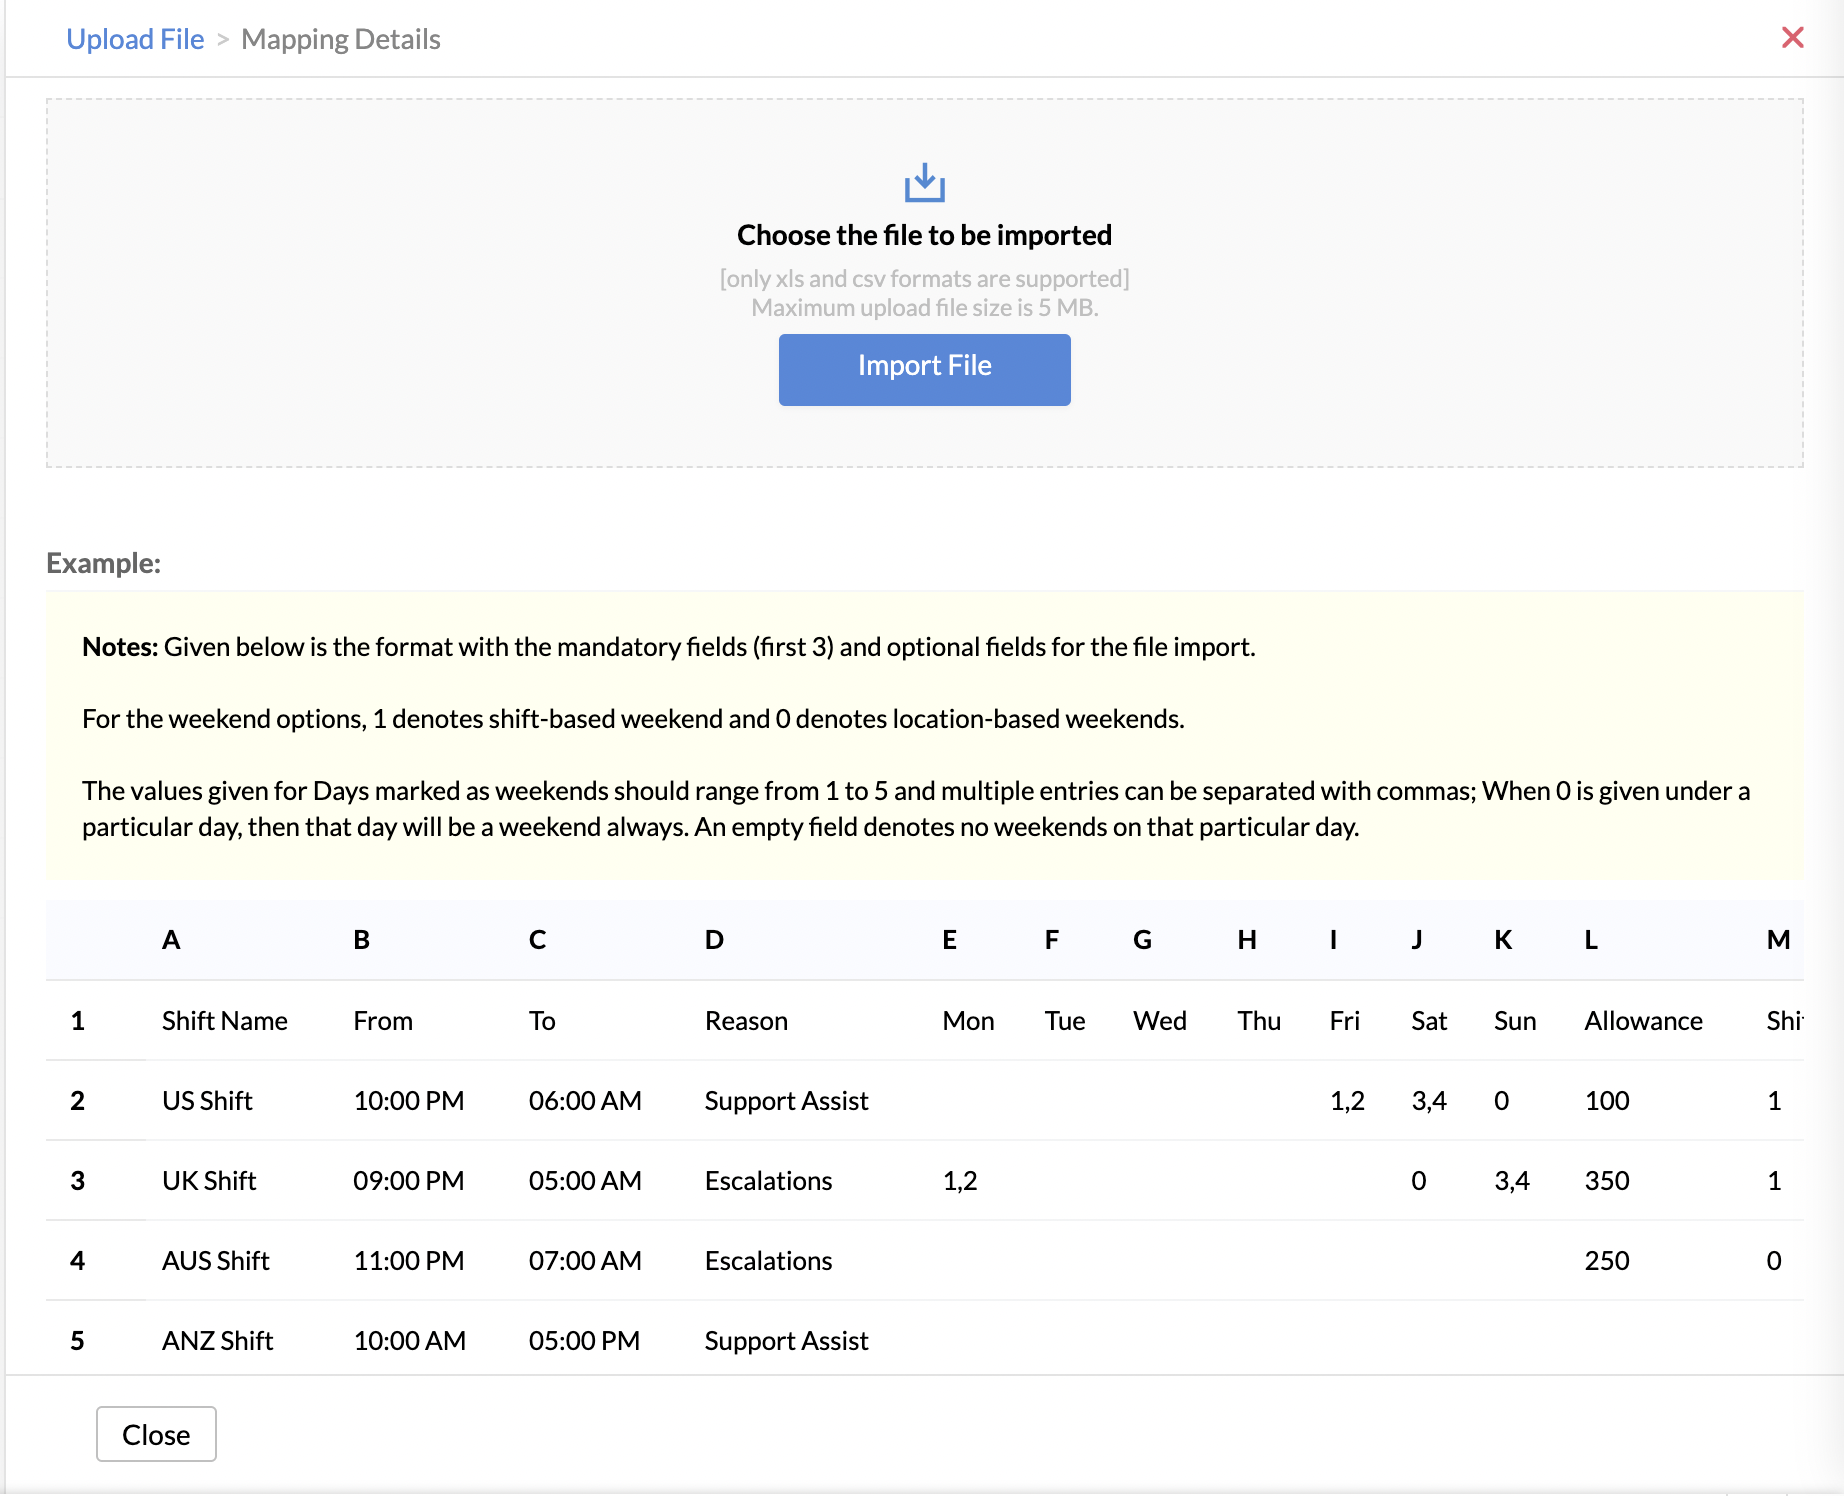
If all the shifts in your organization are location-based then only the first 3 mandatory fields ( Shift Name, From Time, To Time) need to be filled and 0 should be entered for Weekend Options.
If shift-based weekends are included, enter 1 under Weekend Options. If the weekend option column is not given, then all shifts will be considered under shift-based weekends.
For each specific day, specify when that day is considered as a weekend using 1 to 5.
For instance, if the first and fifth Fridays are to be considered weekend, then enter 1, 5 under Friday.
If a day is not considered a weekend, leave it blank.
- Once the file is uploaded, update the mapping details
- Once the mapping has been completed successfully, you will see the message ' The selected file has been imported successfully'. You will also see a summary of the completed import.
- If there are any errors in the imported file, they will be displayed along with the row details and can be rectified. The correctly entered details will be successfully imported. If this happens, a new file with the corrected data can be imported again to ensure all the data in the file is imported.
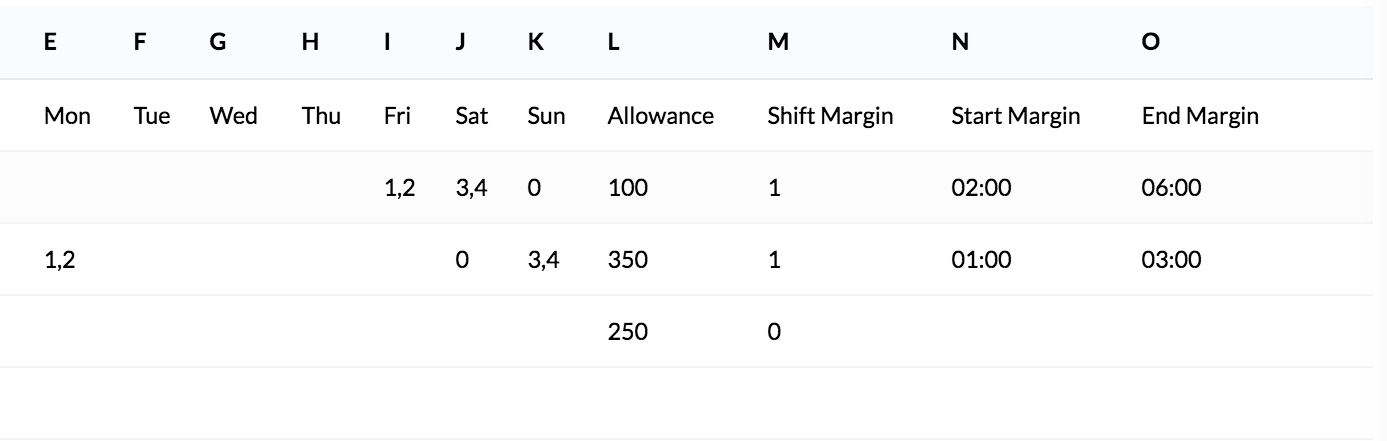
If Shift Margin is enabled, enter 1 , else 0. If enabled, enter the hours before the shifts starts under Start Margin, and hours after the shift ends under End Margin column.
Your file has now been imported successfully.
Shift Change & Shift Change Approval
Shift Change feature allows employees to easily raise a shift change request. This is particularly useful in organizations that have rotational and multiple shifts where employee shifts are not preplanned. An approval process can be configured for a shift change request that allows managers to easily review and approve shift change requests
Setting Up Approval for Shift Change
To setup an simple approval flow for shift change, Navigate to Attendance > Settings > Approval > Shift Change > Add Approval

Here, a single level approval is setup, with the Reporting Manager being the approver. An approver message is also configured.
Raising a Shift Change Request
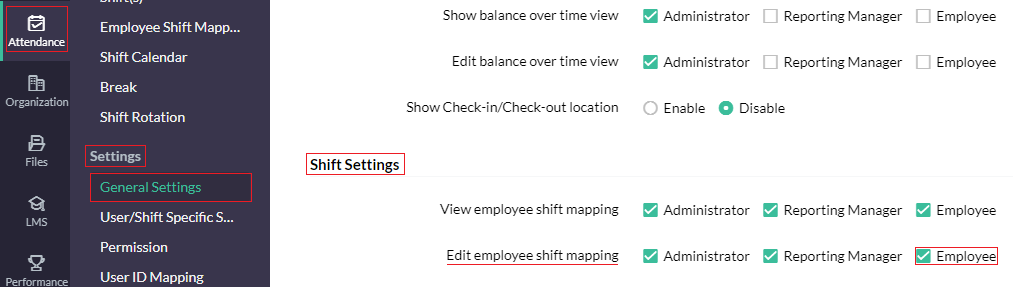
- In order to allow employees to raise shift change requests, Employees must be given shift mapping permissions. This is configured in Attendance > Settings > General Settings and enable Employee in Edit employee shift mapping.
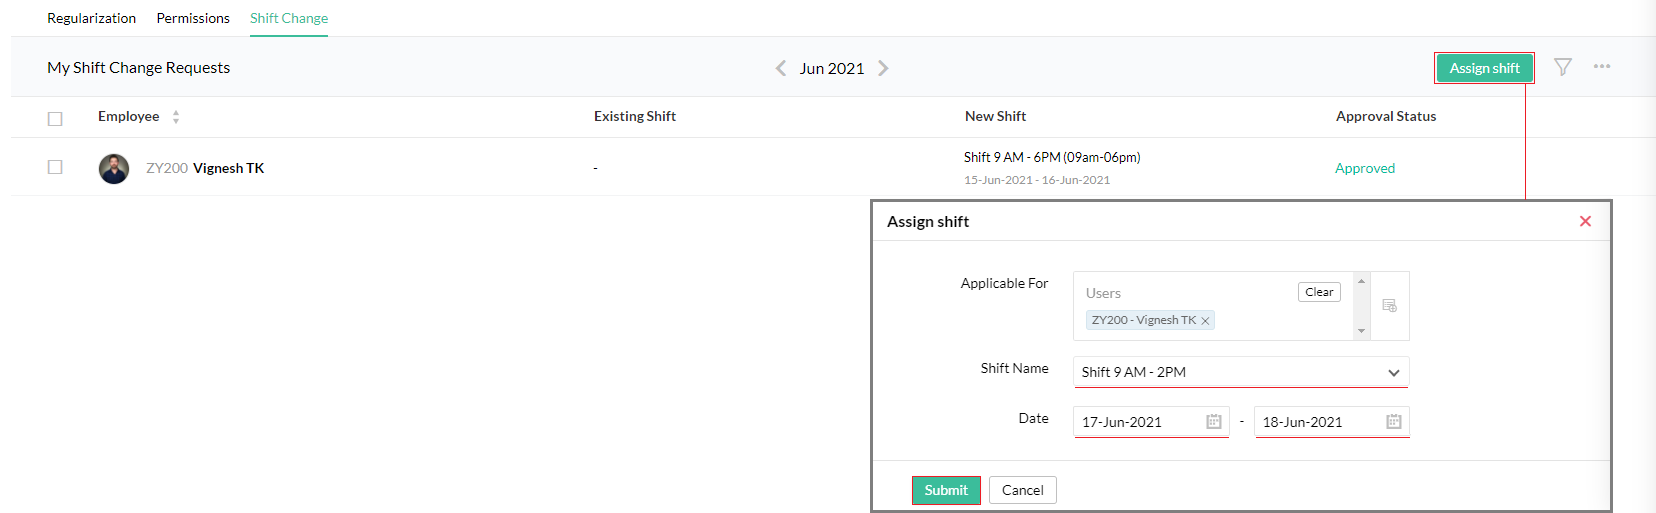
- Now the shift change request can be raised from Attendance > My Requests > Shift Change tab > Assign Shift
In the Assign Shift window, select the required Shift and Date Range. If the shift change is being raised by a Reporting Manager or Administrator , they will be able to raise a shift change request for multiple employees at once by selecting more users in the Applicable For space.
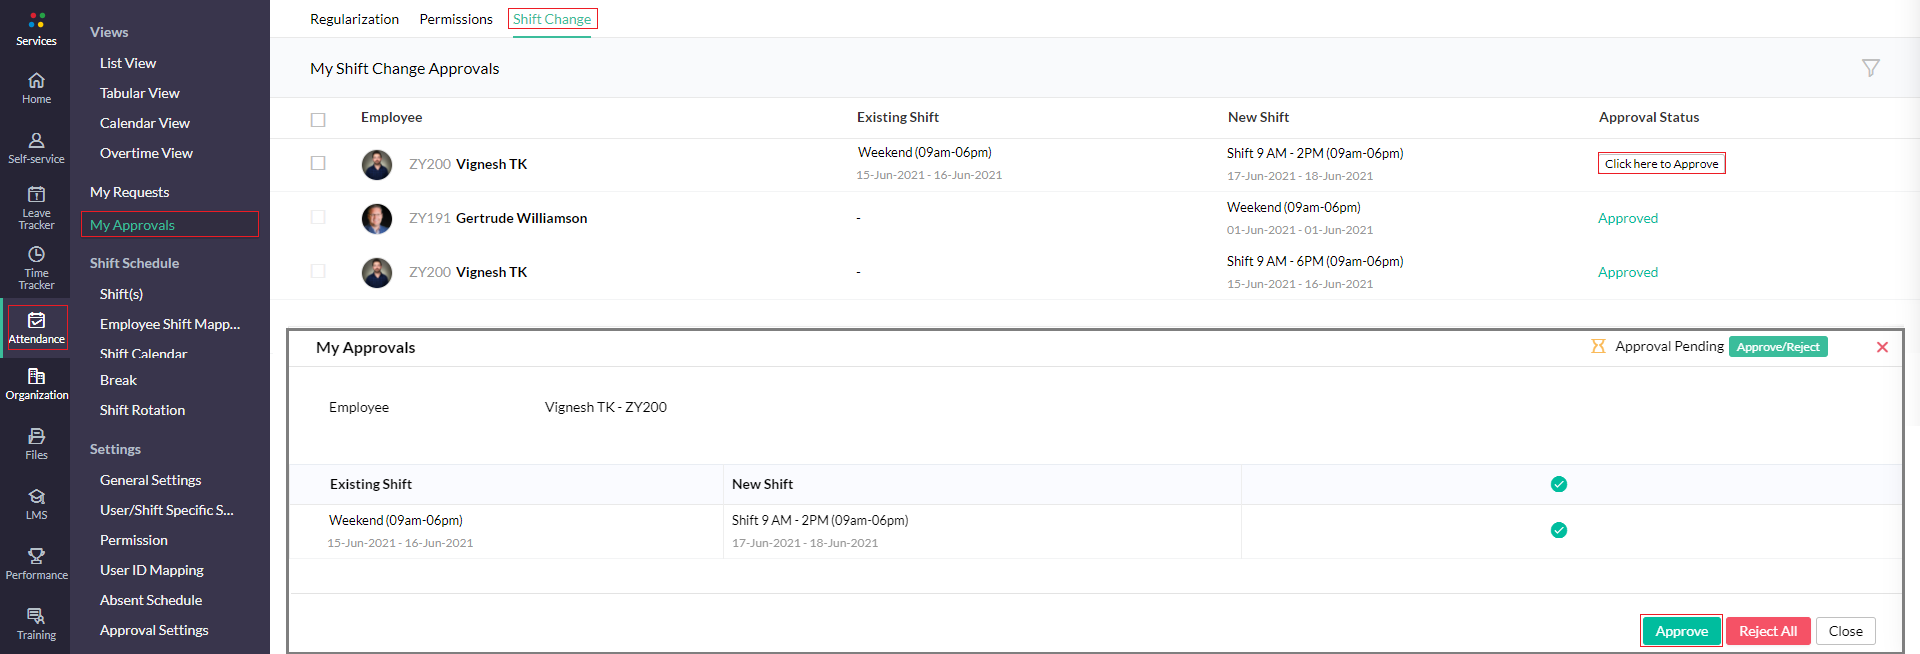
Viewing and Approving Shift Change Requests
The selected approver, Reporting Manager in this case, can view and approve shift change requests from the Attendance > My Approvals > Shift Change tab.