

Quotes
Quotes are documents which denote the approximate cost of products or services you sell.
Understanding Quotes
Quote (Formerly Estimate), literally means an approximation or a rough calculation of the value of a product or service. Quotation is the process of evaluating the value of something. Likewise, in your business, quote is a document that you give to your customers with a quote of the value of the product or service that you’re selling to them. Let’s look at Mark’s business to better understand Quotes.
Scenario: Mark runs a construction firm and takes up a project to construct a house for one of his customers. Firstly, he creates a quote for the project which is an approximation of all the costs involved to complete the construction. Mark sends the quote to his customer to negotiate on the quoted price. The final amount that his customer has to pay can more or lesser than the quoted amount.
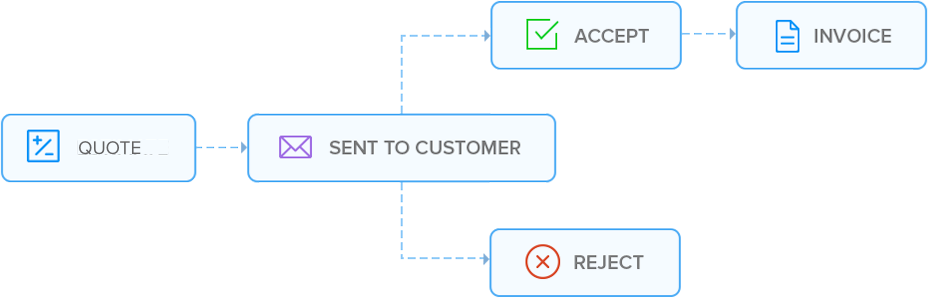
Similarly, you can create a quote for the products or services that your customers have ordered from you to negotiate the price with your customers. As soon as your customers agree on the price, they can accept the quote in the Customer Portal or, you mark the quote as accepted manually and convert it to an invoice. The following diagram will help you understand how Quotes work in Zoho Invoice.
Life Cycle of a Quote
Pro Tip: It’s not mandatory to create a quote If you sell your products or services with fixed prices to your customers. You can directly create an invoice and receive payments.
Create & Send Quotes
Creating a New Quote Send your customers a quick quote for the product/service you offer. Here’s a guide to creating a new quote in Zoho Invoice.
Customizing Quotes Email quotes to your clients, or send it to them via post. Here’s how you do it.
Editing Quotes
If you’re renegotiating with your client and need to make changes to your quotes, use the edit option.
Quote Preferences
- Configuring Quote Preferences
Configure your quote preferences to automate, mention Terms & Conditions and create custom fields.
Managing your Quote
Attaching Files to your Quote Attach bills, documents, sample files, product photos..anything that needs to accompany your quotes when they’re sent out.
Download, Print and Delete your Quote See how you can print your quotes, export them as PDF or even delete them altogether.
Quote Actions
Accepting a Quote Learn how your customers can accept a quote via customer portal (or) to manually update the quote when your customer acknowledges.
Converting your Quote into an Invoice Just when your customer is happy with your quote, convert the quote into an invoice and bill them for the product/service you offer.
Creating Projects from Quotes Learn how to create projects from your quotes.
Cloning your Quote Create a duplicate of the quote you had created previously in Zoho Invoice.
Customizing your Quotes
Customizing Quotes
Customize your quote templates and make them represent your business.Automatically Convert Quote to Invoice You can automate to convert the accepted quotes automatically into an invoice. Here’s how.
Adding Custom Fields Need for extra fields for your quotes? Here’s how you can add them.