Import data to reports
Zoho Creator allows you to import data from into the reports in your Creator application. Creator supports importing data from .xls, .xlsx, .xlsm, .csv, .tsv, .ods, .accdb, .mdb, .json and numbers file formats. The required file can either be stored in your computer or stored in a cloud service (Dropbox, Google Drive, Zoho Docs, etc.).

1. Access your Creator application.
2. Choose the required storage location
- Local storage - Choose a file that is stored in your computer.
- URL - Import a file from a URL by providing a publicly accessible direct download link.
- Cloud service - Import file stored in cloud. Select the cloud service which contains your files from the left pane. After authentication you can choose the required file.
- Paste - Allows you to paste data. Import data by pasting delimiter separated values. The four supported delimiter are comma(,), tab, semicolon(;), space, and pipe(|). Pasting of data up to 5MB is supported.
- If you are importing a large data file, while the process of importing continues in the background you can use the application or view the status of the import. Click the Access Application button in the popup box to access the live mode of the application.
You can view the status of the import by clicking the View Import Status button.
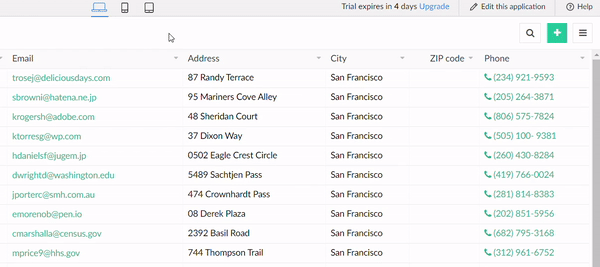
Click the hamburger menu present in the top-right corner of a report and select Import.
Click the Recent Imports tab in the window that appears, to view the status of the successful and failed imports. The import status can also be tracked in the Import progress pop-up.
When you click on a record which contains failed imports, the reason for the failure will be captured as shown below:
For CSV files, the file size limit is 2 GB. For all other file types, the size limit is 100 MB.
CSV files greater than 100MB can be imported only if they are from a local file. It cannot be imported from cloud or url sources.
If the first 3,000 records fail to import successfully, then the remaining import process will also be stopped.
Choice fields like Dropdown, radio, multi-select, and checkbox won't be available for application/form creation for files more than 100 MB.
Navigate to View Import Status
The Recent Imports tab will contain the status of all your imports with the number of total records imported, and both successful and failed records.
Note: Ensure that the data being imported complies with the default and configured validation rules, to ensure an error-free import. Limitations
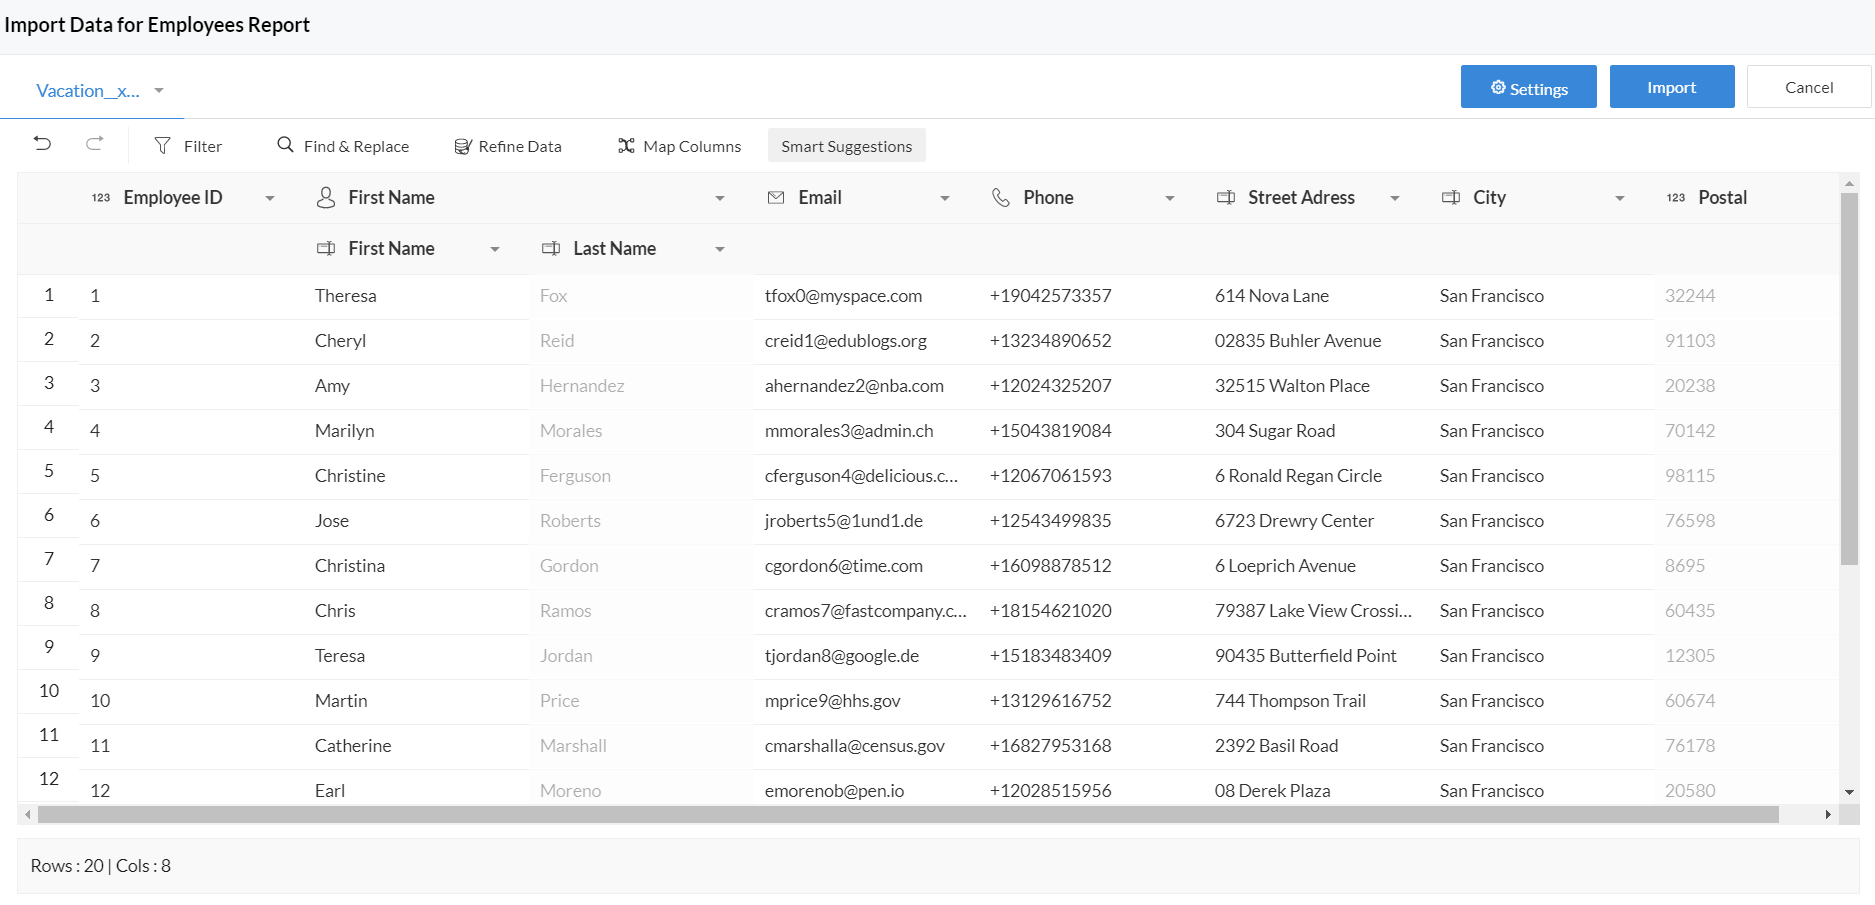
3.Import interface
In the next step the import interface will be shown with data from the selected file. The interface gives a preview of the records that will be created according to the specified mappings of the columns. You can edit the data that is displayed.
The import interface also offers a variety of smart capabilities that enable you to filter, refine, and cleanse the to-be imported data. Based on the data of the imported file, the format for a certain field will be added. If required, this format can be edited as per your requirement.
Creator offers a variety of smart capabilities that enable you to filter, refine, and cleanse the to-be imported data.
- First row contains column headers
- Map columns
- Add column
- Import settings
- On import error
- Data format
- Sort data
- Filter data
- Find and replace
- Refine data
- Smart suggestions with Zia
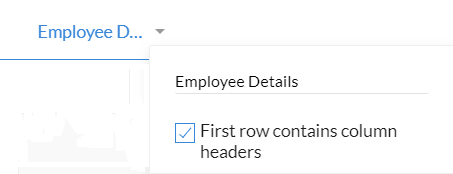
4.First row contains column headers
Creator will automatically try to detect if the first row of your imported file is comprised of headers or not. When the First row contains column headers option is checked, the columns in the field mappings section will be named after those column headers. If the option is unchecked then the first row values will be considered as actual data values.
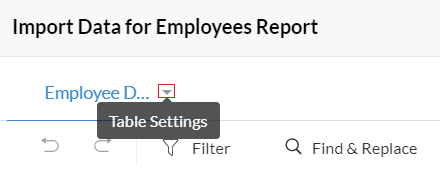
- Click on the Table Settings button adjacent to the required table.
- Check the First row contains column headers option.
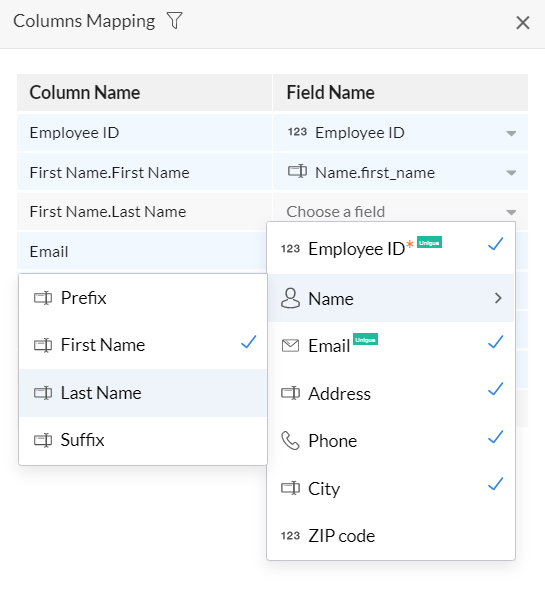
5. Map columns
In the Map columns section you can map fields from the imported file to those present in Creator. In the column mapping pane, the left side shows the columns of the imported file and the right side shows the fields in your Creator. Creator automatically tries to map the fields. You can remap the columns of the imported file to any field based on your requirement. To map a column, choose the field from the drop down list.
- Click on the Map columns button.
- To map a column choose the field from the drop down list.
- Mandatory fields : Make sure are mapped and you do not leave any mandatory fields blank in the import file. Do note that not mapping mandatory fields will lead to error while importing the file.
- Lookup field handling : The lookup fields can be imported based on both ID as well as value. Whether the import is based on Value or ID will be denoted in adjacent to the field.

- Conflict resolution : Creator offers conflict resolution by highlighting warnings that may arise during field mapping. When conflict warning is displayed you can click on remap button to rectify the mistakes.
- Decimal warning: When appropriate number of decimals are not present.
- Field warning/data type mismatch- When incompatible data type is set for the column that is not appropriate for the data.
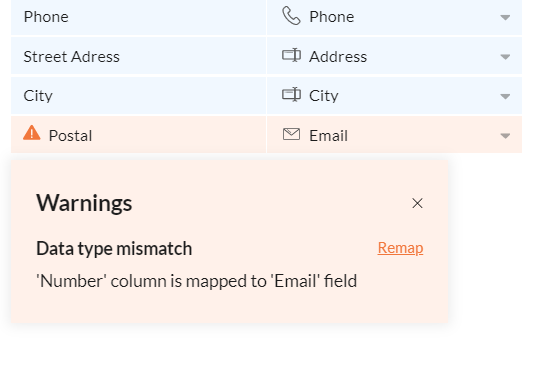
- Lookup-not in parent warning: Some rows may fail during import when their values are not present in the lookup parent field. To resolve it is recommended to set empty values on import error.
- Lookup-duplicate values: When parent lookup field either contains duplicate values or some values are not present in parent lookup fields.
6. Add Column
- Click on the Add column button.
- Select the required field, enter the default value and click Add .

- You can add upto 5 additional columns per import.
- The supported field types with which you can associate additional column during import are: Name, Email, Address, Phone, Single Line, Multi Line, Number, Date, Drop Down, Radio, Multi Select, Checkbox, Decision box, Rich Text, URL, Time, Percent, Currency, Decimal, Date-Time, Subform, Lookup - Singleselect, Lookup - Multiselect, and Auto Number.
7. Import settings
To choose how the data from the file should be imported, Creator supports two types of import:
- Append rows - Adds new rows to the existing report
- Update rows - Updates the existing record based on the specified unique value field.

- Updating existing records overwrites data in the target file and cannot be undone. It is recommended to make a backup copy of the target file to which you’re importing data.
- It is important to remember that values in the existing Creator report will be updated according to the contents of the imported file, even if the field for those matching records in the file is blank.
- 'Update rows' option is available only if the report has at least one field with unique values in the corresponding form.
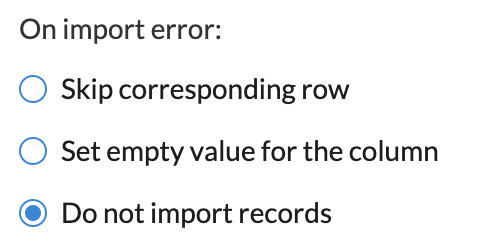
8. Define what's to happen on import error
There is a possibility that errors may occur while importing data. So Zoho creator allows you to choose how to proceed in such instances. Under the On import error section you choose the action to be done when error occurs while the data is being imported. You can choose to either Skip the corresponding rows or Set empty value for the column.
- Click the Settings button displayed near the top-left corner of the interface. The Settings pane will slide in from the right.
- Under the On import error section two options will be displayed.
- Skip Corresponding Rows - If there is any conflict found in any of the row values, Zoho Creator will skip the corresponding rows.
- Set Empty Values for the column - If there is any conflict found in any of the column values, Zoho Creator will set empty(NULL) values for the corresponding columns.
- Do not import records - If there is any conflict found in any of the values then Zoho Creator will not import the data. This option is supported only when the number of records to be imported is less than 3000.
9. Set the date format
Setting the data format's paramount as this will tell Zoho Creator how to interpret the date values in your file.
- Click the Settings button displayed near the top-right corner of the interface. The Settings pane will slide in from the right.
- Select the required value from the dropdown below Date Format.
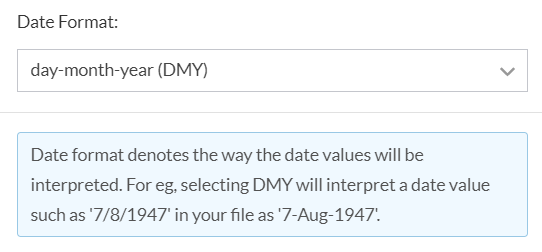
The application has capabilities to recognize date based on locale. A date such as dd.mm.yyyy may not be recognized as date if locale is US and so on import also it will be treated as text. Henceforth, all possible date and time formats will be recognized. If date format is different across the columns then they can be refined into a common format by Standardize Date and Time option under Refine data section
10. Cleansing data
Creator offers you to cleanse the to-be imported data by offering:
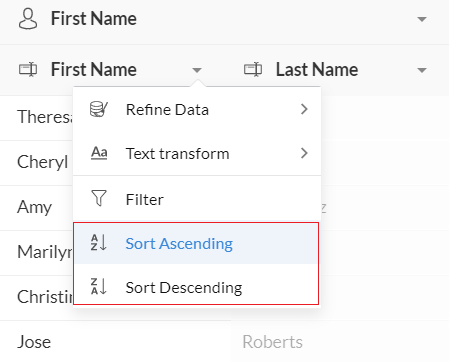
Sort data
Based on a column, you can sort the data in a table in the ascending or descending order. The sorting order you apply will be carried in along with the imported data. This is to let you view data in the required order. Sorting data will be help before you perform the data refining operations.
- Click the down arrow of the required column.
- In the drop down list select the required sorting order.
Filter data
The filter option allows you to narrow down data. Once filter is applied only the filtered data will be imported in to the to-be created imported data.
- Click on Filter option.
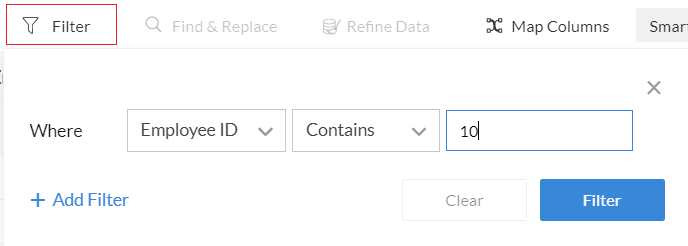
- Set the required criteria. The criteria can contain up to 20 sub-criteria. Now click Filter button.
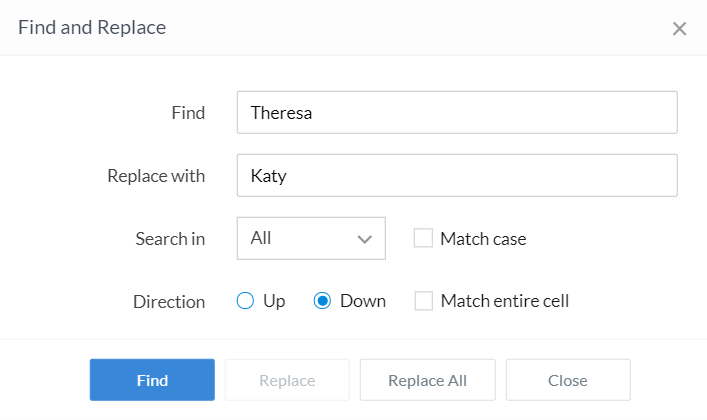
Find and replace
The find and replace allows you to find and replace data.
- Click on the Find and replace button
- Enter the criteria for the find and replace operation.
11. Refine data
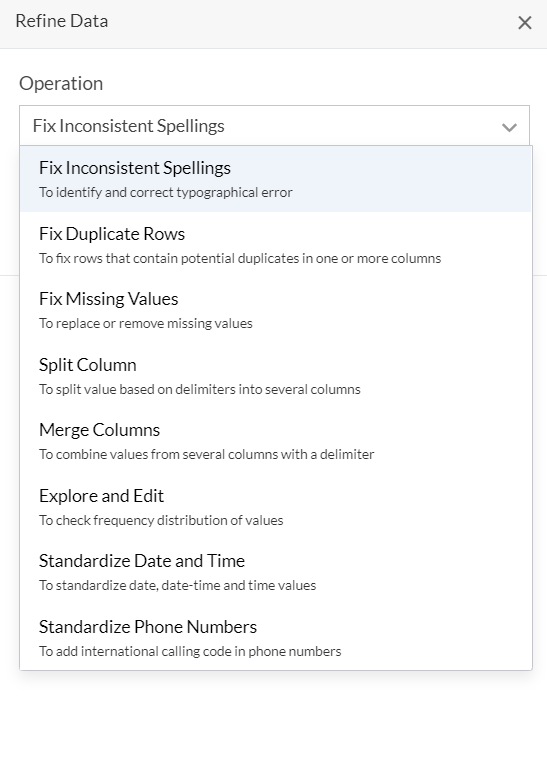
The refine data option allows to you the following smart data refining operations. The available options are:
- Fix Inconsistent Spellings - This enables you in identifying spelling inconsistencies and typographical errors. It'll display Clusters that are nearly similar in terms of number of characters, phonetics, and character repetition. You can modify the values in a cluster with the suggested value, or with a value of your choice.
- Fix Missing Values - This enables you in finding if a column contains empty cells, and fix them in any of the following ways:
- Fill empty cells with the value present in their preceding row
- Fill empty cells with a value of your choice
- Fill empty cells with the most-occurring value in that column
- Remove the rows that do not contain a value in that column
- Split Column - This enables you to split the data in a column in to two. You'll need to define what delimiter (such as whitespace, comma, or hyphen) is to be used to split the data.
- Merge Columns - This enables you to merge the data in two or more columns, in the order they are selected. Optionally, you can define if a separator (such as whitespace, comma, or hyphen) is to be added between the values or the to-be merged columns. You'll get to preview the merged value.
- Explore and Edit - This shows the frequency distribution of values in a column, which can help in deciding if the data is to be modified by find and replace or use Fix Inconsistent Spellings operation.
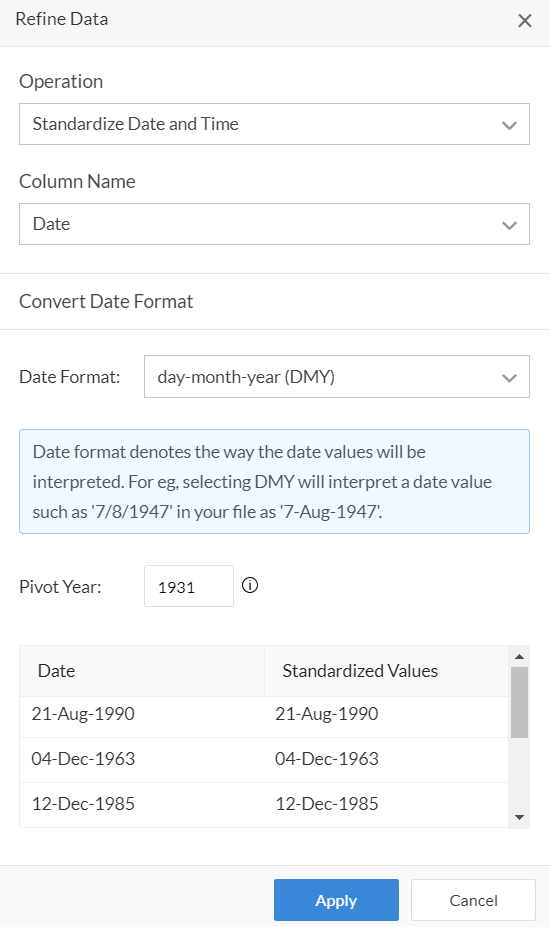
- Standardize Date and Time - This enables you to standardize the Date/Date-Time columns to a common format. With this multiple date formats can be uploaded and standardized. An option to choose the 'Pivot year' will also be available. This pivot year is helpful in the case where the year value has only two digits. In such cases the two-digit year value xx smaller than the pivot year will be expanded into 20xx, and year values larger and equal than the pivot year will be expanded into 19xx.
- If a column is mapped to Date/Date-time field, Standardise Date/Date-Time warning will begiven if the date format of the importing values doesn't match with the date format set for the application.
- If Standardise Date warning is ignored by the user, then the date values will be automatically standardised based on the date order set in Settings. Ignoring Standardise Date will cause import errors only when the importing data has multiple date formats across the columns. Each column has to be standardised individually with an appropriate date order.
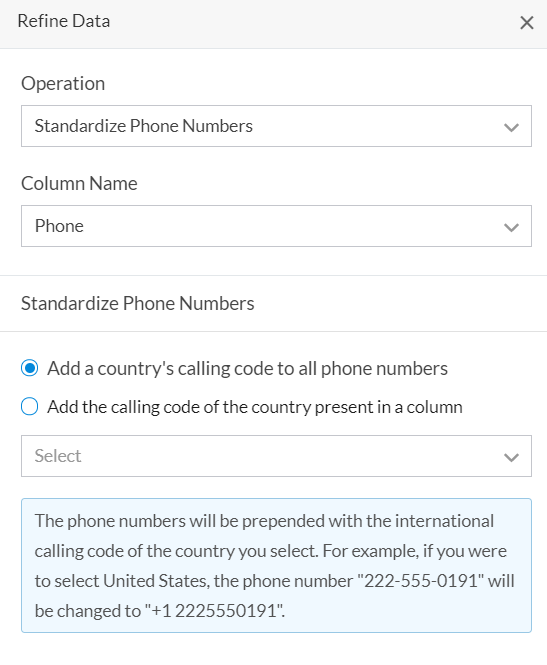 Note : If a column is mapped to a Phone Number field, then a warning to Standardise Phone Number will be provided to add appropriate country code to the values. The values without country code will result in record import failure
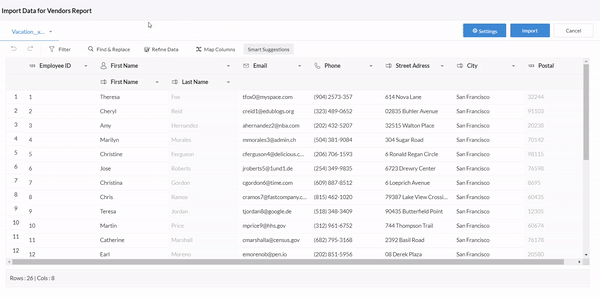
To refine data:
- Click on the Refine data button.
- In the Refine data pane choose the required operation from the drop down list.
- Now choose the required column and perform the data refining operation.
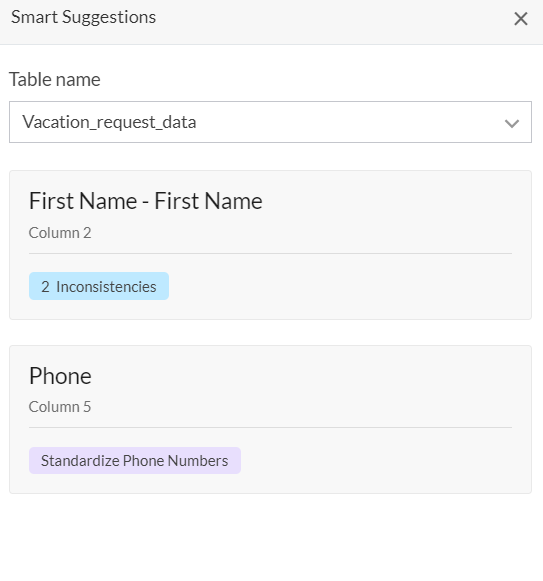
12. Smart suggestions with Zia
Under the Smart suggestions section Zia(Zoho's Intelligent Assistant) will provide suggestions to you based on problems that may be present in the data that has been uploaded from the file. Zia provides suggestions to a handful of problems which are as follows:
- Duplicate rows at table level
- Inconsistencies in data
- Multiple data types
- Missing values
- Phone number without standardization
- Name and Address without standardization
- Date/Date-time/Time without standardization
- Data with un-escaped HTML entities
- Values enclosed in quotes
To work with Zia's suggestions:
- Click on the Smart suggestions button. In the Smart suggestions pane on the list of suggestions by Zia will be displayed.
13. Importing data
Once you've configured your settings and field mappings, you're ready to import the data from the file.
- Click the Import button to start importing data into your report. This may take a few seconds to a few minutes depending on the amount of information you're importing.

- Once the import process is complete a popup will be displayed with the import summary. Errors if any will be shown.

- Click on the Import summary button to view a detailed summary of the success/failure of the records that were imported.
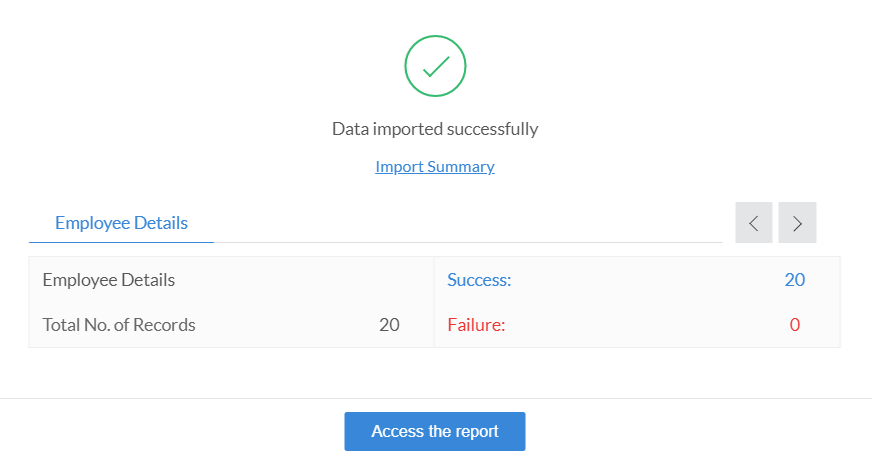
- Click on Access the report to view the report.
What's new in the New Import Interface:
- The new interface allows Addition and Updation of the data provided necessary permissions have been granted.
- Adding and Updating during the import process will be permitted only if the Access, Edit and Import permissions has been granted for the form. The Updation of data also depends on the grant of Modify All permission and the Role hierarchy.
- Updating data during the import process will not be allowed if the Edit permission for the particular form has not been granted.
- The import data function will work only if Access permission has been granted for the particular form.
- Import of files with any kind of script execution is currently supported only when the number of records to be imported are less than 3000.
- By default, the workflows will not be triggered in the new import interface. Instead, they can be enabled from the Import Settings section.
- Do not import records option under On Import Error section will be available only when the number of records to be imported are less than 3000.
Points to remember:
- You can import data from the .xls, .xlsx, .xlsm, .csv, .tsv, .ods, .accdb, .mdb, .json and .numbers file formats.
- The Name field can either be present as a single column or as a composite field made up of Prefix, First Name, Last Name, and Suffix subfields. Creator supports importing data in both scenarios.
- Similarly Address can either be a single column or a composite field made up of the Address Line 1, Address Line 2, City/District, State/Province, Postal Code, and Country subfields. Creator supports importing data in both scenarios.
- If the file has columns containing values such as true/false then Creator will automatically associate it with the Decision box field. In case other boolean values are present then they will be associated with Radio field.
Limitations:
- There is no limit on the number of rows that can be imported provided the file size is less than 100 MB.
- Importing Subform data is currently not supported.
- The new import interface will not available for customer portal users.
- Import of files with any kind of script execution is currently supported only when the number of records to be imported are less than 3000.
- Do not import records option under On Import Error section will be available only when the number of records to be imported are less than 3000.
Related Topics
Zoho CRM Training Programs
Learn how to use the best tools for sales force automation and better customer engagement from Zoho's implementation specialists.
Zoho DataPrep Personalized Demo
If you'd like a personalized walk-through of our data preparation tool, please request a demo and we'll be happy to show you how to get the best out of Zoho DataPrep.
- Zoho Workerly Home
- Forums
- Connect With Us:


- Zoho Recruit Home
- Forums
- Connect With Us:
You are currently viewing the help pages of Qntrl’s earlier version. Click here to view our latest version—Qntrl 3.0's help articles.


Zoho Sheet Resources
Zoho Forms Resources
Zoho Sign Resources
Sign, Paperless!
Zoho TeamInbox Resources
Zoho DataPrep Resources
Design. Discuss. Deliver.
Related Articles
Understand reports
Note: To optimize efficiency and security, support for XLS format has been deprecated, and instead, the XLSX format will be supported with effect from 21-March-2024. We insist you to replace any instance of .xls to .xlsx across Deluge scripts in your ...Export data from reports
Note: To optimize efficiency and security, support for XLS format has been deprecated, and instead, the XLSX format will be supported with effect from 21-March-2024. We insist you to replace any instance of .xls to .xlsx across Deluge scripts in your ...Permission based reports and a consolidated report
Requirement Set visibility of forms and reports based on teams. Management should be able to view all the reports consolidated in to one. Use Case A firm tracks its suppliers details using the Supply Management app. The app has four ...Understand spreadsheet report
The spreadsheet report enables you to view records in a table grid arrangement. The information is distributed into rows and columns, with the fields occupying the column headers and the field values occupying the rows below. This report behaves like ...Understand list report
A list report enables you to present or view your records in the traditional list format. It organizes records in different layouts that make the data comprehensible. By default, the records are presented in a table grid as rows of information, ...